Spring 中提供了一套默认的事件监听机制,在容器初始化时便使用了这套机制。同时,Spring 也提供了事件监听机制的接口扩展能力,开发者基于此可快速实现自定义的事件监听功能。Spring 的事件监听机制是在 JDK 事件监听的基础上进行的扩展,也是在典型观察者模式上的进一步抽象和改进。所以,结合 Spring 的事件监听机制与观察者模式来学习,可以达到理论与实践的完美融合。本篇文章就以观察者模式和 Spring 事件监听机制作为切入点,结合具体的实例来对两者进行系统的学习和实践。#观察者模式
######观察者模式(Observer Pattern),也叫作发布-订阅模式(Publish/Subscribe)。无论是观察者模式,还是 Spring 的事件监听机制,本质上都是在定义对象间一对多的依赖关系,使得每当一个对象(被观察者/事件)改变状态时,所有依赖于它的对象(观察者/事件监听器)都会得到通知,并被自动更新。观察者模式的优点在于:观察者和被观察者之间是抽象耦合,不管是新增观察者或是被观察者,都非常容易扩展。这也符合面向对象所倡导的“开闭原则”:对扩展开放,对修改关闭。观察者模式适用于以下三类场景:关联行为场景,而且关联是可拆分的。事件多级触发场景。跨系统的消息交换场景,比如消息队列的处理机制。在使用的过程中,也要综合考虑开发效率和运行效率的问题。通常,一个被观察者会对应多个观察者,那么在开发和调试的过程中会有一定的复杂度。同时,因为被观察者存在关联、多级拆分,也就是会有多个观察者,而 Java 消息的通知(和 Spring 的事件监听机制)默认是顺序执行的,如果其中一个观察者执行时间过长或卡死,势必会影响整体的效率。此时,就需要考虑异步处理。##观察者的角色定义
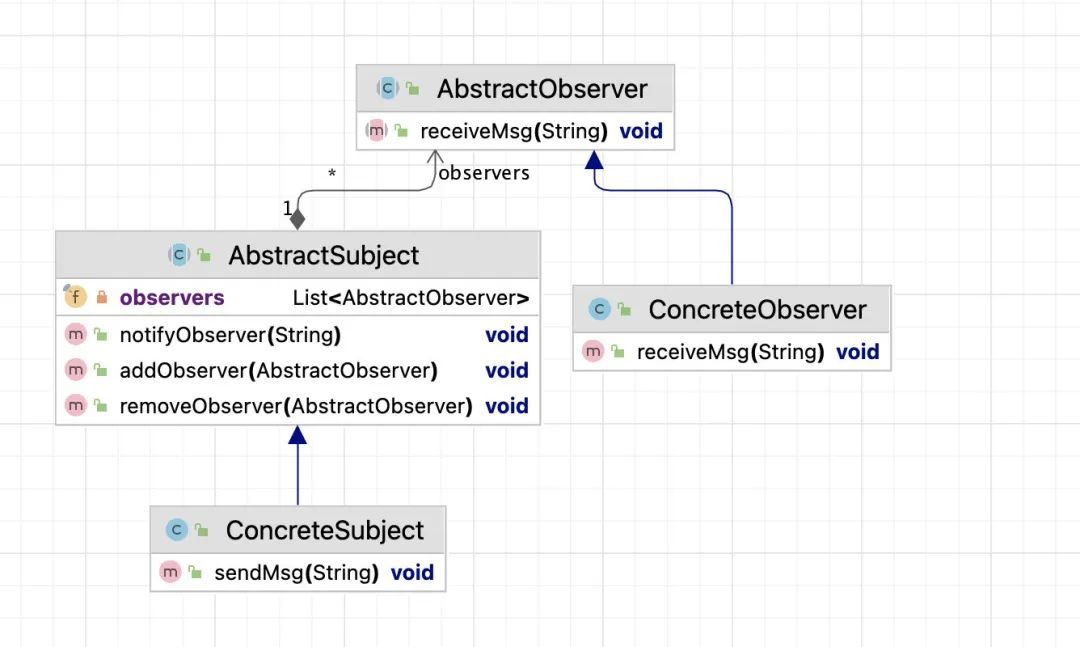
观察者模式是一个典型的发布-订阅模型,其中主要涉及四个角色:
抽象被观察者角色:内部持有所有观察者角色的引用,并对外提供新增、移除观察者角色、通知所有观察者的功能;具体被观察者角色:当状态变更时,会通知到所有的观察者角色;抽象观察者角色:抽象具体观察者角色的一些共性方法,如状态变更方法;具体观察者角色:实现抽象观察者角色的方法;
UML 类图展示类观察者模式大体如下:
以具体的代码来展示一下观察者模式的实现。第一,定义抽象观察者。
/*** 抽象观察者角色* @author sec**/public abstract class AbstractObserver {/*** 接收消息* @param context 消息内容*/public abstract void receiveMsg(String context);}
复制代码
第二,定义抽象被观察者。
/*** 抽象主题(抽象被观察者角色)* @author sec**/public abstract class AbstractSubject {/*** 持有所有抽象观察者角色的集合引用*/private final List<AbstractObserver> observers = new ArrayList<>();/*** 添加一个观察者* @param observer 观察者*/public void addObserver(AbstractObserver observer){observers.add(observer);}/*** 移除一个观察者* @param observer 观察者*/public void removeObserver(AbstractObserver observer){observers.remove(observer);}/*** 通知所有的观察者,执行观察者更新方法* @param context 通知内容*/public void notifyObserver(String context){observers.forEach(observer -> observer.receiveMsg(context));}}
复制代码
第三,定义具体被观察者,实现了抽象被观察者。
/*** 具体被观察者* @author sec**/public class ConcreteSubject extends AbstractSubject{/*** 被观察者发送消息* @param context 消息内容*/public void sendMsg(String context){System.out.println("具体被观察者角色发送消息: " + context);super.notifyObserver(context);}}
复制代码
第四,定义具体观察者,实现了抽象观察者。
/*** 具体观察者角色实现类* @author sec**/public class ConcreteObserver extends AbstractObserver{@Overridepublic void receiveMsg(String context) {System.out.println("具体观察者角色接收消息: " + context);}}
复制代码
第五,使用演示类。
public class ObserverPatternTest {public static void main(String[] args) {ConcreteSubject subject = new ConcreteSubject();subject.addObserver(new ConcreteObserver());subject.sendMsg("Hello World!");}}
复制代码
执行上述方法,控制台打印日志为:
具体被观察者角色发送消息: Hello World!具体观察者角色接收消息: Hello World!
复制代码
在上述代码实现中,被观察者发出消息后,观察者接收到具体的消息,如果添加了多个观察者,它们均会收到消息。也就是前面所说的,每当一个对象(被观察者/事件)改变状态时,所有依赖于它的对象(观察者/事件监听器)都会得到通知,并被自动更新。#Java 中的事件机制前面聊了观察者模式,这里再来看看 Java 中的事件机制。在 JDK 1.1 及以后版本中,事件处理模型采用基于观察者模式的委派事件模型(DelegationEvent Model, DEM),即一个 Java 组件所引发的事件并不由引发事件的对象自己来负责处理,而是委派给独立的事件处理对象负责。这并不是说事件模型是基于 Observer 和 Observable 的,事件模型与 Observer 和 Observable 没有任何关系,Observer 和 Observable 只是观察者模式的一种实现而已。Java 中的事件机制有三个角色参与:
Event Source:事件源,发起事件的主体。Event Object:事件状态对象,传递的信息载体,可以是事件源本身,一般作为参数存在于 listerner 的方法之中。所有事件状态对象都将从 Java 中的 EventObject 派生而来;Event Listener:事件监听器,当监听到 EventObject 产生时,调用相应的方法进行处理。所有事件侦听器接口必须扩展 EventListener 接口;
UML 类图展示类事件模式大体如下:
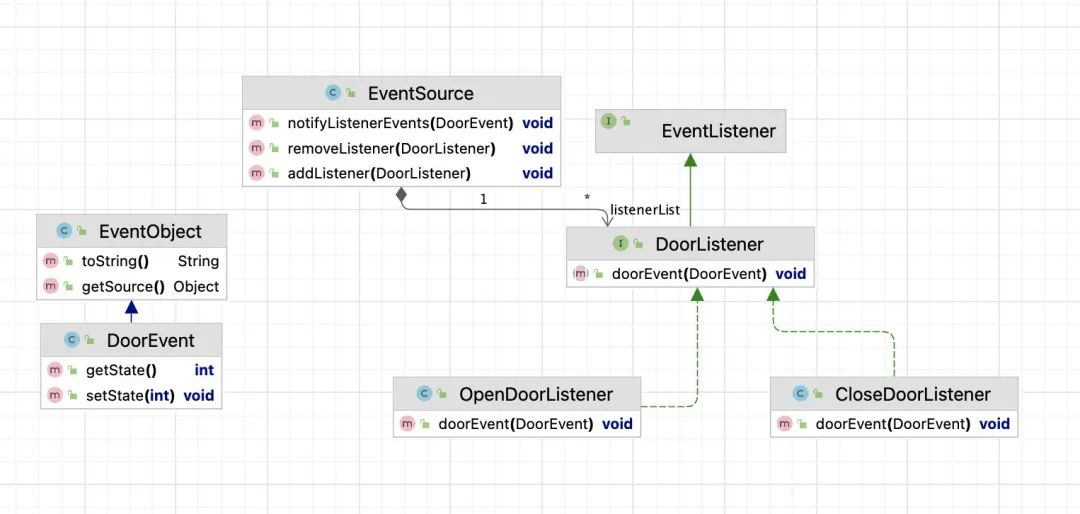
在上面的 UML 图中,EventObject 一般作为 Listener 处理方法的参数传入,而 EventSource 是事件的触发者,通过此对象注册相关的 Listener,然后向 Listener 触发事件。通过 UML 图的对比可以看出,事件监听模式和观察者模式大同小异,它们属于同一类型模式,都属于回调机制,主动推送消息,但在使用场景上有所区别。观察者(Observer)相当于事件监听者(监听器),被观察者(Observable)相当于事件源和事件,事件监听比观察者模式要复杂一些,多了 EventSource 角色的存在。以具体的代码来展示一下 Java 中的事件机制实现。第一,定义事件对象。
/*** 事件对象** @author sec**/public class DoorEvent extends EventObject {private int state;/*** Constructs a prototypical Event.** @param source The object on which the Event initially occurred.* @throws IllegalArgumentException if source is null.*/public DoorEvent(Object source) {super(source);}public DoorEvent(Object source, int state) {super(source);this.state = state;}// 省略getter/setter方法}
复制代码
第二,定义事件监听器接口。
/*** 事件监听器接口** @author sec**/public interface DoorListener extends EventListener {/*** 门处理事件* @param doorEvent 事件*/void doorEvent(DoorEvent doorEvent);}
复制代码
第三,定义事件监听器的实现类。
public class CloseDoorListener implements DoorListener{@Overridepublic void doorEvent(DoorEvent doorEvent) {if(doorEvent.getState() == -1){System.out.println("门关上了");}}}public class OpenDoorListener implements DoorListener{@Overridepublic void doorEvent(DoorEvent doorEvent) {if(doorEvent.getState() == 1){System.out.println("门打开了");}}}
复制代码
这里实现了门的开和关两个事件监听器类。第四,定义事件源 EventSource。
public class EventSource {//监听器列表,监听器的注册则加入此列表private Vector<DoorListener> listenerList = new Vector<>();//注册监听器public void addListener(DoorListener eventListener) {listenerList.add(eventListener);}//撤销注册public void removeListener(DoorListener eventListener) {listenerList.remove(eventListener);}//接受外部事件public void notifyListenerEvents(DoorEvent event) {for (DoorListener eventListener : listenerList) {eventListener.doorEvent(event);}}}
复制代码
第五,测试类。
public class EventTest {public static void main(String[] args) {EventSource eventSource = new EventSource();eventSource.addListener(new CloseDoorListener());eventSource.addListener(new OpenDoorListener());eventSource.notifyListenerEvents(new DoorEvent("关门事件", -1));eventSource.notifyListenerEvents(new DoorEvent("开门时间", 1));}}
复制代码
执行测试类,控制台打印:
门关上了门打开了
复制代码
事件成功触发。#Spring 中的事件机制在了解了观察者模式和 Java 的事件机制之后,再来看看 Spring 中的事件机制。在 Spring 容器中,通过 ApplicationEvent 和 ApplicationListener 接口来实现事件监听机制。每次 Event 事件被发布到 Spring 容器中,都会通知对应的 Listener。默认情况下,Spring 的事件监听机制是同步的。Spring 的事件监听由三部分组成:
事件(ApplicationEvent):该类继承自 JDK 中的 EventObject,负责对应相应的监听器,事件源发生某事件是特定事件监听器被触发的原因;监听器(ApplicationListener):该类继承自 JDK 中的 EventListener,对应于观察者模式中的观察者。监听器监听特定事件,并在内部定义了事件发生后的响应逻辑;事件发布器(ApplicationEventPublisher):对应于观察者模式中的被观察者/主题,负责通知观察者,对外提供发布事件和增删事件监听器的接口,维护事件和事件监听器之间的映射关系,并在事件发生时负责通知相关监听器。通过上面的分析可以看出 Spring 的事件机制不仅是观察者模式的一种实现,也实现了 JDK 提供的事件接口。同时,除了发布者和监听者之外,还存在一个 EventMulticaster 的角色,负责把事件转发给监听者。
Spring 事件机制的工作流程如下:
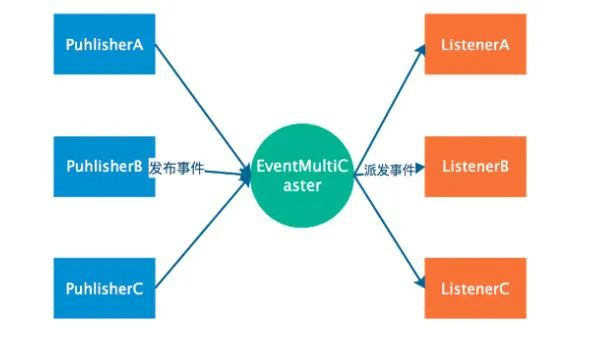
在上述流程中,发布者调用 applicationEventPublisher.publishEvent(msg),将事件发送给 EventMultiCaster。EventMultiCaster 注册着所有的 Listener,它会根据事件类型决定转发给那个 Listener。在 Spring 中提供了一些标准的事件,比如:ContextRefreshEvent、ContextStartedEvent、ContextStoppedEvent、ContextClosedEvent、RequestHandledEvent 等。关于 Spring 事件机制的具体实现和这些标准事件的作用,大家可以通过阅读源码来学习,这里不再详细展开。下面来看看 Spring 事件机制涉及到的几个角色的源码及后续基于它们的实践。第一,事件(ApplicationEvent)。
public abstract class ApplicationEvent extends EventObject {/** use serialVersionUID from Spring 1.2 for interoperability. */private static final long serialVersionUID = 7099057708183571937L;/** System time when the event happened. */private final long timestamp;/*** Create a new {@code ApplicationEvent}.* @param source the object on which the event initially occurred or with* which the event is associated (never {@code null})*/public ApplicationEvent(Object source) {super(source);this.timestamp = System.currentTimeMillis();}/*** Return the system time in milliseconds when the event occurred.*/public final long getTimestamp() {return this.timestamp;}}
事件可类比观察者中的被观察者实现类的角色,继承自 JDK 的 EventObject。上述 Spring 中的标准事件都是直接或间接继承自该类。第二,事件发布器(ApplicationEventPublisher)。
@FunctionalInterfacepublic interface ApplicationEventPublisher {default void publishEvent(ApplicationEvent event) {publishEvent((Object) event);}void publishEvent(Object event);}
通过实现 ApplicationEventPublisher 接口,并重写 publishEvent()方法,可以自定义事件发布的逻辑。ApplicationContext 继承了 ApplicationEventPublisher 接口。因此,我们可以通过实现 ApplicationContextAware 接口,注入 ApplicationContext,然后通过 ApplicationContext 的 publishEvent()方法来实现事件发布功能。ApplicationContext 容器本身仅仅是对外提供了事件发布的接口 publishEvent(),真正的工作委托给了具体容器内部的 ApplicationEventMulticaster 对象。而 ApplicationEventMulticaster 对象可类比观察者模式中的抽象被观察者角色,负责持有所有观察者集合的引用、动态添加、移除观察者角色。第三,事件监听器(ApplicationListener)。
@FunctionalInterfacepublic interface ApplicationListener<E extends ApplicationEvent> extends EventListener {/*** Handle an application event.* @param event the event to respond to*/void onApplicationEvent(E event);}
事件监听器(ApplicationListener)对应于观察者模式中的具体观察者角色。当事件发布之后,就会执行事件监听器的逻辑。通过实现 ApplicationListener 接口,并重写 onApplicationEvent()方法,就可以监听到事件发布器发布的事件。#Spring 事件监听案例
下面以具体的案例代码来说明如何自定义实现 Spring 事件监听。第一,自定义定义事件对象,集成自 ApplicationEvent。
public class MyEvent extends ApplicationEvent {/*** Create a new {@code ApplicationEvent}.** @param source the object on which the event initially occurred or with* which the event is associated (never {@code null})*/public MyEvent(Object source) {super(source);}private String context;public MyEvent(Object source, String context){super(source);this.context = context;}public String getContext() {return context;}public void setContext(String context) {this.context = context;}}
第二,自定义 ApplicationListener 事件监听器。
@Componentpublic class MyApplicationListener implements ApplicationListener<MyEvent> {@Overridepublic void onApplicationEvent(MyEvent event) {// 监听到具体事件,处理对应具体逻辑System.out.println("event.getContext() = " + event.getContext());}}
除了上述基于实现 ApplicationListener 接口的方式外,还可以使用**@EventListener**注解来实现,实现示例如下:
@Componentpublic class MyApplicationListener{// 通过注解实现监听器@EventListenerpublic void handleMyEvent(MyEvent event){// 监听到具体事件,处理对应具体逻辑System.out.println("event.getContext() = " + event.getContext());}}
第三,使用及单元测试。
@Slf4j@SpringBootTestpublic class SpringEventTest {@Autowiredprivate ApplicationEventPublisher eventPublisher;@Testvoid testEvent() {eventPublisher.publishEvent(new MyEvent("自定义事件", "Hello World!"));}}
执行单元测试,可看到控制台打印对应的事件信息。通过上述方式我们已经成功实现了基于 Spring 的事件监听机制,但这其中还有一个问题:同步处理。默认情况下,上述事件是基于同步处理的,如果其中一个监听器阻塞,那么整个线程将处于等待状态。那么,如何使用异步方式处理监听事件呢?只需两步即可。第一步,在监听器类或方法上添加 @Async 注解,例如:
@Component@Asyncpublic class MyApplicationListener implements ApplicationListener<MyEvent> {@Overridepublic void onApplicationEvent(MyEvent event) {// 监听到具体事件,处理对应具体逻辑System.out.println("event.getContext() = " + event.getContext());}}
第二步,在 SpringBoot 启动类(这里以 SpringBoot 项目为例)上添加 @EnableAsync 注解,例如:
@SpringBootApplication@EnableAsyncpublic class SpringBootMainApplication {public static void main(String[] args) {SpringApplication.run(SpringBootMainApplication.class, args);}}
此时,就可以实现异步监听功能了。当然,@Async 注解也可以指定我们已经配置好的线程池来处理异步请求,关于线程数的初始化这里就不再演示了。#小结
本篇文章带大家从观察者模式、Java 事件机制延伸到 Spring 的事件监听机制,将三者融合在一起来讲解。通过这个案例,其实我们能够体会到一些经验性的知识,比如看似复杂的 Spring 事件监听机制实现只不过是观察者模式的一种实现,而其中又集成了 Java 的事件机制。这也就是所谓的融会贯通。我们如果单纯的学习某一个设计模式,可能只会运用和识别它的简单实现,而实践中往往会对设计模式进行变种,甚至融合多种设计模式的优点于一体,这便是活学活用。希望通过这边文章你能够更加深入的理解上述三者。