文章目录
1.集群部署
1.1 环境概述
学习目标:这一节,我们从基础知识、环境规划、小结三个方面来学习。
1.1.1 基础知识
注意事项
在Ceph系统的搭建过程中,会出现各种意想不到或者预想不到的问题,就算整个过程中每一步都没有问题,还是会出现各种问题,这些问题不仅仅在网上找不到,在官网中找不到,甚至玩Ceph数年的人都解决不了。
尤其是,就算你第一次成功了,第二次重试就会出现问题。所以,如果出现问题怎么办?一步一步踏踏实实的进行研究,分析解决问题,并进行总结并梳理成册就可以了。
简介
Ceph的环境部署是非常繁琐的,所以,官方帮我们提供了很多的快捷部署方式。
参考资料:
	https://docs.ceph.com/en/reef/install/
	https://docs.ceph.com/en/quincy/install/
	https://docs.ceph.com/en/pacific/install/	(本文档以Nautilus版本为例进行搭建)
推荐方法:
Cephadm
	使用容器和 systemd 安装和管理 Ceph 集群,并于 CLI 和仪表板 GUI 紧密集成。
	仅支持 Octopus 和更新的版本,需要容器和 Python3 支持。
	与新的编排 API 完全集成
Rook
	在 Kubernetes 中运行的 Ceph 集群,同时还支持通过 Kubernetes API 管理存储资源和配置。
	仅支持 Nautilus 和较新版本的 Ceph。

其他方法:
ceph-ansible:	使用 Ansible 部署 Ceph 集群,对于新的编排器功能、管理功能和仪表板支持不好
ceph-deploy:	是一个快速部署集群的工具,不支持Centos8
DeepSea:		使用 Salt 安装 Ceph
ceph-mon:		使用 Juju	安装 Ceph
Puppet-ceph:	通过 Puppet 安装 Ceph
二进制源码:		手工安装
windows图形:	  在windows主机上,通过鼠标点点点的方式进行部署
版本的选择
版本地址:https://docs.ceph.com/en/latest/releases/
最新版本:官网版本 v18.2.2 Reef
版本特性:x.0.z(开发版)、x.1.z(候选版)、x.2.z(稳定、修正版)
本文档演示版本:官网版本 v14.2.22 Nautilus
1.1.2 环境规划
网络规划
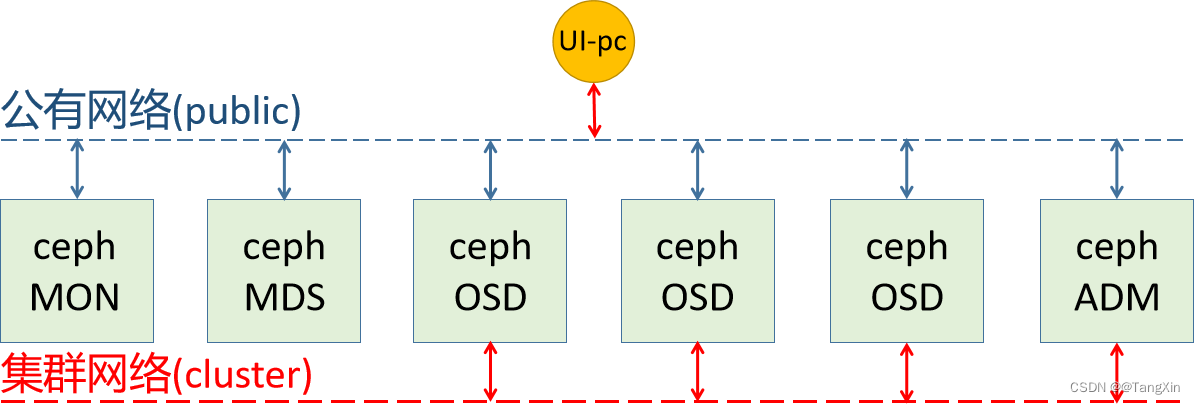
公有网络(Public) - 前端网络 - 北向网络 - a public (front-side) network:连接客户端和集群
	- 用于用户的数据通信
	- 192.168.120.0/24

集群网络(Cluster)- 后端网络	- 东西向网络 - a cluster (back-side) network:连接Ceph各存储节点
	- 用于集群内部的管理通信
	- 192.168.8.0/24

可以在Ceph配置文件的 [global] 部分配置两个网络:
	- public network = {public-network/netmask}
	- cluster network = {cluster-network/netmask}
提示
与客户通信的数据流为纵向,所以称之为北向网络,或称为南北网络。
集群内通过新的数据流为横向,所以称之为东西网络。

南北的含义是数据可以往外走,客户端是集群外的节点,其余为集群内节点。
东西的含义是数据流是横向的,数据流会在集群内节点通信,与外界无关。
主机规划
磁盘规划
	磁盘1	- VM的系统盘
	磁盘2和磁盘3	- Ceph的OSD
主机名规划
| 主机名 | Public/共有网络/前端网络 | Cluster/集群网络/后端网络 | 磁盘 | 其他角色 |
|---|---|---|---|---|
| admin | 192.168.120.20 | 192.168.8.20 | sdb、sdc | |
| stor21 | 192.168.120.21 | 192.168.8.21 | sdb、sdc | mon01 |
| stor22 | 192.168.120.22 | 192.168.8.22 | sdb、sdc | mon02 |
| stor23 | 192.168.120.23 | 192.168.8.23 | sdb、sdc | mon03 |
| stor24 | 192.168.120.24 | 192.168.8.24 | sdb、sdc | |
| stor25 | 192.168.120.25 | 192.168.8.25 | sdb、sdc | |
| stor26 | 192.168.120.26 | 192.168.8.26 | sdb、sdc |
注意:
	由于生产中,Ceph的集群角色是非常多的,当我们的主机最少的时候,只能让一台主机节点运行多个角色。
	stor21、22、23这三台主机,还同时兼具Mon的角色,视情况兼容Mgr角色
	主机名的完整格式是:xxx.superopsmsb.com
其他准备
管理用户
	由于我们接下来的所有操作,基本上都是在 admin 这个主机上来运行,所以,我们不推荐直接使用root用户来管理,倾向于通过一个普通用户来操作接下来的操作。
	由于后续的安装软件,涉及到root用户权限的操作,所以这个普通用户最好具备sudo的权限。
时间同步
	对于任何一个集群来说,时间同步是非常重要的。
主机名规划
	随着生产中的主节点越来越多,我们通过手工定制主机名的方式就不太适合集群的主机管理了。所以在企业中,我们的主机名相关的信息,倾向于通过内网dns来进行管理。
	尤其是等我们到radosgw的时候,必须通过泛域名解析的机制来实现,更强大的面向客户端的主机名管理体系。
VM主机准备
系统镜像:CentOS-7-x86_64-Everything-1708-7.4.iso
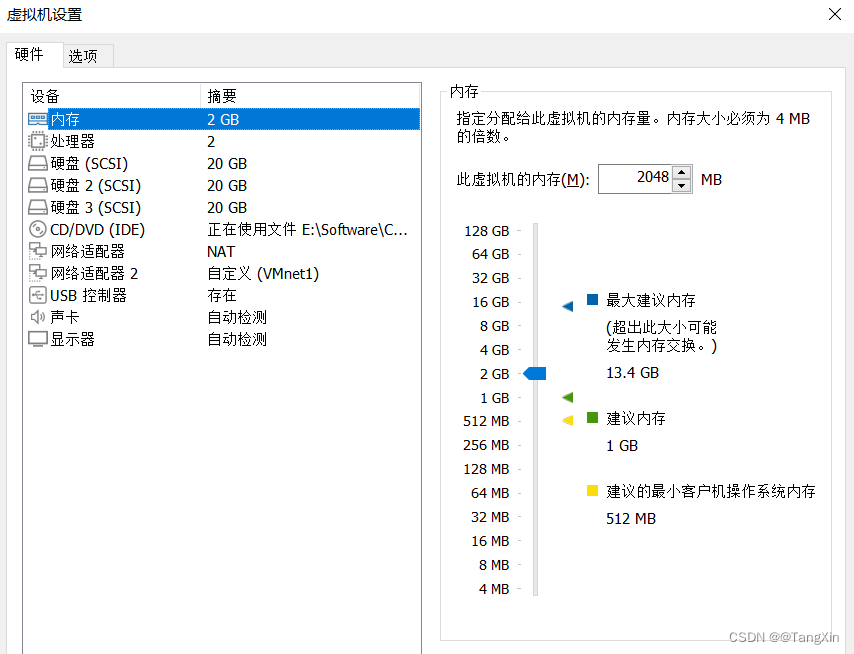
内存:2G
处理器:2核
磁盘:20G*3(包括系统盘)
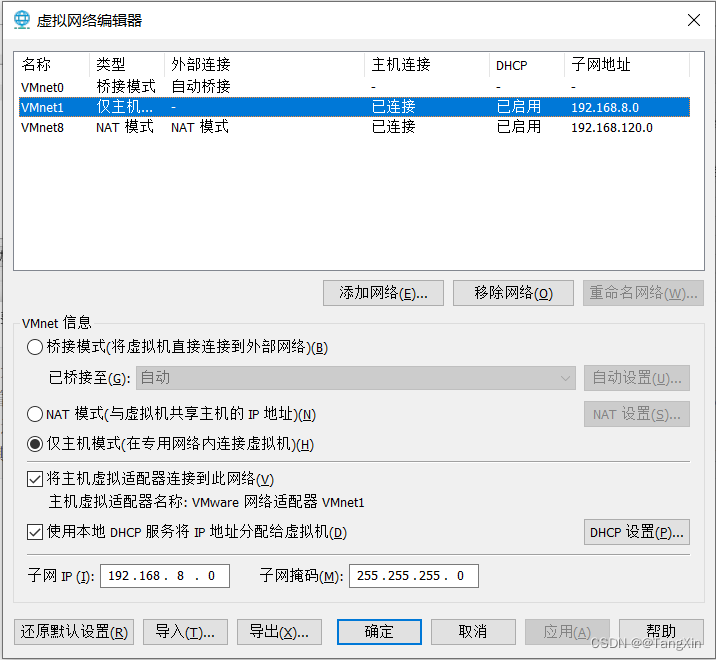
网络:一个NAT模式,一个自定义(VMnet1)模式
虚拟网络设置:
VMnet1 设定为 192.168.8.0 网段,VMnet8 设定为 192.168.120.0 网段
虚拟机设置:
额外添加两块盘,每个根据自己的情况设定容量,本次设定为20G
额外另加一块网络适配器,使用仅主机模式 -- VMnet1,mac地址必须要重新生成,避免冲突
虚拟机创建
1.1.3 小结
1.2 准备工作
学习目标:这一节,我们从基本环境、软件安装、小结三个方面来学习。
1.2.1 基本环境
主机名管理
只需要在admin节点,编辑 /etc/hosts 文件
192.168.120.20 admin.superopsmsb.com admin
192.168.120.21 stor21.superopsmsb.com stor21 mon01.superopsmsb.com mon01
192.168.120.22 stor22.superopsmsb.com stor22 mon02.superopsmsb.com mon02
192.168.120.23 stor23.superopsmsb.com stor23 mon03.superopsmsb.com mon03
192.168.120.24 stor24.superopsmsb.com stor24
192.168.120.25 stor25.superopsmsb.com stor25
192.168.120.26 stor26.superopsmsb.com stor26
注意:
    后续可能会涉及到k8s环境的部署,所以hosts文件有可能会发生变动。
防火墙管理
集群所有节点都需要操作,关闭防火墙
systemctl stop firewalld
systemctl status firewalld
systemctl disable firewalld
systemctl is-enabled firewalld
时间同步服务设置
# 集群所有节点都执行
# 方法1:实验方法
yum install ntpdate -y
ntpdate time.windows.com
-------------------------------------------------------------------
# 方法2:生产环境-在线环境
yum install chrony -y
# 备份配置
cp /etc/chrony.conf  /etc/chrony.conf.orig
sed -i '/^pool/s/^/#/' /etc/chrony.conf    #注解掉pool
grep '#pool' /etc/chrony.conf
sed -i '/#pool/a\server cn.pool.ntp.org iburst' /etc/chrony.conf
sed -i '/#pool/a\server ntp.ntsc.ac.cn iburst' /etc/chrony.conf
sed -i '/#pool/a\server ntp1.aliyun.com iburst' /etc/chrony.conf
grep -A 3 '#pool' /etc/chrony.conf
-------------------------------------------------------------------
# 方法3:生产环境-离线环境
# 时间服务节点
allow 192.168.120.0/24
server 127.127.0.1 iburst
driftfile /var/lib/chrony/drift
keyfile /etc/chrony.keys
leapsectz right/UTC
local stratum 10
makestep 1.0 3
rtcsync
logdir /var/log/chrony

# 时间客户端
allow 192.168.120.0/24
server 192.168.120.41 iburst
driftfile /var/lib/chrony/drift
keyfile /etc/chrony.keys
leapsectz right/UTC
local stratum 10
makestep 1.0 3
rtcsync
logdir /var/log/chrony

# 重启服务
systemctl restart chronyd.service
跨主机通信
脚本文件名称 01_remote_host_auth.sh
#!/bin/bash
# 功能: 批量设定远程主机免密码认证
# 版本: v0.2

# 准备工作
user_dir='/root'
host_file='/etc/hosts'
login_user='root'
login_pass='123456'
target_type=(部署 免密 同步 主机名 退出)

# 菜单
menu(){
  echo -e "\e[31m批量设定远程主机免密码认证管理界面\e[0m"
  echo "====================================================="
  echo -e "\e[32m 1: 部署环境   2: 免密认证   3: 同步hosts \e[0m"
  echo -e "\e[32m 4: 设定主机名 5:退出操作 \e[0m"
  echo "====================================================="
}
# expect环境
expect_install(){
  if [ -f /usr/bin/expect ]
  then
     echo -e "\e[33mexpect环境已经部署完毕\e[0m"
  else
     yum install expect -y >> /dev/null 2>&1 && echo -e "\e[33mexpect软件安装完毕\e[0m" || (echo -e "\e[33mexpect软件安装失败\e[0m" && exit)
  fi
}
# 秘钥文件生成环境
create_authkey(){
  # 保证历史文件清空
  [ -d ${user_dir}/.ssh ] && rm -rf ${user_dir}/.ssh/* || mkdir -p ${user_dir}/.ssh
  # 构建秘钥文件对
  /usr/bin/ssh-keygen -t rsa -P "" -f ${user_dir}/.ssh/id_rsa
  echo -e "\e[33m秘钥文件已经创建完毕\e[0m"
}
# expect自动匹配逻辑
expect_autoauth_func(){
  # 接收外部参数
  command="$@"
  expect -c "
    spawn ${command}
    expect {
      \"yes/no\" {send \"yes\r\"; exp_continue}
      \"*password*\" {send \"${login_pass}\r\"; exp_continue}
      \"*password*\" {send \"${login_pass}\r\"}
   }"
}
# 跨主机传输文件认证
sshkey_auth_func(){
  # 接收外部的参数
  local host_list="$*"
  for ip in ${host_list}
  do
     # /usr/bin/ssh-copy-id -i ${user_dir}/.ssh/id_rsa.pub root@10.0.0.12
     cmd="/usr/bin/ssh-copy-id -i ${user_dir}/.ssh/id_rsa.pub"
     remote_host="${login_user}@${ip}"
     expect_autoauth_func ${cmd} ${remote_host}
  done
}

# 跨主机同步hosts文件
scp_hosts_func(){
  # 接收外部的参数
  local host_list="$*"
  for ip in ${host_list}
  do
     remote_host="${login_user}@${ip}"
     scp ${host_file} ${remote_host}:${host_file}
  done
}

# 跨主机设定主机名规划
set_hostname_func(){
  # 接收外部的参数
  local host_list="$*"
  for ip in ${host_list}
  do
     host_name=$(grep ${ip} ${host_file}|awk '{print $NF}')
     remote_host="${login_user}@${ip}"
     ssh ${remote_host} "hostnamectl set-hostname ${host_name}"
  done
}
# 帮助信息逻辑
Usage(){
  echo "请输入有效的操作id"
}
# 逻辑入口
while true
do
  menu
  read -p "请输入有效的操作id: " target_id
  if [ ${#target_type[@]} -ge ${target_id} ]
  then
    if [ ${target_type[${target_id}-1]} == "部署" ]
    then
       echo "开始部署环境操作..."
       expect_install
       create_authkey
    elif [ ${target_type[${target_id}-1]} == "免密" ]
    then
       read -p "请输入需要批量远程主机认证的主机列表范围(示例: {20..26}): " num_list
       ip_list=$(eval echo 192.168.120.$num_list)
       echo "开始执行免密认证操作..."
       sshkey_auth_func ${ip_list}
    elif [ ${target_type[${target_id}-1]} == "同步" ]
    then
       read -p "请输入需要批量远程主机同步hosts的主机列表范围(示例: {20..26}): " num_list
       ip_list=$(eval echo 192.168.120.$num_list)
       echo "开始执行同步hosts文件操作..."
       scp_hosts_func ${ip_list}
    elif [ ${target_type[${target_id}-1]} == "主机名" ]
    then
       read -p "请输入需要批量设定远程主机主机名的主机列表范围(示例: {20..26}): " num_list
       ip_list=$(eval echo 192.168.120.$num_list)
       echo "开始执行设定主机名操作..."
       set_hostname_func ${ip_list}
    elif [ ${target_type[${target_id}-1]} == "退出" ]
    then
       echo "开始退出管理界面..."
       exit
    fi
  else
    Usage
  fi
done
执行脚本文件,只在admin节点执行
[root@admin ~]# /bin/bash /data/scripts/01_remote_host_auth.sh
批量设定远程主机免密码认证管理界面
=====================================================
 1: 部署环境   2: 免密认证   3: 同步hosts
 4: 设定主机名 5:退出操作
=====================================================
请输入有效的操作id: 1
开始部署环境操作...
expect软件安装完毕
Generating public/private rsa key pair.
Your identification has been saved in /root/.ssh/id_rsa.
Your public key has been saved in /root/.ssh/id_rsa.pub.
The key fingerprint is:
SHA256:9RQMPbTLWZfGDZtqcX4Vfzx+IbVXn/Bo+9kZUPl4ojU root@admin.superopsmsb.com
The key's randomart image is:
+---[RSA 2048]----+
|          .=o..+o|
|            +oB*X|
|          . +*=@@|
|         . +.OE.O|
|        S   B+.*o|
|           .. ..*|
|               +.|
|                 |
|                 |
+----[SHA256]-----+
秘钥文件已经创建完毕
批量设定远程主机免密码认证管理界面
=====================================================
 1: 部署环境   2: 免密认证   3: 同步hosts
 4: 设定主机名 5:退出操作
=====================================================
请输入有效的操作id: 2
请输入需要批量远程主机认证的主机列表范围(示例: {20..26}): {20..26}
开始执行免密认证操作...
spawn /usr/bin/ssh-copy-id -i /root/.ssh/id_rsa.pub root@192.168.120.20
/usr/bin/ssh-copy-id: INFO: Source of key(s) to be installed: "/root/.ssh/id_rsa.pub"
/usr/bin/ssh-copy-id: INFO: attempting to log in with the new key(s), to filter out any that are already installed
/usr/bin/ssh-copy-id: INFO: 1 key(s) remain to be installed -- if you are prompted now it is to install the new keys
root@192.168.120.20's password:

Number of key(s) added: 1

Now try logging into the machine, with:   "ssh 'root@192.168.120.20'"
and check to make sure that only the key(s) you wanted were added.

spawn /usr/bin/ssh-copy-id -i /root/.ssh/id_rsa.pub root@192.168.120.21
/usr/bin/ssh-copy-id: INFO: Source of key(s) to be installed: "/root/.ssh/id_rsa.pub"
/usr/bin/ssh-copy-id: INFO: attempting to log in with the new key(s), to filter out any that are already installed
/usr/bin/ssh-copy-id: INFO: 1 key(s) remain to be installed -- if you are prompted now it is to install the new keys
root@192.168.120.21's password:

Number of key(s) added: 1

Now try logging into the machine, with:   "ssh 'root@192.168.120.21'"
and check to make sure that only the key(s) you wanted were added.

spawn /usr/bin/ssh-copy-id -i /root/.ssh/id_rsa.pub root@192.168.120.22
/usr/bin/ssh-copy-id: INFO: Source of key(s) to be installed: "/root/.ssh/id_rsa.pub"
/usr/bin/ssh-copy-id: INFO: attempting to log in with the new key(s), to filter out any that are already installed
/usr/bin/ssh-copy-id: INFO: 1 key(s) remain to be installed -- if you are prompted now it is to install the new keys
root@192.168.120.22's password:

Number of key(s) added: 1

Now try logging into the machine, with:   "ssh 'root@192.168.120.22'"
and check to make sure that only the key(s) you wanted were added.

spawn /usr/bin/ssh-copy-id -i /root/.ssh/id_rsa.pub root@192.168.120.23
/usr/bin/ssh-copy-id: INFO: Source of key(s) to be installed: "/root/.ssh/id_rsa.pub"
The authenticity of host '192.168.120.23 (192.168.120.23)' can't be established.
ECDSA key fingerprint is SHA256:KpRuS62f0QpNftthTCb49/KRM4z1//3xjP4JXtuSSFI.
ECDSA key fingerprint is MD5:5a:da:83:fb:58:c5:a1:45:1a:e4:9b:f9:d0:f1:30:25.
Are you sure you want to continue connecting (yes/no)? yes
/usr/bin/ssh-copy-id: INFO: attempting to log in with the new key(s), to filter out any that are already installed
/usr/bin/ssh-copy-id: INFO: 1 key(s) remain to be installed -- if you are prompted now it is to install the new keys
root@192.168.120.23's password:

Number of key(s) added: 1

Now try logging into the machine, with:   "ssh 'root@192.168.120.23'"
and check to make sure that only the key(s) you wanted were added.

spawn /usr/bin/ssh-copy-id -i /root/.ssh/id_rsa.pub root@192.168.120.24
/usr/bin/ssh-copy-id: INFO: Source of key(s) to be installed: "/root/.ssh/id_rsa.pub"
The authenticity of host '192.168.120.24 (192.168.120.24)' can't be established.
ECDSA key fingerprint is SHA256:KpRuS62f0QpNftthTCb49/KRM4z1//3xjP4JXtuSSFI.
ECDSA key fingerprint is MD5:5a:da:83:fb:58:c5:a1:45:1a:e4:9b:f9:d0:f1:30:25.
Are you sure you want to continue connecting (yes/no)? yes
/usr/bin/ssh-copy-id: INFO: attempting to log in with the new key(s), to filter out any that are already installed
/usr/bin/ssh-copy-id: INFO: 1 key(s) remain to be installed -- if you are prompted now it is to install the new keys
root@192.168.120.24's password:

Number of key(s) added: 1

Now try logging into the machine, with:   "ssh 'root@192.168.120.24'"
and check to make sure that only the key(s) you wanted were added.

spawn /usr/bin/ssh-copy-id -i /root/.ssh/id_rsa.pub root@192.168.120.25
/usr/bin/ssh-copy-id: INFO: Source of key(s) to be installed: "/root/.ssh/id_rsa.pub"
The authenticity of host '192.168.120.25 (192.168.120.25)' can't be established.
ECDSA key fingerprint is SHA256:KpRuS62f0QpNftthTCb49/KRM4z1//3xjP4JXtuSSFI.
ECDSA key fingerprint is MD5:5a:da:83:fb:58:c5:a1:45:1a:e4:9b:f9:d0:f1:30:25.
Are you sure you want to continue connecting (yes/no)? yes
/usr/bin/ssh-copy-id: INFO: attempting to log in with the new key(s), to filter out any that are already installed
/usr/bin/ssh-copy-id: INFO: 1 key(s) remain to be installed -- if you are prompted now it is to install the new keys
root@192.168.120.25's password:

Number of key(s) added: 1

Now try logging into the machine, with:   "ssh 'root@192.168.120.25'"
and check to make sure that only the key(s) you wanted were added.

spawn /usr/bin/ssh-copy-id -i /root/.ssh/id_rsa.pub root@192.168.120.26
/usr/bin/ssh-copy-id: INFO: Source of key(s) to be installed: "/root/.ssh/id_rsa.pub"
The authenticity of host '192.168.120.26 (192.168.120.26)' can't be established.
ECDSA key fingerprint is SHA256:KpRuS62f0QpNftthTCb49/KRM4z1//3xjP4JXtuSSFI.
ECDSA key fingerprint is MD5:5a:da:83:fb:58:c5:a1:45:1a:e4:9b:f9:d0:f1:30:25.
Are you sure you want to continue connecting (yes/no)? yes
/usr/bin/ssh-copy-id: INFO: attempting to log in with the new key(s), to filter out any that are already installed
/usr/bin/ssh-copy-id: INFO: 1 key(s) remain to be installed -- if you are prompted now it is to install the new keys
root@192.168.120.26's password:

Number of key(s) added: 1

Now try logging into the machine, with:   "ssh 'root@192.168.120.26'"
and check to make sure that only the key(s) you wanted were added.

批量设定远程主机免密码认证管理界面
=====================================================
 1: 部署环境   2: 免密认证   3: 同步hosts
 4: 设定主机名 5:退出操作
=====================================================
请输入有效的操作id: 3
请输入需要批量远程主机同步hosts的主机列表范围(示例: {20..26}): {20..26}
开始执行同步hosts文件操作...
hosts        100%  556     1.4MB/s   00:00
hosts        100%  556   593.5KB/s   00:00
hosts        100%  556   572.1KB/s   00:00
hosts        100%  556   634.8KB/s   00:00
hosts        100%  556   513.5KB/s   00:00
hosts        100%  556   397.4KB/s   00:00
hosts        100%  556   434.3KB/s   00:00
批量设定远程主机免密码认证管理界面
=====================================================
 1: 部署环境   2: 免密认证   3: 同步hosts
 4: 设定主机名 5:退出操作
=====================================================
请输入有效的操作id: 4
请输入需要批量设定远程主机主机名的主机列表范围(示例: {20..26}): {20..26}
开始执行设定主机名操作...
批量设定远程主机免密码认证管理界面
=====================================================
 1: 部署环境   2: 免密认证   3: 同步hosts
 4: 设定主机名 5:退出操作
=====================================================
请输入有效的操作id: 5
开始退出管理界面...
测试效果,只在admin节点执行
[root@admin ~]# for i in {20..26}; do hostname=$(ssh root@192.168.120.$i "hostname"); echo "192.168.120.$i - $hostname"; done
192.168.120.20 - admin
192.168.120.21 - mon01
192.168.120.22 - mon02
192.168.120.23 - mon03
192.168.120.24 - stor24
192.168.120.25 - stor25
192.168.120.26 - stor26
1.2.2 软件安装
用户管理
创建普通用户
useradd -m cephadm -s /bin/bash
echo cephadm:123456 | chpasswd

为用户配置root权限
echo "cephadm ALL = (root) NOPASSWD:ALL" | sudo tee /etc/sudoers.d/cephadm
chmod 0440 /etc/sudoers.d/cephadm

切换用户时,不输出最新登录信息
[root@admin ~]# grep  "se.*postlogin" /etc/pam.d/su
# session               include         postlogin
脚本方法 02_create_ceph_user.sh
#!/bin/bash
# 功能: 创建专属的ceph管理用户
# 版本: v0.2

# 准备工作
login_user='cephadm'
login_pass='123456'

# 设定普通用户
useradd -m ${login_user} -s /bin/bash
echo ${login_user}:${login_pass} | chpasswd
echo "${login_user} ALL = (root) NOPASSWD:ALL" | sudo tee /etc/sudoers.d/${login_user}
chmod 0440 /etc/sudoers.d/${login_user}
批量执行,只在admin节点执行
for i in {20..26}
do
  ssh root@192.168.120.$i "mkdir /data/scripts -p"
  scp /data/scripts/02_create_ceph_user.sh root@192.168.120.$i:/data/scripts/02_create_ceph_user.sh
  ssh root@192.168.120.$i "/bin/bash /data/scripts/02_create_ceph_user.sh"
done
执行效果
[root@admin scripts]# for i in {20..26}
> do
>   ssh root@192.168.120.$i "mkdir /data/scripts -p"
>   scp /data/scripts/02_create_ceph_user.sh root@192.168.120.$i:/data/scripts/02_create_ceph_user.sh
>   ssh root@192.168.120.$i "/bin/bash /data/scripts/02_create_ceph_user.sh"
> done
02_create_ceph_user.sh                          100%  403   624.6KB/s   00:00
cephadm ALL = (root) NOPASSWD:ALL
02_create_ceph_user.sh                          100%  403   168.0KB/s   00:00
cephadm ALL = (root) NOPASSWD:ALL
02_create_ceph_user.sh                          100%  403   296.9KB/s   00:00
cephadm ALL = (root) NOPASSWD:ALL
02_create_ceph_user.sh                          100%  403   253.8KB/s   00:00
cephadm ALL = (root) NOPASSWD:ALL
02_create_ceph_user.sh                          100%  403   360.6KB/s   00:00
cephadm ALL = (root) NOPASSWD:ALL
02_create_ceph_user.sh                          100%  403   424.1KB/s   00:00
cephadm ALL = (root) NOPASSWD:ALL
02_create_ceph_user.sh                          100%  403   304.9KB/s   00:00
cephadm ALL = (root) NOPASSWD:ALL
确认效果
for i in {20..26}; do usermsg=$(ssh root@192.168.120.$i "id cephadm"); echo "192.168.120.$i - $usermsg"; done

[root@admin ~]# for i in {20..26}; do usermsg=$(ssh root@192.168.120.$i "id cephadm"); echo "192.168.120.$i - $usermsg"; done
192.168.120.20 - uid=1000(cephadm) gid=1000(cephadm) groups=1000(cephadm)
192.168.120.21 - uid=1000(cephadm) gid=1000(cephadm) groups=1000(cephadm)
192.168.120.22 - uid=1000(cephadm) gid=1000(cephadm) groups=1000(cephadm)
192.168.120.23 - uid=1000(cephadm) gid=1000(cephadm) groups=1000(cephadm)
192.168.120.24 - uid=1000(cephadm) gid=1000(cephadm) groups=1000(cephadm)
192.168.120.25 - uid=1000(cephadm) gid=1000(cephadm) groups=1000(cephadm)
192.168.120.26 - uid=1000(cephadm) gid=1000(cephadm) groups=1000(cephadm)
跨主机免密码认证
脚本文件内容 /data/scripts/03_remote_cephadm_auth.sh
#!/bin/bash
# 功能: 批量设定远程主机免密码认证
# 版本: v0.3

# 准备工作
user_dir='/home/cephadm'
login_user='cephadm'
login_pass='123456'
host_file='/etc/hosts'
target_type=(部署 免密 退出)

# 菜单
menu(){
  echo -e "\e[31m批量设定远程主机免密码认证管理界面\e[0m"
  echo "====================================================="
  echo -e "\e[32m 1: 部署环境   2: 免密认证   3: 退出操作 \e[0m"
  echo "====================================================="
}
# expect环境
expect_install(){
  if [ -f /usr/bin/expect ]
  then
     echo -e "\e[33mexpect环境已经部署完毕\e[0m"
  else
     sudo yum install expect -y >> /dev/null 2>&1 && echo -e "\e[33mexpect软件安装完毕\e[0m" || (echo -e "\e[33mexpect软件安装失败\e[0m" && exit)
  fi
}
# 秘钥文件生成环境
create_authkey(){
  # 保证历史文件清空
  [ -d ${user_dir}/.ssh ] && rm -rf ${user_dir}/.ssh/*
  # 构建秘钥文件对
  /usr/bin/ssh-keygen -t rsa -P "" -f ${user_dir}/.ssh/id_rsa
  echo -e "\e[33m秘钥文件已经创建完毕\e[0m"
}
# expect自动匹配逻辑
expect_autoauth_func(){
  # 接收外部参数
  command="$@"
  expect -c "
    spawn ${command}
    expect {
      \"yes/no\" {send \"yes\r\"; exp_continue}
      \"*password*\" {send \"${login_pass}\r\"; exp_continue}
      \"*password*\" {send \"${login_pass}\r\"}
   }"
}
# 跨主机传输文件认证
sshkey_auth_func(){
  # 接收外部的参数
  local host_list="$*"
  for ip in ${host_list}
  do
     cmd="/usr/bin/ssh-copy-id -i ${user_dir}/.ssh/id_rsa.pub"
     remote_host="${login_user}@${ip}"
     host_name=$(grep ${ip} ${host_file}|awk '{print $NF}')
     remote_host1="${login_user}@${host_name}"
     remote_host2="${login_user}@${host_name}.superopsmsb.com"
     expect_autoauth_func ${cmd} ${remote_host}
     expect_autoauth_func ${cmd} ${remote_host1}
     expect_autoauth_func ${cmd} ${remote_host2}
  done
}

# 帮助信息逻辑
Usage(){
  echo "请输入有效的操作id"
}
# 逻辑入口
while true
do
  menu
  read -p "请输入有效的操作id: " target_id
  if [ ${#target_type[@]} -ge ${target_id} ]
  then
    if [ ${target_type[${target_id}-1]} == "部署" ]
    then
       echo "开始部署环境操作..."
       expect_install
       create_authkey
    elif [ ${target_type[${target_id}-1]} == "免密" ]
    then
       read -p "请输入需要批量远程主机认证的主机列表范围(示例: {20..26}): " num_list
       ip_list=$(eval echo 192.168.120.$num_list)
       echo "开始执行免密认证操作..."
       sshkey_auth_func ${ip_list}
    elif [ ${target_type[${target_id}-1]} == "退出" ]
    then
       echo "开始退出管理界面..."
       exit
    fi
  else
    Usage
  fi
done
更改文件权限
chown cephadm:cephadm /data/scripts/03_remote_cephadm_auth.sh

切换用户
su - cephadm
执行脚本文件
[cephadm@admin ~]$ /bin/bash /data/scripts/03_remote_cephadm_auth.sh
批量设定远程主机免密码认证管理界面
=====================================================
 1: 部署环境   2: 免密认证   3: 退出操作
=====================================================
请输入有效的操作id: 1
开始部署环境操作...
expect环境已经部署完毕
Generating public/private rsa key pair.
Created directory '/home/cephadm/.ssh'.
Your identification has been saved in /home/cephadm/.ssh/id_rsa.
Your public key has been saved in /home/cephadm/.ssh/id_rsa.pub.
The key fingerprint is:
SHA256:s7sPnVHcaRVTBows3g8vLcPcmcPCyHTZB9HvW66x+/o cephadm@admin
The key's randomart image is:
+---[RSA 2048]----+
|           . oo**|
|          ..o.o+o|
|         . ooo+..|
|          o.=.. o|
|        So.* B = |
|         +ooO X o|
|        o o  =.oo|
|         o     +.|
|        oo.   =*E|
+----[SHA256]-----+
秘钥文件已经创建完毕
批量设定远程主机免密码认证管理界面
=====================================================
 1: 部署环境   2: 免密认证   3: 退出操作
=====================================================
请输入有效的操作id: 2
请输入需要批量远程主机认证的主机列表范围(示例: {20..26}): {20..26}
开始执行免密认证操作...
spawn /usr/bin/ssh-copy-id -i /home/cephadm/.ssh/id_rsa.pub cephadm@192.168.120.20
/usr/bin/ssh-copy-id: INFO: Source of key(s) to be installed: "/home/cephadm/.ssh/id_rsa.pub"
The authenticity of host '192.168.120.20 (192.168.120.20)' can't be established.
ECDSA key fingerprint is SHA256:KpRuS62f0QpNftthTCb49/KRM4z1//3xjP4JXtuSSFI.
ECDSA key fingerprint is MD5:5a:da:83:fb:58:c5:a1:45:1a:e4:9b:f9:d0:f1:30:25.
Are you sure you want to continue connecting (yes/no)? yes
/usr/bin/ssh-copy-id: INFO: attempting to log in with the new key(s), to filter out any that are already installed
/usr/bin/ssh-copy-id: INFO: 1 key(s) remain to be installed -- if you are prompted now it is to install the new keys
cephadm@192.168.120.20's password:

Number of key(s) added: 1

Now try logging into the machine, with:   "ssh 'cephadm@192.168.120.20'"
and check to make sure that only the key(s) you wanted were added.

spawn /usr/bin/ssh-copy-id -i /home/cephadm/.ssh/id_rsa.pub cephadm@admin
/usr/bin/ssh-copy-id: INFO: Source of key(s) to be installed: "/home/cephadm/.ssh/id_rsa.pub"
The authenticity of host 'admin (192.168.120.20)' can't be established.
ECDSA key fingerprint is SHA256:KpRuS62f0QpNftthTCb49/KRM4z1//3xjP4JXtuSSFI.
ECDSA key fingerprint is MD5:5a:da:83:fb:58:c5:a1:45:1a:e4:9b:f9:d0:f1:30:25.
Are you sure you want to continue connecting (yes/no)? yes
/usr/bin/ssh-copy-id: INFO: attempting to log in with the new key(s), to filter out any that are already installed

/usr/bin/ssh-copy-id: WARNING: All keys were skipped because they already exist on the remote system.
                (if you think this is a mistake, you may want to use -f option)

spawn /usr/bin/ssh-copy-id -i /home/cephadm/.ssh/id_rsa.pub cephadm@admin.superopsmsb.com
/usr/bin/ssh-copy-id: INFO: Source of key(s) to be installed: "/home/cephadm/.ssh/id_rsa.pub"
The authenticity of host 'admin.superopsmsb.com (192.168.120.20)' can't be established.
ECDSA key fingerprint is SHA256:KpRuS62f0QpNftthTCb49/KRM4z1//3xjP4JXtuSSFI.
ECDSA key fingerprint is MD5:5a:da:83:fb:58:c5:a1:45:1a:e4:9b:f9:d0:f1:30:25.
Are you sure you want to continue connecting (yes/no)? yes
/usr/bin/ssh-copy-id: INFO: attempting to log in with the new key(s), to filter out any that are already installed

/usr/bin/ssh-copy-id: WARNING: All keys were skipped because they already exist on the remote system.
                (if you think this is a mistake, you may want to use -f option)

spawn /usr/bin/ssh-copy-id -i /home/cephadm/.ssh/id_rsa.pub cephadm@192.168.120.21
/usr/bin/ssh-copy-id: INFO: Source of key(s) to be installed: "/home/cephadm/.ssh/id_rsa.pub"
The authenticity of host '192.168.120.21 (192.168.120.21)' can't be established.
ECDSA key fingerprint is SHA256:KpRuS62f0QpNftthTCb49/KRM4z1//3xjP4JXtuSSFI.
ECDSA key fingerprint is MD5:5a:da:83:fb:58:c5:a1:45:1a:e4:9b:f9:d0:f1:30:25.
Are you sure you want to continue connecting (yes/no)? yes
/usr/bin/ssh-copy-id: INFO: attempting to log in with the new key(s), to filter out any that are already installed
/usr/bin/ssh-copy-id: INFO: 1 key(s) remain to be installed -- if you are prompted now it is to install the new keys
cephadm@192.168.120.21's password:

Number of key(s) added: 1

Now try logging into the machine, with:   "ssh 'cephadm@192.168.120.21'"
and check to make sure that only the key(s) you wanted were added.

spawn /usr/bin/ssh-copy-id -i /home/cephadm/.ssh/id_rsa.pub cephadm@mon01
/usr/bin/ssh-copy-id: INFO: Source of key(s) to be installed: "/home/cephadm/.ssh/id_rsa.pub"
The authenticity of host 'mon01 (192.168.120.21)' can't be established.
ECDSA key fingerprint is SHA256:KpRuS62f0QpNftthTCb49/KRM4z1//3xjP4JXtuSSFI.
ECDSA key fingerprint is MD5:5a:da:83:fb:58:c5:a1:45:1a:e4:9b:f9:d0:f1:30:25.
Are you sure you want to continue connecting (yes/no)? yes
/usr/bin/ssh-copy-id: INFO: attempting to log in with the new key(s), to filter out any that are already installed

/usr/bin/ssh-copy-id: WARNING: All keys were skipped because they already exist on the remote system.
                (if you think this is a mistake, you may want to use -f option)

spawn /usr/bin/ssh-copy-id -i /home/cephadm/.ssh/id_rsa.pub cephadm@mon01.superopsmsb.com
/usr/bin/ssh-copy-id: INFO: Source of key(s) to be installed: "/home/cephadm/.ssh/id_rsa.pub"
The authenticity of host 'mon01.superopsmsb.com (192.168.120.21)' can't be established.
ECDSA key fingerprint is SHA256:KpRuS62f0QpNftthTCb49/KRM4z1//3xjP4JXtuSSFI.
ECDSA key fingerprint is MD5:5a:da:83:fb:58:c5:a1:45:1a:e4:9b:f9:d0:f1:30:25.
Are you sure you want to continue connecting (yes/no)? yes
/usr/bin/ssh-copy-id: INFO: attempting to log in with the new key(s), to filter out any that are already installed

/usr/bin/ssh-copy-id: WARNING: All keys were skipped because they already exist on the remote system.
                (if you think this is a mistake, you may want to use -f option)

spawn /usr/bin/ssh-copy-id -i /home/cephadm/.ssh/id_rsa.pub cephadm@192.168.120.22
/usr/bin/ssh-copy-id: INFO: Source of key(s) to be installed: "/home/cephadm/.ssh/id_rsa.pub"
The authenticity of host '192.168.120.22 (192.168.120.22)' can't be established.
ECDSA key fingerprint is SHA256:KpRuS62f0QpNftthTCb49/KRM4z1//3xjP4JXtuSSFI.
ECDSA key fingerprint is MD5:5a:da:83:fb:58:c5:a1:45:1a:e4:9b:f9:d0:f1:30:25.
Are you sure you want to continue connecting (yes/no)? yes
/usr/bin/ssh-copy-id: INFO: attempting to log in with the new key(s), to filter out any that are already installed
/usr/bin/ssh-copy-id: INFO: 1 key(s) remain to be installed -- if you are prompted now it is to install the new keys
cephadm@192.168.120.22's password:

Number of key(s) added: 1

Now try logging into the machine, with:   "ssh 'cephadm@192.168.120.22'"
and check to make sure that only the key(s) you wanted were added.

spawn /usr/bin/ssh-copy-id -i /home/cephadm/.ssh/id_rsa.pub cephadm@mon02
/usr/bin/ssh-copy-id: INFO: Source of key(s) to be installed: "/home/cephadm/.ssh/id_rsa.pub"
The authenticity of host 'mon02 (192.168.120.22)' can't be established.
ECDSA key fingerprint is SHA256:KpRuS62f0QpNftthTCb49/KRM4z1//3xjP4JXtuSSFI.
ECDSA key fingerprint is MD5:5a:da:83:fb:58:c5:a1:45:1a:e4:9b:f9:d0:f1:30:25.
Are you sure you want to continue connecting (yes/no)? yes
/usr/bin/ssh-copy-id: INFO: attempting to log in with the new key(s), to filter out any that are already installed

/usr/bin/ssh-copy-id: WARNING: All keys were skipped because they already exist on the remote system.
                (if you think this is a mistake, you may want to use -f option)

spawn /usr/bin/ssh-copy-id -i /home/cephadm/.ssh/id_rsa.pub cephadm@mon02.superopsmsb.com
/usr/bin/ssh-copy-id: INFO: Source of key(s) to be installed: "/home/cephadm/.ssh/id_rsa.pub"
The authenticity of host 'mon02.superopsmsb.com (192.168.120.22)' can't be established.
ECDSA key fingerprint is SHA256:KpRuS62f0QpNftthTCb49/KRM4z1//3xjP4JXtuSSFI.
ECDSA key fingerprint is MD5:5a:da:83:fb:58:c5:a1:45:1a:e4:9b:f9:d0:f1:30:25.
Are you sure you want to continue connecting (yes/no)? yes
/usr/bin/ssh-copy-id: INFO: attempting to log in with the new key(s), to filter out any that are already installed

/usr/bin/ssh-copy-id: WARNING: All keys were skipped because they already exist on the remote system.
                (if you think this is a mistake, you may want to use -f option)

spawn /usr/bin/ssh-copy-id -i /home/cephadm/.ssh/id_rsa.pub cephadm@192.168.120.23
/usr/bin/ssh-copy-id: INFO: Source of key(s) to be installed: "/home/cephadm/.ssh/id_rsa.pub"
The authenticity of host '192.168.120.23 (192.168.120.23)' can't be established.
ECDSA key fingerprint is SHA256:KpRuS62f0QpNftthTCb49/KRM4z1//3xjP4JXtuSSFI.
ECDSA key fingerprint is MD5:5a:da:83:fb:58:c5:a1:45:1a:e4:9b:f9:d0:f1:30:25.
Are you sure you want to continue connecting (yes/no)? yes
/usr/bin/ssh-copy-id: INFO: attempting to log in with the new key(s), to filter out any that are already installed
/usr/bin/ssh-copy-id: INFO: 1 key(s) remain to be installed -- if you are prompted now it is to install the new keys
cephadm@192.168.120.23's password:

Number of key(s) added: 1

Now try logging into the machine, with:   "ssh 'cephadm@192.168.120.23'"
and check to make sure that only the key(s) you wanted were added.

spawn /usr/bin/ssh-copy-id -i /home/cephadm/.ssh/id_rsa.pub cephadm@mon03
/usr/bin/ssh-copy-id: INFO: Source of key(s) to be installed: "/home/cephadm/.ssh/id_rsa.pub"
The authenticity of host 'mon03 (192.168.120.23)' can't be established.
ECDSA key fingerprint is SHA256:KpRuS62f0QpNftthTCb49/KRM4z1//3xjP4JXtuSSFI.
ECDSA key fingerprint is MD5:5a:da:83:fb:58:c5:a1:45:1a:e4:9b:f9:d0:f1:30:25.
Are you sure you want to continue connecting (yes/no)? yes
/usr/bin/ssh-copy-id: INFO: attempting to log in with the new key(s), to filter out any that are already installed

/usr/bin/ssh-copy-id: WARNING: All keys were skipped because they already exist on the remote system.
                (if you think this is a mistake, you may want to use -f option)

spawn /usr/bin/ssh-copy-id -i /home/cephadm/.ssh/id_rsa.pub cephadm@mon03.superopsmsb.com
/usr/bin/ssh-copy-id: INFO: Source of key(s) to be installed: "/home/cephadm/.ssh/id_rsa.pub"
The authenticity of host 'mon03.superopsmsb.com (192.168.120.23)' can't be established.
ECDSA key fingerprint is SHA256:KpRuS62f0QpNftthTCb49/KRM4z1//3xjP4JXtuSSFI.
ECDSA key fingerprint is MD5:5a:da:83:fb:58:c5:a1:45:1a:e4:9b:f9:d0:f1:30:25.
Are you sure you want to continue connecting (yes/no)? yes
/usr/bin/ssh-copy-id: INFO: attempting to log in with the new key(s), to filter out any that are already installed

/usr/bin/ssh-copy-id: WARNING: All keys were skipped because they already exist on the remote system.
                (if you think this is a mistake, you may want to use -f option)

spawn /usr/bin/ssh-copy-id -i /home/cephadm/.ssh/id_rsa.pub cephadm@192.168.120.24
/usr/bin/ssh-copy-id: INFO: Source of key(s) to be installed: "/home/cephadm/.ssh/id_rsa.pub"
The authenticity of host '192.168.120.24 (192.168.120.24)' can't be established.
ECDSA key fingerprint is SHA256:KpRuS62f0QpNftthTCb49/KRM4z1//3xjP4JXtuSSFI.
ECDSA key fingerprint is MD5:5a:da:83:fb:58:c5:a1:45:1a:e4:9b:f9:d0:f1:30:25.
Are you sure you want to continue connecting (yes/no)? yes
/usr/bin/ssh-copy-id: INFO: attempting to log in with the new key(s), to filter out any that are already installed
/usr/bin/ssh-copy-id: INFO: 1 key(s) remain to be installed -- if you are prompted now it is to install the new keys
cephadm@192.168.120.24's password:

Number of key(s) added: 1

Now try logging into the machine, with:   "ssh 'cephadm@192.168.120.24'"
and check to make sure that only the key(s) you wanted were added.

spawn /usr/bin/ssh-copy-id -i /home/cephadm/.ssh/id_rsa.pub cephadm@stor24
/usr/bin/ssh-copy-id: INFO: Source of key(s) to be installed: "/home/cephadm/.ssh/id_rsa.pub"
The authenticity of host 'stor24 (192.168.120.24)' can't be established.
ECDSA key fingerprint is SHA256:KpRuS62f0QpNftthTCb49/KRM4z1//3xjP4JXtuSSFI.
ECDSA key fingerprint is MD5:5a:da:83:fb:58:c5:a1:45:1a:e4:9b:f9:d0:f1:30:25.
Are you sure you want to continue connecting (yes/no)? yes
/usr/bin/ssh-copy-id: INFO: attempting to log in with the new key(s), to filter out any that are already installed

/usr/bin/ssh-copy-id: WARNING: All keys were skipped because they already exist on the remote system.
                (if you think this is a mistake, you may want to use -f option)

spawn /usr/bin/ssh-copy-id -i /home/cephadm/.ssh/id_rsa.pub cephadm@stor24.superopsmsb.com
/usr/bin/ssh-copy-id: INFO: Source of key(s) to be installed: "/home/cephadm/.ssh/id_rsa.pub"
The authenticity of host 'stor24.superopsmsb.com (192.168.120.24)' can't be established.
ECDSA key fingerprint is SHA256:KpRuS62f0QpNftthTCb49/KRM4z1//3xjP4JXtuSSFI.
ECDSA key fingerprint is MD5:5a:da:83:fb:58:c5:a1:45:1a:e4:9b:f9:d0:f1:30:25.
Are you sure you want to continue connecting (yes/no)? yes
/usr/bin/ssh-copy-id: INFO: attempting to log in with the new key(s), to filter out any that are already installed

/usr/bin/ssh-copy-id: WARNING: All keys were skipped because they already exist on the remote system.
                (if you think this is a mistake, you may want to use -f option)

spawn /usr/bin/ssh-copy-id -i /home/cephadm/.ssh/id_rsa.pub cephadm@192.168.120.25
/usr/bin/ssh-copy-id: INFO: Source of key(s) to be installed: "/home/cephadm/.ssh/id_rsa.pub"
The authenticity of host '192.168.120.25 (192.168.120.25)' can't be established.
ECDSA key fingerprint is SHA256:KpRuS62f0QpNftthTCb49/KRM4z1//3xjP4JXtuSSFI.
ECDSA key fingerprint is MD5:5a:da:83:fb:58:c5:a1:45:1a:e4:9b:f9:d0:f1:30:25.
Are you sure you want to continue connecting (yes/no)? yes
/usr/bin/ssh-copy-id: INFO: attempting to log in with the new key(s), to filter out any that are already installed
/usr/bin/ssh-copy-id: INFO: 1 key(s) remain to be installed -- if you are prompted now it is to install the new keys
cephadm@192.168.120.25's password:

Number of key(s) added: 1

Now try logging into the machine, with:   "ssh 'cephadm@192.168.120.25'"
and check to make sure that only the key(s) you wanted were added.

spawn /usr/bin/ssh-copy-id -i /home/cephadm/.ssh/id_rsa.pub cephadm@stor25
/usr/bin/ssh-copy-id: INFO: Source of key(s) to be installed: "/home/cephadm/.ssh/id_rsa.pub"
The authenticity of host 'stor25 (192.168.120.25)' can't be established.
ECDSA key fingerprint is SHA256:KpRuS62f0QpNftthTCb49/KRM4z1//3xjP4JXtuSSFI.
ECDSA key fingerprint is MD5:5a:da:83:fb:58:c5:a1:45:1a:e4:9b:f9:d0:f1:30:25.
Are you sure you want to continue connecting (yes/no)? yes
/usr/bin/ssh-copy-id: INFO: attempting to log in with the new key(s), to filter out any that are already installed

/usr/bin/ssh-copy-id: WARNING: All keys were skipped because they already exist on the remote system.
                (if you think this is a mistake, you may want to use -f option)

spawn /usr/bin/ssh-copy-id -i /home/cephadm/.ssh/id_rsa.pub cephadm@stor25.superopsmsb.com
/usr/bin/ssh-copy-id: INFO: Source of key(s) to be installed: "/home/cephadm/.ssh/id_rsa.pub"
The authenticity of host 'stor25.superopsmsb.com (192.168.120.25)' can't be established.
ECDSA key fingerprint is SHA256:KpRuS62f0QpNftthTCb49/KRM4z1//3xjP4JXtuSSFI.
ECDSA key fingerprint is MD5:5a:da:83:fb:58:c5:a1:45:1a:e4:9b:f9:d0:f1:30:25.
Are you sure you want to continue connecting (yes/no)? yes
/usr/bin/ssh-copy-id: INFO: attempting to log in with the new key(s), to filter out any that are already installed

/usr/bin/ssh-copy-id: WARNING: All keys were skipped because they already exist on the remote system.
                (if you think this is a mistake, you may want to use -f option)

spawn /usr/bin/ssh-copy-id -i /home/cephadm/.ssh/id_rsa.pub cephadm@192.168.120.26
/usr/bin/ssh-copy-id: INFO: Source of key(s) to be installed: "/home/cephadm/.ssh/id_rsa.pub"
The authenticity of host '192.168.120.26 (192.168.120.26)' can't be established.
ECDSA key fingerprint is SHA256:KpRuS62f0QpNftthTCb49/KRM4z1//3xjP4JXtuSSFI.
ECDSA key fingerprint is MD5:5a:da:83:fb:58:c5:a1:45:1a:e4:9b:f9:d0:f1:30:25.
Are you sure you want to continue connecting (yes/no)? yes
/usr/bin/ssh-copy-id: INFO: attempting to log in with the new key(s), to filter out any that are already installed
/usr/bin/ssh-copy-id: INFO: 1 key(s) remain to be installed -- if you are prompted now it is to install the new keys
cephadm@192.168.120.26's password:

Number of key(s) added: 1

Now try logging into the machine, with:   "ssh 'cephadm@192.168.120.26'"
and check to make sure that only the key(s) you wanted were added.

spawn /usr/bin/ssh-copy-id -i /home/cephadm/.ssh/id_rsa.pub cephadm@stor26
/usr/bin/ssh-copy-id: INFO: Source of key(s) to be installed: "/home/cephadm/.ssh/id_rsa.pub"
The authenticity of host 'stor26 (192.168.120.26)' can't be established.
ECDSA key fingerprint is SHA256:KpRuS62f0QpNftthTCb49/KRM4z1//3xjP4JXtuSSFI.
ECDSA key fingerprint is MD5:5a:da:83:fb:58:c5:a1:45:1a:e4:9b:f9:d0:f1:30:25.
Are you sure you want to continue connecting (yes/no)? yes
/usr/bin/ssh-copy-id: INFO: attempting to log in with the new key(s), to filter out any that are already installed

/usr/bin/ssh-copy-id: WARNING: All keys were skipped because they already exist on the remote system.
                (if you think this is a mistake, you may want to use -f option)

spawn /usr/bin/ssh-copy-id -i /home/cephadm/.ssh/id_rsa.pub cephadm@stor26.superopsmsb.com
/usr/bin/ssh-copy-id: INFO: Source of key(s) to be installed: "/home/cephadm/.ssh/id_rsa.pub"
The authenticity of host 'stor26.superopsmsb.com (192.168.120.26)' can't be established.
ECDSA key fingerprint is SHA256:KpRuS62f0QpNftthTCb49/KRM4z1//3xjP4JXtuSSFI.
ECDSA key fingerprint is MD5:5a:da:83:fb:58:c5:a1:45:1a:e4:9b:f9:d0:f1:30:25.
Are you sure you want to continue connecting (yes/no)? yes
/usr/bin/ssh-copy-id: INFO: attempting to log in with the new key(s), to filter out any that are already installed

/usr/bin/ssh-copy-id: WARNING: All keys were skipped because they already exist on the remote system.
                (if you think this is a mistake, you may want to use -f option)

批量设定远程主机免密码认证管理界面
=====================================================
 1: 部署环境   2: 免密认证   3: 退出操作
=====================================================
请输入有效的操作id: 3
开始退出管理界面...
测试效果
[cephadm@admin ~]$ for i in {20..26}; do hostname=$(ssh cephadm@192.168.120.$i "hostname"); echo "192.168.120.$i - $hostname"; done
192.168.120.20 - admin
192.168.120.21 - mon01
192.168.120.22 - mon02
192.168.120.23 - mon03
192.168.120.24 - stor24
192.168.120.25 - stor25
192.168.120.26 - stor26
因为 192.168.120.21-23 有两个角色,所以我们需要将相关角色的免密认证
[cephadm@admin ~]$ num_list={1..3}
[cephadm@admin ~]$ for i in $(eval echo stor2$num_list stor2$num_list.superopsmsb.com); do ssh-copy-id cephadm@$i; done
/bin/ssh-copy-id: INFO: Source of key(s) to be installed: "/home/cephadm/.ssh/id_rsa.pub"
The authenticity of host 'stor21 (192.168.120.21)' can't be established.
ECDSA key fingerprint is SHA256:KpRuS62f0QpNftthTCb49/KRM4z1//3xjP4JXtuSSFI.
ECDSA key fingerprint is MD5:5a:da:83:fb:58:c5:a1:45:1a:e4:9b:f9:d0:f1:30:25.
Are you sure you want to continue connecting (yes/no)? yes
/bin/ssh-copy-id: INFO: attempting to log in with the new key(s), to filter out any that are already installed

/bin/ssh-copy-id: WARNING: All keys were skipped because they already exist on the remote system.
                (if you think this is a mistake, you may want to use -f option)

/bin/ssh-copy-id: INFO: Source of key(s) to be installed: "/home/cephadm/.ssh/id_rsa.pub"
The authenticity of host 'stor22 (192.168.120.22)' can't be established.
ECDSA key fingerprint is SHA256:KpRuS62f0QpNftthTCb49/KRM4z1//3xjP4JXtuSSFI.
ECDSA key fingerprint is MD5:5a:da:83:fb:58:c5:a1:45:1a:e4:9b:f9:d0:f1:30:25.
Are you sure you want to continue connecting (yes/no)? yes
/bin/ssh-copy-id: INFO: attempting to log in with the new key(s), to filter out any that are already installed

/bin/ssh-copy-id: WARNING: All keys were skipped because they already exist on the remote system.
                (if you think this is a mistake, you may want to use -f option)

/bin/ssh-copy-id: INFO: Source of key(s) to be installed: "/home/cephadm/.ssh/id_rsa.pub"
The authenticity of host 'stor23 (192.168.120.23)' can't be established.
ECDSA key fingerprint is SHA256:KpRuS62f0QpNftthTCb49/KRM4z1//3xjP4JXtuSSFI.
ECDSA key fingerprint is MD5:5a:da:83:fb:58:c5:a1:45:1a:e4:9b:f9:d0:f1:30:25.
Are you sure you want to continue connecting (yes/no)? yes
/bin/ssh-copy-id: INFO: attempting to log in with the new key(s), to filter out any that are already installed

/bin/ssh-copy-id: WARNING: All keys were skipped because they already exist on the remote system.
                (if you think this is a mistake, you may want to use -f option)

/bin/ssh-copy-id: INFO: Source of key(s) to be installed: "/home/cephadm/.ssh/id_rsa.pub"
The authenticity of host 'stor21.superopsmsb.com (192.168.120.21)' can't be established.
ECDSA key fingerprint is SHA256:KpRuS62f0QpNftthTCb49/KRM4z1//3xjP4JXtuSSFI.
ECDSA key fingerprint is MD5:5a:da:83:fb:58:c5:a1:45:1a:e4:9b:f9:d0:f1:30:25.
Are you sure you want to continue connecting (yes/no)? yes
/bin/ssh-copy-id: INFO: attempting to log in with the new key(s), to filter out any that are already installed

/bin/ssh-copy-id: WARNING: All keys were skipped because they already exist on the remote system.
                (if you think this is a mistake, you may want to use -f option)

/bin/ssh-copy-id: INFO: Source of key(s) to be installed: "/home/cephadm/.ssh/id_rsa.pub"
The authenticity of host 'stor22.superopsmsb.com (192.168.120.22)' can't be established.
ECDSA key fingerprint is SHA256:KpRuS62f0QpNftthTCb49/KRM4z1//3xjP4JXtuSSFI.
ECDSA key fingerprint is MD5:5a:da:83:fb:58:c5:a1:45:1a:e4:9b:f9:d0:f1:30:25.
Are you sure you want to continue connecting (yes/no)? yes
/bin/ssh-copy-id: INFO: attempting to log in with the new key(s), to filter out any that are already installed

/bin/ssh-copy-id: WARNING: All keys were skipped because they already exist on the remote system.
                (if you think this is a mistake, you may want to use -f option)

/bin/ssh-copy-id: INFO: Source of key(s) to be installed: "/home/cephadm/.ssh/id_rsa.pub"
The authenticity of host 'stor23.superopsmsb.com (192.168.120.23)' can't be established.
ECDSA key fingerprint is SHA256:KpRuS62f0QpNftthTCb49/KRM4z1//3xjP4JXtuSSFI.
ECDSA key fingerprint is MD5:5a:da:83:fb:58:c5:a1:45:1a:e4:9b:f9:d0:f1:30:25.
Are you sure you want to continue connecting (yes/no)? yes
/bin/ssh-copy-id: INFO: attempting to log in with the new key(s), to filter out any that are already installed

/bin/ssh-copy-id: WARNING: All keys were skipped because they already exist on the remote system.
                (if you think this is a mistake, you may want to use -f option)
定制软件源
对 ceph-deploy 方式部署 Ceph 来说,Ceph 的官方仓库路径是:http://download.ceph.com/,包括各种 Ceph 版本,比如:Octopus、Pacific、Quincy等,它根据不同OS系统环境,分别位于 rpm-版本号 或者 debian-版本号 的noarch目录下。比如:Pacific版本的软件相关源在:rpm-pacific/el8/noarch/ceph-release-1-1.el8.noarch.rpm

注意:
	el7:代表支持Red Hat 7.x、CentOS 7.x 系统的软件
	el8:代表支持Red Hat 8.x、CentOS 8.x 系统的软件
	pacific版本及其更新版本,只支持CentOS 8.x环境
Ceph 的 Pacific 和 Quincy 版本,仅仅支持 CentOS8.x,Octopus 版本虽然有CentOS7版本,不仅仅软件不全,而且对于底层 GCC 库和 GLIBC 库要求比较高,如果升级 CentOS7 的底层库,会导致其他软件受到影响,无法正常使用,另外没有配套的 ceph-deploy。所以对于 CentOS7 来说,只能部署 Nautilus 版本和更低版本。
对于 Ubuntu 系统来说,即使多个版本对于底层环境要求有些区别,但是经过测试,问题不大,也就是说 Ubuntu 系统可以安装 Ceph 的全系列。
安装软件源
yum install -y https://mirrors.aliyun.com/ceph/rpm-nautilus/el7/noarch/ceph-release-1-1.el7.noarch.rpm
更新软件源
yum makecache fast

所有 Ceph 节点部署软件源,只在 admin 节点执行即可
for i in {20..26}
do
	ssh root@192.168.120.$i yum install -y https://mirrors.aliyun.com/ceph/rpm-nautilus/el7/noarch/ceph-release-1-1.el7.noarch.rpm
	ssh root@192.168.120.$i yum makecache fast
done

[root@admin ~]# for i in {20..26}
> do
> ssh root@192.168.120.$i yum install -y https://mirrors.aliyun.com/ceph/rpm-nautilus/el7/noarch/ceph-release-1-1.el7.noarch.rpm
> ssh root@192.168.120.$i yum makecache fast
> done
Loaded plugins: fastestmirror, langpacks
Examining /var/tmp/yum-root-zoFbmV/ceph-release-1-1.el7.noarch.rpm: ceph-release-1-1.el7.noarch
Marking /var/tmp/yum-root-zoFbmV/ceph-release-1-1.el7.noarch.rpm to be installed
Resolving Dependencies
--> Running transaction check
---> Package ceph-release.noarch 0:1-1.el7 will be installed
--> Finished Dependency Resolution

Dependencies Resolved

================================================================================
 Package          Arch       Version     Repository                        Size
================================================================================
Installing:
 ceph-release     noarch     1-1.el7     /ceph-release-1-1.el7.noarch     544

Transaction Summary
================================================================================
Install  1 Package

Total size: 544
Installed size: 544
Downloading packages:
Running transaction check
Running transaction test
Transaction test succeeded
Running transaction
  Installing : ceph-release-1-1.el7.noarch                                  1/1
  Verifying  : ceph-release-1-1.el7.noarch                                  1/1

Installed:
  ceph-release.noarch 0:1-1.el7

Complete!
......
部署依赖,只在 admin 节点安装 Ceph 软件
yum update -y
yum install ceph-deploy python-setuptools python2-subprocess32 -y

测试效果
su - cephadm -c "ceph-deploy --help"
命令解析
查看命令帮助
[root@admin ~]# su - cephadm
Last login: Tue Apr  2 15:16:12 CST 2024 on pts/0
[cephadm@admin ~]$ ceph-deploy --help
usage: ceph-deploy [-h] [-v | -q] [--version] [--username USERNAME]
                   [--overwrite-conf] [--ceph-conf CEPH_CONF]
                   COMMAND ...

Easy Ceph deployment

    -^-
   /   \
   |O o|  ceph-deploy v2.0.1
   ).-.(
  '/|||\`
  | '|` |
    '|`

Full documentation can be found at: http://ceph.com/ceph-deploy/docs

optional arguments:
  -h, --help            show this help message and exit
  -v, --verbose         be more verbose
  -q, --quiet           be less verbose
  --version             the current installed version of ceph-deploy
  --username USERNAME   the username to connect to the remote host
  --overwrite-conf      overwrite an existing conf file on remote host (if
                        present)
  --ceph-conf CEPH_CONF
                        use (or reuse) a given ceph.conf file

commands:
  COMMAND               description
  	# 创建一个集群
    new                 Start deploying a new cluster, and write a
                        CLUSTER.conf and keyring for it.
    install             Install Ceph packages on remote hosts.
    rgw                 Ceph RGW daemon management
    mgr                 Ceph MGR daemon management
    mds                 Ceph MDS daemon management
    mon                 Ceph MON Daemon management
    gatherkeys          Gather authentication keys for provisioning new nodes.
    disk                Manage disks on a remote host.
    osd                 Prepare a data disk on remote host.
    repo                Repo definition management
    # 同步admin秘钥信息
    admin               Push configuration and client.admin key to a remote
                        host.
    # 同步ceph.conf文件
    config              Copy ceph.conf to/from remote host(s)
    uninstall           Remove Ceph packages from remote hosts.
    purgedata           Purge (delete, destroy, discard, shred) any Ceph data
                        from /var/lib/ceph
    purge               Remove Ceph packages from remote hosts and purge all
                        data.
    forgetkeys          Remove authentication keys from the local directory.
    pkg                 Manage packages on remote hosts.
    calamari            Install and configure Calamari nodes. Assumes that a
                        repository with Calamari packages is already
                        configured. Refer to the docs for examples
                        (http://ceph.com/ceph-deploy/docs/conf.html)

See 'ceph-deploy <command> --help' for help on a specific command
1.2.3 小结
1.3 Ceph部署
学习目标:这一节,我们从集群创建、部署Mon、小结三个方面来学习。
1.3.1 集群创建
准备工作
首先在admin管理节点上,以cephadm用户创建集群相关的配置文件目录:
su - cephadm
mkdir ceph-cluster && cd ceph-cluster
初始化集群解析
操作解析
ceph-deploy new --help
初始化第一个MON节点的命令格式为:“ceph-deploy new {initial-monitor-node(s)}”
	- mon01即为第一个MON节点名称,其名称必须与节点当前实际使用的主机名称(uname -n)保持一致
	- 可以是短名称,也可以是长名称,但是最终用的仍然是短名称,但是会导致如下报错:
		ceph-deploy new: error: hostname:  xxx is not resolvable
	- 推荐使用完整写法:
		格式 hostname:fqdn,比如:mon01:mon01.superopsmsd.com

注意:
	如果初始化的时候,希望同时部署多个节点的换,使用空格隔开 hostname:fqdn即可
	如果部署过程出现问题,需要清空
		- ceph-deploy forgetkeys
		- ceph-deploy purge mon01
		- ceph-deploy purgedata mon01
		- rm ceph.*
集群初始化
部署3个mon节点,只在 admin 节点执行即可,切换到 cephadm用户
ceph-deploy new --public-network 192.168.120.0/24 --cluster-network 192.168.8.0/24 mon01:mon01.superopsmsb.com mon02:mon02.superopsmsb.com mon03:mon03.superopsmsb.com --no-ssh-copykey

[cephadm@admin ceph-cluster]$ ceph-deploy new --public-network 192.168.120.0/24 --cluster-network 192.168.8.0/24 mon01:mon01.superopsmsb.com mon02:mon02.superopsmsb.com mon03:mon03.superopsmsb.com --no-ssh-copykey
[ceph_deploy.conf][DEBUG ] found configuration file at: /home/cephadm/.cephdeploy.conf
[ceph_deploy.cli][INFO  ] Invoked (2.0.1): /bin/ceph-deploy new --public-network 192.168.120.0/24 --cluster-network 192.168.8.0/24 mon01:mon01.superopsmsb.com mon02:mon02.superopsmsb.com mon03:mon03.superopsmsb.com --no-ssh-copykey
[ceph_deploy.cli][INFO  ] ceph-deploy options:
[ceph_deploy.cli][INFO  ]  username                      : None
[ceph_deploy.cli][INFO  ]  func                          : <function new at 0x11bd140>
[ceph_deploy.cli][INFO  ]  verbose                       : False
[ceph_deploy.cli][INFO  ]  overwrite_conf                : False
[ceph_deploy.cli][INFO  ]  quiet                         : False
[ceph_deploy.cli][INFO  ]  cd_conf                       : <ceph_deploy.conf.cephdeploy.Conf instance at 0x121cd88>
[ceph_deploy.cli][INFO  ]  cluster                       : ceph
[ceph_deploy.cli][INFO  ]  ssh_copykey                   : False
[ceph_deploy.cli][INFO  ]  mon                           : ['mon01:mon01.superopsmsb.com', 'mon02:mon02.superopsmsb.com', 'mon03:mon03.superopsmsb.com']
[ceph_deploy.cli][INFO  ]  public_network                : 192.168.120.0/24
[ceph_deploy.cli][INFO  ]  ceph_conf                     : None
[ceph_deploy.cli][INFO  ]  cluster_network               : 192.168.8.0/24
[ceph_deploy.cli][INFO  ]  default_release               : False
[ceph_deploy.cli][INFO  ]  fsid                          : None
[ceph_deploy.new][DEBUG ] Creating new cluster named ceph
[mon01.superopsmsb.com][DEBUG ] connection detected need for sudo
[mon01.superopsmsb.com][DEBUG ] connected to host: mon01.superopsmsb.com
[mon01.superopsmsb.com][DEBUG ] detect platform information from remote host
[mon01.superopsmsb.com][DEBUG ] detect machine type
[mon01.superopsmsb.com][DEBUG ] find the location of an executable
[mon01.superopsmsb.com][INFO  ] Running command: sudo /usr/sbin/ip link show
[mon01.superopsmsb.com][INFO  ] Running command: sudo /usr/sbin/ip addr show
[mon01.superopsmsb.com][DEBUG ] IP addresses found: [u'192.168.8.21', u'192.168.120.21']
[ceph_deploy.new][DEBUG ] Resolving host mon01.superopsmsb.com
[ceph_deploy.new][DEBUG ] Monitor mon01 at 192.168.120.21
[mon02.superopsmsb.com][DEBUG ] connection detected need for sudo
[mon02.superopsmsb.com][DEBUG ] connected to host: mon02.superopsmsb.com
[mon02.superopsmsb.com][DEBUG ] detect platform information from remote host
[mon02.superopsmsb.com][DEBUG ] detect machine type
[mon02.superopsmsb.com][DEBUG ] find the location of an executable
[mon02.superopsmsb.com][INFO  ] Running command: sudo /usr/sbin/ip link show
[mon02.superopsmsb.com][INFO  ] Running command: sudo /usr/sbin/ip addr show
[mon02.superopsmsb.com][DEBUG ] IP addresses found: [u'192.168.120.22', u'192.168.8.22']
[ceph_deploy.new][DEBUG ] Resolving host mon02.superopsmsb.com
[ceph_deploy.new][DEBUG ] Monitor mon02 at 192.168.120.22
[mon03.superopsmsb.com][DEBUG ] connection detected need for sudo
[mon03.superopsmsb.com][DEBUG ] connected to host: mon03.superopsmsb.com
[mon03.superopsmsb.com][DEBUG ] detect platform information from remote host
[mon03.superopsmsb.com][DEBUG ] detect machine type
[mon03.superopsmsb.com][DEBUG ] find the location of an executable
[mon03.superopsmsb.com][INFO  ] Running command: sudo /usr/sbin/ip link show
[mon03.superopsmsb.com][INFO  ] Running command: sudo /usr/sbin/ip addr show
[mon03.superopsmsb.com][DEBUG ] IP addresses found: [u'192.168.120.23', u'192.168.8.23']
[ceph_deploy.new][DEBUG ] Resolving host mon03.superopsmsb.com
[ceph_deploy.new][DEBUG ] Monitor mon03 at 192.168.120.23
[ceph_deploy.new][DEBUG ] Monitor initial members are ['mon01', 'mon02', 'mon03']
[ceph_deploy.new][DEBUG ] Monitor addrs are [u'192.168.120.21', u'192.168.120.22', u'192.168.120.23']
[ceph_deploy.new][DEBUG ] Creating a random mon key...
[ceph_deploy.new][DEBUG ] Writing monitor keyring to ceph.mon.keyring...
[ceph_deploy.new][DEBUG ] Writing initial config to ceph.conf...
注意:
	如果出现如下报错:
	[ceph_deploy][ERROR ] AttributeError: 'module' object has no attribute 'needs_ssh'
	在执行命令的时候,添加一个 --no-ssh-copykey 参数即可
	这主要是因为免密认证的时候,没有进行 ssh cephadm@主机名 导致的
查看效果
查看初始化后的文件内容
[cephadm@admin ceph-cluster]$ ll
total 16
-rw-rw-r--. 1 cephadm cephadm  308 Apr  2 15:36 ceph.conf
-rw-rw-r--. 1 cephadm cephadm 5313 Apr  2 15:36 ceph-deploy-ceph.log
-rw-------. 1 cephadm cephadm   73 Apr  2 15:36 ceph.mon.keyring

查看集群的配置文件
[cephadm@admin ceph-cluster]$ cat ceph.conf
[global]
fsid = 76cc0714-0bd7-43f7-b7c3-ec8cae2819e7	# 这个地方很重要,每次都不一样,不要乱动
public_network = 192.168.120.0/24
cluster_network = 192.168.8.0/24
mon_initial_members = mon01, mon02, mon03
mon_host = 192.168.120.21,192.168.120.22,192.168.120.23
auth_cluster_required = cephx
auth_service_required = cephx
auth_client_required = cephx

查看集群通信的认证信息
[cephadm@admin ceph-cluster]$ cat ceph.mon.keyring
[mon.]
key = AQCZtQtmAAAAABAAGCEERe8csxRdaVWzgtq0mQ==
caps mon = allow *

查看集群初始化的日志信息
[cephadm@admin ceph-cluster]$ cat ceph-deploy-ceph.log
[2024-04-02 15:36:55,425][ceph_deploy.conf][DEBUG ] found configuration file at: /home/cephadm/.cephdeploy.conf
[2024-04-02 15:36:55,425][ceph_deploy.cli][INFO  ] Invoked (2.0.1): /bin/ceph-deploy new --public-network 192.168.120.0/24 --cluster-network 192.168.8.0/24 mon01:mon01.superopsmsb.com mon02:mon02.superopsmsb.com mon03:mon03.superopsmsb.com --no-ssh-copykey
[2024-04-02 15:36:55,425][ceph_deploy.cli][INFO  ] ceph-deploy options:
......
1.3.2 部署Mon
部署mon软件
操作解析:
	ceph-deploy命令能够以远程的方式连入Ceph集群各节点完成程序包安装等操作

命令格式:
	ceph-deploy install {ceph-node} [{ceph-node} ...]
	示例:ceph-deploy install --release nautilus --nogpgcheck admin mon01 mon02 mon03	-- 本教程使用
	注意:
		这里主要是Ceph的工作角色的节点
		一般情况下,不推荐使用这种直接的方法来进行安装,效率太低,而且容易干扰其他主机环境
		如果不指定版本号 --release nautilus 一般默认安装的版本与yum源设置的版本号不对应
注意:
	上面会在所有节点上都来进行正常的安装部署,其实还有另外一种方法,手工在所有节点上安装ceph软件  --  推荐
	如果以下安装执行失败,有可能是yum源配置没有配置好,可以执行ceph-deploy install {ceph-node} [{ceph-node} ...] 命令,自动配置yum源,完成包的安装
	yum install -y ceph ceph-osd ceph-mds ceph-mon ceph-radosgw
	# 推荐指定版本安装
	yum install -y ceph-14.2.22 ceph-osd-14.2.22 ceph-mds-14.2.22 ceph-mon-14.2.22 ceph-radosgw-14.2.22

	最后在admin角色主机上安装
	ceph-deploy install --release nautilus --no-adjust-repos --nogpgcheck admin mon01 mon02 mon03
执行过程
[cephadm@admin ceph-cluster]$ ceph-deploy install --release nautilus --no-adjust-repos --nogpgcheck admin mon01 mon02 mon03
[ceph_deploy.conf][DEBUG ] found configuration file at: /home/cephadm/.cephdeploy.conf
[ceph_deploy.cli][INFO  ] Invoked (2.0.1): /bin/ceph-deploy install --release nautilus --no-adjust-repos --nogpgcheck admin mon01 mon02 mon03
[ceph_deploy.cli][INFO  ] ceph-deploy options:
......
[mon03][INFO  ] Running command: sudo ceph --version
[mon03][DEBUG ] ceph version 14.2.22 (ca74598065096e6fcbd8433c8779a2be0c889351) nautilus (stable)
集群通信认证
配置初始MON节点,同时向所有节点同步配置
ceph-deploy mon create-initial
注意:
	为了避免因为认证方面导致的通信失败,尤其是在现有环境上,推荐使用 --overwrite-conf 参数
	ceph-deploy --overwrite-conf config push mon01 mon02 mon03
执行效果
[cephadm@admin ceph-cluster]$ ceph-deploy mon create-initial
[ceph_deploy.conf][DEBUG ] found configuration file at: /home/cephadm/.cephdeploy.conf
[ceph_deploy.cli][INFO  ] Invoked (2.0.1): /bin/ceph-deploy mon create-initial
[ceph_deploy.cli][INFO  ] ceph-deploy options:
......
[mon01][DEBUG ] ********************************************************************************
[mon01][DEBUG ] status for monitor: mon.mon01
[mon01][DEBUG ] {
[mon01][DEBUG ]   "election_epoch": 0,
[mon01][DEBUG ]   "extra_probe_peers": [
[mon01][DEBUG ]     {
[mon01][DEBUG ]       "addrvec": [
[mon01][DEBUG ]         {
[mon01][DEBUG ]           "addr": "192.168.120.22:3300",
[mon01][DEBUG ]           "nonce": 0,
[mon01][DEBUG ]           "type": "v2"
[mon01][DEBUG ]         },
[mon01][DEBUG ]         {
[mon01][DEBUG ]           "addr": "192.168.120.22:6789",
[mon01][DEBUG ]           "nonce": 0,
[mon01][DEBUG ]           "type": "v1"
[mon01][DEBUG ]         }
[mon01][DEBUG ]       ]
[mon01][DEBUG ]     },
[mon01][DEBUG ]     {
[mon01][DEBUG ]       "addrvec": [
[mon01][DEBUG ]         {
[mon01][DEBUG ]           "addr": "192.168.120.23:3300",
[mon01][DEBUG ]           "nonce": 0,
[mon01][DEBUG ]           "type": "v2"
[mon01][DEBUG ]         },
[mon01][DEBUG ]         {
[mon01][DEBUG ]           "addr": "192.168.120.23:6789",
[mon01][DEBUG ]           "nonce": 0,
[mon01][DEBUG ]           "type": "v1"
[mon01][DEBUG ]         }
[mon01][DEBUG ]       ]
[mon01][DEBUG ]     }
[mon01][DEBUG ]   ],
[mon01][DEBUG ]   "feature_map": {
[mon01][DEBUG ]     "mon": [
[mon01][DEBUG ]       {
[mon01][DEBUG ]         "features": "0x3ffddff8ffecffff",
[mon01][DEBUG ]         "num": 1,
[mon01][DEBUG ]         "release": "luminous"
[mon01][DEBUG ]       }
[mon01][DEBUG ]     ]
[mon01][DEBUG ]   },
[mon01][DEBUG ]   "features": {
[mon01][DEBUG ]     "quorum_con": "0",
[mon01][DEBUG ]     "quorum_mon": [],
[mon01][DEBUG ]     "required_con": "0",
[mon01][DEBUG ]     "required_mon": []
[mon01][DEBUG ]   },
[mon01][DEBUG ]   "monmap": {
[mon01][DEBUG ]     "created": "2024-04-02 16:30:57.060040",
[mon01][DEBUG ]     "epoch": 0,
[mon01][DEBUG ]     "features": {
[mon01][DEBUG ]       "optional": [],
[mon01][DEBUG ]       "persistent": []
[mon01][DEBUG ]     },
[mon01][DEBUG ]     "fsid": "76cc0714-0bd7-43f7-b7c3-ec8cae2819e7",
[mon01][DEBUG ]     "min_mon_release": 0,
[mon01][DEBUG ]     "min_mon_release_name": "unknown",
[mon01][DEBUG ]     "modified": "2024-04-02 16:30:57.060040",
[mon01][DEBUG ]     "mons": [
[mon01][DEBUG ]       {
[mon01][DEBUG ]         "addr": "192.168.120.21:6789/0",
[mon01][DEBUG ]         "name": "mon01",
[mon01][DEBUG ]         "public_addr": "192.168.120.21:6789/0",
[mon01][DEBUG ]         "public_addrs": {
[mon01][DEBUG ]           "addrvec": [
[mon01][DEBUG ]             {
[mon01][DEBUG ]               "addr": "192.168.120.21:3300",
[mon01][DEBUG ]               "nonce": 0,
[mon01][DEBUG ]               "type": "v2"
[mon01][DEBUG ]             },
[mon01][DEBUG ]             {
[mon01][DEBUG ]               "addr": "192.168.120.21:6789",
[mon01][DEBUG ]               "nonce": 0,
[mon01][DEBUG ]               "type": "v1"
[mon01][DEBUG ]             }
[mon01][DEBUG ]           ]
[mon01][DEBUG ]         },
[mon01][DEBUG ]         "rank": 0
[mon01][DEBUG ]       },
[mon01][DEBUG ]       {
[mon01][DEBUG ]         "addr": "0.0.0.0:0/1",
[mon01][DEBUG ]         "name": "mon02",
[mon01][DEBUG ]         "public_addr": "0.0.0.0:0/1",
[mon01][DEBUG ]         "public_addrs": {
[mon01][DEBUG ]           "addrvec": [
[mon01][DEBUG ]             {
[mon01][DEBUG ]               "addr": "0.0.0.0:0",
[mon01][DEBUG ]               "nonce": 1,
[mon01][DEBUG ]               "type": "v1"
[mon01][DEBUG ]             }
[mon01][DEBUG ]           ]
[mon01][DEBUG ]         },
[mon01][DEBUG ]         "rank": 1
[mon01][DEBUG ]       },
[mon01][DEBUG ]       {
[mon01][DEBUG ]         "addr": "0.0.0.0:0/2",
[mon01][DEBUG ]         "name": "mon03",
[mon01][DEBUG ]         "public_addr": "0.0.0.0:0/2",
[mon01][DEBUG ]         "public_addrs": {
[mon01][DEBUG ]           "addrvec": [
[mon01][DEBUG ]             {
[mon01][DEBUG ]               "addr": "0.0.0.0:0",
[mon01][DEBUG ]               "nonce": 2,
[mon01][DEBUG ]               "type": "v1"
[mon01][DEBUG ]             }
[mon01][DEBUG ]           ]
[mon01][DEBUG ]         },
[mon01][DEBUG ]         "rank": 2
[mon01][DEBUG ]       }
[mon01][DEBUG ]     ]
[mon01][DEBUG ]   },
[mon01][DEBUG ]   "name": "mon01",
[mon01][DEBUG ]   "outside_quorum": [
[mon01][DEBUG ]     "mon01"
[mon01][DEBUG ]   ],
[mon01][DEBUG ]   "quorum": [],
[mon01][DEBUG ]   "rank": 0,
[mon01][DEBUG ]   "state": "probing",
[mon01][DEBUG ]   "sync_provider": []
[mon01][DEBUG ] }
[mon01][DEBUG ] ********************************************************************************
[mon01][INFO  ] monitor: mon.mon01 is running
[mon01][INFO  ] Running command: sudo ceph --cluster=ceph --admin-daemon /var/run/ceph/ceph-mon.mon01.asok mon_status
......
[ceph_deploy.gatherkeys][INFO  ] Storing ceph.client.admin.keyring
[ceph_deploy.gatherkeys][INFO  ] Storing ceph.bootstrap-mds.keyring
[ceph_deploy.gatherkeys][INFO  ] Storing ceph.bootstrap-mgr.keyring
[ceph_deploy.gatherkeys][INFO  ] keyring 'ceph.mon.keyring' already exists
[ceph_deploy.gatherkeys][INFO  ] Storing ceph.bootstrap-osd.keyring
[ceph_deploy.gatherkeys][INFO  ] Storing ceph.bootstrap-rgw.keyring
[ceph_deploy.gatherkeys][INFO  ] Destroy temp directory /tmp/tmpFs9N2l
[cephadm@admin ceph-cluster]$ ceph-deploy --overwrite-conf config push mon01 mon02 mon03
[ceph_deploy.conf][DEBUG ] found configuration file at: /home/cephadm/.cephdeploy.conf
[ceph_deploy.cli][INFO  ] Invoked (2.0.1): /bin/ceph-deploy --overwrite-conf config push mon01 mon02 mon03
[ceph_deploy.cli][INFO  ] ceph-deploy options:
[ceph_deploy.cli][INFO  ]  username                      : None
[ceph_deploy.cli][INFO  ]  verbose                       : False
[ceph_deploy.cli][INFO  ]  overwrite_conf                : True
[ceph_deploy.cli][INFO  ]  subcommand                    : push
[ceph_deploy.cli][INFO  ]  quiet                         : False
[ceph_deploy.cli][INFO  ]  cd_conf                       : <ceph_deploy.conf.cephdeploy.Conf instance at 0x1c93440>
[ceph_deploy.cli][INFO  ]  cluster                       : ceph
[ceph_deploy.cli][INFO  ]  client                        : ['mon01', 'mon02', 'mon03']
[ceph_deploy.cli][INFO  ]  func                          : <function config at 0x1c6fed8>
[ceph_deploy.cli][INFO  ]  ceph_conf                     : None
[ceph_deploy.cli][INFO  ]  default_release               : False
[ceph_deploy.config][DEBUG ] Pushing config to mon01
[mon01][DEBUG ] connection detected need for sudo
[mon01][DEBUG ] connected to host: mon01
[mon01][DEBUG ] detect platform information from remote host
[mon01][DEBUG ] detect machine type
[mon01][DEBUG ] write cluster configuration to /etc/ceph/{cluster}.conf
[ceph_deploy.config][DEBUG ] Pushing config to mon02
[mon02][DEBUG ] connection detected need for sudo
[mon02][DEBUG ] connected to host: mon02
[mon02][DEBUG ] detect platform information from remote host
[mon02][DEBUG ] detect machine type
[mon02][DEBUG ] write cluster configuration to /etc/ceph/{cluster}.conf
[ceph_deploy.config][DEBUG ] Pushing config to mon03
[mon03][DEBUG ] connection detected need for sudo
[mon03][DEBUG ] connected to host: mon03
[mon03][DEBUG ] detect platform information from remote host
[mon03][DEBUG ] detect machine type
[mon03][DEBUG ] write cluster configuration to /etc/ceph/{cluster}.conf
到mon的节点上查看mon的守护进程
for i in {20..23}; do ssh cephadm@192.168.120.$i "ps aux | grep -v grep | grep ceph-mon"; done

[cephadm@admin ceph-cluster]$ for i in {20..23}; do ssh cephadm@192.168.120.$i "ps aux | grep -v grep | grep ceph-mon"; done
ceph        5608  0.2  1.7 501720 34636 ?        Ssl  16:30   0:00 /usr/bin/ceph-mon -f --cluster ceph --id mon01 --setuser ceph --setgroup ceph
ceph        5435  0.1  1.6 500700 32772 ?        Ssl  16:31   0:00 /usr/bin/ceph-mon -f --cluster ceph --id mon02 --setuser ceph --setgroup ceph
ceph        5459  0.1  1.4 501724 30152 ?        Ssl  16:31   0:00 /usr/bin/ceph-mon -f --cluster ceph --id mon03 --setuser ceph --setgroup ceph

结果显示:
	在所有的节点主机上,都有一套ceph-mon的进程在进行。
集群在初始化的时候,会为对应的mon节点生成配套的认证信息
[cephadm@admin ceph-cluster]$ ll /home/cephadm/ceph-cluster
total 604
-rw-------. 1 cephadm cephadm    113 Apr  2 16:31 ceph.bootstrap-mds.keyring
-rw-------. 1 cephadm cephadm    113 Apr  2 16:31 ceph.bootstrap-mgr.keyring
-rw-------. 1 cephadm cephadm    113 Apr  2 16:31 ceph.bootstrap-osd.keyring
-rw-------. 1 cephadm cephadm    113 Apr  2 16:31 ceph.bootstrap-rgw.keyring
-rw-------. 1 cephadm cephadm    151 Apr  2 16:31 ceph.client.admin.keyring
-rw-rw-r--. 1 cephadm cephadm    308 Apr  2 15:36 ceph.conf
-rw-rw-r--. 1 cephadm cephadm 534170 Apr  2 16:35 ceph-deploy-ceph.log
-rw-------. 1 cephadm cephadm     73 Apr  2 15:36 ceph.mon.keyring

结果显示:
	这里生成了一系列的与ceph集群相关的认证文件
	ceph.bootstrap-mds.keyring		引导启动 mds 的秘钥文件
	ceph.bootstrap-mgr.keyring		引导启动 mgr 的秘钥文件
	ceph.bootstrap-osd.keyring		引导启动 osd 的密钥文件
	ceph.bootstrap-rgw.keyring		引导启动 rgw 的秘钥文件
	ceph.client.admin.keyring		ceph客户端和管理端通信的认证秘钥,是最重要的

注意:
	ceph.client.admin.keyring 拥有ceph集群的所有权限,一定不能有误。
1.3.3 小结
1.4 Ceph部署2
学习目标:这一节,我们从Mon认证、Mgr环境、小结三个方面来学习
1.4.1 Mon认证
	为了方便后续的监控环境认证操作,在admin角色主机上,把配置文件和admin秘钥拷贝Ceph集群各监控角色节点,拷贝前秘钥文件前的各个mon节点效果
for i in {21..23}; do ssh cephadm@192.168.120.$i "echo -----$i-----; ls /etc/ceph"; done

[cephadm@admin ceph-cluster]$ for i in {21..23}; do ssh cephadm@192.168.120.$i "echo -----$i-----; sudo ls /etc/ceph"; done
-----21-----
ceph.conf
rbdmap
tmpcz8PTU
-----22-----
ceph.conf
rbdmap
tmpSsFhkz
-----23-----
ceph.conf
rbdmap
tmpJ9VgjO
原则上要求,所有mon节点上的 ceph.conf 内容必须一致,如果不一致的话,可以通过下面命令同步
	ceph-deploy --overwrite-conf config push mon01 mon02 mon03

执行集群的认证文件的拷贝动作
ceph-deploy admin mon01 mon02 mon03
执行认证文件信息同步
[cephadm@admin ceph-cluster]$ ceph-deploy admin mon01 mon02 mon03
[ceph_deploy.conf][DEBUG ] found configuration file at: /home/cephadm/.cephdeploy.conf
[ceph_deploy.cli][INFO  ] Invoked (2.0.1): /bin/ceph-deploy admin mon01 mon02 mon03
[ceph_deploy.cli][INFO  ] ceph-deploy options:
[ceph_deploy.cli][INFO  ]  username                      : None
[ceph_deploy.cli][INFO  ]  verbose                       : False
[ceph_deploy.cli][INFO  ]  overwrite_conf                : False
[ceph_deploy.cli][INFO  ]  quiet                         : False
[ceph_deploy.cli][INFO  ]  cd_conf                       : <ceph_deploy.conf.cephdeploy.Conf instance at 0x2284248>
[ceph_deploy.cli][INFO  ]  cluster                       : ceph
[ceph_deploy.cli][INFO  ]  client                        : ['mon01', 'mon02', 'mon03']
[ceph_deploy.cli][INFO  ]  func                          : <function admin at 0x21ea500>
[ceph_deploy.cli][INFO  ]  ceph_conf                     : None
[ceph_deploy.cli][INFO  ]  default_release               : False
[ceph_deploy.admin][DEBUG ] Pushing admin keys and conf to mon01
[mon01][DEBUG ] connection detected need for sudo
[mon01][DEBUG ] connected to host: mon01
[mon01][DEBUG ] detect platform information from remote host
[mon01][DEBUG ] detect machine type
[mon01][DEBUG ] write cluster configuration to /etc/ceph/{cluster}.conf
[ceph_deploy.admin][DEBUG ] Pushing admin keys and conf to mon02
[mon02][DEBUG ] connection detected need for sudo
[mon02][DEBUG ] connected to host: mon02
[mon02][DEBUG ] detect platform information from remote host
[mon02][DEBUG ] detect machine type
[mon02][DEBUG ] write cluster configuration to /etc/ceph/{cluster}.conf
[ceph_deploy.admin][DEBUG ] Pushing admin keys and conf to mon03
[mon03][DEBUG ] connection detected need for sudo
[mon03][DEBUG ] connected to host: mon03
[mon03][DEBUG ] detect platform information from remote host
[mon03][DEBUG ] detect machine type
[mon03][DEBUG ] write cluster configuration to /etc/ceph/{cluster}.conf

查看效果
[cephadm@admin ceph-cluster]$ for i in {21..23}; do ssh cephadm@192.168.120.$i "echo -----$i-----; ls /etc/ceph"; done
-----21-----
ceph.client.admin.keyring
ceph.conf
rbdmap
tmpcz8PTU
-----22-----
ceph.client.admin.keyring
ceph.conf
rbdmap
tmpSsFhkz
-----23-----
ceph.client.admin.keyring
ceph.conf
rbdmap
tmpJ9VgjO

结果显示:
	所有的mon节点上多了一个 ceph 的客户端与服务端进行认证的秘钥文件了。
	ceph.client.admin.keyring 主要用于 ceph 客户端与管理端的一个通信认证。

注意:
	如果我们不做交互式操作的话,这个文件可以不用复制。
认证文件权限
	虽然我们把认证文件传递给对应的监控角色主机了, 但是我们的服务是通过普通用户cephadm来进行交流的。而默认情况下,传递过去的认证文件,cephadm普通用户是无法正常访问的

[cephadm@admin ceph-cluster]$ for i in {21..23}; do ssh cephadm@192.168.120.$i "echo -----$i-----;ls -l /etc/ceph/ceph.cl*"; done
-----21-----
-rw-------. 1 root root 151 Apr  2 17:07 /etc/ceph/ceph.client.admin.keyring
-----22-----
-rw-------. 1 root root 151 Apr  2 17:07 /etc/ceph/ceph.client.admin.keyring
-----23-----
-rw-------. 1 root root 151 Apr  2 17:07 /etc/ceph/ceph.client.admin.keyring

[root@stor21 ceph]# su - cephadm
[cephadm@mon01 ~]$ ceph -s
2024-04-02 17:21:10.541 7f1e2f5a6700 -1 auth: unable to find a keyring on /etc/ceph/ceph.client.admin.keyring,/etc/ceph/ceph.keyring,/etc/ceph/keyring,/etc/ceph/keyring.bin,: (2) No such file or directory
2024-04-02 17:21:10.541 7f1e2f5a6700 -1 AuthRegistry(0x7f1e28066a68) no keyring found at /etc/ceph/ceph.client.admin.keyring,/etc/ceph/ceph.keyring,/etc/ceph/keyring,/etc/ceph/keyring.bin,, disabling cephx
2024-04-02 17:21:10.549 7f1e2f5a6700 -1 auth: unable to find a keyring on /etc/ceph/ceph.client.admin.keyring,/etc/ceph/ceph.keyring,/etc/ceph/keyring,/etc/ceph/keyring.bin,: (2) No such file or directory
2024-04-02 17:21:10.549 7f1e2f5a6700 -1 AuthRegistry(0x7f1e280c82e8) no keyring found at /etc/ceph/ceph.client.admin.keyring,/etc/ceph/ceph.keyring,/etc/ceph/keyring,/etc/ceph/keyring.bin,, disabling cephx
2024-04-02 17:21:10.549 7f1e2f5a6700 -1 auth: unable to find a keyring on /etc/ceph/ceph.client.admin.keyring,/etc/ceph/ceph.keyring,/etc/ceph/keyring,/etc/ceph/keyring.bin,: (2) No such file or directory
2024-04-02 17:21:10.549 7f1e2f5a6700 -1 AuthRegistry(0x7f1e2f5a4e78) no keyring found at /etc/ceph/ceph.client.admin.keyring,/etc/ceph/ceph.keyring,/etc/ceph/keyring,/etc/ceph/keyring.bin,, disabling cephx
[errno 2] error connecting to the cluster
我们需要在 Ceph 集群中,需要运行ceph命令的节点上,以root用户的身份设定普通用户cephadm能够读取/etc/ceph/ceph.client.admin.keyring文件的权限

[cephadm@admin ceph-cluster]$ for i in {21..23}; do ssh cephadm@192.168.120.$i "sudo setfacl -m u:cephadm:r /etc/ceph/ceph.client.admin.keyring"; done

查看文件权限
[cephadm@admin ceph-cluster]$  {21..23}; do ssh cephadm@192.168.120.$i "echo -----$i-----;ls -l /etc/ceph/ceph.cl*"; done
-----21-----
-rw-r-----+ 1 root root 151 Apr  2 17:07 /etc/ceph/ceph.client.admin.keyring
-----22-----
-rw-r-----+ 1 root root 151 Apr  2 17:07 /etc/ceph/ceph.client.admin.keyring
-----23-----
-rw-r-----+ 1 root root 151 Apr  2 17:07 /etc/ceph/ceph.client.admin.keyring

查看文件的授权信息
[cephadm@admin ceph-cluster]$ for i in {21..23}; do ssh cephadm@192.168.120.$i "getfacl /etc/ceph/ceph.client.admin.keyring"; done
getfacl: Removing leading '/' from absolute path names
# file: etc/ceph/ceph.client.admin.keyring
# owner: root
# group: root
user::rw-
user:cephadm:r--
group::---
mask::r--
other::---

getfacl: Removing leading '/' from absolute path names
# file: etc/ceph/ceph.client.admin.keyring
# owner: root
# group: root
user::rw-
user:cephadm:r--
group::---
mask::r--
other::---

getfacl: Removing leading '/' from absolute path names
# file: etc/ceph/ceph.client.admin.keyring
# owner: root
# group: root
user::rw-
user:cephadm:r--
group::---
mask::r--
other::---
监控节点就可以自己来收集相关的数据了,比如我们在mon01上执行如下命令
[root@stor21 ceph]# su - cephadm
Last login: Tue Apr  2 17:21:08 CST 2024 on pts/0
[cephadm@mon01 ~]$ ceph -s
  cluster:
    id:     76cc0714-0bd7-43f7-b7c3-ec8cae2819e7
    health: HEALTH_WARN
            mons are allowing insecure global_id reclaim

  services:
    mon: 3 daemons, quorum mon01,mon02,mon03 (age 56m)
    mgr: no daemons active
    osd: 0 osds: 0 up, 0 in

  data:
    pools:   0 pools, 0 pgs
    objects: 0 objects, 0 B
    usage:   0 B used, 0 B / 0 B avail
    pgs:

结果显示:
	我们的cluster状态不是正常的
	对于service来说,有三个mon服务,选举的节点有三个,其他服务没有。
集群状态不正常的原因,我们可以通过 ceph health 命令来进行确认,效果如下:
[root@stor21 ~]# ceph health
HEALTH_WARN mons are allowing insecure global_id reclaim; clock skew detected on mon.mon02, mon.mon03
[root@stor21 ~]# ceph health detail
HEALTH_WARN mons are allowing insecure global_id reclaim; clock skew detected on mon.mon02, mon.mon03
AUTH_INSECURE_GLOBAL_ID_RECLAIM_ALLOWED mons are allowing insecure global_id reclaim
    mon.mon01 has auth_allow_insecure_global_id_reclaim set to true
    mon.mon02 has auth_allow_insecure_global_id_reclaim set to true
    mon.mon03 has auth_allow_insecure_global_id_reclaim set to true

结果显示:
	我们在所有的mon节点上进行提示属性的设定
ceph config set mon auth_allow_insecure_global_id_reclaim false

[root@stor21 ~]# ceph -s
  cluster:
    id:     76cc0714-0bd7-43f7-b7c3-ec8cae2819e7
    health: HEALTH_OK

  services:
    mon: 3 daemons, quorum mon01,mon02,mon03 (age 92m)
    mgr: no daemons active
    osd: 0 osds: 0 up, 0 in

  data:
    pools:   0 pools, 0 pgs
    objects: 0 objects, 0 B
    usage:   0 B used, 0 B / 0 B avail
    pgs:

结果显示:
	集群状态问题已经解决了
1.4.2 Mgr环境
需求
	ceph-mgr 工作的模式是事件驱动的,简单来说,就是等待事件,事件来了则处理事件返回结果,又继续等待。Ceph MGR 是 Ceph 12.2 依赖主推的功能之一,它负责 Ceph 集群管理的组件,它主要功能是把集群的一些指标暴露给外界使用。根据官方的架构原则上来说,mgr要两个节点来进行工作。
	对于我们的学习环境来说,其实一个就能够正常使用了,为了节省资源的使用,我们这里将mon01和mon02主机节点兼做MGR节点,为了后续的节点扩充实践,我们暂时先安装一个节点,后面再安装一个节点。
未部署MGR节点的集群状态效果
[cephadm@admin ceph-cluster]$ ssh mon01 ceph -s
  cluster:
    id:     76cc0714-0bd7-43f7-b7c3-ec8cae2819e7
    health: HEALTH_OK

  services:
    mon: 3 daemons, quorum mon01,mon02,mon03 (age 9m)
    mgr: no daemons active
    osd: 0 osds: 0 up, 0 in

  data:
    pools:   0 pools, 0 pgs
    objects: 0 objects, 0 B
    usage:   0 B used, 0 B / 0 B avail
    pgs:
mgr服务配置
配置Manager节点,启动ceph-mgr进程:
[cephadm@admin ceph-cluster]$ ceph-deploy mgr create mon01
[ceph_deploy.conf][DEBUG ] found configuration file at: /home/cephadm/.cephdeploy.conf
[ceph_deploy.cli][INFO  ] Invoked (2.0.1): /bin/ceph-deploy mgr create mon01
[ceph_deploy.cli][INFO  ] ceph-deploy options:
[ceph_deploy.cli][INFO  ]  username                      : None
[ceph_deploy.cli][INFO  ]  verbose                       : False
[ceph_deploy.cli][INFO  ]  mgr                           : [('mon01', 'mon01')]
[ceph_deploy.cli][INFO  ]  overwrite_conf                : False
[ceph_deploy.cli][INFO  ]  subcommand                    : create
[ceph_deploy.cli][INFO  ]  quiet                         : False
[ceph_deploy.cli][INFO  ]  cd_conf                       : <ceph_deploy.conf.cephdeploy.Conf instance at 0x10fccf8>
[ceph_deploy.cli][INFO  ]  cluster                       : ceph
[ceph_deploy.cli][INFO  ]  func                          : <function mgr at 0x1096410>
[ceph_deploy.cli][INFO  ]  ceph_conf                     : None
[ceph_deploy.cli][INFO  ]  default_release               : False
[ceph_deploy.mgr][DEBUG ] Deploying mgr, cluster ceph hosts mon01:mon01
[mon01][DEBUG ] connection detected need for sudo
[mon01][DEBUG ] connected to host: mon01
[mon01][DEBUG ] detect platform information from remote host
[mon01][DEBUG ] detect machine type
[ceph_deploy.mgr][INFO  ] Distro info: CentOS Linux 7.4.1708 Core
[ceph_deploy.mgr][DEBUG ] remote host will use systemd
[ceph_deploy.mgr][DEBUG ] deploying mgr bootstrap to mon01
[mon01][DEBUG ] write cluster configuration to /etc/ceph/{cluster}.conf
[mon01][WARNIN] mgr keyring does not exist yet, creating one
[mon01][DEBUG ] create a keyring file
[mon01][DEBUG ] create path recursively if it doesn't exist
[mon01][INFO  ] Running command: sudo ceph --cluster ceph --name client.bootstrap-mgr --keyring /var/lib/ceph/bootstrap-mgr/ceph.keyring auth get-or-create mgr.mon01 mon allow profile mgr osd allow * mds allow * -o /var/lib/ceph/mgr/ceph-mon01/keyring
[mon01][INFO  ] Running command: sudo systemctl enable ceph-mgr@mon01
[mon01][WARNIN] Created symlink from /etc/systemd/system/ceph-mgr.target.wants/ceph-mgr@mon01.service to /usr/lib/systemd/system/ceph-mgr@.service.
[mon01][INFO  ] Running command: sudo systemctl start ceph-mgr@mon01
[mon01][INFO  ] Running command: sudo systemctl enable ceph.target
在指定的mgr节点上,查看守护进程
[cephadm@admin ceph-cluster]$ ssh mon01 ps aux | grep -v grep | grep ceph-mgr
ceph        8649  6.2  6.1 1035684 125616 ?      Ssl  19:49   0:04 /usr/bin/ceph-mgr -f --cluster ceph --id mon01 --setuser ceph --setgroup ceph

结果显示:
	在 mon01 节点上,部署了一个mgr服务进程
查看集群服务的运行状态
[cephadm@admin ceph-cluster]$ ssh mon01 ceph -s
  cluster:
    id:     76cc0714-0bd7-43f7-b7c3-ec8cae2819e7
    health: HEALTH_WARN
            OSD count 0 < osd_pool_default_size 3

  services:
    mon: 3 daemons, quorum mon01,mon02,mon03 (age 13m)
    mgr: mon01(active, since 2m)
    osd: 0 osds: 0 up, 0 in

  data:
    pools:   0 pools, 0 pgs
    objects: 0 objects, 0 B
    usage:   0 B used, 0 B / 0 B avail
    pgs:

结果显示:
	这个时候,services上,多了一个mgr服务,在mon01节点上,服务状态时active。
admin查看状态
远程查看状态方式不太方便,我们可以在admin主机上进行一下操作来实现admin主机查看集群状态
sudo yum install -y ceph-common
ceph-deploy admin admin
sudo setfacl -m u:cephadm:rw /etc/ceph/ceph.client.admin.keyring

确认结果
[cephadm@admin ceph-cluster]$ ceph -s
  cluster:
    id:     76cc0714-0bd7-43f7-b7c3-ec8cae2819e7
    health: HEALTH_WARN
            OSD count 0 < osd_pool_default_size 3

  services:
    mon: 3 daemons, quorum mon01,mon02,mon03 (age 16m)
    mgr: mon01(active, since 5m)
    osd: 0 osds: 0 up, 0 in

  data:
    pools:   0 pools, 0 pgs
    objects: 0 objects, 0 B
    usage:   0 B used, 0 B / 0 B avail
    pgs:
1.4.3 小结
1.5 OSD环境
学习目标:这一节,我们从基本环境、OSD实践、小结三个方面来学习。
1.5.1 基本环境
简介
我们知道对于OSD来说,它进行真正数据的存储的引擎有两种:BlueStore和FileStore,自从 Ceph L版之后,默认都是 BlueStore 了。
基本流程
一般来说,我们可以通过一下四个步骤来设置OSD环境:
	1. 要知道对应的主机上有哪些磁盘可以提供给主机来进行正常的使用。
	2. 格式化磁盘(非必须)
	3. Ceph擦除磁盘上的数据
	4. 添加OSD
1 确保提供专属数据磁盘,然后进行格式化
根据我们的了解,我们为所有的节点主机都准备了两块额外的磁盘
fdisk -l
或者
lsblk
[root@admin ~]# lsblk
NAME            MAJ:MIN RM  SIZE RO TYPE MOUNTPOINT
sda               8:0    0   20G  0 disk
├─sda1            8:1    0    1G  0 part /boot
└─sda2            8:2    0   19G  0 part
  ├─centos-root 253:0    0   17G  0 lvm  /
  └─centos-swap 253:1    0    2G  0 lvm  [SWAP]
sdb               8:16   0   20G  0 disk
sdc               8:32   0   20G  0 disk
sr0              11:0    1  8.1G  0 rom
2 进行磁盘格式化
我们在所有的osd角色的主机上,进行磁盘的格式化操作,对所有的osd节点主机进行磁盘格式化。
mkfs.ext4 /dev/sdb
mkfs.ext4 /dev/sdc
查看磁盘格式化效果,以mon01为例
[root@mon01 ~]# blkid | egrep "sd[bc]"
/dev/sdb: UUID="f7d8e4f4-aed8-478e-9c94-a676658f2770" TYPE="ext4"
/dev/sdc: UUID="ab902de0-7acf-4f2c-8997-298139d3d29c" TYPE="ext4"
3 ceph擦除磁盘上的数据
保证所有包含OSD磁盘上主机上,安装Ceph的命令
yum install -y ceph-14.2.22 ceph-radosgw-14.2.22

检查并列出OSD节点上所有可用的磁盘的相关信息
切换到 cephadm用户
[root@admin ~]# su - cephadm
[cephadm@admin ceph-cluster]$ ceph-deploy disk list admin stor21 stor22 stor23 stor24 stor25 stor26
[ceph_deploy.conf][DEBUG ] found configuration file at: /home/cephadm/.cephdeploy.conf
[ceph_deploy.cli][INFO  ] Invoked (2.0.1): /bin/ceph-deploy disk list admin stor21 stor22 stor23 stor24 stor25 stor26
[ceph_deploy.cli][INFO  ] ceph-deploy options:
[ceph_deploy.cli][INFO  ]  username                      : None
[ceph_deploy.cli][INFO  ]  verbose                       : False
[ceph_deploy.cli][INFO  ]  debug                         : False
[ceph_deploy.cli][INFO  ]  overwrite_conf                : False
[ceph_deploy.cli][INFO  ]  subcommand                    : list
[ceph_deploy.cli][INFO  ]  quiet                         : False
[ceph_deploy.cli][INFO  ]  cd_conf                       : <ceph_deploy.conf.cephdeploy.Conf instance at 0x7f53753899e0>
[ceph_deploy.cli][INFO  ]  cluster                       : ceph
[ceph_deploy.cli][INFO  ]  host                          : ['admin', 'stor21', 'stor22', 'stor23', 'stor24', 'stor25', 'stor26']
[ceph_deploy.cli][INFO  ]  func                          : <function disk at 0x7f5375372c08>
[ceph_deploy.cli][INFO  ]  ceph_conf                     : None
[ceph_deploy.cli][INFO  ]  default_release               : False
[admin][DEBUG ] connection detected need for sudo
[admin][DEBUG ] connected to host: admin
[admin][DEBUG ] detect platform information from remote host
[admin][DEBUG ] detect machine type
[admin][DEBUG ] find the location of an executable
[admin][INFO  ] Running command: sudo fdisk -l
[admin][INFO  ] Disk /dev/sda: 21.5 GB, 21474836480 bytes, 41943040 sectors
[admin][INFO  ] Disk /dev/sdc: 21.5 GB, 21474836480 bytes, 41943040 sectors
[admin][INFO  ] Disk /dev/sdb: 21.5 GB, 21474836480 bytes, 41943040 sectors
[admin][INFO  ] Disk /dev/mapper/centos-root: 18.2 GB, 18249416704 bytes, 35643392 sectors
[admin][INFO  ] Disk /dev/mapper/centos-swap: 2147 MB, 2147483648 bytes, 4194304 sectors
[stor21][DEBUG ] connection detected need for sudo
[stor21][DEBUG ] connected to host: stor21
[stor21][DEBUG ] detect platform information from remote host
[stor21][DEBUG ] detect machine type
[stor21][DEBUG ] find the location of an executable
[stor21][INFO  ] Running command: sudo fdisk -l
[stor21][INFO  ] Disk /dev/sdb: 21.5 GB, 21474836480 bytes, 41943040 sectors
[stor21][INFO  ] Disk /dev/sda: 21.5 GB, 21474836480 bytes, 41943040 sectors
[stor21][INFO  ] Disk /dev/sdc: 21.5 GB, 21474836480 bytes, 41943040 sectors
[stor21][INFO  ] Disk /dev/mapper/centos-root: 18.2 GB, 18249416704 bytes, 35643392 sectors
[stor21][INFO  ] Disk /dev/mapper/centos-swap: 2147 MB, 2147483648 bytes, 4194304 sectors
[stor22][DEBUG ] connection detected need for sudo
[stor22][DEBUG ] connected to host: stor22
[stor22][DEBUG ] detect platform information from remote host
[stor22][DEBUG ] detect machine type
[stor22][DEBUG ] find the location of an executable
[stor22][INFO  ] Running command: sudo fdisk -l
[stor22][INFO  ] Disk /dev/sda: 21.5 GB, 21474836480 bytes, 41943040 sectors
[stor22][INFO  ] Disk /dev/sdb: 21.5 GB, 21474836480 bytes, 41943040 sectors
[stor22][INFO  ] Disk /dev/sdc: 21.5 GB, 21474836480 bytes, 41943040 sectors
[stor22][INFO  ] Disk /dev/mapper/centos-root: 18.2 GB, 18249416704 bytes, 35643392 sectors
[stor22][INFO  ] Disk /dev/mapper/centos-swap: 2147 MB, 2147483648 bytes, 4194304 sectors
[stor23][DEBUG ] connection detected need for sudo
[stor23][DEBUG ] connected to host: stor23
[stor23][DEBUG ] detect platform information from remote host
[stor23][DEBUG ] detect machine type
[stor23][DEBUG ] find the location of an executable
[stor23][INFO  ] Running command: sudo fdisk -l
[stor23][INFO  ] Disk /dev/sda: 21.5 GB, 21474836480 bytes, 41943040 sectors
[stor23][INFO  ] Disk /dev/sdb: 21.5 GB, 21474836480 bytes, 41943040 sectors
[stor23][INFO  ] Disk /dev/sdc: 21.5 GB, 21474836480 bytes, 41943040 sectors
[stor23][INFO  ] Disk /dev/mapper/centos-root: 18.2 GB, 18249416704 bytes, 35643392 sectors
[stor23][INFO  ] Disk /dev/mapper/centos-swap: 2147 MB, 2147483648 bytes, 4194304 sectors
[stor24][DEBUG ] connection detected need for sudo
[stor24][DEBUG ] connected to host: stor24
[stor24][DEBUG ] detect platform information from remote host
[stor24][DEBUG ] detect machine type
[stor24][DEBUG ] find the location of an executable
[stor24][INFO  ] Running command: sudo fdisk -l
[stor24][INFO  ] Disk /dev/sda: 21.5 GB, 21474836480 bytes, 41943040 sectors
[stor24][INFO  ] Disk /dev/sdb: 21.5 GB, 21474836480 bytes, 41943040 sectors
[stor24][INFO  ] Disk /dev/sdc: 21.5 GB, 21474836480 bytes, 41943040 sectors
[stor24][INFO  ] Disk /dev/mapper/centos-root: 18.2 GB, 18249416704 bytes, 35643392 sectors
[stor24][INFO  ] Disk /dev/mapper/centos-swap: 2147 MB, 2147483648 bytes, 4194304 sectors
[stor25][DEBUG ] connection detected need for sudo
[stor25][DEBUG ] connected to host: stor25
[stor25][DEBUG ] detect platform information from remote host
[stor25][DEBUG ] detect machine type
[stor25][DEBUG ] find the location of an executable
[stor25][INFO  ] Running command: sudo fdisk -l
[stor25][INFO  ] Disk /dev/sda: 21.5 GB, 21474836480 bytes, 41943040 sectors
[stor25][INFO  ] Disk /dev/sdc: 21.5 GB, 21474836480 bytes, 41943040 sectors
[stor25][INFO  ] Disk /dev/sdb: 21.5 GB, 21474836480 bytes, 41943040 sectors
[stor25][INFO  ] Disk /dev/mapper/centos-root: 18.2 GB, 18249416704 bytes, 35643392 sectors
[stor25][INFO  ] Disk /dev/mapper/centos-swap: 2147 MB, 2147483648 bytes, 4194304 sectors
[stor26][DEBUG ] connection detected need for sudo
[stor26][DEBUG ] connected to host: stor26
[stor26][DEBUG ] detect platform information from remote host
[stor26][DEBUG ] detect machine type
[stor26][DEBUG ] find the location of an executable
[stor26][INFO  ] Running command: sudo fdisk -l
[stor26][INFO  ] Disk /dev/sda: 21.5 GB, 21474836480 bytes, 41943040 sectors
[stor26][INFO  ] Disk /dev/sdb: 21.5 GB, 21474836480 bytes, 41943040 sectors
[stor26][INFO  ] Disk /dev/sdc: 21.5 GB, 21474836480 bytes, 41943040 sectors
[stor26][INFO  ] Disk /dev/mapper/centos-root: 18.2 GB, 18249416704 bytes, 35643392 sectors
[stor26][INFO  ] Disk /dev/mapper/centos-swap: 2147 MB, 2147483648 bytes, 4194304 sectors
在admin管理节点上使用ceph-deploy命令擦除计划专用于OSD磁盘上的所有分区表和数据以便用于部署OSD
for i in {1..6}; do ceph-deploy disk zap stor2$i /dev/sdb /dev/sdc; done

单独对admin节点磁盘做清除操作
[cephadm@admin ceph-cluster]$ ceph-deploy disk zap admin /dev/sdb /dev/sdc
[cephadm@admin ceph-cluster]$ for i in {1..6}; do ceph-deploy disk zap stor2$i /dev/sdb /dev/sdc; done
...
[ceph_deploy.osd][DEBUG ] zapping /dev/sdb on stor21
[stor21][DEBUG ] connection detected need for sudo
[stor21][DEBUG ] connected to host: stor21
...
[stor21][WARNIN]  stderr: 10+0 records in			# 记录了 10+0 的写入
[stor21][WARNIN] 10+0 records out					# 记录了 10+0 的写出
[stor21][WARNIN] 10485760 bytes (10 MB) copied		# 10485760 字节 (10 MB)已复制
[stor21][WARNIN]  stderr: , 0.0468455 s, 224 MB/s	# 0.0468455 秒, 224 MB/秒
[stor21][WARNIN] --> Zapping successful for: <Raw Device: /dev/sdb>
...
[stor21][WARNIN]  stderr: 10+0 records in
[stor21][WARNIN] 10+0 records out
[stor21][WARNIN] 10485760 bytes (10 MB) copied
[stor21][WARNIN]  stderr: , 0.06139 s, 171 MB/s
[stor21][WARNIN] --> Zapping successful for: <Raw Device: /dev/sdc>
......
[stor22][WARNIN] --> Zapping successful for: <Raw Device: /dev/sdb>
......
[stor22][WARNIN] --> Zapping successful for: <Raw Device: /dev/sdc>
......
[stor23][WARNIN] --> Zapping successful for: <Raw Device: /dev/sdb>
......
[stor23][WARNIN] --> Zapping successful for: <Raw Device: /dev/sdc>
......
[stor24][WARNIN] --> Zapping successful for: <Raw Device: /dev/sdb>
......
[stor24][WARNIN] --> Zapping successful for: <Raw Device: /dev/sdc>
......
[stor25][WARNIN] --> Zapping successful for: <Raw Device: /dev/sdb>
......
[stor25][WARNIN] --> Zapping successful for: <Raw Device: /dev/sdc>
......
[stor26][WARNIN] --> Zapping successful for: <Raw Device: /dev/sdb>
......
[stor26][WARNIN] --> Zapping successful for: <Raw Device: /dev/sdc>
1.5.2 OSD实践
命令解析
对于OSD的相关操作,可以通过 ceph-deploy osd 命令来进行,帮助信息如下:
[cephadm@admin ceph-cluster]$ ceph-deploy osd --help
usage: ceph-deploy osd [-h] {list,create} ...

Create OSDs from a data disk on a remote host:

    ceph-deploy osd create {node} --data /path/to/device

For bluestore, optional devices can be used::

    ceph-deploy osd create {node} --data /path/to/data --block-db /path/to/db-device
    ceph-deploy osd create {node} --data /path/to/data --block-wal /path/to/wal-device
    ceph-deploy osd create {node} --data /path/to/data --block-db /path/to/db-device --block-wal /path/to/wal-device

For filestore, the journal must be specified, as well as the objectstore::

    ceph-deploy osd create {node} --filestore --data /path/to/data --journal /path/to/journal

For data devices, it can be an existing logical volume in the format of:
vg/lv, or a device. For other OSD components like wal, db, and journal, it
can be logical volume (in vg/lv format) or it must be a GPT partition.

positional arguments:
  {list,create}
    list         List OSD info from remote host(s)
    create       Create new Ceph OSD daemon by preparing and activating a
                 device

optional arguments:
  -h, --help     show this help message and exit
帮助显示:这里提示了两类的存储机制
	对于BlueStore来说哦,它主要包含三类数据:
		--data /path/to/data				ceph 保存的对象数据
		--block-db /path/to/db-device		ceph 保存的对象数据
		--block-wal /path/to/wal-device		数据库的 wal 日志
	对于FileStore来说,它主要包括两类数据:
		--data /path/to/data				ceph 的文件数据
		--journal /path/to/journal			文件系统日志数据
	对于OSD来说,它主要有两个动作:
		list		列出OSD相关的信息
		create		创建OSD设备
添加OSD命令解读
对于OSD的创建来说,我们来看一下他的基本格式
[cephadm@admin ceph-cluster]$ ceph-deploy osd create --help
usage: ceph-deploy osd create [-h] [--data DATA] [--journal JOURNAL]
                              [--zap-disk] [--fs-type FS_TYPE] [--dmcrypt]
                              [--dmcrypt-key-dir KEYDIR] [--filestore]
                              [--bluestore] [--block-db BLOCK_DB]
                              [--block-wal BLOCK_WAL] [--debug]
                              [HOST]

positional arguments:
  HOST                  Remote host to connect

optional arguments:
  -h, --help            show this help message and exit
  --data DATA           The OSD data logical volume (vg/lv) or absolute path
                        to device
  --journal JOURNAL     Logical Volume (vg/lv) or path to GPT partition
  --zap-disk            DEPRECATED - cannot zap when creating an OSD
  --fs-type FS_TYPE     filesystem to use to format DEVICE (xfs, btrfs)
  --dmcrypt             use dm-crypt on DEVICE
  --dmcrypt-key-dir KEYDIR
                        directory where dm-crypt keys are stored
  --filestore           filestore objectstore
  --bluestore           bluestore objectstore
  --block-db BLOCK_DB   bluestore block.db path
  --block-wal BLOCK_WAL
                        bluestore block.wal path
  --debug               Enable debug mode on remote ceph-volume calls

结果显示:
	对于OSD的创建,默认情况下用的就是BlueStore类型
添加OSD
创建OSD,我们这里全部用于存储数据
ceph-deploy --overwrite-conf osd create stor21 --data /dev/sdb
ceph-deploy --overwrite-conf osd create stor21 --data /dev/sdc

注意:
	这里只能一个磁盘一个磁盘的添加
查看效果
[cephadm@admin ceph-cluster]$ ceph-deploy --overwrite-conf osd create stor21 --data /dev/sdb
[ceph_deploy.conf][DEBUG ] found configuration file at: /home/cephadm/.cephdeploy.conf
[ceph_deploy.cli][INFO  ] Invoked (2.0.1): /bin/ceph-deploy --overwrite-conf osd create stor21 --data /dev/sdb
[ceph_deploy.cli][INFO  ] ceph-deploy options:
[ceph_deploy.cli][INFO  ]  verbose                       : False
[ceph_deploy.cli][INFO  ]  bluestore                     : None
[ceph_deploy.cli][INFO  ]  cd_conf                       : <ceph_deploy.conf.cephdeploy.Conf instance at 0x136bb00>
[ceph_deploy.cli][INFO  ]  cluster                       : ceph
[ceph_deploy.cli][INFO  ]  fs_type                       : xfs
[ceph_deploy.cli][INFO  ]  block_wal                     : None
[ceph_deploy.cli][INFO  ]  default_release               : False
[ceph_deploy.cli][INFO  ]  username                      : None
[ceph_deploy.cli][INFO  ]  journal                       : None
[ceph_deploy.cli][INFO  ]  subcommand                    : create
[ceph_deploy.cli][INFO  ]  host                          : stor21
[ceph_deploy.cli][INFO  ]  filestore                     : None
[ceph_deploy.cli][INFO  ]  func                          : <function osd at 0x1352b90>
[ceph_deploy.cli][INFO  ]  ceph_conf                     : None
[ceph_deploy.cli][INFO  ]  zap_disk                      : False
[ceph_deploy.cli][INFO  ]  data                          : /dev/sdb
[ceph_deploy.cli][INFO  ]  block_db                      : None
[ceph_deploy.cli][INFO  ]  dmcrypt                       : False
[ceph_deploy.cli][INFO  ]  overwrite_conf                : True
[ceph_deploy.cli][INFO  ]  dmcrypt_key_dir               : /etc/ceph/dmcrypt-keys
[ceph_deploy.cli][INFO  ]  quiet                         : False
[ceph_deploy.cli][INFO  ]  debug                         : False
[ceph_deploy.osd][DEBUG ] Creating OSD on cluster ceph with data device /dev/sdb
[stor21][DEBUG ] connection detected need for sudo
[stor21][DEBUG ] connected to host: stor21
[stor21][DEBUG ] detect platform information from remote host
[stor21][DEBUG ] detect machine type
[stor21][DEBUG ] find the location of an executable
[ceph_deploy.osd][INFO  ] Distro info: CentOS Linux 7.4.1708 Core
[ceph_deploy.osd][DEBUG ] Deploying osd to stor21
[stor21][DEBUG ] write cluster configuration to /etc/ceph/{cluster}.conf
[stor21][WARNIN] osd keyring does not exist yet, creating one
[stor21][DEBUG ] create a keyring file
[stor21][DEBUG ] find the location of an executable
[stor21][INFO  ] Running command: sudo /usr/sbin/ceph-volume --cluster ceph lvm create --bluestore --data /dev/sdb
[stor21][WARNIN] Running command: /bin/ceph-authtool --gen-print-key
[stor21][WARNIN] Running command: /bin/ceph --cluster ceph --name client.bootstrap-osd --keyring /var/lib/ceph/bootstrap-osd/ceph.keyring -i - osd new da8f1936-14c5-4966-92bb-3c096b2fea69
[stor21][WARNIN] Running command: /sbin/vgcreate --force --yes ceph-45d209f9-43bb-4ef2-8ee8-eb801460fd4c /dev/sdb
[stor21][WARNIN]  stdout: Physical volume "/dev/sdb" successfully created.
[stor21][WARNIN]  stdout: Volume group "ceph-45d209f9-43bb-4ef2-8ee8-eb801460fd4c" successfully created
[stor21][WARNIN] Running command: /sbin/lvcreate --yes -l 5119 -n osd-block-da8f1936-14c5-4966-92bb-3c096b2fea69 ceph-45d209f9-43bb-4ef2-8ee8-eb801460fd4c
[stor21][WARNIN]  stdout: Logical volume "osd-block-da8f1936-14c5-4966-92bb-3c096b2fea69" created.
[stor21][WARNIN] Running command: /bin/ceph-authtool --gen-print-key
[stor21][WARNIN] Running command: /bin/mount -t tmpfs tmpfs /var/lib/ceph/osd/ceph-0
[stor21][WARNIN] Running command: /sbin/restorecon /var/lib/ceph/osd/ceph-0
[stor21][WARNIN] Running command: /bin/chown -h ceph:ceph /dev/ceph-45d209f9-43bb-4ef2-8ee8-eb801460fd4c/osd-block-da8f1936-14c5-4966-92bb-3c096b2fea69
[stor21][WARNIN] Running command: /bin/chown -R ceph:ceph /dev/dm-2
[stor21][WARNIN] Running command: /bin/ln -s /dev/ceph-45d209f9-43bb-4ef2-8ee8-eb801460fd4c/osd-block-da8f1936-14c5-4966-92bb-3c096b2fea69 /var/lib/ceph/osd/ceph-0/block
[stor21][WARNIN] Running command: /bin/ceph --cluster ceph --name client.bootstrap-osd --keyring /var/lib/ceph/bootstrap-osd/ceph.keyring mon getmap -o /var/lib/ceph/osd/ceph-0/activate.monmap
[stor21][WARNIN]  stderr: 2024-04-09 15:29:23.751 7f1a06565700 -1 auth: unable to find a keyring on /etc/ceph/ceph.client.bootstrap-osd.keyring,/etc/ceph/ceph.keyring,/etc/ceph/keyring,/etc/ceph/keyring.bin,: (2) No such file or directory
[stor21][WARNIN] 2024-04-09 15:29:23.751 7f1a06565700 -1 AuthRegistry(0x7f1a00066aa8) no keyring found at /etc/ceph/ceph.client.bootstrap-osd.keyring,/etc/ceph/ceph.keyring,/etc/ceph/keyring,/etc/ceph/keyring.bin,, disabling cephx
[stor21][WARNIN]  stderr: got monmap epoch 1
[stor21][WARNIN] Running command: /bin/ceph-authtool /var/lib/ceph/osd/ceph-0/keyring --create-keyring --name osd.0 --add-key AQBS7hRmxzawNxAAEJ/F25VOB7jIUyBpoqpprg==
[stor21][WARNIN]  stdout: creating /var/lib/ceph/osd/ceph-0/keyring
[stor21][WARNIN] added entity osd.0 auth(key=AQBS7hRmxzawNxAAEJ/F25VOB7jIUyBpoqpprg==)
[stor21][WARNIN] Running command: /bin/chown -R ceph:ceph /var/lib/ceph/osd/ceph-0/keyring
[stor21][WARNIN] Running command: /bin/chown -R ceph:ceph /var/lib/ceph/osd/ceph-0/
[stor21][WARNIN] Running command: /bin/ceph-osd --cluster ceph --osd-objectstore bluestore --mkfs -i 0 --monmap /var/lib/ceph/osd/ceph-0/activate.monmap --keyfile - --osd-data /var/lib/ceph/osd/ceph-0/ --osd-uuid da8f1936-14c5-4966-92bb-3c096b2fea69 --setuser ceph --setgroup ceph
[stor21][WARNIN]  stderr: 2024-04-09 15:29:24.281 7ffa87441a80 -1 bluestore(/var/lib/ceph/osd/ceph-0/) _read_fsid unparsable uuid
[stor21][WARNIN] --> ceph-volume lvm prepare successful for: /dev/sdb
[stor21][WARNIN] Running command: /bin/chown -R ceph:ceph /var/lib/ceph/osd/ceph-0
[stor21][WARNIN] Running command: /bin/ceph-bluestore-tool --cluster=ceph prime-osd-dir --dev /dev/ceph-45d209f9-43bb-4ef2-8ee8-eb801460fd4c/osd-block-da8f1936-14c5-4966-92bb-3c096b2fea69 --path /var/lib/ceph/osd/ceph-0 --no-mon-config
[stor21][WARNIN] Running command: /bin/ln -snf /dev/ceph-45d209f9-43bb-4ef2-8ee8-eb801460fd4c/osd-block-da8f1936-14c5-4966-92bb-3c096b2fea69 /var/lib/ceph/osd/ceph-0/block
[stor21][WARNIN] Running command: /bin/chown -h ceph:ceph /var/lib/ceph/osd/ceph-0/block
[stor21][WARNIN] Running command: /bin/chown -R ceph:ceph /dev/dm-2
[stor21][WARNIN] Running command: /bin/chown -R ceph:ceph /var/lib/ceph/osd/ceph-0
[stor21][WARNIN] Running command: /bin/systemctl enable ceph-volume@lvm-0-da8f1936-14c5-4966-92bb-3c096b2fea69
[stor21][WARNIN]  stderr: Created symlink from /etc/systemd/system/multi-user.target.wants/ceph-volume@lvm-0-da8f1936-14c5-4966-92bb-3c096b2fea69.service to /usr/lib/systemd/system/ceph-volume@.service.
[stor21][WARNIN] Running command: /bin/systemctl enable --runtime ceph-osd@0
[stor21][WARNIN]  stderr: Created symlink from /run/systemd/system/ceph-osd.target.wants/ceph-osd@0.service to /usr/lib/systemd/system/ceph-osd@.service.
[stor21][WARNIN] Running command: /bin/systemctl start ceph-osd@0
[stor21][WARNIN] --> ceph-volume lvm activate successful for osd ID: 0
[stor21][WARNIN] --> ceph-volume lvm create successful for: /dev/sdb
[stor21][INFO  ] checking OSD status...
[stor21][DEBUG ] find the location of an executable
[stor21][INFO  ] Running command: sudo /bin/ceph --cluster=ceph osd stat --format=json
[ceph_deploy.osd][DEBUG ] Host stor21 is now ready for osd use.
查看命令执行后Ceph集群的状态
[cephadm@admin ceph-cluster]$ ceph -s
  cluster:
    id:     76cc0714-0bd7-43f7-b7c3-ec8cae2819e7
    health: HEALTH_WARN
            OSD count 2 < osd_pool_default_size 3

  services:
    mon: 3 daemons, quorum mon01,mon02,mon03 (age 63m)
    mgr: mon01(active, since 103m)
    osd: 2 osds: 2 up (since 119s), 2 in (since 119s)

  data:
    pools:   0 pools, 0 pgs
    objects: 0 objects, 0 B
    usage:   2.0 GiB used, 38 GiB / 40 GiB avail
    pgs:

结果显示:
	在services模块多了OSD的信息,有两个OSD是up状态,而且都加入到了集群中。
接下来,我们通过批量操作的方式,将其他节点主机的磁盘都创建OSD
for i in 2 3
do
  ceph-deploy --overwrite-conf osd create stor2$i --data /dev/sdb
  ceph-deploy --overwrite-conf osd create stor2$i --data /dev/sdc
done

再次查看集群状态
[cephadm@admin ceph-cluster]$ ceph -s
  cluster:
    id:     76cc0714-0bd7-43f7-b7c3-ec8cae2819e7
    health: HEALTH_OK

  services:
    mon: 3 daemons, quorum mon01,mon02,mon03 (age 67m)
    mgr: mon01(active, since 107m)
    osd: 6 osds: 6 up (since 13s), 6 in (since 13s)

  data:
    pools:   0 pools, 0 pgs
    objects: 0 objects, 0 B
    usage:   6.0 GiB used, 114 GiB / 120 GiB avail
    pgs:

结果显示:
	OSD的磁盘数量达到了6个,都是处于up的状态。
	对于Ceph集群的数据容量来说,一共有120GiB的磁盘空间可以使用
查看节点磁盘状态
[cephadm@admin ceph-cluster]$ ceph-deploy osd list stor21
[ceph_deploy.conf][DEBUG ] found configuration file at: /home/cephadm/.cephdeploy.conf
[ceph_deploy.cli][INFO  ] Invoked (2.0.1): /bin/ceph-deploy osd list stor21
[ceph_deploy.cli][INFO  ] ceph-deploy options:
[ceph_deploy.cli][INFO  ]  username                      : None
[ceph_deploy.cli][INFO  ]  verbose                       : False
[ceph_deploy.cli][INFO  ]  debug                         : False
[ceph_deploy.cli][INFO  ]  overwrite_conf                : False
[ceph_deploy.cli][INFO  ]  subcommand                    : list
[ceph_deploy.cli][INFO  ]  quiet                         : False
[ceph_deploy.cli][INFO  ]  cd_conf                       : <ceph_deploy.conf.cephdeploy.Conf instance at 0x1738b00>
[ceph_deploy.cli][INFO  ]  cluster                       : ceph
[ceph_deploy.cli][INFO  ]  host                          : ['stor21']
[ceph_deploy.cli][INFO  ]  func                          : <function osd at 0x171fb90>
[ceph_deploy.cli][INFO  ]  ceph_conf                     : None
[ceph_deploy.cli][INFO  ]  default_release               : False
[stor21][DEBUG ] connection detected need for sudo
[stor21][DEBUG ] connected to host: stor21
[stor21][DEBUG ] detect platform information from remote host
[stor21][DEBUG ] detect machine type
[stor21][DEBUG ] find the location of an executable
[ceph_deploy.osd][INFO  ] Distro info: CentOS Linux 7.4.1708 Core
[ceph_deploy.osd][DEBUG ] Listing disks on stor21...
[stor21][DEBUG ] find the location of an executable
[stor21][INFO  ] Running command: sudo /usr/sbin/ceph-volume lvm list
[stor21][DEBUG ]
[stor21][DEBUG ]
[stor21][DEBUG ] ====== osd.0 =======
[stor21][DEBUG ]
[stor21][DEBUG ]   [block]       /dev/ceph-45d209f9-43bb-4ef2-8ee8-eb801460fd4c/osd-block-da8f1936-14c5-4966-92bb-3c096b2fea69
[stor21][DEBUG ]
[stor21][DEBUG ]       block device              /dev/ceph-45d209f9-43bb-4ef2-8ee8-eb801460fd4c/osd-block-da8f1936-14c5-4966-92bb-3c096b2fea69
[stor21][DEBUG ]       block uuid                ncSQir-glU8-eMd6-lLFN-fCvU-nrQJ-uXmNtX
[stor21][DEBUG ]       cephx lockbox secret
[stor21][DEBUG ]       cluster fsid              76cc0714-0bd7-43f7-b7c3-ec8cae2819e7
[stor21][DEBUG ]       cluster name              ceph
[stor21][DEBUG ]       crush device class        None
[stor21][DEBUG ]       encrypted                 0
[stor21][DEBUG ]       osd fsid                  da8f1936-14c5-4966-92bb-3c096b2fea69
[stor21][DEBUG ]       osd id                    0
[stor21][DEBUG ]       osdspec affinity
[stor21][DEBUG ]       type                      block
[stor21][DEBUG ]       vdo                       0
[stor21][DEBUG ]       devices                   /dev/sdb
[stor21][DEBUG ]
[stor21][DEBUG ] ====== osd.1 =======
[stor21][DEBUG ]
[stor21][DEBUG ]   [block]       /dev/ceph-d3acb7b6-2975-4f1e-8340-2e4a9863399b/osd-block-537b5864-3bd9-424c-a96d-dc331247926f
[stor21][DEBUG ]
[stor21][DEBUG ]       block device              /dev/ceph-d3acb7b6-2975-4f1e-8340-2e4a9863399b/osd-block-537b5864-3bd9-424c-a96d-dc331247926f
[stor21][DEBUG ]       block uuid                YNARMa-CkEE-n7rM-KV3t-fwD8-3vvZ-4wIn7j
[stor21][DEBUG ]       cephx lockbox secret
[stor21][DEBUG ]       cluster fsid              76cc0714-0bd7-43f7-b7c3-ec8cae2819e7
[stor21][DEBUG ]       cluster name              ceph
[stor21][DEBUG ]       crush device class        None
[stor21][DEBUG ]       encrypted                 0
[stor21][DEBUG ]       osd fsid                  537b5864-3bd9-424c-a96d-dc331247926f
[stor21][DEBUG ]       osd id                    1
[stor21][DEBUG ]       osdspec affinity
[stor21][DEBUG ]       type                      block
[stor21][DEBUG ]       vdo                       0
[stor21][DEBUG ]       devices                   /dev/sdc
OSD的磁盘状态查看
对于OSD来说,它还有一个专门用于OSD管理的命令Ceph,相关的帮助信息如下:
ceph osd --help
帮助解析:
	这里有几个是与OSD信息查看相关的
	ls		查看所有OSD的id值
	dump	查看OSD的概述性信息
	status	查看OSD的详细的状态信息
	stat	查看OSD的精简的概述性信息
查看所有OSD的id值
[cephadm@admin ceph-cluster]$ ceph osd ls
0
1
2
3
4
5
查看OSD的概述性信息
[cephadm@admin ceph-cluster]$ ceph osd dump
epoch 25
fsid 76cc0714-0bd7-43f7-b7c3-ec8cae2819e7
created 2024-04-02 16:31:10.020077
modified 2024-04-09 15:35:45.949951
flags sortbitwise,recovery_deletes,purged_snapdirs,pglog_hardlimit
crush_version 13
full_ratio 0.95
backfillfull_ratio 0.9
nearfull_ratio 0.85
require_min_compat_client jewel
min_compat_client jewel
require_osd_release nautilus
max_osd 6
osd.0 up   in  weight 1 up_from 5 up_thru 0 down_at 0 last_clean_interval [0,0) [v2:192.168.120.21:6802/3725,v1:192.168.120.21:6803/3725] [v2:192.168.8.21:6800/3725,v1:192.168.8.21:6801/3725] exists,up da8f1936-14c5-4966-92bb-3c096b2fea69
osd.1 up   in  weight 1 up_from 9 up_thru 0 down_at 0 last_clean_interval [0,0) [v2:192.168.120.21:6806/4207,v1:192.168.120.21:6807/4207] [v2:192.168.8.21:6804/4207,v1:192.168.8.21:6805/4207] exists,up 537b5864-3bd9-424c-a96d-dc331247926f
osd.2 up   in  weight 1 up_from 13 up_thru 0 down_at 0 last_clean_interval [0,0) [v2:192.168.120.22:6800/3621,v1:192.168.120.22:6801/3621] [v2:192.168.8.22:6800/3621,v1:192.168.8.22:6801/3621] exists,up 2e1150a8-ac88-49d2-95d7-9eee28e89db7
osd.3 up   in  weight 1 up_from 17 up_thru 0 down_at 0 last_clean_interval [0,0) [v2:192.168.120.22:6804/4100,v1:192.168.120.22:6805/4100] [v2:192.168.8.22:6804/4100,v1:192.168.8.22:6805/4100] exists,up e7ce3fb8-39bd-4916-939f-f8bc815e236c
osd.4 up   in  weight 1 up_from 21 up_thru 0 down_at 0 last_clean_interval [0,0) [v2:192.168.120.23:6800/3592,v1:192.168.120.23:6801/3592] [v2:192.168.8.23:6800/3592,v1:192.168.8.23:6801/3592] exists,up 6bda5a2c-bf96-4f87-96b0-23d3cc6e5d1d
osd.5 up   in  weight 1 up_from 25 up_thru 0 down_at 0 last_clean_interval [0,0) [v2:192.168.120.23:6804/4074,v1:192.168.120.23:6805/4074] [v2:192.168.8.23:6804/4074,v1:192.168.8.23:6805/4074] exists,up 9e555c23-6f99-4d1b-a2ad-7ff4fb012bad
查看OSD的精简概述性信息
[cephadm@admin ceph-cluster]$ ceph osd stat
6 osds: 6 up (since 6m), 6 in (since 6m); epoch: e25
1.5.3 小结
1.6 OSD操作
学习目标:这一节,我们从基本实践、进阶实践、小结三个方面来学习。
1.6.1 基本实践
简介
OSD全程Object Storage Device,负责响应客户端请求返回具体数据的进程。一个Ceph集群中,有专门的OSD角色主机,在这个主机中一般有很多个OSD设备。
对于OSD来说,它还有一个专门用于OSD管理的命令Ceph,相关的帮助信息如下:
	ceph osd --help
帮助解析:
	这里面有几个是与OSD信息查看相关的
	ls		查看所有OSD的id值
	dump	查看OSD的概述性信息
	status	查看OSD的详细的状态信息
	stat	查看OSD的精简的概述性信息
	tree	查看OSD在主机上的分布信息
	perf	查看OSD磁盘的延迟统计信息
	df		查看OSD磁盘的使用率信息
命令查看
查看所有OSD的id值
[cephadm@admin ceph-cluster]$ ceph osd ls
0
1
2
3
4
5
查看OSD的数据映射信息
[cephadm@admin ceph-cluster]$ ceph osd dump
epoch 25
......
max_osd 6
osd.0 up   in  weight 1 up_from 5 up_thru 0 down_at 0 last_clean_interval [0,0) [v2:192.168.120.21:6802/3725,v1:192.168.120.21:6803/3725] [v2:192.168.8.21:6800/3725,v1:192.168.8.21:6801/3725] exists,up da8f1936-14c5-4966-92bb-3c096b2fea69
osd.1 up   in  weight 1 up_from 9 up_thru 0 down_at 0 last_clean_interval [0,0) [v2:192.168.120.21:6806/4207,v1:192.168.120.21:6807/4207] [v2:192.168.8.21:6804/4207,v1:192.168.8.21:6805/4207] exists,up 537b5864-3bd9-424c-a96d-dc331247926f
osd.2 up   in  weight 1 up_from 13 up_thru 0 down_at 0 last_clean_interval [0,0) [v2:192.168.120.22:6800/3621,v1:192.168.120.22:6801/3621] [v2:192.168.8.22:6800/3621,v1:192.168.8.22:6801/3621] exists,up 2e1150a8-ac88-49d2-95d7-9eee28e89db7
osd.3 up   in  weight 1 up_from 17 up_thru 0 down_at 0 last_clean_interval [0,0) [v2:192.168.120.22:6804/4100,v1:192.168.120.22:6805/4100] [v2:192.168.8.22:6804/4100,v1:192.168.8.22:6805/4100] exists,up e7ce3fb8-39bd-4916-939f-f8bc815e236c
osd.4 up   in  weight 1 up_from 21 up_thru 0 down_at 0 last_clean_interval [0,0) [v2:192.168.120.23:6800/3592,v1:192.168.120.23:6801/3592] [v2:192.168.8.23:6800/3592,v1:192.168.8.23:6801/3592] exists,up 6bda5a2c-bf96-4f87-96b0-23d3cc6e5d1d
osd.5 up   in  weight 1 up_from 25 up_thru 0 down_at 0 last_clean_interval [0,0) [v2:192.168.120.23:6804/4074,v1:192.168.120.23:6805/4074] [v2:192.168.8.23:6804/4074,v1:192.168.8.23:6805/4074] exists,up 9e555c23-6f99-4d1b-a2ad-7ff4fb012bad

查看指定OSD节点的信息
[cephadm@admin ceph-cluster]$ ceph osd dump 3
epoch 3
fsid 76cc0714-0bd7-43f7-b7c3-ec8cae2819e7
......
osd.0 down out weight 0 up_from 0 up_thru 0 down_at 0 last_clean_interval [0,0)   exists,new da8f1936-14c5-4966-92bb-3c096b2fea69
查看OSD的精简的概述性信息
[cephadm@admin ceph-cluster]$ ceph osd stat
6 osds: 6 up (since 102m), 6 in (since 102m); epoch: e25

状态解析:
	OSD节点数量(osds)
	集群内(in)、集群外(out)
	运行(up)、不再运行(down)
	OSD的每一次状态变更的历史信息(epoch)
查看OSD的详细的状态信息
[cephadm@admin ceph-cluster]$ ceph osd status
+----+-------+-------+-------+--------+---------+--------+---------+-----------+
| id |  host |  used | avail | wr ops | wr data | rd ops | rd data |   state   |
+----+-------+-------+-------+--------+---------+--------+---------+-----------+
| 0  | mon01 | 1027M | 18.9G |    0   |     0   |    0   |     0   | exists,up |
| 1  | mon01 | 1027M | 18.9G |    0   |     0   |    0   |     0   | exists,up |
| 2  | mon02 | 1027M | 18.9G |    0   |     0   |    0   |     0   | exists,up |
| 3  | mon02 | 1027M | 18.9G |    0   |     0   |    0   |     0   | exists,up |
| 4  | mon03 | 1027M | 18.9G |    0   |     0   |    0   |     0   | exists,up |
| 5  | mon03 | 1027M | 18.9G |    0   |     0   |    0   |     0   | exists,up |
+----+-------+-------+-------+--------+---------+--------+---------+-----------+
查看OSD在各个主机上的分布情况
[cephadm@admin ceph-cluster]$ ceph osd tree
ID CLASS WEIGHT  TYPE NAME      STATUS REWEIGHT PRI-AFF
-1       0.11691 root default
-3       0.03897     host mon01
 0   hdd 0.01949         osd.0      up  1.00000 1.00000
 1   hdd 0.01949         osd.1      up  1.00000 1.00000
-5       0.03897     host mon02
 2   hdd 0.01949         osd.2      up  1.00000 1.00000
 3   hdd 0.01949         osd.3      up  1.00000 1.00000
-7       0.03897     host mon03
 4   hdd 0.01949         osd.4      up  1.00000 1.00000
 5   hdd 0.01949         osd.5      up  1.00000 1.00000
查看OSD磁盘的延迟统计信息
[cephadm@admin ceph-cluster]$ ceph osd perf
osd commit_latency(ms) apply_latency(ms)
  5                  0                 0
  4                  0                 0
  0                  0                 0
  1                  0                 0
  2                  0                 0
  3                  0                 0

结果显示:
	主要解决单块磁盘问题,如果有问题及时剔除OSD。统计的是平均值
	commit_latency	表示从接收请求到设置commit状态的时间间隔
	apply_latency	表示从接收请求到设置apply状态的时间间隔
查看OSD磁盘的使用率信息
[cephadm@admin ceph-cluster]$ ceph osd df
ID CLASS WEIGHT  REWEIGHT SIZE    RAW USE DATA    OMAP META  AVAIL   %USE VAR  PGS STATUS
 0   hdd 0.01949  1.00000  20 GiB 1.0 GiB 3.2 MiB  0 B 1 GiB  19 GiB 5.02 1.00   0     up
 1   hdd 0.01949  1.00000  20 GiB 1.0 GiB 3.2 MiB  0 B 1 GiB  19 GiB 5.02 1.00   0     up
 2   hdd 0.01949  1.00000  20 GiB 1.0 GiB 3.2 MiB  0 B 1 GiB  19 GiB 5.02 1.00   0     up
 3   hdd 0.01949  1.00000  20 GiB 1.0 GiB 3.2 MiB  0 B 1 GiB  19 GiB 5.02 1.00   0     up
 4   hdd 0.01949  1.00000  20 GiB 1.0 GiB 3.2 MiB  0 B 1 GiB  19 GiB 5.02 1.00   0     up
 5   hdd 0.01949  1.00000  20 GiB 1.0 GiB 3.2 MiB  0 B 1 GiB  19 GiB 5.02 1.00   0     up
                    TOTAL 120 GiB 6.0 GiB  20 MiB  0 B 6 GiB 114 GiB 5.02
MIN/MAX VAR: 1.00/1.00  STDDEV: 0
1.6.2 进阶实践
osd暂停开启
命令格式:
	ceph osd pause		集群暂停接收数据
	ceph osd unpause	集群开始接收数据
[cephadm@admin ceph-cluster]$ ceph osd pause
pauserd,pausewr is set
[cephadm@admin ceph-cluster]$ ceph -s
  cluster:
    id:     76cc0714-0bd7-43f7-b7c3-ec8cae2819e7
    health: HEALTH_WARN
            pauserd,pausewr flag(s) set

  services:
    mon: 3 daemons, quorum mon01,mon02,mon03 (age 2h)
    mgr: mon01(active, since 3h)
    osd: 6 osds: 6 up (since 110m), 6 in (since 110m)
         flags pauserd,pausewr				# 可以看到,多了pause的标签

  data:
    pools:   0 pools, 0 pgs
    objects: 0 objects, 0 B
    usage:   6.0 GiB used, 114 GiB / 120 GiB avail
    pgs:

[cephadm@admin ceph-cluster]$ ceph osd unpause
pauserd,pausewr is unset
[cephadm@admin ceph-cluster]$
[cephadm@admin ceph-cluster]$ ceph -s
  cluster:
    id:     76cc0714-0bd7-43f7-b7c3-ec8cae2819e7
    health: HEALTH_OK

  services:
    mon: 3 daemons, quorum mon01,mon02,mon03 (age 2h)
    mgr: mon01(active, since 3h)
    osd: 6 osds: 6 up (since 111m), 6 in (since 111m)	# 可以看到,pause的标签已经被移除

  data:
    pools:   0 pools, 0 pgs
    objects: 0 objects, 0 B
    usage:   6.0 GiB used, 114 GiB / 120 GiB avail
    pgs:
osd数据操作比重
命令格式:
	osd节点上线:ceph osd crush reweight osd.编号 权重值
查看默认的OSD操作权重值
[cephadm@admin ceph-cluster]$ ceph osd crush tree
ID CLASS WEIGHT  TYPE NAME
-1       0.11691 root default
-3       0.03897     host mon01
 0   hdd 0.01949         osd.0		# 0.01949
 1   hdd 0.01949         osd.1
-5       0.03897     host mon02
 2   hdd 0.01949         osd.2
 3   hdd 0.01949         osd.3
-7       0.03897     host mon03
 4   hdd 0.01949         osd.4
 5   hdd 0.01949         osd.5
修改OSD的数据操作权重值
[cephadm@admin ceph-cluster]$ ceph osd crush reweight osd.0 0.1
reweighted item id 0 name 'osd.0' to 0.1 in crush map
[cephadm@admin ceph-cluster]$ ceph osd crush tree
ID CLASS WEIGHT  TYPE NAME
-1       0.19742 root default
-3       0.11948     host mon01
 0   hdd 0.09999         osd.0		# 0.09999
 1   hdd 0.01949         osd.1
-5       0.03897     host mon02
 2   hdd 0.01949         osd.2
 3   hdd 0.01949         osd.3
-7       0.03897     host mon03
 4   hdd 0.01949         osd.4
 5   hdd 0.01949         osd.5
恢复OSD的数据操作权重值
[cephadm@admin ceph-cluster]$ ceph osd crush reweight osd.0 0.01949
reweighted item id 0 name 'osd.0' to 0.01949 in crush map
[cephadm@admin ceph-cluster]$ ceph osd crush tree
ID CLASS WEIGHT  TYPE NAME
-1       0.11691 root default
-3       0.03897     host mon01
 0   hdd 0.01949         osd.0		# 0.01949
 1   hdd 0.01949         osd.1
-5       0.03897     host mon02
 2   hdd 0.01949         osd.2
 3   hdd 0.01949         osd.3
-7       0.03897     host mon03
 4   hdd 0.01949         osd.4
 5   hdd 0.01949         osd.5
osd上下线
命令格式:
	osd节点上线:ceph osd down osd编号
	osd节点下线:ceph osd up osd编号
注意:
	由于OSD有专门的管理服务器控制,一旦发现被下线,会尝试启动它
将磁盘快速下线,然后查看状态
[cephadm@admin ceph-cluster]$ ceph osd down 0 ; ceph osd tree
marked down osd.0.
ID CLASS WEIGHT  TYPE NAME      STATUS REWEIGHT PRI-AFF
-1       0.11691 root default
-3       0.03897     host mon01
 0   hdd 0.01949         osd.0    down  1.00000 1.00000		# down
 1   hdd 0.01949         osd.1      up  1.00000 1.00000
-5       0.03897     host mon02
 2   hdd 0.01949         osd.2      up  1.00000 1.00000
 3   hdd 0.01949         osd.3      up  1.00000 1.00000
-7       0.03897     host mon03
 4   hdd 0.01949         osd.4      up  1.00000 1.00000
 5   hdd 0.01949         osd.5      up  1.00000 1.00000

等待一秒钟后查看状态,指定的节点又上线了
[cephadm@admin ceph-cluster]$ ceph osd tree
ID CLASS WEIGHT  TYPE NAME      STATUS REWEIGHT PRI-AFF
-1       0.11691 root default
-3       0.03897     host mon01
 0   hdd 0.01949         osd.0      up  1.00000 1.00000		# up
 1   hdd 0.01949         osd.1      up  1.00000 1.00000
-5       0.03897     host mon02
 2   hdd 0.01949         osd.2      up  1.00000 1.00000
 3   hdd 0.01949         osd.3      up  1.00000 1.00000
-7       0.03897     host mon03
 4   hdd 0.01949         osd.4      up  1.00000 1.00000
 5   hdd 0.01949         osd.5      up  1.00000 1.00000
驱逐加入OSD对象
命令格式:
	ceph osd out osd编号
	ceph osd in osd编号
注意:
	所谓的从OSD集群中驱离或者加入OSD对象,本质上Ceph集群数据操作的权重值调整
将0号OSD下线
[cephadm@admin ceph-cluster]$ ceph osd out 0
marked out osd.0.
[cephadm@admin ceph-cluster]$ ceph osd tree
ID CLASS WEIGHT  TYPE NAME      STATUS REWEIGHT PRI-AFF
-1       0.11691 root default
-3       0.03897     host mon01
 0   hdd 0.01949         osd.0      up        0 1.00000		# REWEIGHT:0
 1   hdd 0.01949         osd.1      up  1.00000 1.00000
-5       0.03897     host mon02
 2   hdd 0.01949         osd.2      up  1.00000 1.00000
 3   hdd 0.01949         osd.3      up  1.00000 1.00000
-7       0.03897     host mon03
 4   hdd 0.01949         osd.4      up  1.00000 1.00000
 5   hdd 0.01949         osd.5      up  1.00000 1.00000
将0号OSD上线
[cephadm@admin ceph-cluster]$ ceph osd in 0
marked in osd.0.
[cephadm@admin ceph-cluster]$ ceph osd tree
ID CLASS WEIGHT  TYPE NAME      STATUS REWEIGHT PRI-AFF
-1       0.11691 root default
-3       0.03897     host mon01
 0   hdd 0.01949         osd.0      up  1.00000 1.00000		# REWEIGHT:1
 1   hdd 0.01949         osd.1      up  1.00000 1.00000
-5       0.03897     host mon02
 2   hdd 0.01949         osd.2      up  1.00000 1.00000
 3   hdd 0.01949         osd.3      up  1.00000 1.00000
-7       0.03897     host mon03
 4   hdd 0.01949         osd.4      up  1.00000 1.00000
 5   hdd 0.01949         osd.5      up  1.00000 1.00000

结果显示:
	OSD在上下线实践的时候,所谓的REWEIGHT会进行调整,1代表上线,0代表下线
1.6.3 小结
1.7 OSD节点
学习目标:这一节,我们从OSD删除、OSD添加、小结三个方面来学习。
1.7.1 OSD删除
基本步骤
将OSD删除需要遵循一定的步骤:
	1.修改OSD的数据操作权重值,让数据不分布在这个节点上
	2.到指定节点上,停止指定的OSD进程
	3.将移除OSD节点状态标记为out
	4.从crush中移除OSD节点,该节点不作为数据的载体
	5.删除OSD节点
	6.删除OSD节点的认证信息
删除OSD节点实践
修改OSD的数据操作权重值
[cephadm@admin ceph-cluster]$ ceph osd crush reweight osd.5 0
reweighted item id 5 name 'osd.5' to 0 in crush map
[cephadm@admin ceph-cluster]$ ceph osd crush tree
ID CLASS WEIGHT  TYPE NAME
-1       0.09743 root default
-3       0.03897     host mon01
 0   hdd 0.01949         osd.0
 1   hdd 0.01949         osd.1
-5       0.03897     host mon02
 2   hdd 0.01949         osd.2
 3   hdd 0.01949         osd.3
-7       0.01949     host mon03
 4   hdd 0.01949         osd.4
 5   hdd       0         osd.5		# WEIGHT:0
到指定节点上,停止指定的OSD进程
[cephadm@admin ceph-cluster]$ ssh mon03 sudo systemctl disable ceph-osd@5
Removed symlink /etc/systemd/system/ceph-osd.target.wants/ceph-osd@5.service.
[cephadm@admin ceph-cluster]$ ssh mon03 sudo systemctl stop ceph-osd@5
[cephadm@admin ceph-cluster]$ ssh mon03 sudo systemctl status ceph-osd@5
● ceph-osd@5.service - Ceph object storage daemon osd.5
   Loaded: loaded (/usr/lib/systemd/system/ceph-osd@.service; enabled-runtime; vendor preset: disabled)
   Active: inactive (dead) since Tue 2024-04-09 17:57:37 CST; 12s ago
 Main PID: 4074 (code=exited, status=0/SUCCESS)

......
Apr 09 17:57:37 mon03 systemd[1]: Stopped Ceph object storage daemon osd.5.

[cephadm@admin ceph-cluster]$ ceph osd tree
ID CLASS WEIGHT  TYPE NAME      STATUS REWEIGHT PRI-AFF
-1       0.09743 root default
-3       0.03897     host mon01
 0   hdd 0.01949         osd.0      up  1.00000 1.00000
 1   hdd 0.01949         osd.1      up  1.00000 1.00000
-5       0.03897     host mon02
 2   hdd 0.01949         osd.2      up  1.00000 1.00000
 3   hdd 0.01949         osd.3      up  1.00000 1.00000
-7       0.01949     host mon03
 4   hdd 0.01949         osd.4      up  1.00000 1.00000
 5   hdd       0         osd.5    down  1.00000 1.00000
将移除OSD节点状态标记为out
[cephadm@admin ceph-cluster]$ ceph osd out osd.5
marked out osd.5.
[cephadm@admin ceph-cluster]$ ceph osd tree
ID CLASS WEIGHT  TYPE NAME      STATUS REWEIGHT PRI-AFF
-1       0.09743 root default
-3       0.03897     host mon01
 0   hdd 0.01949         osd.0      up  1.00000 1.00000
 1   hdd 0.01949         osd.1      up  1.00000 1.00000
-5       0.03897     host mon02
 2   hdd 0.01949         osd.2      up  1.00000 1.00000
 3   hdd 0.01949         osd.3      up  1.00000 1.00000
-7       0.01949     host mon03
 4   hdd 0.01949         osd.4      up  1.00000 1.00000
 5   hdd       0         osd.5    down        0 1.00000
从crush中移除OSD节点,该节点不作为数据的载体
[cephadm@admin ceph-cluster]$ ceph osd crush remove osd.5

查看效果
removed item id 5 name 'osd.5' from crush map
[cephadm@admin ceph-cluster]$ ceph osd crush tree
ID CLASS WEIGHT  TYPE NAME
-1       0.09743 root default
-3       0.03897     host mon01
 0   hdd 0.01949         osd.0
 1   hdd 0.01949         osd.1
-5       0.03897     host mon02
 2   hdd 0.01949         osd.2
 3   hdd 0.01949         osd.3
-7       0.01949     host mon03
 4   hdd 0.01949         osd.4

结果显示:
	osd.5 已经被移除了
删除OSD节点前查看效果
[cephadm@admin ceph-cluster]$ ceph osd tree
ID CLASS WEIGHT  TYPE NAME      STATUS REWEIGHT PRI-AFF
-1       0.09743 root default
-3       0.03897     host mon01
 0   hdd 0.01949         osd.0      up  1.00000 1.00000
 1   hdd 0.01949         osd.1      up  1.00000 1.00000
-5       0.03897     host mon02
 2   hdd 0.01949         osd.2      up  1.00000 1.00000
 3   hdd 0.01949         osd.3      up  1.00000 1.00000
-7       0.01949     host mon03
 4   hdd 0.01949         osd.4      up  1.00000 1.00000
 5             0 osd.5            down        0 1.00000
移除无效的OSD节点
[cephadm@admin ceph-cluster]$ ceph osd rm osd.5
removed osd.5

再次确认效果
[cephadm@admin ceph-cluster]$ ceph osd tree
ID CLASS WEIGHT  TYPE NAME      STATUS REWEIGHT PRI-AFF
-1       0.09743 root default
-3       0.03897     host mon01
 0   hdd 0.01949         osd.0      up  1.00000 1.00000
 1   hdd 0.01949         osd.1      up  1.00000 1.00000
-5       0.03897     host mon02
 2   hdd 0.01949         osd.2      up  1.00000 1.00000
 3   hdd 0.01949         osd.3      up  1.00000 1.00000
-7       0.01949     host mon03
 4   hdd 0.01949         osd.4      up  1.00000 1.00000

结果显示:
	osd节点已经被移除了
查看历史认证信息
[cephadm@admin ceph-cluster]$ ceph auth ls
......
osd.5
        key: AQDL7xRm23NdMhAAD0csZ+B38JCETQsB2lrkGg==
        caps: [mgr] allow profile osd
        caps: [mon] allow profile osd
        caps: [osd] allow *
......
删除OSD节点的认证信息
[cephadm@admin ceph-cluster]$ ceph auth del osd.5
updated
[cephadm@admin ceph-cluster]$ ceph auth ls

结果显示:
	已经没有历史的节点信息了
1.7.2 OSD添加
基本步骤
将OSD增加到集群需要遵循一定的步骤:
	1.确定OSD节点没有被占用
	2.磁盘格式化
	3.Ceph擦除磁盘上的数据
	4.添加OSD到集群
添加OSD节点实践简介
确定OSD节点没有被占用
[root@mon03 ~]# blkid | egrep 'sd[bc]'
/dev/sdb: UUID="My3NZ6-foeY-Z5Cl-ubah-dgd1-u1LQ-DDLGVz" TYPE="LVM2_member"
/dev/sdc: UUID="yE58ex-hDAP-aXJ9-5Pke-Mq3D-Qvo5-zCpBdu" TYPE="LVM2_member"

格式化磁盘失败
[root@mon03 ~]# mkfs.ext4 /dev/sdc
mke2fs 1.42.9 (28-Dec-2013)
/dev/sdc is entire device, not just one partition!
Proceed anyway? (y,n) y
/dev/sdc is apparently in use by the system; will not make a filesystem here!

查看被占用的磁盘
[root@mon03 ~]# dmsetup status
ceph--52dab675--e27d--4503--8867--a64f502ddb7b-osd--block--6bda5a2c--bf96--4f87--96b0--23d3cc6e5d1d: 0 41934848 linear
centos-swap: 0 4194304 linear
ceph--d3d67496--0ea6--46a4--8e83--0924a2b99f59-osd--block--9e555c23--6f99--4d1b--a2ad--7ff4fb012bad: 0 41934848 linear
centos-root: 0 35643392 linear
[root@mon03 ~]# lsblk
NAME                                                                                                  MAJ:MIN RM  SIZE RO TYPE MOUNTPOINT
sda                                                                                                     8:0    0   20G  0 disk
├─sda1                                                                                                  8:1    0    1G  0 part /boot
└─sda2                                                                                                  8:2    0   19G  0 part
  ├─centos-root                                                                                       253:0    0   17G  0 lvm  /
  └─centos-swap                                                                                       253:1    0    2G  0 lvm  [SWAP]
sdb                                                                                                     8:16   0   20G  0 disk
└─ceph--52dab675--e27d--4503--8867--a64f502ddb7b-osd--block--6bda5a2c--bf96--4f87--96b0--23d3cc6e5d1d 253:2    0   20G  0 lvm
sdc                                                                                                     8:32   0   20G  0 disk
└─ceph--d3d67496--0ea6--46a4--8e83--0924a2b99f59-osd--block--9e555c23--6f99--4d1b--a2ad--7ff4fb012bad 253:3    0   20G  0 lvm
sr0                                                                                                    11:0    1  8.1G  0 rom

1 确定OSD节点没有被占用,注意Ceph的OSD挂载目录
[root@mon03 ~]# cat /var/lib/ceph/osd/ceph-5/fsid
9e555c23-6f99-4d1b-a2ad-7ff4fb012bad

移除被占用磁盘
[root@mon03 ~]# dmsetup remove ceph--d3d67496--0ea6--46a4--8e83--0924a2b99f59-osd--block--9e555c23--6f99--4d1b--a2ad--7ff4fb012bad
[root@mon03 ~]#
[root@mon03 ~]# dmsetup status
ceph--52dab675--e27d--4503--8867--a64f502ddb7b-osd--block--6bda5a2c--bf96--4f87--96b0--23d3cc6e5d1d: 0 41934848 linear
centos-swap: 0 4194304 linear
centos-root: 0 35643392 linear
2 磁盘格式化
[root@mon03 ~]# mkfs.ext4 /dev/sdc
3 Ceph擦除磁盘上的数据
[cephadm@admin ceph-cluster]$ ceph-deploy disk zap stor23 /dev/sdc
......
[stor23][WARNIN]  stderr: 10+0 records in
[stor23][WARNIN] 10+0 records out
[stor23][WARNIN] 10485760 bytes (10 MB) copied
[stor23][WARNIN]  stderr: , 0.0387254 s, 271 MB/s
[stor23][WARNIN] --> Zapping successful for: <Raw Device: /dev/sdc>
4 添加OSD到集群
[cephadm@admin ceph-cluster]$ ceph-deploy --overwrite-conf osd create stor23 --data /dev/sdc
确认效果
[cephadm@admin ceph-cluster]$ ceph osd tree
ID CLASS WEIGHT  TYPE NAME      STATUS REWEIGHT PRI-AFF
-1       0.11691 root default
-3       0.03897     host mon01
 0   hdd 0.01949         osd.0      up  1.00000 1.00000
 1   hdd 0.01949         osd.1      up  1.00000 1.00000
-5       0.03897     host mon02
 2   hdd 0.01949         osd.2      up  1.00000 1.00000
 3   hdd 0.01949         osd.3      up  1.00000 1.00000
-7       0.03897     host mon03
 4   hdd 0.01949         osd.4      up  1.00000 1.00000
 5   hdd 0.01949         osd.5      up  1.00000 1.00000

结果显示:
	之前被移除的osd节点已经被找回来了
1.7.3 小结
1.8 存储实践
学习目标:这一节,我们从基本环境、OSD实践、小结三个方面来学习。
1.8.1 基本环境
存储术语
Pool
	RADOS存储集群提供的基础存储服务需要由“存储池(pool)”分割为逻辑存储区域,此类的逻辑区域亦是对象数据的名称空间。

PG
	归置组(Placement Group)是用于跨OSD将数据存储在某个存储池中的内部数据结构
	相对于存储池来说,PG是一个虚拟组件,它是对象映射到存储池时使用的虚拟层
	是实现大容量集群的关键效率技术

PGP
	(Placement Group fot Placement)是用于维持PG和OSD的一种策略。
	防止OSD重新分配时候,PG找不到之前的OSD,从而引起大范围的数据迁移

CRUSH
	把对象直接映射到OSD之上会导致二者之间的紧密耦合关系,在OSD设备变动时不可避免地对整个集群产生扰动。所以需要一种策略算法来处理这种问题。
	Ceph将一个对象映射进RADOS集群的过程分为两步:
		- 首先是以一致性哈希算法将对象名称映射到PG
		- 而后是将PG ID基于CRUSH算法映射到OSD
	CRUSH(Controlled Replication Under Scalable Hashing),它是一种数据分布式算法,类似于一致性哈希算法,用于为RADOS存储集群控制数据分布。
基本逻辑图

需求
OSD平台的目的就是数据的存在,我们这里就先来简单的演示一下,OSD环境的数据操作。这里主要临时演示两个功能:
1.数据存储 - 客户端连接至RADOS集群上某存储池,根据相关的CRUSH规则完成数据对象存储。
2.数据删除 - 集合配套的命令,实现数据的移除功能。
1.8.2 OSD实践
创建存储池
命令格式
	ceph osd pool create <pool-name> <pg-num> [pgp-num] [replicated] \
[crush-rule-name] [expected-num-objects]
	参数解析:
		pool-name:存储池名称,在一个RADOS存储集群上必须具有唯一性;
		pg-num:当前存储池中的PG数量,一定要合理
		pgp-num:用于归置的PG数量,其值应该等于PG的数量
		replicated:存储池类型,副本存储池需要更多原始存储空间,但已实现Ceph支持的所有操作
		crush-ruleset-name:此存储池所用的CRUSH规则集的名称,引用的规则集必须事先存在

查看命令
	ceph osd pool ls
	rados lspools
创建一个存储池,名称为mypool,pg数量和pgp数量都是16
[cephadm@admin ceph-cluster]$ ceph osd pool ls
[cephadm@admin ceph-cluster]$ ceph osd pool create mypool 16 16
pool 'mypool' created

查看存储池的列表
[cephadm@admin ceph-cluster]$ ceph osd pool ls
mypool
[cephadm@admin ceph-cluster]$ rados lspools
mypool
数据的上传
命令格式:
	虽然我们目前没有形成专用的数据接口,但是Ceph提供了一个原理的文件测试接口 -- rados命令
	rados put 文件对象名(id) /path/to/file --pool=存储池
提交文件到对应的OSD里面
[cephadm@admin ceph-cluster]$ rados put ceph-file /home/cephadm/ceph-cluster/ceph.conf --pool=mypool

确认上传数据效果
[cephadm@admin ceph-cluster]$ rados ls --pool=mypool
ceph-file
查看数据的存储关系
命令格式:
	通过属性的方式获取到存储池中数据对象的具体位置信息
	ceph osd map 存储池 文件对象名(id)
查看ceph-file文件对象的内部属性关系
[cephadm@admin ceph-cluster]$ ceph osd map mypool ceph-file
osdmap e51 pool 'mypool' (1) object 'ceph-file' -> pg 1.7753490d (1.d) -> up ([2,1,5], p2) acting ([2,1,5], p2)
结果解析:
	可以看到文件对象的内部属性关系
	[ num ]是副本所存储的osd id的值
数据删除实践
命令格式:
	将文件对象从pool里面删除
	rados rm 文件对象名(id) --pool=存储池
将刚才添加的文件对象从存储池里面移除
[cephadm@admin ceph-cluster]$ rados rm ceph-file --pool=mypool

查看存储池的内容
[cephadm@admin ceph-cluster]$ rados ls --pool=mypool
1.8.3 小结
1.9 存储解析
学习目标:这一节,我们从存储解析、存储删除、小结三个方面来学习。
1.9.1 存储解析
数据存储逻辑

pool 是 Ceph 存储数据时的逻辑分区,它起到据不同的用户场景,基于namespace实现隔离故障域的作用。
每个pool包含一定数量的PG,PG里的对象被映射到不同的OSD上。
OSD分散到所有的主机磁盘上
存储池基本信息
命令格式
	ceph osd pool ls [detail]
	ceph osd pool stats {<poolname>}
查看存储池名称
[cephadm@admin ceph-cluster]$ ceph osd pool ls
mypool

查看存储池详情
[cephadm@admin ceph-cluster]$ ceph osd pool ls detail
pool 1 'mypool' replicated size 3 min_size 2 crush_rule 0 object_hash rjenkins pg_num 16 pgp_num 16 autoscale_mode warn last_change 51 flags hashpspool stripe_width 0

确认存储池状态
[cephadm@admin ceph-cluster]$ ceph osd pool stats mypool
pool mypool id 1
  nothing is going on

结果显示:
	对于mypool来说,它的id是1,该存储池里面的所有pg都是以1为开头的
存储池&PG
通过 pg 查找 pool
	ceph pg dump | grep "^{poolid}\."

通过 pool 查找 pg
	ceph pg ls-by-pool {poolname}
	ceph pg ls {poolid}
根据pg查找pools
[cephadm@admin ceph-cluster]$ ceph pg dump | grep "^1."
dumped all
1.f           0                  0        0         0       0     0           0          0   0        0 active+clean 2024-04-09 20:01:38.117522     0'0    50:10 [3,1,4]          3 [3,1,4]              3        0'0 2024-04-09 20:01:37.068645             0'0 2024-04-09 20:01:37.068645             0
......

[cephadm@admin ceph-cluster]$ ceph pg dump pools
POOLID OBJECTS MISSING_ON_PRIMARY DEGRADED MISPLACED UNFOUND BYTES OMAP_BYTES* OMAP_KEYS* LOG DISK_LOG
1            0                  0        0         0       0     0           0          0   2        2

* NOTE: Omap statistics are gathered during deep scrub and may be inaccurate soon afterwards depending on utilisation. See http://docs.ceph.com/docs/master/dev/placement-group/#omap-statistics for further details.
dumped pools

根据存储池找PG
[cephadm@admin ceph-cluster]$ ceph pg ls-by-pool mypool | awk '{print $1,$2,$15}'
PG OBJECTS ACTING
1.0 0 [3,5,0]p3
1.1 0 [5,0,2]p5
1.2 0 [2,0,4]p2
1.3 0 [1,2,5]p1
1.4 0 [4,3,1]p4
1.5 0 [4,0,3]p4
1.6 0 [4,3,1]p4
1.7 0 [3,4,0]p3
1.8 0 [3,0,4]p3
1.9 0 [3,4,1]p3
1.a 0 [5,2,0]p5
1.b 0 [4,0,2]p4
1.c 0 [1,2,4]p1
1.d 0 [2,1,5]p2
1.e 0 [2,1,5]p2
1.f 0 [3,1,4]p3

* NOTE: afterwards

看出mypool的pg都是以1开头的,确定pg的分布情况
[cephadm@admin ceph-cluster]$ ceph pg dump pgs | grep ^1 | awk '{print $1,$2,$15,$19}'
dumped pgs
1.f 0 0'0 [3,1,4]
1.e 0 0'0 [2,1,5]
1.d 0 51'2 [2,1,5]
1.c 0 0'0 [1,2,4]
1.b 0 0'0 [4,0,2]
1.a 0 0'0 [5,2,0]
1.3 0 0'0 [1,2,5]
1.2 0 0'0 [2,0,4]
1.1 0 0'0 [5,0,2]
1.0 0 0'0 [3,5,0]
1.4 0 0'0 [4,3,1]
1.5 0 0'0 [4,0,3]
1.6 0 0'0 [4,3,1]
1.7 0 0'0 [3,4,0]
1.8 0 0'0 [3,0,4]
1.9 0 0'0 [3,4,1]

结果显示:
	每个pg都会分布在三个osd上,整个集群有6个osd
PG & OSD
通过 pg 查找 osd
	ceph pg map {pgid}
通过 osd 查找 pg
	ceph pg ls-by-osd osd.{osdid}
根据pg找osd的分布
[cephadm@admin ceph-cluster]$ ceph pg map 1.1
osdmap e51 pg 1.1 (1.1) -> up [5,0,2] acting [5,0,2]

根据osd找pg的分布
[cephadm@admin ceph-cluster]$ ceph pg ls-by-osd osd.1 | awk '{print $1,$2,$10,$14,$15}'
PG OBJECTS STATE UP ACTING
1.3 0 active+clean [1,2,5]p1 [1,2,5]p1
1.4 0 active+clean [4,3,1]p4 [4,3,1]p4
1.6 0 active+clean [4,3,1]p4 [4,3,1]p4
1.9 0 active+clean [3,4,1]p3 [3,4,1]p3
1.c 0 active+clean [1,2,4]p1 [1,2,4]p1
1.d 0 active+clean [2,1,5]p2 [2,1,5]p2
1.e 0 active+clean [2,1,5]p2 [2,1,5]p2
1.f 0 active+clean [3,1,4]p3 [3,1,4]p3

* NOTE: and soon afterwards
1.9.2 存储删除
存储池删除
命令格式:
	删除存储池命令存在数据丢失的风险,Ceph于是默认禁止此类操作。
	管理员需要在ceph.conf配置文件中启动支持删除动作
	ceph osd pool rm 存储池名 存储池名 --yes-i-really-really-mean-it
	注意:
		存储池名称必须出现两遍,后面的参数代表是强制
删除实践
默认情况下删除存储池
[cephadm@admin ceph-cluster]$ ceph osd pool rm mypool mypool --yes-i-really-really-mean-it
Error EPERM: pool deletion is disabled; you must first set the mon_allow_pool_delete config option to true before you can destroy a pool
主节点上修改ceph.conf文件,增加两行配置,让其运行删除pool
[cephadm@admin ceph-cluster]$ tail -n2 ceph.conf
[mon]
mon allow pool delete = true

同步ceph.conf文件到所有ceph节点上
[cephadm@admin ceph-cluster]$ ceph-deploy --overwrite-conf config push admin mon01 mon02 mon03

重启所有的mon节点上的ceph-mon服务
[cephadm@admin ceph-cluster]$ for i in mon0{1..3}; do ssh $i "sudo systemctl restart ceph-mon.target"; done
将刚才添加的文件对象从存储池里面删除
[cephadm@admin ceph-cluster]$ ceph osd pool rm mypool mypool --yes-i-really-really-mean-it
pool 'mypool' removed

确认效果
[cephadm@admin ceph-cluster]$ ceph osd pool stats
there are no pools!
[cephadm@admin ceph-cluster]$ ceph osd pool ls
1.9.3 小结
1.10 环境完善
学习目标:这一节,我们从扩展mon、扩展mgr、小结三个方面来学习。
1.10.1 扩展mon
操作mon节点基础
命令格式:
    ceph-deploy mon add mon节点名称
    注意:如果add换成destroy,则变成移除mon节点
查看ceph的mon状态
[cephadm@admin ceph-cluster]$ ceph -s
  cluster:
    id:     76cc0714-0bd7-43f7-b7c3-ec8cae2819e7
    health: HEALTH_OK

  services:
    mon: 3 daemons, quorum mon01,mon02,mon03 (age 4m)
    mgr: mon01(active, since 6h)
    osd: 6 osds: 6 up (since 76m), 6 in (since 76m)

  data:
    pools:   0 pools, 0 pgs
    objects: 0 objects, 0 B
    usage:   6.0 GiB used, 114 GiB / 120 GiB avail
    pgs:

[cephadm@admin ceph-cluster]$ ceph mon stat
e1: 3 mons at {mon01=[v2:192.168.120.21:3300/0,v1:192.168.120.21:6789/0],mon02=[v2:192.168.120.22:3300/0,v1:192.168.120.22:6789/0],mon03=[v2:192.168.120.23:3300/0,v1:192.168.120.23:6789/0]}, election epoch 32, leader 0 mon01, quorum 0,1,2 mon01,mon02,mon03
移除实践
移除mon节点
[cephadm@admin ceph-cluster]$ ceph-deploy mon destroy mon03

查看效果
[cephadm@admin ceph-cluster]$ ceph -s
  cluster:
    id:     76cc0714-0bd7-43f7-b7c3-ec8cae2819e7
    health: HEALTH_OK

  services:
    mon: 2 daemons, quorum mon01,mon02 (age 34s)
    mgr: mon01(active, since 6h)
    osd: 6 osds: 6 up (since 78m), 6 in (since 78m)

  data:
    pools:   0 pools, 0 pgs
    objects: 0 objects, 0 B
    usage:   6.0 GiB used, 114 GiB / 120 GiB avail
    pgs:

结果显示:
	mon03已经被移除了
扩展实践
扩展mon实践
[cephadm@admin ceph-cluster]$ ceph-deploy mon add mon03

确认效果
[cephadm@admin ceph-cluster]$ ceph -s
  cluster:
    id:     76cc0714-0bd7-43f7-b7c3-ec8cae2819e7
    health: HEALTH_OK

  services:
    mon: 3 daemons, quorum mon01,mon02,mon03 (age 16s)
    mgr: mon01(active, since 6h)
    osd: 6 osds: 6 up (since 79m), 6 in (since 79m)

  task status:

  data:
    pools:   0 pools, 0 pgs
    objects: 0 objects, 0 B
    usage:   6.0 GiB used, 114 GiB / 120 GiB avail
    pgs:

结果显示:
	mon03已经被添加到集群了
1.10.2 扩展mgr
简介
Ceph Manager在高可用的场景下,守护进程以“Active/Standby”模式运行,部署其它ceph-mgr守护程序可确保在Active节点或其上的ceph-mgr守护进程故障时,其中的一个Standby实例可以在不中断服务的情况下接管其任务。如果只有一个mgr服务器的话,守护进程的状态是Active。
确认效果
[cephadm@admin ceph-cluster]$ ceph -s
  cluster:
    id:     76cc0714-0bd7-43f7-b7c3-ec8cae2819e7
    health: HEALTH_OK

  services:
    mon: 3 daemons, quorum mon01,mon02,mon03 (age 85s)
    mgr: mon01(active, since 6h)
    osd: 6 osds: 6 up (since 80m), 6 in (since 80m)

  data:
    pools:   0 pools, 0 pgs
    objects: 0 objects, 0 B
    usage:   6.0 GiB used, 114 GiB / 120 GiB avail
    pgs:
扩展实践
在当前的环境中,添加mgr节点
[cephadm@admin ceph-cluster]$ ceph-deploy mgr create mon02

查看效果
[cephadm@admin ceph-cluster]$ ceph -s
  cluster:
    id:     76cc0714-0bd7-43f7-b7c3-ec8cae2819e7
    health: HEALTH_OK

  services:
    mon: 3 daemons, quorum mon01,mon02,mon03 (age 2m)
    mgr: mon01(active, since 6h), standbys: mon02
    osd: 6 osds: 6 up (since 81m), 6 in (since 81m)

  data:
    pools:   0 pools, 0 pgs
    objects: 0 objects, 0 B
    usage:   6.0 GiB used, 114 GiB / 120 GiB avail
    pgs:

结果显示:
	mon01节点就是我们的主角色节点,mon02是我们的从角色节点。
1.10.3 小结