1.
(问答题)
一.配置server主机要求如下:
1.server主机的主机名称为 ntp_server.example.com
编写脚本文件
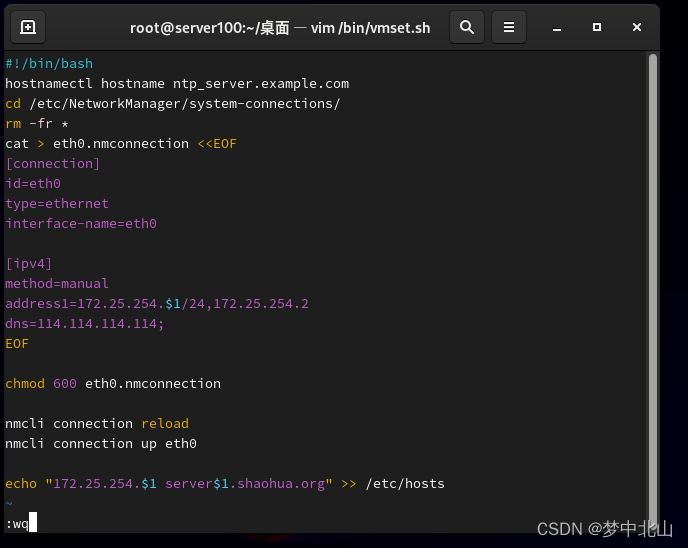
#!/bin/bash
hostnamectl hostname ntp_server.example.com
cd /etc/NetworkManager/system-connections/
rm -fr *
cat > eth0.nmconnection <<EOF
[connection]
id=eth0
type=ethernet
interface-name=eth0

[ipv4]
method=manual
address1=172.25.254.$1/24,172.25.254.2
dns=114.114.114.114;
EOF

chmod 600 eth0.nmconnection

nmcli connection reload
nmcli connection up eth0

echo "172.25.254.$1 server$1.shaohua.org" >> /etc/hosts
2.server主机的IP为: 172.25.254.100
执行脚本文件
[root@server100 桌面]# vmset.sh 100
连接已成功激活(D-Bus 活动路径:/org/freedesktop/NetworkManager/ActiveConnection/3)
[root@server100 桌面]# hostname
ntpserver.example.com
[root@server100 桌面]# ifconfig
eth0: flags=4163<UP,BROADCAST,RUNNING,MULTICAST>  mtu 1500
        inet 172.25.254.100  netmask 255.255.255.0  broadcast 172.25.254.255
        inet6 fe80::e1bf:6c40:f9c2:8d98  prefixlen 64  scopeid 0x20<link>
        ether 00:0c:29:53:36:f8  txqueuelen 1000  (Ethernet)
        RX packets 4445  bytes 6626121 (6.3 MiB)
        RX errors 0  dropped 0  overruns 0  frame 0
        TX packets 1584  bytes 90682 (88.5 KiB)
        TX errors 0  dropped 0 overruns 0  carrier 0  collisions 0

lo: flags=73<UP,LOOPBACK,RUNNING>  mtu 65536
        inet 127.0.0.1  netmask 255.0.0.0
        inet6 ::1  prefixlen 128  scopeid 0x10<host>
        loop  txqueuelen 1000  (Local Loopback)
        RX packets 66  bytes 6216 (6.0 KiB)
        RX errors 0  dropped 0  overruns 0  frame 0
        TX packets 66  bytes 6216 (6.0 KiB)
        TX errors 0  dropped 0 overruns 0  carrier 0  collisions 0

[root@server100 桌面]#
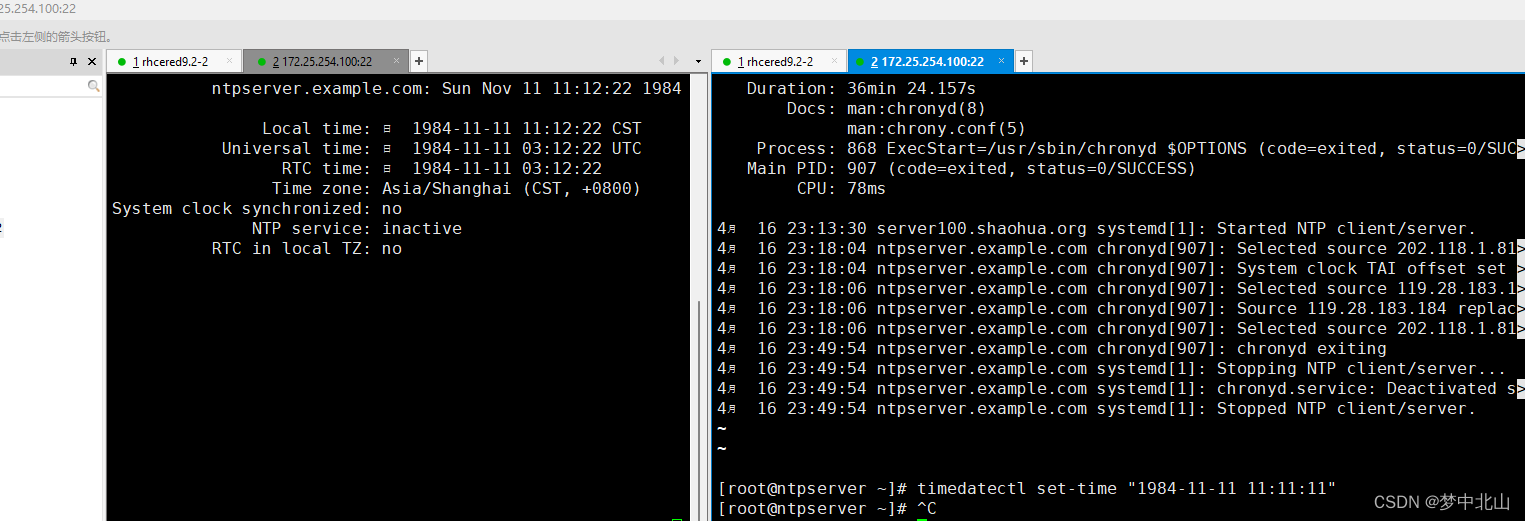
3.server主机的时间为1984-11-11 11:11:11
[root@ntpserver ~]# systemctl stop chronyd.service //关闭时间同步服务
[root@ntpserver ~]# systemctl status  chronyd.service //查看服务状态
○ chronyd.service - NTP client/server
     Loaded: loaded (/usr/lib/systemd/system/chronyd.service; enabled; preset: enabled)
     Active: inactive (dead) since Tue 2024-04-16 23:28:57 CST; 12s ago
   Duration: 15min 26.079s
       Docs: man:chronyd(8)
             man:chrony.conf(5)
    Process: 867 ExecStart=/usr/sbin/chronyd $OPTIONS (code=exited, status=0/SUCCESS)
   Main PID: 907 (code=exited, status=0/SUCCESS)
        CPU: 56ms

4月 16 23:13:31 server100.shaohua.org systemd[1]: Started NTP client/server.
4月 16 23:21:56 client.example.com chronyd[907]: Selected source 202.118.1.81 (2.rhel.pool.n
4月 16 23:21:56 client.example.com chronyd[907]: System clock TAI offset set to 37 seconds
4月 16 23:24:06 client.example.com chronyd[907]: Selected source 193.182.111.141 (2.rhel.poo
4月 16 23:24:07 client.example.com chronyd[907]: Source 202.112.29.82 replaced with 5.79.108
4月 16 23:25:12 client.example.com chronyd[907]: Selected source 202.118.1.81 (2.rhel.pool.n
4月 16 23:28:57 client.example.com chronyd[907]: chronyd exiting
4月 16 23:28:57 client.example.com systemd[1]: Stopping NTP client/server...
4月 16 23:28:57 client.example.com systemd[1]: chronyd.service: Deactivated successfully.
4月 16 23:28:57 client.example.com systemd[1]: Stopped NTP client/server.

[root@ntpserver ~]# [root@client ~]# timedatectl set-time "1984-11-11 11:11:11"//修改时间
4.配置server主机的时间同步服务要求可以被所有人使用
[root@ntpserver ~]# rpm -qc chrony //查看配置文件
/etc/chrony.conf
/etc/chrony.keys
/etc/logrotate.d/chrony
/etc/sysconfig/chronyd
[root@ntpserver ~]# vim /etc/chrony.conf //修改配置文件
[root@ntpserver ~]# systemctl restart chronyd.service //重启服务
[root@ntpserver ~]# systemctl disable --now firewalld.service //关闭火墙
Removed "/etc/systemd/system/multi-user.target.wants/firewalld.service".
Removed "/etc/systemd/system/dbus-org.fedoraproject.FirewallD1.service".
[root@ntpserver ~]#
修改配置文件内容如下:
 25 # Allow NTP client access from local network.
 26 #allow 192.168.0.0/16
 27 allow 0.0.0.0/0
 28 # Serve time even if not synchronized to a time source.
 29 #local stratum 10
 30 local stratum 10
 31
二.设定clinet主机要求如下
1.client主机的IP为:172.25.254.200
2.client主机的主机名称为: client.example.com
编写脚本文件
#!/bin/bash
hostnamectl hostname client.example.com
cd /etc/NetworkManager/system-connections/
rm -fr *
cat > eth0.nmconnection <<EOF
[connection]
id=eth0
type=ethernet
interface-name=eth0

[ipv4]
method=manual
address1=172.25.254.$1/24,172.25.254.2
dns=114.114.114.114;
EOF

chmod 600 eth0.nmconnection

nmcli connection reload
nmcli connection up eth0

echo "172.25.254.$1 server$1.shaohua.org" >> /etc/hosts
执行脚本文件
[root@client ~]# vmset.sh 200
连接已成功激活(D-Bus 活动路径:/org/freedesktop/NetworkManager/ActiveConnection/3)
[root@client ~]# hostname
client.example.com
[root@client ~]# ifconfig
eth0: flags=4163<UP,BROADCAST,RUNNING,MULTICAST>  mtu 1500
        inet 172.25.254.200  netmask 255.255.255.0  broadcast 172.25.254.255
        inet6 fe80::f259:5f8a:c87f:25f8  prefixlen 64  scopeid 0x20<link>
        ether 00:0c:29:5a:50:6e  txqueuelen 1000  (Ethernet)
        RX packets 5554  bytes 8280302 (7.8 MiB)
        RX errors 0  dropped 0  overruns 0  frame 0
        TX packets 1734  bytes 99352 (97.0 KiB)
        TX errors 0  dropped 0 overruns 0  carrier 0  collisions 0

lo: flags=73<UP,LOOPBACK,RUNNING>  mtu 65536
        inet 127.0.0.1  netmask 255.0.0.0
        inet6 ::1  prefixlen 128  scopeid 0x10<host>
        loop  txqueuelen 1000  (Local Loopback)
        RX packets 50  bytes 4856 (4.7 KiB)
        RX errors 0  dropped 0  overruns 0  frame 0
        TX packets 50  bytes 4856 (4.7 KiB)
        TX errors 0  dropped 0 overruns 0  carrier 0  collisions 0
[root@client ~]#
3.同步172.25.254.100主机的时间到达本机
[root@client ~]# systemctl stop chronyd.service
[root@client ~]# vim /etc/chrony.conf
[root@client ~]# systemctl restart chronyd.service
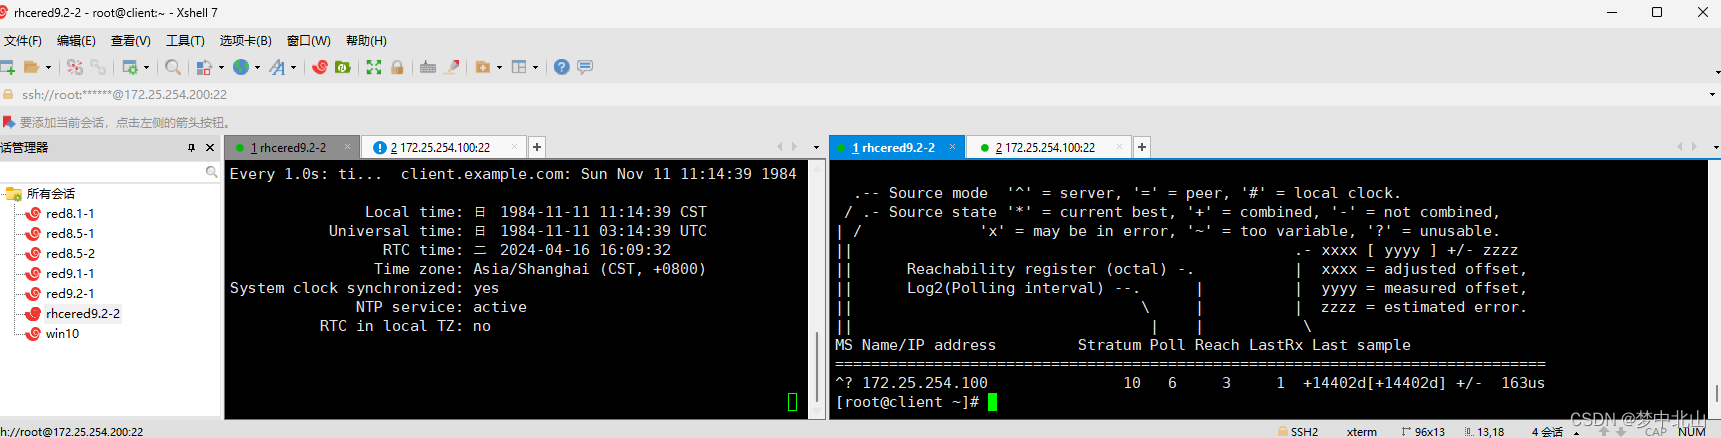
4.用命令显示对于172.25.254.100主机的时间同步情况