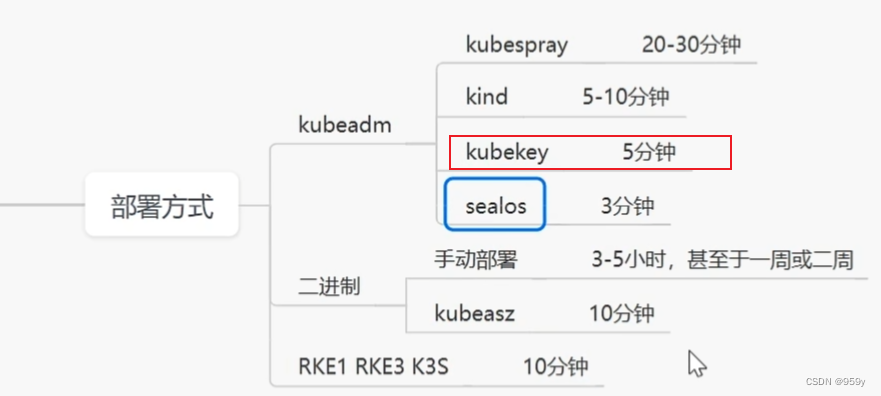
1.K8s 部署方式
- kubeadm: kubekey, sealos, kubespray
- 二进制: kubeasz
- rancher
2.操作系统基础配置
| 主机名 | 内网IP | 外网IP |
|---|---|---|
| master | 192.168.66.2 | 139.198.9.7 |
| node1 | 192.168.66.3 | 139.198.40.175 |
| node2 | 192.168.66.4 | 139.198.16.33 |
- 内网互通
- 每个机器有自己域名
- 防火墙开放30000~32767端口
#各个机器设置自己的域名
hostnamectl set-hostname master
hostnamectl set-hostname node1
hostnamectl set-hostname node2

# 将 SELinux 设置为 permissive 模式(相当于将其禁用)
setenforce 0
sed -i 's/^SELINUX=enforcing$/SELINUX=permissive/' /etc/selinux/config

#关闭swap
swapoff -a
sed -ri 's/.*swap.*/#&/' /etc/fstab

#允许 iptables 检查桥接流量
cat <<EOF | sudo tee /etc/modules-load.d/k8s.conf
br_netfilter
EOF

cat <<EOF | sudo tee /etc/sysctl.d/k8s.conf
net.bridge.bridge-nf-call-ip6tables = 1
net.bridge.bridge-nf-call-iptables = 1
EOF
sudo sysctl --system
配置时间同步:
yum install chrony

# 上面的手工操作,也可以使用 sed 自动替换
sed -i 's/^pool pool.*/pool cn.pool.ntp.org iburst/g' /etc/chrony.conf

systemctl enable chronyd --now

# 执行查看命令
chronyc sourcestats -v
安装依赖:
# 安装 Kubernetes 系统依赖包
yum install curl socat conntrack ebtables ipset ipvsadm

# 安装 tar 包,不装的话后面会报错。openEuler 也是个奇葩,迭代这么多版本了,默认居然还不安装 tar
yum install tar
3.安装部署 K8s
master节点:
下载 kk:
mkdir ~/kubekey
cd ~/kubekey/

# 选择中文区下载(访问 GitHub 受限时使用)
export KKZONE=cn
curl -sfL https://get-kk.kubesphere.io | sh -

#查看 KubeKey 支持的 Kubernetes 版本列表
./kk version --show-supported-k8s
创建 K8s 集群部署配置文件:
# 创建 K8s 集群部署配置文件
./kk create config -f k8s-v1288.yaml --with-kubernetes v1.28.8

修改配置文件:
vi k8s-v1288.yaml

# 修改配置文件
apiVersion: kubekey.kubesphere.io/v1alpha2
kind: Cluster
metadata:
  name: sample
spec:
  hosts:
  - {name: master, address: 192.168.66.2, internalAddress: 192.168.66.2, user: root, password: "111111zZ!"}
  - {name: node1, address: 192.168.66.3, internalAddress: 192.168.66.3, user: root, password: "111111zZ!"}
  - {name: node2, address: 192.168.66.4, internalAddress: 192.168.66.4, user: root, password: "111111zZ!"}
  roleGroups:
    etcd:
    - master
    control-plane:
    - master
    worker:
    - master
    - node1
    - node2
  controlPlaneEndpoint:
    ## Internal loadbalancer for apiservers
    internalLoadbalancer: haproxy

    domain: lb.opsxlab.cn
    address: ""
    port: 6443
  kubernetes:
    version: v1.28.8
    clusterName: opsxlab.cn
    autoRenewCerts: true
    containerManager: containerd
  etcd:
    type: kubekey
  network:
    plugin: calico
    kubePodsCIDR: 10.233.64.0/18
    kubeServiceCIDR: 10.233.0.0/18
    ## multus support. https://github.com/k8snetworkplumbingwg/multus-cni
    multusCNI:
      enabled: false
  registry:
    privateRegistry: ""
    namespaceOverride: ""
    registryMirrors: []
    insecureRegistries: []
  addons: []
执行配置文件:
./kk create cluster -f k8s-v1288.yaml
[root@ksp-master-1 kubekey]# ./kk create cluster -f k8s-v1288.yaml


 _   __      _          _   __
| | / /     | |        | | / /
| |/ / _   _| |__   ___| |/ /  ___ _   _
|    \| | | | '_ \ / _ \    \ / _ \ | | |
| |\  \ |_| | |_) |  __/ |\  \  __/ |_| |
\_| \_/\__,_|_.__/ \___\_| \_/\___|\__, |
                                    __/ |
                                   |___/

14:24:09 CST [GreetingsModule] Greetings
14:24:09 CST message: [node2]
Greetings, KubeKey!
14:24:09 CST message: [master]
Greetings, KubeKey!
14:24:09 CST message: [node1]
Greetings, KubeKey!
14:24:09 CST success: [node2]
14:24:09 CST success: [master]
14:24:09 CST success: [node1]
14:24:09 CST [NodePreCheckModule] A pre-check on nodes
14:24:09 CST success: [node2]
14:24:09 CST success: [master]
14:24:09 CST success: [node1]

14:24:09 CST [ConfirmModule] Display confirmation form
+--------------+------+------+---------+----------+-------+-------+---------+-----------+--------+--------+------------+------------+-------------+------------------+--------------+
| name         | sudo | curl | openssl | ebtables | socat | ipset | ipvsadm | conntrack | chrony | docker | containerd | nfs client | ceph client | glusterfs client | time         |
+--------------+------+------+---------+----------+-------+-------+---------+-----------+--------+--------+------------+------------+-------------+------------------+--------------+
| master | y    | y    | y       | y        | y     | y     | y       | y         | y      |        |            |            |             |                  | CST 10:45:31 |
| node1 | y    | y    | y       | y        | y     | y     | y       | y         | y      |        |            |            |             |                  | CST 10:45:31 |
| node2 | y    | y    | y       | y        | y     | y     | y       | y         | y      |        |            |            |             |                  | CST 10:45:31 |
+--------------+------+------+---------+----------+-------+-------+---------+-----------+--------+--------+------------+------------+-------------+------------------+--------------+

This is a simple check of your environment.
Before installation, ensure that your machines meet all requirements specified at
https://github.com/kubesphere/kubekey#requirements-and-recommendations

Continue this installation? [yes/no]:
nfs client、ceph client、glusterfs client 3 个与存储有关的 client 显示没有安装。
docker、containerd 会根据配置文件选择的 containerManager 类型自动安装。
查看安装进度:
kubectl logs -n kubesphere-system $(kubectl get pod -n kubesphere-system -l app=ks-install -o jsonpath='{.items[0].metadata.name}') -f
4.验证 K8s 集群
kubectl get nodes

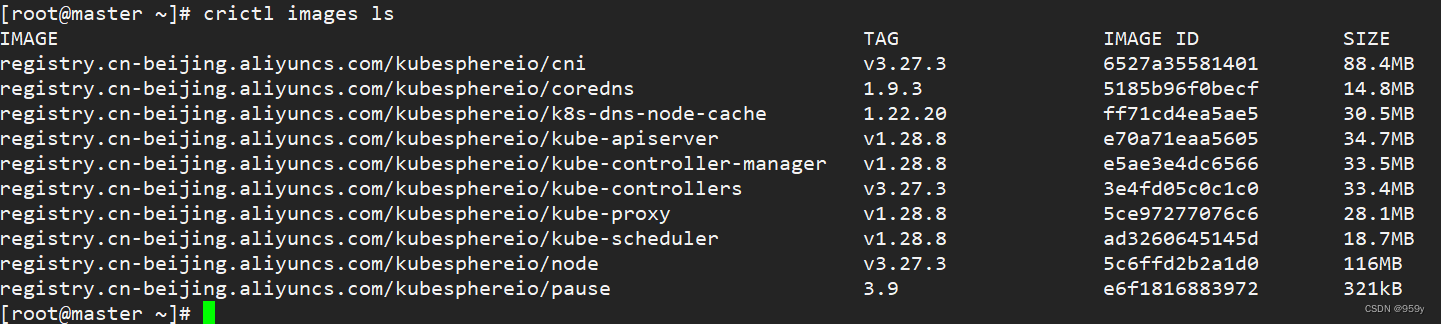
获取在 K8s 集群节点上已经下载的 Image 列表:
crictl images ls
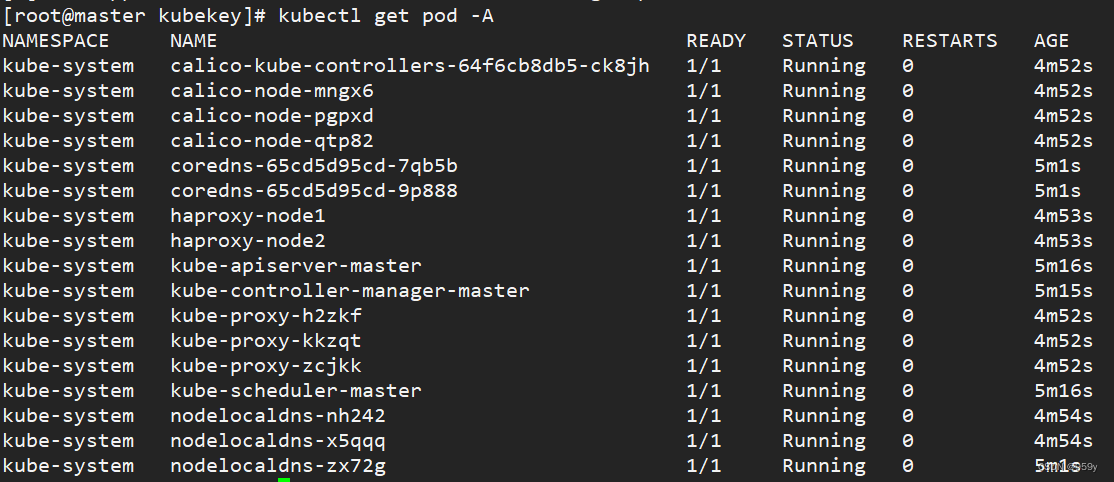
kubectl get pod -A
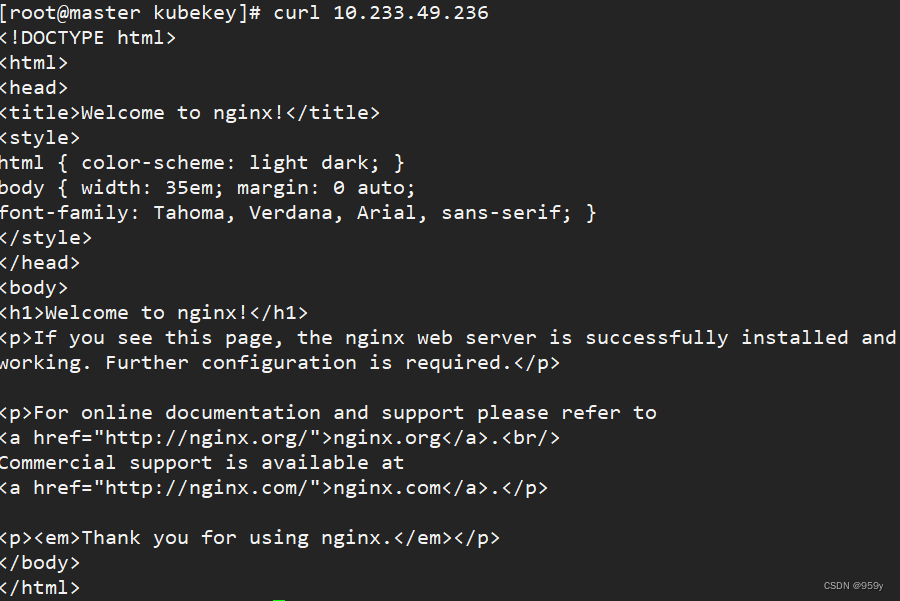
5.部署测试资源

kubectl create deployment nginx --image=nginx:alpine --replicas=2
kubectl create service nodeport nginx --tcp=80:80
kubectl get svc -o wide