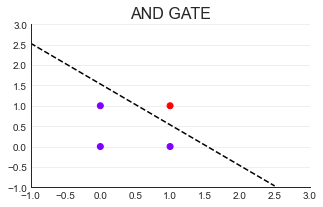
1、andgate
import torch

# X, w, andgate
X = torch.tensor([[1,0,0],[1,0,1],[1,1,0],[1,1,1]],dtype= torch.float32)
andgate = torch.tensor([0,0,0,1],dtype= torch.float32)

def AND(X):
    w = torch.tensor([-0.23,0.15,0.15],dtype= torch.float32)
    zhat = torch.mv(X,w)
    andhat = torch.tensor([int(x) for x in zhat>=0],dtype=torch.float32)  # 阶跃函数 替换 sigmoid函数
    return andhat

andhat = AND(X)
andhat, andgate
(tensor([0., 0., 0., 1.]), tensor([0., 0., 0., 1.]))
# 画图
import matplotlib.pyplot as plt
import seaborn as sns

plt.style.use('seaborn-whitegrid') #设置图像的风格
sns.set_style("white")
plt.figure(figsize=(5,3)) #设置画布大小

plt.title("AND GATE",fontsize=16) #设置图像标题
plt.scatter(X[:,1],X[:,2],c=andgate,cmap="rainbow") #绘制散点图

plt.xlim(-1,3) #设置横纵坐标尺寸
plt.ylim(-1,3)
plt.grid(alpha=.4,axis="y") #显示背景中的网格
plt.gca().spines["top"].set_alpha(.0) #让上方和右侧的坐标轴被隐藏
plt.gca().spines["right"].set_alpha(.0);

import numpy as np
x = np.arange(-1,3,0.5)
plt.plot(x,(0.23-0.15*x)/0.15 # 线性表达式
         ,color="k",linestyle="--")

2、orgate
import torch

# X, w, orgate
X = torch.tensor([[1,0,0],[1,0,1],[1,1,0],[1,1,1]],dtype= torch.float32)
orgate = torch.tensor([0,1,1,1],dtype= torch.float32)

def OR(X):
    w = torch.tensor([-0.08,0.15,0.15],dtype= torch.</