1. DQL查询
MyBatis-Plus 提供了多种内置的基础查询方法,有模糊查询,分组查询,排序等
接下来带大家写一写
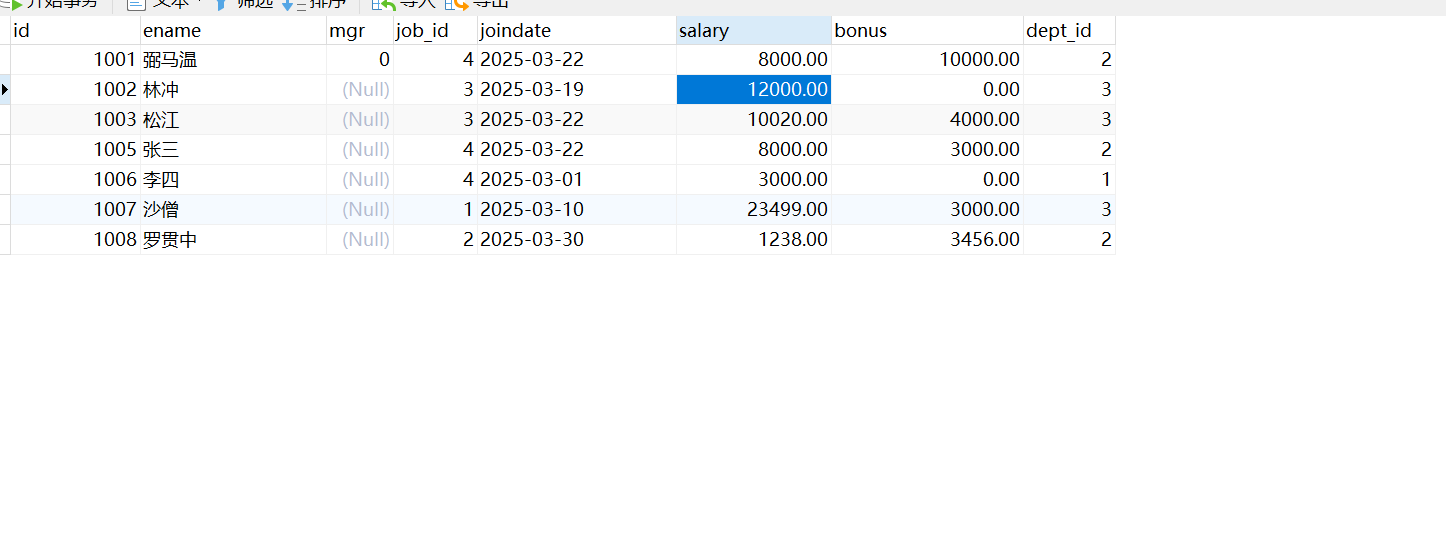
这是数据库表,给大家架设几个情景,大家可以先试着自己写一写
- 查询工资大于10000的,小于20000的
- 查询姓名为 李四 的员工信息
- 模糊查询 查询 员工姓名姓林的 -- 林%
- 根据工资查询,排序前五的人员信息
- 根据1005,1006,1007,1008的员工信息
- 根据部门分组统计不同部门人数
- or 查询 工资在10000一下或者20000以上
- 对员工进行姓名,部门编号,工资范围进行多条件查询
代码如下:
package com.example.mp01.service.impl;;


import com.baomidou.mybatisplus.core.conditions.query.LambdaQueryWrapper;
import com.baomidou.mybatisplus.core.conditions.query.QueryWrapper;
import com.baomidou.mybatisplus.extension.plugins.pagination.Page;
import com.example.mp01.mapper.EmpMapper;
import com.example.mp01.pojo.Emp;
import com.example.mp01.service.EmpService;
import org.junit.jupiter.api.Test;
import org.springframework.beans.factory.annotation.Autowired;
import org.springframework.boot.test.context.SpringBootTest;

import java.util.ArrayList;
import java.util.List;
import java.util.Map;


@SpringBootTest
class EmpServiceImplTest {
    @Autowired
    private EmpService empService;

    @Test
    public void crud() {
//        查询
        Emp emp = empService.getById(1001l);
        System.out.println(emp);
//        查询所有
//        List<Emp> list = empService.list();
//        System.out.println(list);

//        新增
        emp.setId(1009);
        emp.setEname("弼马温333");
        emp.setBonus(10000);
//        boolean save = empService.save(emp);
//        System.out.println(save);

//        修改
//        boolean b = empService.updateById(emp);
//        System.out.println(b);

//        删除
        boolean b = empService.removeById(1009);
        System.out.println(b);

    }

//    分页查询
    @Test
    public void page() {
        // 创建分页对象,当前页为第1页,每页显示3条数据
        Page<Emp> empPage = new Page<>(1, 3);

        // 执行分页查询
        empService.page(empPage);

        // 输出分页信息
        System.out.println("当前页码: " + empPage.getCurrent());
        System.out.println("当前页数据: " + empPage.getRecords());
        System.out.println("总页数: " + empPage.getPages());
        System.out.println("总条数: " + empPage.getTotal());
        System.out.println("当前页条数: " + empPage.getSize());
    }


    //    ------------DQL查询------------------

    @Autowired
    private EmpMapper empMapper;

//    查询工资大于10000的,小于20000的
    @Test
    public void test1(){
//        法一 QueryWrapper
//        QueryWrapper<Emp> qw = new QueryWrapper<>();
//        qw.gt("salary",10000);
//        qw.lt("salary",20000);

//        法二 LambdaQueryWrapper
        LambdaQueryWrapper<Emp> qw = new LambdaQueryWrapper<>();
        qw.gt(Emp::getSalary,10000)
                .lt(Emp::getSalary,20000);
        List<Emp> emps = empMapper.selectList(qw);
        System.out.println(emps);
    }
//    查询姓名为 李四 的员工信息
    @Test
    public void test2(){
        LambdaQueryWrapper<Emp> qw = new LambdaQueryWrapper<>();
        qw.eq(Emp::getEname,"李四");
        Emp emp = empMapper.selectOne(qw);
        System.out.println(emp);

    }

//    模糊查询 查询 员工姓名姓林的 -- 林%
    @Test
    public void test3(){
        LambdaQueryWrapper<Emp> qw = new LambdaQueryWrapper<>();
        qw.like(Emp::getEname,"林");
        List<Emp> emps = empMapper.selectList(qw);
        System.out.println(emps);
    }
    //    根据工资查询,排序前五的人员信息
    @Test
    public void test4(){
        LambdaQueryWrapper<Emp> qw = new LambdaQueryWrapper<>();
        qw.orderByDesc(Emp::getSalary);
//        分页查询
        Page<Emp> empPage = new Page<>(1, 5);
        empMapper.selectPage(empPage,qw);
        System.out.println(empPage.getRecords());
    }
    //    根据1005,1006,1007,1008的员工信息
    @Test
    public void test5(){
        LambdaQueryWrapper<Emp> qw = new LambdaQueryWrapper<>();
        ArrayList<Long> ids = new ArrayList<>();
        ids.add(1005l);
        ids.add(1006l);
        ids.add(1007l);
        ids.add(1008l);
        qw.in(Emp::getId,ids);
        List<Emp> emps = empMapper.selectList(qw);
        System.out.println(emps);
    }
    //    根据部门分组统计不同部门人数
    @Test
    public void test6(){
        QueryWrapper<Emp> qw = new QueryWrapper<>();
        // 使用lambda表达式设置分组条件,按部门ID进行分组
        qw.lambda().groupBy(Emp::getDeptId);
        // 指定查询字段:部门ID和员工数量
        qw.select("dept_id", "count(*) as getCount");
        // 执行查询并获取结果集
        List<Map<String, Object>> maps = empMapper.selectMaps(qw);
        // 遍历结果集并打印每个部门的ID和对应人数
        for (Map<String, Object> map : maps) {
            System.out.println(map.get("dept_id") + "----" + map.get("getCount"));
        }
    }

//    or  查询 工资在10000一下或者20000以上
    @Test
    public void test7(){
        QueryWrapper<Emp> qw = new QueryWrapper<>();
        qw.lambda().lt(Emp::getSalary,10000)
                .or()
                .gt(Emp::getSalary,20000);
        List<Emp> emps = empMapper.selectList(qw);
        System.out.println(emps);
    }
//    对员工进行姓名,部门编号,工资范围进行多条件查询
//    没有传递的参数不添加条件
    @Test
    public void test8(){
        String ename = "林";
        Integer deptId = 3;
        Integer salary1 = 10000;
        Integer salary2 = 20000;
        QueryWrapper<Emp> qw = new QueryWrapper<>();
        qw.lambda()
                .like(ename!=null,Emp::getEname, ename)
                .between(salary1!=null&&salary2!=null,Emp::getSalary, salary1, salary2)
                .eq(deptId!= null,Emp::getDeptId, deptId);
        List<Emp> emps = empMapper.selectList(qw);
        System.out.println(emps);
    }


//    ------------DQL查询------------------


}
2. DML操作
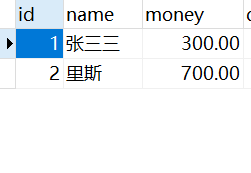
同样的,用另一张表给大家进行演示
2.1 创建pojo类,mapper接口层,测试类
package com.example.mp01.pojo;


import lombok.Data;

@Data
public class Account {
    private int id;
    private String name;
    private Double money;
}
package com.example.mp01.mapper;

import com.baomidou.mybatisplus.core.mapper.BaseMapper;
import com.example.mp01.pojo.Account;
import org.apache.ibatis.annotations.Mapper;

@Mapper
public interface AccountMapper extends BaseMapper<Account> {
}
package com.example.mp01.mapper;


import com.example.mp01.pojo.Account;
import org.apache.ibatis.annotations.Param;
import org.junit.jupiter.api.Test;
import org.springframework.beans.factory.annotation.Autowired;
import org.springframework.boot.test.context.SpringBootTest;

@SpringBootTest
class AccountMapperTest {
    @Autowired
    private AccountMapper accountMapper;

    @Test
    public void test1(){
        Account account = accountMapper.selectById(1);
        System.out.println(account);
    }

}
使用MybatisPlus实现数据库的一些单表增删改查是没有问题的
2.2 字段匹配
但如果实体类的字段名和数据库的对不上就会报异常:
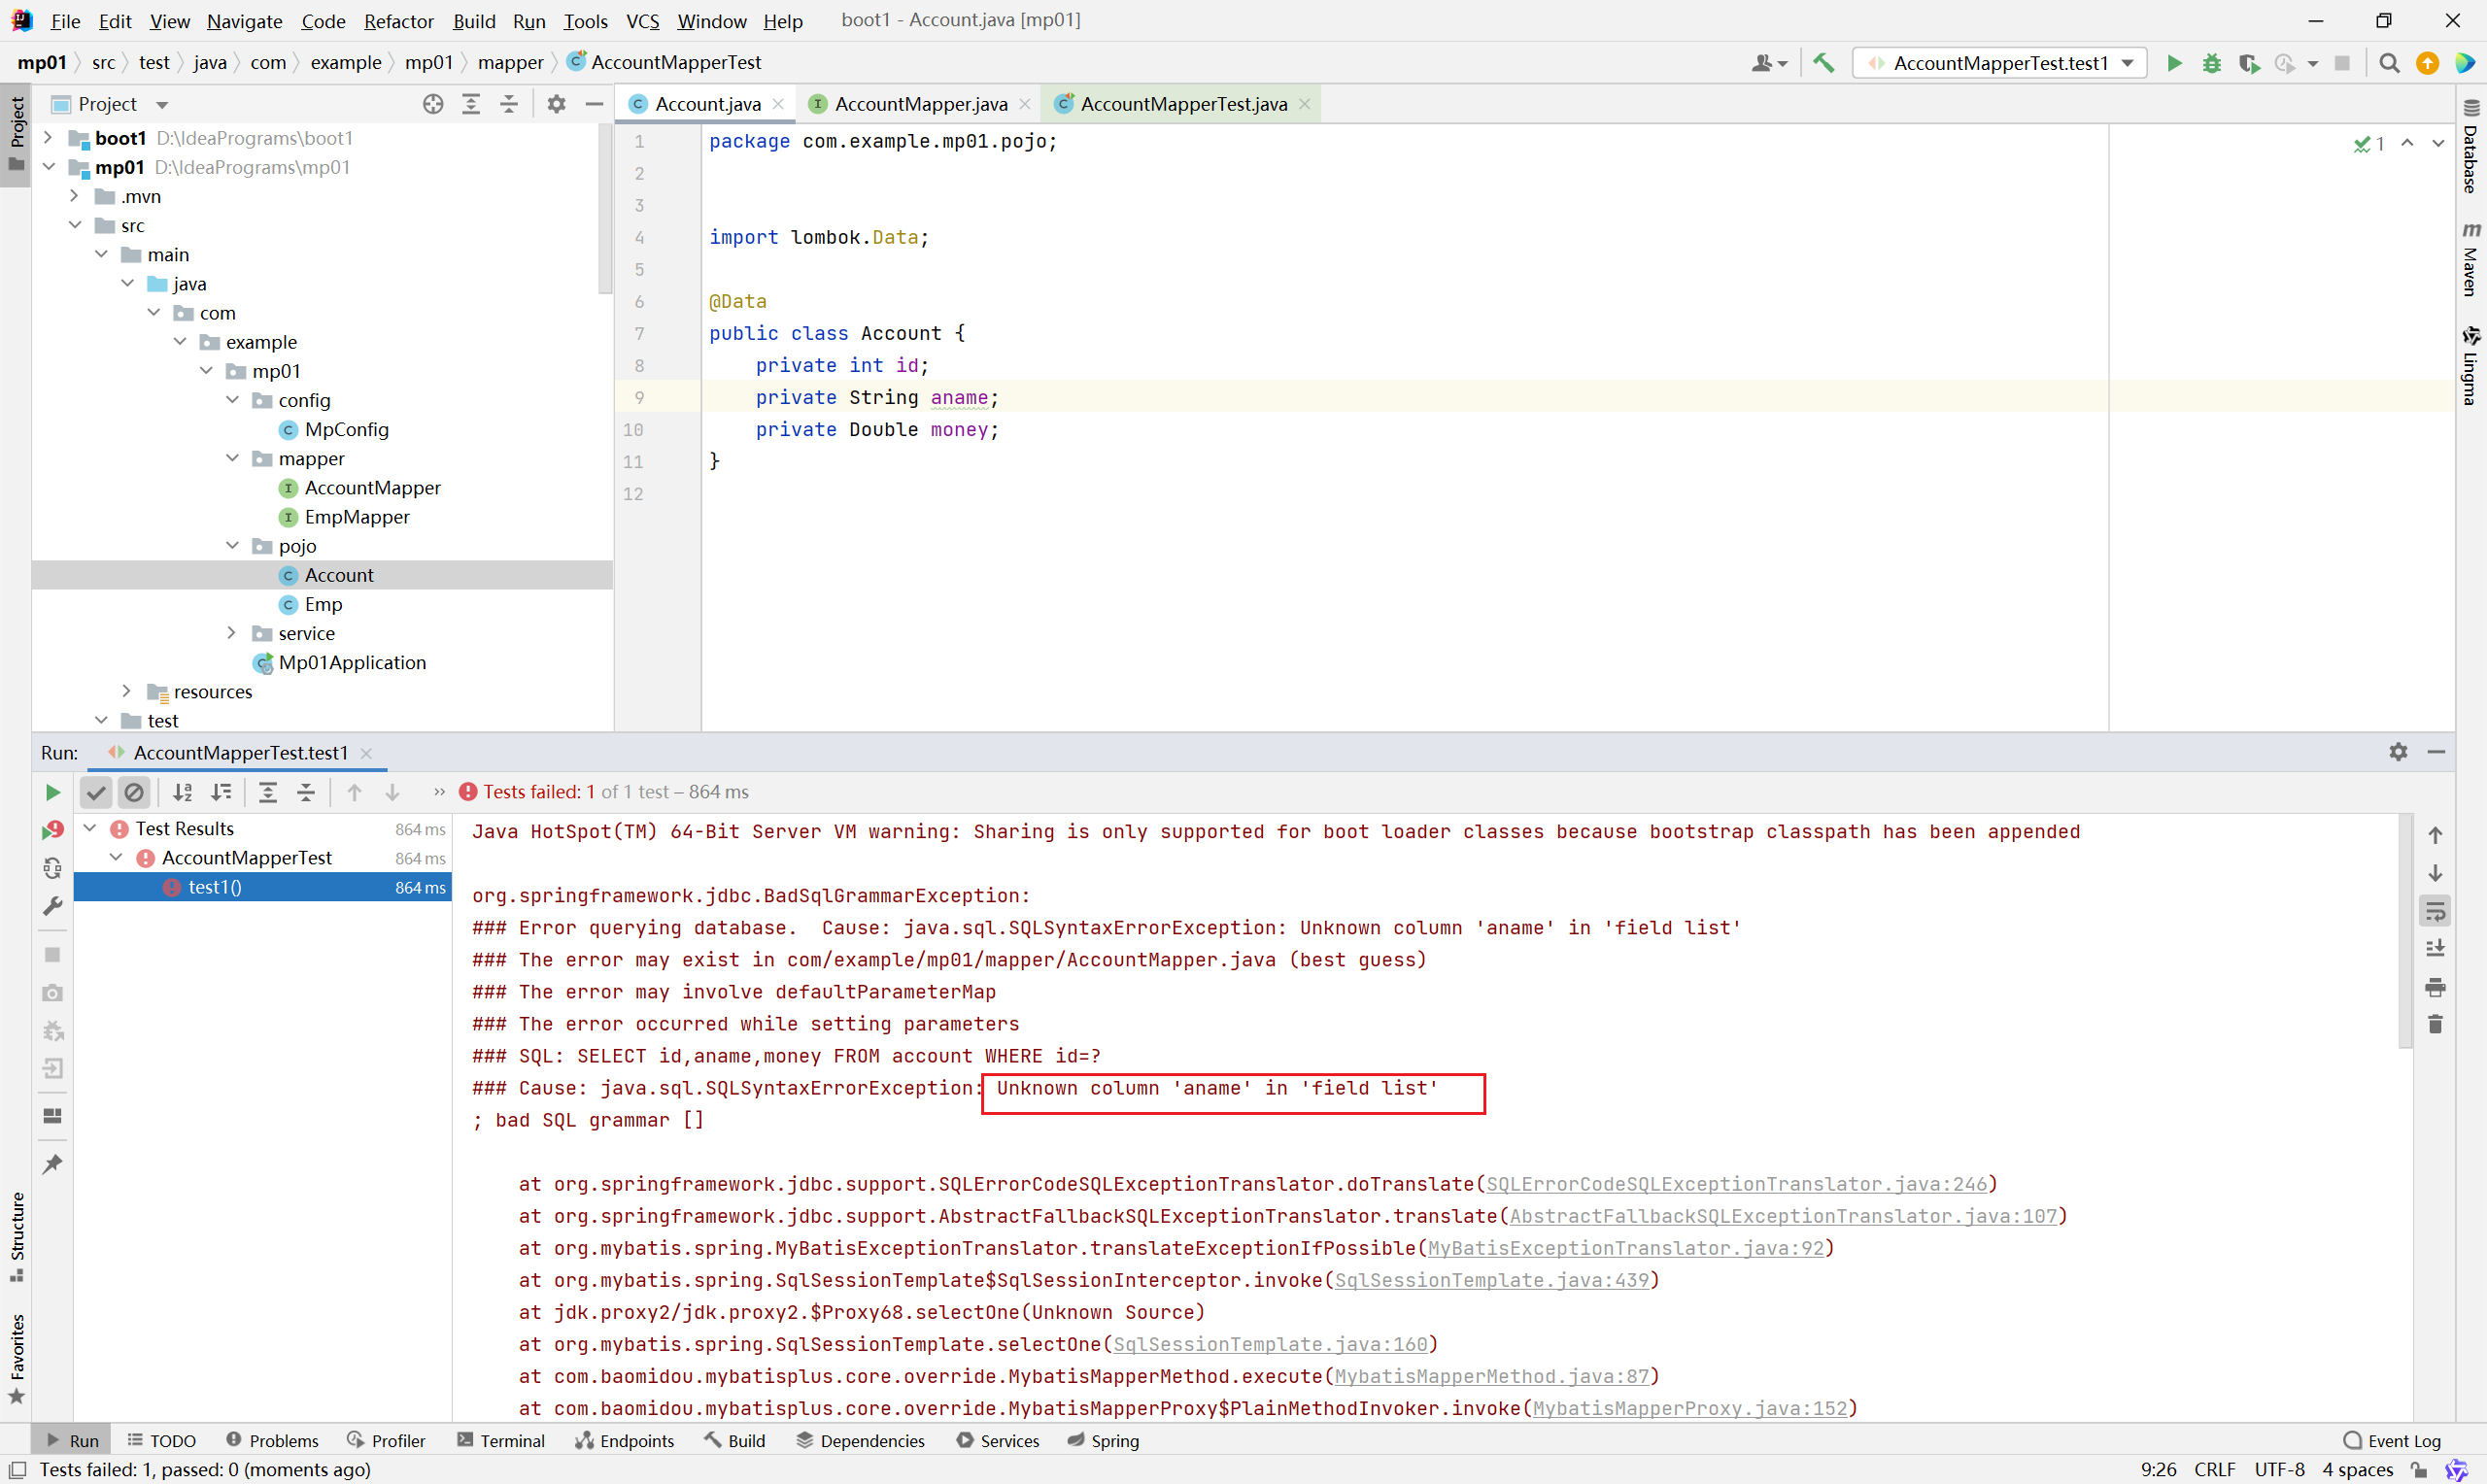
有两种解决方案,一种是让字段名统一,第二种是在实体类加注解@TableField
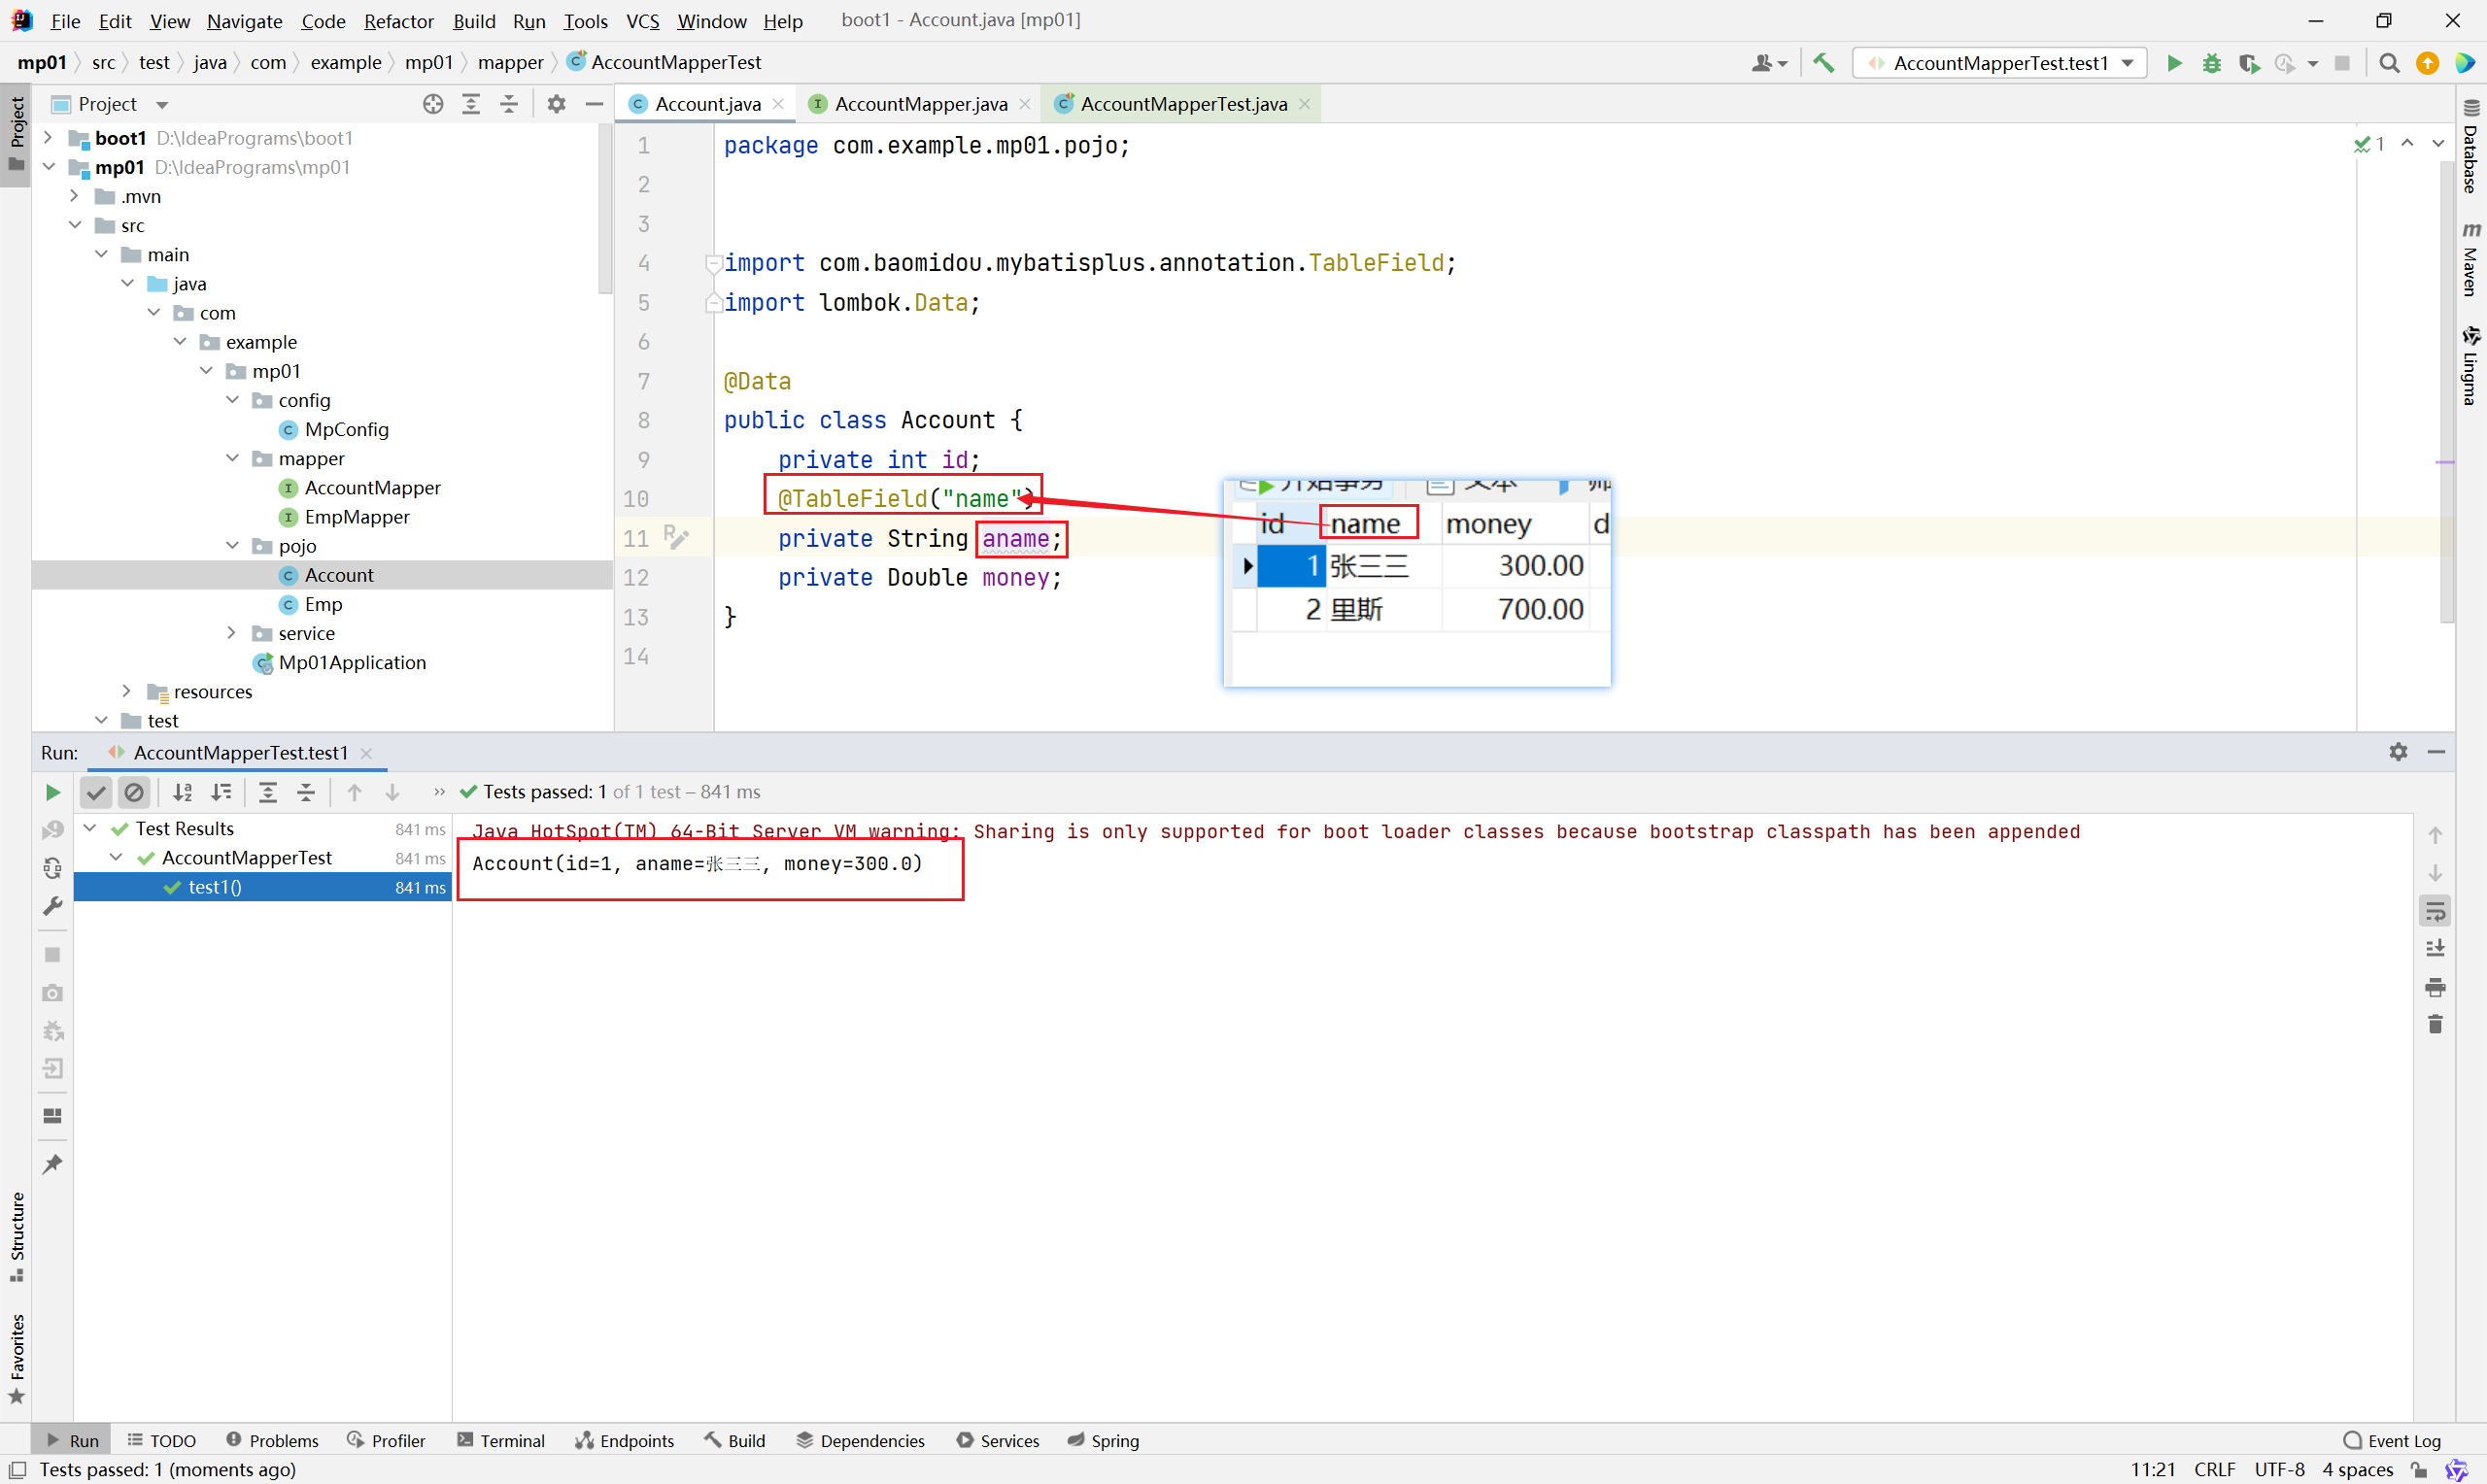
package com.example.mp01.pojo;


import com.baomidou.mybatisplus.annotation.TableField;
import lombok.Data;

@Data
public class Account {
    private int id;
    @TableField("name")
    private String aname;
    private Double money;
}
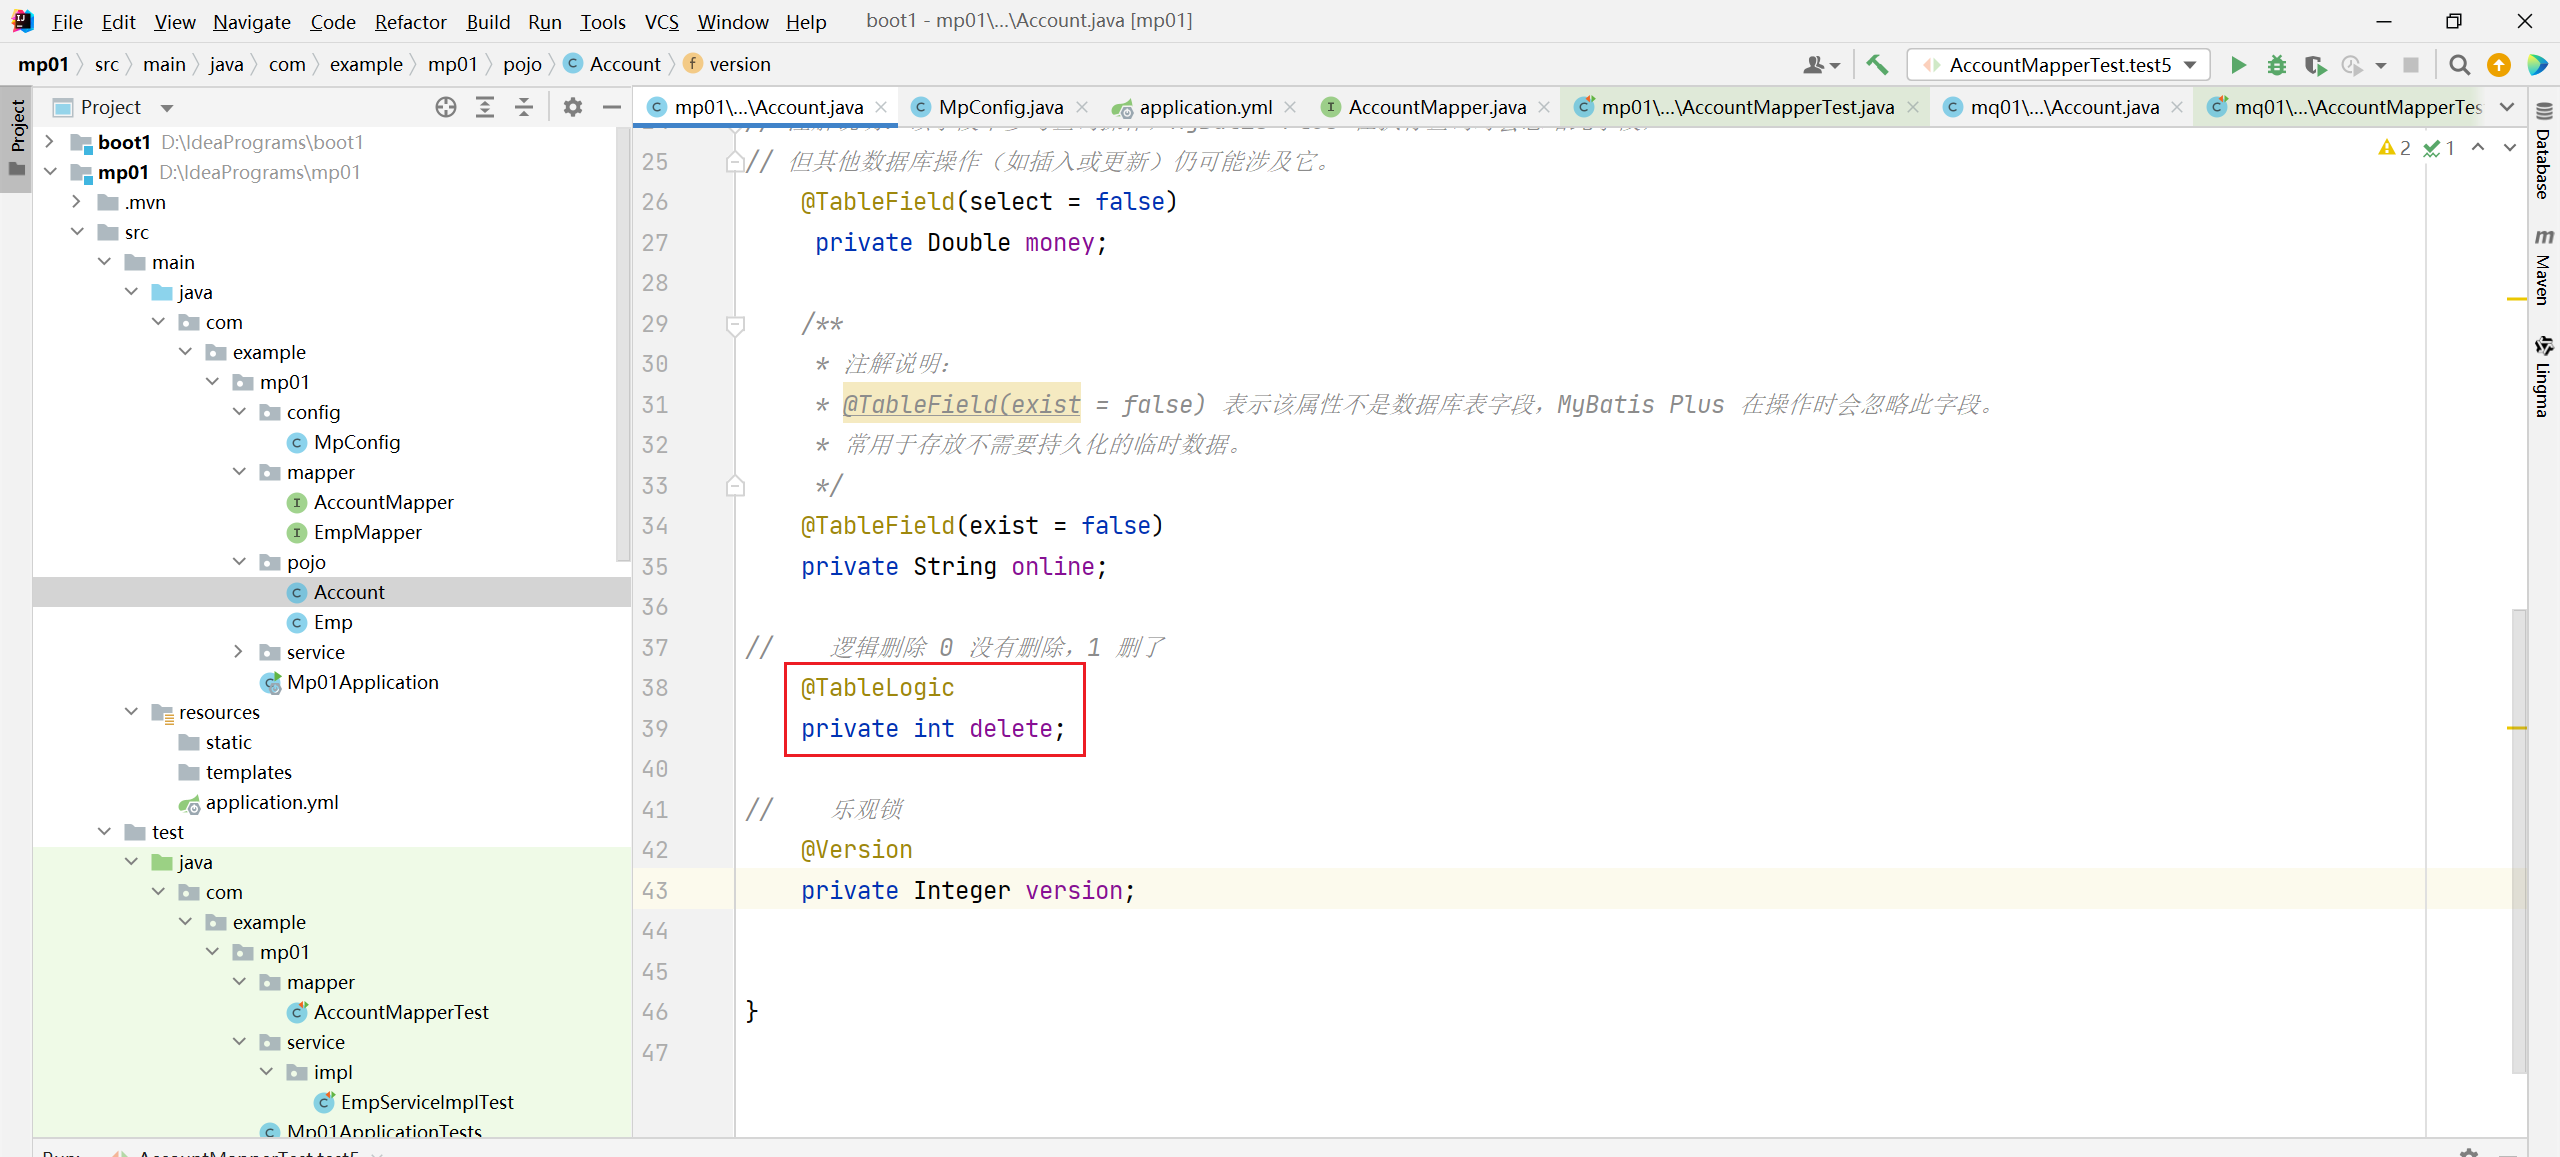
2.3 数据库未定义属性
如果有一种情况,业务需要使用,但是不需要在数据库中定义该字段,同样可以使用注解@TableField
package com.example.mp01.pojo;


import com.baomidou.mybatisplus.annotation.TableField;
import lombok.Data;

@Data
public class Account {
    private int id;
    @TableField("name")
    private String aname;
    private Double money;

    /**
     * 注解说明:
     * @TableField(exist = false) 表示该属性不是数据库表字段,MyBatis Plus 在操作时会忽略此字段。
     * 常用于存放不需要持久化的临时数据。
     */
    @TableField(exist = false)
    private String online;


}
2.4 “隐藏”字段
如果有一些比较敏感的字段或者信息,不想再查询数据库的时候查到封装给前端,可以使用@TableField注解的select属性定义
package com.example.mp01.pojo;


import com.baomidou.mybatisplus.annotation.TableField;
import lombok.Data;

@Data
public class Account {
// 注解说明:该字段不参与查询操作,MyBatis Plus 在执行查询时会忽略此字段,但其他数据库操作(如插入或更新)仍可能涉及它。
    @TableField(select = false)
     private Double money;


}
另外还有一个注解@TableName可以用来定义数据库中表的名字
package com.example.mp01.pojo;


import com.baomidou.mybatisplus.annotation.TableField;
import com.baomidou.mybatisplus.annotation.TableName;
import lombok.Data;

@Data
/**
 * 注解说明:
 * @TableName("account") 用于指定该实体类对应的数据库表名称为 "account"。
 * MyBatis Plus 在进行数据库操作时,会将此类与名为 "account" 的表进行映射。
 */
@TableName("account")
public class Account {
    private int id;
    @TableField("name")
    private String aname;
// 注解说明:该字段不参与查询操作,MyBatis Plus 在执行查询时会忽略此字段,但其他数据库操作(如插入或更新)仍可能涉及它。
    @TableField(select = false)
     private Double money;

    /**
     * 注解说明:
     * @TableField(exist = false) 表示该属性不是数据库表字段,MyBatis Plus 在操作时会忽略此字段。
     * 常用于存放不需要持久化的临时数据。
     */
    @TableField(exist = false)
    private String online;

}
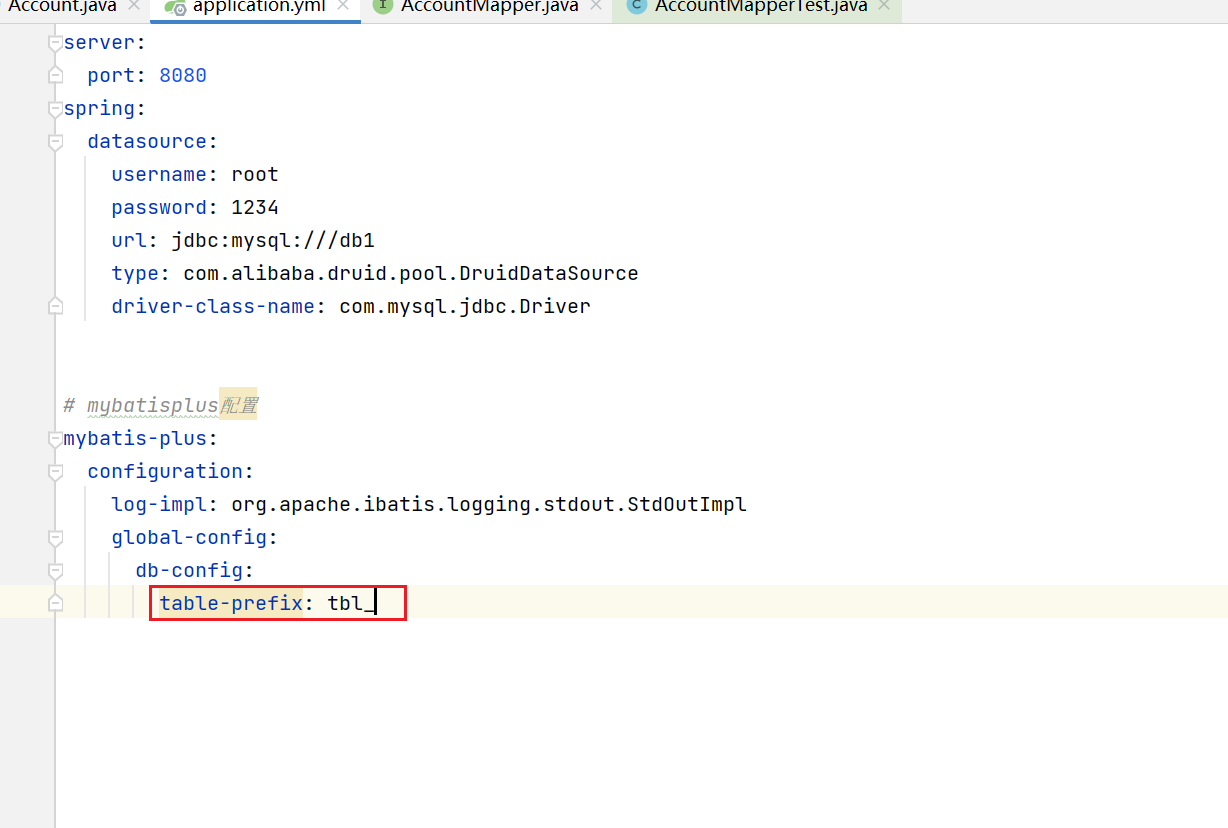
2.5 全局变量配置
除了在@TableName注解上定义表的名称,也可以在配置文件中全局配置数据库表的名称,可以将数据库中所有的表加上一个前缀
2.6 id自动生成策略
MyBatis-Plus 提供了多种主键(ID)自动生成策略,可以方便地为实体类的主键字段自动生成值。主要策略有以下类型
| 策略值 | 描述 | 使用数据库 |
| AUTO | 数据库ID自增 | 支持自增的数据库(如MySQL) |
| NONE | 无状态,该类型为未设置主键类型 | - |
| INPUT | 用户手动输入ID | 所有数据库 |
| ASSIGN_ID | 分配ID(默认),使用雪花算法生成Long类型ID | 所有数据库 |
| ASSIGN_UUID | 分配UUID,生成String类型UUID | 所有数据库 |
| ID_WORKER | 已废弃,使用ASSIGN_ID代替 | 所有数据库 |
| UUID | 已废弃,使用ASSIGN_UUID代替 | 所有数据库 |
以下是主要的ID生成策略及其使用方法:
2.6.1 方式一,注解@TableId
比较常用的有两种:
- AUTO 数据库自增(数据库有自增的情况下)
- ASSIGN_ID 雪花算法随机数: 时间戳+机器编码+序列号
- 使用雪花算法生成19位长度的 Long 类型ID
package com.example.mp01.pojo;


import com.baomidou.mybatisplus.annotation.IdType;
import com.baomidou.mybatisplus.annotation.TableField;
import com.baomidou.mybatisplus.annotation.TableId;
import com.baomidou.mybatisplus.annotation.TableName;
import lombok.Data;

@Data
@TableName("account")
public class Account {
//    IdType.AUTO 数据库自增(数据库有自增的情况下)
//    IdType.ASSIGN_ID 雪花算法随机数: 时间戳+机器编码+序列号 使用雪花算法生成19位长度的 Long 类型ID
    @TableId(type = IdType.ASSIGN_ID)
    private Long id;


}
2.6.2 yml全局配置
server:
  port: 8080
spring:
  datasource:
    username: root
    password: 1234
    url: jdbc:mysql:///db1
    type: com.alibaba.druid.pool.DruidDataSource
    driver-class-name: com.mysql.jdbc.Driver


# mybatisplus配置
mybatis-plus:
  configuration:
    log-impl: org.apache.ibatis.logging.stdout.StdOutImpl
    global-config:
      db-config:
        id-type: assign_id # 所有表配置均为雪花算法
#        table-prefix: tbl_
2.7 批量操作
批量删除
package com.example.mp01.mapper;


import com.example.mp01.pojo.Account;
import org.apache.ibatis.annotations.Param;
import org.junit.jupiter.api.Test;
import org.springframework.beans.factory.annotation.Autowired;
import org.springframework.boot.test.context.SpringBootTest;

import java.util.ArrayList;
import java.util.List;

@SpringBootTest
class AccountMapperTest {
    @Autowired
    private AccountMapper accountMapper;

    //    批量删除
    @Test
    public void test3(){
        ArrayList<Long> ids = new ArrayList<>();
        ids.add(20l);
        ids.add(11l);
        ids.add(1l);
        int i = accountMapper.deleteByIds(ids);
        System.out.println(i);
    }

}
批量查询
package com.example.mp01.mapper;
import com.example.mp01.pojo.Account;
import org.apache.ibatis.annotations.Param;
import org.junit.jupiter.api.Test;
import org.springframework.beans.factory.annotation.Autowired;
import org.springframework.boot.test.context.SpringBootTest;
import java.util.ArrayList;
import java.util.List;
@SpringBootTest
class AccountMapperTest {
@Autowired
private AccountMapper accountMapper;
// 批量查询
@Test
public void test4(){
ArrayList<Long> ids = new ArrayList<>();
ids.add(20l);
ids.add(11l);
ids.add(1l);
List<Account> accounts = accountMapper.selectBatchIds(ids);
System.out.println(accounts);
}
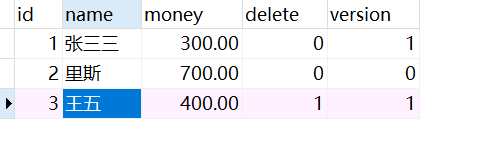
}逻辑删除
为数据设置是否可用状态字段,删除时设置状态字段为不可用状态,数据保留在数据库中
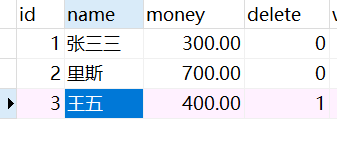
使用注解@TableLogic 👇
全局配置👇
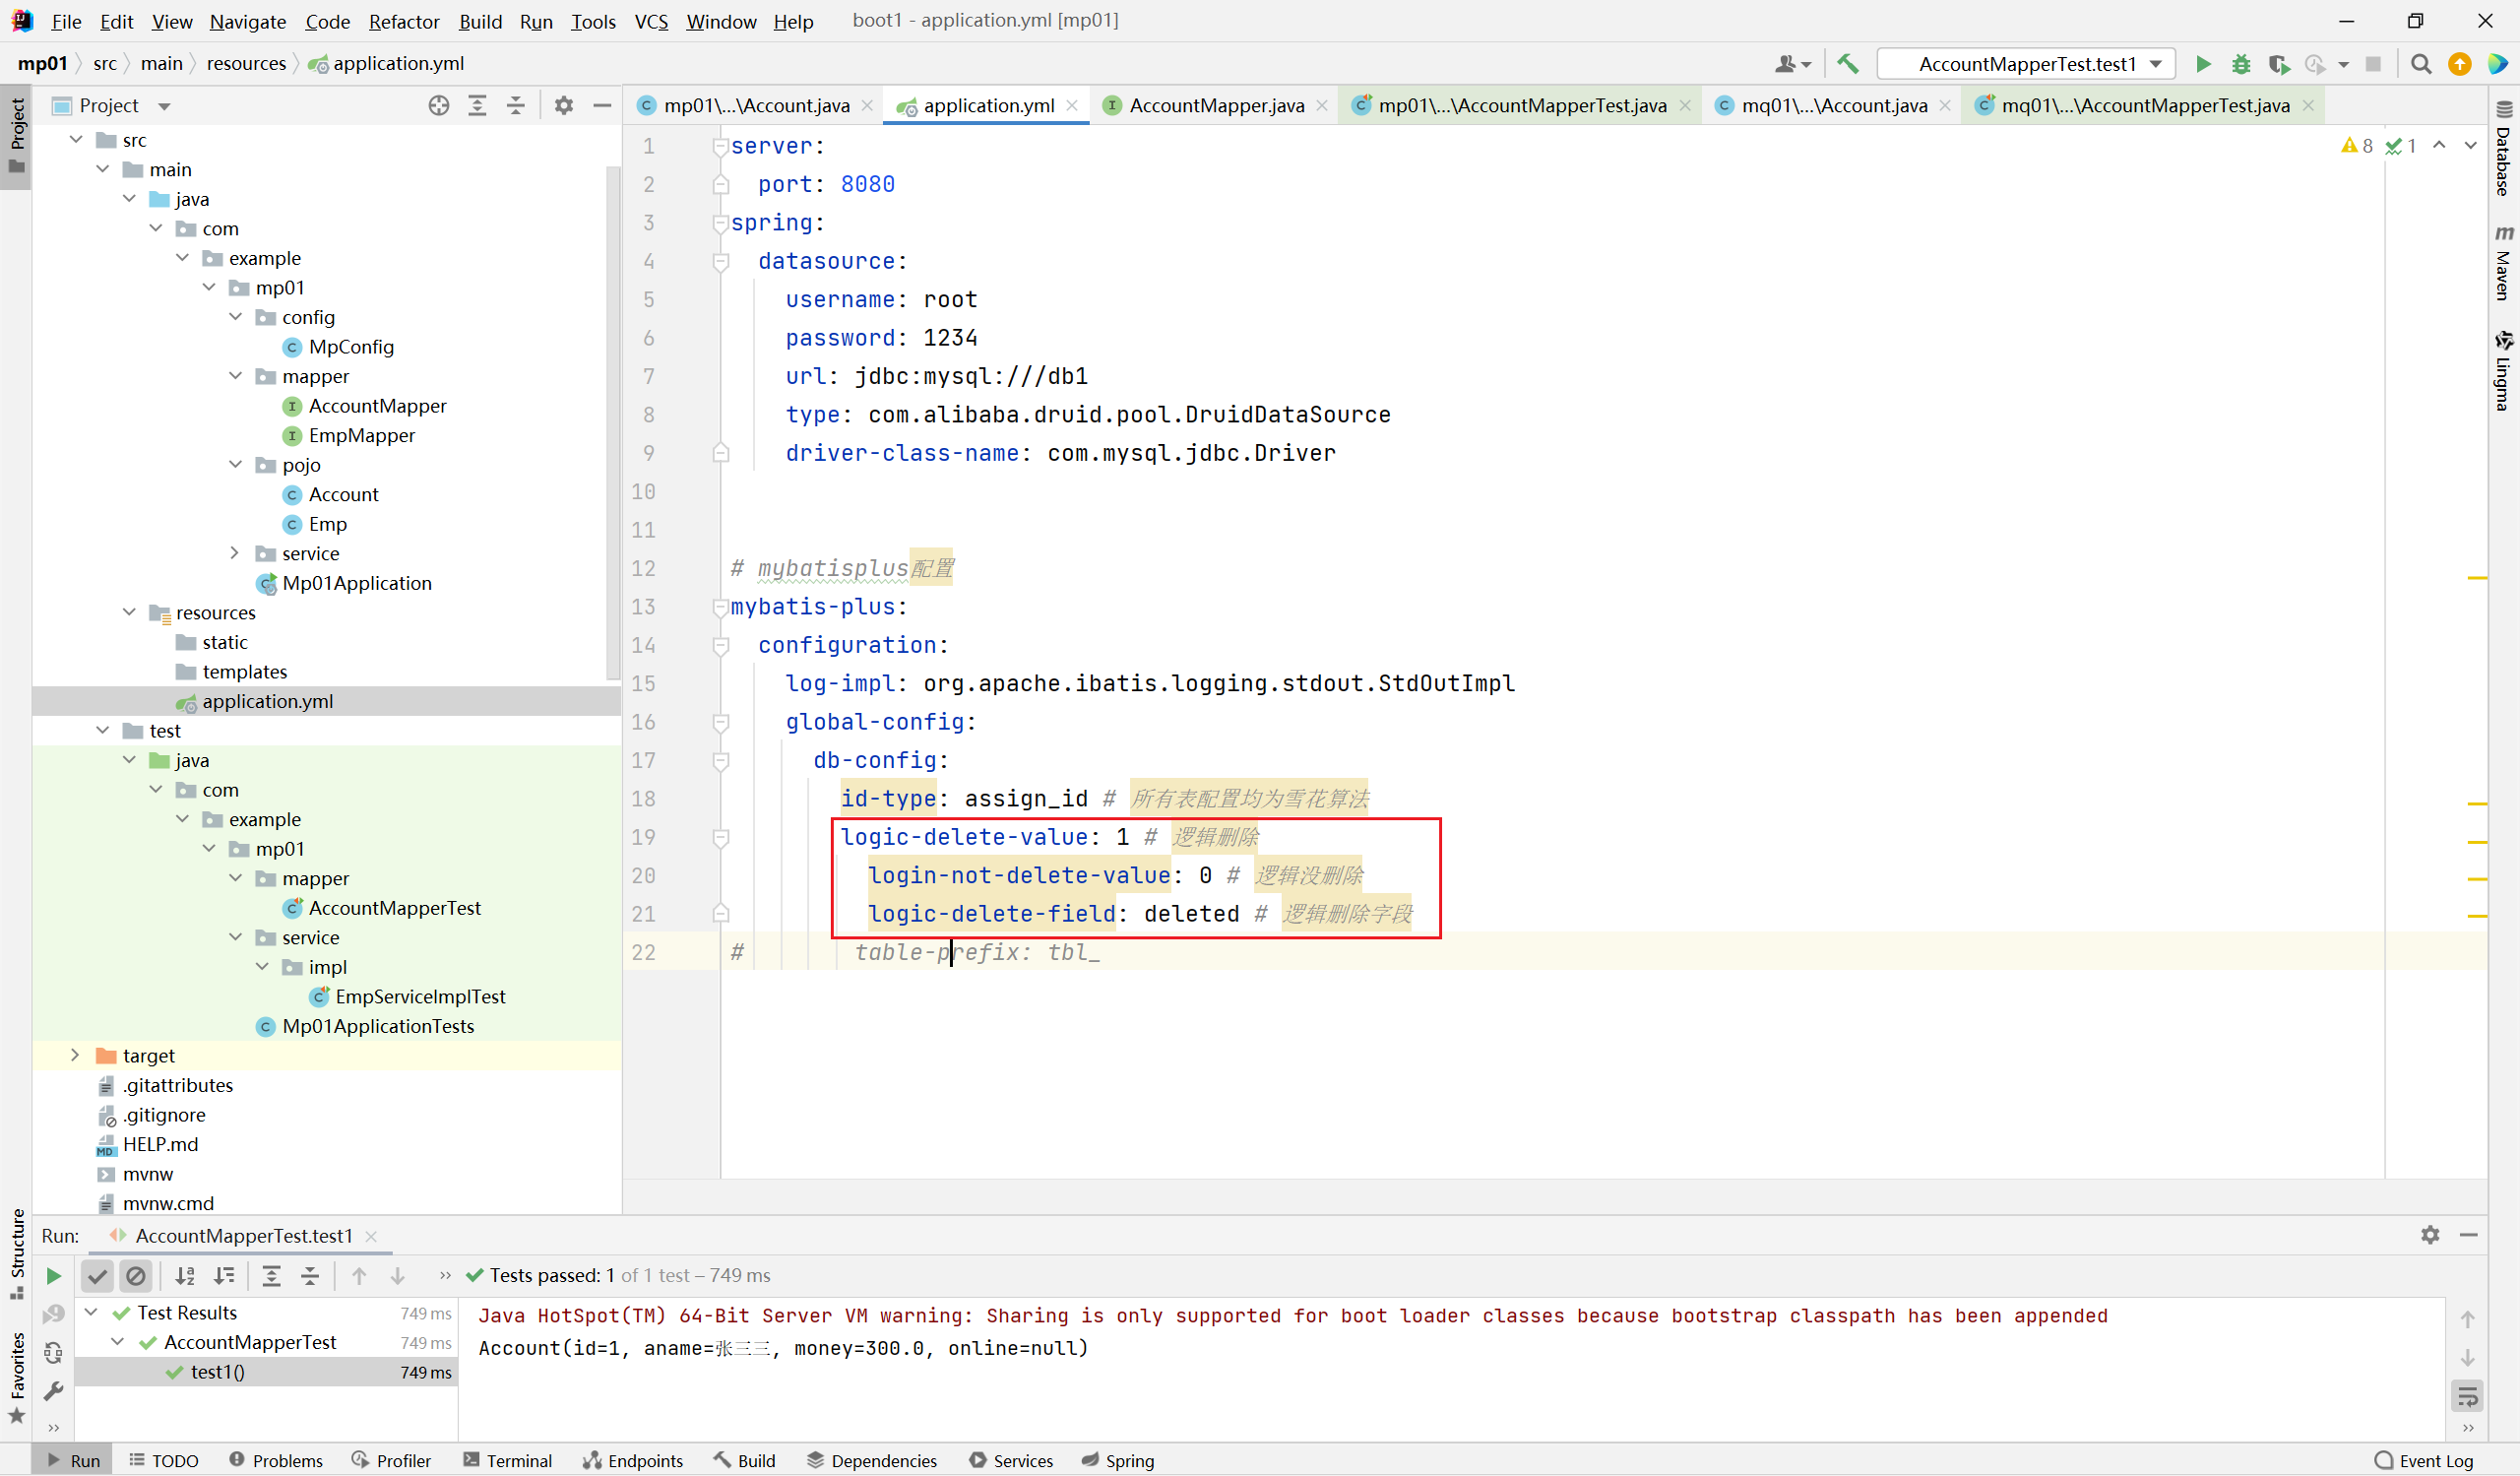
server:
  port: 8080
spring:
  datasource:
    username: root
    password: 1234
    url: jdbc:mysql:///db1
    type: com.alibaba.druid.pool.DruidDataSource
    driver-class-name: com.mysql.jdbc.Driver


# mybatisplus配置
mybatis-plus:
  configuration:
    log-impl: org.apache.ibatis.logging.stdout.StdOutImpl
    global-config:
      db-config:
        id-type: assign_id # 所有表配置均为雪花算法
        logic-delete-value: 1 # 逻辑删除
          login-not-delete-value: 0 # 逻辑没删除
          logic-delete-field: deleted # 逻辑删除字段
#        table-prefix: tbl_
2.8 乐观锁
乐观锁是并发控制的一种重要手段,MyBatis-Plus 提供了便捷的乐观锁实现方式
乐观锁基本原理
乐观锁假设多用户并发操作时不会产生冲突,只在数据提交更新时检查是否被其他操作修改过。主要通过版本号机制实现:
取出记录时,获取当前版本号
更新时,带上这个版本号
执行更新时,检查当前版本号是否与数据库中的版本号一致
如果一致则更新成功并将版本号+1,否则更新失败
有以下几步:
- 数据库表中添加锁标记字段
- 实体类中添加对应字段
- 核心配置类中配置乐观锁拦截器
package com.example.mp01.config;

import com.baomidou.mybatisplus.extension.plugins.MybatisPlusInterceptor;
import com.baomidou.mybatisplus.extension.plugins.inner.OptimisticLockerInnerInterceptor;
import com.baomidou.mybatisplus.extension.plugins.inner.PaginationInnerInterceptor;
import org.springframework.context.annotation.Bean;
import org.springframework.context.annotation.Configuration;

@Configuration
public class MpConfig {
    @Bean
    public MybatisPlusInterceptor mybatisPlusInterceptor() {
        MybatisPlusInterceptor interceptor = new MybatisPlusInterceptor();

        // 添加分页插件
        interceptor.addInnerInterceptor(new PaginationInnerInterceptor());

        // 可添加其他拦截器,例如乐观锁插件
         interceptor.addInnerInterceptor(new OptimisticLockerInnerInterceptor());

        return interceptor;
    }
}