书接上回,上一篇blog是使用esp32s3通过ov2640摄像头拍摄到一帧照片,并把它保存到了SD卡中,这第二篇就通过LCD将拍摄到的图片显示到LCD上,本次分享硬件使用的 ESP32-S3-CAM 果云科技开发板,并且使用了配套的LCD扩展板,扩展板上可以插一个驱动为ili9341的SPI屏
一:现象!
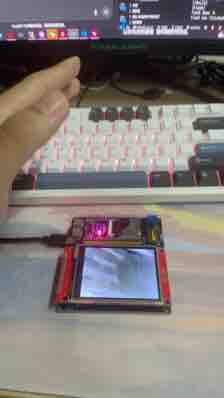
第一件事,还是摆具体实现的现象:
摄像头拍到的图像实时传输到LCD屏幕上,唯一 缺点是使用的图像RGB565的格式,图像不那么清晰
二:配置!
这次esp32用到的外设有camera、lcd以及led,psram这些,没有其他的什么,
先来讲讲这些基础配置,camera和led的配置代码如上一篇blog一样,不需要做什么改变,在每次主函数和任务开始前进行一个初始化操作即可,然后是lcd,lcd的初始化主要是参考了idf的example:spi_lcd_touch,
因为我们lcd与mcu的通信一般是spi,所以需要初始化lcd和mcu之间的spi通信,代码如下所示:
spi_bus_config_t buscfg = {
    .sclk_io_num = EXAMPLE_PIN_NUM_SCLK,
    .mosi_io_num = EXAMPLE_PIN_NUM_MOSI,
    .miso_io_num = EXAMPLE_PIN_NUM_MISO,
    .quadwp_io_num = -1,
    .quadhd_io_num = -1,
    .max_transfer_sz = EXAMPLE_LCD_H_RES * 80 * sizeof(uint16_t),
};
spi_bus_initialize(LCD_HOST, &buscfg, SPI_DMA_CH_AUTO);
这里面我们需要定义spi的三个引脚,max_transfer_sz是一次最大传输字节数,这个配置影响的是DMA的传输性能
紧接着是要初始化esp_lcd_panel_io,也就是LCD面板IO句柄
esp_lcd_panel_io_spi_config_t io_config = {
    .dc_gpio_num = EXAMPLE_PIN_NUM_LCD_DC,
    .cs_gpio_num = EXAMPLE_PIN_NUM_LCD_CS,
    .pclk_hz = EXAMPLE_LCD_PIXEL_CLOCK_HZ,
    .lcd_cmd_bits = EXAMPLE_LCD_CMD_BITS,
    .lcd_param_bits = EXAMPLE_LCD_PARAM_BITS,
    .spi_mode = 0,
    .trans_queue_depth = 10,
};

esp_lcd_new_panel_io_spi((esp_lcd_spi_bus_handle_t)LCD_HOST, &io_config, &io_handle);
在此之前我们还需要定义一个面板驱动
esp_lcd_panel_handle_t panel_handle = NULL;
最后是初始化具体的lcd驱动,包括重启的io和lcd显示的rgb格式
    // esp_lcd_panel_handle_t panel_handle = NULL;
    esp_lcd_panel_dev_config_t panel_config = {
        .reset_gpio_num = EXAMPLE_PIN_NUM_LCD_RST,
        .rgb_ele_order = ESP_LCD_COLOR_SPACE_RGB,
        .bits_per_pixel = 16,
    };
最后是需要检查驱动ILI9341屏幕这一系列命令有没有报错
    ESP_ERROR_CHECK(esp_lcd_new_panel_ili9341(io_handle, &panel_config, &panel_handle));


    ESP_ERROR_CHECK(esp_lcd_panel_reset(panel_handle));
    ESP_ERROR_CHECK(esp_lcd_panel_init(panel_handle));
    ESP_ERROR_CHECK(esp_lcd_panel_swap_xy(panel_handle, true));
    ESP_ERROR_CHECK(esp_lcd_panel_invert_color(panel_handle, true));
    ESP_ERROR_CHECK(esp_lcd_panel_mirror(panel_handle, true, false));

    // user can flush pre-defined pattern to the screen before we turn on the screen or backlight
    ESP_ERROR_CHECK(esp_lcd_panel_disp_on_off(panel_handle, true));
    ESP_LOGI(TAG, "Turn on LCD backlight");
    gpio_set_level(EXAMPLE_PIN_NUM_BK_LIGHT, EXAMPLE_LCD_BK_LIGHT_ON_LEVEL);
这里面有一句很关键的代码,就是 ESP_ERROR_CHECK(esp_lcd_panel_swap_xy(panel_handle, true));
ESP_ERROR_CHECK(esp_lcd_panel_invert_color(panel_handle, true));
这两句代码翻转了LCD屏显示的方向,从原来的纵向改成了横向显示,以及将ILI9341默认的BGR565颜色编码格式改成了RGB565
最后就是根据原理图修改io引脚,
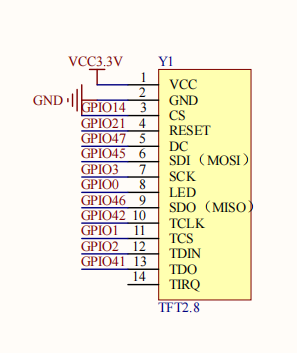
具体修改之后的.h文件如下:
#define LCD_HOST  SPI2_HOST

////////////////////////////////////////////////////////////////////////////////////////////////////////////////////////
//////////////////// Please update the following configuration according to your LCD spec //////////////////////////////
////////////////////////////////////////////////////////////////////////////////////////////////////////////////////////
#define EXAMPLE_LCD_PIXEL_CLOCK_HZ     (40 * 1000 * 1000)
#define EXAMPLE_LCD_BK_LIGHT_ON_LEVEL  1
#define EXAMPLE_LCD_BK_LIGHT_OFF_LEVEL !EXAMPLE_LCD_BK_LIGHT_ON_LEVEL
#define EXAMPLE_PIN_NUM_SCLK           3
#define EXAMPLE_PIN_NUM_MOSI           45
#define EXAMPLE_PIN_NUM_MISO           46
#define EXAMPLE_PIN_NUM_LCD_DC         47
#define EXAMPLE_PIN_NUM_LCD_RST        21
#define EXAMPLE_PIN_NUM_LCD_CS         14
#define EXAMPLE_PIN_NUM_BK_LIGHT       0
#define EXAMPLE_PIN_NUM_TOUCH_CS       -256


// The pixel number in horizontal and vertical

#define EXAMPLE_LCD_H_RES              240
#define EXAMPLE_LCD_V_RES              320
#define LCD_WIDTH 320
#define LCD_HEIGHT 240
// #elif CONFIG_EXAMPLE_LCD_CONTROLLER_GC9A01
// #define EXAMPLE_LCD_H_RES              240
// #define EXAMPLE_LCD_V_RES              240
// #endif
// Bit number used to represent command and parameter
#define EXAMPLE_LCD_CMD_BITS           8
#define EXAMPLE_LCD_PARAM_BITS         8
三:学习历程
为了实现我们最终想要实现的功能,我将他划分成了三个部分,首先是需要camera。camera可以捕获到照片,这是第一步,而第一步我们在第一篇blog已经完成了,然后是第二步,我们需要点亮lcd屏幕,这个部分我主要参考的是上文中提到的example,
代码我也贴在下面,
/*
 * SPDX-FileCopyrightText: 2021-2023 Espressif Systems (Shanghai) CO LTD
 *
 * SPDX-License-Identifier: CC0-1.0
 */

#include <stdio.h>
#include "freertos/FreeRTOS.h"
#include "freertos/task.h"
#include "freertos/semphr.h"
#include "esp_timer.h"
#include "esp_lcd_panel_io.h"
#include "esp_lcd_panel_vendor.h"
#include "esp_lcd_panel_ops.h"
#include "driver/gpio.h"
#include "driver/spi_master.h"
#include "esp_err.h"
#include "esp_log.h"
#include "lvgl.h"

#if CONFIG_EXAMPLE_LCD_CONTROLLER_ILI9341
#include "esp_lcd_ili9341.h"
#elif CONFIG_EXAMPLE_LCD_CONTROLLER_GC9A01
#include "esp_lcd_gc9a01.h"
#endif

#if CONFIG_EXAMPLE_LCD_TOUCH_CONTROLLER_STMPE610
#include "esp_lcd_touch_stmpe610.h"
#endif

static const char *TAG = "example";

// Using SPI2 in the example
#define LCD_HOST  SPI2_HOST

////////////////////////////////////////////////////////////////////////////////////////////////////////////////////////
//////////////////// Please update the following configuration according to your LCD spec //////////////////////////////
////////////////////////////////////////////////////////////////////////////////////////////////////////////////////////
#define EXAMPLE_LCD_PIXEL_CLOCK_HZ     (40 * 1000 * 1000)
#define EXAMPLE_LCD_BK_LIGHT_ON_LEVEL  1
#define EXAMPLE_LCD_BK_LIGHT_OFF_LEVEL !EXAMPLE_LCD_BK_LIGHT_ON_LEVEL
#define EXAMPLE_PIN_NUM_SCLK           3
#define EXAMPLE_PIN_NUM_MOSI           45
#define EXAMPLE_PIN_NUM_MISO           46
#define EXAMPLE_PIN_NUM_LCD_DC         47
#define EXAMPLE_PIN_NUM_LCD_RST        21
#define EXAMPLE_PIN_NUM_LCD_CS         14
#define EXAMPLE_PIN_NUM_BK_LIGHT       0
#define EXAMPLE_PIN_NUM_TOUCH_CS       1

// The pixel number in horizontal and vertical
#if CONFIG_EXAMPLE_LCD_CONTROLLER_ILI9341
#define EXAMPLE_LCD_H_RES              240
#define EXAMPLE_LCD_V_RES              320
#elif CONFIG_EXAMPLE_LCD_CONTROLLER_GC9A01
#define EXAMPLE_LCD_H_RES              240
#define EXAMPLE_LCD_V_RES              240
#endif
// Bit number used to represent command and parameter
#define EXAMPLE_LCD_CMD_BITS           8
#define EXAMPLE_LCD_PARAM_BITS         8

#define EXAMPLE_LVGL_TICK_PERIOD_MS    2
#define EXAMPLE_LVGL_TASK_MAX_DELAY_MS 500
#define EXAMPLE_LVGL_TASK_MIN_DELAY_MS 1
#define EXAMPLE_LVGL_TASK_STACK_SIZE   (4 * 1024)
#define EXAMPLE_LVGL_TASK_PRIORITY     2

static SemaphoreHandle_t lvgl_mux = NULL;

#if CONFIG_EXAMPLE_LCD_TOUCH_ENABLED
esp_lcd_touch_handle_t tp = NULL;
#endif

extern void example_lvgl_demo_ui(lv_disp_t *disp);

static bool example_notify_lvgl_flush_ready(esp_lcd_panel_io_handle_t panel_io, esp_lcd_panel_io_event_data_t *edata, void *user_ctx)
{
    lv_disp_drv_t *disp_driver = (lv_disp_drv_t *)user_ctx;
    lv_disp_flush_ready(disp_driver);
    return false;
}

static void example_lvgl_flush_cb(lv_disp_drv_t *drv, const lv_area_t *area, lv_color_t *color_map)
{
    esp_lcd_panel_handle_t panel_handle = (esp_lcd_panel_handle_t) drv->user_data;
    int offsetx1 = area->x1;
    int offsetx2 = area->x2;
    int offsety1 = area->y1;
    int offsety2 = area->y2;
    // copy a buffer's content to a specific area of the display
    esp_lcd_panel_draw_bitmap(panel_handle, offsetx1, offsety1, offsetx2 + 1, offsety2 + 1, color_map);
}

/* Rotate display and touch, when rotated screen in LVGL. Called when driver parameters are updated. */
static void example_lvgl_port_update_callback(lv_disp_drv_t *drv)
{
    esp_lcd_panel_handle_t panel_handle = (esp_lcd_panel_handle_t) drv->user_data;

    switch (drv->rotated) {
    case LV_DISP_ROT_NONE:
        // Rotate LCD display
        esp_lcd_panel_swap_xy(panel_handle, false);
        esp_lcd_panel_mirror(panel_handle, true, false);
#if CONFIG_EXAMPLE_LCD_TOUCH_ENABLED
        // Rotate LCD touch
        esp_lcd_touch_set_mirror_y(tp, false);
        esp_lcd_touch_set_mirror_x(tp, false);
#endif
        break;
    case LV_DISP_ROT_90:
        // Rotate LCD display
        esp_lcd_panel_swap_xy(panel_handle, true);
        esp_lcd_panel_mirror(panel_handle, true, true);
#if CONFIG_EXAMPLE_LCD_TOUCH_ENABLED
        // Rotate LCD touch
        esp_lcd_touch_set_mirror_y(tp, false);
        esp_lcd_touch_set_mirror_x(tp, false);
#endif
        break;
    case LV_DISP_ROT_180:
        // Rotate LCD display
        esp_lcd_panel_swap_xy(panel_handle, false);
        esp_lcd_panel_mirror(panel_handle, false, true);
#if CONFIG_EXAMPLE_LCD_TOUCH_ENABLED
        // Rotate LCD touch
        esp_lcd_touch_set_mirror_y(tp, false);
        esp_lcd_touch_set_mirror_x(tp, false);
#endif
        break;
    case LV_DISP_ROT_270:
        // Rotate LCD display
        esp_lcd_panel_swap_xy(panel_handle, true);
        esp_lcd_panel_mirror(panel_handle, false, false);
#if CONFIG_EXAMPLE_LCD_TOUCH_ENABLED
        // Rotate LCD touch
        esp_lcd_touch_set_mirror_y(tp, false);
        esp_lcd_touch_set_mirror_x(tp, false);
#endif
        break;
    }
}

#if CONFIG_EXAMPLE_LCD_TOUCH_ENABLED
static void example_lvgl_touch_cb(lv_indev_drv_t * drv, lv_indev_data_t * data)
{
    uint16_t touchpad_x[1] = {0};
    uint16_t touchpad_y[1] = {0};
    uint8_t touchpad_cnt = 0;

    /* Read touch controller data */
    esp_lcd_touch_read_data(drv->user_data);

    /* Get coordinates */
    bool touchpad_pressed = esp_lcd_touch_get_coordinates(drv->user_data, touchpad_x, touchpad_y, NULL, &touchpad_cnt, 1);

    if (touchpad_pressed && touchpad_cnt > 0) {
        data->point.x = touchpad_x[0];
        data->point.y = touchpad_y[0];
        data->state = LV_INDEV_STATE_PRESSED;
    } else {
        data->state = LV_INDEV_STATE_RELEASED;
    }
}
#endif

static void example_increase_lvgl_tick(void *arg)
{
    /* Tell LVGL how many milliseconds has elapsed */
    lv_tick_inc(EXAMPLE_LVGL_TICK_PERIOD_MS);
}

bool example_lvgl_lock(int timeout_ms)
{
    // Convert timeout in milliseconds to FreeRTOS ticks
    // If `timeout_ms` is set to -1, the program will block until the condition is met
    const TickType_t timeout_ticks = (timeout_ms == -1) ? portMAX_DELAY : pdMS_TO_TICKS(timeout_ms);
    return xSemaphoreTakeRecursive(lvgl_mux, timeout_ticks) == pdTRUE;
}

void example_lvgl_unlock(void)
{
    xSemaphoreGiveRecursive(lvgl_mux);
}

static void example_lvgl_port_task(void *arg)
{
    ESP_LOGI(TAG, "Starting LVGL task");
    uint32_t task_delay_ms = EXAMPLE_LVGL_TASK_MAX_DELAY_MS;
    while (1) {
        // Lock the mutex due to the LVGL APIs are not thread-safe
        if (example_lvgl_lock(-1)) {
            task_delay_ms = lv_timer_handler();
            // Release the mutex
            example_lvgl_unlock();
        }
        if (task_delay_ms > EXAMPLE_LVGL_TASK_MAX_DELAY_MS) {
            task_delay_ms = EXAMPLE_LVGL_TASK_MAX_DELAY_MS;
        } else if (task_delay_ms < EXAMPLE_LVGL_TASK_MIN_DELAY_MS) {
            task_delay_ms = EXAMPLE_LVGL_TASK_MIN_DELAY_MS;
        }
        vTaskDelay(pdMS_TO_TICKS(task_delay_ms));
    }
}

void app_main(void)
{
    static lv_disp_draw_buf_t disp_buf; // contains internal graphic buffer(s) called draw buffer(s)
    static lv_disp_drv_t disp_drv;      // contains callback functions

    ESP_LOGI(TAG, "Turn off LCD backlight");
    gpio_config_t bk_gpio_config = {
        .mode = GPIO_MODE_OUTPUT,
        .pin_bit_mask = 1ULL << EXAMPLE_PIN_NUM_BK_LIGHT
    };
    ESP_ERROR_CHECK(gpio_config(&bk_gpio_config));

    ESP_LOGI(TAG, "Initialize SPI bus");
    spi_bus_config_t buscfg = {
        .sclk_io_num = EXAMPLE_PIN_NUM_SCLK,
        .mosi_io_num = EXAMPLE_PIN_NUM_MOSI,
        .miso_io_num = EXAMPLE_PIN_NUM_MISO,
        .quadwp_io_num = -1,
        .quadhd_io_num = -1,
        .max_transfer_sz = EXAMPLE_LCD_H_RES * 80 * sizeof(uint16_t),
    };
    ESP_ERROR_CHECK(spi_bus_initialize(LCD_HOST, &buscfg, SPI_DMA_CH_AUTO));

    ESP_LOGI(TAG, "Install panel IO");
    esp_lcd_panel_io_handle_t io_handle = NULL;
    esp_lcd_panel_io_spi_config_t io_config = {
        .dc_gpio_num = EXAMPLE_PIN_NUM_LCD_DC,
        .cs_gpio_num = EXAMPLE_PIN_NUM_LCD_CS,
        .pclk_hz = EXAMPLE_LCD_PIXEL_CLOCK_HZ,
        .lcd_cmd_bits = EXAMPLE_LCD_CMD_BITS,
        .lcd_param_bits = EXAMPLE_LCD_PARAM_BITS,
        .spi_mode = 0,
        .trans_queue_depth = 10,
        .on_color_trans_done = example_notify_lvgl_flush_ready,
        .user_ctx = &disp_drv,
    };
    // Attach the LCD to the SPI bus
    ESP_ERROR_CHECK(esp_lcd_new_panel_io_spi((esp_lcd_spi_bus_handle_t)LCD_HOST, &io_config, &io_handle));

    esp_lcd_panel_handle_t panel_handle = NULL;
    esp_lcd_panel_dev_config_t panel_config = {
        .reset_gpio_num = EXAMPLE_PIN_NUM_LCD_RST,
        .rgb_ele_order = LCD_RGB_ELEMENT_ORDER_BGR,
        .bits_per_pixel = 16,
    };
#if CONFIG_EXAMPLE_LCD_CONTROLLER_ILI9341
    ESP_LOGI(TAG, "Install ILI9341 panel driver");
    ESP_ERROR_CHECK(esp_lcd_new_panel_ili9341(io_handle, &panel_config, &panel_handle));
#elif CONFIG_EXAMPLE_LCD_CONTROLLER_GC9A01
    ESP_LOGI(TAG, "Install GC9A01 panel driver");
    ESP_ERROR_CHECK(esp_lcd_new_panel_gc9a01(io_handle, &panel_config, &panel_handle));
#endif

    ESP_ERROR_CHECK(esp_lcd_panel_reset(panel_handle));
    ESP_ERROR_CHECK(esp_lcd_panel_init(panel_handle));
#if CONFIG_EXAMPLE_LCD_CONTROLLER_GC9A01
    ESP_ERROR_CHECK(esp_lcd_panel_invert_color(panel_handle, true));
#endif
    ESP_ERROR_CHECK(esp_lcd_panel_mirror(panel_handle, true, false));

    // user can flush pre-defined pattern to the screen before we turn on the screen or backlight
    ESP_ERROR_CHECK(esp_lcd_panel_disp_on_off(panel_handle, true));

#if CONFIG_EXAMPLE_LCD_TOUCH_ENABLED
    esp_lcd_panel_io_handle_t tp_io_handle = NULL;
    esp_lcd_panel_io_spi_config_t tp_io_config = ESP_LCD_TOUCH_IO_SPI_STMPE610_CONFIG(EXAMPLE_PIN_NUM_TOUCH_CS);
    // Attach the TOUCH to the SPI bus
    ESP_ERROR_CHECK(esp_lcd_new_panel_io_spi((esp_lcd_spi_bus_handle_t)LCD_HOST, &tp_io_config, &tp_io_handle));

    esp_lcd_touch_config_t tp_cfg = {
        .x_max = EXAMPLE_LCD_H_RES,
        .y_max = EXAMPLE_LCD_V_RES,
        .rst_gpio_num = -1,
        .int_gpio_num = -1,
        .flags = {
            .swap_xy = 0,
            .mirror_x = 0,
            .mirror_y = 0,
        },
    };

#if CONFIG_EXAMPLE_LCD_TOUCH_CONTROLLER_STMPE610
    ESP_LOGI(TAG, "Initialize touch controller STMPE610");
    ESP_ERROR_CHECK(esp_lcd_touch_new_spi_stmpe610(tp_io_handle, &tp_cfg, &tp));
#endif // CONFIG_EXAMPLE_LCD_TOUCH_CONTROLLER_STMPE610
#endif // CONFIG_EXAMPLE_LCD_TOUCH_ENABLED

    ESP_LOGI(TAG, "Turn on LCD backlight");
    gpio_set_level(EXAMPLE_PIN_NUM_BK_LIGHT, EXAMPLE_LCD_BK_LIGHT_ON_LEVEL);

    ESP_LOGI(TAG, "Initialize LVGL library");
    lv_init();
    // alloc draw buffers used by LVGL
    // it's recommended to choose the size of the draw buffer(s) to be at least 1/10 screen sized
    lv_color_t *buf1 = heap_caps_malloc(EXAMPLE_LCD_H_RES * 20 * sizeof(lv_color_t), MALLOC_CAP_DMA);
    assert(buf1);
    lv_color_t *buf2 = heap_caps_malloc(EXAMPLE_LCD_H_RES * 20 * sizeof(lv_color_t), MALLOC_CAP_DMA);
    assert(buf2);
    // initialize LVGL draw buffers
    lv_disp_draw_buf_init(&disp_buf, buf1, buf2, EXAMPLE_LCD_H_RES * 20);

    ESP_LOGI(TAG, "Register display driver to LVGL");
    lv_disp_drv_init(&disp_drv);
    disp_drv.hor_res = EXAMPLE_LCD_H_RES;
    disp_drv.ver_res = EXAMPLE_LCD_V_RES;
    disp_drv.flush_cb = example_lvgl_flush_cb;
    disp_drv.drv_update_cb = example_lvgl_port_update_callback;
    disp_drv.draw_buf = &disp_buf;
    disp_drv.user_data = panel_handle;
    lv_disp_t *disp = lv_disp_drv_register(&disp_drv);

    ESP_LOGI(TAG, "Install LVGL tick timer");
    // Tick interface for LVGL (using esp_timer to generate 2ms periodic event)
    const esp_timer_create_args_t lvgl_tick_timer_args = {
        .callback = &example_increase_lvgl_tick,
        .name = "lvgl_tick"
    };
    esp_timer_handle_t lvgl_tick_timer = NULL;
    ESP_ERROR_CHECK(esp_timer_create(&lvgl_tick_timer_args, &lvgl_tick_timer));
    ESP_ERROR_CHECK(esp_timer_start_periodic(lvgl_tick_timer, EXAMPLE_LVGL_TICK_PERIOD_MS * 1000));

#if CONFIG_EXAMPLE_LCD_TOUCH_ENABLED
    static lv_indev_drv_t indev_drv;    // Input device driver (Touch)
    lv_indev_drv_init(&indev_drv);
    indev_drv.type = LV_INDEV_TYPE_POINTER;
    indev_drv.disp = disp;
    indev_drv.read_cb = example_lvgl_touch_cb;
    indev_drv.user_data = tp;

    lv_indev_drv_register(&indev_drv);
#endif

    lvgl_mux = xSemaphoreCreateRecursiveMutex();
    assert(lvgl_mux);
    ESP_LOGI(TAG, "Create LVGL task");
    xTaskCreate(example_lvgl_port_task, "LVGL", EXAMPLE_LVGL_TASK_STACK_SIZE, NULL, EXAMPLE_LVGL_TASK_PRIORITY, NULL);

    ESP_LOGI(TAG, "Display LVGL Meter Widget");
    // Lock the mutex due to the LVGL APIs are not thread-safe
    if (example_lvgl_lock(-1)) {
        example_lvgl_demo_ui(disp);
        // Release the mutex
        example_lvgl_unlock();
    }
}
主要用的是lvgl,在根据原理图我修改了IO口配置后,也成功将lcd点亮,
效果图如下:

这一步通过lvgl也完成了,然后就需要将lcd代码加入到我们已有的工程中:
首先是将lvgl、ili9341显示屏驱动加入到工程中
使用命令:
idf.py add-dependency "lvgl/lvgl@v8.3.3"
idf.py add-dependency "someuser/esp_lcd_ili9341"
即可将需要的依赖加入其中,然后是先编译一下,将这些依赖编译加入到我们的项目中,然后移植一下,就可以实现example中的效果
最后,就是将拍摄到的图像显示到lcd屏幕上了
我们在这里创建一个lcd的task,通过camera的 esp_camera_fb_get这个函数,将捕获到的一帧数据存到一个指针中,然后通过判断拍摄到的分辨率和lcd是否一致,可以将这帧数据直接发送给lcd并且显示出来了,代码如下:
            // 如果分辨率和LCD一致
            if (fb->width == LCD_WIDTH && fb->height == LCD_HEIGHT && fb->format == PIXFORMAT_RGB565)
            {

                // 直接送LCD
                esp_lcd_panel_draw_bitmap(panel_handle, 0, 0, LCD_WIDTH, LCD_HEIGHT, fb->buf);
            }
            else
            {
                ESP_LOGE("LCD", "Frame size/format mismatch: %dx%d fmt:%d", fb->width, fb->height, fb->format);
            }

            // 释放摄像头缓冲
            esp_camera_fb_return(fb);
        }
        else
        {
            ESP_LOGE("LCD", "Failed to get camera frame");
        }
因为之前的配置,我已经把所有的坑帮你们趟过去了,所以应该会很顺利的显示出来图像
,最后如果需要显示视频的话,加一个while循环就可以了。
void lcd_task(void *param)
{
    while (1)
    {
        camera_fb_t *fb = esp_camera_fb_get();
        if (fb)
        {
            // 如果分辨率和LCD一致
            if (fb->width == LCD_WIDTH && fb->height == LCD_HEIGHT && fb->format == PIXFORMAT_RGB565)
            {

                // 直接送LCD
                esp_lcd_panel_draw_bitmap(panel_handle, 0, 0, LCD_WIDTH, LCD_HEIGHT, fb->buf);
            }
            else
            {
                ESP_LOGE("LCD", "Frame size/format mismatch: %dx%d fmt:%d", fb->width, fb->height, fb->format);
            }

            // 释放摄像头缓冲
            esp_camera_fb_return(fb);
        }
        else
        {
            ESP_LOGE("LCD", "Failed to get camera frame");
        }

        // 根据需要调整刷新率
        vTaskDelay(pdMS_TO_TICKS(33)); // ~100fps上限
    }
}
最后是main函数
void app_main(void)
{
    esp_err_t ret;
     static lv_disp_draw_buf_t disp_buf; // contains internal graphic buffer(s) called draw buffer(s)
    static lv_disp_drv_t disp_drv;      // contains callback functions

    led_init();
     // 检测 PSRAM 存在性和大小
    if(esp_psram_get_size() == 0) {
        ESP_LOGE("BOOT", "PSRAM NOT DETECTED! Check hardware connection.");
        vTaskDelay(pdMS_TO_TICKS(1000));
        esp_restart(); // 自动重启
    }

    ESP_LOGI("BOOT", "PSRAM Size: %d KB", esp_psram_get_size() / 1024);

    // // 初始化 PSRAM 缓存
    esp_psram_init();

    // 启用 PSRAM 分配
    // heap_caps_malloc_extmem_enable(64); // 最小分配单元64字节
    bsp_camera_init();

    lcd_init();


 xTaskCreatePinnedToCore(lcd_task,"lcd",4096,NULL,3,NULL,1);

 xTaskCreatePinnedToCore(led_blink_task,"led",4096,NULL,3,NULL,1);
//  x
最后源码链接:
通过网盘分享的文件:esp32_video
链接: https://pan.baidu.com/s/1WMGu-un_VoYQoCyNi2LvMQ?pwd=vide 提取码: vide
--来自百度网盘超级会员v4的分享