
概述
自2024年11月由Anthropic公司发布以来,模型上下文协议(Model Context Protocol, MCP)作为一项开放标准,正迅速成为人工智能领域,特别是大型语言模型(LLM)应用开发中的一个重要基石。它旨在为LLM应用与外部数据源和工具之间提供一个标准化的“通用接口”,从而打破模型仅能依赖其内部训练数据的局ăpadă,使其能够获取和利用实时、动态的外部世界信息。
接下来我们将深入介绍MCP协议的核心概念,重点解析其服务器(MCP Server)的角色与功能,并进一步探讨如何利用日趋成熟的Java AI开发框架——Spring AI 1.0.0,来构建支持MCP的应用。
MCP协议:为AI应用连接外部世界的桥梁
MCP协议的核心思想是,在LLM应用(客户端)和提供上下文信息、工具或数据的服务(服务器)之间建立一个统一的通信规范。这极大地简化了集成过程,开发者不再需要为每一个数据源或API编写定制化的连接代码,而是可以遵循一个通用的协议标准。
MCP协议的主要构成与特点:
- 开放标准与协作: 由Anthropic发起,并得到了包括OpenAI、Google DeepMind和微软在内的行业巨头支持,保证了其广泛的适用性和未来的发展潜力。
- 基于成熟技术: MCP在设计上借鉴了语言服务器协议(Language Server Protocol, LSP),并采用JSON-RPC 2.0作为其消息传输格式,可通过stdio、HTTP(支持Server-Sent Events)等多种方式进行传输。
- 核心概念:
- 主机(Host): 指的是LLM应用程序本身,它负责发起与MCP服务器的连接。
- 客户端(Client): 位于主机应用内部,是实现MCP通信的具体连接器。
- 服务器(Server): 负责提供上下文信息,是外部数据和能力的提供者。
- 安全与隐私: 协议在设计上强调了用户授权和控制,要求在访问用户数据或执行操作前必须获得明确的用户同意,并提供了相应的安全指导原则。
MCP Server:上下文与能力的提供者
在MCP生态中,MCP Server扮演着至关重要的角色。它是一个遵循MCP规范的服务,其主要职责是向MCP客户端(即LLM应用)暴露其拥有的资源和能力。
MCP Server提供的核心能力:
资源(Resources): 服务器可以提供类似文件的只读数据。这可以是本地文件系统的文件、数据库查询结果、API响应内容等。LLM应用可以通过标准化的请求来读取这些资源,从而获得回答问题或执行任务所需的背景信息。
工具(Tools): 这是MCP Server最强大的功能之一。服务器可以定义一系列可供LLM调用的函数或方法。例如,一个MCP Server可以提供“发送邮件”、“查询订单状态”、“执行代码”等工具。当LLM在其推理过程中判断需要使用某个工具时,它会向服务器发起一个工具调用请求,服务器执行相应的功能后将结果返回给LLM。这极大地扩展了LLM的应用场景,使其从一个“对话者”转变为一个“行动者”。
提示(Prompts): 服务器还可以提供预定义的、可复用的提示模板。这些模板可以包含参数,允许LLM应用动态地生成更复杂、更具针对性的指令。这有助于提高与模型交互的效率和一致性。
MCP Server的实现与部署:
MCP Server的实现是多样化的。开发者可以使用官方或社区提供的SDK(目前已有Go, C#, Rust, TypeScript等版本)来构建自己的服务器。根据部署需求,服务器可以:
- 以子进程(stdio)形式运行: 适用于本地开发或桌面应用集成,服务器与主应用在同一台机器上运行。
- 以远程服务(HTTP/SSE)形式运行: 这是更常见的部署方式,服务器作为一个独立的Web服务运行,可通过URL被多个客户端访问。
微软的Copilot Studio等产品已经集成了对MCP的支持,允许用户直接连接到外部的MCP服务器,并将其提供的工具无缝地集成到自己的AI助手中。
基于Spring AI 1.0.0的开发之路
Spring AI作为Spring生态系统的一部分,旨在简化Java开发者构建AI应用的复杂性。它提供了一套高级API,用于与各种大型语言模型进行交互,并集成了向量数据库、ETL框架等常用工具。
尽管在当前时间点(2025年8月),Spring AI与MCP协议之间尚未出现官方的、开箱即用的直接集成,但这并不妨碍我们利用Spring AI的强大功能来开发一个符合MCP规范的应用。开发者可以扮演MCP客户端或MCP服务器的角色。
1. 使用Spring AI构建MCP客户端
当你的Java应用需要连接一个已有的MCP服务器时,你可以利用Spring AI的核心能力来消费MCP服务。
开发步骤概览:
理解MCP通信: 首先需要熟悉MCP的JSON-RPC 2.0消息格式和通信流程。你需要知道如何构建初始化请求、工具调用请求等。
HTTP客户端实现: 使用Spring框架中强大的
WebClient或RestClient来与远程的MCP Server(通常是HTTP服务)进行通信。你需要手动构建符合MCP规范的JSON请求体,并解析服务器返回的JSON响应。集成Spring AI
ChatClient: 你的应用核心部分可能仍在使用Spring AI的ChatClient与LLM进行交互。当ChatClient返回的AssistantMessage表明需要调用一个外部工具时,你的代码需要:- 解析出需要调用的工具名称和参数。
- 判断该工具是否由某个已连接的MCP Server提供。
- 通过前述的HTTP客户端,向对应的MCP Server发起工具调用请求。
- 将MCP Server返回的结果包装成Spring AI的
ToolResponseMessage,再次提交给ChatClient,让LLM根据工具执行结果继续生成回应。
2. 使用Spring AI构建MCP服务器
当你想将你的Java应用所拥有的数据或能力通过MCP协议暴露出去时,你可以构建一个MCP Server。
开发步骤概览:
创建Spring Boot应用: 使用Spring Boot快速搭建一个Web服务,这将是你的MCP Server的基础。
定义MCP的API端点: 根据MCP规范,创建处理JSON-RPC请求的Controller。你需要实现如
initialize、tool/run等核心端点。利用Spring AI实现工具功能: 这是将Spring AI与MCP Server结合的关键。你的MCP Server所暴露的“工具”,其内部逻辑可以完全由Spring AI来驱动。
- 示例:创建一个“智能文档问答”工具
- 工具定义: 在你的MCP Server中,你会向客户端声明一个名为
askDocument的工具,它接受一个question作为参数。 - 内部实现: 当收到
tool/run请求调用askDocument时,你的Spring Boot应用会:- 使用Spring AI的
VectorStore接口,将用户的question进行向量化,并在你预先加载好的文档向量库中进行相似性搜索,检索出最相关的文档片段。 - 将这些相关的文档片段作为上下文,连同用户的原始问题,一起构建成一个更丰富的提示(Prompt)。
- 调用Spring AI的
ChatClient,将这个丰富的提示发送给LLM(如GPT-4, Claude 3等)。 - 将LLM返回的答案作为
askDocument工具的执行结果,通过MCP的响应格式返回给客户端。
- 使用Spring AI的
- 工具定义: 在你的MCP Server中,你会向客户端声明一个名为
- 示例:创建一个“智能文档问答”工具
通过这种方式,你将Spring AI在文档检索、与LLM交互等方面的能力,封装成了一个符合MCP标准的、可被任何MCP客户端调用的强大工具。
Mcp Client 实战
整体架构概览
MCP-Client框架采用分层架构设计,主要包含以下核心组件:
┌─────────────────────────────────────────────────────────────┐
│                    Web Layer (控制层)                        │
│  ┌─────────────────┐  ┌─────────────────┐                   │
│  │  ChatController │  │  其他Controller  │                   │
│  └─────────────────┘  └─────────────────┘                   │
└─────────────────────────────────────────────────────────────┘
                              │
┌─────────────────────────────────────────────────────────────┐
│                   Service Layer (服务层)                     │
│  ┌─────────────────┐  ┌─────────────────┐                   │
│  │   ChatClient    │  │ ToolCallbacks   │                   │
│  └─────────────────┘  └─────────────────┘                   │
└─────────────────────────────────────────────────────────────┘
                              │
┌─────────────────────────────────────────────────────────────┐
│                 Integration Layer (集成层)                   │
│  ┌─────────────────┐  ┌─────────────────┐                   │
│  │   Spring AI     │  │   MCP Protocol  │                   │
│  └─────────────────┘  └─────────────────┘                   │
└─────────────────────────────────────────────────────────────┘
                              │
┌─────────────────────────────────────────────────────────────┐
│                  Utility Layer (工具层)                      │
│  ┌─────────────────┐  ┌─────────────────┐                   │
│  │  MarkdownUtil   │  │  其他工具类      │                   │
│  └─────────────────┘  └─────────────────┘                   │
└─────────────────────────────────────────────────────────────┘
技术栈
- Spring Boot 3.x:提供基础框架支持和自动配置
- Spring AI:集成AI模型和工具调用能力
- MCP Protocol:实现模型上下文协议标准
Code
pom
父工程bom
<?xml version="1.0" encoding="UTF-8"?>
<project xmlns="http://maven.apache.org/POM/4.0.0"
         xmlns:xsi="http://www.w3.org/2001/XMLSchema-instance"
         xsi:schemaLocation="http://maven.apache.org/POM/4.0.0 http://maven.apache.org/xsd/maven-4.0.0.xsd">
    <modelVersion>4.0.0</modelVersion>

    <groupId>com.example</groupId>
    <artifactId>spring-ai-mcp-deepseek</artifactId>
    <packaging>pom</packaging>
    <version>1.0-SNAPSHOT</version>

    <parent>
        <groupId>org.springframework.boot</groupId>
        <artifactId>spring-boot-starter-parent</artifactId>
        <version>3.4.3</version>
        <relativePath/> <!-- lookup parent from repository -->
    </parent>

    <modules>
        <module>mcp-server</module>
        <module>mcp-client</module>
        <module>mcp-tool-client</module>
    </modules>

    <properties>
        <maven.compiler.source>17</maven.compiler.source>
        <maven.compiler.target>17</maven.compiler.target>
        <spring.ai.version>1.0.0</spring.ai.version>
        <spring.boot.version>3.4.3</spring.boot.version>
    </properties>

    <dependencyManagement>
        <dependencies>
            <dependency>
                <groupId>org.springframework.ai</groupId>
                <artifactId>spring-ai-bom</artifactId>
                <version>${spring.ai.version}</version>
                <type>pom</type>
                <scope>import</scope>
            </dependency>
        </dependencies>
    </dependencyManagement>

    <dependencies>
        <!-- lombok -->
        <dependency>
            <groupId>org.projectlombok</groupId>
            <artifactId>lombok</artifactId>
            <optional>true</optional>
        </dependency>

    </dependencies>
</project>
mcp-client 子模块pom
<?xml version="1.0" encoding="UTF-8"?>
<project xmlns="http://maven.apache.org/POM/4.0.0"
         xmlns:xsi="http://www.w3.org/2001/XMLSchema-instance"
         xsi:schemaLocation="http://maven.apache.org/POM/4.0.0 http://maven.apache.org/xsd/maven-4.0.0.xsd">
    <parent>
        <artifactId>spring-ai-mcp-deepseek</artifactId>
        <groupId>com.example</groupId>
        <version>1.0-SNAPSHOT</version>
    </parent>
    <modelVersion>4.0.0</modelVersion>

    <artifactId>mcp-client</artifactId>

    <dependencies>
        <!-- spring-web -->
        <dependency>
            <groupId>org.springframework.boot</groupId>
            <artifactId>spring-boot-starter-web</artifactId>
        </dependency>

        <!-- model openai -->
        <dependency>
            <groupId>org.springframework.ai</groupId>
            <artifactId>spring-ai-starter-model-openai</artifactId>
        </dependency>

        <!-- 添加 Spring AI MCP client 依赖 -->
        <dependency>
            <groupId>org.springframework.ai</groupId>
            <artifactId>spring-ai-starter-mcp-client</artifactId>
        </dependency>

        <dependency>
            <groupId>org.commonmark</groupId>
            <artifactId>commonmark</artifactId>
            <version>0.21.0</version>
        </dependency>
        <dependency>
            <groupId>org.commonmark</groupId>
            <artifactId>commonmark-ext-gfm-tables</artifactId>
            <version>0.21.0</version>
        </dependency>

    </dependencies>

    <build>
        <plugins>
            <plugin>
                <groupId>org.apache.maven.plugins</groupId>
                <artifactId>maven-compiler-plugin</artifactId>
            </plugin>
            <plugin>
                <groupId>org.springframework.boot</groupId>
                <artifactId>spring-boot-maven-plugin</artifactId>
            </plugin>
        </plugins>
    </build>

</project>
配置mcp servers(sse&stdio)
application.properties
server.port=8082

spring.ai.openai.api-key=sk-xxxxxxx
spring.ai.openai.base-url=https://api.deepseek.com
spring.ai.openai.chat.options.model=deepseek-chat

spring.ai.mcp.client.enabled=true

spring.ai.mcp.client.sse.connections.server1.url=http://localhost:8085

spring.ai.mcp.client.stdio.servers-configuration=classpath:mcp-servers-config.json

logging.level.org.springframework.ai.model.tool=DEBUG
logging.level.io.modelcontextprotocol=DEBUG
配置项详解
spring.ai.openai.api-key=sk-xxxxxx
这是Spring AI OpenAI模块的配置项,用于设置访问DeepSeek API所需的API密钥。这个密钥用于身份验证,允许应用调用DeepSeek的AI模型服务。
spring.ai.openai.base-url=https://api.deepseek.com
这个配置项指定了OpenAI兼容API的基础URL。由于项目使用的是DeepSeek API而不是真正的OpenAI API,所以需要将基础URL设置为DeepSeek的API端点。
spring.ai.openai.chat.options.model=deepseek-chat
此配置项指定要使用的具体AI模型。在这里,使用的是DeepSeek的"deepseek-chat"模型,这是DeepSeek的主要对话模型。
# 启用 MCP client
spring.ai.mcp.client.enabled=true
这个配置项用于启用或禁用MCP(Model Context Protocol)客户端功能。设置为true表示启用MCP客户端,允许应用与MCP服务器进行交互。
# 配置 MCP 服务端连接地址
spring.ai.mcp.client.sse.connections.server1.url=http://localhost:8085
这个配置项指定了通过SSE(Server-Sent Events)方式连接的MCP服务器的URL。在这里,MCP客户端将连接到本地8085端口的MCP服务器。
# 配置 stdio 方式启动的 MCP 服务
spring.ai.mcp.client.stdio.servers-configuration=classpath:mcp-servers-config.json
这个配置项指定了通过标准输入输出(stdio)方式启动的MCP服务的配置文件位置。该配置文件定义了需要启动的MCP服务及其参数,例如文件系统服务或高德地图服务。
# 设置日志级别以便观察工具调用
logging.level.org.springframework.ai.model.tool=DEBUG
logging.level.io.modelcontextprotocol=DEBUG
这两个配置项设置了特定包的日志级别为DEBUG,以便更详细地观察工具调用过程:
logging.level.org.springframework.ai.model.tool=DEBUG:启用Spring AI工具调用的调试日志logging.level.io.modelcontextprotocol=DEBUG:启用MCP协议相关组件的调试日志
这些配置项共同构成了MCP客户端应用的完整配置,使应用能够连接到DeepSeek AI服务和MCP服务器,并提供详细的调试信息以观察工具调用过程。
mcp-servers-config.json
{
  "mcpServers": {
    "amap-maps": {
      "command": "D:\\Program Files\\nodejs\\npx.cmd",
      "args": [
        "-y",
        "@amap/amap-maps-mcp-server"
      ],
      "env": {
        "AMAP_MAPS_API_KEY": "xxxxxx"
      }
    },
    "filesystem": {
      "command": "D:\\Program Files\\nodejs\\npx.cmd",
      "args": [
        "-y",
        "@modelcontextprotocol/server-filesystem",
        "D:\\tmp"
      ]
    }
  }
}
配置项详解
amap-maps 服务配置
"amap-maps": {
  "command": "D:\\Program Files\\nodejs\\npx.cmd",
  "args": [
    "-y",
    "@amap/amap-maps-mcp-server"
  ],
  "env": {
    "AMAP_MAPS_API_KEY": "eb2e8e2d3e2d24188cc28ec46903b331"
  }
}
高德地图(AMAP)MCP 服务的配置:
"amap-maps": 服务的标识符名称,用于在系统中唯一标识这个服务- command: 指定启动服务的命令,这里是使用 Node.js 的
npx命令 - args: 命令行参数数组,用于传递给 command 命令
-y: 表示自动确认安装依赖@amap/amap-maps-mcp-server: 指定要运行的 npm 包
- env: 环境变量配置
AMAP_MAPS_API_KEY: 高德地图 API 密钥,用于访问高德地图服务
当系统需要使用高德地图功能时,会通过这个配置启动相应的 MCP 服务。
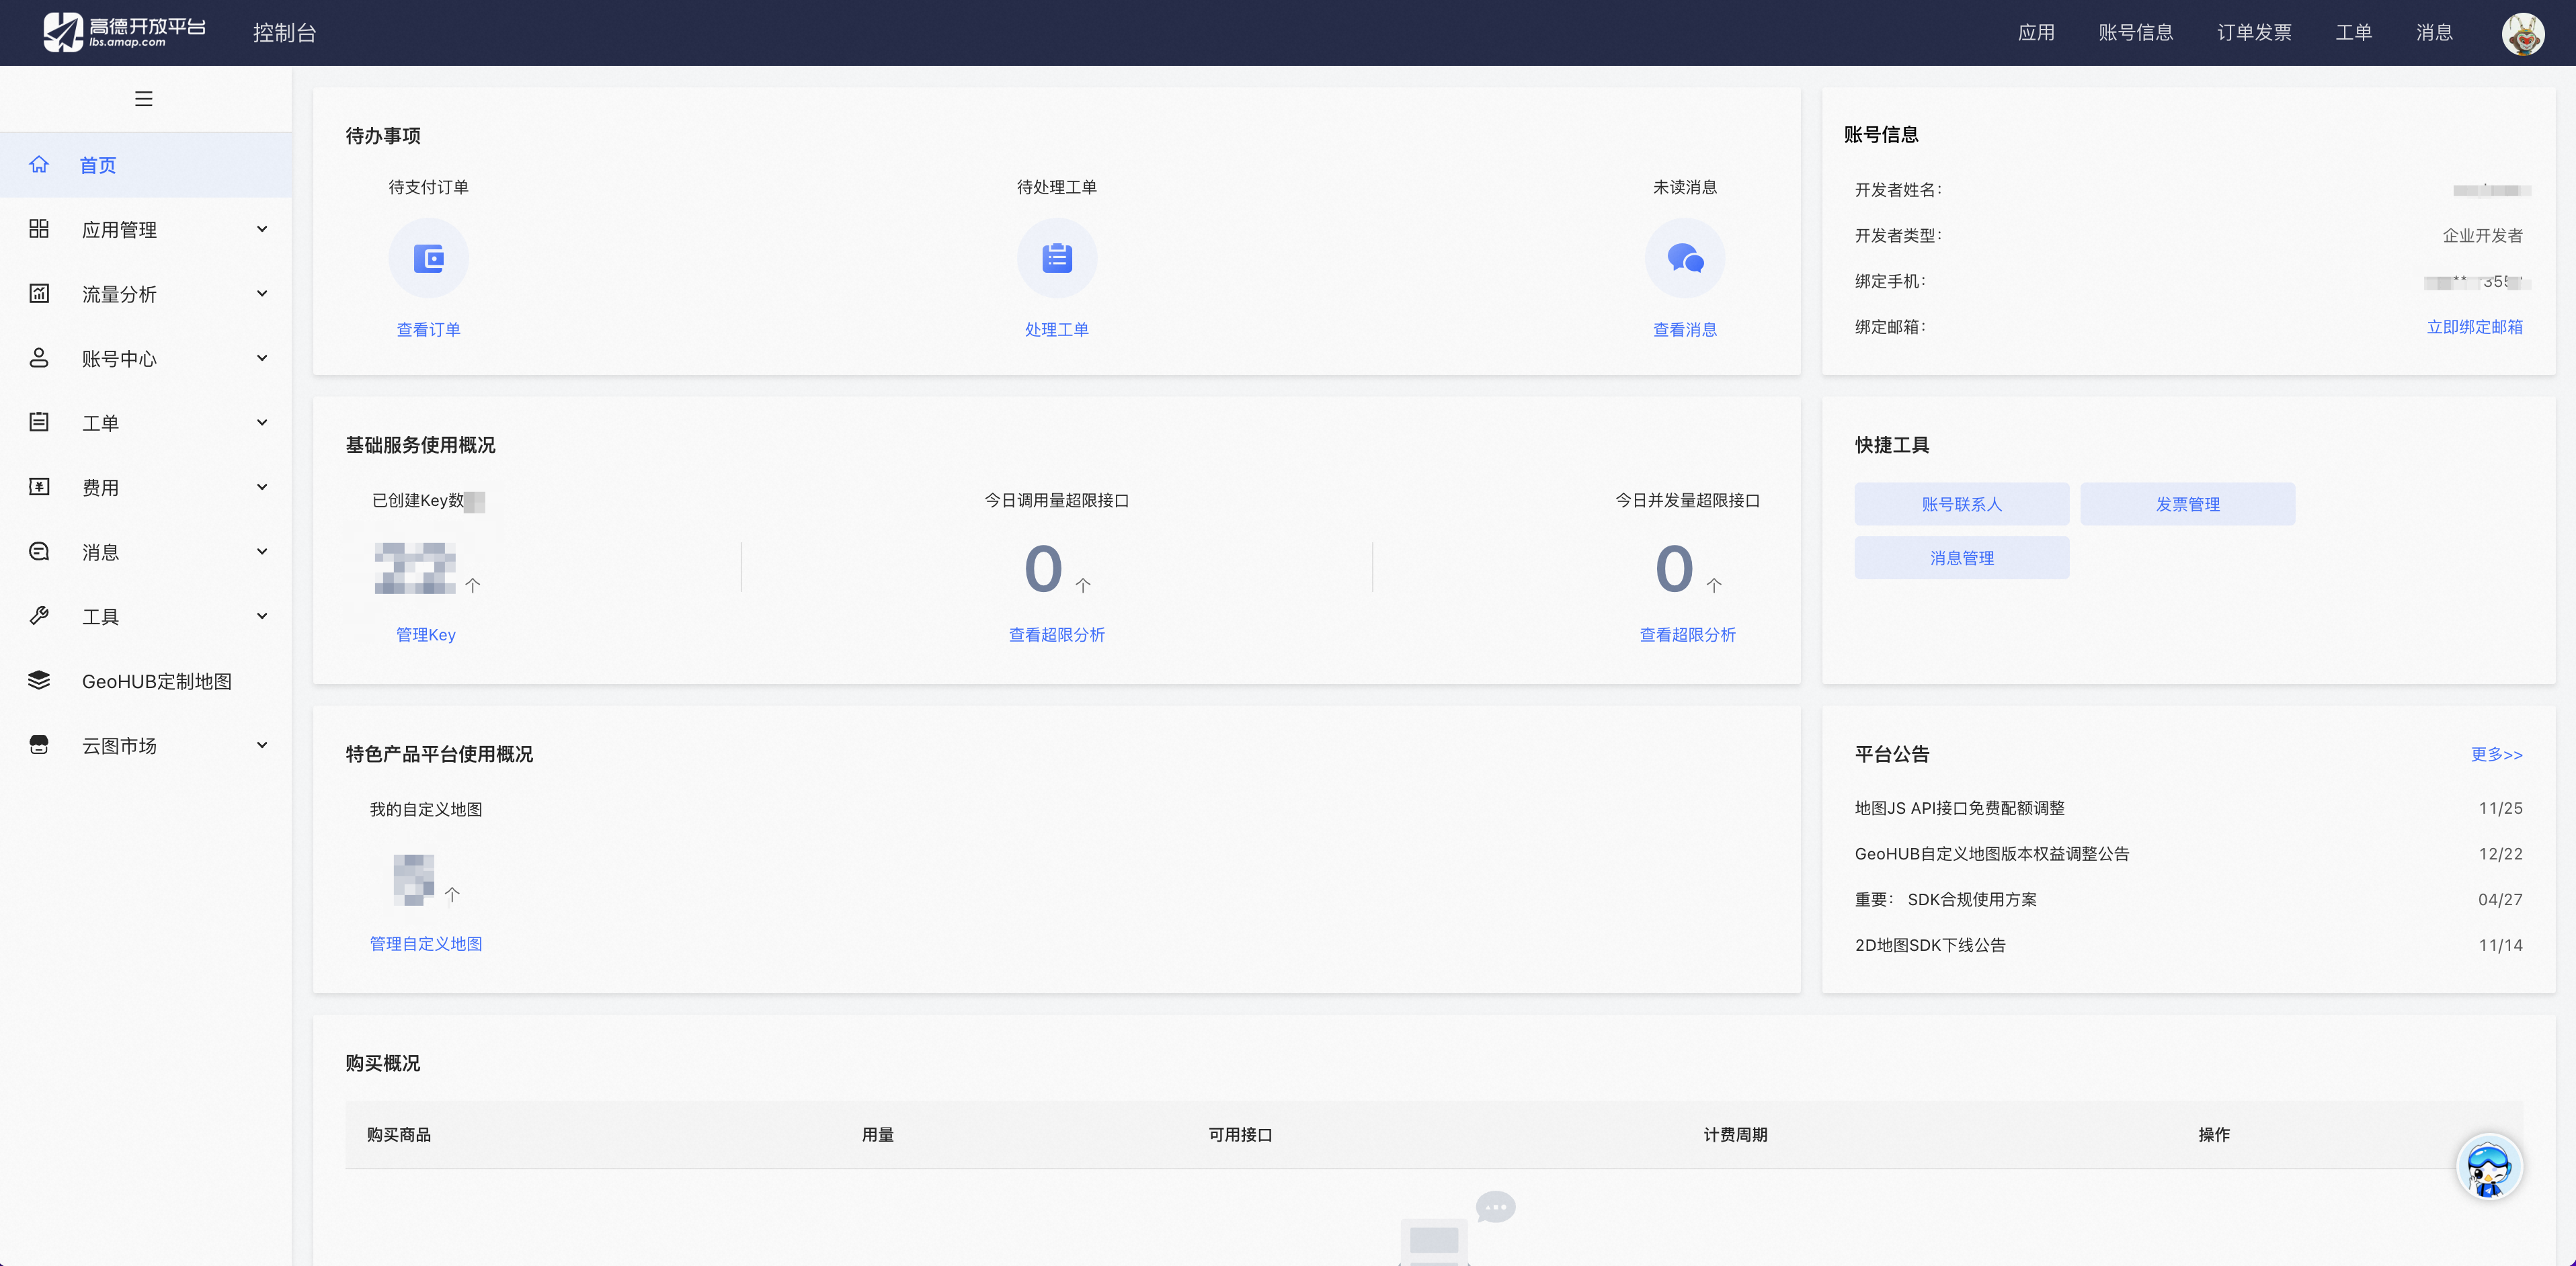
KEY申请,请参考: https://lbs.amap.com/api/mcp-server/create-project-and-key
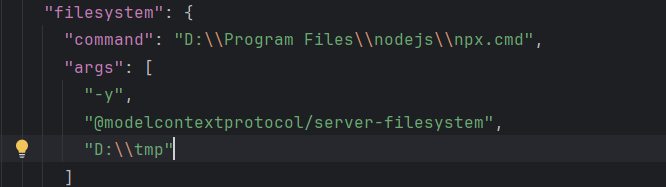
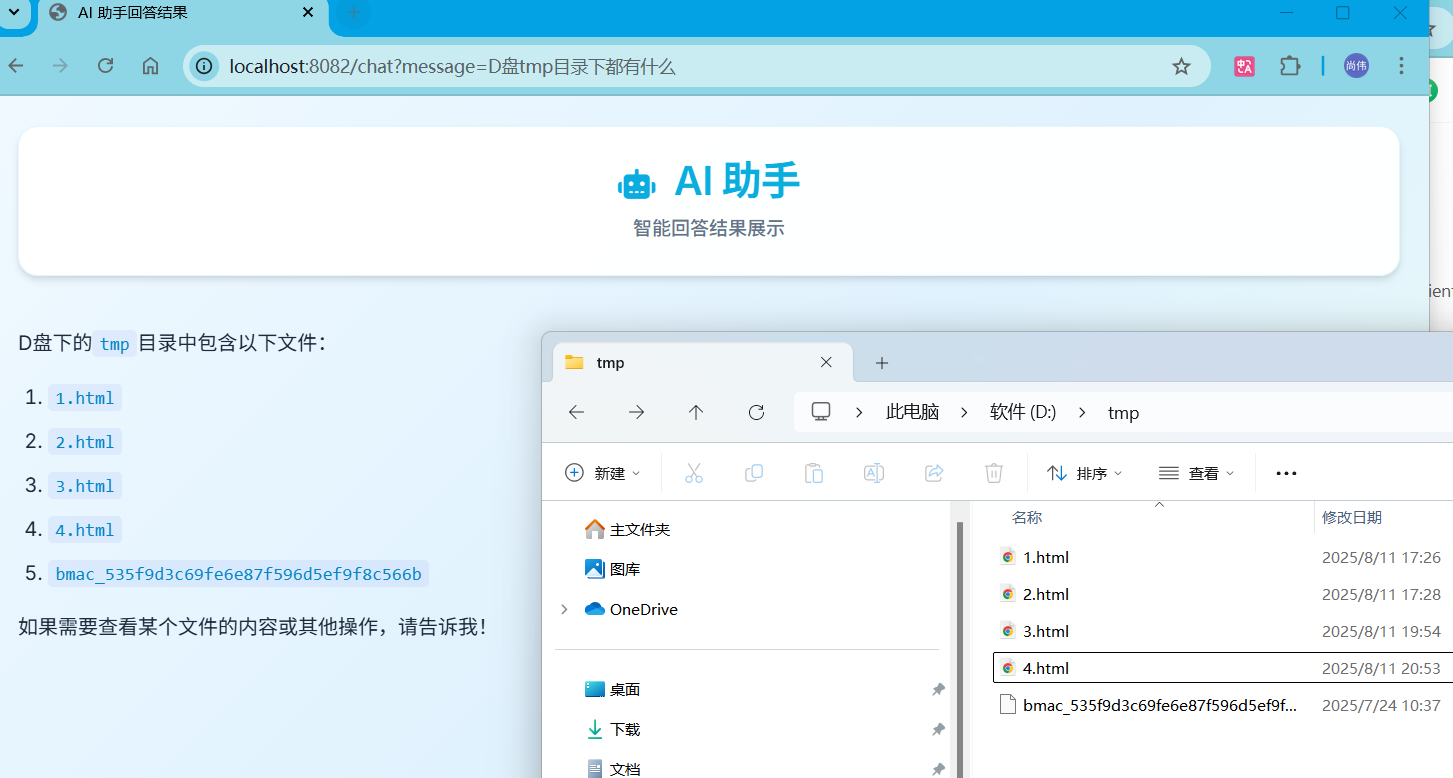
filesystem 服务配置
"filesystem": {
  "command": "D:\\Program Files\\nodejs\\npx.cmd",
  "args": [
    "-y",
    "@modelcontextprotocol/server-filesystem",
    "D:\\tmp"
  ]
}
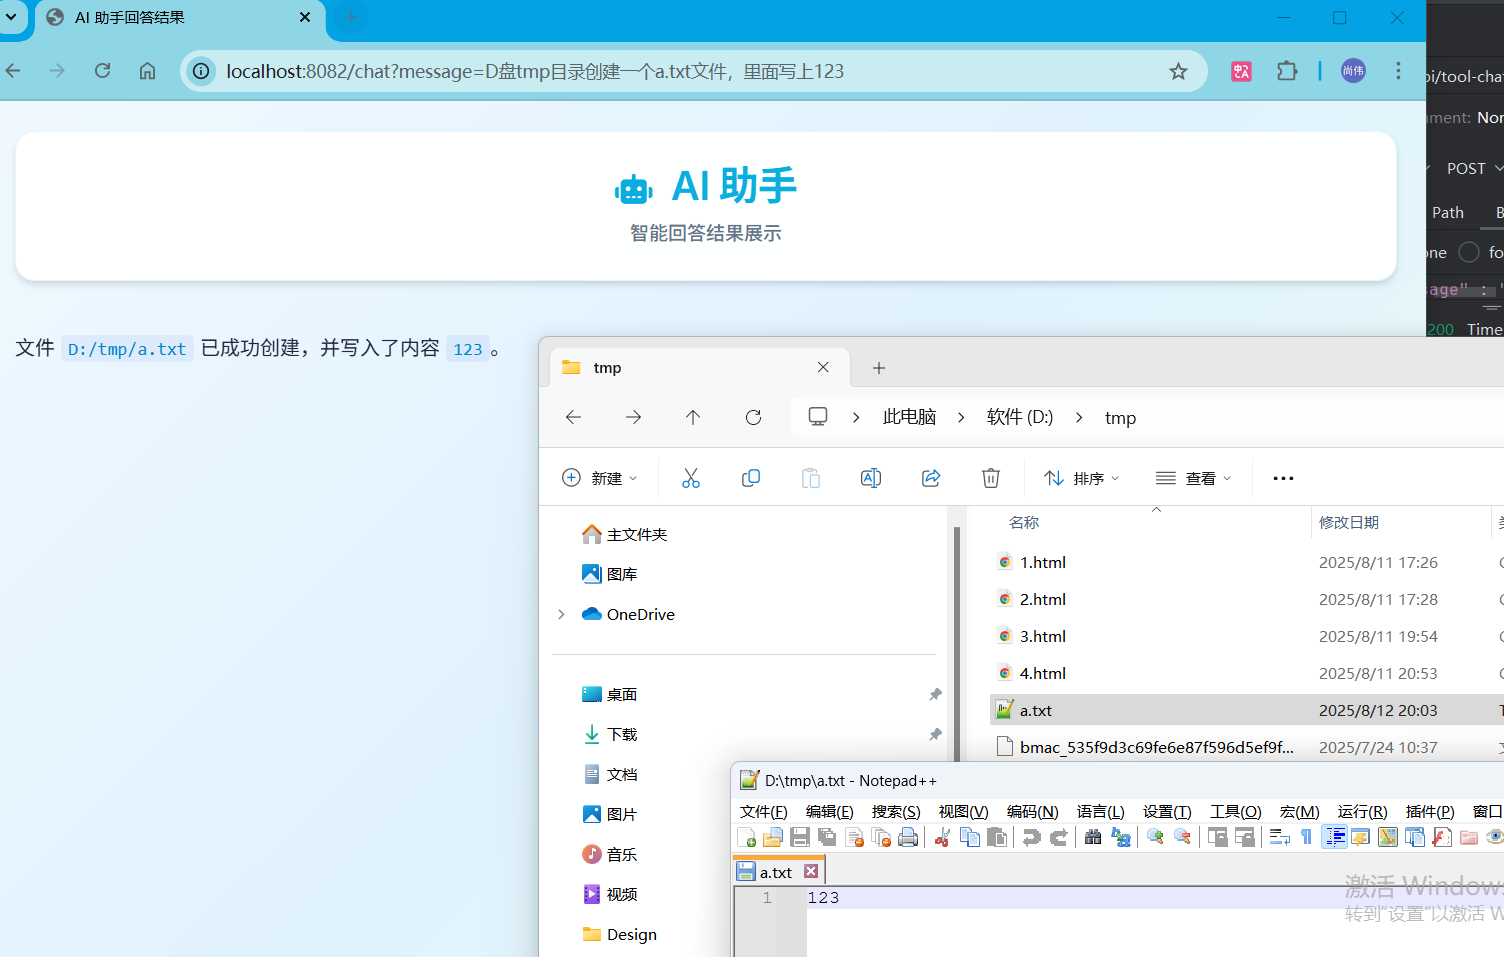
这是一个文件系统 MCP 服务的配置:
"filesystem": 服务的标识符名称- command : 同样使用 Node.js 的
npx命令启动服务 - args : 命令行参数数组
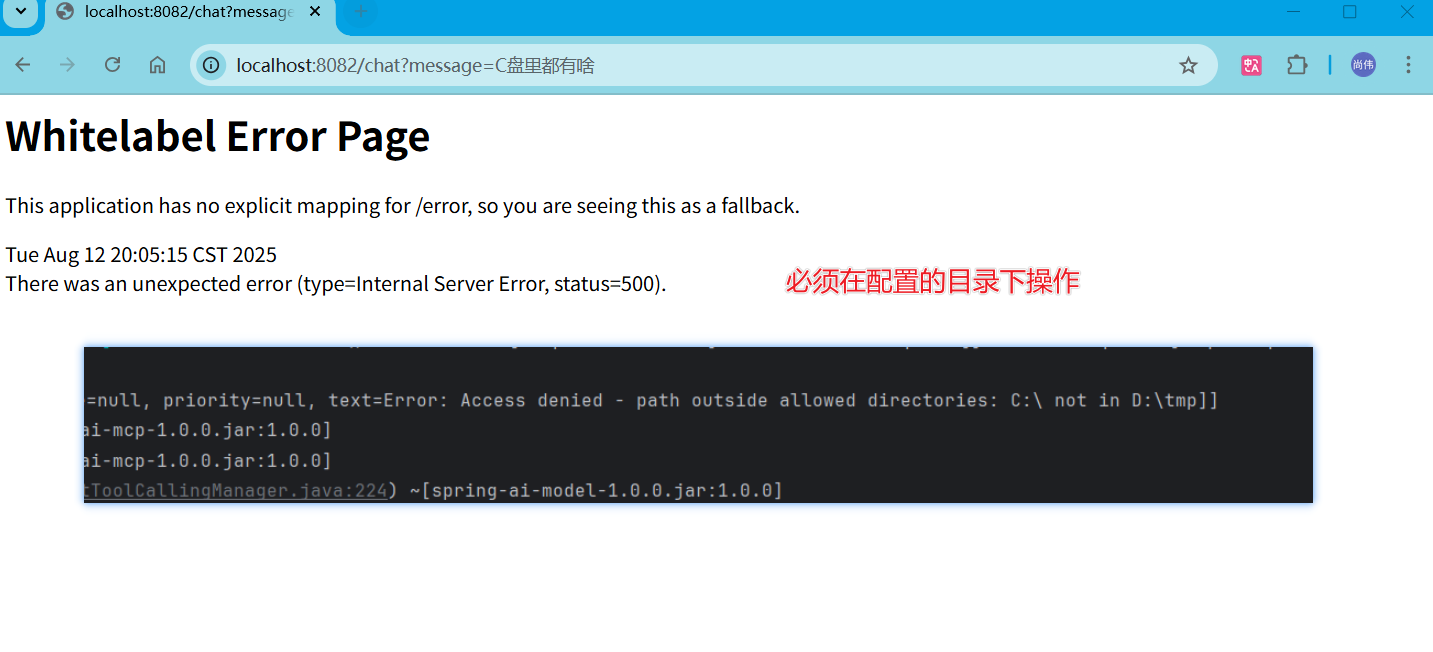
-y: 自动确认安装依赖@modelcontextprotocol/server-filesystem: 指定要运行的文件系统服务 npm 包D:\tmp: 指定文件系统服务可以访问的目录路径
这个服务允许 AI 模型访问本地文件系统,例如读取、写入或浏览指定目录中的文件。
工作原理
这些配置定义了可以通过标准输入输出(stdio)方式启动的 MCP 服务。当 AI 模型需要使用特定功能(如访问地图信息或文件系统)时,系统会根据这些配置启动相应的服务进程,并通过标准输入输出与之通信。
每个服务都是独立的进程,通过 MCP 协议与主应用通信,这样可以实现功能的模块化和扩展性。当不再需要这些服务时,系统会自动终止相关进程以节省资源。
ChatClient核心模块
ChatClient是框架的核心组件,负责AI对话的处理和工具调用的协调。
@RestController
public class ChatController {

    private ChatClient chatClient;

         public ChatController(ChatClient.Builder chatClientBuilder,
                          ToolCallbackProvider toolCallbackProvider) {
        this.chatClient = chatClientBuilder
                .defaultSystem("作为MCP小助手,请根据具体需求智能调用最合适的MCP工具组合来优化回答效果。" +
                        "要求能够自动识别任务类型,精准匹配工具链,并在响应中保持专业性与实用性的平衡。" +
                        "请确保输出结果既符合技术规范又具备良好的用户体验,同时支持多轮交互中的上下文连贯处理。")
                // 注册工具方法
                .defaultToolCallbacks(toolCallbackProvider)
                .build();
    }

}
实现原理分析:
- 构建器模式:使用ChatClient.Builder实现灵活的客户端配置
- 系统提示注入:通过defaultSystem()方法设置AI助手的角色定位
- 工具回调注册:defaultToolCallbacks()注册MCP工具回调处理器
- 链式调用:支持流畅的API调用链
工具回调机制
工具回调机制是MCP-Client的核心特性,实现AI与外部工具的无缝集成:
// 工具调用流程
String content = chatClient.prompt()
        .user(message)           // 用户输入
        .call()                  // 执行AI推理
        .content();              // 获取响应内容
执行流程:
用户输入 → AI模型分析 → 识别工具需求 → 调用MCP工具 → 整合结果 → 返回响应
    ↓           ↓            ↓            ↓           ↓          ↓
  message → ChatClient → ToolCallback → MCP Server → Result → content
典型应用场景代码示例
基础对话场景
 package com.example.client.controller;

import org.springframework.ai.chat.client.ChatClient;
import org.springframework.web.bind.annotation.GetMapping;
import org.springframework.web.bind.annotation.RequestParam;
import org.springframework.web.bind.annotation.RestController;
import org.springframework.http.ResponseEntity;

@RestController
public class BasicChatExample {

    private final ChatClient chatClient;

    public BasicChatExample(ChatClient.Builder chatClientBuilder) {
        this.chatClient = chatClientBuilder.build();
    }

    @GetMapping("/api/simple-chat")
    public ResponseEntity<String> simpleChat(@RequestParam String question) {
        try {
            String response = chatClient.prompt()
                    .user(question)
                    .call()
                    .content();

            return ResponseEntity.ok(response);
        } catch (Exception e) {
            return ResponseEntity.status(500)
                    .body("处理请求时发生错误: " + e.getMessage());
        }
    }
}

工具增强对话场景
package com.example.client.controller;
import com.example.client.domain.ChatRequest;
import org.springframework.ai.chat.client.ChatClient;
import org.springframework.ai.tool.ToolCallbackProvider;
import org.springframework.web.bind.annotation.PostMapping;
import org.springframework.web.bind.annotation.RequestBody;
import org.springframework.web.bind.annotation.RestController;
import java.util.Map;
@RestController
public class ToolEnhancedChatExample {
private final ChatClient toolEnabledClient;
public ToolEnhancedChatExample(ChatClient.Builder builder,
ToolCallbackProvider toolProvider) {
this.toolEnabledClient = builder
.defaultSystem("作为MCP小助手,请根据具体需求智能调用最合适的MCP工具组合来优化回答效果。" +
"要求能够自动识别任务类型,精准匹配工具链,并在响应中保持专业性与实用性的平衡。" +
"请确保输出结果既符合技术规范又具备良好的用户体验,同时支持多轮交互中的上下文连贯处理。")
.defaultToolCallbacks(toolProvider)
.build();
}
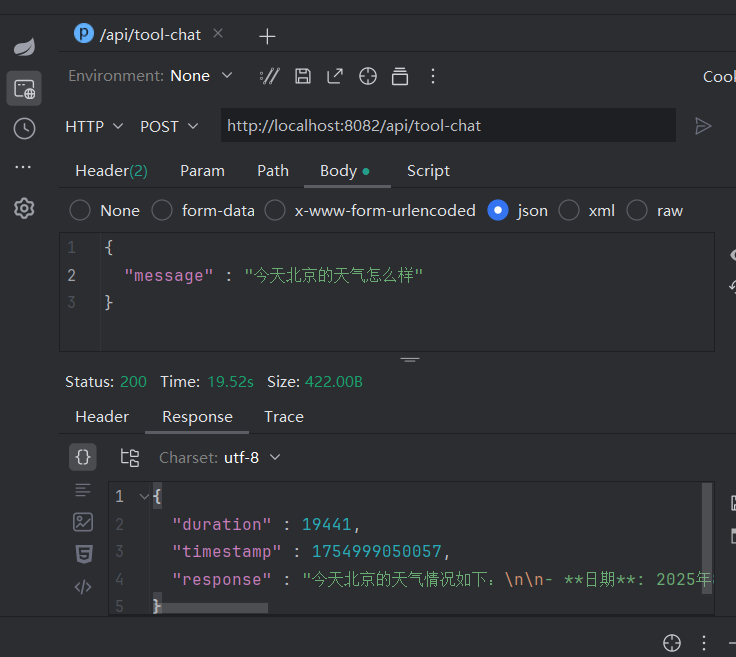
@PostMapping("/api/tool-chat")
public Map<String, Object> toolChat(@RequestBody ChatRequest request) {
long startTime = System.currentTimeMillis();
String response = toolEnabledClient.prompt()
.user(request.getMessage())
.call()
.content();
long duration = System.currentTimeMillis() - startTime;
return Map.of(
"response", response,
"duration", duration,
"timestamp", System.currentTimeMillis()
);
}
}
日志输出
2025-08-12T19:43:55.811+08:00 DEBUG 12292 --- [nio-8082-exec-4] o.s.a.m.tool.DefaultToolCallingManager   : Executing tool call: spring_ai_mcp_client_amap_maps_maps_weather
2025-08-12T19:43:56.030+08:00 DEBUG 12292 --- [pool-7-thread-1] io.modelcontextprotocol.spec.McpSchema   : Received JSON message: {"result":{"content":[{"type":"text","text":"{\n  \"city\": \"北京市\",\n  \"forecasts\": [\n    {\n      \"date\": \"2025-08-12\",\n      \"week\": \"2\",\n      \"dayweather\": \"中雨\",\n      \"nightweather\": \"阴\",\n      \"daytemp\": \"30\",\n      \"nighttemp\": \"22\",\n      \"daywind\": \"西南\",\n      \"nightwind\": \"西南\",\n      \"daypower\": \"1-3\",\n      \"nightpower\": \"1-3\",\n      \"daytemp_float\": \"30.0\",\n      \"nighttemp_float\": \"22.0\"\n    },\n    {\n      \"date\": \"2025-08-13\",\n      \"week\": \"3\",\n      \"dayweather\": \"雷阵雨\",\n      \"nightweather\": \"雷阵雨\",\n      \"daytemp\": \"29\",\n      \"nighttemp\": \"22\",\n      \"daywind\": \"东\",\n      \"nightwind\": \"东\",\n      \"daypower\": \"1-3\",\n      \"nightpower\": \"1-3\",\n      \"daytemp_float\": \"29.0\",\n      \"nighttemp_float\": \"22.0\"\n    },\n    {\n      \"date\": \"2025-08-14\",\n      \"week\": \"4\",\n      \"dayweather\": \"阴\",\n      \"nightweather\": \"雷阵雨\",\n      \"daytemp\": \"31\",\n      \"nighttemp\": \"23\",\n      \"daywind\": \"南\",\n      \"nightwind\": \"南\",\n      \"daypower\": \"1-3\",\n      \"nightpower\": \"1-3\",\n      \"daytemp_float\": \"31.0\",\n      \"nighttemp_float\": \"23.0\"\n    },\n    {\n      \"date\": \"2025-08-15\",\n      \"week\": \"5\",\n      \"dayweather\": \"雷阵雨\",\n      \"nightweather\": \"雷阵雨\",\n      \"daytemp\": \"31\",\n      \"nighttemp\": \"24\",\n      \"daywind\": \"南\",\n      \"nightwind\": \"南\",\n      \"daypower\": \"1-3\",\n      \"nightpower\": \"1-3\",\n      \"daytemp_float\": \"31.0\",\n      \"nighttemp_float\": \"24.0\"\n    }\n  ]\n}"}],"isError":false},"jsonrpc":"2.0","id":"2b682735-4"}
2025-08-12T19:43:56.031+08:00 DEBUG 12292 --- [pool-7-thread-1] i.m.spec.McpClientSession                : Received Response: JSONRPCResponse[jsonrpc=2.0, id=2b682735-4, result={content=[{type=text, text={
  "city": "北京市",
  "forecasts": [
    {
      "date": "2025-08-12",
      "week": "2",
      "dayweather": "中雨",
      "nightweather": "阴",
      "daytemp": "30",
      "nighttemp": "22",
      "daywind": "西南",
      "nightwind": "西南",
      "daypower": "1-3",
      "nightpower": "1-3",
      "daytemp_float": "30.0",
      "nighttemp_float": "22.0"
    },
    {
      "date": "2025-08-13",
      "week": "3",
      "dayweather": "雷阵雨",
      "nightweather": "雷阵雨",
      "daytemp": "29",
      "nighttemp": "22",
      "daywind": "东",
      "nightwind": "东",
      "daypower": "1-3",
      "nightpower": "1-3",
      "daytemp_float": "29.0",
      "nighttemp_float": "22.0"
    },
    {
      "date": "2025-08-14",
      "week": "4",
      "dayweather": "阴",
      "nightweather": "雷阵雨",
      "daytemp": "31",
      "nighttemp": "23",
      "daywind": "南",
      "nightwind": "南",
      "daypower": "1-3",
      "nightpower": "1-3",
      "daytemp_float": "31.0",
      "nighttemp_float": "23.0"
    },
    {
      "date": "2025-08-15",
      "week": "5",
      "dayweather": "雷阵雨",
      "nightweather": "雷阵雨",
      "daytemp": "31",
      "nighttemp": "24",
      "daywind": "南",
      "nightwind": "南",
      "daypower": "1-3",
      "nightpower": "1-3",
      "daytemp_float": "31.0",
      "nighttemp_float": "24.0"
    }
  ]
}}], isError=false}, error=null]
流式响应场景
package com.example.client.controller;

import org.springframework.ai.chat.client.ChatClient;
import org.springframework.beans.factory.annotation.Autowired;
import org.springframework.http.MediaType;
import org.springframework.web.bind.annotation.GetMapping;
import org.springframework.web.bind.annotation.RequestParam;
import org.springframework.web.bind.annotation.RestController;
import reactor.core.publisher.Flux;

@RestController
public class StreamingChatExample {

    private final ChatClient chatClient;

    public StreamingChatExample(ChatClient.Builder chatClientBuilder) {
        this.chatClient = chatClientBuilder.build();
    }

    @GetMapping(value = "/api/stream-chat",  produces = "text/html;charset=UTF-8")
    public Flux<String> streamChat(@RequestParam String message) {
        return chatClient.prompt()
                .user(message)
                .stream()
                .content()
                .map(chunk -> "data: " + chunk + "\n\n");
    }

    @GetMapping(value = "/api/stream-chat-2", produces = "text/html;charset=UTF-8")
    public Flux<String> streamChat() {
        return chatClient
                .prompt()
                .user("你是谁")
                .stream()
                .content();
    }
}
MCP Server调用
package com.example.client.controller;
import com.example.client.domain.ChatRequest;
import com.example.client.util.MarkdownUtil;
import org.springframework.ai.chat.client.ChatClient;
import org.springframework.ai.tool.ToolCallbackProvider;
import org.springframework.http.MediaType;
import org.springframework.web.bind.annotation.*;
import java.util.Map;
/**
* 聊天控制器,处理AI聊天请求
*/
@RestController
public class ChatController {
private ChatClient chatClient;
public ChatController(ChatClient.Builder chatClientBuilder,
ToolCallbackProvider toolCallbackProvider) {
this.chatClient = chatClientBuilder
.defaultSystem("作为MCP小助手,请根据具体需求智能调用最合适的MCP工具组合来优化回答效果。" +
"要求能够自动识别任务类型,精准匹配工具链,并在响应中保持专业性与实用性的平衡。" +
"请确保输出结果既符合技术规范又具备良好的用户体验,同时支持多轮交互中的上下文连贯处理。")
// 注册工具方法
.defaultToolCallbacks(toolCallbackProvider)
.build();
}
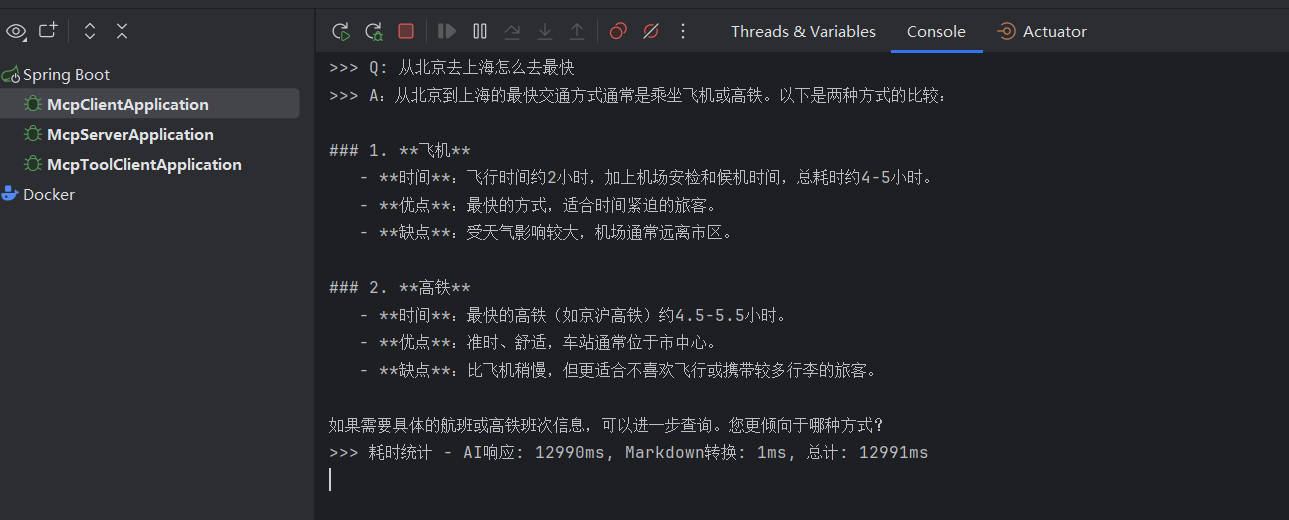
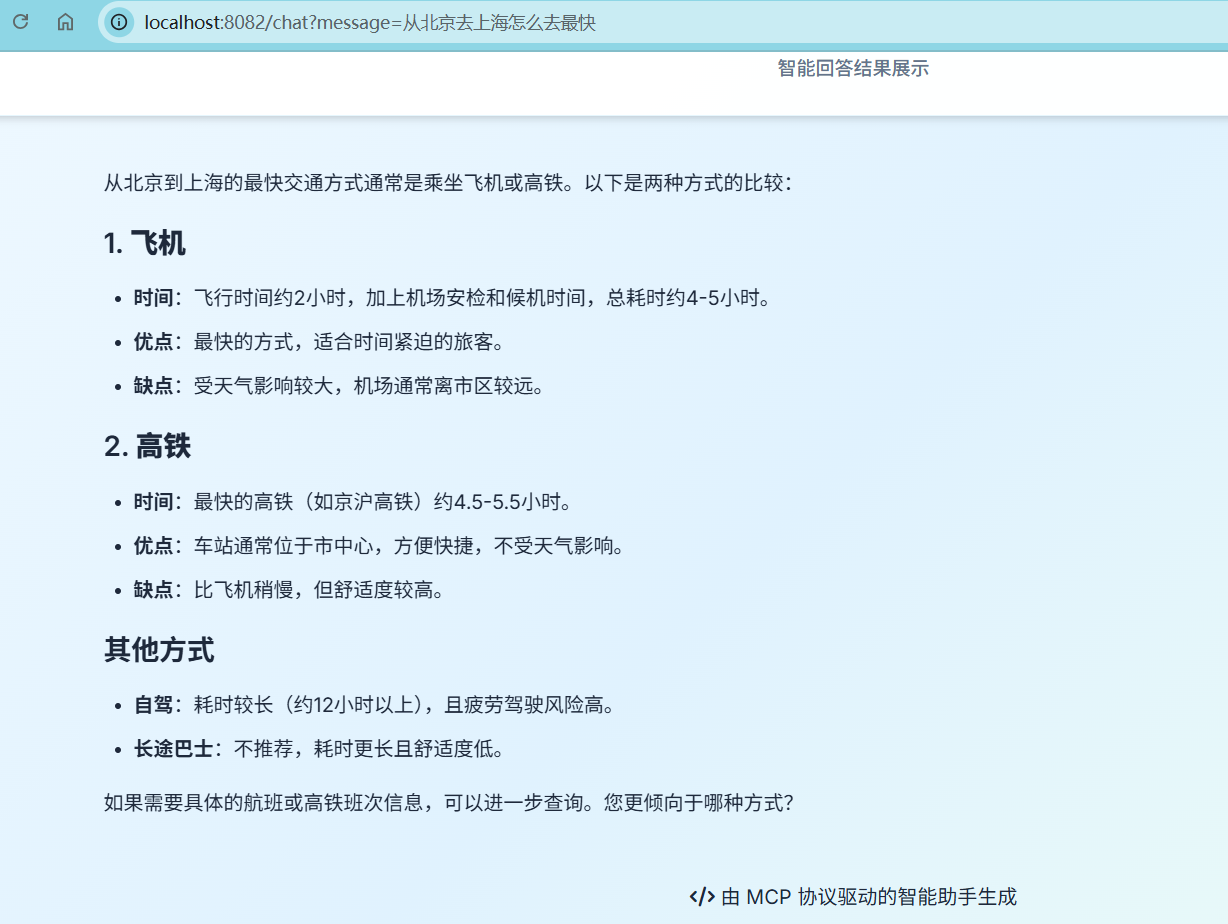
@RequestMapping(value = "/chat", produces = MediaType.TEXT_HTML_VALUE)
public String chatPage(@RequestParam String message) {
System.out.println(">>> Q: " + message);
// 记录开始时间
long startTime = System.currentTimeMillis();
// 使用API调用聊天
String content = chatClient.prompt()
.user(message)
.call()
.content();
// 计算AI响应耗时
long aiResponseTime = System.currentTimeMillis();
long aiDuration = aiResponseTime - startTime;
System.out.println(">>> A:" + content);
// Markdown转换耗时统计
long markdownStartTime = System.currentTimeMillis();
String htmlPage = MarkdownUtil.toHtmlPage(content);
long markdownEndTime = System.currentTimeMillis();
long markdownDuration = markdownEndTime - markdownStartTime;
long totalDuration = markdownEndTime - startTime;
System.out.println(">>> 耗时统计 - AI响应: " + aiDuration + "ms, Markdown转换: " + markdownDuration + "ms, 总计: " + totalDuration + "ms");
return htmlPage;
}
}
调用高德 MCP Server (stdio)
调用server-filesystem MCP Server (stdio)
调用自己写的服务(sse)
spring.ai.mcp.client.sse.connections.server1.url=http://localhost:8085
2025-08-12T21:05:32.615+08:00 WARN 56008 --- [nio-8082-exec-9] .w.s.m.s.DefaultHandlerExceptionResolver : Resolved [org.springframework.web.bind.MissingServletRequestParameterException: Required request parameter 'message' for method parameter type String is not present]
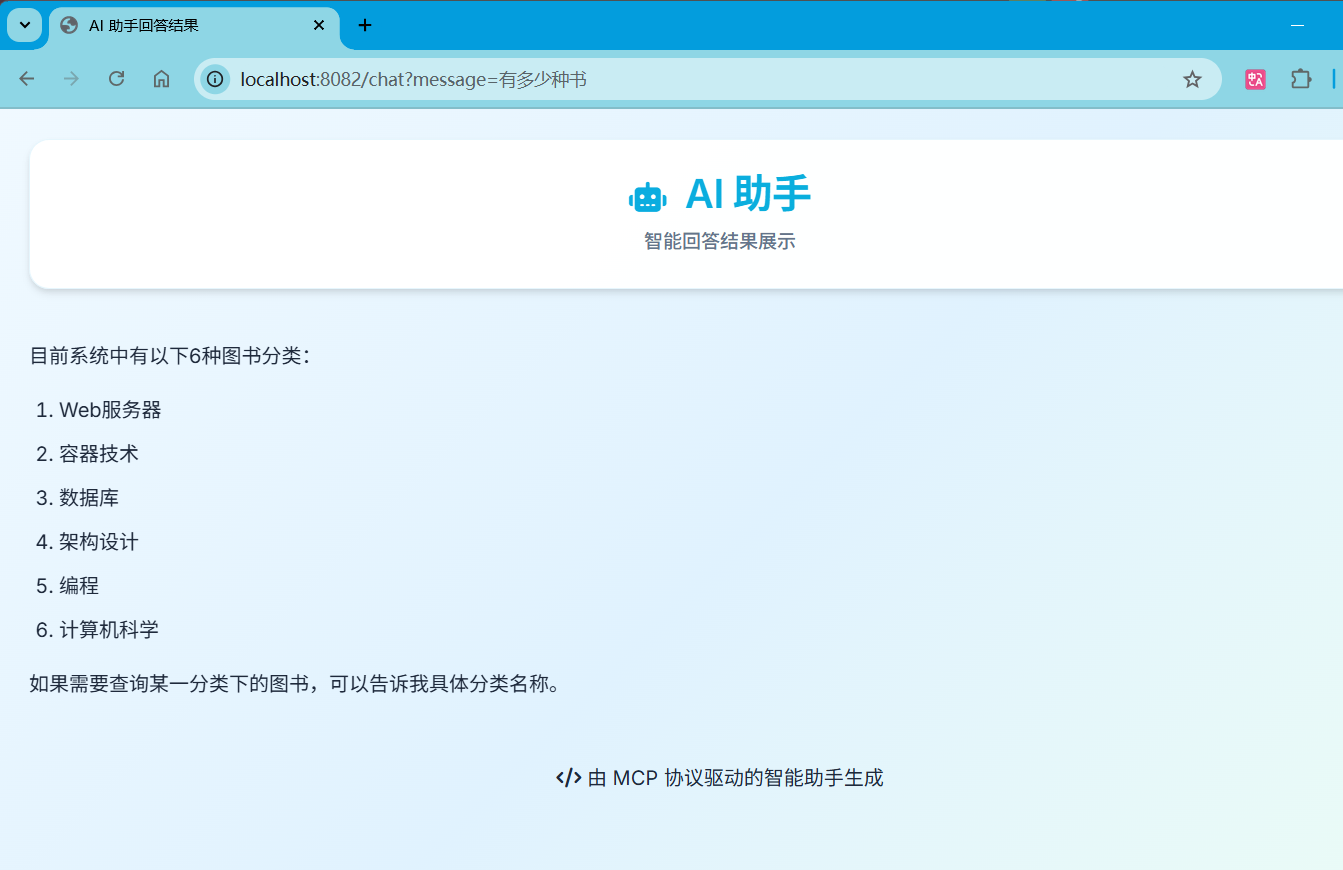
>>> Q: 有多少种书
2025-08-12T21:06:15.405+08:00 DEBUG 56008 --- [nio-8082-exec-1] o.s.a.m.tool.DefaultToolCallingManager : Executing tool call: spring_ai_mcp_client_server1_getBookCategories
2025-08-12T21:06:15.623+08:00 DEBUG 56008 --- [ient-1-Worker-8] io.modelcontextprotocol.spec.McpSchema : Received JSON message: {"jsonrpc":"2.0","id":"b016e092-6","result":{"content":[{"type":"text","text":"[\"Web服务器\",\"容器技术\",\"数据库\",\"架构设计\",\"编程\",\"计算机科学\"]"}],"isError":false}}
2025-08-12T21:06:15.630+08:00 DEBUG 56008 --- [ient-1-Worker-8] i.m.spec.McpClientSession : Received Response: JSONRPCResponse[jsonrpc=2.0, id=b016e092-6, result={content=[{type=text, text=["Web服务器","容器技术","数据库","架构设计","编程","计算机科学"]}], isError=false}, error=null]
>>> A:目前系统中有以下6种图书分类:
1. Web服务器
2. 容器技术
3. 数据库
4. 架构设计
5. 编程
6. 计算机科学
如果需要查询某一分类下的图书,可以告诉我具体分类名称。
>>> 耗时统计 - AI响应: 12955ms, Markdown转换: 5ms, 总计: 12960ms
性能优化建议
缓存策略
@Service
@EnableCaching
public class CachedChatService {

    @Cacheable(value = "chatResponses", key = "#message.hashCode()")
    public String getCachedResponse(String message) {
        return chatClient.prompt()
                .user(message)
                .call()
                .content();
    }

    @CacheEvict(value = "chatResponses", allEntries = true)
    @Scheduled(fixedRate = 3600000) // 1小时清理一次
    public void clearCache() {
        // 定期清理缓存
    }
}
异步处理优化
@Service
public class AsyncChatService {

    @Async("chatExecutor")
    public CompletableFuture<String> processAsync(String message) {
        String response = chatClient.prompt()
                .user(message)
                .call()
                .content();

        return CompletableFuture.completedFuture(response);
    }

    @Bean("chatExecutor")
    public TaskExecutor chatExecutor() {
        ThreadPoolTaskExecutor executor = new ThreadPoolTaskExecutor();
        executor.setCorePoolSize(4);
        executor.setMaxPoolSize(8);
        executor.setQueueCapacity(100);
        executor.setThreadNamePrefix("chat-");
        executor.initialize();
        return executor;
    }
}
最佳实践建议
架构设计最佳实践
- 分层清晰:严格按照控制层、服务层、集成层的分层架构设计
- 接口抽象:为核心组件定义清晰的接口,便于测试和扩展
- 配置外部化:所有可变参数通过配置文件管理
- 异常处理:建立统一的异常处理机制
性能优化最佳实践
- 连接复用:使用连接池管理HTTP连接
- 缓存策略:对频繁访问的数据实施缓存
- 异步处理:对耗时操作采用异步处理
- 资源管理:及时释放不再使用的资源
安全性最佳实践
- 输入验证:对所有用户输入进行严格验证
- 输出转义:防止XSS攻击
- API密钥管理:使用环境变量管理敏感信息
- 访问控制:实施适当的访问控制机制
