目录
WebServerAutoConfiguration自动配置类

Springboot是什么?
Spring Boot 是在 Spring Framework 基础上做的一个“快速启动框架”。主要目的是简化Spring应用的开发,在以前我们要用 Spring,必须:
写一堆
xml配置(Bean、事务、数据源、MVC 等等)配置
web.xml里的DispatcherServlet把各种依赖版本自己管理好(比如 Spring、Hibernate、Tomcat、Jackson 之间要配套)
自己在 Tomcat 部署
war包
而Spring Boot 替你做了几件事:
自动配置:根据你引入的依赖,帮你自动装配 Bean(比如你加了
spring-boot-starter-web,它就帮你自动配置好DispatcherServlet、Jackson、Tomcat)。起步依赖:提供 starter(比如
spring-boot-starter-web),帮你把常用依赖一次性拉全,而且版本匹配。内嵌容器:不需要外部 Tomcat/Jetty,直接
main方法就能启动内置服务器。零配置运行:默认配置能跑,特殊需求再去覆盖。
一句话:Spring Boot = Spring + 自动配置 + 内嵌容器 + Starter依赖管理。
前置准备
目录结构如下:
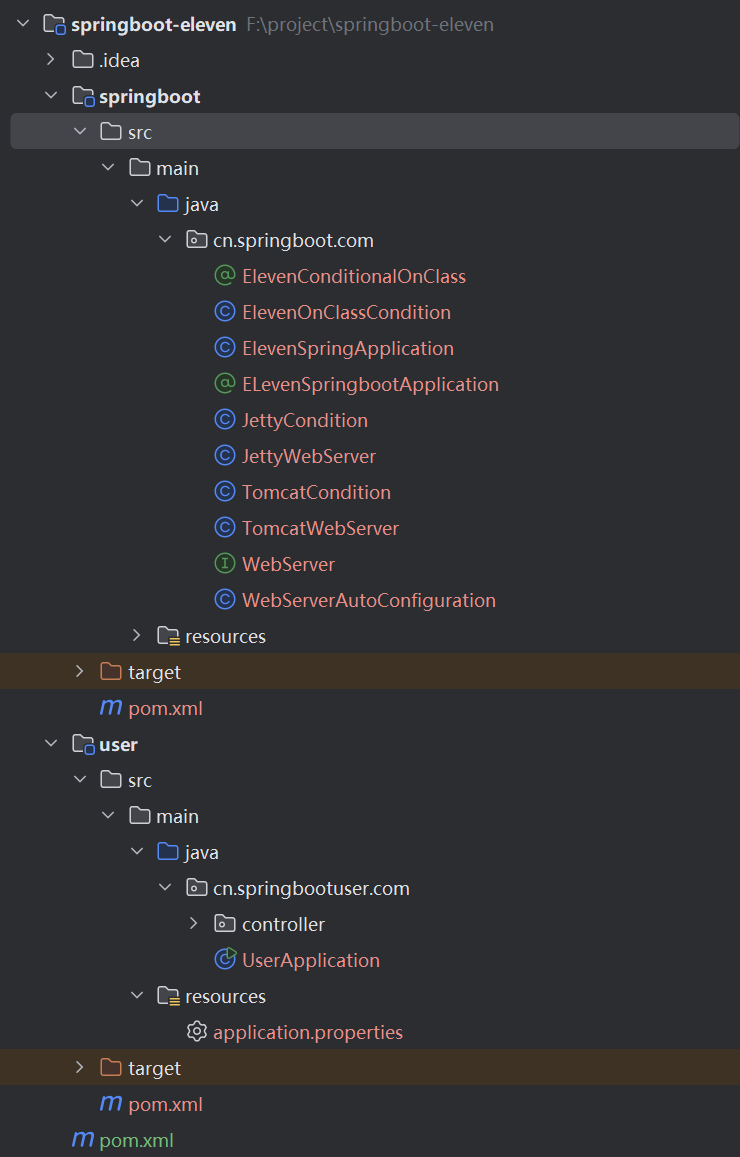
其中我们将要把有关Springboot的注解,接口等写到springboot模块,而使用则在user模块,下面准备依赖:
依赖准备:
springboot模块依赖:
spring-webmvc + spring-aop + tomcat-embed-core(内嵌 Tomcat)+ javax.servlet-api(Servlet 标准 API)+ jetty-server(内嵌 Jetty)
<?xml version="1.0" encoding="UTF-8"?>
<project xmlns="http://maven.apache.org/POM/4.0.0" xmlns:xsi="http://www.w3.org/2001/XMLSchema-instance"
         xsi:schemaLocation="http://maven.apache.org/POM/4.0.0 https://maven.apache.org/xsd/maven-4.0.0.xsd">
    <modelVersion>4.0.0</modelVersion>

    <groupId>cn.springboot.com</groupId>
    <artifactId>springboot</artifactId>
    <version>0.0.1-SNAPSHOT</version>
    <name>springboot</name>
    <description>springboot</description>

    <properties>
        <java.version>17</java.version>
    </properties>

    <dependencies>
        <!-- 嵌入的spring-webmvc依赖-->
        <dependency>
            <groupId>org.springframework</groupId>
            <artifactId>spring-webmvc</artifactId>
            <version>5.3.18</version>
        </dependency>
        <dependency>
            <groupId>org.springframework</groupId>
            <artifactId>spring-aop</artifactId>
            <version>5.3.18</version>
        </dependency>

        <!-- 嵌入的tomcat-->
        <dependency>
            <groupId>org.apache.tomcat.embed</groupId>
            <artifactId>tomcat-embed-core</artifactId>
            <version>9.0.73</version>
        </dependency>
        <!-- 嵌入的servlet-api依赖-->
        <dependency>
            <groupId>javax.servlet</groupId>
            <artifactId>javax.servlet-api</artifactId>
            <version>4.0.1</version>
            <scope>provided</scope>
        </dependency>

        <dependency>
            <groupId>org.eclipse.jetty</groupId>
            <artifactId>jetty-server</artifactId>
            <version>9.4.46.v20220331</version>
            <!-- 可选依赖,在依赖传递时不会将该依赖传递到子Maven-->
            <optional>true</optional>
        </dependency>
    </dependencies>

    <repositories>
        <repository>
            <id>central</id>
            <url>https://repo1.maven.org/maven2/</url>
        </repository>
    </repositories>
</project>
user模块依赖:(依赖传递)
<?xml version="1.0" encoding="UTF-8"?>
<project xmlns="http://maven.apache.org/POM/4.0.0" xmlns:xsi="http://www.w3.org/2001/XMLSchema-instance"
         xsi:schemaLocation="http://maven.apache.org/POM/4.0.0 https://maven.apache.org/xsd/maven-4.0.0.xsd">
    <modelVersion>4.0.0</modelVersion>

    <groupId>cn.springboot.com</groupId>
    <artifactId>user</artifactId>
    <version>0.0.1-SNAPSHOT</version>
    <name>user</name>
    <description>user</description>

    <properties>
        <java.version>17</java.version>
    </properties>

    <dependencies>
        <dependency>
            <groupId>cn.springboot.com</groupId>
            <artifactId>springboot</artifactId>
            <version>0.0.1-SNAPSHOT</version>
        </dependency>
    </dependencies>
</project>
聚合工程:
<?xml version="1.0" encoding="UTF-8"?>
<project xmlns="http://maven.apache.org/POM/4.0.0" xmlns:xsi="http://www.w3.org/2001/XMLSchema-instance"
         xsi:schemaLocation="http://maven.apache.org/POM/4.0.0 https://maven.apache.org/xsd/maven-4.0.0.xsd">
    <modelVersion>4.0.0</modelVersion>

    <groupId>cn.springboot.com</groupId>
    <artifactId>springboot-eleven</artifactId>
    <version>0.0.1-SNAPSHOT</version>
    <name>springboot-eleven</name>
    <packaging>pom</packaging>

    <modules>
        <module>springboot</module>
        <module>user</module>
    </modules>

    <properties>
        <java.version>17</java.version>
    </properties>
</project>
启动类:
我们在使用Springboot时首先编写启动类(一个注解,一个main方法,之后在内部调用Springboot提供的run方法):
@SpringbootApplication
public class UserApplication {
    public static void main(String[] args) {
        SpringApplication.run(UserApplication.class);
    }
}
写一个注解,一个main方法,之后在内部调用Springboot提供的run方法,所以我们也仿照上面构建一个类来实现run方法:
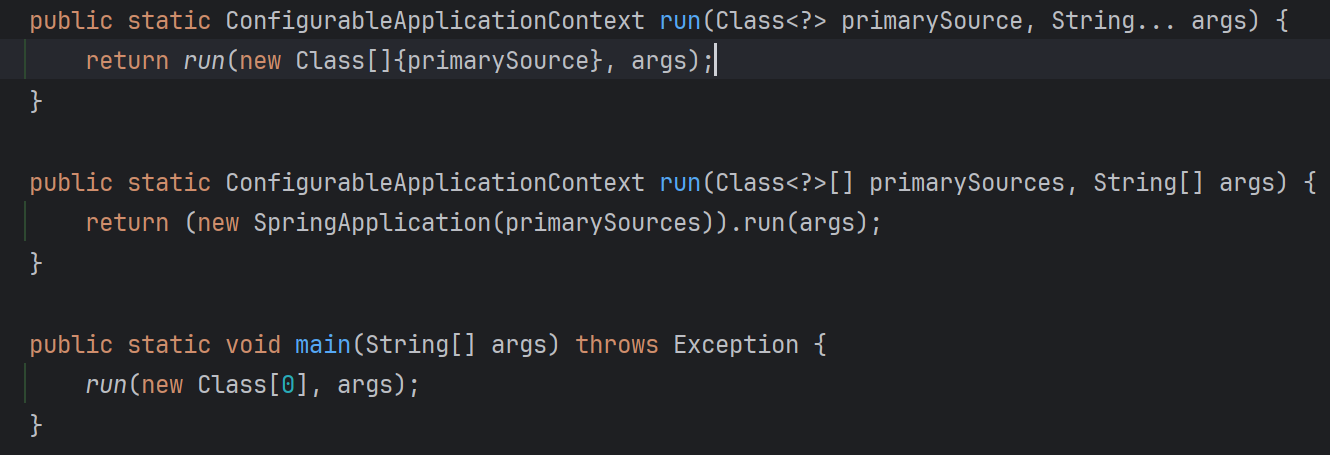
上图是Springboot的run方法的实现,我们先仿写该代码也传入一个configClazz配置类:
package cn.springboot.com;

public class ElevenSpringApplication {

    public static void run(Class<?> configClazz) {

    }
}
传与不传 String[] args 的区别:
当我们不传 String[] args 时,run方法只知道从配置类里加载 Bean,启动容器,不会接收到命令行参数,因此我们无法通过命令行动态配置应用(比如端口号、环境变量)。
而当我们传 String[] args 时,除了配置类,还把 JVM 启动时 main() 接收到的命令行参数传入框架。例如:
java -jar app.jar --server.port=8082 --spring.profiles.active=dev这些参数就会被 Spring Boot 自动解析,修改端口、环境。

之后仿照上面创建一个跟@SpringbootApplication注解一样意思的@ELevenSpringbootApplication注解:(这里@EnableAutoConfiguration后面会加)
package cn.springboot.com;

import org.springframework.context.annotation.ComponentScan;
import org.springframework.context.annotation.Import;

import java.lang.annotation.*;

/**
 * 自定义启动注解,相当于 SpringBootApplication
 * 用于标记在主启动类上,触发自动配置和组件扫描
 */
@Target(ElementType.TYPE) // 说明该注解只能放在类、接口(包括注解类型)或枚举上
@Retention(RetentionPolicy.RUNTIME) // 保留到运行时,运行时可以通过反射获取
@Documented  // 元注解,表示生成 javadoc 时会包含这个注解的信息
@Inherited   // 允许子类继承父类的注解
@ComponentScan // 启动包扫描,扫描当前类所在包及其子包中的 @Component/@Service/@Controller 等注解
public @interface ELevenSpringbootApplication {

}
随后完善启动类:
package cn.springbootuser.com;

import cn.springboot.com.ELevenSpringbootApplication;
import cn.springboot.com.ElevenSpringApplication;

@ELevenSpringbootApplication
@SpringBootApplication
public class UserApplication {

    // 启动时只会扫描UserApplication配置类所在包,也就是 cn.springbootuser.com
    public static void main(String[] args) {
        ElevenSpringApplication.run(UserApplication.class);
    }
}
如何实现启动后,在浏览器访问controller接口渲染数据?
我们都知道在启动后,UserApplication 内的 main 内的 run 方法启动后就会启动 Tomcat,
所以接下来我们先尝试启动Tomcat。
Tomcat启动
首先我们在springboot模块内引入了tomcat依赖:
<!-- 嵌入的tomcat-->
<dependency>
    <groupId>org.apache.tomcat.embed</groupId>
    <artifactId>tomcat-embed-core</artifactId>
    <version>9.0.73</version>
</dependency>
之后编写startTomcat()方法来启动Tomcat:
package cn.springboot.com;

import org.apache.catalina.*;
import org.apache.catalina.connector.Connector;
import org.apache.catalina.core.StandardContext;
import org.apache.catalina.core.StandardEngine;
import org.apache.catalina.core.StandardHost;
import org.apache.catalina.startup.Tomcat;
import org.springframework.web.context.WebApplicationContext;
import org.springframework.web.context.support.AnnotationConfigWebApplicationContext;
import org.springframework.web.servlet.DispatcherServlet;

import javax.servlet.Servlet;
import java.util.Map;


public class ElevenSpringApplication {

    public static void run(Class<?> configClazz) {
        startTomcat();
    }

    /**
     * 启动Tomcat
     * @param applicationContext
     */
    private static void startTomcat() {
        // 创建Tomcat服务器
        Tomcat tomcat = new Tomcat();
        Server server = tomcat.getServer();
        Service service = server.findService("Tomcat");
        // 创建连接器
        Connector connector = new Connector();
        connector.setPort(8081);

        // 创建引擎
        Engine engine = new StandardEngine();
        engine.setDefaultHost("localhost");
        // 创建主机
        Host host = new StandardHost();
        host.setName("localhost");

        String contextPath = "";
        // 创建上下文
        Context context = new StandardContext();
        // 设置上下文路径
        context.setPath(contextPath);
        context.addLifecycleListener(new Tomcat.FixContextListener());
        // 添加上下文
        host.addChild(context);
        engine.addChild(host);
        // 设置引擎
        service.setContainer(engine);
        // 添加连接器
        service.addConnector(connector);

        try {
            tomcat.start();
        } catch (LifecycleException e) {
            e.printStackTrace();
        }
    }
}
现在Tomcat已经可以通过启动类启动了并且能够接受到浏览器的请求,那么接下来如何处理请求?
我们可以添加 Servlet,因为Tomcat是 Servlet 的容器,而 Servlet 可以做到添加并处理请求。我们的大概逻辑如下:
假设浏览器要对 localhost:8081/test 发送请求,那么Tomcat接受到请求后要根据 /test 路径来找到Controller内的 /test,随后执行方法:
package cn.springbootuser.com.controller;

import org.springframework.web.bind.annotation.GetMapping;
import org.springframework.web.bind.annotation.RestController;

@RestController

public class UserController {

    @GetMapping("/test")
    public String test() {
        return "test";
    }
}
并且Servlet需将返回结果写到Response内返回。
而在这个找到内部 controller 可以交给SpringMVC的 DispatcherServlet:
tomcat.addServlet(contextPath, "dispatcher", new DispatcherServlet(applicationContext));
context.addServletMappingDecoded("/*", "dispatcher"); // 映射所有请求到DispatcherServlet
DispatcherServlet 是 Spring MVC 的前端控制器(Front Controller)。
它接收所有进入 Web 应用的 HTTP 请求,然后根据 HandlerMapping → Controller → ViewResolver 这套流程来分发和处理请求。
① new DispatcherServlet(applicationContext) 表示把 Spring 的 ApplicationContext(IOC 容器)交给 DispatcherServlet,
让它能拿到所有 Controller、Service、配置 Bean。
② context.addServletMappingDecoded("/*", "dispatcher") 用来给刚才注册的 dispatcher Servlet 绑定 URL 映射规则。
"/*" 表示所有请求路径都交给 dispatcher 处理。这样我们Tomcat启动完成后,所有的请求都会交给DispatcherServlet,而DispatcherServlet就可以根据地址后面的 /test 找到对应的接口的实现方法并返回数据。
而我们构造一个DispatcherServlet需要传入Spring容器(applicationContext,它继承了BeanFactory接口),因为我们需要通过容器来查找Bean对象进而来找到对应的接口的实现方法。所以我们需要先创建一个Spring容器:
public static void run(Class<?> configClazz) {
    // 创建Spring容器
    AnnotationConfigWebApplicationContext webApplicationContext = new AnnotationConfigWebApplicationContext();
    // 注册配置类(目的是拿到扫描Bean的路径)
    webApplicationContext.register(configClazz);
    webApplicationContext.refresh(); // 刷新容器
    // 启动Tomcat
    startTomcat(webApplicationContext);
}
随后改写启动Tomcat方法:
/**
 * 启动Tomcat
 * @param applicationContext
 */
private static void startTomcat(WebApplicationContext applicationContext) {
    // 创建Tomcat服务器
    Tomcat tomcat = new Tomcat();
    Server server = tomcat.getServer();
    Service service = server.findService("Tomcat");
    // 创建连接器
    Connector connector = new Connector();
    connector.setPort(8081);

    // 创建引擎
    Engine engine = new StandardEngine();
    engine.setDefaultHost("localhost");
    // 创建主机
    Host host = new StandardHost();
    host.setName("localhost");

    String contextPath = "";
    // 创建上下文
    Context context = new StandardContext();
    // 设置上下文路径
    context.setPath(contextPath);
    context.addLifecycleListener(new Tomcat.FixContextListener());
    // 添加上下文
    host.addChild(context);
    engine.addChild(host);
    // 设置引擎
    service.setContainer(engine);
    // 添加连接器
    service.addConnector(connector);

    // Tomcat是Servlet容器
    // 通过 DispatcherServlet 来处理请求,需要传入 Spring 容器
    // UserApplication内的main方法启动后就会启动Tomcat,就会将所有请求交给 DispatcherServlet 来处理
    // 随后 DispatcherServlet 从传入的 applicationContext 容器中获取Bean找到方法
    // 配置DispatcherServlet
    tomcat.addServlet(contextPath, "dispatcher", new DispatcherServlet(applicationContext));
    context.addServletMappingDecoded("/*", "dispatcher"); // 映射所有请求到DispatcherServlet
    try {
        tomcat.start();
    } catch (LifecycleException e) {
        e.printStackTrace();
    }
}
然后 Spring 就可以扫描 @Bean 注解以及 @ELevenSpringbootApplication注解:
package cn.springbootuser.com;

import cn.springboot.com.ELevenSpringbootApplication;
import cn.springboot.com.ElevenSpringApplication;
import org.springframework.context.annotation.Bean;

@ELevenSpringbootApplication
public class UserApplication {

    @Bean
    // ...

    // 启动时只会扫描UserApplication配置类所在包,也就是 cn.springbootuser.com
    public static void main(String[] args) {
        ElevenSpringApplication.run(UserApplication.class);
    }
}
而解析 @ELevenSpringbootApplication注解就可以解析到 cn.springbootuser.com 包下的所有类:
package cn.springboot.com;

import org.springframework.context.annotation.ComponentScan;
import org.springframework.context.annotation.Import;

import java.lang.annotation.*;

@Target(ElementType.TYPE)
@Retention(RetentionPolicy.RUNTIME)
@Documented
@Inherited
@ComponentScan  // 没有指定扫描路径就直接扫描使用这个注解的启动类的解析类的包路径
// 也就是代表扫描 UserApplication.class 配置类的路径(cn.springboot.com)
public @interface ELevenSpringbootApplication {
}
但是我们这个对于启动Tomcat时是采用硬编码的方式,一些配置全部都是写固定的,并且我们只要启动,就只能启动Tomcat,假如我们不想启动Tomcat而想启动Jetty呢?所以这个时候我们可以加入一些配置来让用户去选择使用Tomcat还是Jetty。
便捷选择使用Tomcat与Jetty
首先Tomcat与Jetty都是WebServer,那我们直接抽出方法实现WebServer接口:
package cn.springboot.com;

public interface WebServer {
    void start();
    void stop();
}
之后创建 TomcatWebServer 实现 WebServer:
package cn.springboot.com;

import java.time.LocalDateTime;

public class TomcatWebServer implements WebServer {
    @Override
    public void start() {
        System.out.println("TomcatWebServer start");

    }

    @Override
    public void stop() {
        LocalDateTime localDateTime = LocalDateTime.now();
        localDateTime.plusHours(1);
        System.out.println("TomcatWebServer stop");
    }
}
同样也创建 JettyWebServer :
package cn.springboot.com;

public class JettyWebServer implements WebServer {
    @Override
    public void start() {
        System.out.println("JettyWebServer start");
    }

    @Override
    public void stop() {
        System.out.println("JettyWebServer stop");
    }
}
那为了我们能够选择使用Tomcat还是Jetty,我们需要修改run()方法的逻辑:
首先创建一个getWebServer()方法来得到当前使用的WebServer对象,随后调用Start方法即可使用:
package cn.springboot.com;


import org.apache.catalina.*;
import org.apache.catalina.connector.Connector;
import org.apache.catalina.core.StandardContext;
import org.apache.catalina.core.StandardEngine;
import org.apache.catalina.core.StandardHost;
import org.apache.catalina.startup.Tomcat;
import org.springframework.web.context.WebApplicationContext;
import org.springframework.web.context.support.AnnotationConfigWebApplicationContext;
import org.springframework.web.servlet.DispatcherServlet;

import javax.servlet.Servlet;
import java.util.Map;


public class ElevenSpringApplication {

    public static void run(Class<?> configClazz) {
        // 创建Spring容器
        AnnotationConfigWebApplicationContext webApplicationContext = new AnnotationConfigWebApplicationContext();
        // 注册配置类
        webApplicationContext.register(configClazz);
        webApplicationContext.refresh(); // 刷新容器

        // 启动tomcat或jetty
        WebServer webServer = getWebServer(webApplicationContext);
        webServer.start();
    }
}
那么现在我们就需要实现getWebServer()方法。这里就需要判断到底是Tomcat还是Jetty?
首先使用 webApplicationContext.getBeansOfType(WebServer.class) 方法根据传递给方法的WebServer类型来获取对应的Bean对象,之后判断Bean对象是否合法?(因为我们要保证有且只能有一个WebServer),之后直接返回第一个对象即可。
/**
 * 获取WebServer
 * @param webApplicationContext
 * @return
 */
private static WebServer getWebServer(AnnotationConfigWebApplicationContext webApplicationContext) {
    // 在容器中根据类型获取所有的WebServer
    Map<String, WebServer> webServerMap = webApplicationContext.getBeansOfType(WebServer.class);
    if (webServerMap.isEmpty()) {
        // 没有WebServer,抛出异常
        throw new NullPointerException("WebServer is null");
    }
    if (webServerMap.size() > 1) {
        // 多个WebServer,抛出异常
        throw new IllegalStateException("Multiple WebServer found");
    }
    // 返回唯一的WebServer对象
    return webServerMap.values().stream().findFirst().get();
}
之后我们需要再去启动类定义一个Bean:
package cn.springbootuser.com;

import cn.springboot.com.ELevenSpringbootApplication;
import cn.springboot.com.ElevenSpringApplication;
import cn.springboot.com.TomcatWebServer;
import org.springframework.context.annotation.Bean;

@ELevenSpringbootApplication
public class UserApplication {

    @Bean
    public TomcatWebServer tomcatWebServer() {
        return new TomcatWebServer();
    }

    // 启动时只会扫描UserApplication配置类所在包,也就是 cn.springbootuser.com
    public static void main(String[] args) {
        ElevenSpringApplication.run(UserApplication.class);
    }
}
但是这样仍然是写固定使用Tomcat,这时我们就可以使用自动配置。在springboot模块中创建 WebServerAutoConfiguration。
WebServerAutoConfiguration自动配置类
在内部定义两个Bean,通过使用Spring提供的条件注解@Conditional来决定使用哪个WebServer。
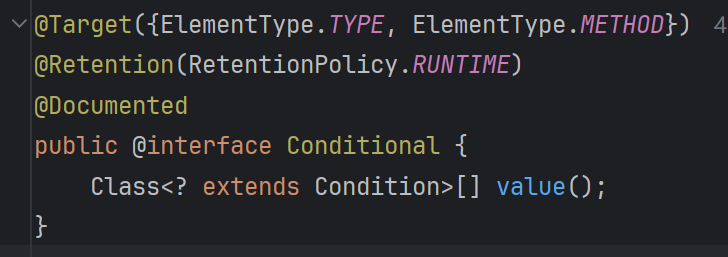
通过上面的源码可以发现,我们需要去给注解传入一个具体的类,而这个类有个Conditions接口来实现限制:

所以我们需要去定义两个类TomcatCondition与JettyCondition,随后重写matches方法声明使用限制。
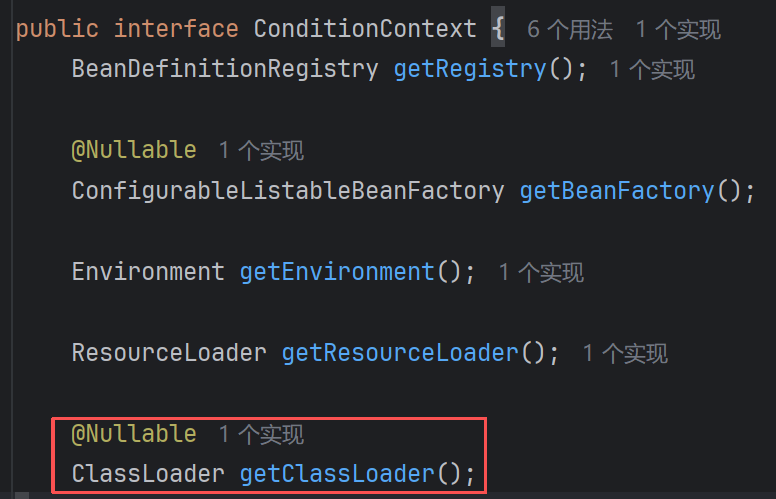
通过 context.getClassLoader().loadClass("org.eclipse.jetty.server.Server") 方法,看看是否可以加载出来WebServer特定类,如果能则代表用户使用了该WebServer:
package cn.springboot.com;

import org.springframework.context.annotation.Condition;
import org.springframework.context.annotation.ConditionContext;
import org.springframework.core.type.AnnotatedTypeMetadata;

import java.util.Map;

/**
 * 自定义条件类,用于判断是否存在Tomcat依赖
 */
public class TomcatCondition implements Condition {
    @Override
    public boolean matches(ConditionContext context, AnnotatedTypeMetadata metadata) {
        // 判断是否存在Tomcat依赖 =》判断Tomcat特定类是否存在 =》使用类加载器加载Tomcat特定类
        try {
            context.getClassLoader().loadClass("org.apache.catalina.startup.Tomcat");
        } catch (ClassNotFoundException e) {
            return false; // 不存在Tomcat依赖,返回false
        }
        // 存在Tomcat依赖,返回true
        return true;
    }
}

///////////////////////////////////////////////////////////////////

package cn.springboot.com;

import org.springframework.context.annotation.Condition;
import org.springframework.context.annotation.ConditionContext;
import org.springframework.core.type.AnnotatedTypeMetadata;

/**
 * 自定义条件类,用于判断是否存在Jetty依赖
 */
public class JettyCondition implements Condition {
    @Override
    public boolean matches(ConditionContext context, AnnotatedTypeMetadata metadata) {
        // 判断是否存在Jetty依赖 =》判断Jetty特定类是否存在 =》使用类加载器加载Jetty特定类
        try {
            context.getClassLoader().loadClass("org.eclipse.jetty.server.Server");
        } catch (ClassNotFoundException e) {
            return false; // 不存在Jetty依赖,返回false
        }
        // 存在Jetty依赖,返回true
        return true;
    }
}
之后我们在@Conditional()内加入对应的Condition传入即可。
package cn.springboot.com;


import org.springframework.context.annotation.Bean;
import org.springframework.context.annotation.Conditional;
import org.springframework.context.annotation.Configuration;

/**
 * 配置类,用于配置WebServer
 */
@Configuration
public class WebServerAutoConfiguration {

    @Bean
    @Conditional(TomcatCondition.class)
    public TomcatWebServer tomcatWebServer() {
        return new TomcatWebServer();
    }

    @Bean
    // 通过条件注解判断是否创建JettyWebServer的Bean
    @Conditional(JettyCondition.class)
    public JettyWebServer jettyWebServer() {
        return new JettyWebServer();
    }
}
但是因为前面说到,Spring扫描时是根据配置类所在的目录进行扫描,而我们的WebServerAutoConfiguration是配置在springboot模块中,为了扫描WebServer配置类,我们可以在 @ELevenSpringbootApplication 内加入 @Import(WebServerAutoConfiguration.class)以此来让启动类扫描到WebServerAutoConfiguration类来解析配置:
package cn.springboot.com;


import org.springframework.context.annotation.ComponentScan;
import org.springframework.context.annotation.Import;

import java.lang.annotation.*;

@Target(ElementType.TYPE)
@Retention(RetentionPolicy.RUNTIME)
@Documented
@Inherited
@ComponentScan
@Import(WebServerAutoConfiguration.class) // 为了让启动类扫描到WebServerAutoConfiguration类来解析配置
public @interface ELevenSpringbootApplication {

}
而原本的Springboot是提供了 @ConditionOnClass 条件注解(作用:当指定的类存在于类路径(classpath)中时,当前配置类或 Bean 才会生效),我们可以自己写一个条件注解:
在该注解上加入属性方法,运行时使用等注解,随后加入@Conditional条件注解,将我们待引入Condition实现匹配的类(
下面有代码)传入即可。
package cn.springboot.com;


import org.springframework.context.annotation.Conditional;

import java.lang.annotation.*;

/**
 * 自定义条件注解,用于判断是否存在指定的类
 */
@Target({ElementType.TYPE, ElementType.METHOD}) // 在属性和方法上使用
@Retention(RetentionPolicy.RUNTIME)
@Conditional(ElevenOnClassCondition.class)
public @interface ElevenConditionalOnClass {
    /**
     * 类名
     * @return
     */
    String value();
}
package cn.springboot.com;

import org.springframework.context.annotation.Condition;
import org.springframework.context.annotation.ConditionContext;
import org.springframework.core.type.AnnotatedTypeMetadata;

import java.util.Map;

public class ElevenOnClassCondition implements Condition {
    @Override
    public boolean matches(ConditionContext context, AnnotatedTypeMetadata metadata) {
        // 判断是否存在依赖 =》判断特定类是否存在 =》使用类加载器加载特定类
        try {
            Map<String, Object> annotationAttributes = metadata.getAnnotationAttributes(ElevenConditionalOnClass.class.getName());
            String value = (String) annotationAttributes.get("value"); // 拿到ElevenConditionalOnClass内的value
            context.getClassLoader().loadClass(value);
        } catch (ClassNotFoundException e) {
            return false; // 不存在依赖,返回false
        }
        // 存在依赖,返回true
        return true;
    }
}
使用的时候直接传入特定类,然后我们可以直接写一个方法根据特定类判断是否生效:
package cn.springboot.com;


import org.springframework.context.annotation.Bean;
import org.springframework.context.annotation.Conditional;
import org.springframework.context.annotation.Configuration;

/**
 * 配置类,用于配置WebServer
 */
@Configuration
public class WebServerAutoConfiguration {

    @Bean
//    @Conditional(TomcatCondition.class)
    @ElevenConditionalOnClass("org.apache.catalina.startup.Tomcat")
    public TomcatWebServer tomcatWebServer() {
        return new TomcatWebServer();
    }

    @Bean
//    @Conditional(JettyCondition.class)
    @ElevenConditionalOnClass("org.eclipse.jetty.server.Server")
    public JettyWebServer jettyWebServer() {
        return new JettyWebServer();
    }
}
自动配置类实现的意义实际上就是帮助我们去配置一些Bean。就比如我们如果想去使用MyBatis框架时候:
<dependency>
    <groupId>org.mybatis.spring.boot</groupId>
    <artifactId>mybatis-spring-boot-starter</artifactId>
    <version>2.3.1</version>
</dependency>
我们导入依赖后就无需自己手动配置@Bean,因为我们引入了这个依赖后会间接的引入自动配置的Jar包:

内部有一个自动配置类MybatisAutoConfiguration:
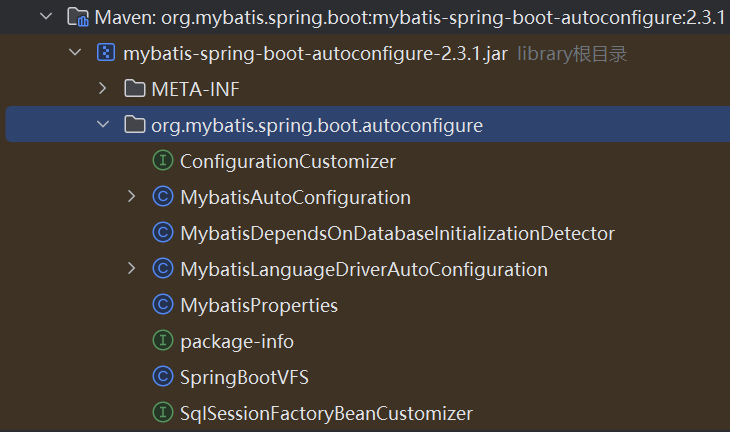
同样在内部也是帮助我们定义了很多Bean:
但是如果一但我们的Bean需要定义的很多时,就需要使用批量导入。
批量导入
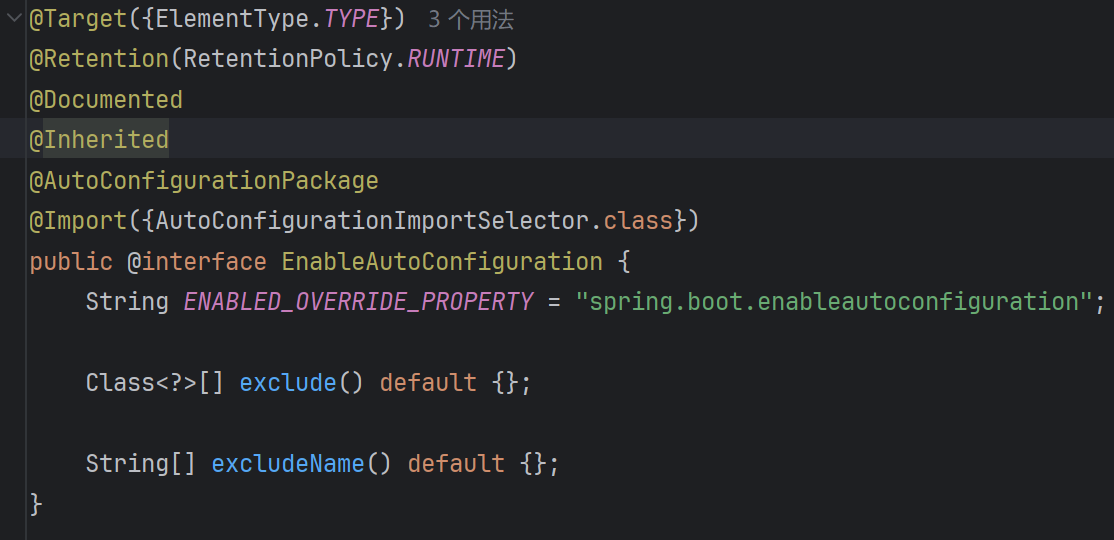
在Springboot源码中有@EnableAutoConfiguration注解:
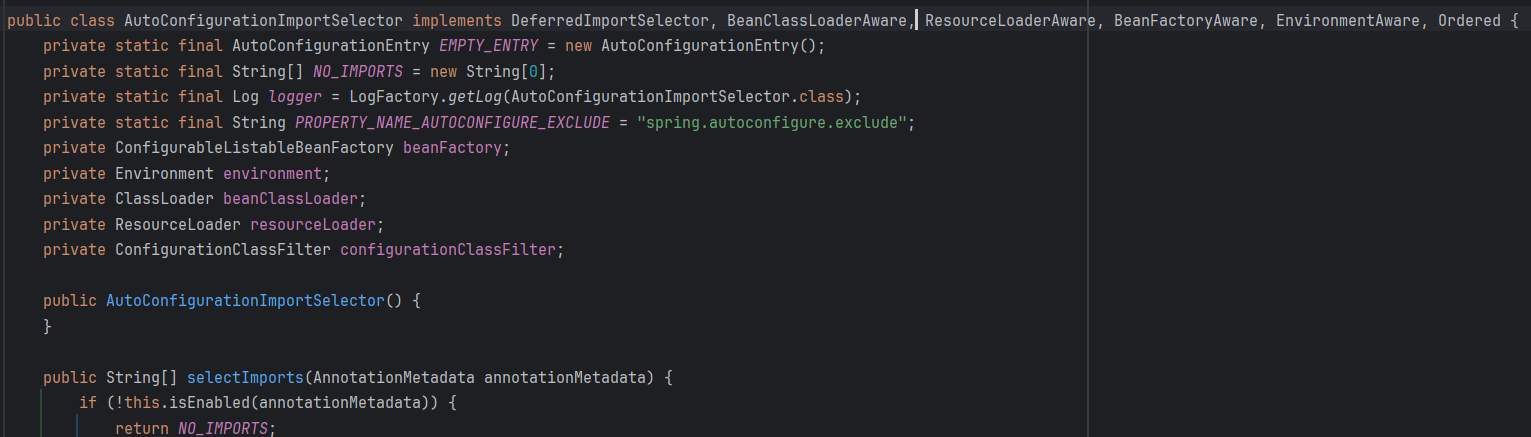
然后其内部有一个 AutoConfigurationImportSelector 自动导入配置类:
所以我们也可以仿照Springboot源码实现一个自动导入配置类:
package cn.springboot.com;

import org.springframework.context.annotation.DeferredImportSelector;
import org.springframework.core.type.AnnotationMetadata;

public class AutoConfigurationImportSelector implements DeferredImportSelector {
    @Override
    public String[] selectImports(AnnotationMetadata importingClassMetadata) {
        // 返回自动配置类的全限定名(自动配置类的名字)
        return new String[0];
    }
}
但一般来说我们不仅需要本地的一些Bean的类名,还需要第三方依赖的Bean名,所以我们还需要将这两个一起封装到String[]数组后返回。
我们可以查看引入的Springboot实现的自动导入配置类:
public class AutoConfigurationImportSelector implements DeferredImportSelector, BeanClassLoaderAware, ResourceLoaderAware, BeanFactoryAware, EnvironmentAware, Ordered {
    // ...

    public String[] selectImports(AnnotationMetadata annotationMetadata) {
        if (!this.isEnabled(annotationMetadata)) {
            return NO_IMPORTS;
        } else {
            AutoConfigurationEntry autoConfigurationEntry = this.getAutoConfigurationEntry(annotationMetadata);
            return StringUtils.toStringArray(autoConfigurationEntry.getConfigurations());
        }
    }

    // ...
}
在导入自动配置时是使用Springboot内部的Jar包,而在上面我们导入的MyBatis也有自动配置类,那如何让AutoConfigurationImportSelector方法最后返回的是所有引入的包的Bean名呢?
Springboot自动导入配置源码解析
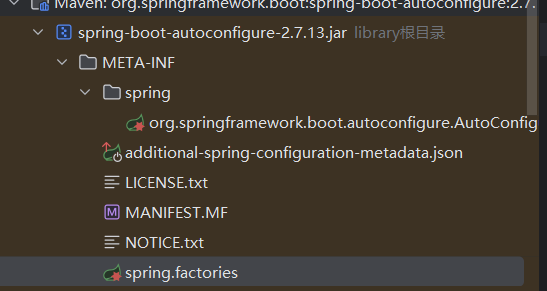
我们不可能去遍历所有的类的名字来判断该类是否是配置类,我们可以查看内部的spring.factories:
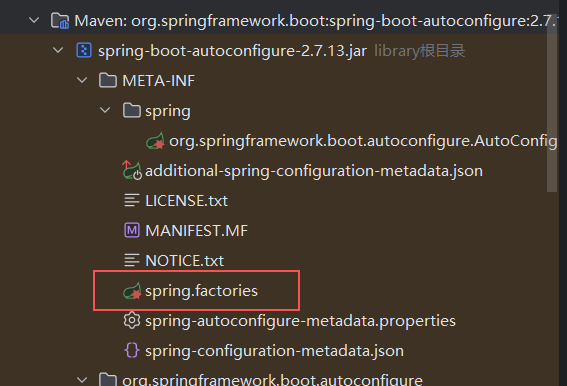
可以发现每个依赖内都是有这个文件的,其内部是key、value格式:
以Mybatis的spring.factorities为例:
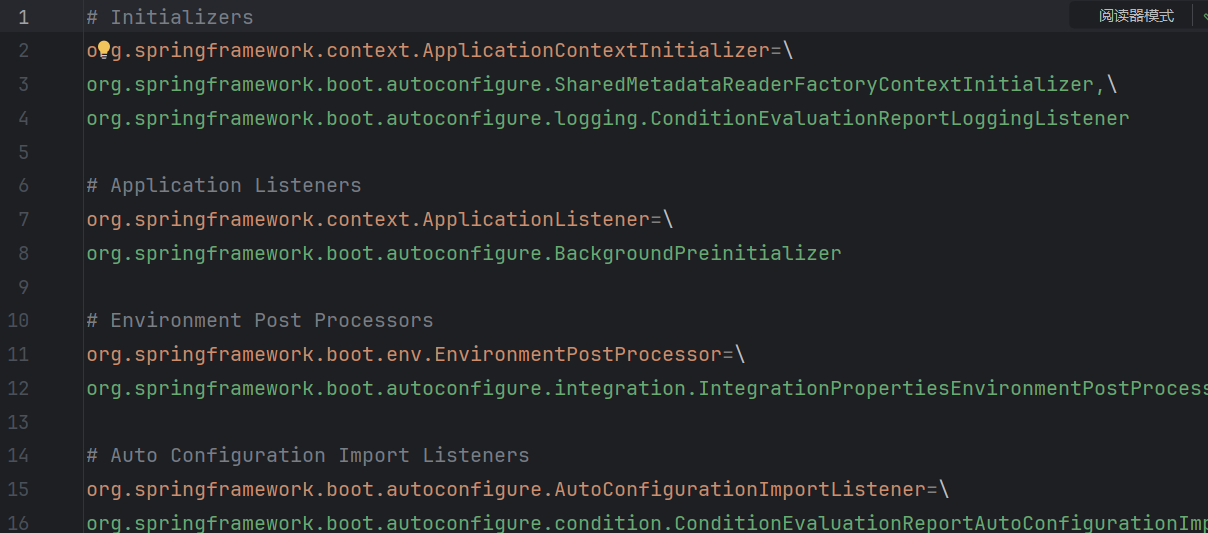
springboot2.x版本是通过 SpringFactoriesLoader.loadFactoryNames() 方法,扫描所有依赖包下的META-INF/spring.factories,然后读取键为:org.springframework.boot.autoconfigure.EnableAutoConfiguration的值,这些值就是自动配置类的全限定名。
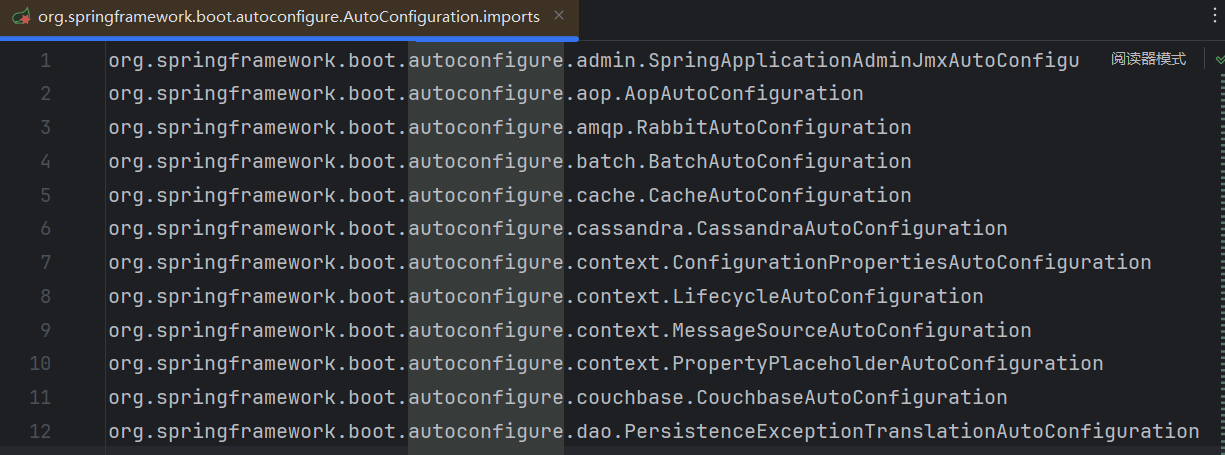
而springboot3.x版本采用新的 META-INF/spring/org.springframework.boot.autoconfigure.AutoConfiguration.imports 文件,
避免一次性加载大量不必要类,提高性能:
而selectImports()内有个getAutoConfigurationEntry()方法:
protected AutoConfigurationEntry getAutoConfigurationEntry(AnnotationMetadata annotationMetadata) { // 获取自动配置条目的主方法,返回要导入的配置类列表及排除项
    if (!this.isEnabled(annotationMetadata)) {                                                     // 如果自动配置功能未启用(检查@EnableAutoConfiguration开关),直接返回空条目
        return EMPTY_ENTRY;                                                                        // 返回一个空的AutoConfigurationEntry
    } else {
        AnnotationAttributes attributes = this.getAttributes(annotationMetadata);                   // 解析@EnableAutoConfiguration上的所有属性(如exclude、excludeName等)
        List<String> configurations = this.getCandidateConfigurations(annotationMetadata, attributes); // 读取候选配置类列表(从AutoConfiguration.imports文件中加载)
        configurations = this.removeDuplicates(configurations);                                     // 去重,避免重复导入同一个自动配置类
        Set<String> exclusions = this.getExclusions(annotationMetadata, attributes);                 // 获取用户显式排除的配置类集合
        this.checkExcludedClasses(configurations, exclusions);                                      // 校验排除类是否在候选列表中,并确保不存在非法排除
        configurations.removeAll(exclusions);                                                       // 从候选列表中移除排除的类
        configurations = this.getConfigurationClassFilter().filter(configurations);                 // 通过条件过滤器进一步筛选(如@ConditionalOnClass等条件)
        this.fireAutoConfigurationImportEvents(configurations, exclusions);                         // 发布自动配置导入事件(供监听器扩展,例如日志输出或调试)
        return new AutoConfigurationEntry(configurations, exclusions);                              // 封装最终的配置类和排除项,返回结果
    }
}
其内部有一个getCandidateConfigurations()方法用来找到有哪些配置类:
    protected List<String> getCandidateConfigurations(AnnotationMetadata metadata, AnnotationAttributes attributes) {
        List<String> configurations = new ArrayList(SpringFactoriesLoader.loadFactoryNames(this.getSpringFactoriesLoaderFactoryClass(), this.getBeanClassLoader()));
        ImportCandidates.load(AutoConfiguration.class, this.getBeanClassLoader()).forEach(configurations::add);
        Assert.notEmpty(configurations, "No auto configuration classes found in META-INF/spring.factories nor in META-INF/spring/org.springframework.boot.autoconfigure.AutoConfiguration.imports. If you are using a custom packaging, make sure that file is correct.");
        return configurations;
    }
然后通过ImportCandidates.load(AutoConfiguration.class, this.getBeanClassLoader()).forEach(configurations::add)方法查找与 @AutoConfiguration 相关的候选类。
而上面说到,在 Spring Boot 3 里,所有自动配置类的全限定类名都集中在META-INF/spring/org.springframework.boot.autoconfigure.AutoConfiguration.imports文件中,这个文件就是与 AutoConfiguration 关联的:
这样就可以拿到所有的配置类名。
而 spring.factories 用来保存与 SPI 机制 相关的映射,比如:
org.springframework.boot.autoconfigure.AutoConfigurationImportFilter:自动配置过滤器(如OnClassCondition)。org.springframework.boot.autoconfigure.AutoConfigurationImportListener:自动配置监听器。其它环境处理器、失败分析器等。
这些是启动过程中的扩展点,并非自动配置类本身。
| 文件/类 | 作用 |
|---|---|
@AutoConfiguration |
标记自动配置类,支持顺序控制。 |
AutoConfiguration.imports |
自动配置类的清单,启动时加载。 |
spring.factories |
SPI 扩展点映射(过滤器、监听器、处理器等)。 |
spring-configuration-metadata.json |
为 IDE 提供属性补全与提示的元数据。 |
additional-spring-configuration-metadata.json |
手动补充或修正的属性元数据。 |
spring-autoconfigure-metadata.properties |
条件元数据,加速启动,避免不必要的类加载。 |
Maven配置
回到最初的问题,原本的Springboot是默认使用Tomcat服务器,如果想使用Jetty需要对依赖做一些配置:
<dependencies>
    <dependency>
        <groupId>cn.springboot.com</groupId>
        <artifactId>springboot</artifactId>
        <version>0.0.1-SNAPSHOT</version>
        <exclusions>
            <exclusion>
                <groupId>org.apache.tomcat.embed</groupId>
                <artifactId>tomcat-embed-core</artifactId>
            </exclusion>
        </exclusions>
    </dependency>
    <dependency>
        <groupId>org.eclipse.jetty</groupId>
        <artifactId>jetty-server</artifactId>
        <version>9.4.46.v20220331</version>
    </dependency>
</dependencies>
在这里,我们的user模块是继承的springboot模块,而springboot模块内我们对jetty依赖做了配置,以此来保证在进行依赖传递时,不会将jetty依赖传到user模块:
<dependency>
    <groupId>org.eclipse.jetty</groupId>
    <artifactId>jetty-server</artifactId>
    <version>9.4.46.v20220331</version>
    <!-- 可选依赖,在依赖传递时不会将该依赖传递到子Maven-->
    <optional>true</optional>
</dependency>