目录
一、安卓输入系统简介
输入事件的源头是位于dev/input/下的设备节点,即:当我们触摸屏幕或按键后会在该节点下生成数据,而输入系统的终点是由WMS管理的某个窗口。
最初的输入事件为内核生成的原始事件,而最终交付给窗口的则是KeyEvent或MotionEvent对象。
Android输入系统的主要工作是读取设备节点中的原始事件,将其加工封装,然后派发给一个指定的窗口以及窗口中的控件。这个过程由InputManagerService系统服务为核心的多个参与者共同完成。

1.1 核心成员
1.Linux内核
接受输入设备的中断,并将原始事件的输入写入设备节点中;
2.设备节点
作为内核和IMS的桥梁,将原始事件的数据暴露给用户空间,以便IMS可以从中读取事件;
3.InputManagerService
Android系统服务,它分为java层和native层两部分;java层负责与WMS通信,native层则是InputReader和InputDispatcher两个输入系统关键组件的运行容器;
4.EventHub
直接访问所有的设备节点。它通过一个名为getEvent()的函数将所有输入系统相关的待处理的底层事件返回给使用者。这些事件包括原始输入事件、设备节点的增删等;
5.InputReader
IMS中的关键组件之一,它运行于一个独立的线程中,负责管理输入设备的列表与配置,以及进行输入事件的加工处理。它通过其线程循环不断地通过getEvents()函数从EventHub中将事件取出并进行处理。对于设备节点的增删事件,它会更新输入设备列表与配置。对于原始输入事件,InputReader对其进行翻译、组装、封装为包含更多信息、更具可读性的输入事件,然后交给InputDispatcher进行派发;
6.InputReaderPolicy
它为InputReader的事件加工处理提供一些策略配置,例如键盘布局信息等;
7.InputDispatcher
IMS中的另一个关键组件,它也运行于一个独立的线程中。InputDispatcher中保管了来自WMS的所有窗口的信息,其收到来自InputReader的输入事件后,会在其保管的窗口中寻找合适的窗口,并将事件派发给此窗口;
8.InputDispatcherPolicy
它为InputDispatcher的派发过程提供策略控制。例如截取某些特定的输入事件用作特殊用途,或者阻止将某些事件派发给目标窗口。一个典型的例子就是HOME键被InputDispatcherPolicy截取到PhoneWindowManager中进行处理,并阻止窗口收到HOME键按下的事件;
9.WMS
不是输入系统的一员,但它对InputDispatcher的正常工作起到重要作用。当新建窗口时,WMS为新窗口和IMS创建了事件传递所用的通道。另外,WMS还将所有窗口的信息,包括窗口的可点击区域,焦点窗口等信息,实时的更新到IMS的InputDispatcher中,使得InputDispatcher可以正确地将事件派发到指定的窗口;
10.ViewRootImpl
对某些窗口,如壁纸窗口、SurfaceView的窗口来说,窗口就是输入事件派发的终点。而对其他的activity、对话框等使用了Android控件系统的窗口来说,输入事件的终点是控件View。ViewRootImpl将窗口所接收的输入事件沿着控件树将事件派发给感兴趣的控件;
总结:
内核将原始事件写入设备节点中,InputReader不断地通过EventHub将原始事件取出来并翻译加工成Android输入事件,然后交给InputDispatcher。InputDispatcher根据WMS提供的窗口信息将事件交给合适的窗口。窗口的ViewRootImpl对象再沿着控件树将事件派发给感兴趣的控件。控件对其收到的事件做出响应,更新自己的画面、执行特定的动作。所有这些参与者以IMS为核心,构建Android输入体系。
二、IMS启动流程
2.1 初始化流程
IMS分为java和native两部分,其启动过程是从java部分的初始化开始,进而完成native部分的初始化;
同其他核心服务一样,IMS运行在system_server进程里面,在startOtherServices()里面启动:
private void startOtherServices() {
     .......
     .......
     traceBeginAndSlog("StartInputManagerService");
     inputManager = new InputManagerService(context);
     traceEnd();

     traceBeginAndSlog("StartInputManager");
     inputManager.setWindowManagerCallbacks(wm.getInputManagerCallback());
     inputManager.start();
     traceEnd();
     .......
     ......
}
通过启动逻辑可以看到,在创建完IMS实例后,先执行了setWindowManagerCallbacks然后执行了start(),接下来进入InputManagerService源码中一起看一下内部实现逻辑:
325      public InputManagerService(Context context) {
326          this.mContext = context;
327          this.mHandler = new InputManagerHandler(DisplayThread.get().getLooper());
328
329          mStaticAssociations = loadStaticInputPortAssociations();
330          mUseDevInputEventForAudioJack =
331                  context.getResources().getBoolean(R.bool.config_useDevInputEventForAudioJack);
332          Slog.i(TAG, "Initializing input manager, mUseDevInputEventForAudioJack="
333                  + mUseDevInputEventForAudioJack);
334          mPtr = nativeInit(this, mContext, mHandler.getLooper().getQueue());
335
336          String doubleTouchGestureEnablePath = context.getResources().getString(
337                  R.string.config_doubleTouchGestureEnableFile);
338          mDoubleTouchGestureEnableFile = TextUtils.isEmpty(doubleTouchGestureEnablePath) ? null :
339              new File(doubleTouchGestureEnablePath);
340
341          LocalServices.addService(InputManagerInternal.class, new LocalService());
342      }

          ......


352      public void start() {
353          Slog.i(TAG, "Starting input manager");
354          nativeStart(mPtr);
355
            .......
378 }在构造方法内,执行了nativeInit(),在start()中执行了nativeStart(),以上两个方法都是native方法,具体的逻辑是在native层实现的,对应的类路径为:
base/services/core/jni/com_android_server_input_InputManagerService.cpp
1261  static jlong nativeInit(JNIEnv* env, jclass /* clazz */,
1262          jobject serviceObj, jobject contextObj, jobject messageQueueObj) {
1263      sp<MessageQueue> messageQueue = android_os_MessageQueue_getMessageQueue(env, messageQueueObj);
1264      if (messageQueue == nullptr) {
1265          jniThrowRuntimeException(env, "MessageQueue is not initialized.");
1266          return 0;
1267      }
1268
1269      NativeInputManager* im = new NativeInputManager(contextObj, serviceObj,
1270              messageQueue->getLooper());
1271      im->incStrong(0);
1272      return reinterpret_cast<jlong>(im);
1273  }

            .......

87  class NativeInputManager : public virtual RefBase,
188      public virtual InputReaderPolicyInterface,
189      public virtual InputDispatcherPolicyInterface,
190      public virtual PointerControllerPolicyInterface {

           ......
}

327  NativeInputManager::NativeInputManager(jobject contextObj,
328          jobject serviceObj, const sp<Looper>& looper) :
329          mLooper(looper), mInteractive(true) {
330      JNIEnv* env = jniEnv();
331
332      mServiceObj = env->NewGlobalRef(serviceObj);
333
334      {
335          AutoMutex _l(mLock);
336          mLocked.systemUiVisibility = ASYSTEM_UI_VISIBILITY_STATUS_BAR_VISIBLE;
337          mLocked.pointerSpeed = 0;
338          mLocked.pointerGesturesEnabled = true;
339          mLocked.showTouches = false;
340          mLocked.pointerCapture = false;
341          mLocked.pointerDisplayId = ADISPLAY_ID_DEFAULT;
342      }
343      mInteractive = true;
344
345      mInputManager = new InputManager(this, this);
346      defaultServiceManager()->addService(String16("inputflinger"),
347              mInputManager, false);
348 }NativeInputManager继承了InputReaderPolicyInterface、InputDispatcherPolicyInterface等,后续会讲到,然后回到构造方法,在构造方法内部,创建了InputManager,再看一下InputManager,位于frameworks/native/services/inputflinger/InputManager.cpp:
34  InputManager::InputManager(
35          const sp<InputReaderPolicyInterface>& readerPolicy,
36          const sp<InputDispatcherPolicyInterface>& dispatcherPolicy) {
37      mDispatcher = createInputDispatcher(dispatcherPolicy);
38      mClassifier = new InputClassifier(mDispatcher);
39      mReader = createInputReader(readerPolicy, mClassifier);
40  }
1.初始化InputDispatcher:
frameworks/native/services/inputflinger/dispatcher/InputDispatcherFactory.cpp
std::unique_ptr<InputDispatcherInterface> createInputDispatcher(
        const sp<InputDispatcherPolicyInterface>& policy) {
    return std::make_unique<android::inputdispatcher::InputDispatcher>(policy);
}
使用std:make_unique调用InputDispatcher的构造函数,其构造函数如下:
frameworks/native/services/inputflinger/dispatcher/InputDispatcher.cpp
389  // --- InputDispatcher ---
390
391  InputDispatcher::InputDispatcher(const sp<InputDispatcherPolicyInterface>& policy)
392        : mPolicy(policy),
393          mPendingEvent(nullptr),
394          mLastDropReason(DropReason::NOT_DROPPED),
395          mIdGenerator(IdGenerator::Source::INPUT_DISPATCHER),
396          mAppSwitchSawKeyDown(false),
397          mAppSwitchDueTime(LONG_LONG_MAX),
398          mNextUnblockedEvent(nullptr),
399          mDispatchEnabled(false),
400          mDispatchFrozen(false),
401          mInputFilterEnabled(false),
402          // mInTouchMode will be initialized by the WindowManager to the default device config.
403          // To avoid leaking stack in case that call never comes, and for tests,
404          // initialize it here anyways.
405          mInTouchMode(true),
406          mFocusedDisplayId(ADISPLAY_ID_DEFAULT) {
407      mLooper = new Looper(false);
408      mReporter = createInputReporter();
409
410      mKeyRepeatState.lastKeyEntry = nullptr;
411
412      policy->getDispatcherConfiguration(&mConfig);
413  }
(407行)mLooper = new Looper(false)用于唤起InputDispatcher中的InputThread
2.初始化InputReader:
frameworks/native/services/inputflinger/reader/InputReaderFactory.cpp
std::unique_ptr<InputReaderInterface> createInputReader(
        const sp<InputReaderPolicyInterface>& policy, InputListenerInterface& listener) {
    return std::make_unique<InputReader>(std::make_unique<EventHub>(), policy, listener);
}
frameworks/native/services/inputflinger/reader/InputReader.cpp
41  // --- InputReader ---
42
43  InputReader::InputReader(std::shared_ptr<EventHubInterface> eventHub,
44                           const sp<InputReaderPolicyInterface>& policy,
45                           const sp<InputListenerInterface>& listener)
46        : mContext(this),
47          mEventHub(eventHub),
48          mPolicy(policy),
49          mGlobalMetaState(0),
50          mGeneration(1),
51          mNextInputDeviceId(END_RESERVED_ID),
52          mDisableVirtualKeysTimeout(LLONG_MIN),
53          mNextTimeout(LLONG_MAX),
54          mConfigurationChangesToRefresh(0) {
55      mQueuedListener = new QueuedInputListener(listener);
56
57      { // acquire lock
58          AutoMutex _l(mLock);
59
60          refreshConfigurationLocked(0);
61          updateGlobalMetaStateLocked();
62      } // release lock
63  }
64 mEventHub(eventHub)用于读取/dev/input事件,其中mEventHub->wake()用于唤起InputDispatcher中的InputThread
mQueuedListener = new QueuedInputListener(listener)连接InputDispatcher\InputReader,就是mClassifier
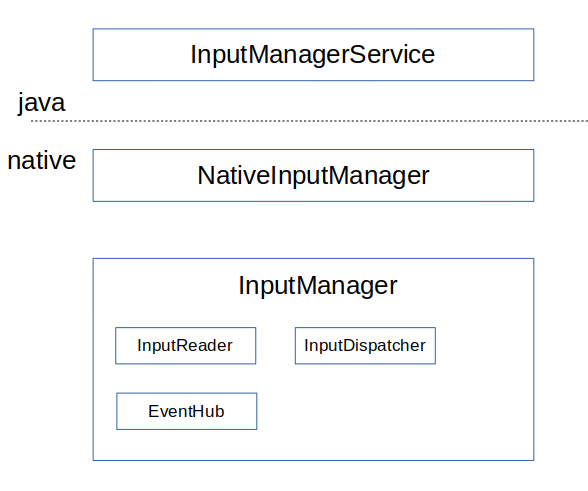
总结一下:在执行nativeInit()后,会创建NativeInputManager对象,然后在NativeInputManager内部创建InputManager对象,接着在InputManager内部创建了InputReader和InputDispatcher对象,用一张图概况一下:
2.2 启动流程
接着上面分析,在执行nativeInit()后,会执行nativeStart():IMS的启动还是从SystemServer的startOtherServices方法中启动的。
private void startOtherServices(@NonNull TimingsTraceAndSlog t) {
	...
	t.traceBegin("StartInputManager");
	inputManager.setWindowManagerCallbacks(wm.getInputManagerCallback());
	inputManager.start();
	t.traceEnd();
	...
}
这里调用InputManagerService的start方法。
/frameworks/base/services/core/java/com/android/server/input/InputManagerService.java
public void start() {
    Slog.i(TAG, "Starting input manager");
    mNative.start(); //1

    // Add ourselves to the Watchdog monitors.
    Watchdog.getInstance().addMonitor(this); //2

    registerPointerSpeedSettingObserver();
    registerShowTouchesSettingObserver();
    registerAccessibilityLargePointerSettingObserver();
    registerLongPressTimeoutObserver();
    registerMaximumObscuringOpacityForTouchSettingObserver();
    registerBlockUntrustedTouchesModeSettingObserver();

    mContext.registerReceiver(new BroadcastReceiver() {
        @Override
        public void onReceive(Context context, Intent intent) {
            updatePointerSpeedFromSettings();
            updateShowTouchesFromSettings();
            updateAccessibilityLargePointerFromSettings();
            updateDeepPressStatusFromSettings("user switched");
        }
    }, new IntentFilter(Intent.ACTION_USER_SWITCHED), null, mHandler);

    updatePointerSpeedFromSettings();
    updateShowTouchesFromSettings();
    updateAccessibilityLargePointerFromSettings();
    updateDeepPressStatusFromSettings("just booted");
    updateMaximumObscuringOpacityForTouchFromSettings();
    updateBlockUntrustedTouchesModeFromSettings();
}
注释1处调用native的start方法,注释2处将自身添加到watchdog中进行监测。
frameworks/base/services/core/jni/com_android_server_input_InputManagerService.cpp
static void nativeStart(JNIEnv* env, jobject nativeImplObj) {
    NativeInputManager* im = getNativeInputManager(env, nativeImplObj);

    status_t result = im->getInputManager()->start();
    if (result) {
        jniThrowRuntimeException(env, "Input manager could not be started.");
    }
}
这里获取native中的InputManager对象,并调用其中的start方法。
frameworks/native/services/inputflinger/InputManager.cpp
status_t InputManager::start() {
    status_t result = mDispatcher->start(); //1
    if (result) {
        ALOGE("Could not start InputDispatcher thread due to error %d.", result);
        return result;
    }

    result = mReader->start(); //2
    if (result) {
        ALOGE("Could not start InputReader due to error %d.", result);

        mDispatcher->stop();
        return result;
    }

    return OK;
}
注释1处调用了InputDispatcher的start函数,注释2处调用了InputReader的start函数
2.2.1 inputdispatch启动
由上面的InputManager的start方法中调用了InputDispatcher的start函数。
frameworks/native/services/inputflinger/dispatcher/InputDispatcher.cpp
status_t InputDispatcher::start() {
    if (mThread) {
        return ALREADY_EXISTS;
    }
    mThread = std::make_unique<InputThread>(
            "InputDispatcher", [this]() { dispatchOnce(); }, [this]() { mLooper->wake(); });
    return OK;
}
创建了单独的线程运行,InputThread构造函数接收三个参数,第一个参数是线程名,第二个参数是执行threadLoop时的回调函数,第三个参数是线程销毁前唤醒线程的回调。
dispatchOnce()函数
/frameworks/native/services/inputflinger/dispatcher/InputDispatcher.cpp
void InputDispatcher::dispatchOnce() {
    nsecs_t nextWakeupTime = LONG_LONG_MAX;
    { // acquire lock
        std::scoped_lock _l(mLock);
        mDispatcherIsAlive.notify_all();

        // Run a dispatch loop if there are no pending commands.
        // The dispatch loop might enqueue commands to run afterwards.
        if (!haveCommandsLocked()) { //1
            dispatchOnceInnerLocked(&nextWakeupTime); //2
        }

        // Run all pending commands if there are any.
        // If any commands were run then force the next poll to wake up immediately.
        if (runCommandsLockedInterruptable()) {
            nextWakeupTime = LONG_LONG_MIN;
        }

        // If we are still waiting for ack on some events,
        // we might have to wake up earlier to check if an app is anr'ing.
        const nsecs_t nextAnrCheck = processAnrsLocked();
        nextWakeupTime = std::min(nextWakeupTime, nextAnrCheck);

        // We are about to enter an infinitely long sleep, because we have no commands or
        // pending or queued events
        if (nextWakeupTime == LONG_LONG_MAX) {
            mDispatcherEnteredIdle.notify_all();
        }
    } // release lock

    // Wait for callback or timeout or wake.  (make sure we round up, not down)
    nsecs_t currentTime = now(); //3
    int timeoutMillis = toMillisecondTimeoutDelay(currentTime, nextWakeupTime); //4
    mLooper->pollOnce(timeoutMillis);
}
注释1处用于检查InputDispatcher的缓存队列中是否有等待处理的命令,如果没有就会调用注释2处的dispatchOnceInnerLocked函数进行窗口的分发。注释3处获取当前时间,注释4处得出休眠时间,然后调用pollOnce进入休眠,当InputReader有输入事件时,会唤醒InputDispatcher,重新进行事件的分发。
2.2.2 inputReader启动
InputReader也是在InputManager的start方法中启动的,与InputDispatcher一样,会创建一个InputThread在单独的线程中运行。
frameworks/native/services/inputflinger/reader/InputReader.cpp
status_t InputReader::start() {
    if (mThread) {
        return ALREADY_EXISTS;
    }
    mThread = std::make_unique<InputThread>(
            "InputReader", [this]() { loopOnce(); }, [this]() { mEventHub->wake(); });
    return OK;
}
threadLoop中执行的是loopOnce函数
frameworks/native/services/inputflinger/reader/InputReader.cpp
void InputReader::loopOnce() {
	...
    size_t count = mEventHub->getEvents(timeoutMillis, mEventBuffer, EVENT_BUFFER_SIZE); //1

    { // acquire lock
       std::scoped_lock _l(mLock);
       mReaderIsAliveCondition.notify_all();

       if (count) {
           processEventsLocked(mEventBuffer, count); //2
     }
       ...
}
注释1处调用EvnetHub的getEvents函数获取事件信息,存储到mEventBuffer中。事件信息主要有两种,一种是设备节点的增删事件,一种是原始输入事件。注释2处processEventsLocked函数用于处理原始输入事件,并将其交给InputDispatcher来处理。
线程处理流程:
当两个线程启动后,InputReader在其线程循环中不断地从EventHub中抽取原始输入事件,进行加工处理后将加工所得的事件放入InputDispatcher的派发队列中;InputDispatcher则在其线程循环中将派发队列中的事件取出,查找合适的窗口,将事件写入窗口的事件接收管道中;窗口事件接收线程的Looper从管道中将事件取出,交由事件处理函数进行事件响应。
