0 python知识
0.1 os库常见用法
os 库提供了许多用于操作操作系统功能的函数。常见用法包括:
- 文件和目录操作:
os.listdir(path):列出指定路径下的所有文件和目录。os.mkdir(path):创建新目录。os.remove(path):删除文件。os.rmdir(path):删除空目录。os.rename(src, dst):重命名文件或目录。
- 路径操作:
os.path.join(path, *paths):连接路径。os.path.exists(path):检查路径是否存在。os.path.isfile(path):检查路径是否为文件。os.path.isdir(path):检查路径是否为目录。
- 环境变量:
os.getenv(key, default=None):获取环境变量的值。os.environ:访问和修改环境变量。
- 进程管理:
os.system(command):在子终端中执行命令。os.getpid():获取当前进程的ID。os.getppid():获取父进程的ID。
0.2 call
在 Python 中,魔术方法 <font style="color:rgb(36, 41, 47);background-color:rgb(244, 246, 248);">__call__</font> 的作用是使得一个对象可以像函数一样被调用。当你实现了 <font style="color:rgb(36, 41, 47);background-color:rgb(244, 246, 248);">__call__</font> 方法后,Python 会在你使用 <font style="color:rgb(36, 41, 47);background-color:rgb(244, 246, 248);">()</font> 操作符调用对象时自动触发这个方法。下面是详细的解释:
魔术方法 <font style="color:rgb(36, 41, 47);background-color:rgb(244, 246, 248);">__call__</font>
- 定义
**<font style="color:rgb(36, 41, 47);background-color:rgb(244, 246, 248);">__call__</font>**方法:当你在一个类中定义了<font style="color:rgb(36, 41, 47);background-color:rgb(244, 246, 248);">__call__</font>方法时,这个类的实例就可以被调用。也就是说,如果<font style="color:rgb(36, 41, 47);background-color:rgb(244, 246, 248);">__call__</font>方法被定义了,那么你可以用圆括号<font style="color:rgb(36, 41, 47);background-color:rgb(244, 246, 248);">()</font>来调用这个对象,并且这个调用会触发<font style="color:rgb(36, 41, 47);background-color:rgb(244, 246, 248);">__call__</font>方法。 - 调用对象:
<font style="color:rgb(36, 41, 47);background-color:rgb(244, 246, 248);">obj()</font>这样的语法实际上是调用了<font style="color:rgb(36, 41, 47);background-color:rgb(244, 246, 248);">obj.__call__()</font>。这就是为什么在之前的示例中,调用<font style="color:rgb(36, 41, 47);background-color:rgb(244, 246, 248);">obj(1, 2, 3, key='value')</font>会触发<font style="color:rgb(36, 41, 47);background-color:rgb(244, 246, 248);">__call__</font>方法。
示例解释
以下是一个更详细的示例:
pythonCopy Codeclass CallableClass:
    def __call__(self, *args, **kwargs):
        print("被调用了!")
        print("参数:", args)
        print("关键字参数:", kwargs)

# 创建类的实例
obj = CallableClass()

# 调用实例,就像调用函数一样
obj(1, 2, 3, key='value')
在这个示例中:
<font style="color:rgb(36, 41, 47);background-color:rgb(244, 246, 248);">CallableClass</font>类定义了一个<font style="color:rgb(36, 41, 47);background-color:rgb(244, 246, 248);">__call__</font>方法。- 当你创建
<font style="color:rgb(36, 41, 47);background-color:rgb(244, 246, 248);">CallableClass</font>的实例<font style="color:rgb(36, 41, 47);background-color:rgb(244, 246, 248);">obj</font>时,<font style="color:rgb(36, 41, 47);background-color:rgb(244, 246, 248);">obj</font>实际上是一个可调用的对象。 - 当你写
<font style="color:rgb(36, 41, 47);background-color:rgb(244, 246, 248);">obj(1, 2, 3, key='value')</font>时,Python 解释器会将其视为<font style="color:rgb(36, 41, 47);background-color:rgb(244, 246, 248);">obj.__call__(1, 2, 3, key='value')</font>,因此<font style="color:rgb(36, 41, 47);background-color:rgb(244, 246, 248);">__call__</font>方法会被自动调用。
使用场景
使用 <font style="color:rgb(36, 41, 47);background-color:rgb(244, 246, 248);">__call__</font> 方法可以让你的对象表现得像函数一样,这在一些场景中非常有用,例如:
- 工厂函数:可以用来创建复杂对象或进行一些初始化操作。
- 策略模式:你可以使用
<font style="color:rgb(36, 41, 47);background-color:rgb(244, 246, 248);">__call__</font>方法来封装一些可变的算法或策略。 - 装饰器:在创建自定义装饰器时,你可以使用
<font style="color:rgb(36, 41, 47);background-color:rgb(244, 246, 248);">__call__</font>来实现。
总之,<font style="color:rgb(36, 41, 47);background-color:rgb(244, 246, 248);">__call__</font> 方法的存在使得类的实例可以像函数一样被调用,并且它会在这种调用操作发生时被自动触发。
1 Anaconda
1.1 存储位置修改
https://blog.csdn.net/weixin_69317550/article/details/135134588
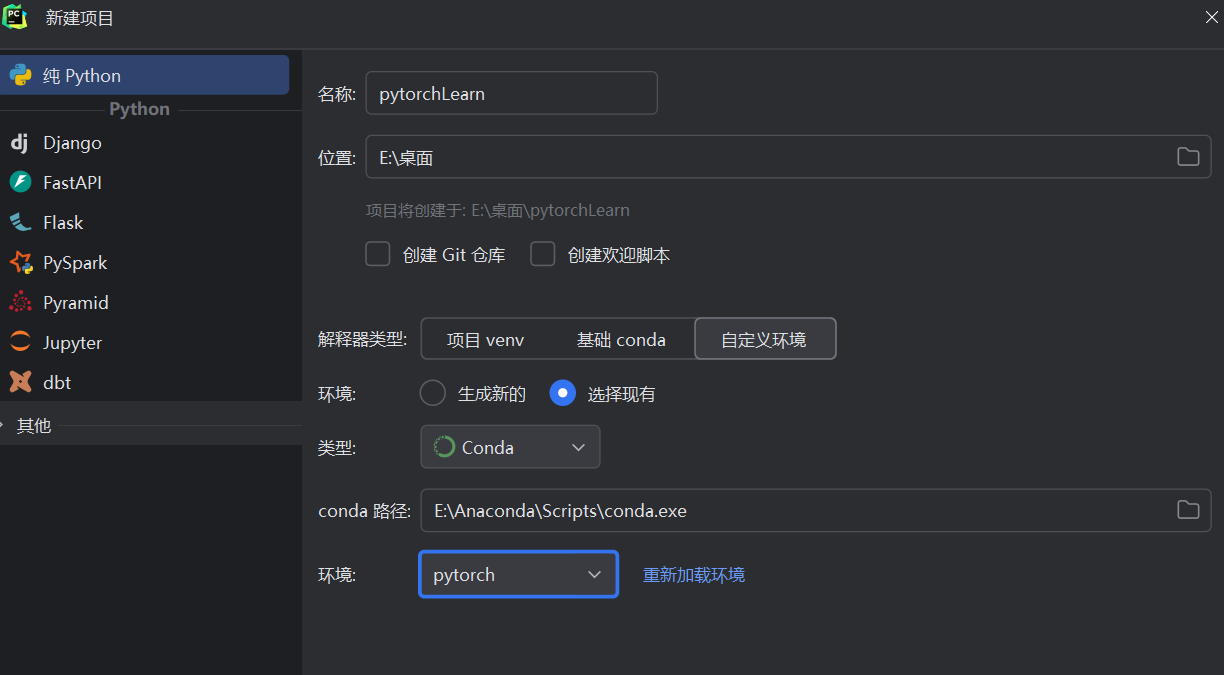
1.2 安装pytorch
pytorch为环境的库名
conda create -n pytorch python=3.6
1.2.1 激活pytorch
conda activate pytorch
1.3 在1.2的环境中安装Jupyter
conda install nb_conda
或者 conda install jupyter notebook
启动:jupyter notebook
1.4 系统环境变量配置
E:\Anaconda
E:\Anaconda\Scripts\
E:\Anaconda\Library\bin
E:\Anaconda\Library\mingw-w64\bin
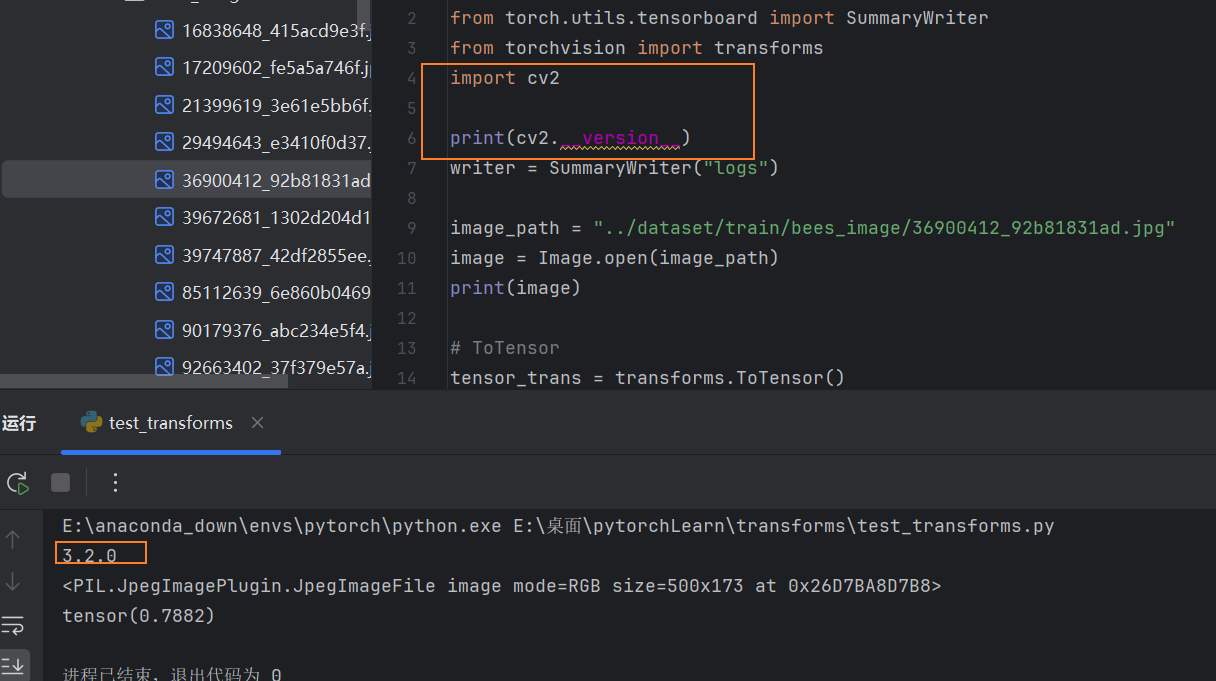
1.5 安装opencv
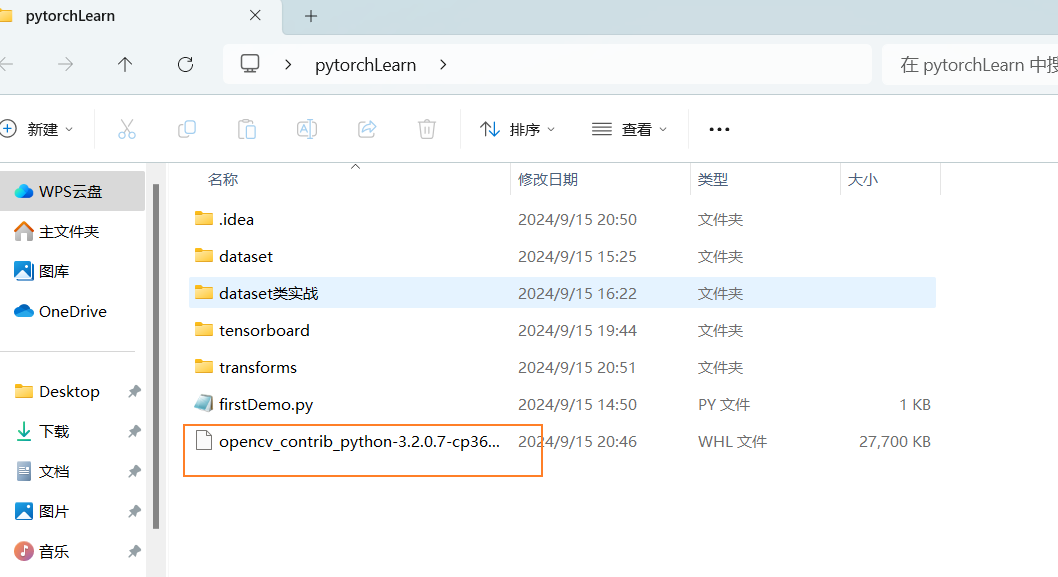
https://pypi.tuna.tsinghua.edu.cn/simple/opencv-contrib-python/注意要根据自己电脑和python版本进行选择,举个例子,cp35表示python3.5版本,下图中前两个是linux版本,后两个分别是Windows32和Windows64版本的

然后在控制台输入
pip install opencv_contrib_python-3.4.7.28-cp35-cp35m-win32.whl #具体文件名根据自己下载的修改
如果出现ERROR: Could not install packages due to an OSError: [Errno 2] No such file or directory: 'E:\桌面\pytorchLearn\opencv_contrib_python-3.2.0.7-cp36-cp36m-w_amd64.whl’问题
解决:把该文件放到对应的文件夹下
再次输入安装命令

可以用相关命令,只不过pycharm没有提示
2 pytorch
2.1 安装查看gpu对应的cuda
https://blog.csdn.net/zeng001201/article/details/118437337
在电脑桌面右键NVIDIA控制面板,点击帮助->系统信息->组件
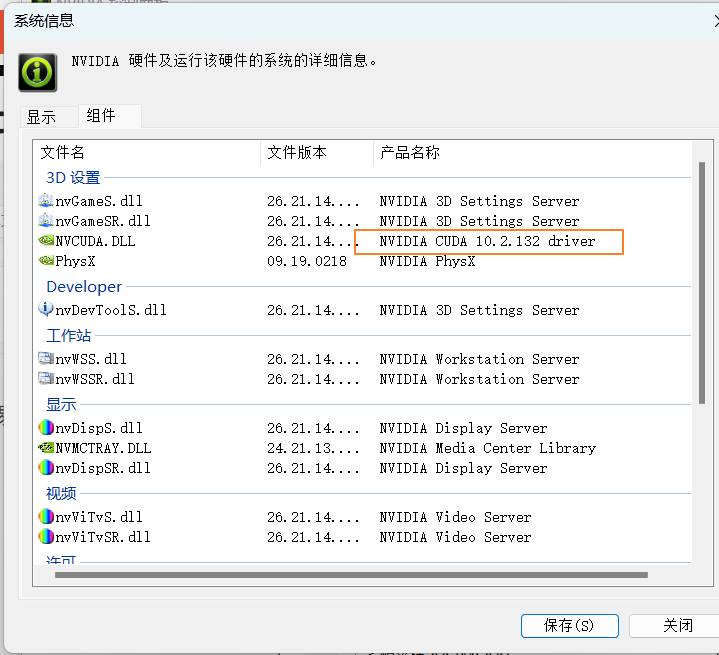
gtx 1060安装的pytorch 版本 cuda 10.2
python 3.6
conda install pytorch1.7.0 torchvision0.8.0 torchaudio==0.7.0 cudatoolkit=10.2 -c pytorch
conda install pytorch==1.7.0 torchvision==0.8.0 torchaudio==0.7.0 cudatoolkit=10.2 -c pytorch
conda install pytorch==1.9.0 torchvision==0.10.0 torchaudio==0.9.0 cudatoolkit=10.2 -c pytorch
conda install pytorch==1.12.1 torchvision==0.13.1 torchaudio==0.12.1 cudatoolkit=10.2 -c pytorch
检验pytorch安装成功且可以使用gpu
python
import torch
torch.cuda.is_available()
(1)输入python 可以进入
(2)输入import torch 不报错
(3)torch.cuda.is_available()返回true
2.2 PyCharm创建、cmd及未知问题
如果出现numpy的错误,先pip uninstall numpy,在install回来
2.3 蚂蚁蜜蜂分类数据集
蚂蚁蜜蜂分类数据集和下载连接https://download.pytorch.org/tutorial/hymenoptera_data.zip
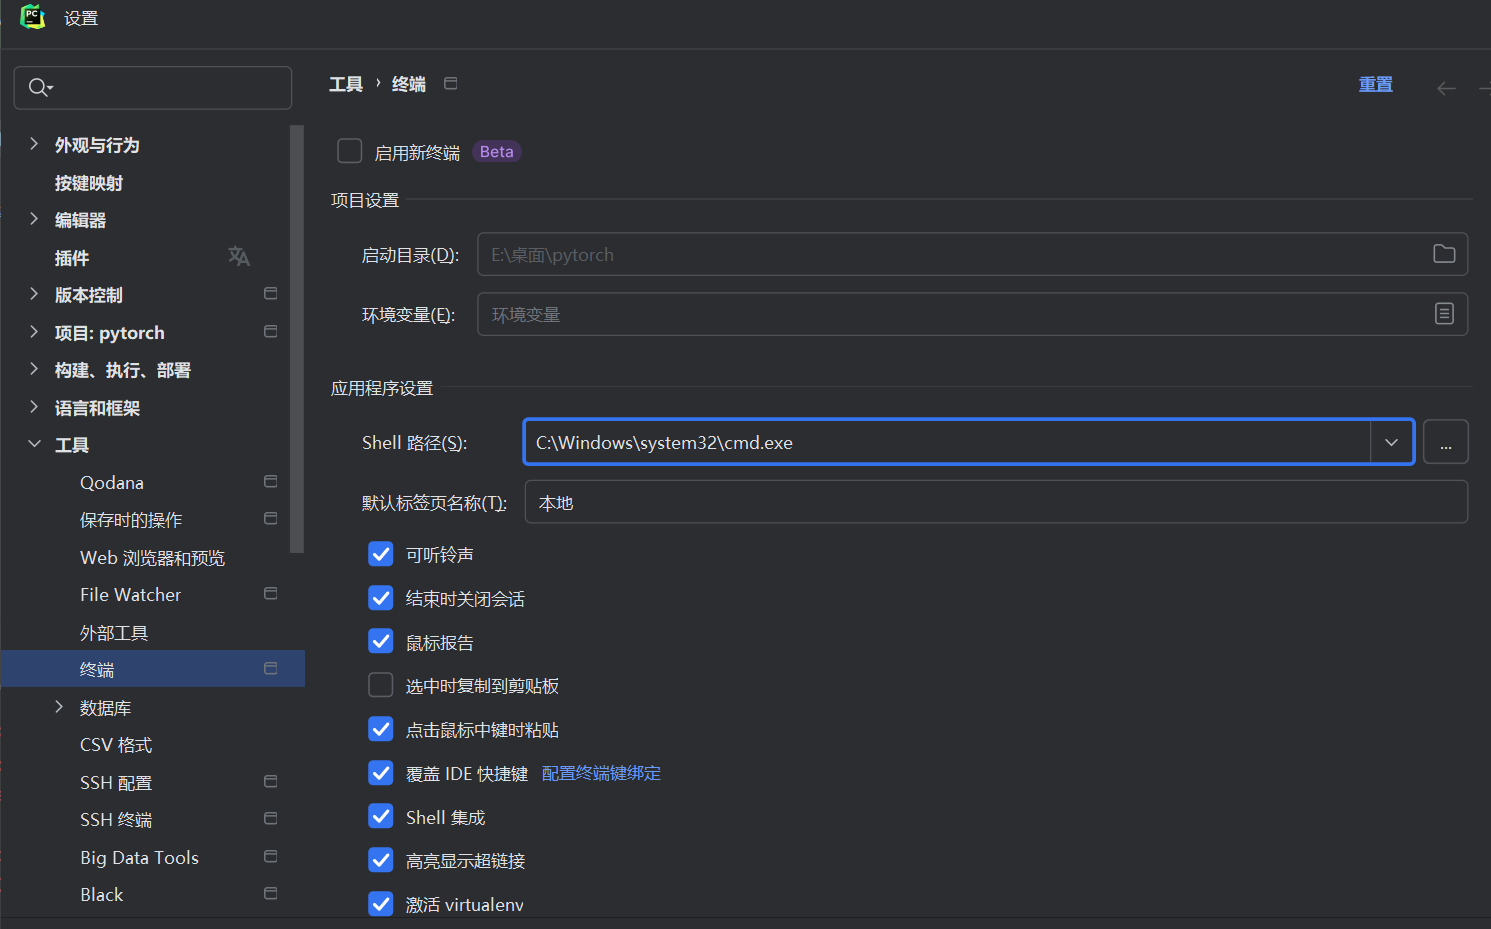
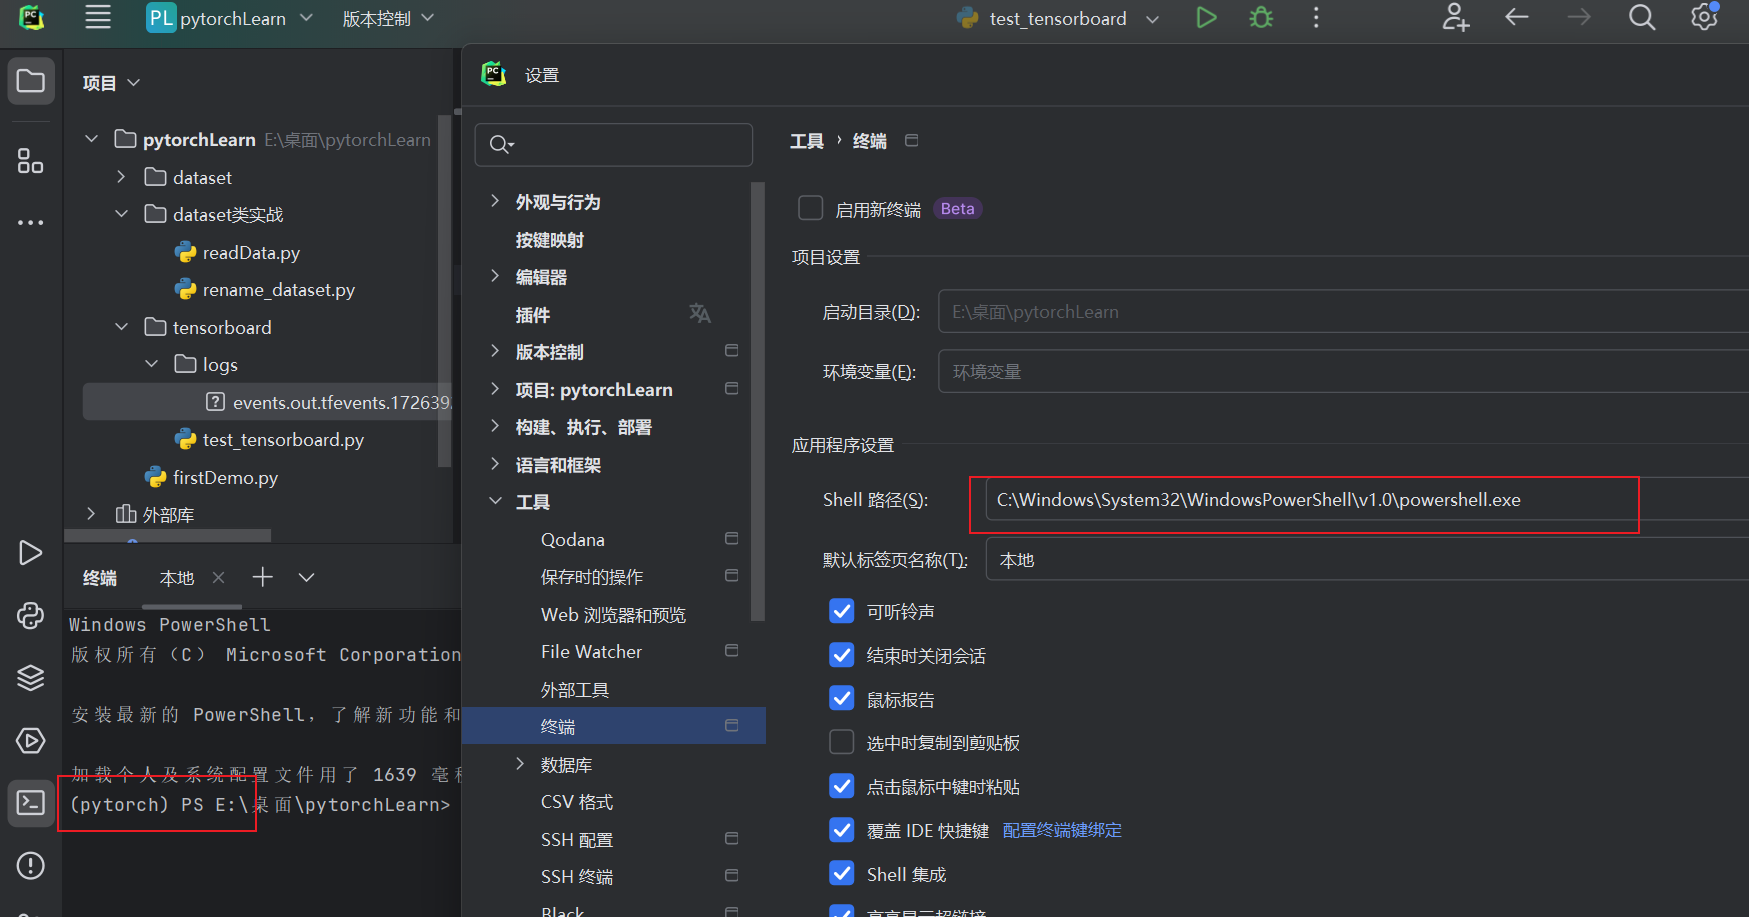
2.4 Pycharm 终端设置为pytorch环境
2.6 Dataset类实战
from torch.utils.data import Dataset
from PIL import Image
import os


# help(Dataset)
class MyData(Dataset):

    def __init__(self, root_dir, img_dir, label_dir):
        self.root_dir = root_dir
        self.img_dir = img_dir
        self.label_dir = label_dir
        self.image_path = os.listdir(os.path.join(self.root_dir, self.img_dir))
        self.label_path = os.listdir(os.path.join(self.root_dir, self.label_dir))

    def __getitem__(self, idx):
        image_name = self.image_path[idx]
        label_name = self.label_path[idx]
        image = Image.open(os.path.join(self.root_dir, self.img_dir, image_name))
        with open(os.path.join(self.root_dir, self.label_dir, label_name), 'r') as f:
            label = f.readline()

        return image, label

    def __len__(self):
        return len(self.image_path)


root_dir = "../dataset/train"
img_dir = "ants_image"
label_dir = "ants_label"
ants_dataset = MyData(root_dir, img_dir, label_dir)
img_dir = "bees_image"
label_dir = "bees_label"
bees_dataset = MyData(root_dir, img_dir, label_dir)

train_dataset = ants_dataset + bees_dataset

# 测试
image, label = bees_dataset[1]
print(image)
print(label)
image.show()
2.7 TensorBoard的使用
2.7.1 打开logs文件夹并指定端口
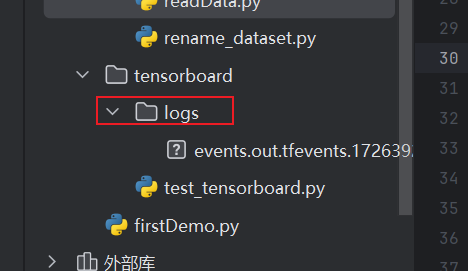
tensorboard --logdir="tensorboard\logs" --port=6007
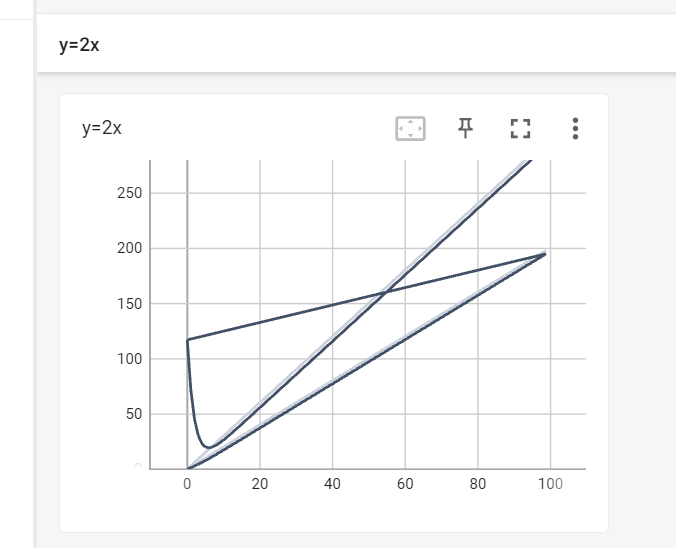
2.7.2 图像乱的解决方式–清楚所有logs,重新运行并执行2.7.1
2.8 Transforms的使用
ToTensor() 转化为Tensor形式
Normalize() 图像归一化/标准化
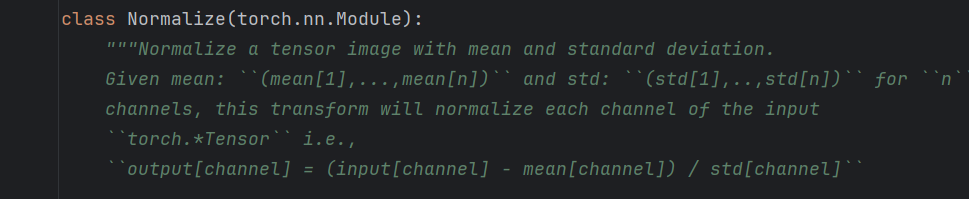
输入的是一个tensor类型的image
它会将图像的每个像素值减去给定的均值,并除以给定的标准差
<font style="color:rgb(36, 41, 47);background-color:rgb(244, 246, 248);">transforms.Normalize([1, 2, 3], [3, 2, 1])</font> 的作用是:
- 均值:每个通道的均值是
<font style="color:rgb(36, 41, 47);background-color:rgb(244, 246, 248);">[1, 2, 3]</font>。 - 标准差:每个通道的标准差是
<font style="color:rgb(36, 41, 47);background-color:rgb(244, 246, 248);">[3, 2, 1]</font>。 - 图像一般RGB 三通道
Resize() 改变图像的大小

输入的是一个image类型
Compose() 参数需要一个列表
python中,列表的表示形式是[数据1,数据2,。。。]
在compose中,数据需要时transforms类型,即Compose([transforms参数1,transforms参数2,。。。])
总结:
1、上述是比较常用的一些函数,到时候要用了再常看官方的源码文档,多看官方的
2、关注输入和输出类型
3、关注方法需要什么参数
4、不知道返回值的时候,可以直接print、print(type(…))、调试
2.9 torchvision中数据集使用(transforms、tensorboard都是其下的)
https://pytorch.org/vision/stable/
2.10 DataLoader()
3 神经网络
3.1 基本骨架 ——nn.module
class Net(nn.Module):

    def __init__(self):
        super().__init__()
        self.conv1 = Conv2d(3, 6, 3, 1, 1)

    def forward(self, x):
        x = self.conv1(x)
        return x
3.2 卷积 以conv2d举例
作用:
提取特征。卷积操作通过在输入图像上滑动卷积核(滤波器),计算局部区域的加权和,从而生成特征图。卷积能够捕捉图像中的局部模式,例如边缘、纹理和角点。
结果:生成特征图,使网络能够学习图像的空间层次特征。
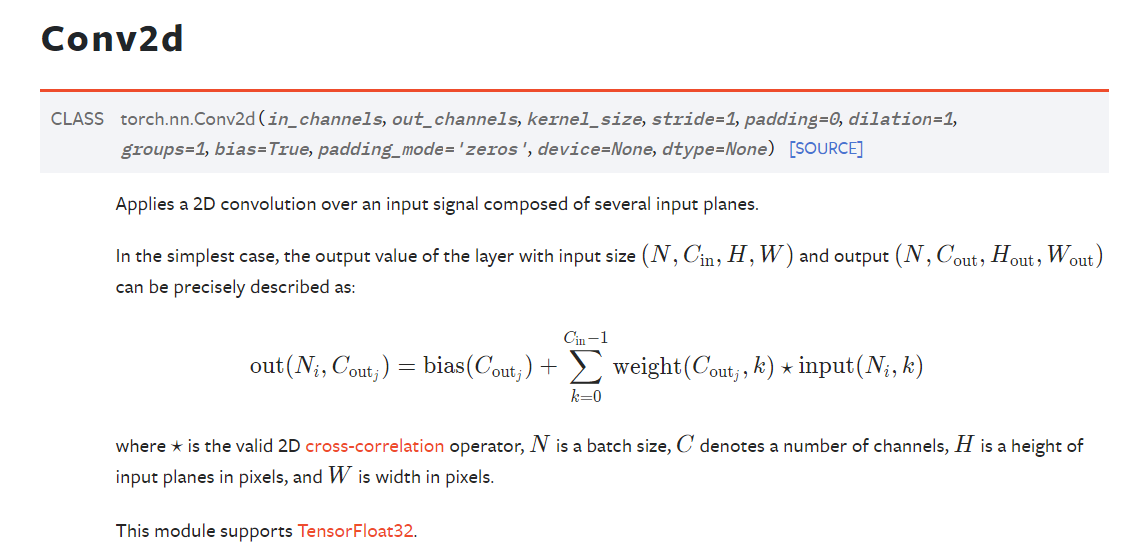
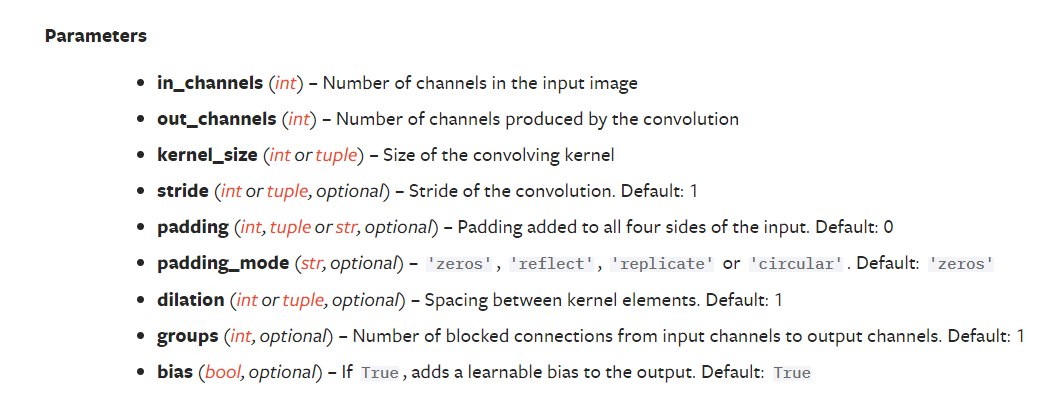
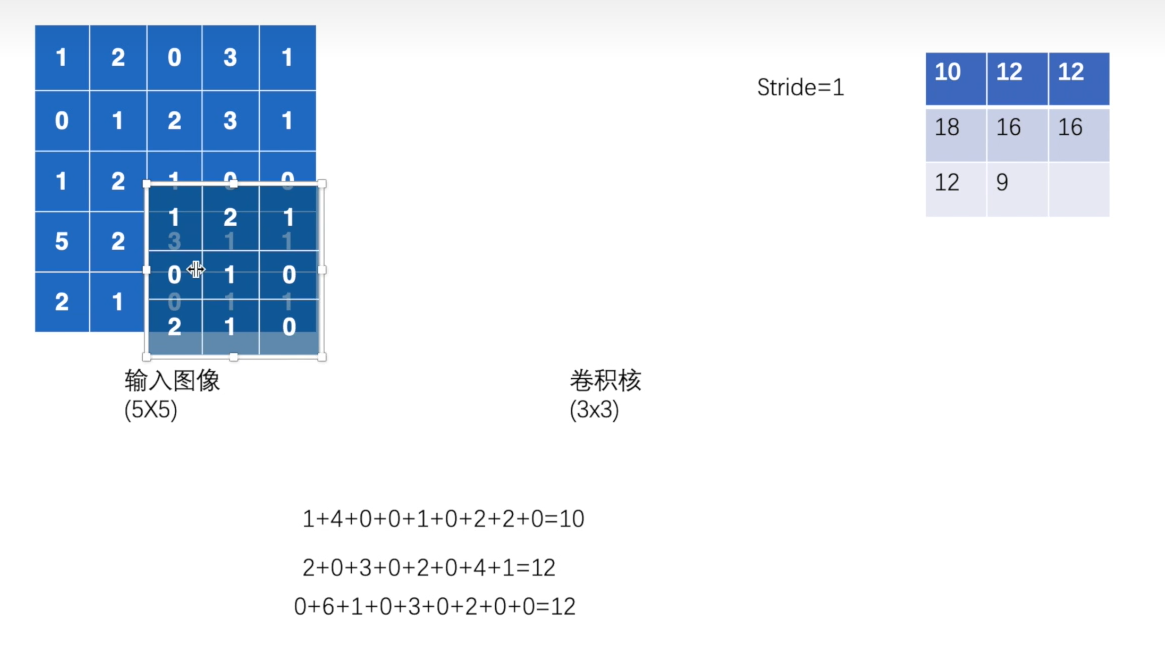
stride为步长
conv2d中input(N,C,H,W)解释:
- N就是batch_size 也就是一次输入的图片数量
- C就是通道数,例如一个二维张量,那么通道就是1,表示灰度图像,如果是有颜色的图像,就是RGB,通道数为3
- H就是高
- W就是宽
3.3 池化 以MaxPool2d(最大池化)举例
作用:
保留数据特征但是减少数据量。
减少特征图的尺寸,降低计算复杂度,同时保留重要信息。池化通过对特征图中的局部区域进行下采样来实现,例如最大池化(Max Pooling)选择局部区域的最大值,平均池化(Average Pooling)计算局部区域的平均值。
结果:减少特征图的空间尺寸,减小计算量,防止过拟合,并使网络对小的平移和变形更具鲁棒性。
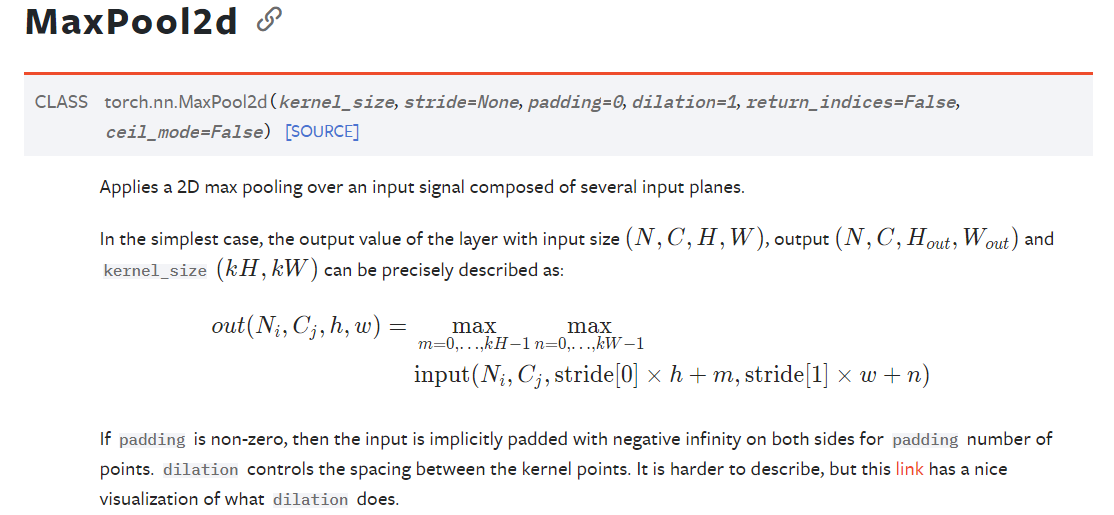
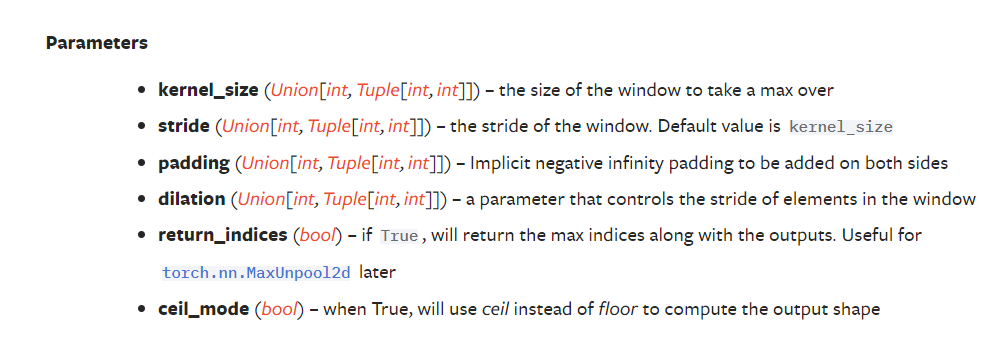
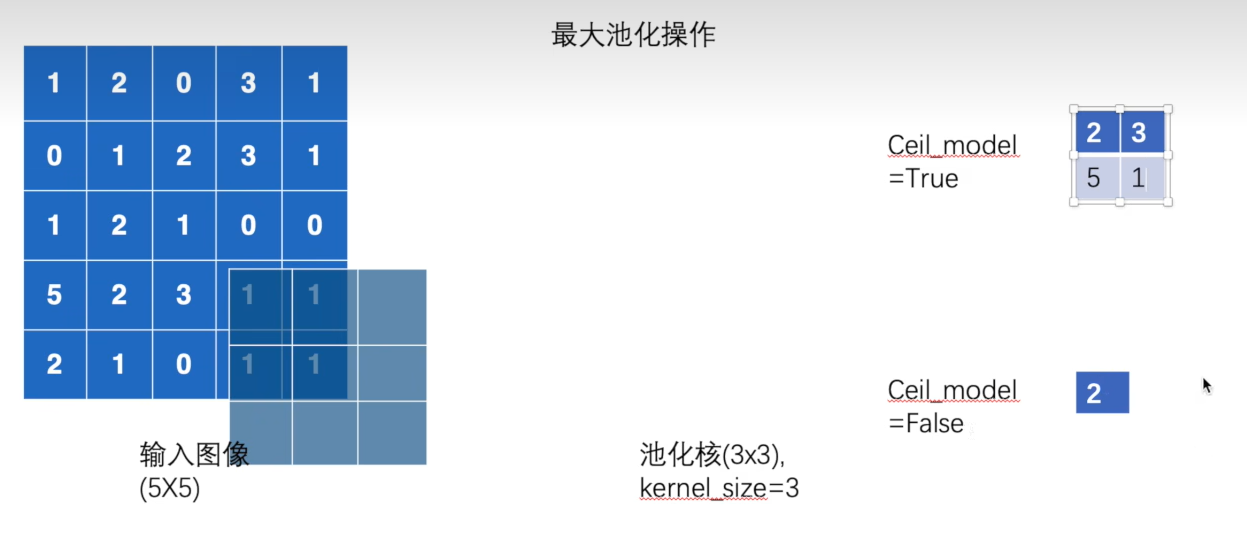
关于** ceil_model中ceil 和 floor**,通俗的理解:在做池化操作时,走过kernel_size(步长)后有出界部分,ceil保留,floor舍弃
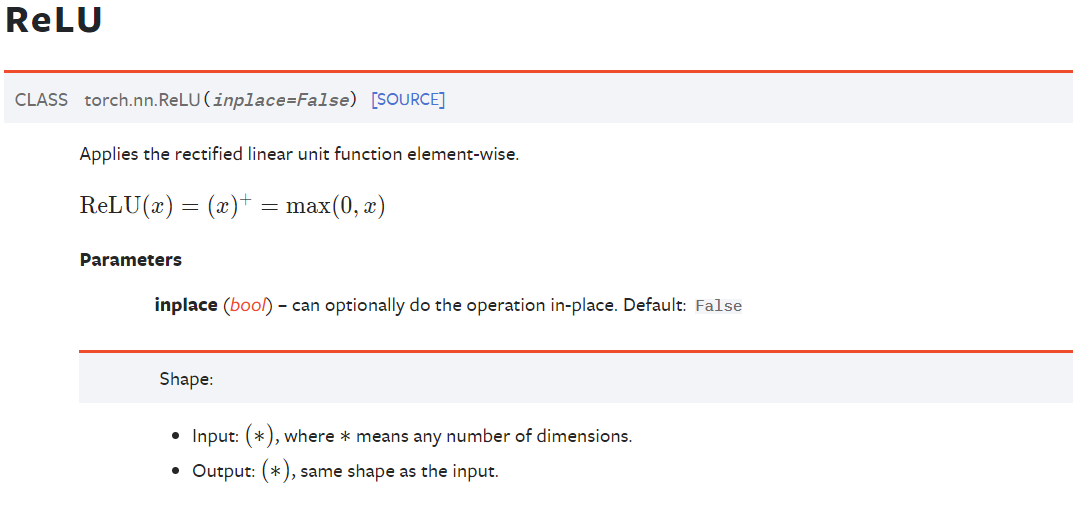
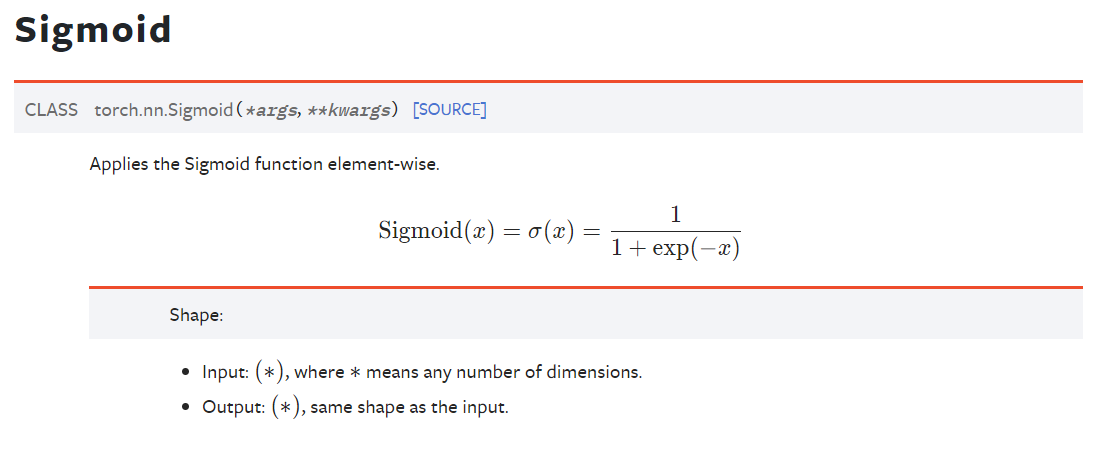
3.4 非线性激活
作用:
添加非线性特征,让神经网络能够训练出符合更多曲线/特征的模型,提高泛化能力
ReLU
Sigmoid
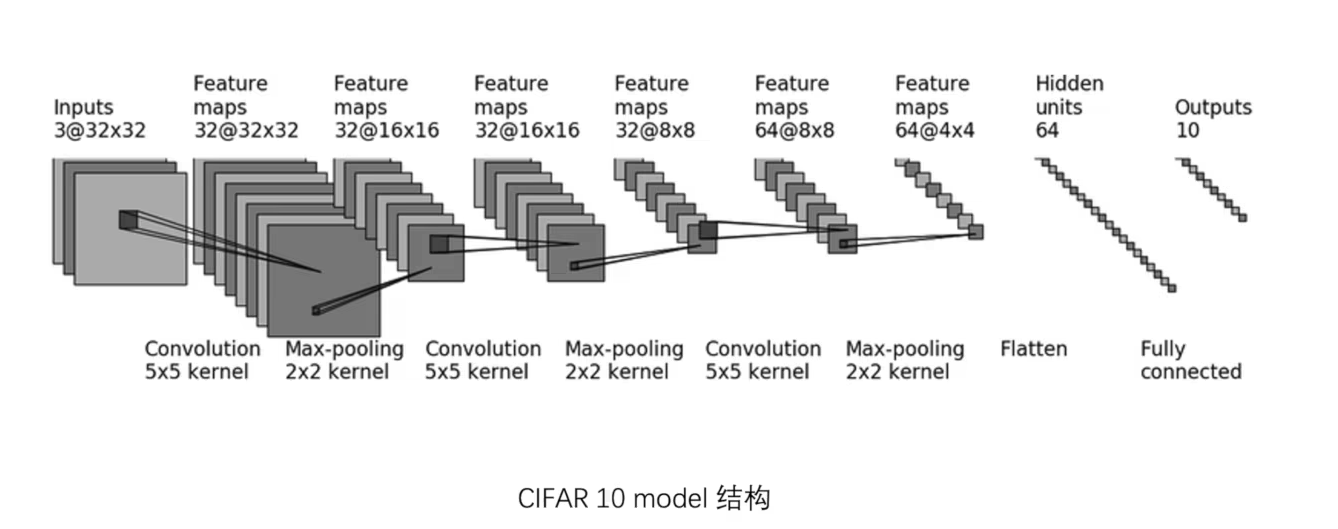
3.5 CIFAR搭建小实战与Sequential的使用
CIFAR10神经网络示例:
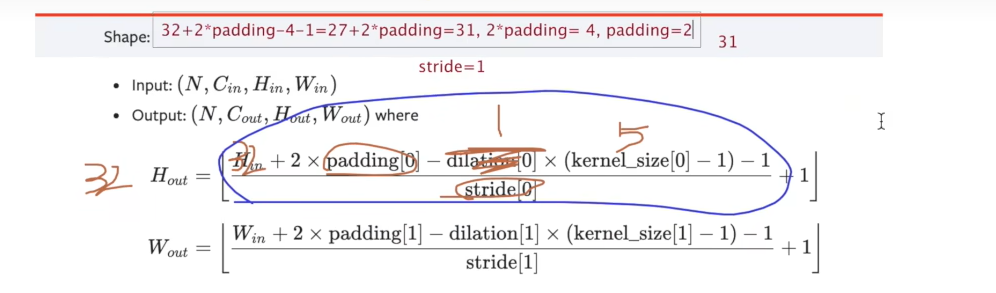
解方程得到 padding 和 stride
可以先假设stride为1,那么padding就是2
如果假设stride为2 3 啥的,那么padding都解不出来
import torch
from torch import nn
from torch.nn import Conv2d, MaxPool2d, Flatten, Linear, Sequential
from torch.utils.tensorboard import SummaryWriter


class Net(nn.Module):
    def __init__(self):
        super(Net, self).__init__()
        # self.conv1 = Conv2d(3, 32, 5, padding=2)
        # self.maxpool1 = MaxPool2d(2)
        # self.conv2 = Conv2d(32, 32, 5, padding=2)
        # self.maxpool2 = MaxPool2d(2)
        # self.conv3 = Conv2d(32, 64, 5, padding=2)
        # self.maxpool3 = MaxPool2d(2)
        # self.flatten = Flatten()
        # self.linear1 = Linear(1024, 64)
        # self.linear2 = Linear(64, 10)

        self.model1 = Sequential(
            Conv2d(3, 32, 5, padding=2),
            MaxPool2d(2),
            Conv2d(32, 32, 5, padding=2),
            MaxPool2d(2),
            Conv2d(32, 64, 5, padding=2),
            MaxPool2d(2),
            Flatten(),
            Linear(1024, 64),
            Linear(64, 10)

        )

    def forward(self, x):
        # x = self.conv1(x)
        # x = self.maxpool1(x)
        # x = self.conv2(x)
        # x = self.maxpool2(x)
        # x = self.conv3(x)
        # x = self.maxpool3(x)
        # x = self.flatten(x)
        # x = self.linear1(x)
        # x = self.linear2(x)
        # Sequential
        x = self.model1(x)
        return x


net = Net()
print(net)
# 检验batch_size 通道 H W (64 3@32x32)
input = torch.ones((64, 3, 32, 32))
output = net(input)
# 要产生batch_size 正确的output(64 10)
print(output.shape)

writer = SummaryWriter("./logs_seq")
writer.add_graph(net, input)
writer.close()