个人github对应项目链接:
https://github.com/KLWU07/Image-classification-and-model-deployment
1.流程总览
2.图像分类的模型—Alexnet
3.服务器端部署及运行
4.本地PyCharm调用—GUI界面
一、流程总览
本项目方法还是使用Flask 库,与之前一篇机器学习模型部署类似,只不过这里换了深度学习模型以及GUI界面调用,前面不知道可参考这篇文章机器学习模型部署:使用Flask 库的 Python Web 框架将XGBoost模型部署在服务器上(简单小模型)从模型训练到部署再到本地调用,有些方法有修改,至少没有遇到报错,之前是库版本不同报错。如果不知道怎么训练一个Alexnet网络模型,请看内容二。本模型在CPU下训练,训练环境python==3.8,框架pytorch.数据集下载地址如下:
https://storage.googleapis.com/download.tensorflow.org/example_images/flower_photos.tgz
本项目目录结构如下:主要得到server/和client/文件夹。
image_classification/
├── server/
│   ├── app.py               # Flask服务端代码
│   ├── model.py             # AlexNet模型定义,由train/里复制过来
│   ├── requirements.txt     # 服务端依赖
│   └── model/
│       ├── AlexNet-flower.pth    # 训练好的模型权重,由train/里复制过来
│       └── class_indices.json    # 类别标签文件,由train/里复制过来
└── client/
│   ├── gui_app.py           # 客户端GUI代码
│   └── requirements.txt     # 客户端依赖
├── train/                   # 训练模型文件夹
│   ├── model.py             # AlexNet模型定义
│   ├── train.py             # 训练模型文件
│   ├── predict.py           # 训练好的模型使用一张图片预测文件
│   └── class_indices.json   # 训练模型时生成文件
└── data_set/
│   ├── flower_data          # 数据集
│   │   ├── flower_photos/   # 官网公开数据集
│   │       ├── daisy/       # 里面是自己种类图片
│   │       ├── dandelion/   # 图片
│   │       ├── roses/       # 图片
│   │       ├── sunflowers/  # 图片
│   │       └──tulips/       # 图片
│   │   ├──train/            # 训练集图片,里面结构和flower_photos一样
│   │   └──val/              # 验证集图片,里面结构和flower_photos一样
│   └── split_data.py        # 划分数据集文件,争对flower_photos文件夹里数据划分成train和val两个文件夹
└── requirements.txt         # 在本地端pycharm终端生成的文件,方面在服务器端创建相同环境,安装相同版本的库,三个requirements.txt文件相同。
二、训练图像分类模型—Alexnet
说明这里不介绍Alexnet模型结构以及怎么训练你自己的分类模型,请参考之前两篇文章 。卷积神经网络CNN里经典网络模型之 AlexNet全网最详解(理论篇)和
深度学习pytorch实战二:AlexNet图像分类篇且官网提供花数据集分五类。
1.训练模型和预测
总结以下几步:
1.自建几类数据集,train和val放好对应几类文件夹,如果练习就采用官网提供数据集。
2.split_data.py文件划分数据集,得到当前文件夹下产生train和val文件夹(模型训练训练集和验证集)。
3.model.py和train.py文件(代码直接在那篇文章复制).
4.模型训练结束有两个文件AlexNet-flower.pth和class_indices.json。
5.复制移动相应的文件到指定目录
2.生成requirements.txt
方法1.不建议使用以下代码,当前环境中所有已安装的包及其版本写入requirements.txt,使用方法2
pip freeze > requirements.txt

# 因为文本中有含其他内容,如
Flask==3.1.1
matplotlib==3.7.2
gmpy2 @ file:///C:/ci/gmpy2_1645456279018/work
numpy==1.24.4
idna @ file:///C:/b/abs_aad84bnnw5/croot/idna_1714398896795/work
方法2.使用pipreqs工具自动分析代码中的导入语句,生成更精准的依赖列表
# 安装工具
pip install pipreqs

# 生成requirements.txt(在项目根目录下执行)
pipreqs .

# --force参数的作用是覆盖已有的requirements.txt文件。运行代码过程中也会警告报错一些内容,不影响等待生成requirements.txt。
pipreqs . --force
方法3:比较麻烦,需要一个个去搜版本库在安装。
当然这里可以检查对应库版本,以及更新对应版本库。
(pytorchcpu) :pip show torch   #示例一个

Name: torch
Version: 2.4.1
Summary: Tensors and Dynamic neural networks in Python with strong GPU acceleration
Home-page: https://pytorch.org/
Author: PyTorch Team
Author-email: packages@pytorch.org
License: BSD-3
Location: c:\users\.conda\envs\pytorchcpu\lib\site-packages
Requires: filelock, fsspec, jinja2, networkx, sympy, typing-extensions
Required-by: torchaudio, torchvision

pip install torch==2.4.1  # 安装 torch 2.4.1 版本

#如果
pip install --upgrade flask==2.2.5  # 升级或降级到 2.2.5 版本

#conda代码
conda install flask=2.2.5  # 注意是等号(=)而非双等号(==)
conda update flask=2.2.5
当然还有其他安装库和包,参考这篇文章争对机器学习和深度学习里Python项目开发管理项目依赖的工具中方便第三方库和包的安装
三、服务器端部署及运行
1.服务器端代码 (server/app.py)
import os
from flask import Flask, request, jsonify
from werkzeug.utils import secure_filename
import torch
from torchvision import transforms
from PIL import Image
import json
import numpy as np
from model import AlexNet  # 确保您的模型定义可用

app = Flask(__name__)

# 配置
UPLOAD_FOLDER = 'uploads'
ALLOWED_EXTENSIONS = {'png', 'jpg', 'jpeg'}
app.config['UPLOAD_FOLDER'] = UPLOAD_FOLDER

# 加载模型和类别信息
device = torch.device("cuda:0" if torch.cuda.is_available() else "cpu")
model = AlexNet(num_classes=5, init_weights=True)
model.load_state_dict(torch.load('model/AlexNet-flower.pth', map_location=device, weights_only=True))
model.to(device)
model.eval()

# 加载类别信息
with open('model/class_indices.json', 'r') as f:
    class_indices = json.load(f)

# 图像预处理
data_transform = transforms.Compose([
    transforms.Resize((224, 224)),
    transforms.ToTensor(),
    transforms.Normalize((0.5, 0.5, 0.5), (0.5, 0.5, 0.5))
])


def allowed_file(filename):
    return '.' in filename and filename.rsplit('.', 1)[1].lower() in ALLOWED_EXTENSIONS


@app.route('/predict', methods=['POST'])
def predict():
    if 'file' not in request.files:
        return jsonify({'error': 'No file part'}), 400

    file = request.files['file']
    if file.filename == '':
        return jsonify({'error': 'No selected file'}), 400

    if file and allowed_file(file.filename):
        filename = secure_filename(file.filename)
        filepath = os.path.join(app.config['UPLOAD_FOLDER'], filename)
        file.save(filepath)

        try:
            # 预处理图像
            img = Image.open(filepath)
            if img.mode != 'RGB':
                img = img.convert('RGB')
            img = data_transform(img)
            img = torch.unsqueeze(img, dim=0)

            # 预测
            with torch.no_grad():
                output = model(img.to(device))
                predict = torch.softmax(output, dim=1)
                prob, classes = torch.max(predict, 1)

            class_name = class_indices[str(classes.item())]
            confidence = prob.item()

            # 清理上传的文件
            os.remove(filepath)

            return jsonify({
                'class': class_name,
                'confidence': confidence,
                'class_id': classes.item()
            })
        except Exception as e:
            return jsonify({'error': f'Prediction failed: {str(e)}'}), 500

    return jsonify({'error': 'File type not allowed'}), 400


if __name__ == '__main__':
    # 确保上传文件夹存在
    os.makedirs(UPLOAD_FOLDER, exist_ok=True)
    app.run(host='0.0.0.0', port=5000, debug=True)
2.创建环境和安装对应库
conda create --name WY python=3.8 #创建环境
安装requirements.txt问价里库。
Flask==3.0.3
matplotlib==3.7.2
numpy==1.24.4
Pillow==10.4.0
Requests==2.32.3
torch==2.4.1
torchvision==0.20.0
tqdm==4.67.1
Werkzeug==3.0.3
3.上传server文件夹到服务器
试着验证是否能运行-modle.py
conda activate WY   #激活环境
python modle.py     #是否报错,没有报错就可以,运行app.py文件
如果报错如下
(WY) $ python model.py
Traceback (most recent call last):
  File "model.py", line 1, in <module>
    import torch.nn as nn
  File "/data/home/sgt_wkl/software/miniconda3/envs/WY/lib/python3.8/site-packages/torch/__init__.py", line 289, in <module>
    _load_global_deps()
  File "/data/home/sgt_wkl/software/miniconda3/envs/WY/lib/python3.8/site-packages/torch/__init__.py", line 245, in _load_global_deps
    raise err
  File "/data/home/sgt_wkl/software/miniconda3/envs/WY/lib/python3.8/site-packages/torch/__init__.py", line 226, in _load_global_deps
    ctypes.CDLL(global_deps_lib_path, mode=ctypes.RTLD_GLOBAL)
  File "/data/home/sgt_wkl/software/miniconda3/envs/WY/lib/python3.8/ctypes/__init__.py", line 373, in __init__
    self._handle = _dlopen(self._name, mode)
OSError: libstdc++.so.6: wrong ELF class: ELFCLASS32

解析:问题的根本原因是 libstdc++.so.6 文件的 ELF 类型与系统要求不匹配。具体来说,报错信息中提到 wrong ELF class: ELFCLASS32,这意味着加载的 libstdc++.so.6 是 32 位的,而你的系统或程序可能需要 64 位的版本。Miniconda 环境中可能安装了错误版本的 libstdc++,

# 解决
conda install -c conda-forge libstdcxx-ng  # 在 Miniconda 环境中安装正确的 libstdc++
conda list libstdc
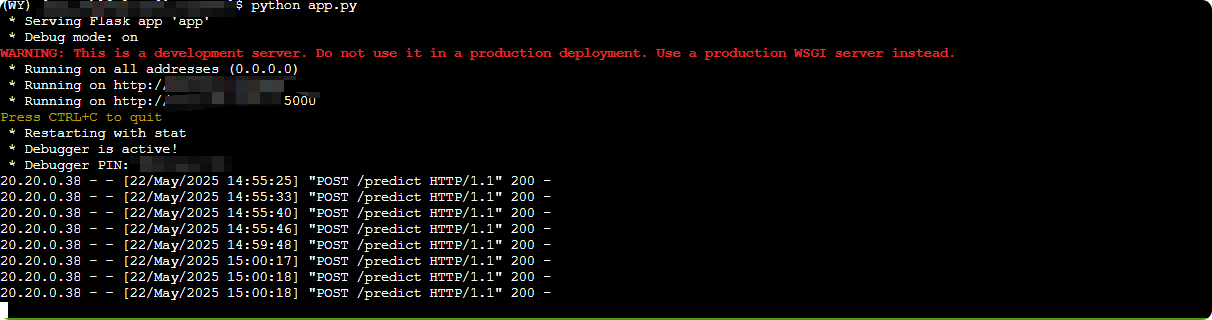
4.运行app.py
python app.py
运行后生成一些内容
(WY) $ python app.py

 * Serving Flask app 'app'
 * Debug mode: on
WARNING: This is a development server. Do not use it in a production deployment. Use a production WSGI server instead.
 * Running on all addresses (0.0.0.0)
 * Running on http://111.1.1.1:5000               # IP我改成1替换
 * Running on http://111.111.111.1:5000           # IP我改成1替换

Press CTRL+C to quit
 * Restarting with stat
 * Debugger is active!
 * Debugger PIN: 111-111-111                # 我改成1替换
每个设备生成的IP地址不同,记得修改。
四、本地PyCharm调用—GUI界面
1.gui_app.py代码
import tkinter as tk
from tkinter import filedialog, messagebox
from PIL import Image, ImageTk
import requests
import io
class ImageClassifierApp:
def __init__(self, root):
self.root = root
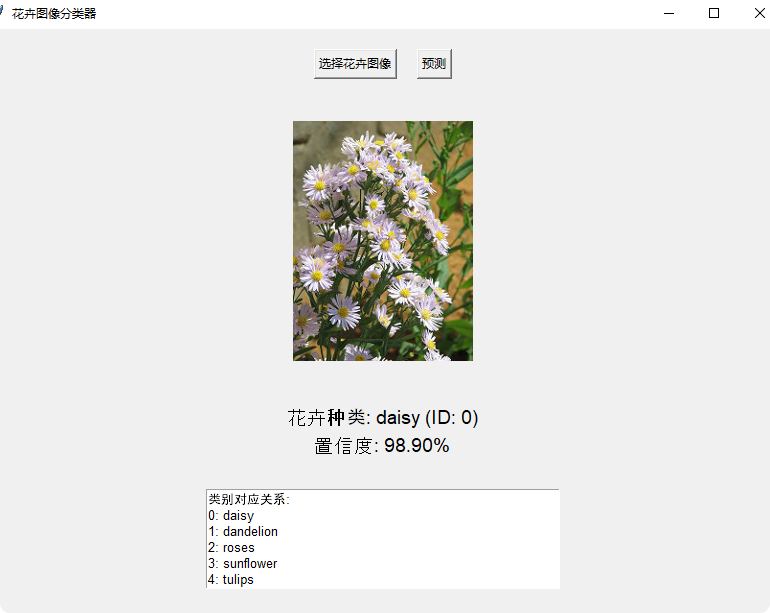
self.root.title("花卉图像分类器")
self.root.geometry("800x600")
# 服务器URL
self.server_url = "http://192.168.168.5:5000/predict"
# 创建UI组件
self.create_widgets()
def create_widgets(self):
# 顶部框架
top_frame = tk.Frame(self.root)
top_frame.pack(pady=20)
# 选择图像按钮
self.select_btn = tk.Button(top_frame, text="选择花卉图像", command=self.select_image)
self.select_btn.pack(side=tk.LEFT, padx=10)
# 预测按钮
self.predict_btn = tk.Button(top_frame, text="预测", command=self.predict_image, state=tk.DISABLED)
self.predict_btn.pack(side=tk.LEFT, padx=10)
# 图像显示区域
self.image_frame = tk.Frame(self.root)
self.image_frame.pack(pady=20)
self.image_label = tk.Label(self.image_frame)
self.image_label.pack()
# 结果显示区域
self.result_frame = tk.Frame(self.root)
self.result_frame.pack(pady=20)
self.class_label = tk.Label(self.result_frame, text="花卉种类: ", font=('Arial', 14))
self.class_label.pack()
self.confidence_label = tk.Label(self.result_frame, text="置信度: ", font=('Arial', 14))
self.confidence_label.pack()
# 添加一个显示类别对应关系的文本区域
self.class_info = tk.Text(self.root, height=6, width=50, font=('Arial', 10))
self.class_info.pack(pady=10)
self.class_info.insert(tk.END, "类别对应关系:\n0: daisy\n1: dandelion\n2: roses\n3: sunflower\n4: tulips")
self.class_info.config(state=tk.DISABLED)
def select_image(self):
file_path = filedialog.askopenfilename(
title="选择花卉图像",
filetypes=(("JPEG files", "*.jpg"), ("PNG files", "*.png"), ("All files", "*.*")))
if file_path:
try:
self.image_path = file_path
self.display_image(file_path)
self.predict_btn.config(state=tk.NORMAL)
except Exception as e:
messagebox.showerror("错误", f"无法加载图像: {str(e)}")
def display_image(self, image_path):
img = Image.open(image_path)
img.thumbnail((400, 400))
img_tk = ImageTk.PhotoImage(img)
self.image_label.config(image=img_tk)
self.image_label.image = img_tk
def predict_image(self):
if not hasattr(self, 'image_path'):
messagebox.showwarning("警告", "请先选择图像")
return
try:
with open(self.image_path, 'rb') as img_file:
files = {'file': img_file}
response = requests.post(self.server_url, files=files)
if response.status_code == 200:
result = response.json()
self.show_result(result)
else:
messagebox.showerror("错误", f"预测失败: {response.text}")
except Exception as e:
messagebox.showerror("错误", f"发生错误: {str(e)}")
def show_result(self, result):
self.class_label.config(text=f"花卉种类: {result['class']} (ID: {result['class_id']})")
self.confidence_label.config(text=f"置信度: {result['confidence']:.2%}")
if __name__ == "__main__":
root = tk.Tk()
app = ImageClassifierApp(root)
root.mainloop()
2.运行app.py的GUI界面以及操作
1.选择花卉图像:电脑本地文件夹
2.预测:产生结果
3.服务器端调用一次生成一次记录