目录
2.3 Spring AI Function Calling 介绍
2.3.2 Spring AI Function Calling 应用场景
一、前言
在人工智能与软件开发深度融合的时代,Spring AI 作为一个强大的框架,持续为开发者提供着高效且便捷的工具,以实现与大语言模型(LLM)的无缝交互。Spring AI 的最新版本引入了一系列令人瞩目的特性,其中 Function Calling 到 Tool Calling 的转换以及模型上下文协议(MCP)的应用,标志着该框架在 AI 集成领域的又一次重大飞跃。
二、Function Calling 介绍
2.1 什么是 Function Calling
Function Calling(函数调用)是大型语言模型(LLM)中的一项重要功能,它允许AI模型在需要时调用外部函数或工具来完成特定任务。
Function Calling 是指AI模型能够识别用户请求中需要执行特定操作的场景,然后以结构化格式输出这些操作请求,让应用程序可以实际执行这些函数。
2.1.1 工作原理
Function Calling的执行原理如下:
用户输入:用户提出需要调用外部功能的问题或请求
模型分析:AI模型分析请求并决定是否需要调用函数
生成调用请求:如果需要,模型会生成包含函数名和参数的JSON格式请求
执行函数:应用程序接收并执行实际函数
返回结果:函数结果返回给模型,模型再生成最终响应
2.2 应用场景和优势
Function Calling 主要有下面的场景:
数据检索:从数据库或API获取最新信息
数学计算:执行复杂计算
系统操作:与外部系统交互
多工具协作:串联多个工具完成复杂任务
实时信息获取:获取模型训练数据之外的实时信息
Function Calling 优势:
扩展能力:突破模型固有知识限制
准确性:通过专门工具获得更精确结果
实时性:获取最新信息而非训练时的静态知识
灵活性:可根据需求集成各种专业工具
2.3 Spring AI Function Calling 介绍
Spring AI 是 Spring 官方推出的 AI 应用开发框架,它简化了在 Spring 应用中集成 AI 功能的过程,包括 Function Calling 功能。
Spring AI Function Calling 允许你的 Spring 应用与 AI 模型交互时,动态调用 Java 方法作为外部函数,从而扩展 AI 的能力。
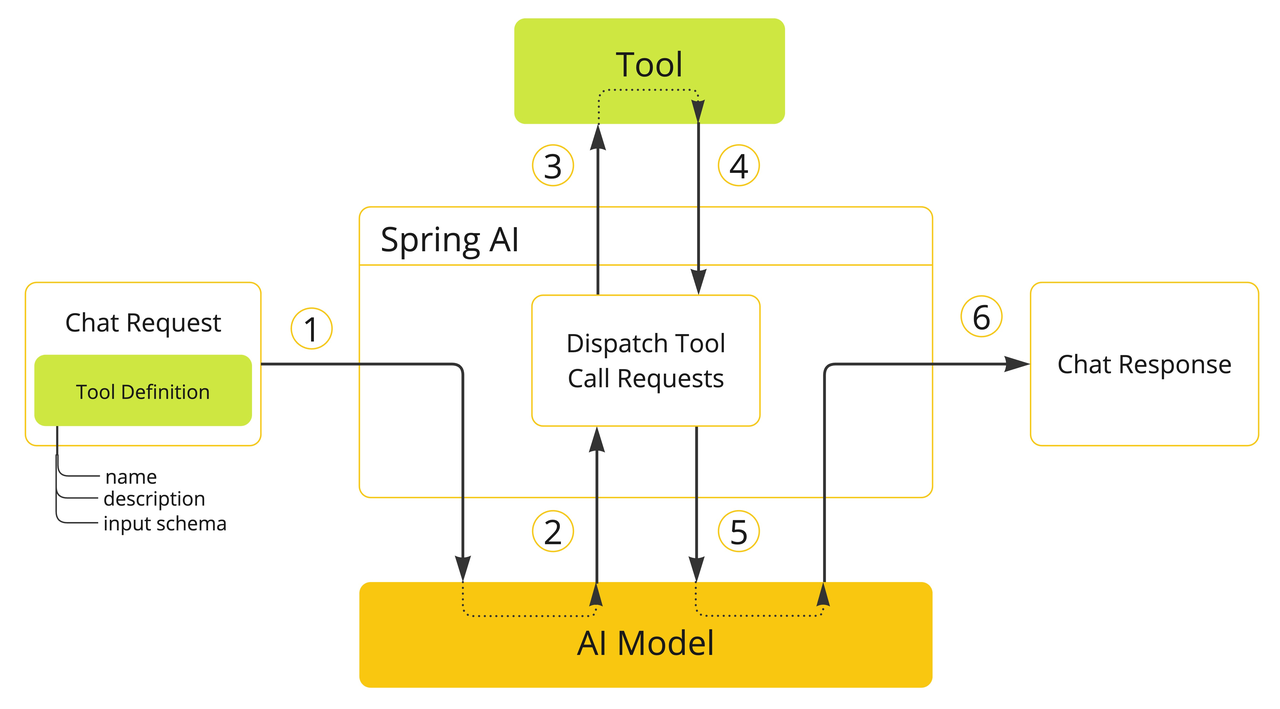
如下,是Spring AI Function Calling的执行过程:
2.3.1 核心特点
Spring AI Function Calling 具有如下特性:
与 Spring 生态无缝集成:利用 Spring 的依赖注入和 AOP 等特性
声明式函数注册:通过注解简单定义可调用函数
类型安全:基于 Java 方法签名,避免 JSON 解析错误
自动参数转换:AI 提供的参数自动转换为 Java 类型
2.3.2 Spring AI Function Calling 应用场景
Tool Calling 应用场景:
信息检索
此类工具可用于从外部来源(例如数据库、Web 服务、文件系统或 Web搜索引擎)检索信息。其目标是增强模型的知识,使其能够回答原本无法回答的问题。因此,它们可用于检索增强生成 (RAG)场景。
例如,可以使用工具检索给定位置的当前天气、检索最新新闻文章或查询数据库中的特定记录。
采取行动
使用工具用于在软件系统中采取行动,例如发送电子邮件、在数据库中创建新记录、提交表单或触发工作流。其目标是自动化原本需要人工干预或明确编程的任务。例如,可以使用工具为与聊天机器人交互的客户预订航班、在网页上填写表单,或在代码生成场景中基于自动化测试 (TDD) 实现 Java 类。
尽管我们通常将工具调用称为模型功能,但实际上工具调用逻辑是由客户端应用程序提供的。模型只能请求工具调用并提供输入参数,而应用程序负责根据输入参数执行工具调用并返回结果。
2.3.3 使用流程
tools 使用的主要流程如下:
定义tool:通过注解或接口定义工具的功能和描述。
注册tool:将工具注册到 LLM 的调用上下文中。
调用tool:在用户输入中触发工具调用,LLM 根据工具的描述生成调用请求。
三、前置案例操作演示
在正式开始了解并使用Function Calling之前,我们先通过一个实际案例操作,演示下现有的大模型在处理一些特定场景下的业务时遇到的问题。
3.1 代码操作过程演示
3.1.1 添加依赖
在本地的springboot工程中添加如下核心依赖
<dependency>
    <groupId>com.alibaba.cloud.ai</groupId>
    <artifactId>spring-ai-alibaba-starter</artifactId>
    <version>1.0.0-M6.1</version>
</dependency>
3.1.2 添加配置信息
在配置文件中增加如下配置
server:
  port: 8081
#使用阿里云百炼平台的apikey
spring:
  ai:
    dashscope:
      api-key: 你的apikey
      chat:
        options:
          model: qwen-plus
3.1.3 增加配置类
增加一个配置类,用于初始化ChatClient,并且可以在ChatClient对象中初始化一些参数信息,比如设置会话记忆,tool,系统角色等信息,参考下面的代码
package com.congge.config;

import org.springframework.ai.chat.client.ChatClient;
import org.springframework.ai.chat.client.advisor.SimpleLoggerAdvisor;
import org.springframework.context.annotation.Bean;
import org.springframework.context.annotation.Configuration;

import java.io.IOException;

@Configuration
public class ChatConfig {

    @Bean
    public ChatClient chatClient(ChatClient.Builder chatClientBuilder) throws IOException {

        var chatClient = chatClientBuilder
                .defaultSystem("You are a helpful assistant.")
                .defaultAdvisors(new SimpleLoggerAdvisor()) // LOG
                .build();
        return chatClient;
    }

}
3.1.4 添加测试接口
增加下面的接口用于效果测试
package com.congge.web;

import jakarta.annotation.Resource;
import org.springframework.ai.chat.client.ChatClient;
import org.springframework.web.bind.annotation.GetMapping;
import org.springframework.web.bind.annotation.RequestMapping;
import org.springframework.web.bind.annotation.RequestParam;
import org.springframework.web.bind.annotation.RestController;

@RestController
@RequestMapping("/ai/tool")
public class ToolChatController {

    @Resource
    private ChatClient chatClient;

    //localhost:8081/ai/tool/chat?message=北京现在天气如何
    @GetMapping("/chat")
    public String completion(@RequestParam("message") String message) {
        return chatClient
                .prompt()
                .user(message)
                .call()
                .content();
    }
}
3.1.5 接口效果测试
调用一下上面的接口,问大模型一个问题,北京今天的天气,很明显大模型是无法回答这个问题的

出现这个问题的根本原因在于这个问题超出了目前使用的这个大模型的认知范围,此时就要借助 tool来进行实现。
四、Tool 操作案例演示
基于上面大模型自身的局限,我们使用Tool来完善大模型能力,通过下面几个案例近距离感受下Function Calling的魅力。
4.1 Tool Calling 操作案例一
在下面的案例中,我们希望通过提问给AI大模型,然后大模型能够调用我们自定义的Tool 来查询系统时间,首先定义一个工具配置类,参考下面的代码:
package com.congge.tool;

import java.util.function.Function;

import org.slf4j.Logger;
import org.slf4j.LoggerFactory;
import org.springframework.context.annotation.Bean;
import org.springframework.context.annotation.Configuration;
import org.springframework.context.annotation.Description;

@Configuration
public class FunctionTools {

    private static final Logger logger = LoggerFactory.getLogger(FunctionTools.class);

    public record AddOperationRequest(int d1, int d2) {

    }

    public record MulOperationRequest(int d1, int d2) {

    }

    @Bean
    @Description("加法运算")
    public Function<AddOperationRequest, Integer> addOperation() {
        return request -> {
            logger.info("加法运算函数被调用了:" + request.d1 + "," + request.d2);
            return request.d1 + request.d2;
        };
    }

    @Bean
    @Description("乘法运算")
    public Function<MulOperationRequest, Integer> mulOperation() {
        return request -> {
            logger.info("乘法运算函数被调用了:" + request.d1 + "," + request.d2);
            return request.d1 * request.d2;
        };
    }

}
增加一个测试接口,参考下面的代码
package com.congge.web;


import org.springframework.ai.chat.client.ChatClient;
import org.springframework.ai.chat.model.ChatModel;
import org.springframework.beans.factory.annotation.Autowired;
import org.springframework.http.MediaType;
import org.springframework.web.bind.annotation.GetMapping;
import org.springframework.web.bind.annotation.RequestMapping;
import org.springframework.web.bind.annotation.RequestParam;
import org.springframework.web.bind.annotation.RestController;

@RestController
@RequestMapping("/ai/function")
public class FunctionCallController {

    @Autowired
    private ChatModel chatModel;

    //localhost:8081/ai/function/chat?userMessage=你是谁
    //localhost:8081/ai/function/chat?userMessage=3加7等于几
    @GetMapping(value = "/chat", produces = MediaType.APPLICATION_STREAM_JSON_VALUE)
    public String ragJsonText(@RequestParam(value = "userMessage") String userMessage){
        return ChatClient.builder(chatModel)
                .build()
                .prompt()
                .system("""
                  您是算术计算器的代理。
                  您能够支持加法运算、乘法运算等操作,其余功能将在后续版本中添加,如果用户问的问题不支持请告知详情。
                   在提供加法运算、乘法运算等操作之前,您必须从用户处获取如下信息:两个数字,运算类型。
                   请调用自定义函数执行加法运算、乘法运算。
                   请讲中文。
               """)
                .user(userMessage)
                .functions("addOperation", "mulOperation")
                .call()
                .content();
    }

}
启动工程后,调用一下接口,从效果来看,很明显底层调用了我们自己编写的工具方法

4.2 Tool Calling 操作案例二
下面这个案例中,用于向大模型提问,大模型调用我们自定义的tool工具类,从而获得当前的系统时间,首先定义一个tool的工具配置类
package com.congge.tool;

import org.springframework.ai.tool.annotation.Tool;
import org.springframework.context.i18n.LocaleContextHolder;
import org.springframework.stereotype.Component;

import java.time.LocalDateTime;
import java.time.format.DateTimeFormatter;

@Component
public class DateTimeTools {

    @Tool(description = "Get the current date and time in the user's timezone")
    String getCurrentDateTime() {
        return LocalDateTime.now().atZone(LocaleContextHolder.getTimeZone().toZoneId()).toString();
    }

    @Tool(description = "Set a user alarm for the given time, provided in ISO-8601 format")
    void setAlarm(String time) {
        LocalDateTime alarmTime = LocalDateTime.parse(time, DateTimeFormatter.ISO_DATE_TIME);
        System.out.println("Alarm set for " + alarmTime);
    }

}
增加一个测试用的接口
private ChatClient chatClient;

/**
 * localhost:8081/deepseek/tool?prompt=今天是几号
 * @param prompt
 * @return
 */
@GetMapping("/tool")
public String get(@RequestParam(value = "prompt", required = false) String prompt) {
    return chatClient
            .prompt(prompt)
            .tools(new DateTimeTools())
            .call()
            .content();
}
4.3 Tool Calling 操作案例三
使用Tool还可以远程调用外部API接口执行特定的动作,比如发送邮件、短信、预定机票等,在接下来的案例中,使用Tool实现一个调用外部API接口获取真实的天气信息功能。首先增加一个Tool的工具类
package com.congge.tool;

import com.fasterxml.jackson.core.JsonProcessingException;
import com.fasterxml.jackson.databind.ObjectMapper;
import org.springframework.ai.tool.annotation.Tool;
import org.springframework.stereotype.Component;
import org.springframework.web.client.RestClient;

import java.net.URI;
import java.util.Map;

@Component
public class WeatherTools {

    @Tool(description = "获取当前天气预报")
    public String getCurrentWeather(String city) {
        RestClient client = RestClient.create(
                URI.create("https://api.vvhan.com")) ;
        Map<?, ?> result = client.get()
                .uri("/api/weather?city={0}", city)
                .retrieve()
                .body(Map.class) ;
        try {
            return new ObjectMapper().writeValueAsString(result) ;
        } catch (JsonProcessingException e) {
            throw new RuntimeException(e) ;
        }
    }
}
增加一个测试接口,参考下面的代码
package com.congge.web;

import com.congge.tool.WeatherTools;
import org.springframework.ai.chat.client.ChatClient;
import org.springframework.http.ResponseEntity;
import org.springframework.web.bind.annotation.GetMapping;
import org.springframework.web.bind.annotation.RequestMapping;
import org.springframework.web.bind.annotation.RestController;

@RestController
@RequestMapping("/weather/chat")
public class WeatherChatController {

    private final WeatherTools weatherTools ;

    private final ChatClient chatClient ;

    public WeatherChatController(WeatherTools weatherTools, ChatClient chatClient) {
        this.weatherTools = weatherTools ;
        this.chatClient = chatClient ;
    }

    //localhost:8081/weather/chat/get?prompt=查询今天上海天气
    @GetMapping("/get")
    public ResponseEntity<String> getCurrentWeather(String prompt) {
        String response = this.chatClient
                .prompt(prompt)
                .tools(new WeatherTools())
                .call().content() ;
        return ResponseEntity.ok(response) ;
    }

}
启动工程后,调用下接口,当询问获取上海的天气时能够得到上海今天的天气情况

五、Spring AI Tool 操作数据库实战
在AI大模型应用开发中,使用 Spring AI+Tools 可以完成很多定制化场景下的业务开发,与大模型结合后,甚至可以完成很多复杂的功能,Tools 赋予了大语言模型与外部工具或API交互能力,使其能动态调用函数执行复杂任务。其核心作用包括:
突破模型文本生成的局限,实现查询天气、调用数据库、调用三方平台API等实时操作能力;
构建多步骤智能体,支持旅行规划、电商下单、机票预定、发送邮件等跨工具协同场景;
与企业系统深度集成,自动调用CRM、ERP等业务接口处理客户订单、库存查询等需求,推动AI从对话助手向业务执行者跃迁。
接下来通过一个实际案例,演示如何基于Spring AI+Tools整合springboot项目中完成对数据库的增删改查功能。
5.1 前置准备
5.1.1 springboot工程导入依赖
在pom文件中导入下面的核心依赖
本次springai的版本使用了比较新的1.0.0-M6;
后续功能需要操作数据库,引入了mybatis和mysql;
springboot版本选择了3.4.2,在实际整合时需要注意相关组件的版本兼容性;
<properties>
        <maven.compiler.source>17</maven.compiler.source>
        <maven.compiler.target>17</maven.compiler.target>
        <project.build.sourceEncoding>UTF-8</project.build.sourceEncoding>
        <spring-ai.version>1.0.0-M6</spring-ai.version>
    </properties>

    <parent>
        <groupId>org.springframework.boot</groupId>
        <artifactId>spring-boot-starter-parent</artifactId>
        <version>3.4.2</version>
        <relativePath/>
    </parent>

    <dependencies>

        <dependency>
            <groupId>org.mybatis.spring.boot</groupId>
            <artifactId>mybatis-spring-boot-starter</artifactId>
            <version>3.0.3</version>
        </dependency>

        <!-- mysql驱动依赖 -->
        <dependency>
            <groupId>com.mysql</groupId>
            <artifactId>mysql-connector-j</artifactId>
            <version>8.3.0</version>
        </dependency>

<!--        <dependency>
            <groupId>org.springframework.ai</groupId>
            <artifactId>spring-ai-mcp-server-spring-boot-starter</artifactId>
            <version>1.0.0-M6</version>
        </dependency>-->

        <dependency>
            <groupId>com.alibaba.cloud.ai</groupId>
            <artifactId>spring-ai-alibaba-starter</artifactId>
            <version>1.0.0-M6.1</version>
        </dependency>

        <dependency>
            <groupId>com.alibaba</groupId>
            <artifactId>fastjson</artifactId>
            <version>2.0.35</version>
        </dependency>

        <dependency>
            <groupId>com.squareup.okhttp3</groupId>
            <artifactId>okhttp</artifactId>
            <version>4.12.0</version>
        </dependency>

        <dependency>
            <groupId>org.springframework.boot</groupId>
            <artifactId>spring-boot-starter-web</artifactId>
        </dependency>

        <dependency>
            <groupId>org.projectlombok</groupId>
            <artifactId>lombok</artifactId>
            <scope>provided</scope>
        </dependency>

    </dependencies>

    <repositories>
        <repository>
            <id>spring-milestones</id>
            <name>Spring Milestones</name>
            <url>https://repo.spring.io/milestone</url>
            <snapshots>
                <enabled>false</enabled>
            </snapshots>
        </repository>
    </repositories>

    <build>
        <finalName>boot-docker</finalName>
        <plugins>
            <plugin>
                <groupId>org.springframework.boot</groupId>
                <artifactId>spring-boot-maven-plugin</artifactId>
            </plugin>
        </plugins>
    </build>
5.1.2 添加配置文件
在工程配置文件中增加下面的配置信息
server:
  port: 8081

spring:
  ai:
    dashscope:
      #使用阿里云百炼平台的apikey
      api-key: 你的apikey
      #新加的
      base-url: https://dashscope.aliyuncs.com/compatible-mode/v1
      chat:
        options:
          model: qwen-turbo
          #qwen-plus

# 数据库相关配置
  datasource:
    driverClassName: com.mysql.cj.jdbc.Driver
    url: jdbc:mysql://IP:3306/test_db
    username: root
    password: 123456

# mybatis配置
mybatis:
  type-aliases-package: com.congge.entity
  mapper-locations: classpath:mapper/*.xml
  configuration:
    map-underscore-to-camel-case: true
5.1.3 添加测试数据表
在后文的功能演示中,需要操作数据表,提前创建如下数据表:
CREATE TABLE `book` (
  `id` int NOT NULL AUTO_INCREMENT,
  `name` varchar(64) DEFAULT NULL,
  `author` varchar(32) DEFAULT NULL,
  `price` varchar(32) DEFAULT NULL,
  PRIMARY KEY (`id`)
) ENGINE=InnoDB AUTO_INCREMENT=1 DEFAULT CHARSET=utf8mb4 COLLATE=utf8mb4_general_ci;
5.2 代码操作完整过程
5.2.1 增加book的实体类
作为与book表映射的对象
package com.congge.entity;

public class Book {

    private Integer id;

    private String name;

    private String author;

    private String price;

    public Integer getId() {
        return id;
    }

    public void setId(Integer id) {
        this.id = id;
    }

    public String getName() {
        return name;
    }

    public void setName(String name) {
        this.name = name;
    }

    public String getAuthor() {
        return author;
    }

    public void setAuthor(String author) {
        this.author = author;
    }

    public String getPrice() {
        return price;
    }

    public void setPrice(String price) {
        this.price = price;
    }
}
5.2.2 业务实现基本增删改查方法
增加一个业务实现类,这里我提供了插入和查询方法,可以结合自身的情况添加
package com.congge.service;

import com.congge.dao.BookMapper;
import com.congge.entity.Book;
import com.congge.entity.vo.BookVO;
import org.springframework.beans.BeanUtils;
import org.springframework.beans.factory.annotation.Autowired;
import org.springframework.stereotype.Service;
import org.springframework.transaction.annotation.Transactional;

@Service
public class BookService {

    @Autowired
    private BookMapper bookMapper;

    @Transactional
    public void addBook(BookVO book) {
        Book book1 = new Book();
        BeanUtils.copyProperties(book,book1);
        bookMapper.insert(book1);
    }

    public Book getBookById(Integer id) {
        return bookMapper.getBookById(id);
    }

}
5.2.3 自定义Tool工具类
在实际结合大模型的业务开发中,Tool工具类的开发才是核心,其作用相当于是连接了实际业务与大模型之间的桥梁,如下,提供了两个工具方法,分别用于执行数据库的插入和查询
package com.congge.tool;

import com.congge.entity.Book;
import com.congge.entity.vo.BookVO;
import com.congge.service.BookService;
import jakarta.annotation.Resource;
import org.springframework.ai.tool.annotation.Tool;
import org.springframework.stereotype.Component;

@Component
public class BookTools {

    @Resource
    private BookService bookService;

    @Tool(description = "新增一本书")
    public void addBook(BookVO book) {
        bookService.addBook(book);
    }

    @Tool(description = "根据指定ID查询书籍")
    public Book queryBookById(Integer id) {
        Book dbbook = bookService.getBookById(id);
        return dbbook;
    }

}
1)Tool 注解关键属性补充说明:
需要掌握Tool相关的几个注解,以及注解中参数的含义,以便更好的应对开发
Tool 注解支持的几个关键属性
name :工具名称。若未指定,默认使用方法名。名称需在单个类中唯一,且在同一聊天请求中所有工具名称不可重复。
description :工具描述,用于帮助模型理解调用时机和用途。若未指定,默认使用方法名,但强烈建议提供详细描述以避免模型误用或忽略工具。
returnDirect :是否直接将结果返回客户端而非传递给模型(详见"直接返回"章节)。
resultConverter :指定ToolCallResultConverter实现,用于将工具调用结果转换为字符串返回模型(详见"结果转换"章节)。
2)Tool 参数注解补充说明:
Spring AI会自动为**@Tool方法生成输入参数的JSON Schema,模型据此理解调用格式。通过@ToolParam**注解可补充参数信息,参考如下示例代码:
class DateTimeTools {

    @Tool(description = "设置指定时间的用户闹钟")
    void setAlarm(@ToolParam(description = "ISO-8601格式的时间") String time) {
        LocalDateTime alarmTime = LocalDateTime.parse(time, DateTimeFormatter.ISO_DATE_TIME);
        System.out.println("闹钟已设置为 " + alarmTime);
    }
}
@ToolParam支持以下属性:
description :
参数描述(如格式要求、允许值等),帮助模型正确使用参数。
required :
是否为必填参数。默认所有参数为必填,但标注@Nullable的参数会被视为可选(除非显式标记为required=true)
此外,可结合Swagger的**@Schema或Jackson的@JsonProperty**注解定义JSON Schema
5.2.4 自定义ChatClient
还需要自定义ChatClient,将基本的提示词模板嵌入到spring ai的上下文环境中,以便在与大模型交互的时候使用,参考下面的代码
package com.congge.config;

import org.springframework.ai.chat.client.ChatClient;
import org.springframework.context.annotation.Bean;
import org.springframework.context.annotation.Configuration;

@Configuration
public class BookChatConfig {

    @Bean
    ChatClient bookChat(ChatClient.Builder chatClientBuilder) {
        String systemMessage = """
                  当前时间:{date}。输出结果使用HTML table表格展示。需要自适应页面大小(宽度),字体大小为12px。除HTML相关的内容,不要有任何其它内容。
                """;
        ChatClient chatClient = chatClientBuilder
                .defaultSystem(systemMessage)
                .build();
        return chatClient;
    }

}
5.2.5 mybatis层操作数据表
如下在mybatis文件中操作数据表的sql
<?xml version="1.0" encoding="UTF-8" ?>
<!DOCTYPE mapper
PUBLIC "-//mybatis.org//DTD Mapper 3.0//EN"
"http://mybatis.org/dtd/mybatis-3-mapper.dtd">
<mapper namespace="com.congge.dao.BookMapper">

    <resultMap type="com.congge.entity.Book" id="BookMap">
        <result property="id"    column="id"    />
        <result property="name"    column="name"    />
        <result property="author"    column="author"    />
        <result property="price"    column="price"    />
    </resultMap>

    <insert id="insert">
        insert into book(`name`,author,price)
        values(#{name},#{author},#{price})
    </insert>

    <select id="getBookById" resultMap="BookMap">
        select * from book where id = #{id}
    </select>

</mapper>
5.2.6 增加测试接口
如下,增加一个测试接口,在后面通过接口测试一下是否可以通过tool直接完成对数据表的数据插入和查询
package com.congge.web;

import com.congge.tool.BookTools;
import org.springframework.ai.chat.client.ChatClient;
import org.springframework.ai.chat.prompt.Prompt;
import org.springframework.http.ResponseEntity;
import org.springframework.web.bind.annotation.GetMapping;
import org.springframework.web.bind.annotation.RequestMapping;
import org.springframework.web.bind.annotation.RestController;

import java.util.Date;

@RestController
@RequestMapping("/book/chat")
public class BookChatController {

    private final BookTools bookTools ;

    private final ChatClient chatClient ;

    public BookChatController(BookTools bookTools, ChatClient chatClient) {
        this.bookTools = bookTools ;
        this.chatClient = chatClient ;
    }

    //localhost:8081/book/chat/v1?message=新增一本书,书名是《java从入门到精通》,作者是张三,价格是100元
    @GetMapping("/v1")
    public ResponseEntity<?> chat(String message) {
        Prompt prompt = new Prompt(message) ;
        String content = this.chatClient
                .prompt(prompt)
                // 设置系统文本中的占位符参数
                .system(p -> p.param("date", new Date()))
                .tools(bookTools)
                .call()
                .content() ;
        return ResponseEntity.ok(content) ;
    }
}
5.3 效果测试
5.3.1 新增数据测试
在下面的接口调用中,我们希望通过上面的接口增加一条数据到数据表,浏览器执行下面的接口:
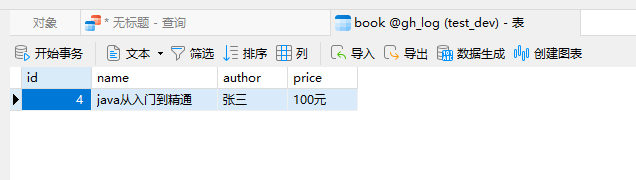
localhost:8081/book/chat/v1?message=新增一本书,书名是《java从入门到精通》,作者是张三,价格是100元执行接口,执行成功后,由于返回的是html,所以能够渲染到浏览器网页

检查数据表,可以看到增加了一条数据
5.3.2 查询数据测试
下面根据ID来查询上面新增的这条记录,能够按照预期查询出结果并展示在网页上,虽然样式一般,也是按照预期查询到了数据

六、写在文末
本文通过较大的篇幅详细介绍了Spring AI Tool的使用,并通过实际案例演示了具体的使用过程,希望对看到的同学有用,本篇到此结束,感谢观看。