第一章 初识SpringMVC
1.1 SpringMVC概述
- SpringMVC是Spring子框架
- SpringMVC是Spring 为【展现层|表示层|表述层|控制层】提供的基于 MVC 设计理念的优秀的 Web 框架,是目前最主流的MVC 框架。
- SpringMVC是非侵入式:可以使用注解让普通java对象,作为请求处理器【Controller】。
- SpringMVC是用来代替Servlet
Servlet作用
1. 处理请求
- 将数据共享到域中
2. 做出响应
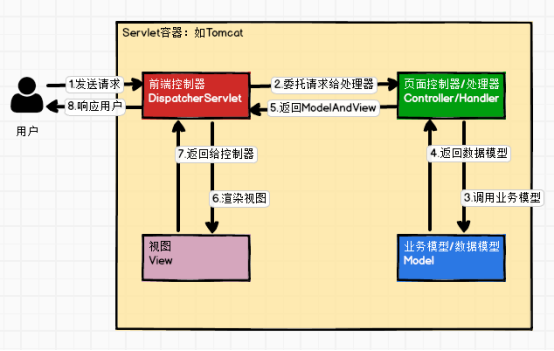
- 跳转页面【视图】1.2 SpringMVC处理请求原理简图
- 请求
- DispatcherServlet【前端控制器】
- 将请求交给Controller|Handler
- Controller|Handler【请求处理器】
- 处理请求
- 返回数据模型
- ModelAndView
- Model:数据模型
- View:视图对象或视图名
- DispatcherServlet渲染视图
- 将数据共享到域中
- 跳转页面【视图】
- 响应
第二章 SpringMVC搭建框架
2.1 搭建SpringMVC框架
- 创建工程【web工程】
- 导入jar包
<!--spring-webmvc-->
<dependency>
    <groupId>org.springframework</groupId>
    <artifactId>spring-webmvc</artifactId>
    <version>5.3.1</version>
</dependency>

<!-- 导入thymeleaf与spring5的整合包 -->
<dependency>
    <groupId>org.thymeleaf</groupId>
    <artifactId>thymeleaf-spring5</artifactId>
    <version>3.0.12.RELEASE</version>
</dependency>

<!--servlet-api-->
<dependency>
    <groupId>javax.servlet</groupId>
    <artifactId>javax.servlet-api</artifactId>
    <version>4.0.1</version>
    <scope>provided</scope>
</dependency>- 编写配置文件
- web.xml注册DispatcherServlet
- url配置:/
- <load-on-startup>:设置DispatcherServlet优先级【启动服务器时,创建当前Servlet对象】
- init-param:contextConfigLocation,设置springmvc.xml配置文件路径【管理容器对象】
- springmvc.xml
- 开启组件扫描
- 配置视图解析器【解析视图(设置视图前缀&后缀)】
- web.xml注册DispatcherServlet
- 编写请求处理器【Controller|Handler】
- 使用@Controller 注解标识请求处理器
- 使用@RequestMapping 注解标识处理方法【URL】
- 准备页面进行,测试
第三章 @RequestMapping详解
@RequestMapping注解作用:为指定的类或方法设置相应URL
3.1 @RequestMapping注解位置
- 书写在类上面
- 作用:为当前类设置映射URL
- 注意:不能单独使用,需要与方法上的@RequestMapping配合使用
- 书写在方法上面
- 作用:为当前方法设置映射URL
- 注意:可以单独使用
3.2 @RequestMapping注解属性
- value属性
- 类型:String[]
- 作用:设置URL信息
- path属性
- 类型:String[]
- 作用:与value属性作用一致
- method属性
- 类型:RequestMethod[]
public enum RequestMethod {
   GET, HEAD, POST, PUT, PATCH, DELETE, OPTIONS, TRACE
}- 作用:为当前URL【类或方法】设置请求方式【POST、DELETE、PUT、GET】
注意:
- 默认情况:所有请求方式均支持
- 如请求方式不支持,会报如下错误
- 405【Request method 'GET' not supported】
- params
- 类型:String[]
- 作用:为当前URL设置请求参数
- 注意:如设置指定请求参数,但URL中未携带指定参数,会报如下错误
- 400【Parameter conditions "lastName" not met for actual request parameters:】
- headers
- 类型:String[]
- 作用:为当前URL设置请求头信息
- 注意:如设置指定请求头,但URL中未携带请求头,会报如下错误
- 404:请求资源未找到
- 示例代码
@RequestMapping(value = {"/saveEmp","/insertEmp"},
                method = RequestMethod.GET,
                params = "lastName=lisi",
                headers = "User-Agent=Mozilla/5.0 (Windows NT 10.0; Win64; x64) AppleWebKit/537.36 (KHTML, like Gecko) Chrome/99.0.4844.84 Safari/537.36")
public String saveEmp(){
    System.out.println("添加员工信息!!!!");

    return SUCCESS;
}
@RequestMapping(method = RequestMethod.POST)
public @interface PostMapping {}
@RequestMapping(method = RequestMethod.GET)
public @interface GetMapping {}
@RequestMapping(method = RequestMethod.PUT)
public @interface PutMapping {}
@RequestMapping(method = RequestMethod.DELETE)
public @interface DeleteMapping {}3.3 @RequestMapping支持Ant 风格的路径(了解)
a) ?:匹配一个字符
b) *:匹配任意字符
c) **:匹配多层路径
常用通配符
- 示例代码
@RequestMapping("/testAnt/**")
public String testAnt(){
    System.out.println("==>testAnt!!!");
    return SUCCESS;
}
第四章 @PathVariable 注解
4.1 @PathVariable注解位置
@Target(ElementType.PARAMETER)- 书写在参数前面
4.2 @PathVariable注解作用
- 获取URL中占位符参数
- 占位符语法:{}
- 示例代码
<a th:href="@{/EmpController/testPathVariable/1001}">测试PathVariable注解</a><br>4.3 @PathVariable注解属性
- value属性
- 类型:String
- 作用:设置占位符中的参数名
- name属性
- 类型:String
- 作用:与name属性的作用一致
- required属性
- 类型:boolean
- 作用:设置当前参数是否必须入参【默认值:true】
- true:表示当前参数必须入参,如未入参会报如下错误
- Missing URI template variable 'empId' for method parameter of type Integer
- false:表示当前参数不必须入参,如未入参,会装配null值
- true:表示当前参数必须入参,如未入参会报如下错误
第五章 REST【RESTful】风格CRUD
5.1 REST的CRUD与传统风格CRUD对比
- 传统风格CRUD
- 功能 URL 请求方式
- 增 /insertEmp POST
- 删 /deleteEmp?empId=1001 GET
- 改 /updateEmp POST
- 查 /selectEmp?empId=1001 GET
- 功能 URL 请求方式
- REST风格CRUD
- 功能 URL 请求方式
- 增 /emp POST
- 删 /emp/1001 DELETE
- 改 /emp PUT
- 查 /emp/1001 GET
- 功能 URL 请求方式
5.2 REST风格CRUD优势
- 提高网站排名
- 排名方式
- 竞价排名
- 技术排名
- 排名方式
- 便于第三方平台对接
5.3 实现PUT&DELETE提交方式步骤
- 注册过滤器HiddenHttpMethodFilter
- 设置表单的提交方式为POST
- 设置参数:_method=PUT或_method=DELETE
5.4 源码解析HiddenHttpMethodFilter
public static final String DEFAULT_METHOD_PARAM = "_method";

private String methodParam = DEFAULT_METHOD_PARAM;

@Override
protected void doFilterInternal(HttpServletRequest request, HttpServletResponse response, FilterChain filterChain)
      throws ServletException, IOException {

   HttpServletRequest requestToUse = request;

   if ("POST".equals(request.getMethod()) && request.getAttribute(WebUtils.ERROR_EXCEPTION_ATTRIBUTE) == null) {
      String paramValue = request.getParameter(this.methodParam);
      if (StringUtils.hasLength(paramValue)) {
         String method = paramValue.toUpperCase(Locale.ENGLISH);
         if (ALLOWED_METHODS.contains(method)) {
            requestToUse = new HttpMethodRequestWrapper(request, method);
         }
      }
   }

   filterChain.doFilter(requestToUse, response);
}
/**
	 * Simple {@link HttpServletRequest} wrapper that returns the supplied method for
	 * {@link HttpServletRequest#getMethod()}.
	 */
	private static class HttpMethodRequestWrapper extends HttpServletRequestWrapper {

		private final String method;

		public HttpMethodRequestWrapper(HttpServletRequest request, String method) {
			super(request);
			this.method = method;
		}

		@Override
		public String getMethod() {
			return this.method;
		}
	}
第六章 SpringMVC处理请求数据
使用Servlet处理请求数据
- 请求参数
- String param = request.getParameter();
- 请求头
- request.getHeader();
- Cookie
- request.getCookies();
6.1 处理请求参数
- 默认情况:可以将请求参数名,与入参参数名一致的参数,自动入参【自动类型转换】
- SpringMVC支持POJO入参
- 要求:请求参数名与POJO的属性名保持一致
- 示例代码
<form th:action="@{/saveEmp}" method="POST">
    id:<input type="text" name="id"><br>
    LastName:<input type="text" name="lastName"><br>
    Email:<input type="text" name="email"><br>
    Salary:<input type="text" name="salary"><br>
    <input type="submit" value="添加员工信息">
</form>- @RequestParam注解
- 作用:如请求参数与入参参数名不一致时,可以使用@RequestParam注解设置入参参数名
- 属性
- value
- 类型:String
- 作用:设置需要入参的参数名
- name
- 类型:String
- 作用:与value属性作用一致
- required
- 类型:Boolean
- 作用:设置当前参数,是否必须入参
- true【默认值】:表示当前参数必须入参,如未入参会报如下错误
- 400【Required String parameter 'sName' is not present】
- false:表示当前参数不必须入参,如未入参,装配null值
- defaultValue
- 类型:String
- 作用:当装配数值为null时,指定当前defaultValue默认值
- 作用:如请求参数与入参参数名不一致时,可以使用@RequestParam注解设置入参参数名
- 示例代码
/**
 * 获取请求参数
 * @return
 */
@RequestMapping("/requestParam1")
public String requestParam1(@RequestParam(value = "sName",required = false,
                                        defaultValue = "zhangsan")
                                        String stuName,
                            Integer stuAge){
    System.out.println("stuName = " + stuName);
    System.out.println("stuAge = " + stuAge);
    return SUCCESS;
}
6.2 处理请头
- 语法:@RequestHeader注解
- 属性
- value
- 类型:String
- 作用:设置需要获取请求头名称
- name
- 类型:String
- 作用:与value属性作用一致
- required
- 类型:boolean
- 作用:【默认值true】
- true:设置当前请求头是否为必须入参,如未入参会报如下错误
- 400【Required String parameter 'sName' is not present】
- false:表示当前参数不必须入参,如未入参,装配null值
- defaultValue
- 类型:String
- 作用:当装配数值为null时,指定当前defaultValue默认值
- value
- 示例代码
<a th:href="@{/testGetHeader}">测试获取请求头</a>6.3 处理Cookie信息
- 语法:@CookieValue 获取Cookie数值
- 属性
- value
- 类型:String
- 作用:设置需要获取Cookie名称
- name
- 类型:String
- 作用:与value属性作用一致
- required
- 类型:boolean
- 作用:【默认值true】
- true:设置当前Cookie是否为必须入参,如未入参会报如下错误
- 400【Required String parameter 'sName' is not present】
- false:表示当前Cookie不必须入参,如未入参,装配null值
- defaultValue
- 类型:String
- 作用:当装配数值为null时,指定当前defaultValue默认值
- value
- 示例代码
<a th:href="@{/setCookie}">设置Cookie信息</a><br>
<a th:href="@{/getCookie}">获取Cookie信息</a><br>
6.4 使用原生Servlet-API
- 将原生Servlet相关对象,入参即可
@RequestMapping("/useRequestObject")
public String useRequestObject(HttpServletRequest request){}
第七章 SpringMVC处理响应数据
7.1 使用ModelAndView
- 使用ModelAndView对象作为方法返回值类型,处理响应数据
- ModelAndView是模型数据与视图对象的集成对象,源码如下
public class ModelAndView {

   /** View instance or view name String. */
   //view代表view对象或viewName【建议使用viewName】
   @Nullable
   private Object view;

   /** Model Map. */
   //ModelMap集成LinkedHashMap,存储数据
   @Nullable
   private ModelMap model;

    /**
    	设置视图名称
	 */
	public void setViewName(@Nullable String viewName) {
		this.view = viewName;
	}

	/**
	 * 获取视图名称
	 */
	@Nullable
	public String getViewName() {
		return (this.view instanceof String ? (String) this.view : null);
	}

    /**
	 获取数据,返回Map【无序,model可以为null】
	 */
	@Nullable
	protected Map<String, Object> getModelInternal() {
		return this.model;
	}

	/**
	 * 获取数据,返回 ModelMap【有序】
	 */
	public ModelMap getModelMap() {
		if (this.model == null) {
			this.model = new ModelMap();
		}
		return this.model;
	}

	/**
	 * 获取数据,返回Map【无序】
	 */
	public Map<String, Object> getModel() {
		return getModelMap();
	}

    /**
    	设置数据
    */
    public ModelAndView addObject(String attributeName, @Nullable Object attributeValue) {
		getModelMap().addAttribute(attributeName, attributeValue);
		return this;
	}


}- 示例代码
@GetMapping("/testMvResponsedata")
public ModelAndView testMvResponsedata(){
    ModelAndView mv = new ModelAndView();
    //设置逻辑视图名
    mv.setViewName("response_success");
    //设置数据【将数据共享到域中(request\session\servletContext)】
    mv.addObject("stuName","zhouxu");
    return mv;
}
7.2 使用Model、ModelMap、Map
- 使用Model、ModelMap、Map作为方法入参,处理响应数据
- 示例代码
/**
     * 使用Map、Model、ModelMap处理响应数据
     * @return
     */
    @GetMapping("/testMapResponsedata")
    public String testMapResponsedata(Map<String,Object> map
                                         /* Model model
                                        ModelMap modelMap*/){
        map.put("stuName","zhangsan");
//        model.addAttribute("stuName","lisi");
//        modelMap.addAttribute("stuName","wangwu");

        return "response_success";
    }
7.3 SpringMVC中域对象
- SpringMVC封装数据,默认使用request域对象
- session域的使用
- 方式一
/**
 * 测试响应数据【其他域对象】
 * @return
 */
@GetMapping("/testScopeResponsedata")
public String testScopeResponsedata(HttpSession session){
    session.setAttribute("stuName","xinlai");
    return "response_success";
}-
- 方式二
@Controller
@SessionAttributes(value = "stuName") //将request域中数据,同步到session域中
public class TestResponseData {
    /**
     * 使用ModelAndView处理响应数据
     * @return
     */
    @GetMapping("/testMvResponsedata")
    public ModelAndView testMvResponsedata(){
        ModelAndView mv = new ModelAndView();
        //设置逻辑视图名
        mv.setViewName("response_success");
        //设置数据【将数据共享到域中(request\session\servletContext)】
        mv.addObject("stuName","zhouxu");
        return mv;
    }
}
第八章 SpringMVC处理请求响应乱码
8.1 源码解析CharacterEncodingFilter
public class CharacterEncodingFilter extends OncePerRequestFilter {

   //需要设置字符集
   @Nullable
   private String encoding;
   //true:处理请乱码
   private boolean forceRequestEncoding = false;
   //true:处理响应乱码
   private boolean forceResponseEncoding = false;

    public String getEncoding() {
		return this.encoding;
	}

    public boolean isForceRequestEncoding() {
		return this.forceRequestEncoding;
	}

    public void setForceResponseEncoding(boolean forceResponseEncoding) {
		this.forceResponseEncoding = forceResponseEncoding;
	}

    public void setForceEncoding(boolean forceEncoding) {
		this.forceRequestEncoding = forceEncoding;
		this.forceResponseEncoding = forceEncoding;
	}

 	@Override
	protected void doFilterInternal(
			HttpServletRequest request, HttpServletResponse response, FilterChain filterChain)
			throws ServletException, IOException {

		String encoding = getEncoding();
		if (encoding != null) {
			if (isForceRequestEncoding() || request.getCharacterEncoding() == null) {
				request.setCharacterEncoding(encoding);
			}
			if (isForceResponseEncoding()) {
				response.setCharacterEncoding(encoding);
			}
		}

		filterChain.doFilter(request, response);

    }


}
8.2 处理请求与响应乱码
- SpringMVC底层默认处理响应乱码
- SpringMVC处理请求乱码步骤
- 注册CharacterEncodingFilter
- 注册CharacterEncodingFilter必须是第一Filter位置
- 为CharacterEncodingFilter中属性encoding赋值
- 为CharacterEncodingFilter中属性forceRequestEncoding赋值
- 示例代码
<!--    必须是第一过滤器位置-->
<filter>
    <filter-name>CharacterEncodingFilter</filter-name>
    <filter-class>org.springframework.web.filter.CharacterEncodingFilter</filter-class>
    <init-param>
        <param-name>encoding</param-name>
        <param-value>UTF-8</param-value>
    </init-param>
    <init-param>
        <param-name>forceRequestEncoding</param-name>
        <param-value>true</param-value>
    </init-param>
</filter>
<filter-mapping>
    <filter-name>CharacterEncodingFilter</filter-name>
    <url-pattern>/*</url-pattern>
</filter-mapping>
第九章 源码解析SpringMVC工作原理
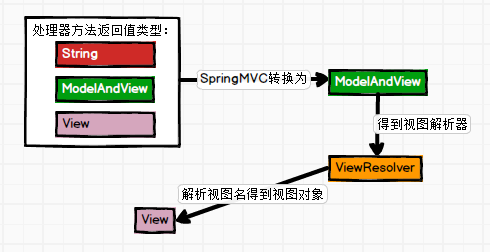
9.1 Controller中方法的返回值问题
- 无论方法返回是ModelAndView还是String,最终SpringMVC底层,均会封装为ModelAndView对象
//DispatcherServlet的1061行代码
ModelAndView mv = null;
mv = ha.handle(processedRequest, response, mappedHandler.getHandler());- SpringMVC解析mv【ModelAndView】
//DispatcherServlet的1078行代码
processDispatchResult(processedRequest, response, mappedHandler, mv, dispatchException);- ThymeleafView对象中344行代码【SpringMVC底层处理响应乱码】
//computedContentType="text/html;charset=UTF-8"
response.setContentType(computedContentType);- WebEngineContext对象中783行代码【SpringMVC底层将数据默认共享到request域】
this.request.setAttribute(name, value);9.2 视图及视图解析器源码
- 视图解析器将View从ModelAndView中解析出来
- ThymeleafViewResolver的837行代码
//底层使用反射的方式,newInstance()创建视图对象
final AbstractThymeleafView viewInstance = BeanUtils.instantiateClass(getViewClass());
第十章 SpringMVC视图及视图解析器
10.1 视图解析器对象【ViewResolver】
- 概述:ViewResolver接口的实现类或子接口,称之为视图解析器
- 作用:将ModelAndView中的View对象解析出来
10.2 视图对象【View】
- 概述:View接口的实现类或子接口,称之为视图对象
- 作用:视图渲染
-
- 将数据共享域中
- 跳转路径【转发或重定向】
第十一章 视图控制器&重定向&加载静态资源
11.1 视图控制器
- 语法:view-controller
- 步骤
-
- 添加<mvc:view-controller>标签:为指定URL映射html页面
- 添加<mvc:annotation-driven>
-
-
- 有20+种功能
- 配置了<mvc:view-controller>标签之后会导致其他请求路径都失效,添加<mvc:annotation-driven>解决
-
11.2 重定向
- 语法:return "redirect:/xxx.html";
11.3 加载静态资源
- 由DefaultServlet加载静态资源到服务器
-
- 静态资源:html、css、js等资源
- tomcat->conf->web.xml关键代码如下:
<servlet>
        <servlet-name>default</servlet-name>
        <servlet-class>org.apache.catalina.servlets.DefaultServlet</servlet-class>
        <init-param>
            <param-name>debug</param-name>
            <param-value>0</param-value>
        </init-param>
        <init-param>
            <param-name>listings</param-name>
            <param-value>false</param-value>
        </init-param>
        <load-on-startup>1</load-on-startup>
    </servlet>
<servlet-mapping>
        <servlet-name>default</servlet-name>
        <url-pattern>/</url-pattern>
</servlet-mapping>- 发现问题
-
- DispatcherServlet与DefaultServlet的URL配置均为:/,导致DispatcherServlet中的配置将DefaultServlet配置的/覆盖了【DefaultServlet失效,无法加载静态资源】
- 解决方案
<!--    解决静态资源加载问题-->
<mvc:default-servlet-handler></mvc:default-servlet-handler>
<!-- 添加上述标签,会导致Controller无法正常使用,需要添加mvc:annotation-driven解决 -->
<mvc:annotation-driven></mvc:annotation-driven>
11.4 源码解析重定向原理
- 创建RedirectView对象【ThymeleafViewResolver的775行代码】
// Process redirects (HTTP redirects)
if (viewName.startsWith(REDIRECT_URL_PREFIX)) {
    vrlogger.trace("[THYMELEAF] View \"{}\" is a redirect, and will not be handled directly by ThymeleafViewResolver.", viewName);
    final String redirectUrl = viewName.substring(REDIRECT_URL_PREFIX.length(), viewName.length());
    final RedirectView view = new RedirectView(redirectUrl, isRedirectContextRelative(), isRedirectHttp10Compatible());
    return (View) getApplicationContext().getAutowireCapableBeanFactory().initializeBean(view, REDIRECT_URL_PREFIX);
}- RedirectView视图渲染
-
- RedirectView对象URL处理【330行代码】

- 执行重定向【RedirectView的627行代码】

- RedirectView对象URL处理【330行代码】
第十二章 REST风格CRUD练习
12.1 搭建环境
● 导入相关jar包
● 编写配置文件
○web.xml
■CharacterEncodingFilter
■HiddenHttpMethodFilter
■DispatcherServlet
○springmvc.xml
■开启组件扫描
■装配视图解析器
■装配视图控制器
■解决静态资源加载问题
■装配annotation-driver
● dao&pojo
12.2 实现功能思路
● 实现添加功能思路
a跳转添加页面【查询所有部门信息】
b实现添加功能
● 实现删除功能思路
a 方式一:直接使用表单实现DELETE提交方式
b 方式二:使用超链接【a】实现DELETE提交方式
■ 使用Vue实现单击超链接,后提交对应表单
■ 取消超链接默认行为
■ 示例代码
HTML运行代码复制代码
<div align="center" id="app">
<a href="#" @click="deleteEmp">删除</a>
<form id="delForm" th:action="@{/emps/}+${emp.id}" method="post">
<input type="hidden" name="_method" value="DELETE">
</form>
</div>
<script type="text/javascript" src="static/js/vue_v2.6.14.js"></script>
<script type="text/javascript">
new Vue({
    el:"#app",
    data:{},
    methods:{
        deleteEmp(){
            alert("hehe");
            //获取响应表单
            var formEle = document.getElementById("delForm");
            formEle.submit();
            //取消超链接默认行为
            event.preventDefault();
        }
    }
});
</script>