一、两种路由模式
1、hash路由
(1)url中有#号,背后是监听onhashchange事件
(2)hash路由部署上线不会出现404问题,背后是基于history api实现的
2、history路由
(1)url中没有#号
(2)history路由部署上线会出现404问题,要用服务器做重定向处理
二、两个全局组件
1、<route-view>
视图容器
属性:
name:用于指定命名视图(给route-view加个名字,默认叫default)
路由规则:
<router-view name='alive'></router-view>比如当url='/home'时,路由系统加载HomePage组件,将其显示在一个name=alive的视图容器中
routes: [
        { path: '/home',
        components: {
          // 左key是视图容器的名称,右边是组件名称
          alive: HomePage
        }
      }
    ]
2、<route-link>
相当于a标签,用于设计菜单导航
属性:
to:用于指定跳转的目标
tag:用于指定最终渲染成什么标签,默认是a标签
active-class:用于指定菜单高亮样式显示
replace:跳转时,用当前链接替换路由栈栈顶
exact、exact-active-class:路由精确匹配
字符串写法:
<route-link to='/home'>首页</route-link>
对象写法:
<route-link :to='{path:"/home"}'>首页</route-link>
3、什么是路由栈
浏览器向左向右的箭头,控制页面访问,比如依次访问:
/
/home
/user
路由栈是['/', '/home', '/user'],这时候选择向左箭头,则跳转回到/home
三、两个内置api
1、$route
表示路由信息。url信息。
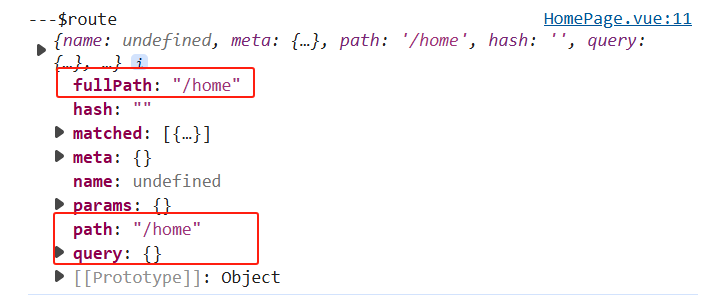
$route常用的api:
(1)this.$route.fullPath
拿路由地址的。
(2)this.$route.query
拿查询参数的。
(3)this.$route.params
拿动态路由的。
(5)this.$route.meta
拿路由元信息的。
2、$router
路由实例,用于路由跳转。
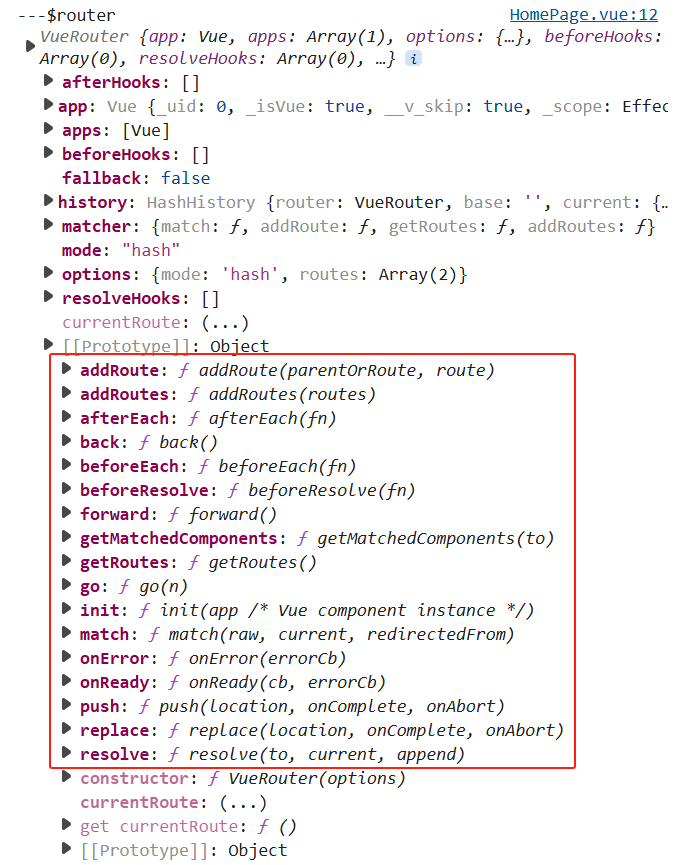
$router常用api:
(1)this.$router.push
向前跳转。
(2)this.$router.replace
向前跳转。替换路由栈顶操作。
(3)this.$router.back
返回上一页。
四、怎么监听路由的变化
1、watch可以监听$route的变化
watch: {
    $route() {
    console.log('---url变化了')
    }
}
五、两种路由跳转
1、声明式跳转
声明式路由跳转,就是使用<route-link>做跳转。一般用于菜单设计。
2、编程式跳转
用$router.push方法做跳转。一般用于事件绑定中。
六、两种命名
1、命名路由
意思是给路由规则{path,component}取一个名字。
routes: [
        { path: '/home',
        components: {
          // 左key是视图容器的名称,右边是组件名称
          alive: HomePage
        },
        // 命名路由,给路由规则取个名
        name: 'tt'
      }
    ]
跳转:
<route-link :to='{name:"tt"}'>首页</route-link>2、命名视图
意思是给<router-view>加一个name属性。
七、两种路由传参
1、query传参
(1)页面上点击一个项,跳转页面,触发点击事件
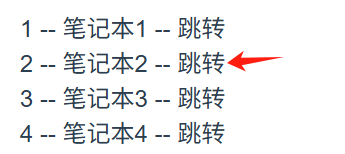
<template>
    <div>
        <h1>首页</h1>
        <div v-for='item in list' :key='item.id'>
            <span v-text='item.id'></span>
            --
            <span v-text='item.name'></span>
            --
            <span @click='skip(item)'>跳转</span>
        </div>
    </div>
</template>
methods: {
skip(item) {
// 编程式跳转
this.$router.push('/good?id=' + item.id)
}
}(2)url出现传过来的id
![]()
(3)商品详情页面打印接收到的id
![]()
<template>
    <div>
        <h1>商品详情页</h1>
    </div>
</template>

<script>

export default {
    mounted() {
        const id = this.$route.query.id
        console.log('---id', id)
    }
}
</script>

<style lang="css" scoped>

</style>
2、动态路由传参
(1)路由参数
从:
{ path: '/good', component: GoodInfo}改为:
{ path: '/good/:id', component: GoodInfo}这个:id就叫做动态路由,默认使用this.$route.params接收。如果在这里开启了props:true,那么还可以使用props来接收动态路由参数。
(2)页面上点击一个项,跳转页面,触发点击事件
methods: {
        skip(item) {
            // 编程式跳转
            //this.$router.push('/good?id=' + item.id)
            this.$router.push('/good/' + item.id)
        }
    }
(3)url出现传过来的id
![]()
(4)商品详情页面打印接收到的id
![]()
<template>
    <div>
        <h1>商品详情页</h1>
    </div>
</template>

<script>

export default {
    mounted() {
        //const id = this.$route.query.id
        const id = this.$route.params.id
        console.log('---id', id)
    }
}
</script>

<style lang="css" scoped>

</style>