写在最前面的使用方式
- 查看 所有分支的备注
git branch.notes - 创建分支并为分支添加备注
git co -b feat/oauth -m '第三方用户登录' - 对分支描述的添加与清除
添加git branch.note --add清除git branch.note --clear
📝 为 Git branch 命令添加描述功能
🧭 背景说明
目前,Git 本身并没有内置的分支描述功能,开发者通常通过分支名来了解分支的目的,但这种方式不够直观。为了提升分支管理的清晰度和可读性,我在项目中引入了一个名为 .gitbranch 的本地文件,用于记录每个 Git 分支的描述信息。这个文件不会影响 Git 的版本控制功能,仅作为开发人员在本地维护分支说明的工具。
通过添加 git branch.note 命令,可以更方便地为当前分支添加描述,提高团队协作效率与代码可维护性。该命令对团队成员完全透明、易于使用,是对外展示的入口。
📌 一、用户应该如何配置
1. 创建 .gitbranch 文件
在项目根目录下创建一个名为 .gitbranch 的普通文本文件,用于存储各分支的描述信息:
touch .gitbranch
或者你可以直接写入初始内容:
echo "| main | 主分支,用于生产环境代码" > .gitbranch
📌 推荐将 .gitbranch 写入到 .gitignore 中 echo .gitbranch >> .gitignore , 要不然切换分支时它也会跟随变更。
2. 配置 Git 别名
将以下配置添加到你的 .gitconfig 文件中,使 git branch.note 命令正常工作:
⚠️ 注意:以下命令为 Mac OS 系统的配置文件。
[alias "branch"]
  clear = "!f() { if test -f .gitbranch ; then grep -v $(git rev-parse --abbrev-ref HEAD) .gitbranch > .gitbranch.tmp && mv .gitbranch.tmp .gitbranch; fi;}; f"
  add =  "!f() { if [[ -n $1 ]]; then echo \"| $(git rev-parse --abbrev-ref HEAD) | $1 |\" >> .gitbranch ; fi; }; f"
  show = "!f() { if test -f .gitbranch ; then grep --no-filename $(git rev-parse --abbrev-ref HEAD) .gitbranch | awk -F '|' '{print $3}'; else echo 'The file `.gitbranch` does not exist'; fi; }; f"
  note =  "!f() { if [[ -n $1 && $1 = '--add' && -n $2 ]]; then git branch.add $2; elif [[ -n $1 && $1 = '--clear' ]]; then git branch.clear; else git branch.show; fi; }; f"
  notes = "!f() { git branch --list | tr -d ' *' | while read -r name; do if [[ -n $(grep ${name} .gitbranch) ]]; then grep ${name} .gitbranch| sed 's/^|[[:space:]]//g' | awk -F '|' '{print \"\\033[32m\" $1 $2 \"\\033[0m\" }'; else echo  $name; fi; done; }; f"
✅ 所有分支描述操作均通过内部命令(如
branch.add、branch.show)实现,因此你只需配置branch.note命令即可。
📌 二、介绍一下 git branch.note 应该如何使用
1. 添加分支描述
使用如下命令为当前分支添加描述(支持中文):
git branch.note --add "这是当前分支的说明"
✅ 示例:
git branch.note --add "用于开发用户登录模块,包含前端和后端接口"
💡 运行后,
git branch.note会自动将描述写入.gitbranch文件,格式如下:
| <branch-name> | <description> |
例如:执行 git branch.note
用于开发用户登录模块,包含前端和后端接口
2. 查看当前分支的描述
直接使用以下命令查看当前分支的说明:
git branch.note
✅ 示例:
git branch.note

📝 此命令会自动读取
.gitbranch文件中的内容,并输出当前分支的描述。如果没有设置描述,则会显示空白。
3. 清空当前分支的描述
直接使用以下命令清空当前分支的说明:
git branch.note --clear
当前分支的描述将会被清空 ⚠️ 请谨慎操作
4. 查看所有分支的描述
直接使用以下命令查看当前分支的说明:
git branch.notes
列出所有分支并展示出分支的描述
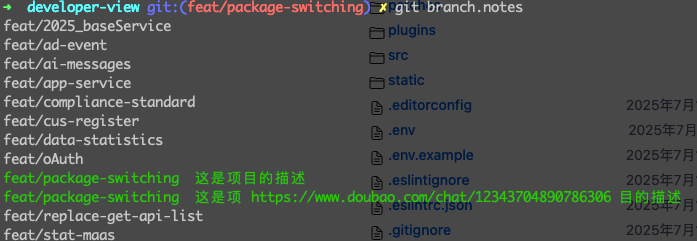
eat/cus-register
feat/data-statistics
feat/oAuth
feat/package-switching 这是项目的描述
feat/replace-get-api-list
feat/stat-maas
feat/super-group
feat/test-template
fix/blog
fix/config-base
fix/huoshan-register
fix/optimization
快速创建分支 并 添加分支描述
文件名 git-co
请将 git-co 文件添加到 $PATH 中;
#!/bin/bash

# git-co - 自定义 Git 插件,用于处理带 -m 参数的 checkout 命令
# 使用方法:git co [checkout 参数] -m [注释内容]

# 初始化变量
note_message=""
checkout_args=()
found_m=false

# 解析命令行参数
for arg in "$@"; do
    if [[ $found_m == true ]]; then
        note_message="$arg"
        found_m=false
    elif [[ $arg == "-m" ]]; then
        found_m=true
    else
        checkout_args+=("$arg")
    fi
done

# 检查是否找到了 -m 参数但没有提供值
if [[ $found_m == true ]]; then
    echo "错误:-m 选项需要一个参数值。" >&2
    exit 1
fi

# 执行 git checkout 命令
git checkout "${checkout_args[@]}"
checkout_status=$?

# 如果 checkout 成功且有注释内容,则添加分支注释
if [[ $checkout_status -eq 0 && -n "$note_message" ]]; then
    # 获取当前分支名
    current_branch=$(git rev-parse --abbrev-ref HEAD)
    if [[ -n "$current_branch" ]]; then
        git branch.add $note_message;
    fi
fi

exit $checkout_status
使用方式
如 git co -b feat/test -m '这是一个分支的描述'