前言
目标:完整了解做项目的思路,接触一些企业级的开发技术,让大家之后都能轻松做出管理系统!
企业做项目的流程
需求分析=>设计(概要设计、详细设计)=>技术选型=>初始化/引入需要的技术=>写Deo=>写代码(实现业务
逻辑)=>测试(单元测试、系统测试)=>代码提交/代码评审=>部署=>发布上线
需求分析
- 登录/注册
- 用户管理(仅管理员可见)对用户的查询或者修改
技术选型
前端:
- 三件套
- vue
- 组件库Ant Design Pro
后端:
- java
- spring(依赖注入框架,帮助你管理Java对象,集成一些其他的内容)
- springmvc(web框架,提供接口访问、restful接口等能力)
- mybatis(Java操作数据库的框架,持久层框架,对jdbc的封装)
- mybatis-.plus(对mybatis的增强,不用写sql也能实现增删改查)
- springboot(快速启动/快速集成项目。不用自己管理spring配置,不用自己整合各种框架)
- junit单元测试库
- mysql数据库
数据库设计
id(主键)bigint

username 昵称  varchar

userAccount 登录账号

avatarUrl 头像 varchar

gender 性别 tinyint

userPassword 密码  varchar

phone 电话 varchar

email 邮箱 varchar

userStatus 用户状态 int  0 - 正常

createTime 创建时间(数据插入时间)datetime

updateTime 更新时间(数据更新时间)datetime

isDelete 是否删除 0 1(逻辑删除)tinyint

userRole 用户角色 0 - 普通用户 1 - 管理员
后端开发
后端初始化
环境准备
- IDEA(尽量2023版本,24及25版本存在不少bug)
- git(版本控制)
- maven
- JDK17
- MySQL8.x版本
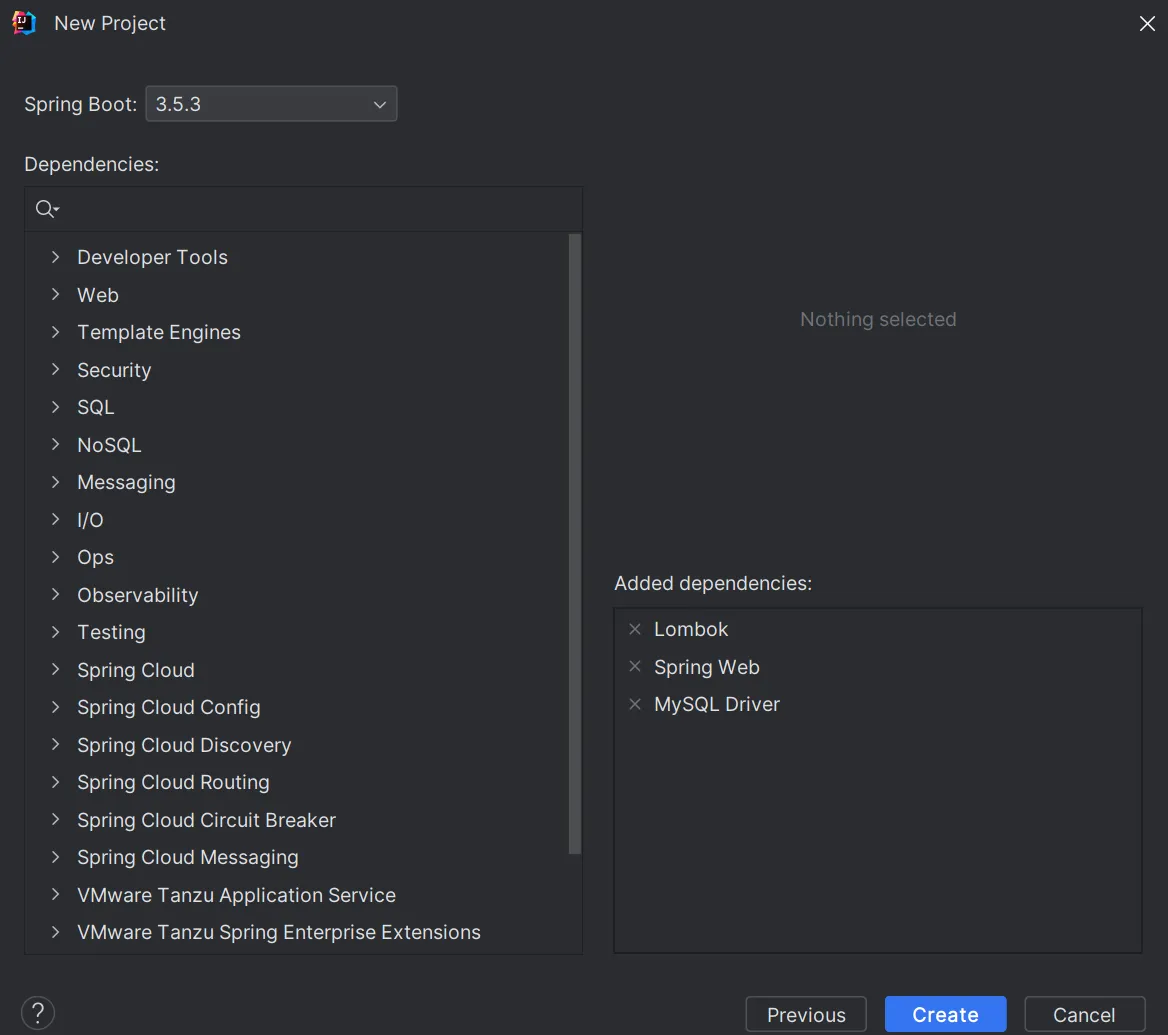
创建项目
- 打开idea,选择spring Initializr脚手架创建项目,版本控制选择maven,jdk选择17,打包选择jar
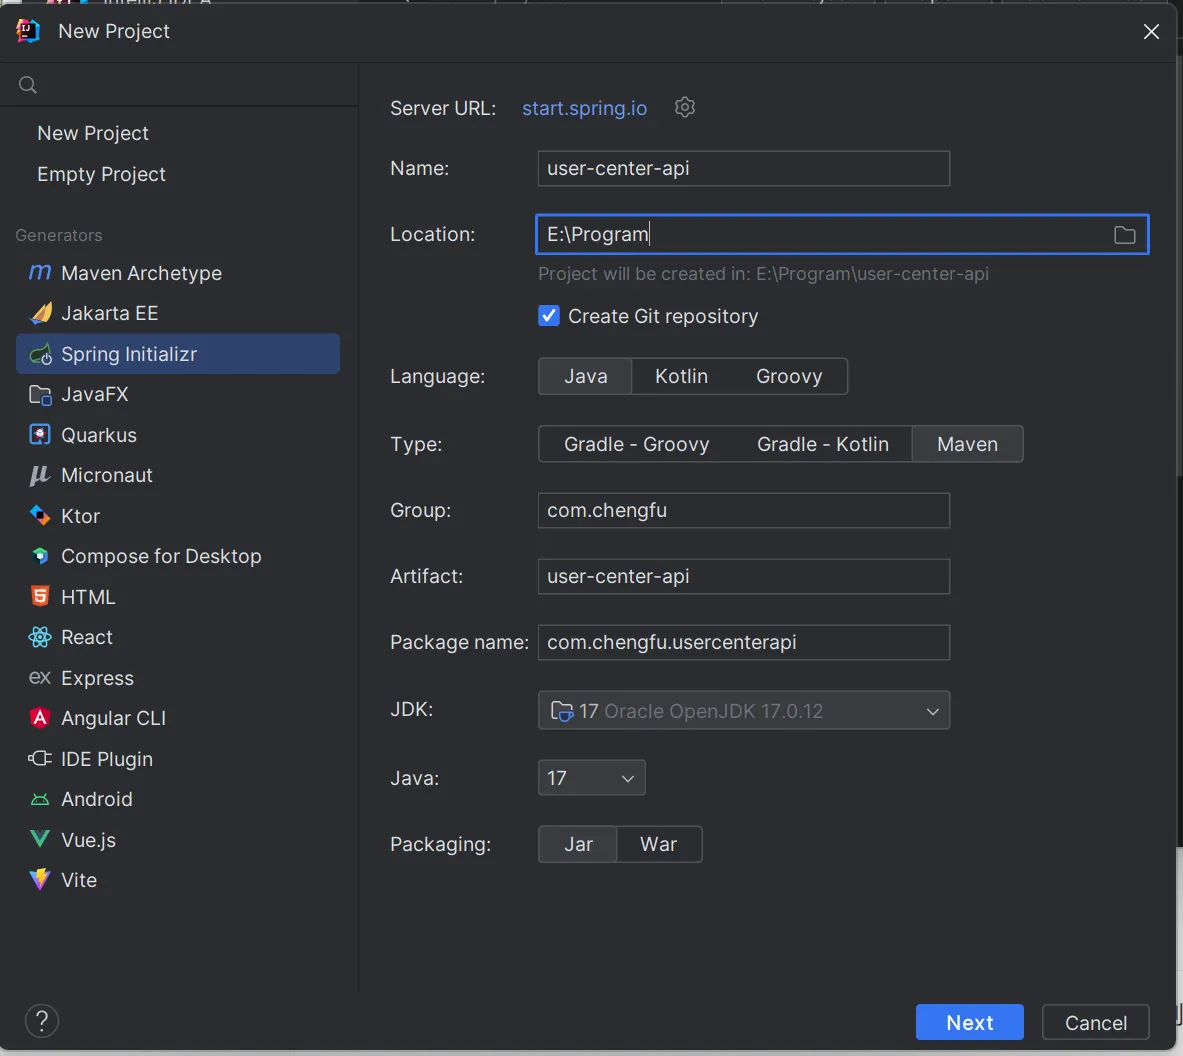
- 依赖选择:Lombok注解,springweb,mysql驱动
- 等待项目初始化完成,在src/main/resources目录下将application文件的后缀名改为yml,本文后所有配置文件都指该文件:

然后将配置改为树状结构:
spring:
  application:
    name: user-center-api
再写上数据库配置xxx为你自己的配置:
spring:
  application:
    name: user-center-api
  datasource:
    driver-class-name: com.mysql.cj.jdbc.Driver
    url: xxx
    username: xxx
    password: xxx
配置后端端口,路径
server:
  port: 8123
  servlet:
    context-path: /api
建表语句
CREATE TABLE `user` (
                        `id` BIGINT NOT NULL AUTO_INCREMENT COMMENT '主键',
                        `username` VARCHAR(255) NOT NULL COMMENT '昵称',
                        `userAccount` VARCHAR(255) NOT NULL COMMENT '登录账号',
                        `avatarUrl` VARCHAR(255) DEFAULT NULL COMMENT '头像',
                        `gender` TINYINT DEFAULT NULL COMMENT '性别',
                        `userPassword` VARCHAR(255) NOT NULL COMMENT '密码',
                        `phone` VARCHAR(20) DEFAULT NULL COMMENT '电话',
                        `email` VARCHAR(100) DEFAULT NULL COMMENT '邮箱',
                        `userStatus` INT NOT NULL DEFAULT 0 COMMENT '用户状态: 0-正常',
                        `createTime` DATETIME NOT NULL DEFAULT CURRENT_TIMESTAMP COMMENT '创建时间',
                        `updateTime` DATETIME NOT NULL DEFAULT CURRENT_TIMESTAMP ON UPDATE CURRENT_TIMESTAMP COMMENT '更新时间',
                        `isDelete` TINYINT NOT NULL DEFAULT 0 COMMENT '是否删除: 0-未删除, 1-已删除',
                        `userRole` TINYINT NOT NULL DEFAULT 0 COMMENT '用户角色: 0-普通用户, 1-管理员',
                        PRIMARY KEY (`id`),
                        UNIQUE KEY `uk_useraccount` (`userAccount`)
) ENGINE=InnoDB DEFAULT CHARSET=utf8mb4 COMMENT='用户表';
打开navicate,连接刚才创建的数据库,发现创建完成:

启动项目,项目征程运行:

- 再pom.xml中手动添加一些依赖:mybatis-plus数据库操作和knif4j接口文档:
Knife4j · 集Swagger2及OpenAPI3为一体的增强解决方案. | Knife4j
这两个依赖可以帮我们极大提高开发效率
pom.xml:
<dependency>
    <groupId>com.baomidou</groupId>
    <artifactId>mybatis-plus-spring-boot3-starter</artifactId>
    <version>3.5.12</version>
</dependency>
<dependency>
    <groupId>com.github.xiaoymin</groupId>
    <artifactId>knife4j-openapi3-jakarta-spring-boot-starter</artifactId>
    <version>4.4.0</version>
</dependency>
然后点击刷新下载依赖:

在配置文件中添加接口文档配置:
# 接口文档配置
knife4j:
  enable: true
  openapi:
    title: "接口文档"
    version: 1.0
    group:
      default:
        api-rule: package
        api-rule-resources:
          - com.chengfu.usercenterapi.controller
接下来进行mubatis-plus配置:
在项目中新建mapper包,后续用于存放操作数据库的Mapper类,然后在项目启动类中添加扫描Mapper的@MapperScan注解:

在配置文件中添加mybatis-plus配置:
mybatis-plus:
  configuration:
    map-underscore-to-camel-case: false
    # 仅在开发环境开启日志
    log-impl: org.apache.ibatis.logging.stdout.StdOutImpl
  global-config:
    db-config:
      logic-delete-field: isDelete # 全局逻辑删除的实体字段名
      logic-delete-value: 1 # 逻辑已删除值(默认为 1)
      logic-not-delete-value: 0 # 逻辑未删除值(默认为 0)
启动项目,在本地浏览器输入http://localhost:8123/api/doc.html进入接口文档:

能正常进入,后端项目初始化完成。
代码开发
基础通用代码
通用基础代码是指:无论在任何后端项目中,都可以复用的代码。这种代码一般”一辈子只用写一次”,了解作用之后复制粘贴即可,无需记忆。
项目目录为:
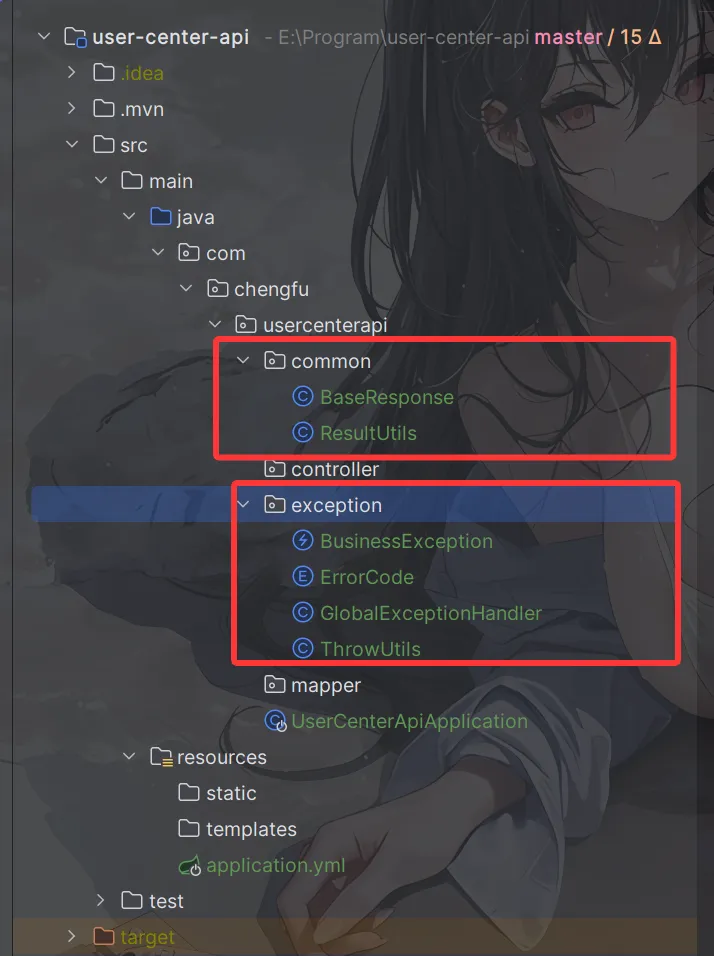
1. 自定义异常
自定义错误码,对错误进行收敛,便于前端统一处理。
这里有2个小技巧:
- 自定义错误码时,建议跟主流的错误码(比如HTTP错误码)的含义保持一致,比如"未登录”定义为40100,和HTTP401错误(用户需要进行身份认证)保持一致,会更容易理解。
- 错误码不要完全连续,预留一些间隔,便于后续扩展。
在exception包下新建错误码枚举类:
@Getter
public enum ErrorCode {

    SUCCESS(0, "ok"),
    PARAMS_ERROR(40000, "请求参数错误"),
    NOT_LOGIN_ERROR(40100, "未登录"),
    NO_AUTH_ERROR(40101, "无权限"),
    NOT_FOUND_ERROR(40400, "请求数据不存在"),
    FORBIDDEN_ERROR(40300, "禁止访问"),
    SYSTEM_ERROR(50000, "系统内部异常"),
    OPERATION_ERROR(50001, "操作失败");

    /**
     * 状态码
     */
    private final int code;

    /**
     * 信息
     */
    private final String message;

    ErrorCode(int code, String message) {
        this.code = code;
        this.message = message;
    }

}
一般不建议直接抛出Java内置的RuntimeException,而是自定义一个业务异常,和内置的异常类区分开,便于定制化输出错误信息:
@Getter
public class BusinessException extends RuntimeException {

    /**
     * 错误码
     */
    private final int code;

    public BusinessException(int code, String message) {
        super(message);
        this.code = code;
    }

    public BusinessException(ErrorCode errorCode) {
        super(errorCode.getMessage());
        this.code = errorCode.getCode();
    }

    public BusinessException(ErrorCode errorCode, String message) {
        super(message);
        this.code = errorCode.getCode();
    }

}
为了更方便地根据情况抛出异常,可以封装一个ThrowUtils,类似断言类,简化抛异常的代码:
public class ThrowUtils {

    /**
     * 条件成立则抛异常
     *
     * @param condition        条件
     * @param runtimeException 异常
     */
    public static void throwIf(boolean condition, RuntimeException runtimeException) {
        if (condition) {
            throw runtimeException;
        }
    }

    /**
     * 条件成立则抛异常
     *
     * @param condition 条件
     * @param errorCode 错误码
     */
    public static void throwIf(boolean condition, ErrorCode errorCode) {
        throwIf(condition, new BusinessException(errorCode));
    }

    /**
     * 条件成立则抛异常
     *
     * @param condition 条件
     * @param errorCode 错误码
     * @param message   错误信息
     */
    public static void throwIf(boolean condition, ErrorCode errorCode, String message) {
        throwIf(condition, new BusinessException(errorCode, message));
    }
}
2. 响应包装类
一般情况下,每个后端接口都要返回调用码、数据、调用信息等,前端可以根据这些信息进行相应的处理
我们可以封装统一的响应结果类,便于前端统一获取这些信息。
通用响应类
@Data
public class BaseResponse<T> implements Serializable {

    private int code;

    private T data;

    private String message;

    public BaseResponse(int code, T data, String message) {
        this.code = code;
        this.data = data;
        this.message = message;
    }

    public BaseResponse(int code, T data) {
        this(code, data, "");
    }

    public BaseResponse(ErrorCode errorCode) {
        this(errorCode.getCode(), null, errorCode.getMessage());
    }
}
但之后每次接口返回值时,都要手动new一个BaseResponse对象并传入参数,比较麻烦,我们可以新建一个工具类,提供成功调用和失败调用的方法,支持灵活地传参,简化调用。
public class ResultUtils {

    /**
     * 成功
     *
     * @param data 数据
     * @param <T>  数据类型
     * @return 响应
     */
    public static <T> BaseResponse<T> success(T data) {
        return new BaseResponse<>(0, data, "ok");
    }

    /**
     * 失败
     *
     * @param errorCode 错误码
     * @return 响应
     */
    public static BaseResponse<?> error(ErrorCode errorCode) {
        return new BaseResponse<>(errorCode);
    }

    /**
     * 失败
     *
     * @param code    错误码
     * @param message 错误信息
     * @return 响应
     */
    public static BaseResponse<?> error(int code, String message) {
        return new BaseResponse<>(code, null, message);
    }

    /**
     * 失败
     *
     * @param errorCode 错误码
     * @return 响应
     */
    public static BaseResponse<?> error(ErrorCode errorCode, String message) {
        return new BaseResponse<>(errorCode.getCode(), null, message);
    }
}
3. 全局异常处理器
为了防止意料之外的异常,利用AOP切面全局对业务异常和RuntimeException进行捕获,首先导入springboot的AOP依赖:
     	<dependency>
            <groupId>org.springframework.boot</groupId>
            <artifactId>spring-boot-starter-aop</artifactId>
        </dependency>
接下来编写全局异常处理器
@RestControllerAdvice
@Slf4j
public class GlobalExceptionHandler {

    @ExceptionHandler(BusinessException.class)
    public BaseResponse<?> businessExceptionHandler(BusinessException e) {
        log.error("BusinessException", e);
        return ResultUtils.error(e.getCode(), e.getMessage());
    }

    @ExceptionHandler(RuntimeException.class)
    public BaseResponse<?> runtimeExceptionHandler(RuntimeException e) {
        log.error("RuntimeException", e);
        return ResultUtils.error(ErrorCode.SYSTEM_ERROR, "系统错误");
    }
}
4. 全局跨域配置
跨域是指浏览器访问的URL(前端地址)和后端接口地址的域名(或端口号)不一致导致的,浏览器为了安全,默认禁用跨域请求访问。
为了开发调试方便,我们可以通过全局跨域配置,让整个项目所有的接口支持跨域,解决跨域报错。
新建config包,用于存放所有的配置相关代码。全局跨域配置代码如下:
@Configuration
public class CorsConfig implements WebMvcConfigurer {

    @Override
    public void addCorsMappings(CorsRegistry registry) {
        // 覆盖所有请求
        registry.addMapping("/**")
                // 允许发送 Cookie
                .allowCredentials(true)
                // 放行哪些域名(必须用 patterns,否则 * 会和 allowCredentials 冲突)
                .allowedOriginPatterns("*")
                .allowedMethods("GET", "POST", "PUT", "DELETE", "OPTIONS")
                .allowedHeaders("*")
                .exposedHeaders("*");
    }
}
编写示例接口
在controller包下新建MainController类,测试一下项目是否正常:
@RestController
@RequestMapping("/")
public class MainController {

    /**
     * 健康检查
     */
    @GetMapping("/health")
    public BaseResponse<String> health() {
        return ResultUtils.success("ok");
    }
}
在浏览器输入localhost:8123/api/health,发现接口返回正常:

输入接口文档地址:

可能会发生的错误
1. 接口文档异常
这是 SpringDoc OpenAPI 2.3.0 与 Spring Framework 6.2.8 之间的 方法签名不兼容 会导致接口文档运行时异常。所以将springBoot版本进行降级:

2. Lombok注解不生效

这是由于初始化项目spring框架为将其指定版本,需要在依赖中更改一些地方:


这样就能正常运行项目。
前端开发
前端初始化
环境准备
nodejs版本>=16
查看我的node版本

创建项目
使用Vue官方推荐的脚手架create–vue快速创建Vue3的项目:快速上手 | Vue.js
Vue提供了在线编码测试,可以通过Playground来学习:https://play.vuejs.org/
在终端输入:
npm create vue
输入项目名称:

接下来按照如下选项创建项目,脚手架会自动帮我们安装Vue Router路由、Pinia全局状态管理等实用类库:

然后用WebStorm打开项目,先在终端执行npm install安装依赖,然后执行npm run dev能访问网页就成功了。

前端工程化配置
脚手架已经帮我们整合了Prettier代码美化、ESLint自动校验、TypeScript类型校验,无需再自行整合。
但是需要在webstorm里开启代码美化插件:

更改格式化代码快捷键:

引入组件库
引入Ant Design Vue组件库,参考官方文档快速上手。Components Overview - Ant Design Vue
代码
npm i --save ant-design-vue@4.x
改变入口文件main.ts
import App from './App.vue'
import router from './router'
import Antd from "ant-design-vue";
import "ant-design-vue/dist/reset.css";

const app = createApp(App)
app.use(Antd);
app.use(createPinia())
app.use(router)

app.mount('#app')
页面基本信息
可以修改项目根目录下的index.html文件,来定义页面的元信息,比如修改标题:
<!DOCTYPE html>
<html lang="">
  <head>
    <meta charset="UTF-8">
    <link rel="icon" href="/favicon.ico">
    <meta name="viewport" content="width=device-width, initial-scale=1.0">
    <title>用户中心</title>
  </head>
  <body>
    <div id="app"></div>
    <script type="module" src="/src/main.ts"></script>
  </body>
</html>

全局通用布局
1. 基础布局结构
在layouts目录下新建-个布局BasicLayout…vue,在App.vue全局页面入口文件中引入。
App.vue
<template>
  <div id="app">
    <BasicLayout />
  </div>
</template>
<script setup lang="ts">
import BasicLayout from '@/layouts/BasicLayout.vue'
</script>
<style scoped>
#app {
}
</style>
BasicLayout.vue
<template>
  <div id="basicLayout"></div>
</template>
<script setup lang="ts"></script>
<style scoped></style>
选用Ant Design组件库的Layout组件,先把【上中下】布局编排好,然后再填充内容:

BasicLayout.vue
<template>
  <div id="basicLayout">
    <a-layout style="min-height: 100vh">
      <a-layout-header>Header</a-layout-header>
      <a-layout-content>Content</a-layout-content>
      <a-layout-footer>Footer</a-layout-footer>
    </a-layout>
  </div>
</template>

<script setup lang="ts"></script>
<style scoped>
#basicLayout {
}
</style>
2. 全局底部栏
通常用于展示版权信息
      <a-layout-footer class="footer">
        <a href="https://github.com/chengfushi" target="_blank"> Github By ChengFu </a>
      </a-layout-footer>
样式
#basicLayout .footer {
  background: #efefef;
  padding: 16px;
  position: fixed;
  bottom: 0;
  left: 0;
  right: 0;
  text-align: center;
}
3. 动态替换内容
项目使用了VueRouter路由库,可以在router/index.ts配置路由,能够根据访问的页面地址找到不同的文件并加载渲染。
修改BasicLayout内容部分的代码如下:
      <a-layout-content>
        <router-view class="content" />
      </a-layout-content>
样式:
<style scoped>
#basicLayout .content {
  background: linear-gradient(to right, #fefefe, #fff);
  margin-bottom: 28px;
  padding: 20px;
}
</style>
4. 全局顶部栏
由于顶部栏的开发相对复杂,可以基于Ant Design的菜单组件来创建GlobalHeader全局顶部栏组件**组件统一放在components 目录中 **。
先直接复制现成的组件示例代码到GlobalHeader中即可。

引入代码
<a-layout-header class="header">
  <GlobalHeader />
</a-layout-header>
样式:
#basicLayout .header {
  padding-inline: 20px;
  margin-bottom: 16px;
  color: unset;
  background: white;
}
效果如下:

接下来要修改GlobalHeader组件,完善更多内容。
1)给菜单外套一层元素,用于整体控制样式:
<div id="globalHeader">
  <a-menu v-model:selectedKeys="current" mode="horizontal" :items="items" />
</div>
2)根据我们的需求修改菜单配置,key为要跳转的URL路径:
import { h, ref } from 'vue'
import { HomeOutlined } from '@ant-design/icons-vue'
import { MenuProps } from 'ant-design-vue'

const current = ref<string[]>(['home'])
const items = ref<MenuProps['items']>([
  {
    key: '/',
    icon: () => h(HomeOutlined),
    label: '主页',
    title: '主页',
  },
  {
    key: 'others',
    label: h('a', { href: 'https://chengfushi.blog.csdn.net/', target: '_blank' }, '个人博客'),
    title: '个人博客',
  },
])

3)完善全局顶部栏,左侧补充网站图标和标题。
先把Iogo.png放到src/assets目录下,替换掉原本的默认Logo:
修改GlobalHeader组件:
<RouterLink to="/">
  <div class="title-bar">
    <img class="logo" src="../assets/logo.png" alt="logo" />
    <div class="title">用户中心</div>
  </div>
</RouterLink>
补充css
<style scoped>
.title-bar {
  display: flex;
  align-items: center;
}

.title {
  color: black;
  font-size: 18px;
  margin-left: 16px;
}

.logo {
  height: 48px;
}
</style>

看着还是巨丑无比
4)完善顶部导航栏,右侧展示当前用户的登录状态(暂时用登录按钮代替):
<div class="user-login-status">
  <a-button type="primary" href="/user/login">登录</a-button>
</div>
5)优化导航栏的布局,采用栅格组件的自适应布局(左中右结构,左侧右侧宽度固定,中间菜单栏自适应)
 <a-row :wrap="false">
      <a-col flex="200px">
        <RouterLink to="/">
          <div class="title-bar">
            <img class="logo" src="../assets/logo.png" alt="logo" />
            <div class="title">用户中心</div>
          </div>
        </RouterLink>
      </a-col>
      <a-col flex="auto">
        <a-menu v-model:selectedKeys="current" mode="horizontal" :items="items" />
      </a-col>
      <a-col flex="120px">
        <div class="user-login-status">
          <a-button type="primary" href="/user/login">登录</a-button>
        </div>
      </a-col>
    </a-row>
现在导航栏就显得好看了

路由
目标:点击菜单项后,可以跳转到对应的页面;并且刷新页面后,对应的菜单自动高亮。
1.修改路由配置
创建一个页面HomePage:
代码:
<template>
  <div id="homePage"></div>
</template>
<script setup lang="ts"></script>
按需修改router/index.ts文件的routes配置,定义我们需要的页面路由,每个path对应一个component(要加载的组件):
const router = createRouter({
  history: createWebHistory(import.meta.env.BASE_URL),
  routes: [
    {
      path:'/',
      name:'home',
      component: HomePage
    }
  ],
})
2. 路由跳转
给GlobalHeader的菜单组件绑定跳转事件:
import { useRouter } from 'vue-router'
const router = useRouter()

// 路由跳转事件
const doMenuClick = ({ key }: { key: string }) => {
  router.push({
    path: key,
  })
}
修改菜单栏:
      <a-col flex="auto">
        <a-menu
          v-model:selectedKeys="current"
          mode="horizontal"
          :items="items"
          @click="doMenuClick"
        />
      </a-col>
3. 高亮同步
刷新页面后,你会发现当前菜单项并没有高亮,所以需要同步路由的更新到菜单项高亮。
同步高亮原理:
- 点击菜单时,Ant Design组件已经通过v-model绑定current变量实现了高亮。
- 刷新页面时,需要获取到当前URL路径,然后修改current变量的值,从而实现同步。
使用Vue Router的afterEach路由钩子实现,每次改变路由或刷新页面时都会自动更新current的值,从而实现高亮:
const router = useRouter();
// 当前选中菜单
const current = ref<string[]>([]);
// 监听路由变化,更新当前选中菜单
router.afterEach((to, from, next) => {
  current.value = [to.path];
});
请求
一般情况下,前端只负责界面展示和动效交互,尽量避免写复杂的逻辑;当需要获取数据时,通常是向后端提供的接口发送请求,由后端执行操作(比如保存数据)并响应数据给前端。
前端如何向后端发送请求呢?最传统的方式是使用A八X技术。但其代码有些复杂,我们可以使用第三方的封装库,来简化发送请求的代码,比如主流的请求工具库AxoS。
1.请求工具库
安装请求工具类Axios.,参考官方文档:Getting Started | Axios Docs
代码
npm install axios
2. 全局自定义请求
需要自定义全局请求地址等,参考Axios官方文档,编写请求配置文件request.ts。
包括全局接口请求地址、超时时间、自定义请求响应拦截器等。
响应拦截器的应用场景:我们需要对接口的通用响应进行统一处理,比如从response中取出data;或者根据code去集中处理错误。这样不用在每个接口请求中都去写相同的逻辑。
比如可以在全局响应拦截器中,读取出结果中的data,并校验code是否合法,如果是未登录状态,则自动登录。
示例代码如下,其中withCredentials:true一定要写,否则无法在发请求时携带Cookie,就无法完成登录。
import axios from 'axios'
import { message } from 'ant-design-vue'

// 创建 Axios 实例
const myAxios = axios.create({
  baseURL: 'http://localhost:8123/api',
  timeout: 60000,
  withCredentials: true,
})

// 全局请求拦截器
myAxios.interceptors.request.use(
  function (config) {
    // Do something before request is sent
    return config
  },
  function (error) {
    // Do something with request error
    return Promise.reject(error)
  },
)

// 全局响应拦截器
myAxios.interceptors.response.use(
  function (response) {
    const { data } = response
    // 未登录
    if (data.code === 40100) {
      // 不是获取用户信息的请求,并且用户目前不是已经在用户登录页面,则跳转到登录页面
      if (
        !response.request.responseURL.includes('user/get/login') &&
        !window.location.pathname.includes('/user/login')
      ) {
        message.warning('请先登录')
        window.location.href = `/user/login?redirect=${window.location.href}`
      }
    }
    return response
  },
  function (error) {
    // Any status codes that falls outside the range of 2xx cause this function to trigger
    // Do something with response error
    return Promise.reject(error)
  },
)

export default myAxios
自动生成请求代码
如果采用传统开发方式,针对每个请求都要单独编写代码,很麻烦。
推荐使用OpenAPI工具,直接自动生成即可:@umijs/openapi - npm
按照官方文档的步骤,先安装:
npm i --save-dev @umijs/openapi
在项目根目录新建openapi.config.js,根据自己的需要定制生成的代码:
import { generateService } from '@umijs/openapi'

generateService({
  requestLibPath: "import request from '@/request'",
  schemaPath: 'http://localhost:8123/api/v3/api-docs',
  serversPath: './src',
})
控制台输入:
node openapi.config.js

成功生成接口函数

这里我们测试一下,找到app.vue界面,输入一下代码:
import { health } from "@/api/mainController.ts";

health().then(res =>{
  console.log(res);
})

成功,前后端能正常交互。
全局状态管理
什么是全局状态管理?
答:所有页面全局共享的变量,而不是局限在某一个页面中。
适合作为全局状态的数据:已登录用户信息(每个页面几乎都要用)
Pinia是一个主流的状态管理库,相比于Vuex来说使用更简单,可参考入门文档进行引入。
1.引入Pinia
此处由于create-vue脚手架已经帮我们整合了Pinia,无需手动引入,直接使用即可。
2.定义状态
在src/stores目录下定义user模块,定义了用户的存储、远程获取、修改逻辑:
import { defineStore } from "pinia";
import { ref } from "vue";

export const useLoginUserStore = defineStore("loginUser", () => {
  const loginUser = ref<any>({
    userName: "未登录",
  });

  async function fetchLoginUser() {
    // todo 由于后端还没提供接口,暂时注释
    // const res = await getCurrentUser();
    // if (res.data.code === 0 && res.data.data) {
    //   loginUser.value = res.data.data;
    // }
  }

  function setLoginUser(newLoginUser: any) {
    loginUser.value = newLoginUser;
  }

  return { loginUser, setLoginUser, fetchLoginUser };
});
3.使用状态
可以直接使用store中导出的状态变量和函数。
在首次进入到页面时,一般我们会尝试获取登录用户信息。修改App.vue,编写远程获取数据代码:
import { useLoginUserStore } from "@/stores/user.ts";
const loginUserStore = useLoginUserStore()
loginUserStore.fetchLoginUser()
在任何页面中都可以使用数据,比如GlobalHeader全局顶部栏组件中直接展示:
修改全局顶部栏组件,在右侧展示登录状态:
<div class="user-login-status">
  <div v-if="loginUserStore.loginUser.id">
    {{ loginUserStore.loginUser.userName ?? '无名' }}
  </div>
  <div v-else>
    <a-button type="primary" href="/user/login">登录</a-button>
  </div>
</div>
4. 模拟登录
在user.ts中编写逻辑,模拟3秒后登录:
async function fetchLoginUser() {
  // 测试用户登录,3 秒后登录
  setTimeout(() => {
    loginUser.value = { userName: '测试用户', id: 1 }
  }, 3000)
}

查看效果,等待3秒后网站右上方会展示出登录用户信息。
至此,前端项目初始化完成
欢迎页面的开发
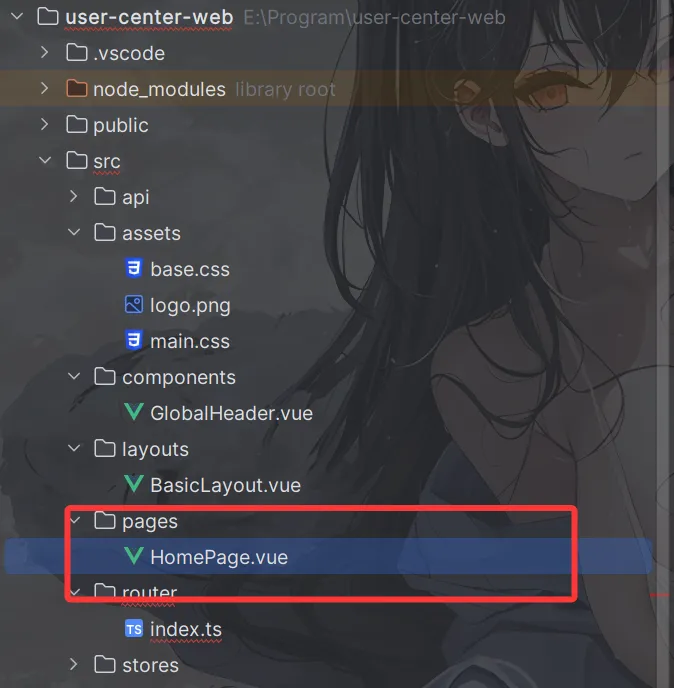
新建src/pages目录,用于存放所有的页面文件。
每次新建页面时,需要在router/index.ts中配置路由,比如欢迎页的路由为:
const router = createRouter({
  history: createWebHistory(import.meta.env.BASE_URL),
  routes: [
    {
      path:'/',
      name:'home',
      component: HomePage
    },
  ],
})
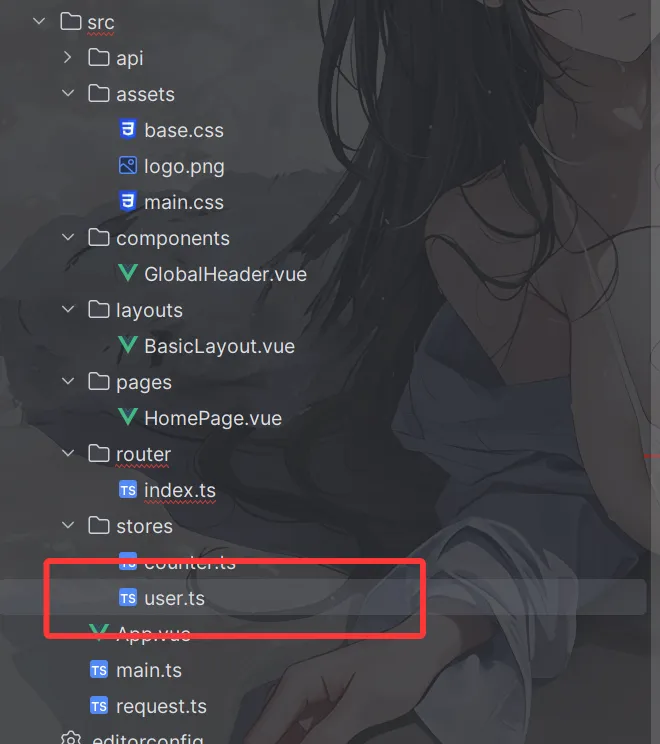
然后在pages目录下新建页面文件,将所有页面按照ul层级进行创建。注意,页面名称尽量做到"见名知意"”。
结构如图,可以先提前建出我们需要的页面文件,也可以随写随建:

在页面中随便写一些代码:
<template>
  <div id="homePage">
    <h1>{{ msg }}</h1>
  </div>
</template>
<script setup lang="ts">
import { ref } from 'vue'

const msg = ref('欢迎来到用户中心项目')
</script>
效果:

用户注册(后端)
逻辑设计
1.用户在前端输入账户和密码、以及校验码(todo)
2.校验用户的账户、密码、校验密码,是否符合要求
i非空
ⅱ.账户长度不小于4位
ⅱ.密码就不小于8位吧
v.账户不能重复
V.账户不包含特殊字符
ⅵ.密码和校验密码相同
3.对密码进行加密(密码千万不要直接以明文存储到数据库中)
4.向数据库插入用户数据
数据模型
- 打开idea插件市场,下载这个插件:

- 选择idea内置数据库建的数据表

- 点击MybatisX-Generator自动生成需要的增删改查的类:


完成后,我们发现一些增删改查的代码已经建好了:
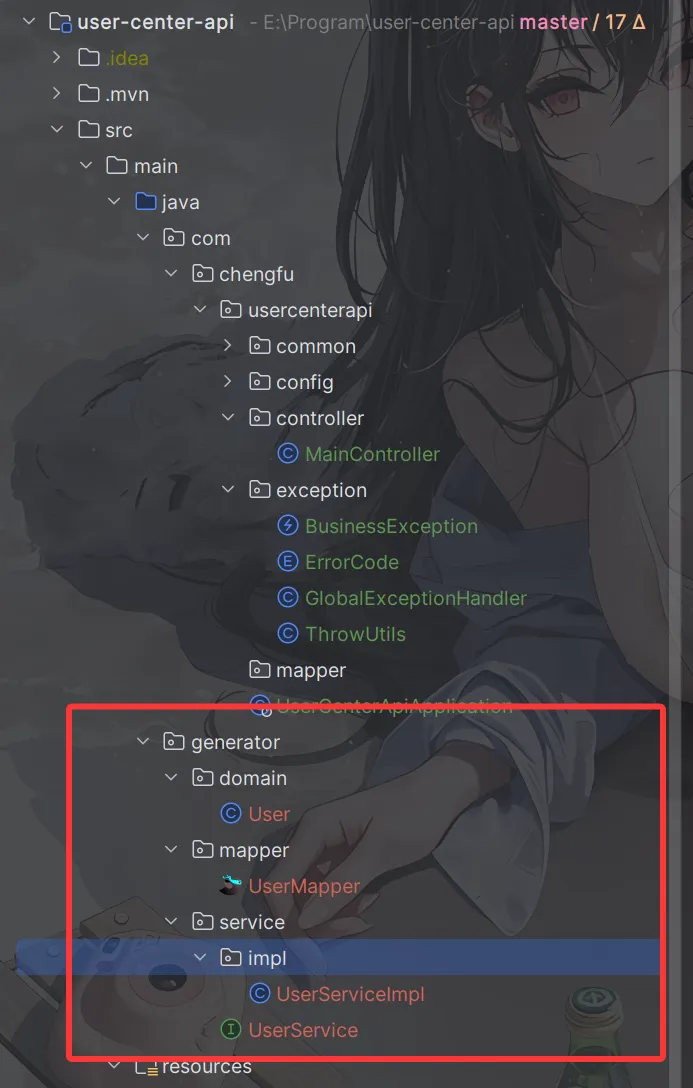
将他们移动一下位置到项目中:
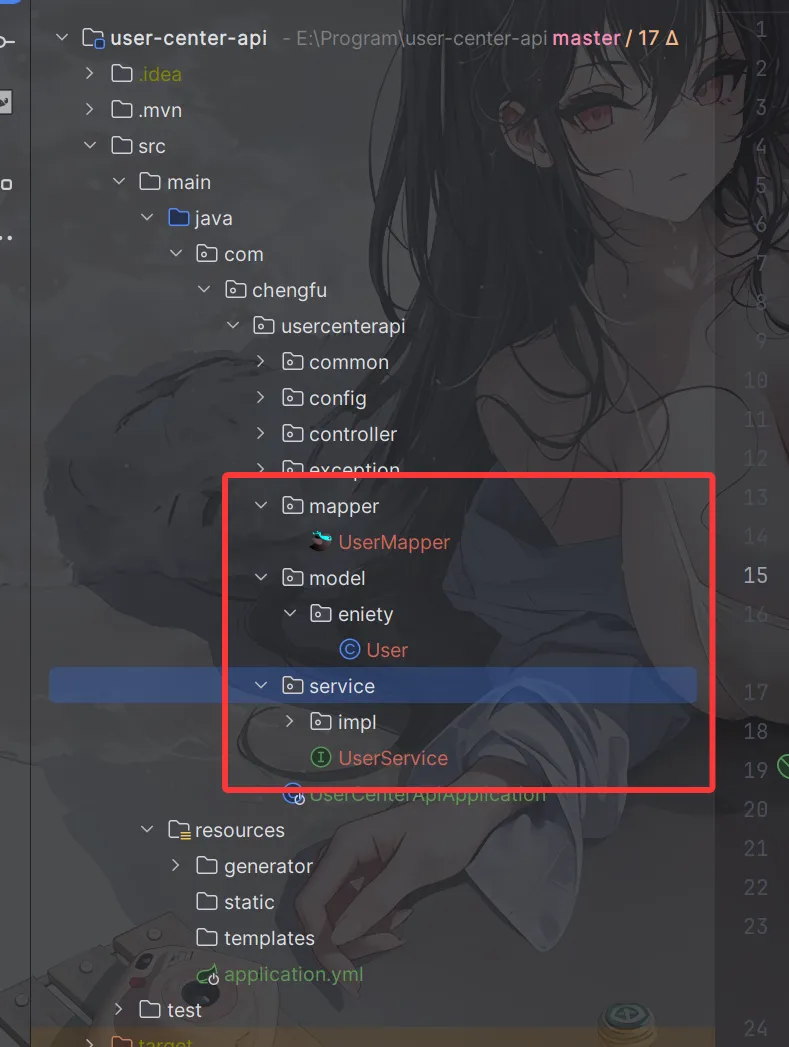
再User类中做一下操作:
修改id自增规则:


再idDelete字段上逻辑删除注解

- 创建UserRegisterRequest.java类,用于用户前端请求到后端:
@Data
public class UserRegisterRequest implements Serializable {
    @Serial
    private static final long serialVersionUID = 1L;
    /**
     * 登录账号
     */
    private String userAccount;

    /**
     * 密码
     */
    private String userPassword;

    /**
     * 验证密码
     */
    private String checkPassword;
}
逻辑开发
1. 创建UserController类
@RestController
@RequestMapping("/user")
public class UserController {

    @Resource
    private UserService userService;

    @PostMapping("/register")
    public BaseResponse<Long> userRegister(@RequestBody  UserRegisterRequest userRegisterRequest){

    }
}
2. 在UserService接口中创建注册方法
public interface UserService extends IService<User> {

    long userRegister(String userAccount, String userPassword, String checkPassword);

}
3.在UserServiceImpl中实现接口的方法
        @Override
        public long userRegister(String userAccount, String userPassword, String checkPassword) {
            // 1. 校验用户的账户、密码、校验密码是否符合要求
            if (StringUtils.isAnyBlank(userAccount, userPassword, checkPassword)) {
                throw new BusinessException(ErrorCode.PARAMS_ERROR,"参数为空");
            }

            if (userAccount.length() < 4) {
                throw new BusinessException(ErrorCode.PARAMS_ERROR,"账户长度不能小于4位");
            }

            if (userPassword.length() < 8) {
                throw new BusinessException(ErrorCode.PARAMS_ERROR,"密码长度不能小于8位");
            }

            if (!userPassword.equals(checkPassword)) {
                throw new IllegalArgumentException("密码和校验密码不一致");
            }

            // 检查账户是否包含特殊字符
            if (!userAccount.matches("^[a-zA-Z0-9_]*$")) {
                throw new BusinessException(ErrorCode.PARAMS_ERROR,"账户不能包含特殊字符");
            }

            // 2. 检查账户是否重复
            User existingUser = this.query().eq("userAccount", userAccount).one();
            if (existingUser != null) {
                throw new BusinessException(ErrorCode.PARAMS_ERROR,"账户已存在");
            }

            // 3. 对密码进行加密
            String encryptedPassword = DigestUtils.md5DigestAsHex(userPassword.getBytes());

            // 4. 向数据库插入用户数据
            User user = new User();
            //为用户名指定一个默认值
            user.setUsername("用户" + userAccount);
            user.setUserAccount(userAccount);
            user.setUserPassword(encryptedPassword);
            this.save(user);

            return user.getId();
        }
4. 在Controller类中完善逻辑
    @PostMapping("/register")
    public BaseResponse<Long> userRegister(@RequestBody UserRegisterRequest userRegisterRequest) {
        // 参数校验
        ThrowUtils.throwIf(userRegisterRequest == null, ErrorCode.PARAMS_ERROR, "参数为空");
        String userAccount = userRegisterRequest.getUserAccount();
        String userPassword = userRegisterRequest.getUserPassword();
        String checkPassword = userRegisterRequest.getCheckPassword();
        Long result = userService.userRegister(userAccount, userPassword, checkPassword);
        return ResultUtils.success(result);
    }
测试
打开接口文档

输入账号密码进行注册

注册成功,查看数据库发现有记录,后端编写完成。

用户注册(前端)
每次后端编写完成,写前端时运行一次openapi.config.js生成接口
node openapi.config.js
我们查看api目录下,发现有我们注册需要调用的一些方法

然后查看typing文件,有我们注册需要传入的数据结构

1. 路由页面创建
- 在router/index.ts中新建注册的路由:
    {
      path:'/user/register',
      name:'register',
      component: UserRegisterPage
    }
- 新建pages/user/UserRegisterPage.vue页面:

- 在GlobalHeader.vue文件的导航栏组件中,添加我们的页面路由
const items = ref<MenuProps['items']>([
  {
    key: '/',
    icon: () => h(HomeOutlined),
    label: '主页',
    title: '主页',
  },
  {
    key:'/user/register',
    label: '用户注册',
    title: '用户注册',
  },
  {
    key: 'others',
    label: h('a', { href: 'https://chengfushi.blog.csdn.net/', target: '_blank' }, '个人博客'),
    title: '个人博客',
  },
])
2. 页面开发
1.定义用户注册的数据结构
const userRegisterFrom = reactive<API.UserRegisterRequest>({
  userAccount: '',
  userPassword: '',
  checkPassword: '',
})
其中reactive是vue的响应式对象,页面任何地方userRegisterFrom属性发生改变这个表单也跟着改变,相当于绑定的作用。
2. 定义表单提交用户注册的逻辑
const router = useRouter()
const handleSubmit = async () => {
  // 可以增加一些前端校验
  if (userRegisterFrom.checkPassword !== userRegisterFrom.userPassword) {
    message.error('二次输入的密码不一致')
    return
  }
  const res = await userRegister(userRegisterFrom)
  // 注册成功,跳转到登录页面
  if (res.data.code === 0 && res.data.data) {
    message.success('注册成功')
    await router.push({
      path: '/user/login',
      replace: true,
    })
  } else {
    message.error('注册失败,' + res.data.message)
  }
}
逐行解析
const router = useRouter()
调用 Vue Router 提供的组合式 API,拿到当前组件可用的路由实例,后面用它做跳转。const handleSubmit = async () => { ... }
定义一个异步方法,绑定到注册按钮的点击事件上。if (userRegisterFrom.checkPassword !== userRegisterFrom.userPassword) { message.error('二次输入的密码不一致') return }- 纯粹的前端校验:两次密码是否一致。
- 不一致就弹出错误提示,并提前 return,不再往下执行网络请求。
const res = await userRegister(userRegisterFrom)userRegister是我们openapi.config.js生成的 POST 请求函数,典型实现:
if (res.data.code === 0 && res.data.data) {
  message.success('注册成功')
  await router.push({
    path: '/user/login',
    replace: true,
  })
}
code === 0表示业务成功(由后端约定)。
3. 页面编写
我们找到antdesign表单组件:

直接复制下来,稍作修改
<template>
  <div id="userRegisterPage">
    <h2 class="title">用户注册</h2>
    <a-form
      style="max-width: 480px; margin: 0 auto"
      label-align="left"
      :label-col="{ span: 4 }"
      :wrapper-col="{ span: 20 }"
      :model="userRegisterFrom"
      @finish="handleSubmit"
    >
      <a-form-item
        name="userAccount"
        label="账号"
        :rules="[{ required: true, message: '请输入账号' }]"
      >
        <a-input v-model:value="userRegisterFrom.userAccount" placeholder="请输入账号" />
      </a-form-item>
      <a-form-item
        name="userPassword"
        label="密码"
        :rules="[
          { required: true, message: '请输入密码' },
          { min: 8, message: '密码不少于 8 位' },
        ]"
      >
        <a-input-password v-model:value="userRegisterFrom.userPassword" placeholder="请输入密码" />
      </a-form-item>
      <a-form-item
        name="checkPassword"
        label="确认密码"
        :rules="[
          { required: true, message: '请输入确认密码' },
          { min: 8, message: '确认密码不少于 8 位' },
        ]"
      >
        <a-input-password v-model:value="userRegisterFrom.checkPassword" placeholder="请输入密码" />
      </a-form-item>

      <a-form-item :wrapper-col="{ offset: 4, span: 20 }">
        <a-button type="primary" html-type="submit">注册</a-button>
      </a-form-item>
    </a-form>
  </div>
</template>
其中
<a-form
      style="max-width: 480px; margin: 0 auto"
      label-align="left"
      :label-col="{ span: 4 }"
      :wrapper-col="{ span: 20 }"
      :model="userRegisterFrom"
      @finish="handleSubmit"
    >
userRegisterFrom是注册表单的数据结构,handleSubmit是输入完成点击注册按钮触发的函数
测试


注册成功
用户登录(后端)
逻辑设计
1.校验用户账户和密码是否合法
2.非空
3.账户长度不小于4位
4.密码就不小于8位
5.账户不包含特殊字符
6.校验密码是否输入正确,要和数据库中的密文密码去对比
7.用户信息脱敏,隐藏敏感信息,防止数据库中的字段泄露
8.我们要记录用户的登录态(session).,将其存到服务器上(用后端SpringBoot框架封装的服务器tomcat去记录)
9.返回脱敏后的用户信息
数据模型
- 用户登录请求类UserLoginRequest.java
@Data
public class UserLoginRequest implements Serializable {
    @Serial
    private static final long serialVersionUID = 3191241716373120793L;
    private String userAccount;
    private String userPassword;
}
- 在model/dto下创建UserDTO.java类用于返回用户脱敏后的信息
@Data
public class UserDTO implements Serializable {
    @Serial
    private static final long serialVersionUID = 1L;

    private Long id;

    /**
     * 昵称
     */
    private String username;

    /**
     * 头像
     */
    private String avatarUrl;

    /**
     * 性别
     */
    private Integer gender;

    /**
     * 电话
     */
    private String phone;

    /**
     * 邮箱
     */
    private String email;

    /**
     * 用户状态: 0-正常
     */
    private Integer userStatus;

    /**
     * 创建时间
     */
    private Date createTime;

    /**
     * 更新时间
     */
    private Date updateTime;

    /**
     * 用户角色: 0-普通用户, 1-管理员
     */
    private Integer userRole;
}
逻辑开发
1. 在Controller类中创建UserLogin方法
@PostMapping("/login")
public BaseResponse<UserDTO> userLogin(@RequestBody UserLoginRequest userLoginRequest){

}
2. 在Service接口中创建登录方法
User userLogin(String userAccount, String userPassword, HttpServletRequest request);
3. 在UserServiceImpl中实现接口的方法
@Override
public User userLogin(String userAccount, String userPassword) {
    // 1. 校验用户的账户、密码
    ThrowUtils.throwIf(StringUtils.isAnyBlank(userAccount, userPassword), ErrorCode.PARAMS_ERROR, "参数为空");
    // 检查账户是否包含特殊字符
    ThrowUtils.throwIf(!userAccount.matches("^[a-zA-Z0-9_]*$"), ErrorCode.PARAMS_ERROR, "账户不能包含特殊字符");

    // 2. 对密码进行加密
    String encryptedPassword = DigestUtils.md5DigestAsHex(userPassword.getBytes());

    //3. 查询用户
    User user = this.query().eq("userAccount", userAccount).eq("userPassword", encryptedPassword).one();
    ThrowUtils.throwIf(user == null, ErrorCode.PARAMS_ERROR, "用户不存在或密码错误");
    //将用户放到session中
    request.getSession().setAttribute("user", user);
    return user;

}
4.在Controller类中完善逻辑
@PostMapping("/login")
public BaseResponse<UserDTO> userLogin(@RequestBody UserLoginRequest userLoginRequest, HttpServletRequest request) {
    // 参数校验
    ThrowUtils.throwIf(userLoginRequest == null, ErrorCode.PARAMS_ERROR, "参数为空");
    String userAccount = userLoginRequest.getUserAccount();
    String userPassword = userLoginRequest.getUserPassword();
    User user = userService.userLogin(userAccount,userPassword,request);
    UserDTO userDTO = new UserDTO();
    BeanUtils.copyProperties(user,userDTO);
    return ResultUtils.success(userDTO);
}
测试

用户登录(前端)
老规矩,运行一次openapi.config.js文件
1.路由页面创建
- 在pages/user下创建UserLoginPage.vue页面:
<template>
  <div id="userLoginPage"></div>
</template>
<script setup lang="ts"></script>
- 在router/index.ts中添加登录的路由:
{
  path:'/user/login',
  name:'login',
  component: UserLoginPage
}
- 在GlobalHeader导航栏中添加路由:
{
  key:'/user/login',
  label: '用户登录',
  title: '用户登录',
},

2. 页面开发
我们直接复用用户注册的表单
1. 定义用户登录的数据结构
这里有两个,一个是用户登录,一个是返回的用户脱敏信息
const userLoginForm = reactive<API.UserLoginRequest>({
  userAccount: "",
  userPassword: ""
})
const userDTO = reactive<API.UserDTO>({
  id : '',
  username : '',
  avatarUrl : '',
  gender : '',
  phone: '',
  email: '',
  userStatus : '',
  createTime: '',
  updateTime: '',
  userRole : ''
})
2.定义表单提交用户登录逻辑
const router = useRouter()
const handleSubmit = async () => {
  const res = await userLogin(userLoginForm)
  if (res.data.code === 0){
    message.success('登录成功')
    // 使用 Object.assign 更新对象属性而不是整体赋值
    Object.assign(userDTO, res.data.data);
    await router.push({
      path: '/',
      replace: true,
    })
  }else {
    message.error('登录失败,' + res.data.message)
  }

}
3.页面编写
<template>
  <div id="userLoginPage">
    <h2 class="title">用户登录</h2>
    <a-form
      style="max-width: 480px; margin: 0 auto"
      label-align="left"
      :label-col="{ span: 4 }"
      :wrapper-col="{ span: 20 }"
      :model="userLoginForm"
      @finish="handleSubmit"
    >
      <a-form-item
        name="userAccount"
        label="账号"
        :rules="[{ required: true, message: '请输入账号' }]"
      >
        <a-input v-model:value="userLoginForm.userAccount" placeholder="请输入账号" />
      </a-form-item>
      <a-form-item
        name="userPassword"
        label="密码"
        :rules="[
          { required: true, message: '请输入密码' },
          { min: 8, message: '密码不少于 8 位' },
        ]"
      >
        <a-input-password v-model:value="userLoginForm.userPassword" placeholder="请输入密码" />
      </a-form-item>

      <a-form-item :wrapper-col="{ offset: 4, span: 20 }">
        <a-button type="primary" html-type="submit">登录</a-button>
      </a-form-item>
    </a-form>
  </div>
</template>
测试


获取当前登录用户(前后端)
后端
我们前面用户登录的时候已经将登录的用户放到session中了,这里我们直接拿出来即可:
UserController.java:
    @GetMapping("/current")
    public BaseResponse<UserDTO> getCurrentUser(HttpServletRequest request) {
        Object user = request.getSession().getAttribute("user");

        //如果用户session为空,报出错误
        ThrowUtils.throwIf(user == null, ErrorCode.NOT_LOGIN_ERROR);
        UserDTO userDTO = new UserDTO();
        BeanUtils.copyProperties(user,userDTO);
        return ResultUtils.success(userDTO);
    }
测试:
打开后端接口文档
未登录状态:

已登录状态:


前端
运行一次openapi生成获取登录信息的方法
找到stores/user.ts之前注册的地方补充逻辑:

async function fetchLoginUser() {
  // todo 由于后端还没提供接口,暂时注释
  const res = await getCurrentUser();
  if (res.data.code === 0 && res.data.data) {
    loginUser.value = res.data.data;
  }

}
修改GlobalHeader代码,改为返回类型的值

运行项目,进行登录,发现已经能正常记录用户的登录状态了。

用户管理(后端)
由于crud是最基本的项目,这里我只写一个用户搜索和用户删除
1.数据模型
假定为我们只根据用户名搜索用户、根据ID删除用户,准备两个数据模型
@Data
public class UserSearchRequst implements Serializable {
    @Serial
    private static final long serialVersionUID = -1L;
    private String username;
}
@Data
public class UserDeleteRequest implements Serializable {
    @Serial
    private static final long serialVersionUID = -1L;
    private Long id;
}
2. 控制层方法
@PostMapping("search")
public BaseResponse<List<UserDTO>> searchUser(@RequestBody UserSearchRequst userSearchRequst){
    ThrowUtils.throwIf(userSearchRequst == null, ErrorCode.PARAMS_ERROR,"参数为空");

    QueryWrapper<User> queryWrapper = new QueryWrapper<>();
    if (userSearchRequst.getUsername() != null){
        queryWrapper.like("username",userSearchRequst.getUsername());
    }
    List<User> users = userService.list(queryWrapper);
    List<UserDTO> userDTOList = users.stream().map(user -> {
        UserDTO userDTO = new UserDTO();
        BeanUtils.copyProperties(user,userDTO);
        return userDTO;
    }).toList();

    return ResultUtils.success(userDTOList);
}
该方法实现了根据用户名模糊查询用户信息的功能:
- 参数校验:使用 [ThrowUtils.throwIf](file://E:\Program\user-center-api\src\main\java\com\chengfu\usercenterapi\exception\ThrowUtils.java#L30-L32) 校验请求参数是否为空,若为空则抛出参数错误异常;
- 构建查询条件:创建 [QueryWrapper](file://com\baomidou\mybatisplus\core\conditions\query\QueryWrapper.java#L10-L26),若请求中有用户名则添加模糊匹配条件;
- 执行查询:调用
userService.list(queryWrapper)查询符合条件的用户列表; - 数据转换:将查询到的 [User](file://E:\Program\user-center-api\src\main\java\com\chengfu\usercenterapi\model\eniety\User.java#L12-L81) 实体列表转换为 [UserDTO](file://E:\Program\user-center-api\src\main\java\com\chengfu\usercenterapi\model\dto\UserDTO.java#L16-L67) 数据传输对象列表;
- 返回结果:使用 [ResultUtils.success](file://E:\Program\user-center-api\src\main\java\com\chengfu\usercenterapi\common\ResultUtils.java#L21-L23) 包装结果并返回。
@GetMapping("search")
public BaseResponse<List<UserDTO>> searchUser(@RequestBody UserSearchRequst userSearchRequst){
    ThrowUtils.throwIf(userSearchRequst == null, ErrorCode.PARAMS_ERROR,"参数为空");

    QueryWrapper<User> queryWrapper = new QueryWrapper<>();
    if (userSearchRequst.getUsername() != null){
        queryWrapper.like("username",userSearchRequst.getUsername());
    }
    List<User> users = userService.list(queryWrapper);
    List<UserDTO> userDTOList = users.stream().map(user -> {
        UserDTO userDTO = new UserDTO();
        BeanUtils.copyProperties(user,userDTO);
        return userDTO;
    }).toList();

    return ResultUtils.success(userDTOList);
}
该方法实现了用户删除功能:
- 接收
/user/delete的 POST 请求,参数为 [UserDeleteRequest](file://E:\Program\user-center-api\src\main\java\com\chengfu\usercenterapi\model\request\UserDeleteRequest.java#L15-L20) 类型; - 使用 [ThrowUtils.throwIf](file://E:\Program\user-center-api\src\main\java\com\chengfu\usercenterapi\exception\ThrowUtils.java#L30-L32) 校验参数是否为空,若为空则抛出参数错误异常;
- 调用
userService.removeById删除指定 ID 的用户; - 返回删除结果,封装为
BaseResponse<Boolean>类型,表示操作成功与否。
测试
用户搜索:

用户删除:

用户管理(前端)
运行一次openapi
1. 路由界面创建
在pages/admin下创建UserManagrPage.vue界面:
<template>
  <div id="userManagerPage"></div>
</template>
<script setup lang="ts"></script>
在index.ts创建路由:
{
  path:'/user/admin',
  name:'admin',
  component: UserManagerPage
}
在GlobalHeader更改导航栏
{
  key:'/user/admin',
  label: '用户管理',
  title: '用户管理',
},
2. 数据结构
const searchForm = reactive<API.UserSearchRequst>({
  username: '',
});
const data = ref<API.UserDTO[]>([]);
3. 删除与搜索函数
const searchForm = reactive<API.UserSearchRequst>({
  username: '',
});

const loading = ref(false);
const data = ref<API.UserDTO[]>([]);


const onSearch = () => {
  fetchData(searchForm.username);
};

const doDelete = async (id: number) => {
  const res = await deleteUser({ id });
  if (res.data.code === 0) {
    message.success("删除成功");
    await fetchData(searchForm.username);
  } else {
    message.error("删除失败");
  }
};


const fetchData = async (username: string) => {
  loading.value = true;
  const res = await searchUser({ username });
  loading.value = false;
  if (res.data.data) {
    data.value = res.data.data;
  } else {
    message.error("获取用户列表失败");
  }
};

// 初始加载
fetchData('');
4. 页面开发
搜索栏
<a-input-search
  style="max-width: 320px; margin-bottom: 20px"
  v-model:value="searchForm.username"
  placeholder="输入用户名搜索"
  enter-button
  size="large"
  @search="onSearch"
/>
用户表格
<a-table :columns="columns" :data-source="data" :loading="loading">
  <template #bodyCell="{ column, record }">
    <template v-if="column.dataIndex === 'avatarUrl'">
      <a-image :src="record.avatarUrl" :width="120" />
    </template>
    <template v-else-if="column.dataIndex === 'userRole'">
      <a-tag :color="record.userRole === 0 ? 'blue' : 'red'">
        {{ record.userRole === 0 ? '普通用户' : '管理员' }}
      </a-tag>
    </template>
    <template v-else-if="column.dataIndex === 'gender'">
      <a-tag :color="record.gender === 0 ? 'pink' : 'green'">
        {{ record.gender === 0 ? '女' : '男' }}
      </a-tag>
    </template>
    <template v-else-if="column.dataIndex === 'createTime'">
      {{ dayjs(record.createTime).format("YYYY-MM-DD HH:mm:ss") }}
    </template>
    <template v-else-if="column.dataIndex === 'action'">
      <a-popconfirm
        title="确定删除该用户吗?"
        @confirm="doDelete(record.id)"
      >
        <a-button danger>删除</a-button>
      </a-popconfirm>
    </template>
  </template>
</a-table>
表格数组
const columns = [
  { title: '用户名', dataIndex: 'username' },
  { title: '性别', dataIndex: 'gender' },
  { title: '创建时间', dataIndex: 'createTime' },
  { title: '用户角色', dataIndex: 'userRole' },
  { title: '操作', dataIndex: 'action' },
];
测试

执行搜索:

执行删除:


发现返回正确却未删除:


id最后两位都变成0了。
这是由于前端JS的精度范围有限,我们后端返回的id范围过大,导致前端精度丢失,会影响前端页面获取到的数据结果。
为了解决这个问题,可以在后端config包下新建一个全局JSON配置,将整个后端SpringMVC接口返回值的长整型数字转换为字符串进行返回,从而集中解决问题。
@JsonComponent
public class JsonConfig {

    /**
     * 添加 Long 转 json 精度丢失的配置
     */
    @Bean
    public ObjectMapper jacksonObjectMapper(Jackson2ObjectMapperBuilder builder) {
        ObjectMapper objectMapper = builder.createXmlMapper(false).build();
        SimpleModule module = new SimpleModule();
        module.addSerializer(Long.class, ToStringSerializer.instance);
        module.addSerializer(Long.TYPE, ToStringSerializer.instance);
        objectMapper.registerModule(module);
        return objectMapper;
    }
}
再次删除:

删除成功
{{ record.userRole === 0 ? ‘普通用户’ : ‘管理员’ }}
{{ record.gender === 0 ? ‘女’ : ‘男’ }}
{{ dayjs(record.createTime).format(“YYYY-MM-DD HH:mm:ss”) }}
<a-popconfirm
title=“确定删除该用户吗?”
@confirm=“doDelete(record.id)”
>
删除
表格数组

```ts
const columns = [
  { title: '用户名', dataIndex: 'username' },
  { title: '性别', dataIndex: 'gender' },
  { title: '创建时间', dataIndex: 'createTime' },
  { title: '用户角色', dataIndex: 'userRole' },
  { title: '操作', dataIndex: 'action' },
];
测试
[外链图片转存中…(img-vi27XjDe-1752904189511)]
执行搜索:
[外链图片转存中…(img-XFoq5rq2-1752904189511)]
执行删除:
[外链图片转存中…(img-dyD2ilZz-1752904189511)]
[外链图片转存中…(img-CWHoU2Nc-1752904189511)]
发现返回正确却未删除:
[外链图片转存中…(img-6CRf5lRv-1752904189511)]
[外链图片转存中…(img-mlq7zzlV-1752904189511)]
id最后两位都变成0了。
这是由于前端JS的精度范围有限,我们后端返回的id范围过大,导致前端精度丢失,会影响前端页面获取到的数据结果。
为了解决这个问题,可以在后端config包下新建一个全局JSON配置,将整个后端SpringMVC接口返回值的长整型数字转换为字符串进行返回,从而集中解决问题。
@JsonComponent
public class JsonConfig {

    /**
     * 添加 Long 转 json 精度丢失的配置
     */
    @Bean
    public ObjectMapper jacksonObjectMapper(Jackson2ObjectMapperBuilder builder) {
        ObjectMapper objectMapper = builder.createXmlMapper(false).build();
        SimpleModule module = new SimpleModule();
        module.addSerializer(Long.class, ToStringSerializer.instance);
        module.addSerializer(Long.TYPE, ToStringSerializer.instance);
        objectMapper.registerModule(module);
        return objectMapper;
    }
}
再次删除:
[外链图片转存中…(img-dKJl47oD-1752904189511)]
删除成功