前言:在构建任何一个涉及多用户的系统时,无论是精巧的工具还是庞大的平台,有一个模块总是最先被设计、最先被开发、也最先被集成的,它就是用户模块。 所以这篇文章也是智能协同云图库后端开始的第一个模块,接下来我们来聊聊常见的用户模块的功能及对应的代码,希望可以帮到大家😘


摘要
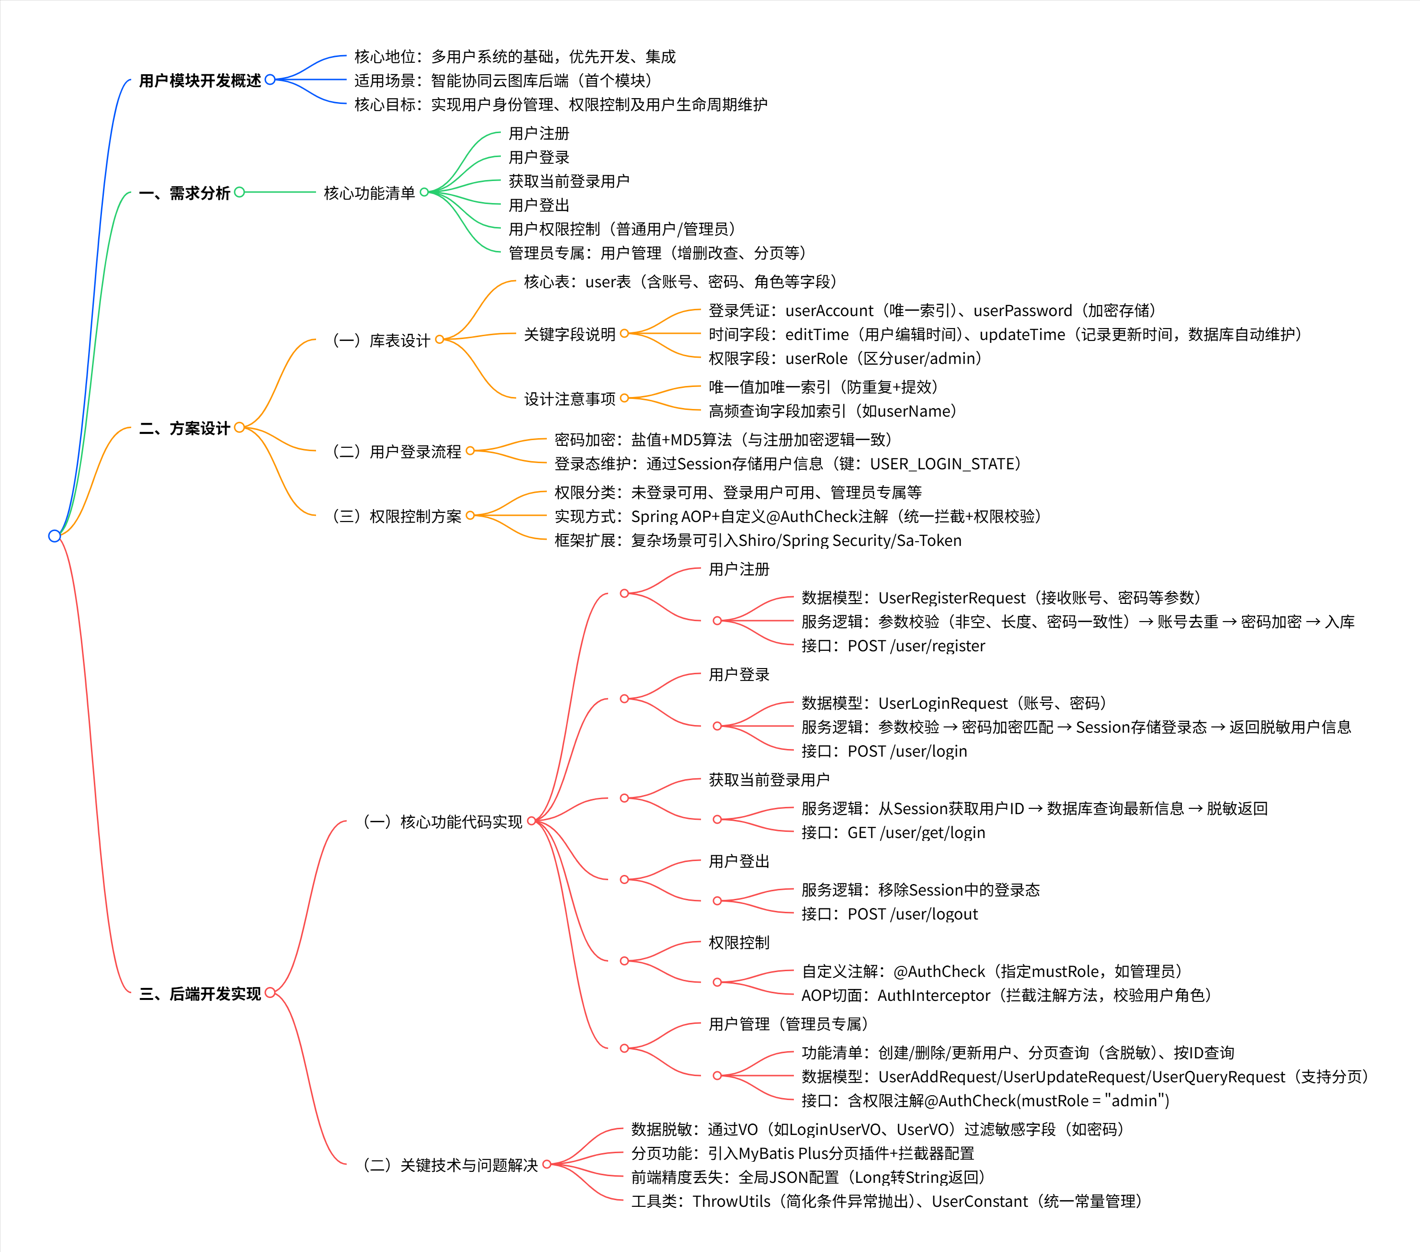
本文详解智能协同云图库后端用户模块的开发,该模块为多用户系统基础,需优先开发,包含注册、登录、获取当前用户、登出、权限控制及管理员用户管理功能。文章从需求分析、方案设计(库表、登录流程、权限控制)到代码实现(服务、接口开发)展开,重点介绍 Spring AOP + 自定义注解实现权限控制、数据脱敏、分页处理等技术,解决前端精度丢失问题,提供可复用方案。
文章超详细思维导图
接下来就是本节的具体实现内容
一、需求分析
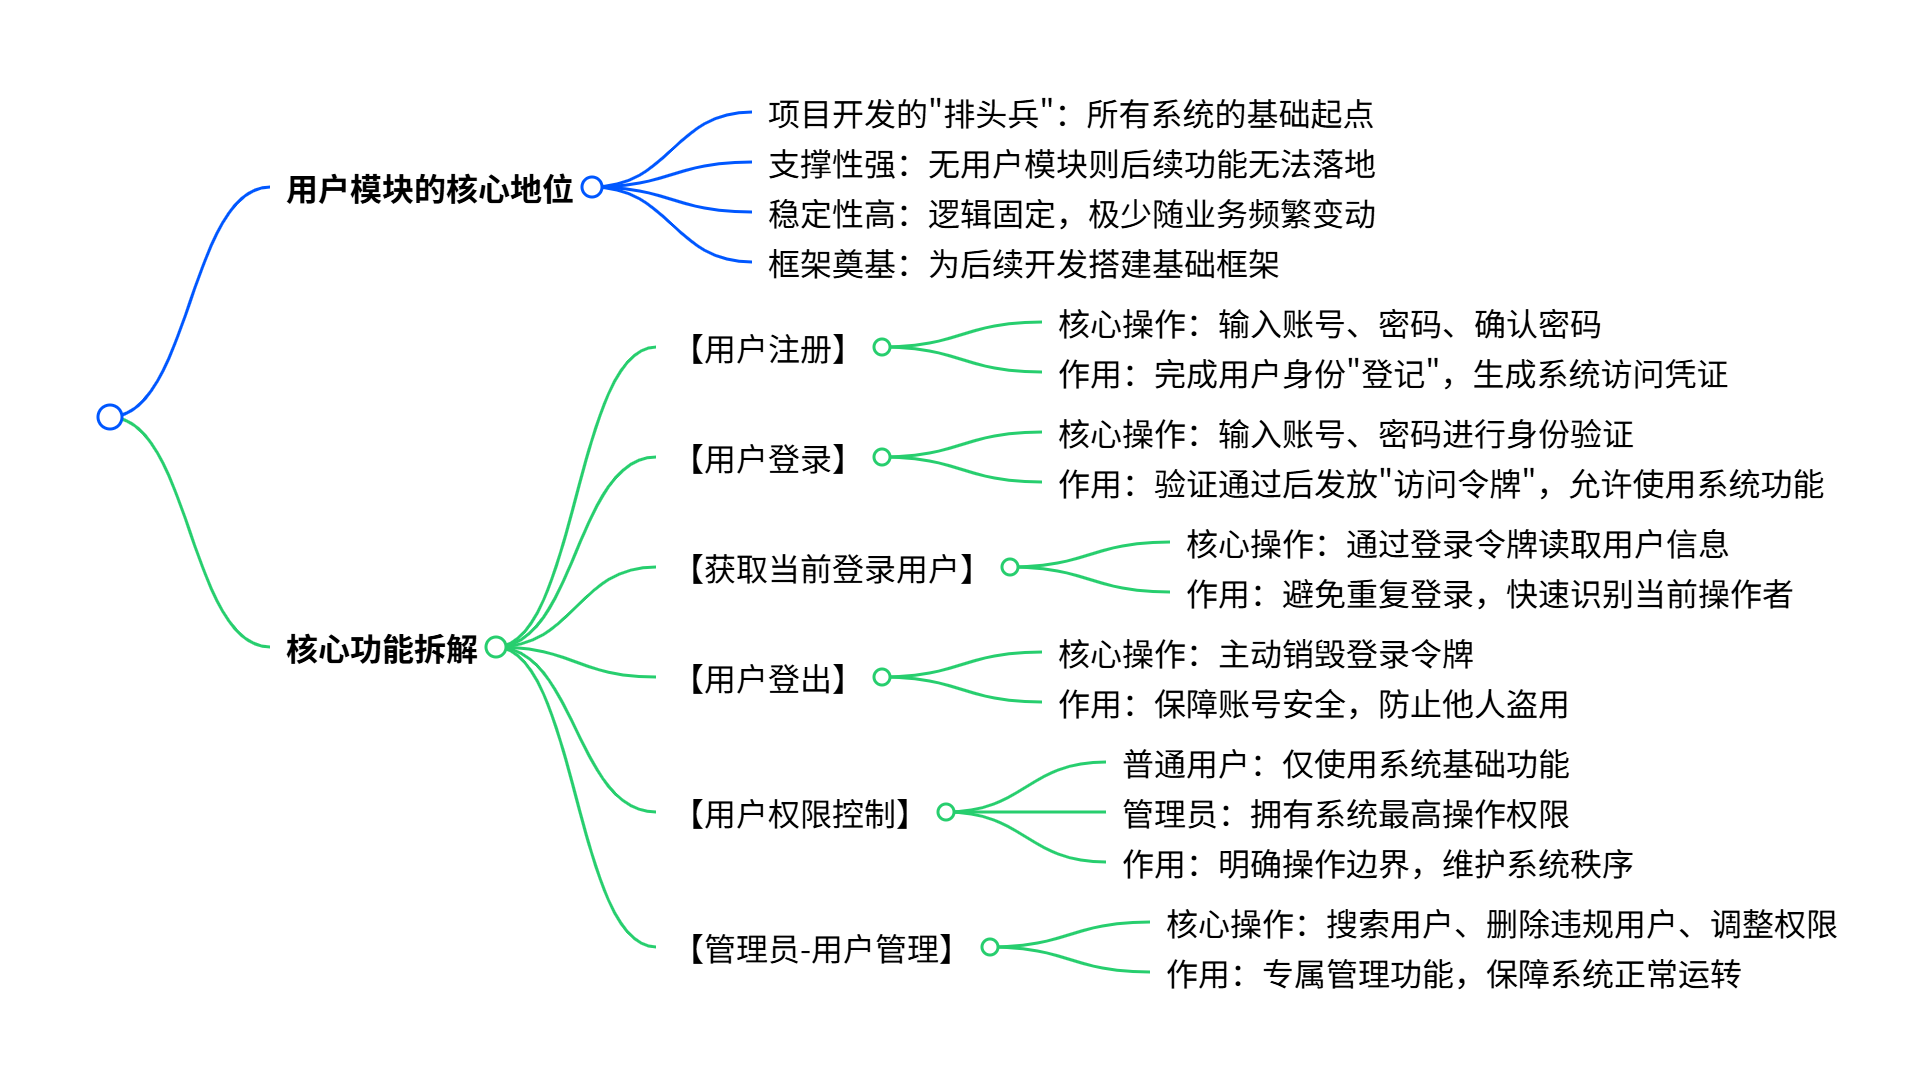
对于用户模块,通常要具有下列功能:
二、方案设计
(一)库表设计🔍
实现用户模块的难度不大,在方案设计阶段,我们需要确认以下内容:
- 库表设计
- 用户登录流程
- 如何对用户权限进行控制
核心设计
用户表的核心是用户登录凭证(账号密码)和个人信息,SQL 如下:
-- 用户表
create table if not exists user
(
    id           bigint auto_increment comment 'id' primary key,
    userAccount  varchar(256)                           not null comment '账号',
    userPassword varchar(512)                           not null comment '密码',
    userName     varchar(256)                           null comment '用户昵称',
    userAvatar   varchar(1024)                          null comment '用户头像',
    userProfile  varchar(512)                           null comment '用户简介',
    userRole     varchar(256) default 'user'            not null comment '用户角色:user/admin',
    editTime     datetime     default CURRENT_TIMESTAMP not null comment '编辑时间',
    createTime   datetime     default CURRENT_TIMESTAMP not null comment '创建时间',
    updateTime   datetime     default CURRENT_TIMESTAMP not null on update CURRENT_TIMESTAMP comment '更新时间',
    isDelete     tinyint      default 0                 not null comment '是否删除',
    UNIQUE KEY uk_userAccount (userAccount),
    INDEX idx_userName (userName)
) comment '用户' collate = utf8mb4_unicode_ci;
✅几个注意事项:
1)editTime 和 updateTime 的区别:editTime 表示用户编辑个人信息的时间(需要业务代码来更新),而 updateTime 表示这条用户记录任何字段发生修改的时间(由数据库自动更新)。
2)给唯一值添加唯一键(唯一索引),比如账号 userAccount,利用数据库天然防重复,同时可以增加查询效率。
3)给经常用于查询的字段添加索引,比如用户昵称 userName,可以增加查询效率。
💡 建议养成好习惯,将库表设计 SQL 保存到项目的目录中,比如新建
sql/create_table.sql文件,这样其他开发者就能更快地了解项目。
用户登录流程
对用户权限控制
可以将接口分为 4 种权限:
- 未登录也可以使用
- 登录用户才能使用
- 未登录也可以使用,登录能进行更多操作
- 仅管理员才能使用
传统的权限控制方法是,在每个接口内单独编写逻辑:先获取到当前登录用户信息,然后判断用户的权限是否符合要求。
这种方法最灵活,但是会写很多重复的代码,而且其他开发者无法一眼得知接口所需要的权限。
权限校验其实是一个比较通用的业务需求,一般会通过 Spring AOP 切面 + 自定义权限校验注解 实现统一的接口拦截和权限校验;如果有特殊的权限校验逻辑,再单独在接口中编码。
💡 如果需要更复杂更灵活的权限控制,可以引入 Shiro / Spring Security / Sa-Token 等专门的权限管理框架。
三、后端开发
用户注册
1、数据模型
在 model.dto.user 下新建用于接受请求参数的类:
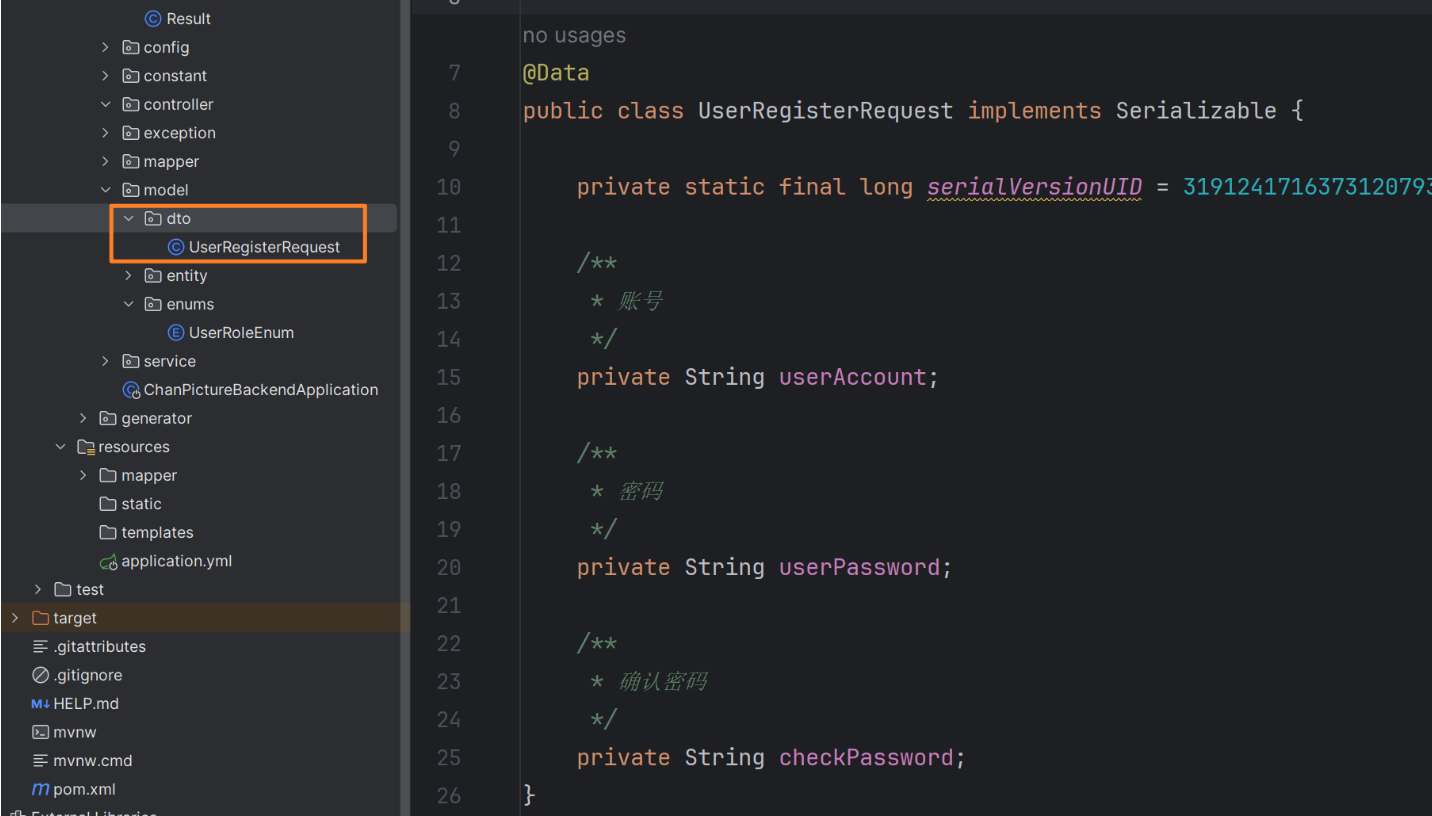
@Data
public class UserRegisterRequest implements Serializable {
private static final long serialVersionUID = 3191241716373120793L;
/**
* 账号
*/
private String userAccount;
/**
* 密码
*/
private String userPassword;
/**
* 确认密码
*/
private String checkPassword;
}💡 在 Java 接口开发中,为每个接口定义一个专门的类来接收请求参数,可以提高代码的可读性和维护性,便于对参数进行统一验证和扩展,同时减少接口方法参数过多导致的复杂性,有助于在复杂场景下更清晰地管理和传递数据
2、服务开发
在 service 包的 UserService 中增加方法声明:
   /**
     *
     * @param userAccount
     * @param userPassword
     * @param checkPassword
     * @return
     */
    long userRegister(String userAccount,String userPassword,String checkPassword);


    /**
     * 获取加密后的密码
     *
     * @param userPassword 原始密码
     * @return 加密后的密码
     */
    String getEncryptPassword(String userPassword);
提前写好密码加密的方法
 @Override
    public String getEncryptPassword(String userPassword) {
        // 盐值,混淆密码
        final String SALT = "guochang";
        return DigestUtils.md5DigestAsHex((SALT + userPassword).getBytes());
    }
在 UserServiceImpl 中增加实现代码,注意多补充一些校验条件:
@Override
public long userRegister(String userAccount, String userPassword, String checkPassword) {
    // 1. 校验
    if (StrUtil.hasBlank(userAccount, userPassword, checkPassword)) {
        throw new BusinessException(ErrorCode.PARAMS_ERROR, "参数为空");
    }
    if (userAccount.length() < 4) {
        throw new BusinessException(ErrorCode.PARAMS_ERROR, "用户账号过短");
    }
    if (userPassword.length() < 8 || checkPassword.length() < 8) {
        throw new BusinessException(ErrorCode.PARAMS_ERROR, "用户密码过短");
    }
    if (!userPassword.equals(checkPassword)) {
        throw new BusinessException(ErrorCode.PARAMS_ERROR, "两次输入的密码不一致");
    }
    // 2. 检查是否重复
    QueryWrapper<User> queryWrapper = new QueryWrapper<>();
    queryWrapper.eq("userAccount", userAccount);
    long count = this.baseMapper.selectCount(queryWrapper);
    if (count > 0) {
        throw new BusinessException(ErrorCode.PARAMS_ERROR, "账号重复");
    }
    // 3. 加密
    String encryptPassword = getEncryptPassword(userPassword);
    // 4. 插入数据
    User user = new User();
    user.setUserAccount(userAccount);
    user.setUserPassword(encryptPassword);
    user.setUserName("无名");
    user.setUserRole(UserRoleEnum.USER.getValue());
    boolean saveResult = this.save(user);
    if (!saveResult) {
        throw new BusinessException(ErrorCode.SYSTEM_ERROR, "注册失败,数据库错误");
    }
    return user.getId();
}
这个地方也可以使用自定义的ThrowUtils简化校验过程哦
自定义异常类ThrowUtils
public class ThrowUtils {

    /**
     * 条件成立则抛异常
     *
     * @param condition
     * @param runtimeException
     */
    public static void throwIf(boolean condition, RuntimeException runtimeException) {
        if (condition) {
            throw runtimeException;
        }
    }

    /**
     * 条件成立则抛异常
     *
     * @param condition
     * @param errorCode
     */
    public static void throwIf(boolean condition, ErrorCode errorCode) {
        throwIf(condition, new BusinessException(errorCode));
    }

    /**
     * 条件成立则抛异常
     *
     * @param condition
     * @param errorCode
     * @param message
     */
    public static void throwIf(boolean condition, ErrorCode errorCode, String message) {
        throwIf(condition, new BusinessException(errorCode, message));
    }
}这个时候就可以用这一行代替注释的内容🌟
ThrowUtils.throwIf(userAccount.length() < 4,ErrorCode.PARAMS_ERROR, "参数为空");

/*if (StrUtil.hasBlank(userAccount, userPassword, checkPassword)) {
        throw new BusinessException(ErrorCode.PARAMS_ERROR, "参数为空");
    }*/
3、接口开发
在 controller 包中新建 UserController,新增用户注册接口:
@RestController
@RequestMapping("/user")
public class UserController {

    @Resource
    private UserService userService;

    /**
     * 用户注册
     */
    @PostMapping("/register")
    public BaseResponse<Long> userRegister(@RequestBody UserRegisterRequest userRegisterRequest) {
        ThrowUtils.throwIf(userRegisterRequest == null, ErrorCode.PARAMS_ERROR);
        String userAccount = userRegisterRequest.getUserAccount();
        String userPassword = userRegisterRequest.getUserPassword();
        String checkPassword = userRegisterRequest.getCheckPassword();
        long result = userService.userRegister(userAccount, userPassword, checkPassword);
        return ResultUtils.success(result);
    }
}
这样就形成了完整的用户注册的三层架构
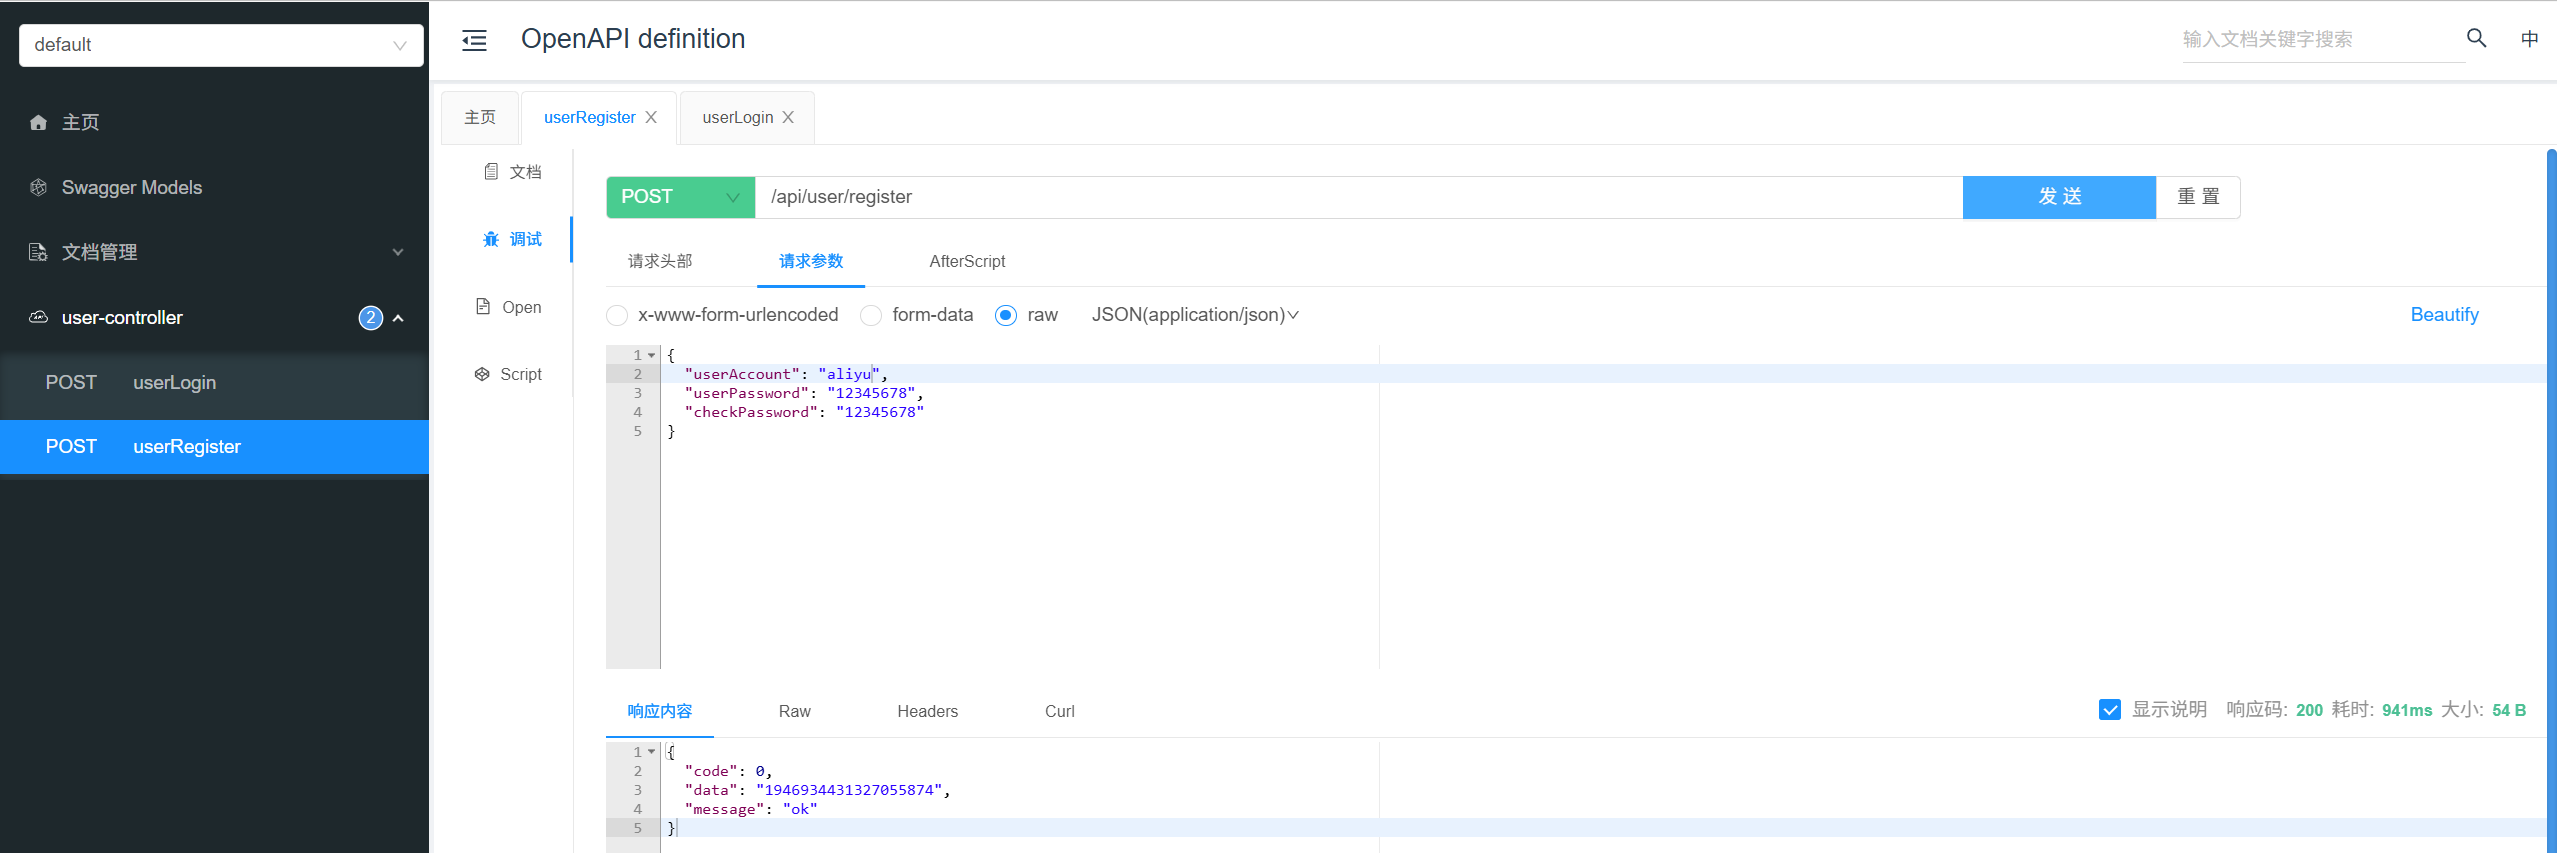
4、测试
每开发完一个接口,都可以使用 Swagger 接口文档来测试:
用户登录
1、数据模型
在 model.dto.user 下新建用于接受请求参数的类:
@Data
public class UserLoginRequest implements Serializable {

    private static final long serialVersionUID = 3191241716373120793L;

    /**
     * 账号
     */
    private String userAccount;

    /**
     * 密码
     */
    private String userPassword;
}
2、服务开发
在 service 包的 UserService 中增加方法声明:
/**
 * 用户登录
 *
 * @param userAccount  用户账户
 * @param userPassword 用户密码
 * @param request
 * @return 脱敏后的用户信息
 */
LoginUserVO userLogin(String userAccount, String userPassword, HttpServletRequest request);
在 UserServiceImpl 中增加实现代码,注意多补充一些校验条件,在用户登录成功后,将用户信息存储在当前的 Session 中。代码如下:
@Override
public LoginUserVO userLogin(String userAccount, String userPassword, HttpServletRequest request) {
    // 1. 校验
    if (StrUtil.hasBlank(userAccount, userPassword)) {
        throw new BusinessException(ErrorCode.PARAMS_ERROR, "参数为空");
    }
    if (userAccount.length() < 4) {
        throw new BusinessException(ErrorCode.PARAMS_ERROR, "账号错误");
    }
    if (userPassword.length() < 8) {
        throw new BusinessException(ErrorCode.PARAMS_ERROR, "密码错误");
    }
    // 2. 加密
    String encryptPassword = getEncryptPassword(userPassword);
    // 查询用户是否存在
    QueryWrapper<User> queryWrapper = new QueryWrapper<>();
    queryWrapper.eq("userAccount", userAccount);
    queryWrapper.eq("userPassword", encryptPassword);
    User user = this.baseMapper.selectOne(queryWrapper);
    // 用户不存在
    if (user == null) {
        log.info("user login failed, userAccount cannot match userPassword");
        throw new BusinessException(ErrorCode.PARAMS_ERROR, "用户不存在或密码错误");
    }
    // 3. 记录用户的登录态
    request.getSession().setAttribute(USER_LOGIN_STATE, user);
    return this.getLoginUserVO(user);
}
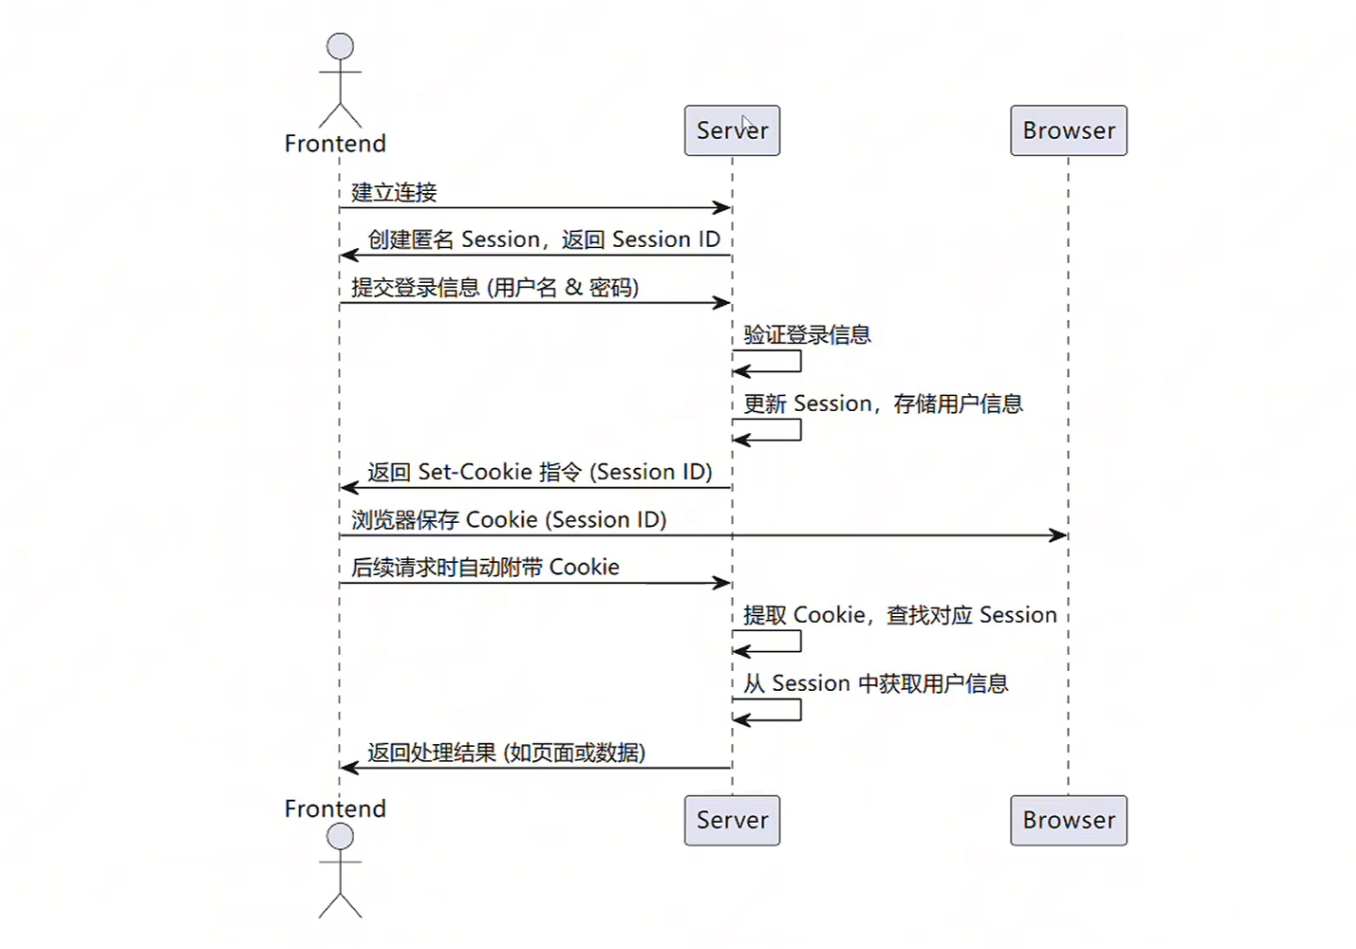
注意,由于注册用户时存入数据库的密码是加密后的,查询用户信息时,也要对用户输入的密码进行同样算法的加密,才能跟数据库的信息对应上。
可以把上述的 Session 理解为一个 Map,可以给 Map 设置 key 和 value,每个不同的 SessionID 对应的 Session 存储都是不同的,不用担心会污染。所以上述代码中,给 Session 设置了固定的 key(USER_LOGIN_STATE),可以将这个 key 值提取为常量,便于后续获取。
在 constant 包下新建 UserConstant 类,统一声明用户相关的常量:
public interface UserConstant {

    /**
     * 用户登录态键
     */
    String USER_LOGIN_STATE = "user_login";

    //  region 权限

    /**
     * 默认角色
     */
    String DEFAULT_ROLE = "user";

    /**
     * 管理员角色
     */
    String ADMIN_ROLE = "admin";

    // endregion
}
3、接口开发
在 UserController 中新增用户登录接口:
@PostMapping("/login")
public BaseResponse<LoginUserVO> userLogin(@RequestBody UserLoginRequest userLoginRequest, HttpServletRequest request) {
    ThrowUtils.throwIf(userLoginRequest == null, ErrorCode.PARAMS_ERROR);
    String userAccount = userLoginRequest.getUserAccount();
    String userPassword = userLoginRequest.getUserPassword();
    LoginUserVO loginUserVO = userService.userLogin(userAccount, userPassword, request);
    return ResultUtils.success(loginUserVO);
}
获取当前登录用户
可以从 request 请求对象对应的 Session 中直接获取到之前保存的登录用户信息,无需其他请求参数。
1、服务开发
在 service 包的 UserService 中增加方法声明:
/**
 * 获取当前登录用户
 *
 * @param request
 * @return
 */
User getLoginUser(HttpServletRequest request);
在 UserServiceImpl 中增加实现代码,此处为了保证获取到的数据始终是最新的,先从 Session 中获取登录用户的 id,然后从数据库中查询最新的结果。代码如下:
@Override
public User getLoginUser(HttpServletRequest request) {
    // 先判断是否已登录
    Object userObj = request.getSession().getAttribute(USER_LOGIN_STATE);
    User currentUser = (User) userObj;
    if (currentUser == null || currentUser.getId() == null) {
        throw new BusinessException(ErrorCode.NOT_LOGIN_ERROR);
    }
    // 从数据库查询(追求性能的话可以注释,直接返回上述结果)
    long userId = currentUser.getId();
    currentUser = this.getById(userId);
    if (currentUser == null) {
        throw new BusinessException(ErrorCode.NOT_LOGIN_ERROR);
    }
    return currentUser;
}
2、接口开发
在 UserController 中新增获取当前登录用户接口:
@GetMapping("/get/login")
public BaseResponse<LoginUserVO> getLoginUser(HttpServletRequest request) {
    User loginUser = userService.getLoginUser(request);
    return ResultUtils.success(userService.getLoginUserVO(loginUser));
}
注意,上述代码是直接将数据库查到的所有信息都返回给了前端(包括密码),可能存在信息泄露的安全风险。因此,我们还需要对返回结果进行脱敏处理。
3、数据脱敏
在 model.vo 包下新建 LoginUserVO 类,表示脱敏后的登录用户信息:
@Data
public class LoginUserVO implements Serializable {

    /**
     * 用户 id
     */
    private Long id;

    /**
     * 账号
     */
    private String userAccount;

    /**
     * 用户昵称
     */
    private String userName;

    /**
     * 用户头像
     */
    private String userAvatar;

    /**
     * 用户简介
     */
    private String userProfile;

    /**
     * 用户角色:user/admin
     */
    private String userRole;

    /**
     * 创建时间
     */
    private Date createTime;

    /**
     * 更新时间
     */
    private Date updateTime;

    private static final long serialVersionUID = 1L;
}
在 UserService 中新增获取脱敏后的已登录用户信息方法:
/**
 * 获取脱敏的已登录用户信息
 *
 * @return
 */
LoginUserVO getLoginUserVO(User user);
编写方法对应的实现类,其实就是将 User 类的属性复制到 LoginUserVO 中,不存在的字段就被过滤掉了:
@Override
public LoginUserVO getLoginUserVO(User user) {
    if (user == null) {
        return null;
    }
    LoginUserVO loginUserVO = new LoginUserVO();
    BeanUtils.copyProperties(user, loginUserVO);
    return loginUserVO;
}
修改 Controller 的 getLoginUser 接口,改为返回脱敏后的用户信息:
@GetMapping("/get/login")
public BaseResponse<LoginUserVO> getLoginUser(HttpServletRequest request) {
    User user = userService.getLoginUser(request);
    return ResultUtils.success(userService.getLoginUserVO(user));
}
用户登出
可以从 request 请求对象对应的 Session 中直接获取到之前保存的登录用户信息,来完成注销,无需其他请求参数。
1、服务开发
在 service 包的 UserService 中增加方法声明:
/**
 * 用户注销
 *
 * @param request
 * @return
 */
boolean userLogout(HttpServletRequest request);
在 UserServiceImpl 中增加实现代码,从 Session 中移除掉当前用户的登录态即可:
@Override
public boolean userLogout(HttpServletRequest request) {
    // 先判断是否已登录
    Object userObj = request.getSession().getAttribute(USER_LOGIN_STATE);
    if (userObj == null) {
        throw new BusinessException(ErrorCode.OPERATION_ERROR, "未登录");
    }
    // 移除登录态
    request.getSession().removeAttribute(USER_LOGIN_STATE);
    return true;
}
2、接口开发
在 UserController 中新增用户注销接口:
@PostMapping("/logout")
public BaseResponse<Boolean> userLogout(HttpServletRequest request) {
    ThrowUtils.throwIf(request == null, ErrorCode.PARAMS_ERROR);
    boolean result = userService.userLogout(request);
    return ResultUtils.success(result);
}
用户权限控制(本节的核心)
在本节教程的方案设计中讲到:权限校验其实是一个比较通用的业务需求,一般会通过 **Spring AOP 切面 + 自定义权限校验注解 **实现统一的接口拦截和权限校验;如果有特殊的权限校验逻辑,再单独在接口中编码。
1、权限校验注解
首先编写权限校验注解,放到 annotation 包下:
@Target(ElementType.METHOD)
@Retention(RetentionPolicy.RUNTIME)
public @interface AuthCheck {

    /**
     * 必须有某个角色
     */
    String mustRole() default "";
}
2、权限校验切面
编写权限校验 AOP,采用环绕通知,在 打上该注解的方法 执行前后进行一些额外的操作,比如校验权限。
代码如下,放到 aop 包下:
@Aspect
@Component
public class AuthInterceptor {

    @Resource
    private UserService userService;

    /**
     * 执行拦截
     *
     * @param joinPoint 切入点
     * @param authCheck 权限校验注解
     */
    @Around("@annotation(authCheck)")
    public Object doInterceptor(ProceedingJoinPoint joinPoint, AuthCheck authCheck) throws Throwable {
        String mustRole = authCheck.mustRole();
        RequestAttributes requestAttributes = RequestContextHolder.currentRequestAttributes();
        HttpServletRequest request = ((ServletRequestAttributes) requestAttributes).getRequest();
        // 当前登录用户
        User loginUser = userService.getLoginUser(request);
        UserRoleEnum mustRoleEnum = UserRoleEnum.getEnumByValue(mustRole);
        // 不需要权限,放行
        if (mustRoleEnum == null) {
            return joinPoint.proceed();
        }
        // 以下为:必须有该权限才通过
        // 获取当前用户具有的权限
        UserRoleEnum userRoleEnum = UserRoleEnum.getEnumByValue(loginUser.getUserRole());
        // 没有权限,拒绝
        if (userRoleEnum == null) {
            throw new BusinessException(ErrorCode.NO_AUTH_ERROR);
        }
        // 要求必须有管理员权限,但用户没有管理员权限,拒绝
        if (UserRoleEnum.ADMIN.equals(mustRoleEnum) && !UserRoleEnum.ADMIN.equals(userRoleEnum)) {
            throw new BusinessException(ErrorCode.NO_AUTH_ERROR);
        }
        // 通过权限校验,放行
        return joinPoint.proceed();
    }
}
3、使用注解
只要给方法添加了 @AuthCheck 注解,就必须要登录,否则会抛出异常。
可以设置 mustRole 为管理员,这样仅管理员才能使用该接口:
@AuthCheck(mustRole = UserConstant.ADMIN_ROLE)
对于不需要登录就能使用的接口,不需要使用该注解。
用户管理
用户管理功能具体可以拆分为:
- 【管理员】创建用户
- 【管理员】根据 id 删除用户
- 【管理员】更新用户
- 【管理员】分页获取用户列表(需要脱敏)
- 【管理员】根据 id 获取用户(未脱敏)
- 根据 id 获取用户(脱敏)
1、数据模型
1)每个操作都需要提供一个请求类,都放在 dto.user 包下。
用户创建请求:
@Data
public class UserAddRequest implements Serializable {

    /**
     * 用户昵称
     */
    private String userName;

    /**
     * 账号
     */
    private String userAccount;

    /**
     * 用户头像
     */
    private String userAvatar;

    /**
     * 用户简介
     */
    private String userProfile;

    /**
     * 用户角色: user, admin
     */
    private String userRole;

    private static final long serialVersionUID = 1L;
}
用户更新请求:
@Data
public class UserUpdateRequest implements Serializable {

    /**
     * id
     */
    private Long id;

    /**
     * 用户昵称
     */
    private String userName;

    /**
     * 用户头像
     */
    private String userAvatar;

    /**
     * 简介
     */
    private String userProfile;

    /**
     * 用户角色:user/admin
     */
    private String userRole;

    private static final long serialVersionUID = 1L;
}
用户查询请求,需要继承公共包中的 PageRequest 来支持分页查询:
@EqualsAndHashCode(callSuper = true)
@Data
public class UserQueryRequest extends PageRequest implements Serializable {

    /**
     * id
     */
    private Long id;

    /**
     * 用户昵称
     */
    private String userName;

    /**
     * 账号
     */
    private String userAccount;

    /**
     * 简介
     */
    private String userProfile;

    /**
     * 用户角色:user/admin/ban
     */
    private String userRole;

    private static final long serialVersionUID = 1L;
}
2)由于要提供获取用户信息的接口,需要和获取当前登录用户接口一样对用户信息进行脱敏。
在 model.vo 包下新建 UserVO,表示脱敏后的用户:
@Data
public class UserVO implements Serializable {

    /**
     * id
     */
    private Long id;

    /**
     * 账号
     */
    private String userAccount;

    /**
     * 用户昵称
     */
    private String userName;

    /**
     * 用户头像
     */
    private String userAvatar;

    /**
     * 用户简介
     */
    private String userProfile;

    /**
     * 用户角色:user/admin
     */
    private String userRole;

    /**
     * 创建时间
     */
    private Date createTime;

    private static final long serialVersionUID = 1L;
}
2、服务开发
1)在 UserService 中编写获取脱敏后的单个用户信息、获取脱敏后的用户列表方法:
@Override
public UserVO getUserVO(User user) {
    if (user == null) {
        return null;
    }
    UserVO userVO = new UserVO();
    BeanUtils.copyProperties(user, userVO);
    return userVO;
}

@Override
public List<UserVO> getUserVOList(List<User> userList) {
    if (CollUtil.isEmpty(userList)) {
        return new ArrayList<>();
    }
    return userList.stream().map(this::getUserVO).collect(Collectors.toList());
}
可以在 UserService 中编写一个方法,专门用于将查询请求转为 QueryWrapper 对象:
@Override
public QueryWrapper<User> getQueryWrapper(UserQueryRequest userQueryRequest) {
    if (userQueryRequest == null) {
        throw new BusinessException(ErrorCode.PARAMS_ERROR, "请求参数为空");
    }
    Long id = userQueryRequest.getId();
    String userAccount = userQueryRequest.getUserAccount();
    String userName = userQueryRequest.getUserName();
    String userProfile = userQueryRequest.getUserProfile();
    String userRole = userQueryRequest.getUserRole();
    String sortField = userQueryRequest.getSortField();
    String sortOrder = userQueryRequest.getSortOrder();
    QueryWrapper<User> queryWrapper = new QueryWrapper<>();
    queryWrapper.eq(ObjUtil.isNotNull(id), "id", id);
    queryWrapper.eq(StrUtil.isNotBlank(userRole), "userRole", userRole);
    queryWrapper.like(StrUtil.isNotBlank(userAccount), "userAccount", userAccount);
    queryWrapper.like(StrUtil.isNotBlank(userName), "userName", userName);
    queryWrapper.like(StrUtil.isNotBlank(userProfile), "userProfile", userProfile);
    queryWrapper.orderBy(StrUtil.isNotEmpty(sortField), sortOrder.equals("ascend"), sortField);
    return queryWrapper;
}
3、接口开发
上述功能其实都是样板代码,俗称 “增删改查”。
代码实现比较简单,注意添加对应的权限注解、做好参数校验即可:
/**
 * 创建用户
 */
@PostMapping("/add")
@AuthCheck(mustRole = UserConstant.ADMIN_ROLE)
public BaseResponse<Long> addUser(@RequestBody UserAddRequest userAddRequest) {
    ThrowUtils.throwIf(userAddRequest == null, ErrorCode.PARAMS_ERROR);
    User user = new User();
    BeanUtils.copyProperties(userAddRequest, user);
    // 默认密码 12345678
    final String DEFAULT_PASSWORD = "12345678";
    String encryptPassword = userService.getEncryptPassword(DEFAULT_PASSWORD);
    user.setUserPassword(encryptPassword);
    boolean result = userService.save(user);
    ThrowUtils.throwIf(!result, ErrorCode.OPERATION_ERROR);
    return ResultUtils.success(user.getId());
}

/**
 * 根据 id 获取用户(仅管理员)
 */
@GetMapping("/get")
@AuthCheck(mustRole = UserConstant.ADMIN_ROLE)
public BaseResponse<User> getUserById(long id) {
    ThrowUtils.throwIf(id <= 0, ErrorCode.PARAMS_ERROR);
    User user = userService.getById(id);
    ThrowUtils.throwIf(user == null, ErrorCode.NOT_FOUND_ERROR);
    return ResultUtils.success(user);
}

/**
 * 根据 id 获取包装类
 */
@GetMapping("/get/vo")
public BaseResponse<UserVO> getUserVOById(long id) {
    BaseResponse<User> response = getUserById(id);
    User user = response.getData();
    return ResultUtils.success(userService.getUserVO(user));
}

/**
 * 删除用户
 */
@PostMapping("/delete")
@AuthCheck(mustRole = UserConstant.ADMIN_ROLE)
public BaseResponse<Boolean> deleteUser(@RequestBody DeleteRequest deleteRequest) {
    if (deleteRequest == null || deleteRequest.getId() <= 0) {
        throw new BusinessException(ErrorCode.PARAMS_ERROR);
    }
    boolean b = userService.removeById(deleteRequest.getId());
    return ResultUtils.success(b);
}

/**
 * 更新用户
 */
@PostMapping("/update")
@AuthCheck(mustRole = UserConstant.ADMIN_ROLE)
public BaseResponse<Boolean> updateUser(@RequestBody UserUpdateRequest userUpdateRequest) {
    if (userUpdateRequest == null || userUpdateRequest.getId() == null) {
        throw new BusinessException(ErrorCode.PARAMS_ERROR);
    }
    User user = new User();
    BeanUtils.copyProperties(userUpdateRequest, user);
    boolean result = userService.updateById(user);
    ThrowUtils.throwIf(!result, ErrorCode.OPERATION_ERROR);
    return ResultUtils.success(true);
}

/**
 * 分页获取用户封装列表(仅管理员)
 *
 * @param userQueryRequest 查询请求参数
 */
@PostMapping("/list/page/vo")
@AuthCheck(mustRole = UserConstant.ADMIN_ROLE)
public BaseResponse<Page<UserVO>> listUserVOByPage(@RequestBody UserQueryRequest userQueryRequest) {
    ThrowUtils.throwIf(userQueryRequest == null, ErrorCode.PARAMS_ERROR);
    long current = userQueryRequest.getCurrent();
    long pageSize = userQueryRequest.getPageSize();
    Page<User> userPage = userService.page(new Page<>(current, pageSize),
            userService.getQueryWrapper(userQueryRequest));
    Page<UserVO> userVOPage = new Page<>(current, pageSize, userPage.getTotal());
    List<UserVO> userVOList = userService.getUserVOList(userPage.getRecords());
    userVOPage.setRecords(userVOList);
    return ResultUtils.success(userVOPage);
}
💡 有同学可能会有疑惑:不是说不要在 Controller 中写业务逻辑代码么?
我的建议是开发时要灵活一些,我们要保证 Controller 的精简没错,但不代表什么代码都不在 Controller 里写。对于我们上述的代码,根本就没有复杂的业务逻辑,如果非要抽一层 Service 方法也不是不行,但会更麻烦一些。
4、分页功能修复
使用 Swagger 接口文档依次对上述接口进行测试,发现 listUserVOByPage 接口有一些问题!
分页好像没有生效,还是查出了全部数据:
在 pom.xml 中引入分页插件依赖:
<!-- MyBatis Plus 分页插件 -->
<dependency>
    <groupId>com.baomidou</groupId>
    <artifactId>mybatis-plus-jsqlparser-4.9</artifactId>
</dependency>
光引入这一条,大概率是无法成功下载依赖的,还要在 pom.xml 的依赖管理配置中补充 mybatis-plus-bom:
<dependencyManagement>
    <dependencies>
        <dependency>
            <groupId>org.springframework.boot</groupId>
            <artifactId>spring-boot-dependencies</artifactId>
            <version>${spring-boot.version}</version>
            <type>pom</type>
            <scope>import</scope>
        </dependency>
        <dependency>
            <groupId>com.baomidou</groupId>
            <artifactId>mybatis-plus-bom</artifactId>
            <version>3.5.9</version>
            <type>pom</type>
            <scope>import</scope>
        </dependency>
    </dependencies>
</dependencyManagement>
依赖下载成功后,在 config 包下新建 MyBatis Plus 拦截器配置,添加分页插件:
@Configuration
@MapperScan("com.yupi.yupicturebackend.mapper")
public class MyBatisPlusConfig {

    /**
     * 拦截器配置
     *
     * @return {@link MybatisPlusInterceptor}
     */
    @Bean
    public MybatisPlusInterceptor mybatisPlusInterceptor() {
        MybatisPlusInterceptor interceptor = new MybatisPlusInterceptor();
        // 分页插件
        interceptor.addInnerInterceptor(new PaginationInnerInterceptor(DbType.MYSQL));
        return interceptor;
    }
}
重启项目,这次就能正常完成分页了~
5、数据精度修复
但是,在测试中,如果你打开 F12 控制台,利用预览来查看响应数据,就会发现另一个问题:id 的最后两位好像都变成 0 了!
这是由于前端 JS 的精度范围有限,我们后端返回的 id 范围过大,导致前端精度丢失,会影响前端页面获取到的数据结果。
为了解决这个问题,可以在后端 config 包下新建一个全局 JSON 配置,将整个后端 Spring MVC 接口返回值的长整型数字转换为字符串进行返回,从而集中解决问题。
/**
 * Spring MVC Json 配置
 */
@JsonComponent
public class JsonConfig {

    /**
     * 添加 Long 转 json 精度丢失的配置
     */
    @Bean
    public ObjectMapper jacksonObjectMapper(Jackson2ObjectMapperBuilder builder) {
        ObjectMapper objectMapper = builder.createXmlMapper(false).build();
        SimpleModule module = new SimpleModule();
        module.addSerializer(Long.class, ToStringSerializer.instance);
        module.addSerializer(Long.TYPE, ToStringSerializer.instance);
        objectMapper.registerModule(module);
        return objectMapper;
    }
}
至此,用户相关的后端接口开发完毕,大家可以按需完善上述代码。
大功告成!🎉🎉🎉