MyBatis整体架构分析
一图胜千言
1、Mybatis核心框架示意图
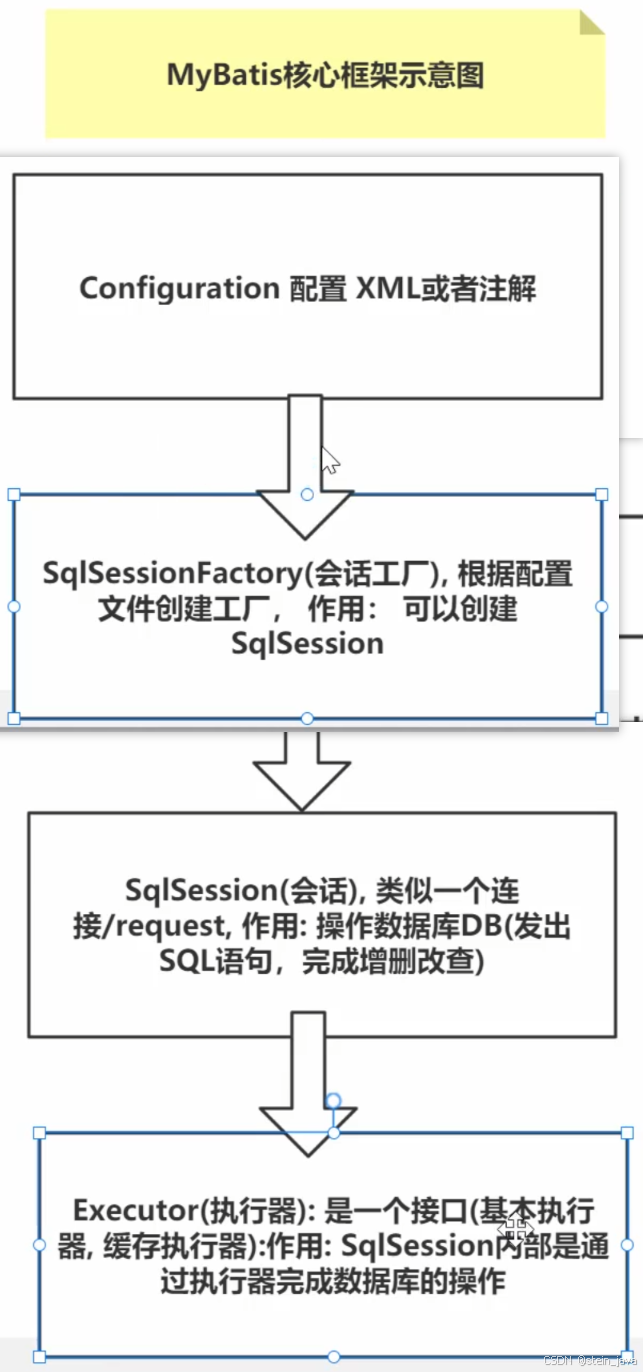
2、对上图的解读
1)mybatis的核配置文件
mybatis-config.xml:进行全局配置,全局只能有一个这样的配置文件
XxxMapper.xml配置多个SQL,可以有多个XxxMappe.xml配置文件
2)通过mybatis-config.xml配置文件得到SqlSessionFactory
3)通过SqlSessionFactory得到SqlSession,用SqlSession就可以操作数据了
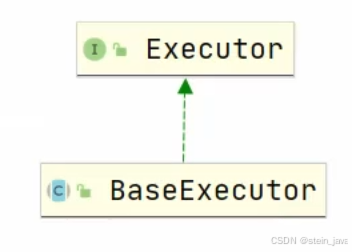
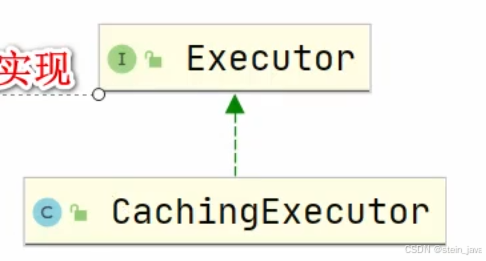
4)SqlSession.底层是Executor(执行器),有2个重要的实现类,它们有很多实现方法
4.1基本执行器BaseExecutor
4.2带缓存的执行器CachingExecutor
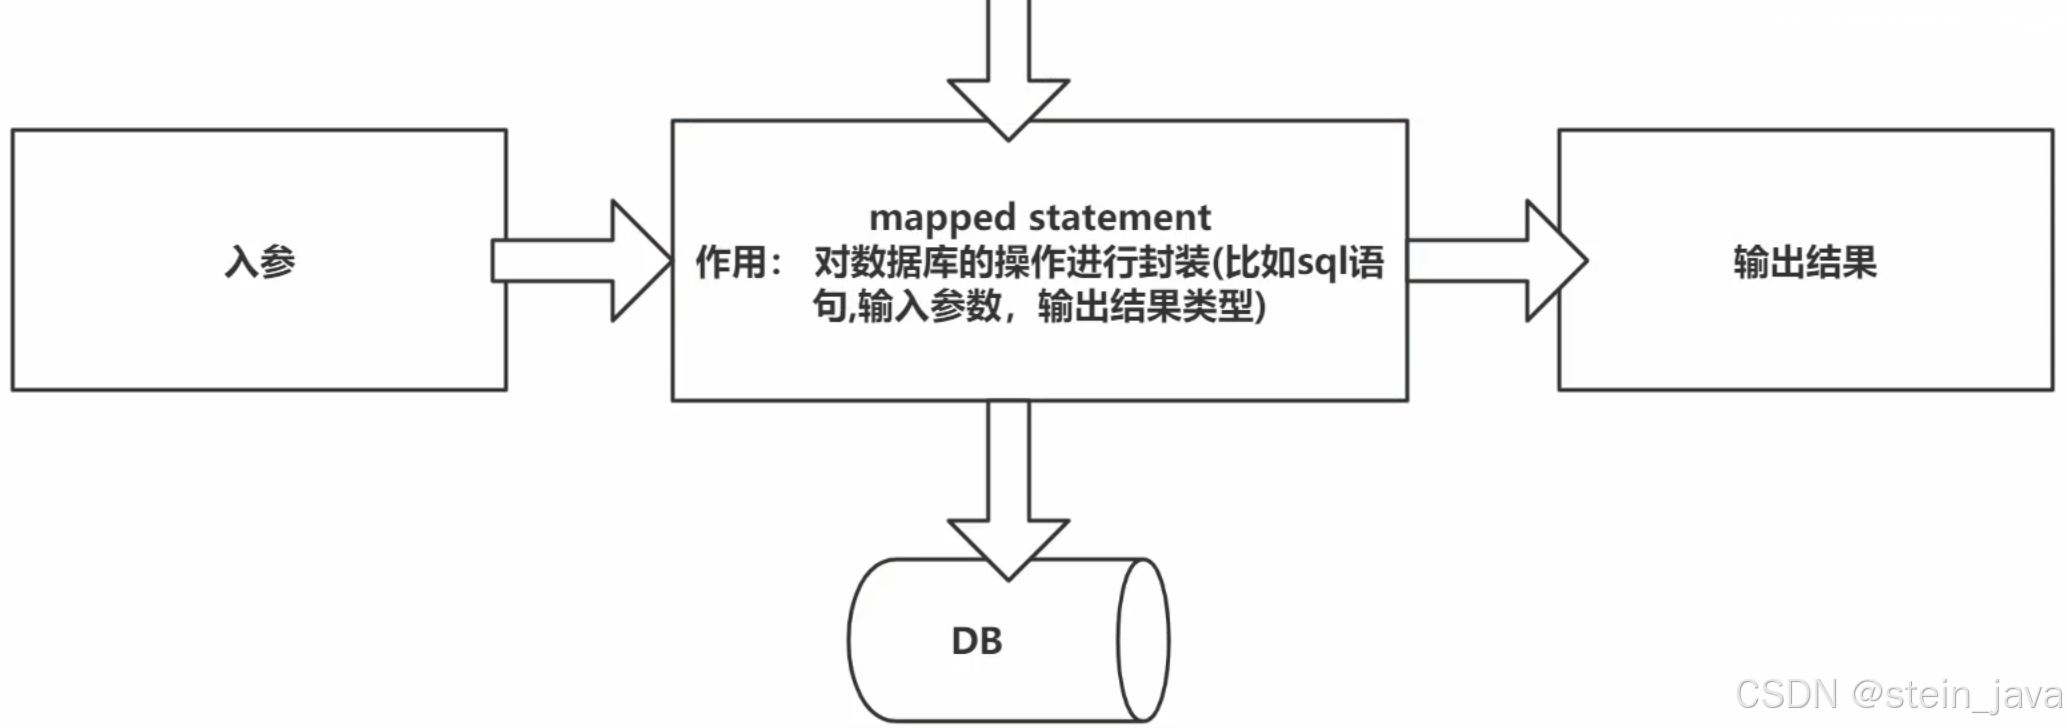
5)MappedStatement是通过XxxMapper.xml中定义,生成的statement对象
6)参数输入执行并输出结果集,无需手动判断参数类型和参数下标位置,且自动将结果集映射为Java对象
搭建MyBatis底层机制开发环境
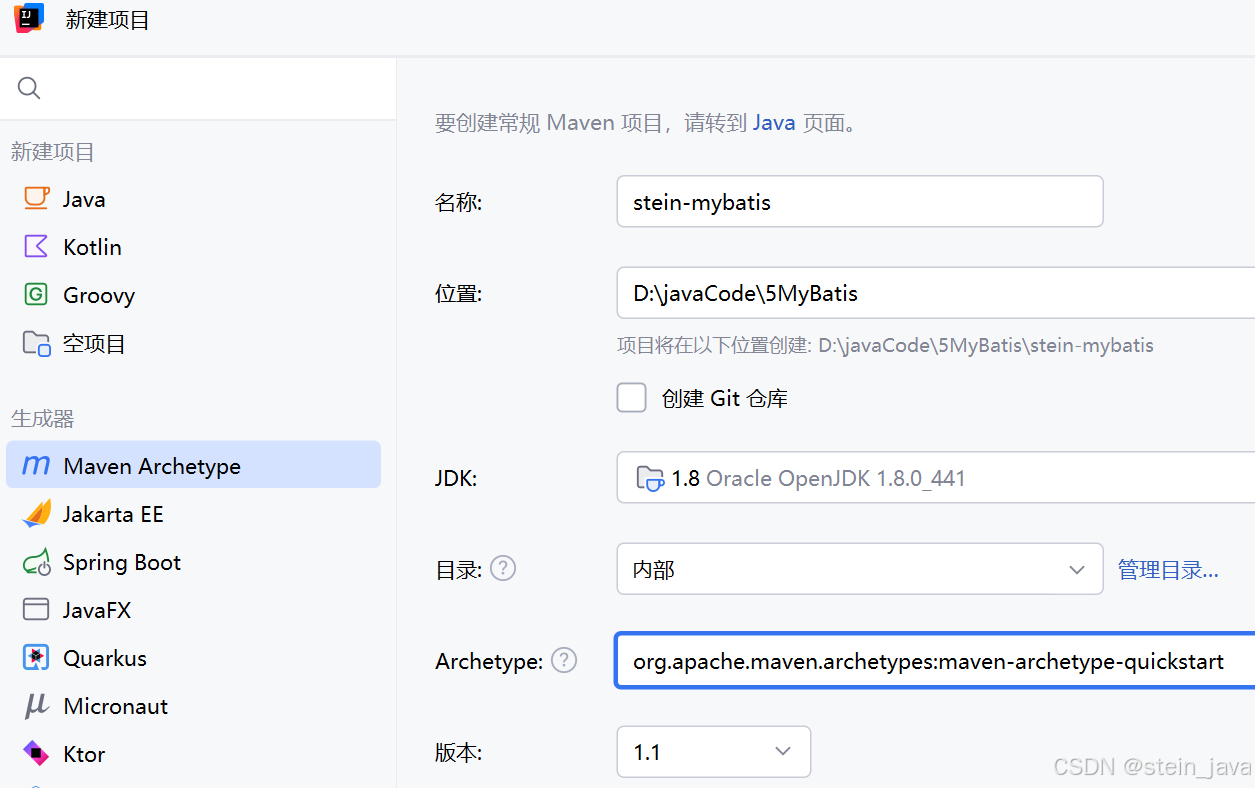
1.创建Maven项目stein-mybatis
Archetype还是选的quickstart
2.修改文件pom.xml
引入必要的依赖
<dependencies>
    <!--解析配置文件,引入dom4j -->
    <dependency>
      <groupId>dom4j</groupId>
      <artifactId>dom4j</artifactId>
      <version>1.6.1</version>
    </dependency>

    <!--引入mysql依赖-->
    <dependency>
      <groupId>mysql</groupId>
      <artifactId>mysql-connector-java</artifactId>
      <version>8.0.26</version>
      <!--原来使用的版本,出现异常情况,可以退回该版本-->
      <!--<version>5.1.49</version>-->
    </dependency>

    <!--引入神器lombok,简化entity/pojo/javabean的开发-->
    <dependency>
      <groupId>org.projectlombok</groupId>
      <artifactId>lombok</artifactId>
      <version>1.18.30</version>
      <!--原来使用的版本,异常时回退-->
      <!--<version>1.18.4</version>-->
    </dependency>

    <!--测试依赖-->
    <dependency>
      <groupId>junit</groupId>
      <artifactId>junit</artifactId>
      <version>4.13.2</version>
      <!--<version>4.12</version>-->
      <!--暂时取消了作用域-->
      <!--<scope>test</scope>-->
    </dependency>
  </dependencies>
3.创建数据库和表
CREATE DATABASE stein_mybatis;
USE stein_mybatis
CREATE TABLE monster(
`id` INT PRIMARY KEY AUTO_INCREMENT,
`age` INT NOT NULL,
`birthday` DATE DEFAULT NULL,
`email` VARCHAR(255)NOT NULL,
`gender` TINYINT NOT NULL,
`name` VARCHAR(255)NOT NULL,
`salary` DOUBLE NOT NULL
)CHARSET=utf8
-- 测试数据
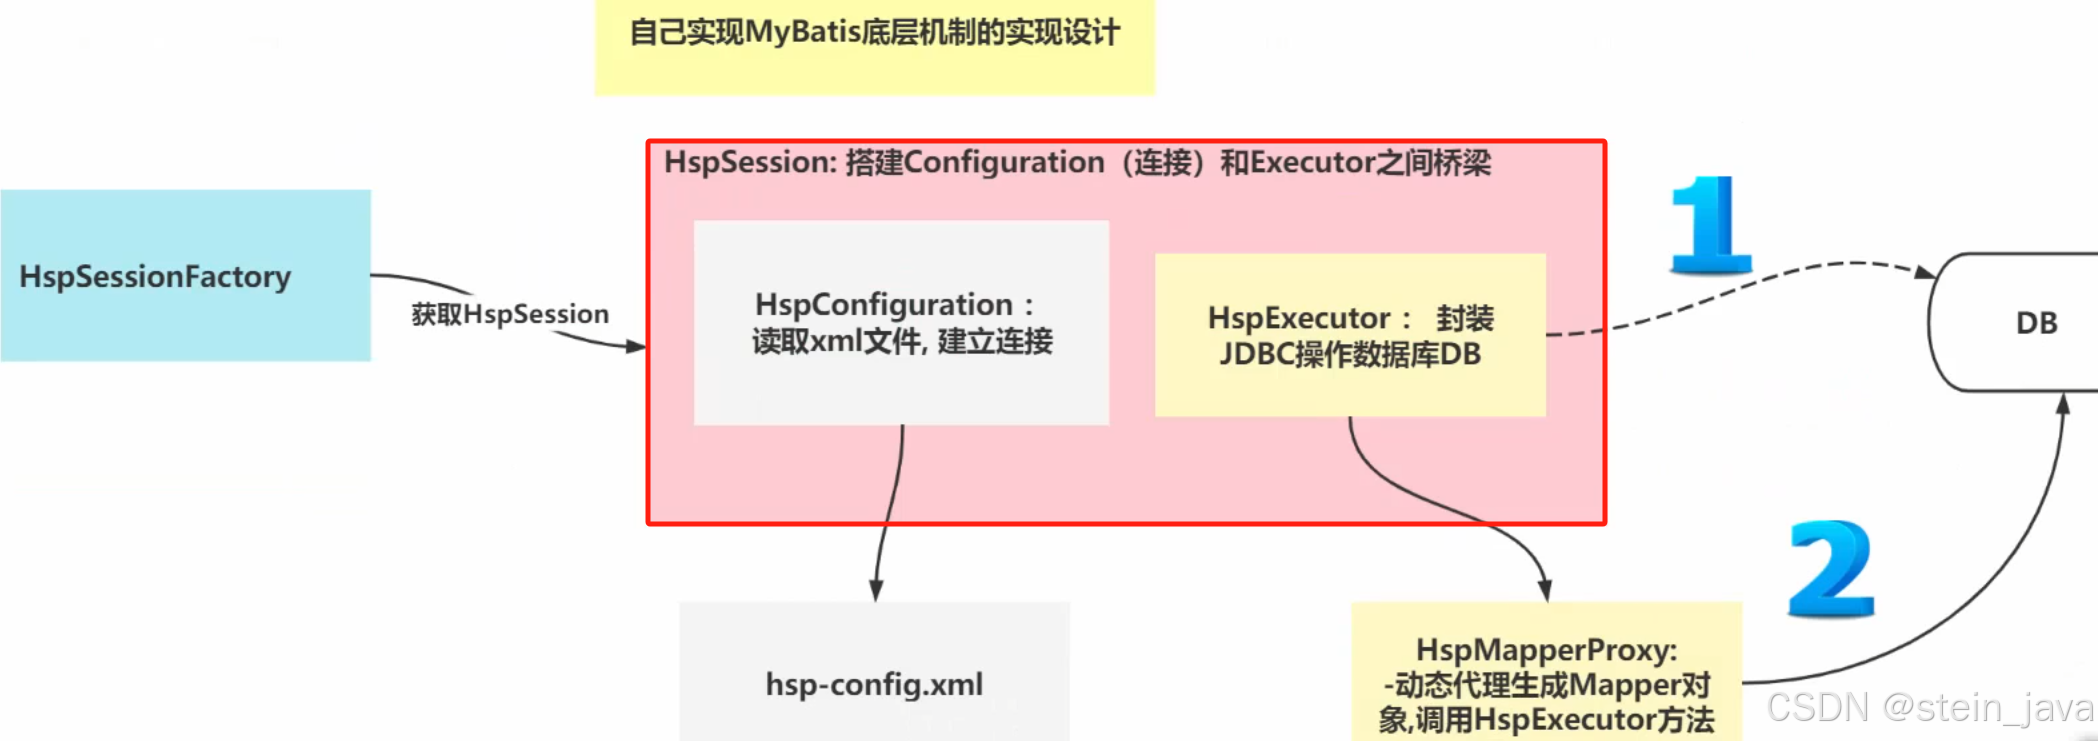
INSERT INTO `monster` VALUES(NULL,200,'2000-11-11','nmw@sohu.com',1,'牛魔王',8888.88)自己写的Mybatis——设计思路
1.自己写Mybatis的底层实现设计
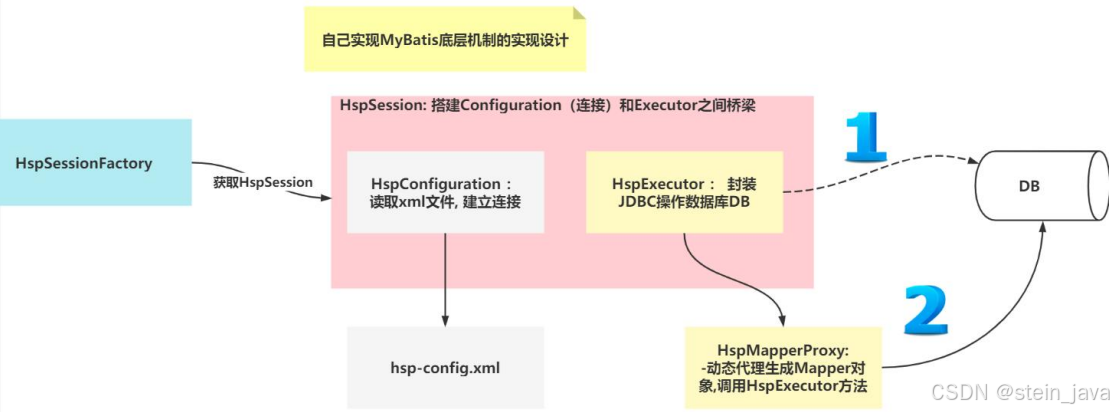
2.对上图的解读
一、传统的方式操作数据库
1)得到HspSession对象
2)调用HspExecutor的方法完成操作
3)HspExecutor的连接是从HspConfiguration获取
二、 MyBatis操作数据库的方式分析
1)得到HspSession
2)不直接调用HspExecutorl的方法完成操作
3)通过HspMapperProxy获取Mapper对象
4)调用Mapper的方法,完成数据库的操作
5)Mapper最终还是动态代理方式,使用HspExecutor的方法完成操作
6)这里比较麻烦的就是HspMapperProxy的动态代理机制的实现
自己实现Mybatis底层机制
实现任务
阶段1-完成读取配置文件,得到数据库连接
完成设计图中的这部分
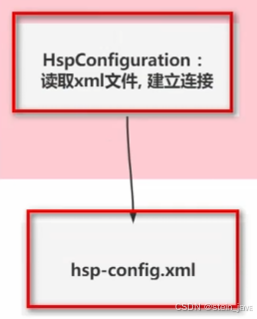
1.创建配置文件
新建resource目录,然后再建src/main/resources/stein-config.xml
<?xml version="1.0" encoding="UTF-8" ?>
<database>
<property name="driverClassName" value="com.mysql.jdbc.Driver"/>
<property name="url" value="jdbc:mysql://localhost:3306/stein_mybatis?useSSL=true&useUnicode=true&charsetEncoding=UTF-8"/>
<property name="username" value="root"/>
<property name="password" value="root"/>
</database>2.新建读取配置文件的类
src/main/java/com/stein/steinmybatis/sqlSession/SteinConfiguration.java
public class SteinConfiguration {
    public ClassLoader classLoader=ClassLoader.getSystemClassLoader();

    public Connection build(String xmlConfigFile) {
        InputStream resource = classLoader.getResourceAsStream(xmlConfigFile);

        Connection connection=null;

        try {
            SAXReader saxReader = new SAXReader();
            Document document = saxReader.read(resource);
            Element rootElement = document.getRootElement();
            System.out.println("rootElement="+rootElement);

            connection = evalDataSource(rootElement);

        } catch (DocumentException e) {
            throw new RuntimeException(e);
        }

        return connection;
    }


    public Connection evalDataSource(Element node) {
        if(!"database".equals(node.getName())) {
            throw new RuntimeException("root节点应当是<database>");
        }
        String driverClassName = null;
        String url = null;
        String username = null;
        String password = null;
        for (Object element : node.elements()) {
            Element ele = (Element) element;
            String name = ele.attributeValue("name");
            String value = ele.attributeValue("value");

            //当获取标签之间的文本的时候才用它
            //String value = ele.getText();


            if(name==null || value==null) {
                throw new RuntimeException("节点内容获取失败");
            }

            //java注意版本
            switch(name) {
                case "driverClassName":
                    driverClassName = value;
                    break;
                case "url":
                    url = value;
                    break;
                case "username":
                    username = value;
                    break;
                case "password":
                    password = value;
                    break;
                default:
                    throw new RuntimeException("元素异常"+name+";"+value);
            }
        }

        Connection connection =null;
        try {
            //自动注册,这儿的反射也可以不写了
            //Class.forName(driverClassName);
            connection = DriverManager.getConnection(url, username, password);
        } catch (Exception e) {
            throw new RuntimeException("获取连接失败");
        }

        return connection;
    }
}
3.测试
可以在写完读取xml文档,获得root节点时测试一次。再在获得connection后测试一次。这儿两个测试合并一起了。
public class SteinConfigurationTest {
    public static void main(String[] args) {
        Connection connection = new SteinConfiguration().build("stein-config.xml");
        System.out.println("connection = " + connection);
    }
}
阶段2-编写执行器,输入SQL语句,完成操作
穿插:lombok的使用
1)引入pom.xml
    <!--引入神器lombok,简化entity/pojo/javabean的开发-->

    <dependency>
      <groupId>org.projectlombok</groupId>
      <artifactId>lombok</artifactId>
      <version>1.18.30</version>
      <!--演示的版本,异常时回退到该版本-->
      <!--<version>1.18.4</version>-->
    </dependency>
2)常用注解
@NoArgsConstructor 生成无参构造器
@AllArgsConstructor 生成全参构造器
@data 相当于:
@Getter
@Setter
@RequiredArgsConstructor 为每个需要特殊处理的字段生成一个带有1个参数的构造函数。
@ToString
@EqualsAndHashCode
lombok.Value 这个是啥?欢迎评论区指点
虽然没有指定无参构造器,但是在没有构造器的时候,它会默认生成一个无参构造器。但是指定有构造器了,就不会默认生成构造器。
3)常用组合
@Setter
@Getter
@ToString
@NoArgsConstructor
@AllArgsConstructor
或者
@Data
@AllArgsConstructor 因为指定了全参构造器
@NoArgsConstructor  就必须显式的给出无参构造器,否则不会生成
1.创建Entity
完成Monster.java的创建
@Setter
@Getter
@ToString
@NoArgsConstructor
@AllArgsConstructor
public class Monster {
private Integer id;
private Integer age;
private String name;
private String email;
private Date birthday;
private Double salary;
private String gender;
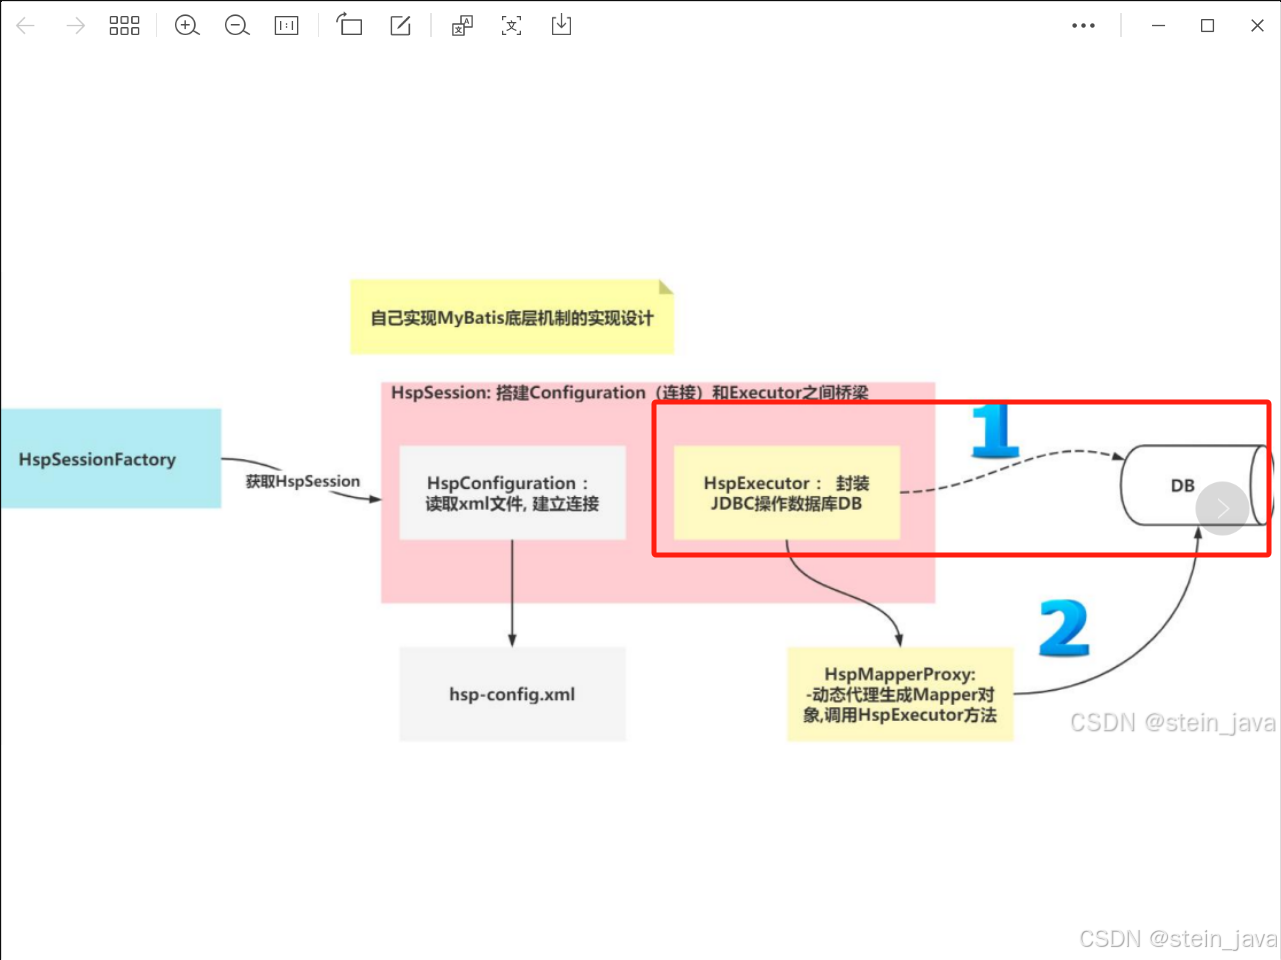
}2.创建执行器
接下来完成图中的这一步:
1)创建接口
com/stein/steinmybatis/sqlSession/Executor.java
public interface Executor {

    <T> T query(String statement, Object parameter);
}
2)实现接口
com/stein/steinmybatis/sqlSession/SteinExecutor.java
public class SteinExecutor implements Executor {

    private SteinConfiguration config=new SteinConfiguration();

    @Override
    public <T> T query(String sql, Object parameter) {
        Connection connection = getConnection();
        Monster monster = new Monster();

        try {
            PreparedStatement preparedStatement = connection.prepareStatement(sql);
            //设置参数,如果参数多,可以使用数组处理
            //preparedStatement.setString(1, parameter.toString());
            //这两种写法都可以
            preparedStatement.setObject(1,parameter);
            ResultSet resultSet = preparedStatement.executeQuery();
            //这儿的结果集是如何完全循环的?
            //实际上只执行了一次循环就将monster赋值完成了
            while (resultSet.next()) {
                monster.setId(resultSet.getInt("id"));
                monster.setName(resultSet.getString("name"));
                monster.setAge(resultSet.getInt("age"));
                monster.setGender(resultSet.getString("gender"));
                monster.setSalary(resultSet.getDouble("salary"));
                monster.setEmail(resultSet.getString("email"));
                monster.setBirthday(resultSet.getDate("birthday"));
            }
            //关闭资源
            if(resultSet!=null){
                resultSet.close();
            }
            if(preparedStatement!=null){
                preparedStatement.close();
            }
            if(connection!=null){
                connection.close();
            }
        } catch (Exception e) {
            throw new RuntimeException(e);
        }

        return (T)monster;
    }

    public Connection getConnection() {
        Connection connection = config.build("stein-config.xml");
        return connection;
    }
}
3)测试
@Test
public void query(){
Executor executor = new SteinExecutor();
Monster monster = executor.query("select * from monster where id=?", 1);
System.out.println("monster = " + monster);
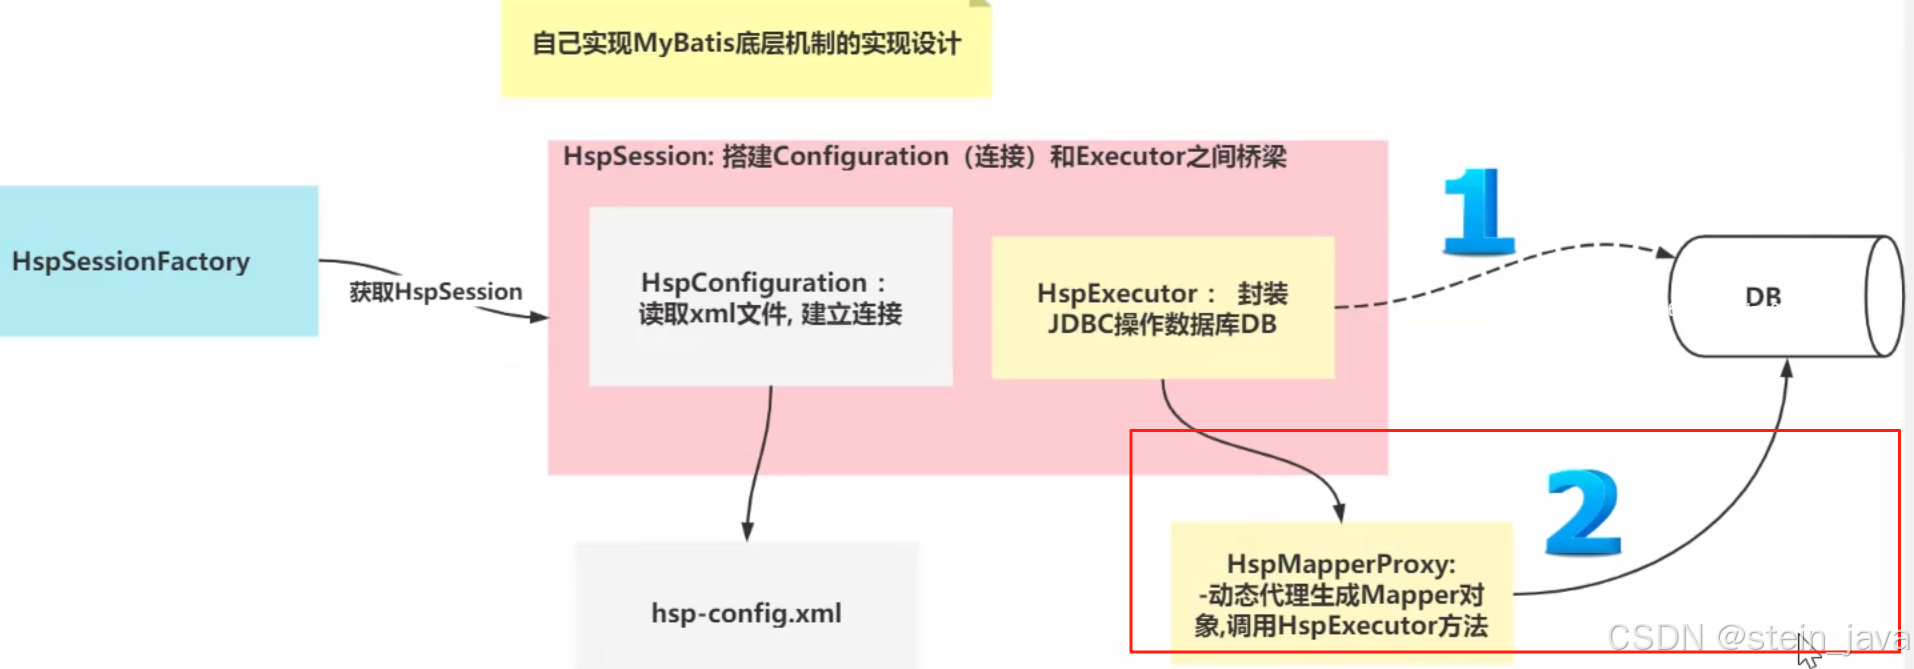
}阶段3-将Sqlsession封装到执行器
接下来要做的事情:
搭建Configuration(连接)Executor之间的桥梁
1.创建SteinSession
com/stein/steinmybatis/sqlSession/SteinSession.java
public class SteinSession {
    //属性
    //执行器
    private SteinExecutor executor=new SteinExecutor();
    //配置类
    private SteinConfiguration config=new SteinConfiguration();

    //编写方法,返回一条记录-即一个对象
    public <T> T selectOne(String sql, Object parameter) {
        return executor.query(sql, parameter);
    }
}
2.测试
    @Test
    public void selectOne(){
        SteinSession steinSession = new SteinSession();
        Monster monster = steinSession.selectOne("select * from monster where id=?", 1);
        System.out.println("monster = " + monster);
    }
阶段4-开发Mapper接口和Mapper.xml(重点)
本次完成的任务:

1.创建Mapper接口
com/stein/mapper/MonsterMapper.java
public interface MonsterMapper {
    Monster getMonsterById(Integer id);
}
2.配置实现Mapper接口
src\main\resources\MonsterMapper.xml
<?xml version="1.0" encoding="UTF-8" ?>
<mapper namespace="com.stein.mapper.MonsterMapper" >
    <select id="getMonsterById" resultType="com.stein.entity.Monster">
        <!--这儿为了简化,没有写成#{id}的形式-->
        select * from monster where id=?
    </select>
</mapper>
阶段5-开发和Mapper接口相映射的MapperBean
接下来完成,MapperBean,它关联了接口与实现类的组件/对象

1.创建Function记录Mapper.xml的方法信息
com/stein/config/Function.java
@Setter
@Getter
public class Function {
    //sql类型
    private String sqlType;
    //方法名
    private String functionName;
    //结果类型
    private Object resultType;
    //具体的sql语句
    private String sql;
    //参数类型,xml里没有设置,是个空的字段
    private String parameterType;
}
2.创建MapperBean记录XXXMapper接口的信息,和Function
com/stein/config/MapperBean.java
@Getter
@Setter
public class MapperBean {
    private String interfaceName;
    private Function[] functions;
}
阶段6-读取解析XxxMapper.xml,装填MappperBean对象
1.添加读取方法
com/stein/steinmybatis/sqlSession/SteinConfiguration.java
 /**
     * @param xmlFile 传入文件名,resource文件夹会在target目录中重建,直接获取即可
     * @return
     */
    public MapperBean readMapperBean(String xmlFile) {

        MapperBean mapperBean = new MapperBean();


        InputStream stream = classLoader.getResourceAsStream(xmlFile);

        SAXReader saxReader = new SAXReader();

        try {
            Document document = saxReader.read(stream);

            Element rootElement = document.getRootElement();

            System.out.println("rootElement="+rootElement);

            /**
             <mapper namespace="com.stein.mapper.MonsterMapper" >
                 <select id="getMonsterById" resultType="com.stein.entity.Monster">
                    select * from monster where id=?
                 </select>
             </mapper>
             */


            //获取namespace的方法名
            if(!"mapper".equals(rootElement.getName())) {
                throw new RuntimeException("xml文件找不到<mapper>标签");
            }
            String interfaceName = rootElement.attributeValue("namespace");
            System.out.println("interfaceName="+interfaceName);
            mapperBean.setInterfaceName(interfaceName.trim());

            List<Function> functions = new ArrayList<>();


            /**
             <select id="getMonsterById" resultType="com.stein.entity.Monster">
                select * from monster where id=?
             </select>
            */

            //获取select的内容
            List elements = rootElement.elements();
            for (Object element : elements) {
                //System.out.println("进入元素遍历");
                Element ele = (Element) element;
                System.out.println("ele="+ele);
                Function function = new Function();

                //这儿取值为null,可以看出"select"并不是属性"attribute"
                //String sqlType = ele.attributeValue("select");
                String sqlType = ele.getName().trim();
                function.setSqlType(sqlType);
                System.out.println("sqlType="+sqlType);

                String functionName = ele.attributeValue("id");
                function.setFunctionName(functionName);

                String resultType = ele.attributeValue("resultType");
                //因为resultType是一个Object类型,这儿返回一个实例
                Object newInstance = Class.forName(resultType).newInstance();
                function.setResultType(newInstance);

                //sql语句也明显不是"attribute"
                //String sql = ele.attributeValue("sql");
                String sql = ele.getTextTrim();
                function.setSql(sql);

                //这儿的getFunctions并没有new ArrayList,所以是个null,导致出bug的罪魁祸首
                //mapperBean.getFunctions().add(function);

                functions.add(function);
                System.out.println("第一次遍历结束");
            }

            mapperBean.setFunctions(functions);

        } catch (Exception e) {
            throw new RuntimeException("解析填充内容时遇到异常");
        }
        System.out.println("mapperBean="+mapperBean);

        return mapperBean;
    }
2.进行测试
随时进行一些测试
com/stein/SteinConfigurationTest.java
    @Test
    public void readMapper(){
        SteinConfiguration steinConfiguration = new SteinConfiguration();
        MapperBean mapperBean = steinConfiguration.readMapperBean("MonsterMapper.xml");
        System.out.println("ok~~");
    }
输出结果
mapperBean=MapperBean(interfaceName=com.stein.mapper.MonsterMapper, functions=[Function(sqlType=select, functionName=getMonsterById, resultType=Monster(id=null, age=null, name=null, email=null, birthday=null, salary=null, gender=null), sql=select * from monster where id=?, parameterType=null)])
阶段7-实现动态代理Mapper的方法
完成动态代理生成Mapper对象
1.创建SteinMapperProxy
com/stein/steinmybatis/sqlSession/SteinMapperProxy.java
public class SteinMapperProxy implements InvocationHandler {
    private SteinConfiguration steinConfiguration;
    private String mapperFile;
    private SteinSession steinSession;

    public SteinMapperProxy(SteinConfiguration steinConfiguration,
                            SteinSession steinSession,
                            Class clazz) {
        this.steinConfiguration = steinConfiguration;
        this.mapperFile = clazz.getSimpleName();
        this.steinSession = steinSession;
    }


    @Override
    public Object invoke(Object proxy, Method method, Object[] args) throws Throwable {

        MapperBean mapperBean = steinConfiguration.readMapperBean(mapperFile + ".xml");
        String mapperBeanInterfaceName = mapperBean.getInterfaceName();
        System.out.println("mapperBeanInterfaceName = " + mapperBeanInterfaceName);

        if(!method.getDeclaringClass().getName().equals(mapperBeanInterfaceName)){
            return null;
        }

        List<Function> functions = mapperBean.getFunctions();
        //判断内容是否为空
        if(functions!=null && 0!=functions.size()){
            for (Function function : functions) {
                //判断是同一个方法时,就能执行对应的方法
                if(method.getName().equals(function.getFunctionName())){
                    //如果执行的类型是select,就执行selectOne()方法
                    if("select".equalsIgnoreCase(function.getSqlType())){
                        return steinSession.selectOne(function.getSql(), String.valueOf(args[0]));
                    }
                }
            }
        }
        return null;
    }
}
2.完善SteinConfiguration的readMapperBean()方法
/**
     * @param xmlFile 传入文件名,resource文件夹会在target目录中重建,直接获取即可
     * @return
     */
    public MapperBean readMapperBean(String xmlFile) {

        MapperBean mapperBean = new MapperBean();


        InputStream stream = classLoader.getResourceAsStream(xmlFile);

        SAXReader saxReader = new SAXReader();

        try {
            Document document = saxReader.read(stream);

            Element rootElement = document.getRootElement();

            System.out.println("rootElement="+rootElement);

            /**
             <mapper namespace="com.stein.mapper.MonsterMapper" >
                 <select id="getMonsterById" resultType="com.stein.entity.Monster">
                    select * from monster where id=?
                 </select>
             </mapper>
             */


            //获取namespace的方法名
            if(!"mapper".equals(rootElement.getName())) {
                throw new RuntimeException("xml文件找不到<mapper>标签");
            }
            String interfaceName = rootElement.attributeValue("namespace");
            System.out.println("interfaceName="+interfaceName);
            mapperBean.setInterfaceName(interfaceName.trim());

            List<Function> functions = new ArrayList<>();


            /**
             <select id="getMonsterById" resultType="com.stein.entity.Monster">
                select * from monster where id=?
             </select>
            */

            //获取select的内容
            List elements = rootElement.elements();
            for (Object element : elements) {
                //System.out.println("进入元素遍历");
                Element ele = (Element) element;
                System.out.println("ele="+ele);
                Function function = new Function();

                //这儿取值为null,可以看出"select"并不是属性"attribute"
                //String sqlType = ele.attributeValue("select");
                String sqlType = ele.getName().trim();
                function.setSqlType(sqlType);
                System.out.println("sqlType="+sqlType);

                String functionName = ele.attributeValue("id");
                function.setFunctionName(functionName);

                String resultType = ele.attributeValue("resultType");
                //因为resultType是一个Object类型,这儿返回一个实例
                Object newInstance = Class.forName(resultType).newInstance();
                function.setResultType(newInstance);

                //sql语句也明显不是"attribute"
                //String sql = ele.attributeValue("sql");
                String sql = ele.getTextTrim();
                function.setSql(sql);

                //这儿的getFunctions并没有new ArrayList,所以是个null,导致出bug的罪魁祸首
                //mapperBean.getFunctions().add(function);

                functions.add(function);
                System.out.println("第一次遍历结束");
            }

            mapperBean.setFunctions(functions);

        } catch (Exception e) {
            throw new RuntimeException("解析填充内容时遇到异常");
        }
        System.out.println("mapperBean="+mapperBean);

        return mapperBean;
    }
3.测试
    @Test
    public void mapperProxy(){
        SteinSession steinSession = new SteinSession();
        MonsterMapper mapperProxy = steinSession.getMapperProxy(MonsterMapper.class);
        Monster monster = mapperProxy.getMonsterById(1);
        System.out.println("monster = " + monster);
    }
以上便是手动实现Mybaits的过程代码。