最近开发了一套iOS原生的蓝牙SDK,总结了一些有价值的踩过的坑,分享出来给有需要的同学做个参考。
一、蓝牙的使用
iOS有一套封装好的完善的蓝牙API ,可以很便捷的实现与蓝牙的连接和通信,蓝牙通信的大体流程如下,先对基本流程和术语有个初步的理解,然后我们在细细的从代码级别从零开始来实现一个蓝牙通信的示例。
蓝牙的通信大体分为如下三个步骤

在整个流程中,我们需要理解两个基本概念,【蓝牙设备的服务】和【蓝牙的特征】
蓝牙设备的服务(Service)
在低功耗蓝牙通信(BLE)里,通信是基于 GATT(Generic Attribute Profile) 的。简单来说,蓝牙设备的服务就类似与蓝牙的功能模块,一个蓝牙设备会有多个服务,用来描述设备提供什么功能,每一个功能就对应一个服务,每一个蓝牙的服务 (Service)都有一个唯一的UUID(通用唯一标识符) 来标识,如果有需要的话可以通过UUID来作为唯一标识符来区分。
蓝牙的特征(Characteristic)
每一个蓝牙的服务都包含多个特征,这个命名很抽象,但是特征才是我们在进行蓝牙通信的最基本的通信单元,比如写特征和监听特征。我们可以查询指定服务下拥有那些特征,然后通过这些特征来与蓝牙进行通信,比如我们可以通过【写特征】来进行蓝牙数据的写入,【监听特征】来收取蓝牙的回复。
当我们连接上蓝牙设备之后,我们可以先查询它拥有那些服务,然后再查询每个服务下面有那些特征来给我们使用,接着就可以跟蓝牙设备来进行通信了。
接下来我们通过代码来实现一个蓝牙通信的示例,来讲解每一个步骤的具体使用,每一步都会有详细的分步代码(全量代码会在文内贴出以便查询)
1.搜索蓝牙设备
配置项目权限
在进行搜索蓝牙设备之前,我们需要先在项目里配置上蓝牙的权限声明,具体位置在这里

伸手党自取:
NSBluetoothWhileInUseUsageDescription	TestBluetooth 想要使用蓝牙
Privacy - Bluetooth Peripheral Usage Description	 TestBluetooth想要使用蓝牙
Privacy - Bluetooth Always Usage Description		TestBluetooth想要使用蓝牙
(仅做示例使用,具体文案请根据不同场景自行优化)
配置好之后就可以正式开始蓝牙使用的开发了,废话不多说,直接上代码
首先 我们需要创建一个中央设备管理器CBCentralManager,它是 CoreBluetooth 框架 提供的一个核心类,功能就是用来扫描蓝牙设备、连接蓝牙设备、断开蓝牙设备、通过代理监听设备连接的成功和失败,是我们实现蓝牙功能的第一步。
创建中央设备管理器
    dispatch_queue_t centralQueue = dispatch_queue_create("Central_Queue",DISPATCH_QUEUE_SERIAL);
	self.centralManager = [[CBCentralManager alloc] initWithDelegate:self queue:centralQueue];
我这里为了防止影响主线程的性能,所以单独创建了一个串行队列用来实现蓝牙的所有功能、通信和监听,也建议各位用这种方式来实现,因为蓝牙功能绝大部分都是在后台运行的,通过串行队列也可以使得通信处理顺序不会错乱,但是记得更新页面的时候需要回到主线程来更新。
扫描蓝牙设备
扫描蓝牙设备的功能极其简单
系统api 如下
/*!
 *  @method scanForPeripheralsWithServices:options:
 *
 *  @param serviceUUIDs A list of <code>CBUUID</code> objects representing the service(s) to scan for.
 *  @param options      An optional dictionary specifying options for the scan.
 *
 *  @discussion         Starts scanning for peripherals that are advertising any of the services listed in <i>serviceUUIDs</i>. Although strongly discouraged,
 *                      if <i>serviceUUIDs</i> is <i>nil</i> all discovered peripherals will be returned. If the central is already scanning with different
 *                      <i>serviceUUIDs</i> or <i>options</i>, the provided parameters will replace them.
 *                      Applications that have specified the <code>bluetooth-central</code> background mode are allowed to scan while backgrounded, with two
 *                      caveats: the scan must specify one or more service types in <i>serviceUUIDs</i>, and the <code>CBCentralManagerScanOptionAllowDuplicatesKey</code>
 *                      scan option will be ignored.
 *
 *  @see                centralManager:didDiscoverPeripheral:advertisementData:RSSI:
 *  @seealso            CBCentralManagerScanOptionAllowDuplicatesKey
 *	@seealso			CBCentralManagerScanOptionSolicitedServiceUUIDsKey
 *
 */
- (void)scanForPeripheralsWithServices:(nullable NSArray<CBUUID *> *)serviceUUIDs options:(nullable NSDictionary<NSString *, id> *)options;
其中
serviceUUIDs:你希望扫描的蓝牙服务列表(可为 nil 扫描所有外设)。
options:可选的扫描参数,控制扫描行为和结果。
options有一个很实用的选项,是否允许重复扫描
NSDictionary *options = @{ CBCentralManagerScanOptionAllowDuplicatesKey : @YES };
[centralManager scanForPeripheralsWithServices:nil options:options];
如果设置为Yes,会重复返回同一个外设,常用于实时更新信号强度 RSSI 或观察广告包变化,默认情况下我们传nil就可以了,系统会自动去重,每个外设只会返回一次,即使扫描过程中设备的 RSSI 或广告包发生变化,也不会重复触发回调。
调用方法来扫描设备
[self.centralManager scanForPeripheralsWithServices:nil options:nil];
然后我们需要实现CBCentralManagerDelegate来监听搜索到的蓝牙设备,搜索到的蓝牙设备会通过CBCentralManagerDelegate中的回调方法中返回
CBCentralManagerDelegate回调中有几个常用的方法如下,介绍及参数都在备注里进行了说明:
#pragma mark CBCentralManagerDelegate
/*
 -  蓝牙状态更改时回调,当系统蓝牙开启和关闭的时候,也会回调该方法,可通过CBManagerStatePoweredOn枚举来判断当前蓝牙是否可用,当系统权限正确配置且系统蓝牙开关开启的时候才会返回CBManagerStatePoweredOn
 */
- (void)centralManagerDidUpdateState:(CBCentralManager *)central
{
    NSLog(@"蓝牙状态变更");
    switch (central.state) {
        case CBManagerStateUnknown: //未知状态
            NSLog(@"中央设备蓝牙状态:未知状态");
            break;
        case CBManagerStateResetting: //重启状态
            NSLog(@"中央设备蓝牙状态:重启状态");
            break;
        case CBManagerStateUnsupported: //不支持
            NSLog(@"中央设备蓝牙状态:不支持");
            break;
        case CBManagerStateUnauthorized: //未授权
            NSLog(@"中央设备蓝牙状态:未授权");
            break;
        case CBManagerStatePoweredOff: //蓝牙未开启
            NSLog(@"中央设备蓝牙状态:蓝牙未开启");
            break;
        case CBManagerStatePoweredOn: //蓝牙开启
        {
            NSLog(@"中央设备蓝牙状态:蓝牙开启");
        }
            break;
        default:
            break;
    }
}

/*
 发现蓝牙设备回调
 - Parameters:
 - central: 中央设备
 - peripheral: 蓝牙外设
 - advertisementData: 广播数据
 - RSSI: 信号强度
 */
-(void)centralManager:(CBCentralManager *)central didDiscoverPeripheral:(CBPeripheral *)peripheral advertisementData:(NSDictionary<NSString *,id> *)advertisementData RSSI:(NSNumber *)RSSI{

    NSLog(@"发现设备: %@  蓝牙强度RSSI:%d", peripheral.name ?: @"未知设备",[RSSI intValue]);
    if(![self.dataList containsObject:peripheral])[self.dataList addObject:peripheral];

    // 获取 ManufacturerData
    if([peripheral.name containsString:@"88"]){
        NSData *manufacturerData = advertisementData[CBAdvertisementDataManufacturerDataKey];
        if (manufacturerData) {
            [self parseManufacturerData:manufacturerData];
        }
    }
    dispatch_async(dispatch_get_main_queue(), ^{
        [self.deviceTableView reloadData];
    });
}

/*
 蓝牙设备连接成功
 - Parameters:
 - central: 中央设备
 - peripheral: 蓝牙外设
 */
- (void)centralManager:(CBCentralManager *)central didConnectPeripheral:(CBPeripheral *)peripheral{
    NSString *deviceName = peripheral.name ?: @"未知设备";
    NSLog(@"蓝牙设备连接成功 设备名:%@", deviceName);
    dispatch_async(dispatch_get_main_queue(), ^{
        self.stateLabel.text = deviceName;
        self.connectPeripheral = peripheral;
        self.connectPeripheral.delegate = self;
    });
}

/*
 蓝牙设备连接失败
 - Parameters:
 - central: 中央设备
 - peripheral: 蓝牙外设
 - error: 错误信息
 */
-(void)centralManager:(CBCentralManager *)central didFailToConnectPeripheral:(CBPeripheral *)peripheral error:(NSError *)error{
    NSLog(@"蓝牙设备连接失败,连接设备名 %@",peripheral.name);
}

/*
 蓝牙设备连接断开
 - Parameters:
 - central: 中央设备
 - peripheral: 蓝牙外设
 - error: 错误信息
 */
- (void)centralManager:(CBCentralManager *)central didDisconnectPeripheral:(CBPeripheral *)peripheral error:(NSError *)error{
    NSLog(@"蓝牙设备断开,连接设备名 %@",peripheral.name);
}
当扫描到蓝牙设备之后,会通过
/*!
 *  @method centralManager:didDiscoverPeripheral:advertisementData:RSSI:
 *
 *  @param central              The central manager providing this update.
 *  @param peripheral           A <code>CBPeripheral</code> object.
 *  @param advertisementData    A dictionary containing any advertisement and scan response data.
 *  @param RSSI                 The current RSSI of <i>peripheral</i>, in dBm. A value of <code>127</code> is reserved and indicates the RSSI
 *								was not available.
 *
 *  @discussion                 This method is invoked while scanning, upon the discovery of <i>peripheral</i> by <i>central</i>. A discovered peripheral must
 *                              be retained in order to use it; otherwise, it is assumed to not be of interest and will be cleaned up by the central manager. For
 *                              a list of <i>advertisementData</i> keys, see {@link CBAdvertisementDataLocalNameKey} and other similar constants.
 *
 *  @seealso                    CBAdvertisementData.h
 *
 */
- (void)centralManager:(CBCentralManager *)central didDiscoverPeripheral:(CBPeripheral *)peripheral advertisementData:(NSDictionary<NSString *, id> *)advertisementData RSSI:(NSNumber *)RSSI;
方法将设备的详细信息返回,其中有几个常用的重要信息

蓝牙名称:
通过peripheral.name可以获取的蓝牙的设备名称
RSSI:
RSSI 标识的是蓝牙的强度,是以负数RSSI 表示设备接收到的信号强度大小,通常用 dBm(分贝毫瓦) 表示。
值越高(接近 0),信号越强;
值越低(负数越大),信号越弱
比如
-30 dBm → 信号非常强
-60 dBm → 信号良好
-90 dBm → 信号很弱,可能无法通信
可以通过RSSI进行距离估计,判断发射设备和接收设备的相对距离(虽然精度受环境影响大)和连接质量判断,用来删除掉那些信号非常差的设备
附加信息:
advertisementData 这个数据也是非常重要的信息,advertisementData是通过键值对来返回蓝牙设备的附属信息,需要注意的是,advertisementData不是一次回调就可以获取完整,而是通过扫描来逐次获取和补充更新的,常见的信息字段如下:
CBAdvertisementDataLocalNameKey 设备本地名称
CBAdvertisementDataServiceUUIDsKey 设备广播的服务 UUID 数组
CBAdvertisementDataServiceDataKey 服务相关数据(字典:UUID → Data)
CBAdvertisementDataManufacturerDataKey 厂商自定义数据
CBAdvertisementDataTxPowerLevelKey 发射功率,通常用于距离估算
CBAdvertisementDataIsConnectable 是否可连接(BOOL)
因为IOS的隐私保护机制,我们在扫描蓝牙的时候不能够直接获取到蓝牙设备的mac地址,但是有的蓝牙厂商会将mac地址放在CBAdvertisementDataManufacturerDataKey这个厂商自定义的字段中返回,在使用的过程中可以留意一下。
停止蓝牙扫描调用方法
/*!
 *  @method stopScan:
 *
 *  @discussion Stops scanning for peripherals.
 *
 */
- (void)stopScan;
实际使用方法:
[self.centralManager stopScan];
2.连接蓝牙设备
通过上面的代理 ,我们就可以获取到当前周围蓝牙设备的信息了,也可以通过蓝牙搜索的回调找到我们想要连接的设备,可以使用下面的方法来进行蓝牙的连接。
连接某一蓝牙设备:
从我们缓存的蓝牙列表里找到我们想要连接的蓝牙设备,然后调用方法来进行连接
/*!
 *  @method connectPeripheral:options:
 *
 *  @param peripheral   The <code>CBPeripheral</code> to be connected.
 *  @param options      An optional dictionary specifying connection behavior options.
 *
 *  @discussion         Initiates a connection to <i>peripheral</i>. Connection attempts never time out and, depending on the outcome, will result
 *                      in a call to either {@link centralManager:didConnectPeripheral:} or {@link centralManager:didFailToConnectPeripheral:error:}.
 *                      Pending attempts are cancelled automatically upon deallocation of <i>peripheral</i>, and explicitly via {@link cancelPeripheralConnection}.
 *
 *  @see                centralManager:didConnectPeripheral:
 *  @see                centralManager:didFailToConnectPeripheral:error:
 *  @seealso            CBConnectPeripheralOptionNotifyOnConnectionKey
 *  @seealso            CBConnectPeripheralOptionNotifyOnDisconnectionKey
 *  @seealso            CBConnectPeripheralOptionNotifyOnNotificationKey
 *  @seealso            CBConnectPeripheralOptionEnableTransportBridgingKey
 *	@seealso			CBConnectPeripheralOptionRequiresANCS
 *  @seealso            CBConnectPeripheralOptionEnableAutoReconnect
 *
 */
- (void)connectPeripheral:(CBPeripheral *)peripheral options:(nullable NSDictionary<NSString *, id> *)options;
实际使用方式如下:
CBPeripheral *peripheral = self.dataList[indexPath.row];
[self.centralManager connectPeripheral:peripheral options:nil];
发起连接之后,通过CBCentralManagerDelegate代理中的方法可以监听蓝牙的连接成功与失败
/*
 蓝牙设备连接成功
 - Parameters:
 - central: 中央设备
 - peripheral: 蓝牙外设
 */
- (void)centralManager:(CBCentralManager *)central didConnectPeripheral:(CBPeripheral *)peripheral{
    NSString *deviceName = peripheral.name ?: @"未知设备";
    NSLog(@"蓝牙设备连接成功 设备名:%@", deviceName);
    dispatch_async(dispatch_get_main_queue(), ^{
        self.stateLabel.text = deviceName;
        self.connectPeripheral = peripheral;
        self.connectPeripheral.delegate = self;
    });
}

/*
 蓝牙设备连接失败
 - Parameters:
 - central: 中央设备
 - peripheral: 蓝牙外设
 - error: 错误信息
 */
-(void)centralManager:(CBCentralManager *)central didFailToConnectPeripheral:(CBPeripheral *)peripheral error:(NSError *)error{
    NSLog(@"蓝牙设备连接失败,连接设备名 %@",peripheral.name);
}
3.查询设备服务
当设备连接成功之后,切记要缓存设备的并设置设备的代理
self.connectPeripheral = peripheral;
self.connectPeripheral.delegate = self;
否则的话后续的扫描服务、扫描服务特征的回调都是收不到的。
连接设备成功之后就可以查询设备有那些服务,查询设备服务的方法是
/*!
 *  @method discoverServices:
 *
 *  @param serviceUUIDs A list of <code>CBUUID</code> objects representing the service types to be discovered. If <i>nil</i>,
 *						all services will be discovered.
 *
 *  @discussion			Discovers available service(s) on the peripheral.
 *
 *  @see				peripheral:didDiscoverServices:
 */
- (void)discoverServices:(nullable NSArray<CBUUID *> *)serviceUUIDs;
通过我们当前连接的蓝牙设备的CBPeripheral对象来调用
[self.connectPeripheral discoverServices:nil];
然后实现代理CBPeripheralDelegate的一系列代理方法,其中代理方法中的
/*!
 *  @method peripheral:didDiscoverServices:
 *
 *  @param peripheral	The peripheral providing this information.
 *	@param error		If an error occurred, the cause of the failure.
 *
 *  @discussion			This method returns the result of a @link discoverServices: @/link call. If the service(s) were read successfully, they can be retrieved via
 *						<i>peripheral</i>'s @link services @/link property.
 *
 */
- (void)peripheral:(CBPeripheral *)peripheral didDiscoverServices:(nullable NSError *)error;
会以代理回调的方式将蓝牙设备的服务返还给我们
可以通过如下方式来进行解析
/*
 查询到蓝牙设备服务回调
 - Parameters:
   - peripheral: 蓝牙外设
   - error: 错误信息
 */
- (void)peripheral:(CBPeripheral *)peripheral didDiscoverServices:(nullable NSError *)error{
    NSString *tipStr = @"开始查询外设服务信息";
    NSLog(@"%@",tipStr);

    if (error) {
        NSString *tipStr = [NSString stringWithFormat:@"获取外设服务失败,原因: %@",error.userInfo];
        NSLog(@"%@",tipStr);
    }
    for (CBService *service in peripheral.services) {
        NSString *tipStr = [NSString stringWithFormat:@"发现外设服务: UUID: %@ 服务总数:%lu",service.UUID,peripheral.services.count];
        NSLog(@"%@",tipStr);

        //扫描服务特征
        [peripheral discoverCharacteristics:nil forService:service];
    }
}
通过这个方法我们便可以扫描到当前蓝牙设备提供那些服务,然后可以通过查询服务下面的特征值来找到我们想要的特征
4.查询服务特征
查询服务特征使用的方法是
/*!
 *  @method discoverCharacteristics:forService:
 *
 *  @param characteristicUUIDs	A list of <code>CBUUID</code> objects representing the characteristic types to be discovered. If <i>nil</i>,
 *								all characteristics of <i>service</i> will be discovered.
 *  @param service				A GATT service.
 *
 *  @discussion					Discovers the specified characteristic(s) of <i>service</i>.
 *
 *  @see						peripheral:didDiscoverCharacteristicsForService:error:
 */
- (void)discoverCharacteristics:(nullable NSArray<CBUUID *> *)characteristicUUIDs forService:(CBService *)service;
其使用方式其实在上面的扫描服务的示例方法里已经给出来了,使用方法如下
[peripheral discoverCharacteristics:nil forService:service];
然后扫描处理出来的服务特征值依然会通过CBPeripheralDelegate的代理方法返回,回调的方法如下:
/*!
 *  @method peripheral:didDiscoverCharacteristicsForService:error:
 *
 *  @param peripheral	The peripheral providing this information.
 *  @param service		The <code>CBService</code> object containing the characteristic(s).
 *	@param error		If an error occurred, the cause of the failure.
 *
 *  @discussion			This method returns the result of a @link discoverCharacteristics:forService: @/link call. If the characteristic(s) were read successfully,
 *						they can be retrieved via <i>service</i>'s <code>characteristics</code> property.
 */
- (void)peripheral:(CBPeripheral *)peripheral didDiscoverCharacteristicsForService:(CBService *)service error:(nullable NSError *)error;
具体使用方法和数据解析方法如下:
/*
 发现蓝牙服务特征回调
 - Parameters:
   - peripheral: 蓝牙外设
   - service: 服务
   - error: 错误信息
 */
-(void)peripheral:(CBPeripheral *)peripheral didDiscoverCharacteristicsForService:(CBService *)service error:(NSError *)error{
    NSString *tipStr = [NSString stringWithFormat:@"开始查询服务 %@ 特征信息:",service.UUID];
    NSLog(@"%@",tipStr);

    for (CBCharacteristic *cha in service.characteristics) {
        NSString *tipStr = [NSString stringWithFormat:@"发现特征: UUID == %@",cha.UUID];
        NSLog(@"%@",tipStr);

        if([cha.UUID.UUIDString isEqualToString:Write_Characteristic_Code]){
            self.writeCharacteristic = cha;
            [peripheral setNotifyValue:YES forCharacteristic:self.writeCharacteristic];
            NSString *tipStr = [NSString stringWithFormat:@"*** 连接写特征值: UUID == %@ *** ",cha.UUID];
            NSLog(@"%@",tipStr);
        }
        if([cha.UUID.UUIDString isEqualToString:Notify_Characteristic_Code]){
            NSString *tipStr = [NSString stringWithFormat:@"*** 连接监听特征值:UUID == %@ ***",cha.UUID];
            NSLog(@"%@",tipStr);
            self.notifyCharacteristic = cha;
            [peripheral setNotifyValue:YES forCharacteristic:self.notifyCharacteristic];
        }
    }
}
我这里定义了两个字符常量
Write_Characteristic_Code = @“FF02”
Notify_Characteristic_Code = @“FF01”
这两个字符串是我们跟硬件通过蓝牙协议约定的通信特征值,那么如果拿到一台没有蓝牙协议的设备的话,我们如果去查找他的读写特征值呢,有两种方法
第一种方法
在 iOS 中,每个 CBCharacteristic 对象都有一个属性:
@property(nonatomic, readonly) CBCharacteristicProperties properties;
properties 是一个位掩码(bitmask),表示该特征支持的操作。
常用的 CBCharacteristicProperties 值
CBCharacteristicPropertyRead 可读
CBCharacteristicPropertyWrite 可写(无响应)
CBCharacteristicPropertyWriteWithoutResponse 可写(无需响应)
CBCharacteristicPropertyNotify 可通知(Notify,监听)
CBCharacteristicPropertyIndicate 可指示(Indicate,也是一种监听,带确认)
判断是否是写入特征
if (characteristic.properties & CBCharacteristicPropertyNotify ||  characteristic.properties & CBCharacteristicPropertyIndicate) {
    NSLog(@"这是监听特征");
}
判断是否是监听特征
if (characteristic.properties & CBCharacteristicPropertyNotify || characteristic.properties & CBCharacteristicPropertyIndicate) {
    NSLog(@"这是监听特征");
}
因为一个蓝牙设备会有很多个服务,每个服务都可能会有读写特征,所以具体使用哪个服务来进行通信可以跟硬件协议沟通好
第二种方法
可以在iOS设备上安装一个LightBlue调试软件,通过软件连接上我们的蓝牙设备之后,可以在设备详情里看到所有的服务列表和每个服务提供的特征以及每个特征的属性,可以直接在这个调试软件里进行蓝牙的读写测试,然后找到我们后续通信的固定特征的UUID,后续再连接该设备的时候,只需要通过UUID去连接固定的读写特征作为后续沟通的工具即可。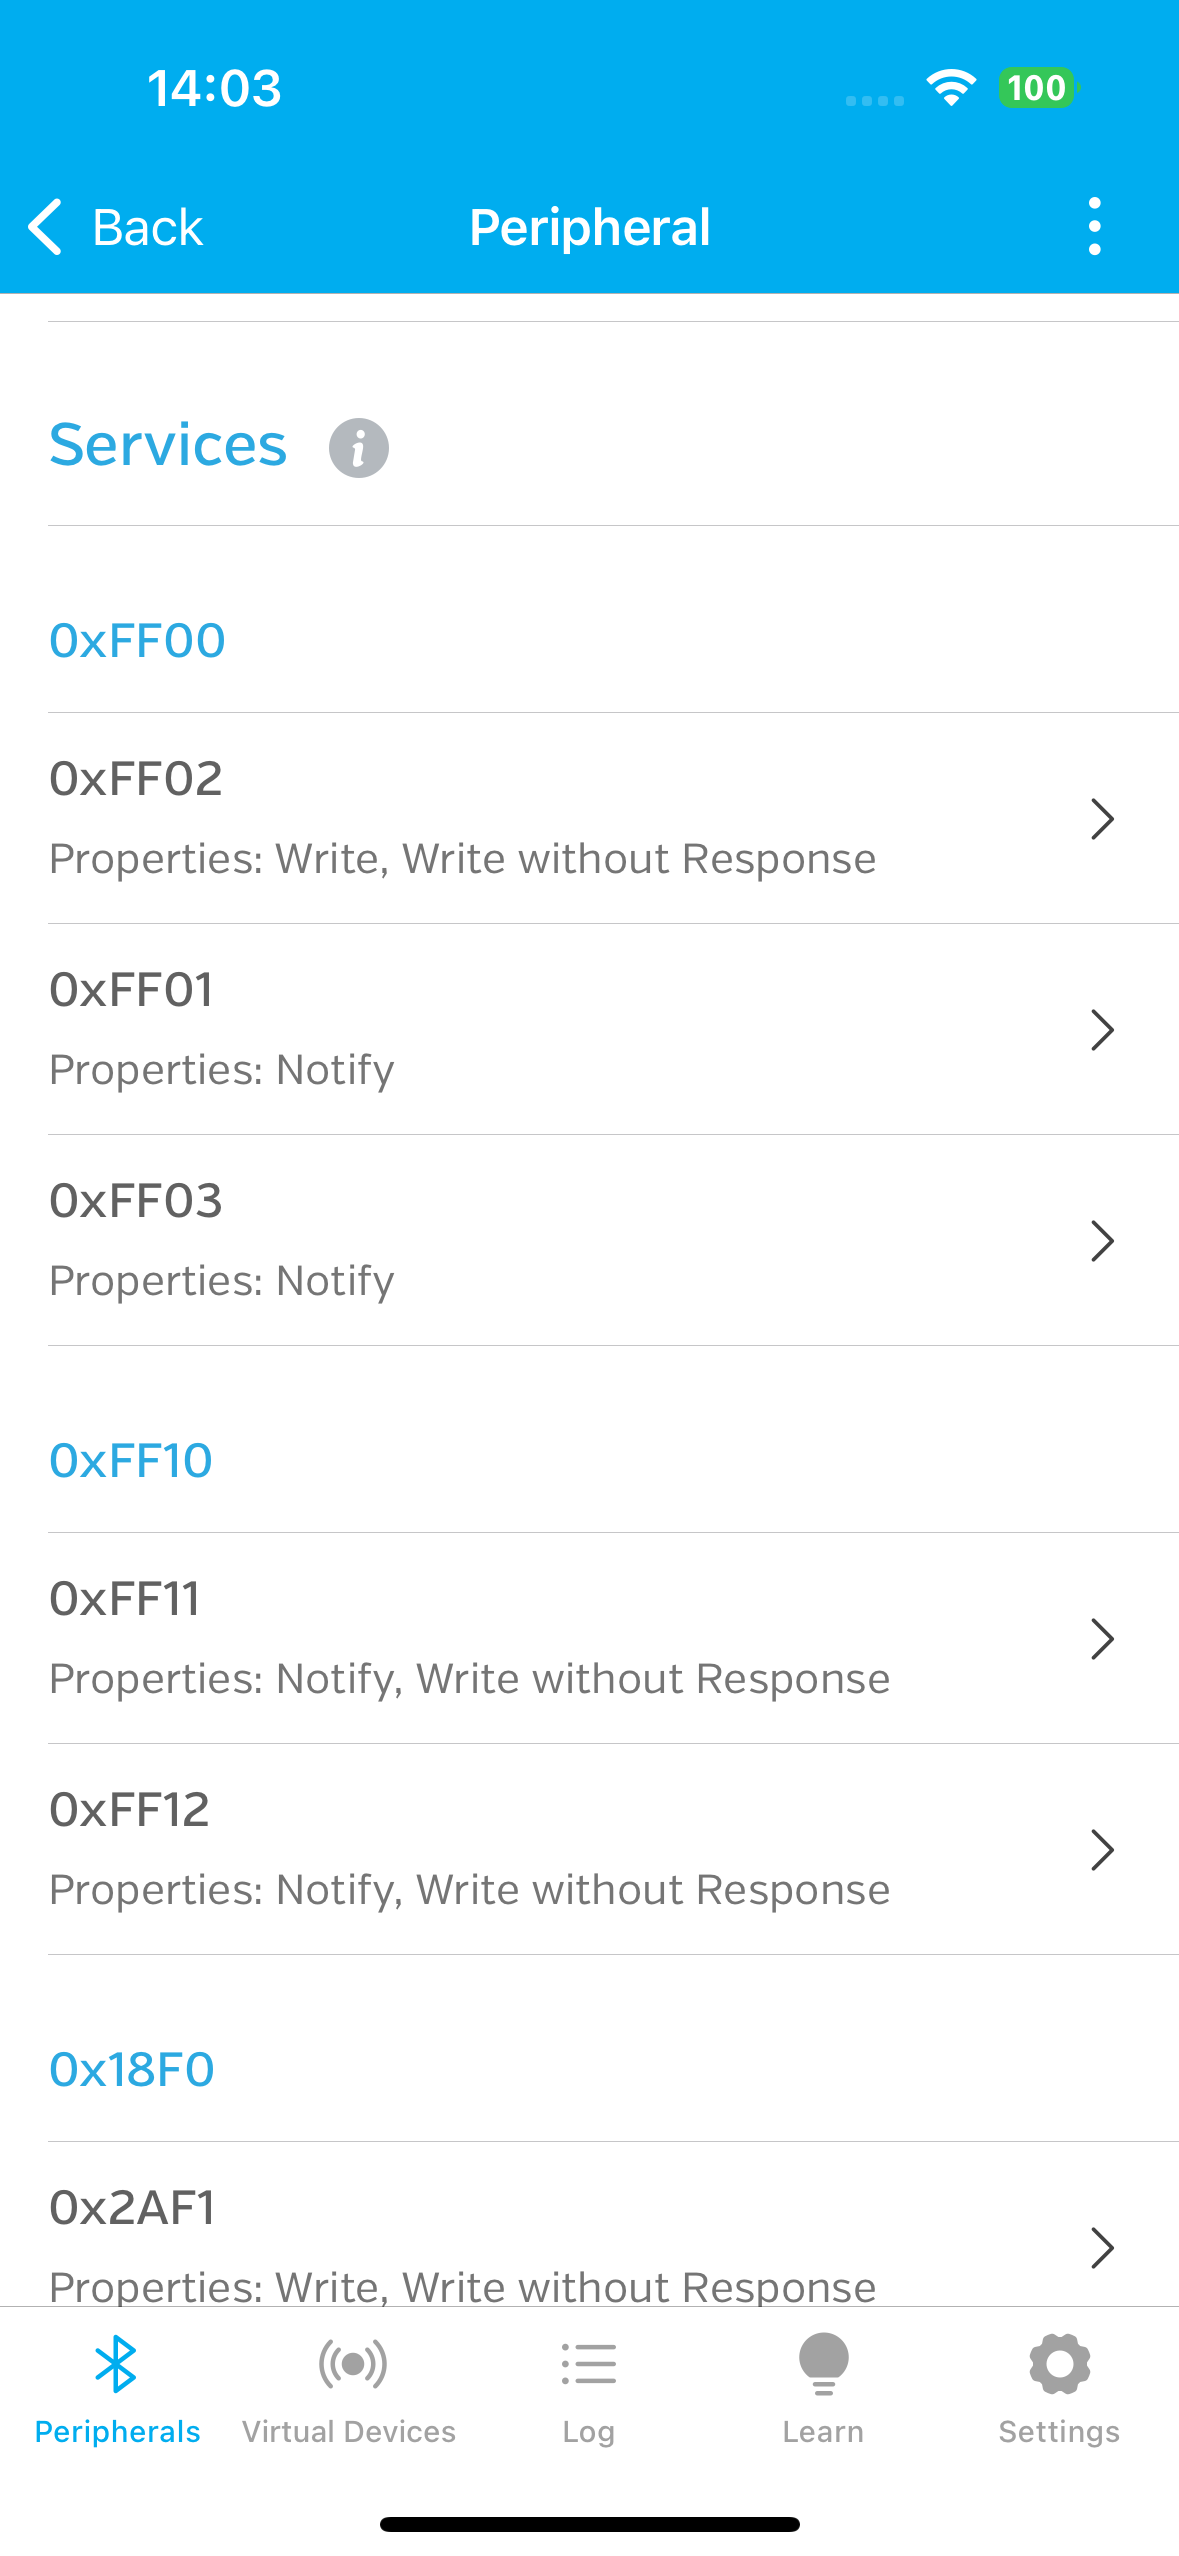
5.使用【写特征】/【监听特征】来进行蓝牙的【数据写入】/【监听蓝牙回复】
写入数据
/*!
 *  @method writeValue:forCharacteristic:type:
 *
 *  @param data				The value to write.
 *  @param characteristic	The characteristic whose characteristic value will be written.
 *  @param type				The type of write to be executed.
 *
 *  @discussion				Writes <i>value</i> to <i>characteristic</i>'s characteristic value.
 *							If the <code>CBCharacteristicWriteWithResponse</code> type is specified, {@link peripheral:didWriteValueForCharacteristic:error:}
 *							is called with the result of the write request.
 *							If the <code>CBCharacteristicWriteWithoutResponse</code> type is specified, and canSendWriteWithoutResponse is false, the delivery
 * 							of the data is best-effort and may not be guaranteed.
 *
 *  @see					peripheral:didWriteValueForCharacteristic:error:
 *  @see					peripheralIsReadyToSendWriteWithoutResponse:
 *	@see					canSendWriteWithoutResponse
 *	@see					CBCharacteristicWriteType
 */
- (void)writeValue:(NSData *)data forCharacteristic:(CBCharacteristic *)characteristic type:(CBCharacteristicWriteType)type;
使用该方法向蓝牙设备的特征值写入数据,这个方法接收两个参数
第一个参数是二进制的数据块,大部分蓝牙应用层协议都是使用的十六进制数据来进行通信
第二个参数可以有两个传值
typedef NS_ENUM(NSInteger, CBCharacteristicWriteType) {
CBCharacteristicWriteWithResponse = 0,
CBCharacteristicWriteWithoutResponse,
};
如果选择传入CBCharacteristicWriteWithResponse,那么每次写入时数据完成之后,在CBPeripheralDelegate代理中的
/*
 蓝牙写入完成回调
 - Parameters:
   - peripheral: 蓝牙外设
   - characteristic: 写入的特征
   - error: 错误信息
 */
- (void)peripheral:(CBPeripheral*)peripheral didWriteValueForCharacteristic:(CBCharacteristic *)characteristic error:(NSError *)error{
    NSLog(@"数据写入完成");
}
都会进行回调
如果选择传入CBCharacteristicWriteWithoutResponse,那么每次写入完成之后就不会回调
下面是使用十六进制格式的通信方式来进行一次数据发送的示例
    NSString *orderCode = @"FF0012450504";
    NSMutableData *sendData = [NSMutableData new];
    for (int i = 0; i < orderCode.length; i+= 2) {
        NSString *hexString = [orderCode substringWithRange:NSMakeRange(i, 2)];
        unsigned int hexValue;
        NSScanner *scanner = [NSScanner scannerWithString:hexString];
        [scanner scanHexInt:&hexValue];
        unsigned char send[1] = {hexValue};
        [sendData appendData:[NSData dataWithBytes:send length:1]];
    }
    [self.connectPeripheral writeValue:sendData forCharacteristic:self.writeCharacteristic type:CBCharacteristicWriteWithResponse];

(不同协议的处理方式不一样,根据自己的蓝牙协议进行格式化即可)
切记如果传入CBCharacteristicWriteWithResponse,希望获取到写入数据之后的蓝牙回调的话,需要在缓存服务特征的时候设置对该特征的监听
[peripheral setNotifyValue:YES forCharacteristic:self.writeCharacteristic];
监听蓝牙回复
监听蓝牙回复是通过监听我们蓝牙的服务监听特征来实现的,这就需要我们在缓存监听特征的时候来设置监听对象,否则的话我们无法接收到蓝牙的回复响应
[peripheral setNotifyValue:YES forCharacteristic:self.notifyCharacteristic];
蓝牙给我们进行数据回复的时候,回调方法是
/*!
 *  @method peripheral:didUpdateValueForCharacteristic:error:
 *
 *  @param peripheral		The peripheral providing this information.
 *  @param characteristic	A <code>CBCharacteristic</code> object.
 *	@param error			If an error occurred, the cause of the failure.
 *
 *  @discussion				This method is invoked after a @link readValueForCharacteristic: @/link call, or upon receipt of a notification/indication.
 */
- (void)peripheral:(CBPeripheral *)peripheral didUpdateValueForCharacteristic:(CBCharacteristic *)characteristic error:(nullable NSError *)error;
在使用这个方法的时候,我们可以通过解析蓝牙回复的数据来完成一次通信
/*
 特征值更新回调
 - Parameters:
   - peripheral: 蓝牙外设
   - characteristic: 更新的特征
   - error: 错误信息
 */
-(void)peripheral:(CBPeripheral *)peripheral didUpdateValueForCharacteristic:(CBCharacteristic *)characteristic error:(NSError *)error{
    NSData *responseData = characteristic.value;
    NSLog(@"收到蓝牙回复数据");
}
这样,我们就完成了一次完整的蓝牙通信,是不是很简单。
可以根据上面的功能来来实现很多常见的业务,比如缓存上一次连接蓝牙的信息,这样每次打开我们的app时都可以默认搜索并连接上一次连接的蓝牙设备,这个功能很常用在实际的使用中也非常方便。
二、深入剖析高频高负载传输丢包解决方案
我们通过一个真实的场景来探讨高频高负载发送蓝牙数据的时候遇到问题以及相应的解决方案
先回顾一下两种发送模式,这在我们后面的讨论中会高频的出现
WithResponse发送模式
[peripheral writeValue:chunk forCharacteristic:characteristic type:CBCharacteristicWriteWithResponse];
每发送一包数据都会得到ACK(确认包)
- (void)peripheral:(CBPeripheral*)peripheral didWriteValueForCharacteristic:(CBCharacteristic *)characteristic error:(NSError *)error
- 在这个回调里我们可以继续发送后续数据,可以在数据发送的稳定性上得到保证
WithoutResponse发送模式
[peripheral writeValue:chunk forCharacteristic:characteristic type:CBCharacteristicWriteWithoutResponse];
发送之后没有回调,无法确定是否发送成功,但是可以手动控制发送频率,发送大块数据效率会高很多
场景:
当通过蓝牙协议向蓝牙设备发送一张图片的时候,图片大小为77831个字节(76KB左右),使用6ms的固定频率、withoutResponse方式来快速发送,分为428包发送,会有千分之五左右的丢包率
为什么会出现丢包的情况呢?
1.iOS蓝牙协议的深入探究
实测结果:
通过在iphone14 pro和 iPhone 12上进行的测试,发现丢包率是不同的
在iPhone 12上的丢包率是1%,在iphone14 pro上的丢包率是0.1%
为什么一定以稳定一致性著称的IOS系统,丢包率会相差这么多呢?原因就在蓝牙协议的区别上
苹果从 iPhone 8 和 iPhone X 这一代(2017年秋季发布)开始引入对蓝牙5.0的支持
从 iPhone 14 系列(2022年秋季发布)开始引入对蓝牙5.3的支持
也就是说 iPhone12使用的是蓝牙5.0,iPhone 14 pro 使用的是蓝牙5.3的协议
这两种协议主要有以下几点的区分:
链路层调度优化
5.0:在高数据密度场景下,链路调度比较死板,包和包之间的间隔依赖固化的连接间隔(Connection Interval),如果环境干扰大(Wi-Fi、其他蓝牙设备),包可能延迟甚至丢失
5.3:增加了 Isochronous Channels(同步信道) 和更灵活的调度机制,能更好地插入重传包,减少丢包几率。
干扰抑制能力
5.3 的 Enhanced Channel Selection Algorithm #2 对频点选择更智能,能避开拥挤的 2.4GHz 信道(比如周围的 Wi-Fi AP)。
5.0 在密集环境(办公室、展会)下容易撞频,丢包率会偏高。
重传与延迟
BLE 本身有 链路层自动重传(LL retransmit),但 5.3 在重传延迟、优先级调度上更优化,意味着短时间高并发下数据更容易补回。
428 包的数据量其实已经接近 BLE 持续传输的上限,如果是 5.0,间歇性的丢包概率比 5.3 高
实测差异(参考实验数据)
在相同干扰环境下:
BLE 5.0:高负载 + 每 10 秒 burst 传输时,丢包率可能在 1%~3%(取决于连接参数)。
BLE 5.3:丢包率能压到 0.1% 以下,甚至趋近于零(如果连接参数、MTU、PHY 优化得好)。
这个数据跟我们实际测试的数据【在iPhone 12上的丢包率是1% 在iphone14 pro上的丢包率是0.1% 】也是相符的,所以在传输策略和接收设备不变的情况下,影响丢包率的因素就是两台手机使用了不同的蓝牙协议版本
最核心的原因就是蓝牙5.3相比于5.0有了 Isochronous Channels(同步信道),这个特性是从蓝牙5.2起开始增加的,虽然主要是为 LE Audio 设计的,但它的调度机制可以减少非音频数据的排队延迟,提升短时间高密度传输的稳定性,所以丢包率大幅下降
2.传输策略对丢包率的影响
当使用withoutResponse机制来进行蓝牙数据传输的时候,发送频率对丢包率的影响也是非常大的
实测结果:
当发送间隔设置为4ms,每包大小为182字节,分为428包发送 实测丢包率为50%
当发送间隔设置为6ms,每包大小为182字节,分为428包发送 实测丢包率为千分之五
当发送间隔设置为8ms,每包大小为182字节,分为428包发送 循环发送两千次未出现丢包的情况
(为什么会使用182个字节来进行分包,后面会解释具体的原因。)
所以如果使用withoutResponse机制来进行蓝牙传输,并且以固定间隔频率发送数据的话,要根据通信设备之间的实际交互能力来制定发送间隔频率。
3.MTU(Maximum Transmission Unit,最大传输单元)对传输速率的影响
BLE 传输数据是通过 Characteristic 的 Value 完成的,每次写入/通知的数据包大小受 MTU(Maximum Transmission Unit,最大传输单元) 限制,MTU = ATT 层能承载的最大字节数,包含协议开销
iOS 9 及之前:
没有 MTU 协商机制
有效负载最大是 20 字节(ATT 默认 MTU = 23 字节,去掉 3 字节协议头 = 20 字节数据)
iOS 10 及之后:
支持 MTU 协商(Peripheral 和 Central 在连接时协商最大 MTU)
理论上:
iOS 最大支持 185 字节有效数据(MTU = 185 + 3 = 188)
有些资料提到 iOS 实际最大 MTU 是 185,这是 Apple 文档和测试得到的结论
当发送的数据超过MTU的时候,系统底层会对需要传输的数据进行拆分,然后分包发送,但是系统蓝牙底层能支持的拆分数据缓冲量是有限的,当传输的数据远大于MTU的时候,CoreBluetooth 的发送队列直接被撑爆,底层丢弃多余部分(这个后面会深入解析)
4.如何获取蓝牙MTU单包发送数据的大小
当我们需要进行稳定可靠的数据传输的时候,可以选择WithResponse模式来进行传输,当我们传输的数据大于MTU的时候,蓝牙底层会将我们的数据进行拆分发送,每发送一包收到ACK之后才会发送下一包,经过实测,76KB的数据在蓝牙5.3上会发送16秒左右,这个时效对于现在的数据传输速率来说确实慢太多了。
所以我们可以采取另一种发送频率更快的方式,使用WithoutResponse模式来进行发送,这样我们可以控制发送的速率,经过合理的搭配之后,76KB的数据只需要三秒左右即可完成传输,这对于用户来说就是质的提升。
但是WithoutResponse如果使用不当的话,会有诸多问题,如果每包发送的数据太大,那么蓝牙底层会丢弃缓存不了的数据,会出现缓存溢出和丢包的情况,这就需要我们选择一个合适的分包大小和发送频率,而发送频率又受到分包大小的限制,这就需要根据实际情况来调试选择一个最合适的分包大小和频率的搭配。
对于WithoutResponse模式下的分包大小,应当选择小于MTU的,一包即可将数据发送完成、不需要系统底层再去分包发送的大小。
在IOS 10之后的系统里,我们可以使用maximumWriteValueLengthForType来获取这两种模式下的MTU
使用方式如下:
   NSUInteger writeWithResponseMTU = [self.connectPeripheral maximumWriteValueLengthForType:CBCharacteristicWriteWithResponse];
    NSUInteger writeoutWithResponseMTU = [self.connectPeripheral maximumWriteValueLengthForType:CBCharacteristicWriteWithoutResponse];
    NSLog(@"maxMTU WithResponse = %lu  WithoutResponse = %lu",writeWithResponseMTU,writeoutWithResponseMTU);
输出结果如下

这样我们就可以获取到在WithResponse与WithoutResponse模式下分别支持的MTU大小了,而且获取到数据结果是减去协议句柄消耗的大小,我们在这两种模式下发送的数据应当小于这两个模式的数据大小来进行传输。
5.对maximumWriteValueLengthForType获取蓝牙MTU单包发送数据的大小的更深入讨论
需要注意的是,当我们连接完蓝牙之后立刻去获取协商MTU的话,获取到的数据是不正确的,如下图所示:

当我们连接完蓝牙设备之后,立刻获取WithoutResponse的MTU,返回的结果是20,但是延迟一秒之后在获取的话,却变成了244。
这是因为连接设备完成之后会有一个蓝牙协商的阶段,如果连接之后立刻获取的话,获取的到是安全的默认的MTU,在蓝牙4.3的协议的时候,单包20个字节是MTU的安全发送阈值,所以默认会返回20个字节。这个协商过程通常在0.5-1秒内协商完成,所以我们应当在蓝牙连接完成之后延迟一秒来获取协商后的MTU,而且拿到数据之后需要验证一下是否是默认值,如果并不是的话可以延迟在获取一次协商后的MTU。
6.小于MTU的发送数据就一定不会分包吗
先说结论:不一定
实测结果:对于同一张图片,使用WithoutResponse模式下,每包发送500个字节和每包发送182个字节,耗时分别是20秒和16秒。
如果按照设计来说。500个字节小于协商后的512个字节,应当是属于效率最高且稳定安全的发送策略,为什么反而每包发送182个字节的反而传输效率更高呢?原因就是系统进行了分包。
即使 iOS 给你返回 512 的 maximumWriteValueLengthForType,链路层并不一定能单次吞下 512 字节,可能还要切分成多包。
例如:外设/连接参数限制下,链路层可能一次只能传 251B(BLE 5.0 2M PHY 常见值),那写 512B 就会被拆成 3 个链路层包(251+251+10)。
WithResponse = 每个 ATT Write Request → 等外设返回 Write Response 才算完成
如果你每次写 512B,系统需要在 链路层拆成多包再等确认,一旦有延迟,整体 RTT 就被放大,这是 Apple 明确开放的优化,不是默认的分包机制。
所以这其实是 iOS 在 WithoutResponse 模式下的特殊策略,而 182B 恰好能让链路层单包完成(或 2 包以内),所以 每次确认的延迟更短,整体吞吐反而更高
有些外设(特别是 MCU 上的 BLE 协议栈,比如 Nordic / TI)对 512B 的大包处理效率很差,需要更多缓冲和拷贝,但 182B 属于 ATT 层常见的“安全长度”,外设处理快、应答也快
• 512 看似更大,但实际上传输时:
• 多分包 + 多次链路层调度 → RTT 放大。
• 182 更小,但更符合链路层的最优分包大小 → 整体效率更高。
• 所以 MTU 最大 ≠ 最快,最佳 chunk size 要结合:
• 外设 buffer 能力
• 链路层最大 PDU (常见 185, 251)
• RTT + 硬件栈优化程度
[peripheral maximumWriteValueLengthForType:…] 返回的数值,只能理解为 iOS CoreBluetooth 层愿意让你一次 writeValue 调用传进去的最大字节数。它并不等于底层物理链路一定会“整块”发出去。真正的数据传输要经过:
1. ATT 层 (Attribute Protocol)
• 你调用 writeValue:forCharacteristic:type:,会被封装成一个 ATT PDU。
• 这个 PDU 的负载部分最大就是你传的长度。
2. L2CAP 层 / LL 层
• ATT PDU 可能大于链路层一次能承载的大小(比如常见的 27B、185B、251B)。
• 超过就会被 拆包 (fragmentation) 成多个 Link Layer PDU 逐个发出。
• 这时候,即使你上传了 512B,也要拆成 2~3 个 LL 包,分几次发送。
3. 外设处理能力
• 外设的缓冲区可能也有限,如果它不能一次收下 512B,也会分次处理。
maximumWriteValueLengthForType = “上层允许你写的最大数据块”
• 并不保证物理层单包发出
• 真正的“最优 chunk size”要取决于:
• 链路层最大 PDU(一般 185B 或 251B)
• 外设的 buffer 能力
• ACK 往返延迟
7.直接使用WithoutResponse传输大块数据的深入探究
实测场景:
当使用WithoutResponse模式,直接将图片的77831个字节的数据一起发送出去的时候,会发现蓝牙不会报错,但是接收设备也不会报错,原因是什么呢?
这其实是 iOS CoreBluetooth 的 WriteWithoutResponse 特性 + 流控机制共同作用的结果
因为CBCharacteristicWriteWithoutResponse 模式下,不会有 ACK(确认包),而且iOS 在 API 设计上也不会报错,即使一次调用写入的数据远远大于 maximumWriteValueLengthForType,所以直接 writeValue: 77831 字节,Xcode 控制台不会提示任何错误。虽然 WithoutResponse 允许比 MTU 大的数据写入,但它不是无限制的
Apple 底层会对超大数据做截断 / 丢弃,超过缓冲区的部分直接没发,所以看起来“没传输”,其实是数据超限被丢掉了
WriteWithoutResponse 本身没有响应机制,如果一次扔 70KB 下去,CoreBluetooth 的发送队列直接被撑爆,底层丢弃多余部分,iOS 只保证 maximumWriteValueLengthForType: 范围内的数据可靠写入,所以要发送大数据(比如图片、固件升级包、传感器日志),必须分包 + 流控。
整包发送最大数据长度参考
| 数据大小 | 结果 | 原因 |
|---|---|---|
| < 20~30 KB | 通常成功 | iOS 自动拆包 + 内部队列可承受 |
| > 70 KB | 写失败 | 队列被撑爆,内部拆包机制不够,系统拒绝写入 |
| 极大数据(几十 MB) | 必须手动拆包 + 回调控制 | 保证每次写入不超过 MTU 并等待回调,避免队列溢出 |
8.直接使用WithoutResponse最大可挂载队列的分包数
iOS 在 Write Without Response 模式下,会在底层维护一个 发送队列(内核 BLE 堆栈),缓存调用 writeValue:forCharacteristic:type:.withoutResponse 的数据包。
当队列满时:
canSendWriteWithoutResponse 返回 NO
系统会延迟写入,直到触发 peripheralIsReadyToSendWriteWithoutResponse 回调
系统/设备情况 可挂在队列的分包数(约)
早期 iOS 10–12 1–3
iOS 13+ / iPhone 8+ 4–8
高速 2M PHY + 小包 8–12
这些都是经验值,具体数值取决于:
• 每包大小(chunk size = MTU-3)
• BLE PHY(1M / 2M / Coded)
• 手机型号、系统版本
• 外设接收缓冲和处理速度
最后还是要根据实际的设备调试结果来确定
底层队列容量不是固定的,一般 3–6 包,强稳健可测试到 8–12,发送大数据必须结合流控,不能一次性塞满队列
9. 使用WithoutResponse传输 分包 + 流控传输发送大数据实际示例
分包 获取最大可写长度:
NSUInteger mtu = [peripheral maximumWriteValueLengthForType:CBCharacteristicWriteWithoutResponse];
每次发送数据前,判断是否可以进行数据传输:
[peripheral canSendWriteWithoutResponse]
逐包写入,每次写入一片
先获取到协商后的MTU,然后再进行
[peripheral writeValue:chunk forCharacteristic:characteristic type:CBCharacteristicWriteWithoutResponse];
流控
不能一口气写完所有分片,否则 iOS 内部队列会溢出丢包
需要监听 -peripheralIsReadyToSendWriteWithoutResponse: 回调:
- (void)peripheralIsReadyToSendWriteWithoutResponse:(CBPeripheral *)peripheral {
// 在这里继续写下一包
}
代码示例:
@interface BLEDataSender : NSObject <CBPeripheralDelegate>

@property (nonatomic, strong) CBPeripheral *peripheral;
@property (nonatomic, strong) CBCharacteristic *characteristic;
@property (nonatomic, strong) NSMutableArray<NSData *> *chunks; // 数据分片队列
@property (nonatomic, assign) NSInteger inFlightCount;          // 当前发送中的包数
@property (nonatomic, assign) NSInteger inFlightLimit;          // 最大同时发送包数  对于蓝牙5.0的设备来说 设置 4–8 是最合适的
@property (nonatomic, assign) BOOL sending;                     // 是否正在发送

@end

@implementation BLEDataSender

- (instancetype)initWithPeripheral:(CBPeripheral *)peripheral characteristic:(CBCharacteristic *)characteristic {
    if (self = [super init]) {
        self.peripheral = peripheral;
        self.characteristic = characteristic;
        self.inFlightLimit = 4; // 可根据外设能力调整
        self.inFlightCount = 0;
        self.sending = NO;
        self.chunks = [NSMutableArray array];
        self.peripheral.delegate = self;
    }
    return self;
}

// 分包准备数据
- (void)prepareDataToSend:(NSData *)data {
    [self.chunks removeAllObjects];

    NSUInteger mtu = [self.peripheral maximumWriteValueLengthForType:CBCharacteristicWriteWithoutResponse];
    NSUInteger offset = 0;

    while (offset < data.length) {
        NSUInteger chunkSize = MIN(mtu, data.length - offset);
        NSData *chunk = [data subdataWithRange:NSMakeRange(offset, chunkSize)];
        [self.chunks addObject:chunk];
        offset += chunkSize;
    }
}

// 开始发送
- (void)startSending {
    if (self.chunks.count == 0) return;
    self.sending = YES;
    [self sendNextChunks];
}

// 核心发送逻辑
- (void)sendNextChunks {
    while (self.sending &&
           self.inFlightCount < self.inFlightLimit &&
           self.chunks.count > 0 &&
           [self.peripheral canSendWriteWithoutResponse]) {

        NSData *chunk = self.chunks.firstObject;
        [self.chunks removeObjectAtIndex:0];

        [self.peripheral writeValue:chunk forCharacteristic:self.characteristic type:CBCharacteristicWriteWithoutResponse];

        self.inFlightCount += 1;
    }

    if (self.chunks.count == 0 && self.inFlightCount == 0) {
        self.sending = NO;
        NSLog(@"全部数据发送完成");
    }
}

// CBPeripheralDelegate 回调
- (void)peripheralIsReadyToSendWriteWithoutResponse:(CBPeripheral *)peripheral {
    // 有空余缓冲时触发
    self.inFlightCount = MAX(0, self.inFlightCount - 1);
    [self sendNextChunks];
}

@end
10.使用WithResponse传输大块数据方案示例
代码示例:
#import <CoreBluetooth/CoreBluetooth.h>

@interface BLEDataSender : NSObject <CBPeripheralDelegate>

@property (nonatomic, strong) CBPeripheral *peripheral;
@property (nonatomic, strong) CBCharacteristic *writeChar;

@property (nonatomic, strong) NSData *bigData;     // 要发送的大数据
@property (nonatomic, assign) NSUInteger offset;   // 已经发送到的位置
@property (nonatomic, assign) NSUInteger mtu;      // 每次可写数据大小

@end

@implementation BLEDataSender

- (instancetype)initWithPeripheral:(CBPeripheral *)peripheral writeChar:(CBCharacteristic *)characteristic {
    if (self = [super init]) {
        self.peripheral = peripheral;
        self.writeChar = characteristic;
        self.peripheral.delegate = self;

        //  注意:WithResponse 和 WithoutResponse 的 maximumWriteValueLengthForType 可能不同
        self.mtu = [peripheral maximumWriteValueLengthForType:CBCharacteristicWriteWithResponse];
    }
    return self;
}

/// 开始发送大数据
- (void)sendBigData:(NSData *)data {
    self.bigData = data;
    self.offset = 0;
    [self sendNextChunk];
}

/// 分包发送
- (void)sendNextChunk {
    if (self.offset >= self.bigData.length) {
        NSLog(@" 大数据发送完成,总长度 %lu 字节", (unsigned long)self.bigData.length);
        return;
    }

    NSUInteger chunkSize = MIN(self.mtu, self.bigData.length - self.offset);
    NSData *chunk = [self.bigData subdataWithRange:NSMakeRange(self.offset, chunkSize)];

    // 发送数据 (WithResponse 模式)
    [self.peripheral writeValue:chunk
              forCharacteristic:self.writeChar
                           type:CBCharacteristicWriteWithResponse];

    NSLog(@"发送第 %lu ~ %lu 字节", (unsigned long)self.offset, (unsigned long)(self.offset + chunkSize));
}

/// 发送完成回调 (WithResponse 模式会走这里)
- (void)peripheral:(CBPeripheral *)peripheral
didWriteValueForCharacteristic:(CBCharacteristic *)characteristic
             error:(NSError *)error {
    if (error) {
        NSLog(@" 写入失败: %@", error);
        return;
    }

    // 上一包确认成功,继续发下一包
    self.offset += self.mtu;
    [self sendNextChunk];
}

@end
结语:
对于高频高负载的数据发送来说
如果追求绝对的稳定可靠性,那么使用withResponse的ACK应答发送模式并使用协商后的MTU来进行数据传输是最稳定的,稳定的应答模式可以保证数据双方的通信和数据传输得到保障:
如果希望在稳定性和传输效率之间得到平衡:那么可以通过withoutResponse和协商后的MTU,搭配分包+流控模式来进行数据传输,每次发包前判断canSendWriteWithoutResponse是否可用,发包完之后监听peripheralIsReadyToSendWriteWithoutResponse来控制队列容量,采用这种方式可以在性能和稳定性之间得到平衡。
蓝牙传输容易受到外界环境干扰,要实现稳定的数据传输,需要通过大量测试来覆盖尽可能多的使用场景。当出现意外问题时,应将其视为积累经验、优化传输方案的关键契机。只有不断尝试、持续打磨代码,才能使整体传输更加稳定可靠。
(项目源码在页面顶部,可自行下载)