1_内置Chart图标控件
(1)图标的重要组成部分
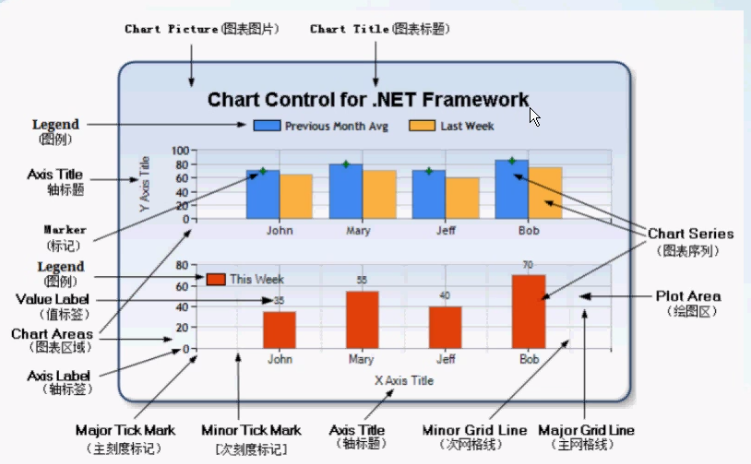
图标标题
图例Legend
两个轴
图表的序列(系列)(Series)
图表区域(Areas)
图表的数据(从数据库读取,从设备读取(通讯)
轴标签:沿轴的标签。
(2)重要属性
| 属性 | 说明 | 描述 |
|---|---|---|
| ChartAreas属性 | 绘图区 | 一个控件可以有多个绘图区 |
| Series属性 | 序列,各种图表的图形 | |
| egends属性 | 图标的图例 |
(3)数据的绑定
private void PaintChart2()
{
    List<Mychart> list = new List<Mychart>();
    string connString = "server=.,50736;database=chartdb;uid=sa;pwd=070303;";
    using (SqlConnection conn = new SqlConnection(connString))
    {
        conn.Open();
        using (SqlCommand cmd = conn.CreateCommand())
        {
            cmd.CommandText = "select * from MyChart1";
            using (SqlDataReader dataReader = cmd.ExecuteReader())
            {
                while (dataReader.Read())
                {
                    Mychart mychart = new Mychart();
                    mychart.X = dataReader["X"].ToString();
                    mychart.Y = Convert.ToInt32(dataReader["Y"]);
                    list.Add(mychart);
                }
            }
        }
    }

    //1.使用DataBind绑定集合
    chart2.Series[0].Points.DataBind(list,"X","Y",null);
    chart2.Series[0].ChartType = SeriesChartType.Pie;
    chart2.Titles.Add("案情数量分析饼图");

    //2.使用DataBindXY()绑定x,y轴
      string[] x = new string[] { "南山大队", "福田大队", "罗湖大队", "宝安大队" };
    double[] y = new double[] { 541, 574, 345, 854};
    chart1.Series[0].Points.DataBindXY(x, y);
}
(4)设置外观
private void PaintChart1()
{
//1.数据源
string[] x = new string[] { "南山大队", "福田大队", "罗湖大队", "宝安大队" };
double[] y = new double[] { 541, 574, 345, 854};
//Series 序列
//DataBindXY 绑定数据
//2.设置数据源
chart1.Series[0].Points.DataBindXY(x, y);
//3.更改外观
//Titles 标题集合
chart1.Titles.Add("案情数量分析图");
//找到第一个标题 ForeColor字体颜色
//设置标题的字体颜色
chart1.Titles[0].ForeColor = Color.Red;
//设置标题的字体 字体格式 字体大小 字体样式
//FontStyle 字体样式 枚举类型 Bold 加粗 Italic斜体
chart1.Titles[0].Font = new Font("微软雅黑", 12f, FontStyle.Italic|FontStyle.Bold);
//对齐方式
//ContentAlignment 枚举
/*
* TopLeft = 1,
TopCenter = 2,
TopRight = 4,
MiddleLeft = 0x10,
MiddleCenter = 0x20,
MiddleRight = 0x40,
BottomLeft = 0x100,
BottomCenter = 0x200,
BottomRight = 0x400
Center 水平居中
Middle 垂直居中
*/
chart1.Titles[0].Alignment = ContentAlignment.TopLeft;
//第二个标题
chart1.Titles.Add("合计:25414 宗");
chart1.Titles[1].ForeColor = Color.Black;
chart1.Titles[1].Font = new Font("微软雅黑", 8f, FontStyle.Regular);
chart1.Titles[1].Alignment = ContentAlignment.TopRight;
//Transparent 透明
//控件背景
chart1.BackColor = Color.Transparent;
//图表区背景
chart1.ChartAreas[0].BackColor = Color.Transparent;
chart1.ChartAreas[0].BorderColor = Color.Transparent;
//X轴标签间距
chart1.ChartAreas[0].AxisX.Interval = 1;
chart1.ChartAreas[0].AxisX.LabelStyle.IsStaggered = true;
chart1.ChartAreas[0].AxisX.LabelStyle.Angle = -45;
chart1.ChartAreas[0].AxisX.TitleFont = new Font("微软雅黑", 14f, FontStyle.Regular);
chart1.ChartAreas[0].AxisX.TitleForeColor = Color.White;
//X坐标轴颜色
// 十六进制的颜色表示方式
chart1.ChartAreas[0].AxisX.LineColor = ColorTranslator.FromHtml("#38587a");
//设置x轴的文本颜色
chart1.ChartAreas[0].AxisX.LabelStyle.ForeColor = Color.Blue;
// 设置x轴的字体样式
chart1.ChartAreas[0].AxisX.LabelStyle.Font = new Font("微软雅黑", 10f, FontStyle.Regular);
//X坐标轴标题
//chart1.ChartAreas[0].AxisX.Title = "数量(宗)";
//chart1.ChartAreas[0].AxisX.TitleFont = new Font("微软雅黑", 10f, FontStyle.Regular);
//chart1.ChartAreas[0].AxisX.TitleForeColor = Color.White;
//chart1.ChartAreas[0].AxisX.TextOrientation = TextOrientation.Horizontal;
//chart1.ChartAreas[0].AxisX.ToolTip = "数量(宗)";
//X轴网络线条
chart1.ChartAreas[0].AxisX.MajorGrid.Enabled = true;
chart1.ChartAreas[0].AxisX.MajorGrid.LineColor = ColorTranslator.FromHtml("#2c4c6d");
//Y坐标轴颜色
chart1.ChartAreas[0].AxisY.LineColor = ColorTranslator.FromHtml("#38587a");
chart1.ChartAreas[0].AxisY.LabelStyle.ForeColor = Color.White;
chart1.ChartAreas[0].AxisY.LabelStyle.Font = new Font("微软雅黑", 10f, FontStyle.Regular);
//Y坐标轴标题
chart1.ChartAreas[0].AxisY.Title = "数量(宗)";
chart1.ChartAreas[0].AxisY.TitleFont = new Font("微软雅黑", 10f, FontStyle.Regular);
chart1.ChartAreas[0].AxisY.TitleForeColor = Color.White;
chart1.ChartAreas[0].AxisY.TextOrientation = TextOrientation.Rotated270;
chart1.ChartAreas[0].AxisY.ToolTip = "数量(宗)";
//Y轴网格线条
chart1.ChartAreas[0].AxisY.MajorGrid.Enabled = true;
chart1.ChartAreas[0].AxisY.MajorGrid.LineColor = Color.Red;
chart1.ChartAreas[0].AxisY2.LineColor = Color.Transparent;
chart1.ChartAreas[0].BackGradientStyle = GradientStyle.TopBottom;
Legend legend = new Legend("legend");
// legend.Title = "legendTitle";
// legend.ForeColor = Color.Yellow;
chart1.Series[0].XValueType = ChartValueType.String; //设置X轴上的值类型
//#VAL (#VALY) #VALX 内置的变量
chart1.Series[0].Label = "#VAL"; //设置显示X Y的值
chart1.Series[0].LabelForeColor = Color.White;
chart1.Series[0].ToolTip = "#VALX:#VAL"; //鼠标移动到对应点显示数值
chart1.Series[0].ChartType = SeriesChartType.Column; //图类型(折线)
//chart1.Series[0].Color = Color.Lime;
chart1.Series[0].LegendText = legend.Name;
//chart1.Series[0].IsValueShownAsLabel = true;
//chart1.Series[0].LabelForeColor = Color.White;
//chart1.Series[0].CustomProperties = "DrawingStyle = Cylinder";
//chart1.Legends.Add(legend);
//chart1.Legends[0].Position.Auto = false;
}2_LiveChart2图表库
(1)LiveCharts2 是一个简单、灵活、交互式以及功能强大的跨平台图表。LiveCharts 是一个.net的数据可视化库,可以跨多个设备和框架运行,它在MIT许可证下运行(免费),并提供了一个付费包来提高性能和扩展功能。
LiveCharts2 现在几乎可以运行在任何平台,支持Maui,Uno Platform、Avalonia、Etoforms、Xamarin、Blazor-wasm、WPF、Winforms、WinUI、UWP等。
LiveCharts2 是LiveCharts(0)的升级,它修复了前身的主要设计问题,专注于在任何地方运行,在不丢失V0中已有的特性情况下提高了灵活性。
(2)LiveCharts2官网:LiveCharts - LiveCharts2
最好在官网上查看每个图表的用法
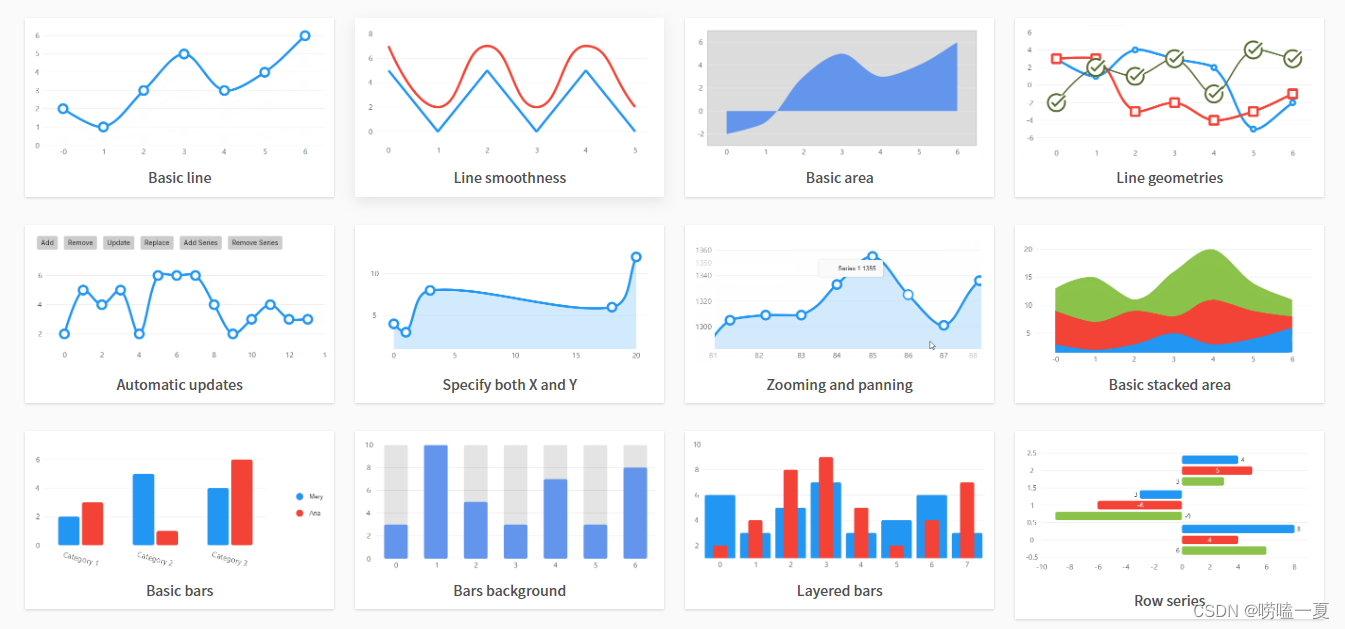
(3)使用,LiveCharts2 提供了折线图、饼图、柱状图、散点图、面积图等多种类型的图表。此外,它还支持多个图表联动显示,支持动态更新数据、自定义样式和动画效果等功能。
(4)使用
创建一个.net framework版本/.net core(出现版本不兼容问题)的winform项目
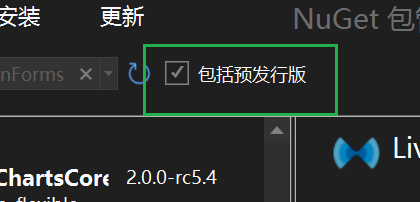
安装LiveChartsCore.SkiaSharpView.WinForms类库
拖控件
设数据
更改属性
抄文档
3_Dapper
(1)Dapper 是一个轻量级的 ORM(对象关系映射)工具,它基于 ADO.NET 实现,能够显著提高数据库操作的性能和效率。Dapper 由 Stack Overflow 团队开发,最初是为了优化其网站的数据库访问性能而设计的。它通过扩展 IDbConnection 接口,提供了一种简单而高效的方式来执行 SQL 查询和更新操作。
参考博客:Dapper ORM 和 DapperExtensions 从入门到精通-CSDN博客
(2)环境搭建:通过NuGet程序下载Dapper,通过using引入命名空间
在appConfig中配置数据库连接字符串
<connectionStrings>
    <add name="connstring" connectionString="server=.;database=NlayerDB;uid=sa;pwd=12345"/>
 </connectionStrings>
(3)重要方法:
Execute 返回影响的行数:用于执行插入,更新,删除
Query 返回多个数据 :用于执行查询多个
QuerySingle 返回单个数据,用于查询单个数据
//通过app.config配置数据路连接字符串
string connstring = ConfigurationManager.ConnectionStrings["connstring"].ConnectionString;
//Execute方法:返回影响的行数
//obj相当于一个参数列表,也可以使用具体的类,例如user
public bool Add(UserInfo model)
{
using (SqlConnection conn=new SqlConnection(connstring))
{
object obj = new { u = model.UserName, P = model.Password };
string sql = "insert into UserInfo(UserName,Password) values(@U,@P)";
//var user = new User { Name = "John", Age = 30 };
// conn.Execute(sql, user);
return conn.Execute(sql, obj)>0;
}
}
public bool Delete(int id)
{
using (SqlConnection conn=new SqlConnection(connstring))
{
object obj = new { Id = id };
string sql = "delete from UserInfo where Id=@Id";
return conn.Execute(sql, obj)>0;
}
}
//可以不新建一个列表,在参数中new一个
public List<UserInfo> GetList()
{
using (SqlConnection conn = new SqlConnection(connstring))
{
string sql = "select * from UserInfo";
return conn.Query<UserInfo>(sql,new { }).ToList();
}
}
public UserInfo GetModel(int id)
{
using (SqlConnection conn = new SqlConnection(connstring))
{
string sql = "select * from UserInfo where Id=@Id";
return conn.QuerySingle<UserInfo>(sql, new { Id = id });
}
}
public bool Update(UserInfo model)
{
using (SqlConnection conn = new SqlConnection(connstring))
{
object obj = new { model.UserName, model.Password, model.Id };
string sql = "Update UserInfo set UserName=@UserName,Password =@Password where Id=@Id";
return conn.Execute(sql, obj) > 0;
}
}4_简单的三层架构
(1)三层架构
Model:模型层,主要负责把数据库中对象(表)映射成语言中对象(类)。 不依赖其他层。
DAL:数据访问层 Data Access Layer,主要负责编写和数据库交互逻辑(增,删,查,改,分页等逻辑)。DAL依赖Model,IDAL。
UI:用户界面 User Interface,主要负责数据收集和管理(可以把界面上收集的数据,保存到数据库;也可以把数据库中数据读取出来,渲染页面)。UI依赖Model, DAL。
5_N层架构
(1)相对于三层架构,N层架构多了以下几层
IDAL层,DAL层的接口层,主要负责统一管理各种DAL,换句话说:把每个DAL中公共的功能抽象,达到统一管理目的。某个DAL独有的功能再扩展。IDAL依赖Model
BLL层,Business Logic Layer业务逻辑层。提醒:DAL负责逻辑主要是和数据库交互的逻辑。BLL层主要对DAL层逻辑做进一步封装,也可以把界面的校验逻辑放到BLL层。BLL层的一个方法有可能去调用DAL层的多个方法。 没有DAL工厂层之前,BLL层要想对DAL封闭,需要依赖DAL。
DALFactory:DAL工厂层(抽象工厂层),主要负责把DAL和BLL解耦的。有DAL工厂层之后,BLL和DAL不见面。
工具层(命名:Common,DBUtility),不是必需的层。
(2)BLL具体:
如果Bll层仅仅对DAl做一个简单的封装 它出现的意义不大,没有BLL之前 UI层直接使用DAl 如果使用DAl之前需要做一些数据验证, 这些验证逻辑,要写在UI层 但是会造成UI层代码臃肿;有了BLL之后 就可以把验证的逻辑写在BLL层 减少UI的代码量
(3)DALFactory:抽象工厂层
主要负责创建各种DAL的实例 ,通过反射获取DAL中的类
不能引用DAL:BLL不想依赖DAl 如果 DALFactory引用了DAl 把问题转嫁到了DALFactory身上 没有意义
当一个类库(如DALFactory) 不能引用另一个类库(如DAl) 但是知道另外一个类型所在的位置(路径) 就可以使用反射加载另一个类型 不需要强依赖 达到解耦的目的
但是反射性能比较低 所以是用 性能 换 灵活
//在DALFactory中定义一个创建DAL对象的函数,调用此函数创建一个DAL对象(接口)
public static IUserInfo CreateUserInfoDAL()
{
string assemblyName = ConfigurationManager.AppSettings["DALName"];
//加载特定名称的程序集
//DAL.dll程序集
//只写程序集的名称,相当于是去bin/DeBUG目录下找、
//注意:把DAL.DLL文件放到UI层的bin/DeBUG目录下
Assembly assembly = Assembly.Load(assemblyName);
Console.WriteLine(assembly);
//类的完整名称
//======》DAL.UserInfoDAL
string fullNamespace = $"{assemblyName}.UserInfoDAL";
//创建类的实例
//CreateInstance()==== new UserInfoDAL();
object obj = assembly.CreateInstance(fullNamespace);
Console.WriteLine(assembly.CreateInstance(fullNamespace));
return (IUserInfo)obj;
}注意:
把DAL.DLL文件放到UI层的bin/DeBUG目录下,因为整个项目启动的是UI层,索引获取到的也是UI层的程序集,
因为DAL使用了Dapper,索引也需要将Dapper.dll放到UI层的bin/DeBug目录下,否则DAL.dll文件中的方法无法使用