本指南将详细介绍如何在Web应用中实现GitHub OAuth登录功能,包括GitHub应用配置、后端API实现和前端集成。适用于Vue.js + Node.js技术栈的项目。
第一部分:GitHub OAuth应用配置
步骤1:创建GitHub OAuth应用
登录GitHub账号
访问 https://github.com/settings/developers
点击 “New OAuth App”
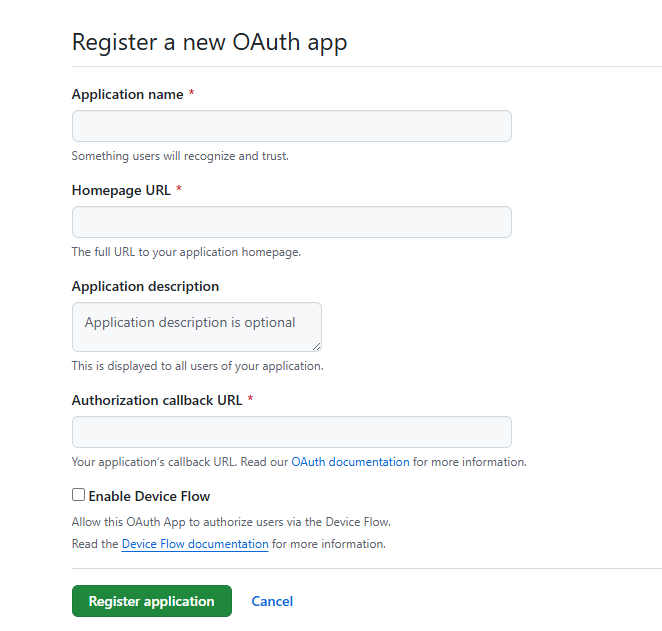
填写应用信息:
- Application name: 你的应用名称
- Homepage URL: http://localhost:5173 (开发环境)
- Application description: 你的应用描述
- Authorization callback URL: http://localhost:3000/api/auth/github/callback
点击 “Register application”
创建成功后,记录以下信息:
- Client ID: 复制显示的Client ID
- Client Secret: 点击"Generate a new client secret"生成并复制

步骤2:配置环境变量
在后端项目的 .env 文件中添加GitHub OAuth配置:
GITHUB_CLIENT_ID=你的Client_ID
GITHUB_CLIENT_SECRET=你的Client_Secret
GITHUB_CALLBACK_URL=http://localhost:3000/api/auth/github/callback
FRONTEND_URL=http://localhost:5173
第二部分:后端实现
步骤3:项目结构和依赖安装
推荐的后端项目结构:
backend/
├── src/
│   ├── controllers/
│   │   └── authController.js
│   ├── routes/
│   │   └── auth.js
│   ├── models/
│   │   └── User.js
│   ├── middleware/
│   │   └── auth.js
│   └── utils/
│       └── jwt.js
├── .env
├── package.json
└── server.js
安装必要的依赖:
npm install axios express express-validator jsonwebtoken sequelize
# 根据数据库选择对应驱动
npm install mysql2  # MySQL数据库
步骤4:数据库模型配置
首先创建用户模型(models/User.js):
const { DataTypes } = require('sequelize')
const sequelize = require('../config/database') // 数据库连接配置

const User = sequelize.define('User', {
  id: {
    type: DataTypes.INTEGER,
    primaryKey: true,
    autoIncrement: true
  },
  username: {
    type: DataTypes.STRING,
    allowNull: false,
    unique: true
  },
  email: {
    type: DataTypes.STRING,
    allowNull: false,
    unique: true,
    validate: {
      isEmail: true
    }
  },
  github_id: {
    type: DataTypes.STRING,
    allowNull: true,
    unique: true
  },
  avatar_url: {
    type: DataTypes.STRING,
    allowNull: true
  },
  password_hash: {
    type: DataTypes.STRING,
    allowNull: true // OAuth用户可能没有密码
  },
  provider: {
    type: DataTypes.ENUM('local', 'github'),
    defaultValue: 'local'
  },
  role: {
    type: DataTypes.ENUM('student', 'teacher', 'admin'),
    defaultValue: 'student'
  }
}, {
  tableName: 'users',
  timestamps: true,
  createdAt: 'created_at',
  updatedAt: 'updated_at'
})

module.exports = User
步骤5:创建认证控制器
在后端项目中创建认证控制器文件(如 controllers/authController.js),实现GitHub OAuth逻辑:
const axios = require('axios');
const { User } = require('../models');
const { generateToken } = require('../utils/jwt');
const { Op } = require('sequelize');

/**
 * GitHub OAuth登录 - 重定向到GitHub授权页面
 */
const githubAuth = (req, res) => {
  const clientId = process.env.GITHUB_CLIENT_ID;
  const redirectUri = process.env.GITHUB_CALLBACK_URL;
  const scope = 'user:email';

  const githubAuthUrl = `https://github.com/login/oauth/authorize?client_id=${clientId}&redirect_uri=${redirectUri}&scope=${scope}`;

  res.redirect(githubAuthUrl);
};

/**
 * GitHub OAuth回调处理
 */
const githubCallback = async (req, res) => {
  try {
    const { code } = req.query;

    if (!code) {
      return res.redirect(`${process.env.FRONTEND_URL}/login?error=github_auth_failed`);
    }

    // 1. 使用授权码获取访问令牌
    const tokenResponse = await axios.post('https://github.com/login/oauth/access_token', {
      client_id: process.env.GITHUB_CLIENT_ID,
      client_secret: process.env.GITHUB_CLIENT_SECRET,
      code: code
    }, {
      headers: {
        'Accept': 'application/json'
      }
    });

    const accessToken = tokenResponse.data.access_token;

    if (!accessToken) {
      return res.redirect(`${process.env.FRONTEND_URL}/login?error=github_token_failed`);
    }

    // 2. 使用访问令牌获取用户信息
    const userResponse = await axios.get('https://api.github.com/user', {
      headers: {
        'Authorization': `token ${accessToken}`
      }
    });

    const githubUser = userResponse.data;

    // 3. 获取用户邮箱(GitHub可能不公开邮箱)
    const emailResponse = await axios.get('https://api.github.com/user/emails', {
      headers: {
        'Authorization': `token ${accessToken}`
      }
    });

    const primaryEmail = emailResponse.data.find(email => email.primary)?.email || githubUser.email;

    // 4. 查找或创建用户
    let user = await User.findOne({
      where: {
        [Op.or]: [
          { github_id: githubUser.id.toString() },
          { email: primaryEmail }
        ]
      }
    });

    if (!user) {
      // 创建新用户
      user = await User.create({
        username: githubUser.login,
        email: primaryEmail,
        github_id: githubUser.id.toString(),
        avatar_url: githubUser.avatar_url,
        role: 'student'
      });
    } else {
      // 更新GitHub信息
      await user.update({
        github_id: githubUser.id.toString(),
        avatar_url: githubUser.avatar_url
      });
    }

    // 5. 生成JWT令牌
    const token = generateToken({
      id: user.id,
      username: user.username,
      email: user.email,
      role: user.role
    });

    // 6. 重定向到前端,携带token
    res.redirect(`${process.env.FRONTEND_URL}/login?token=${token}&github_login=success`);

  } catch (error) {
    console.error('GitHub OAuth错误:', error);
    res.redirect(`${process.env.FRONTEND_URL}/login?error=github_auth_error`);
  }
};

module.exports = {
  githubAuth,
  githubCallback
};
步骤5:配置路由
在后端项目中创建或更新路由文件(如 routes/auth.js),添加GitHub OAuth路由:
const express = require('express');
const { githubAuth, githubCallback } = require('../controllers/authController');

const router = express.Router();

// GitHub OAuth登录路由
router.get('/github', githubAuth);

// GitHub OAuth回调路由
router.get('/github/callback', githubCallback);

module.exports = router;
步骤6:数据库模型更新
确保User模型包含GitHub相关字段(以Sequelize为例):
// 在用户模型中添加字段
github_id: {
  type: DataTypes.STRING,
  allowNull: true,
  unique: true
},
avatar_url: {
  type: DataTypes.STRING,
  allowNull: true
}
如果使用其他ORM或数据库,请根据相应语法添加这些字段。
第三部分:前端实现
步骤7:前端登录页面实现
在登录页面添加GitHub登录按钮和处理逻辑:
<template>
  <div class="social-login">
    <el-divider>GitHub登录</el-divider>
    <div class="social-buttons">
      <el-button circle @click="loginWithGithub">
        <svg class="github-icon" viewBox="0 0 24 24" width="20" height="20">
          <path fill="currentColor" d="M12 0C5.37 0 0 5.37 0 12c0 5.31 3.435 9.795 8.205 11.385.6.105.825-.255.825-.57 0-.285-.015-1.23-.015-2.235-3.015.555-3.795-.735-4.035-1.41-.135-.345-.72-1.41-1.23-1.695-.42-.225-1.02-.78-.015-.795.945-.015 1.62.87 1.845 1.23 1.08 1.815 2.805 1.305 3.495.99.105-.78.42-1.305.765-1.605-2.67-.3-5.46-1.335-5.46-5.925 0-1.305.465-2.385 1.23-3.225-.12-.3-.54-1.53.12-3.18 0 0 1.005-.315 3.3 1.23.96-.27 1.98-.405 3-.405s2.04.135 3 .405c2.295-1.56 3.3-1.23 3.3-1.23.66 1.65.24 2.88.12 3.18.765.84 1.23 1.905 1.23 3.225 0 4.605-2.805 5.625-5.475 5.925.435.375.81 1.095.81 2.22 0 1.605-.015 2.895-.015 3.3 0 .315.225.69.825.57A12.02 12.02 0 0 0 24 12c0-6.63-5.37-12-12-12Z"/>
        </svg>
      </el-button>
    </div>
  </div>
</template>

<script setup>
import { onMounted } from 'vue'
import { useRouter } from 'vue-router'
import { ElMessage } from 'element-plus'

const router = useRouter()

// GitHub登录方法
const loginWithGithub = () => {
  // 重定向到后端GitHub OAuth授权端点
  window.location.href = 'http://localhost:3000/api/auth/github'
}

// 处理GitHub OAuth回调
onMounted(() => {
  const urlParams = new URLSearchParams(window.location.search)
  const token = urlParams.get('token')
  const githubLogin = urlParams.get('github_login')
  const error = urlParams.get('error')

  if (token && githubLogin === 'success') {
    // GitHub登录成功
    localStorage.setItem('token', token)

    // 获取用户信息
    fetchUserInfo().then(() => {
      ElMessage.success('GitHub登录成功')

      // 清理URL参数
      window.history.replaceState({}, document.title, window.location.pathname)

      // 跳转到首页
      const redirect = router.currentRoute.value.query.redirect as string
      router.push(redirect || '/')
    }).catch(() => {
      ElMessage.error('获取用户信息失败')
    })
  } else if (error) {
    // GitHub登录失败
    let errorMessage = 'GitHub登录失败'
    switch (error) {
      case 'github_auth_failed':
        errorMessage = 'GitHub授权失败'
        break
      case 'github_token_failed':
        errorMessage = 'GitHub令牌获取失败'
        break
      case 'github_auth_error':
        errorMessage = 'GitHub登录过程中发生错误'
        break
    }
    ElMessage.error(errorMessage)

    // 清理URL参数
    window.history.replaceState({}, document.title, window.location.pathname)
  }
})

// 获取用户信息的方法
const fetchUserInfo = async () => {
  try {
    const response = await fetch('/api/auth/me', {
      headers: {
        'Authorization': `Bearer ${localStorage.getItem('token')}`
      }
    })
    const data = await response.json()
    if (data.success) {
      // 保存用户信息到状态管理或本地存储
      localStorage.setItem('user', JSON.stringify(data.data.user))
      return data.data.user
    }
    throw new Error(data.message)
  } catch (error) {
    console.error('获取用户信息失败:', error)
    throw error
  }
}
</script>

<style scoped>
.github-icon {
  color: #333;
  transition: color 0.2s;
}

.social-buttons .el-button:hover .github-icon {
  color: #409eff;
}
</style>

第四部分:测试和部署
步骤8:本地测试
- 数据库初始化
# 创建数据库表
node -e "require('./src/models/User').sync({ force: true })"
- 启动服务
# 启动后端服务
cd your-backend-folder
npm start

# 启动前端服务(新终端)
cd your-frontend-folder
npm run dev
- 测试流程
- 访问前端应用的登录页面
- 点击GitHub登录按钮测试流程
- 验证token是否正确保存
- 测试受保护的API接口
步骤9:生产环境部署
环境配置:
# 生产环境变量示例
NODE_ENV=production
PORT=3000
JWT_SECRET=your-super-secure-jwt-secret-for-production
GITHUB_CLIENT_ID=your-production-github-client-id
GITHUB_CLIENT_SECRET=your-production-github-client-secret
GITHUB_CALLBACK_URL=https://yourdomain.com/api/auth/github/callback
FRONTEND_URL=https://yourdomain.com
DB_HOST=your-production-db-host
DB_NAME=your-production-db-name
DB_USER=your-production-db-user
DB_PASS=your-production-db-password
部署检查清单:
GitHub OAuth应用设置:
- Homepage URL: https://yourdomain.com
- Authorization callback URL: https://yourdomain.com/api/auth/github/callback
前端API地址更新:
// 更新前端中的后端API地址
window.location.href = 'https://yourdomain.com/api/auth/github'
- 服务器配置:
- 确保HTTPS配置正确
- 配置CORS策略
- 设置适当的安全头
- 配置反向代理(如Nginx)
技术栈要求
本教程基于以下技术栈:
- 前端: Vue.js 3 + Element Plus + Vite
- 后端: Node.js + Express.js
- 数据库: 支持Sequelize ORM的数据库(MySQL)
- 认证: JWT