在写这边文章前,其实思路很清楚,知道要怎么操作,但是具体怎么实现呢?找了很多资料,都很零散,因此,在此记录一下,方便以后使用,也能加深自己的印象(大神请忽略。。。),话不多说,开整。。。。。
一、前期准备工作
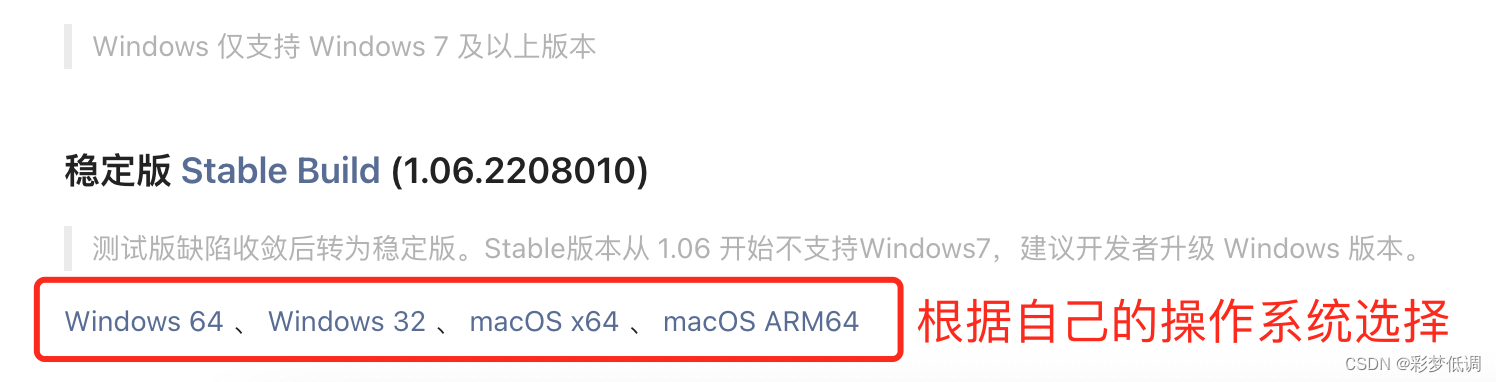
1.下载微信开发者工具,下载地址:
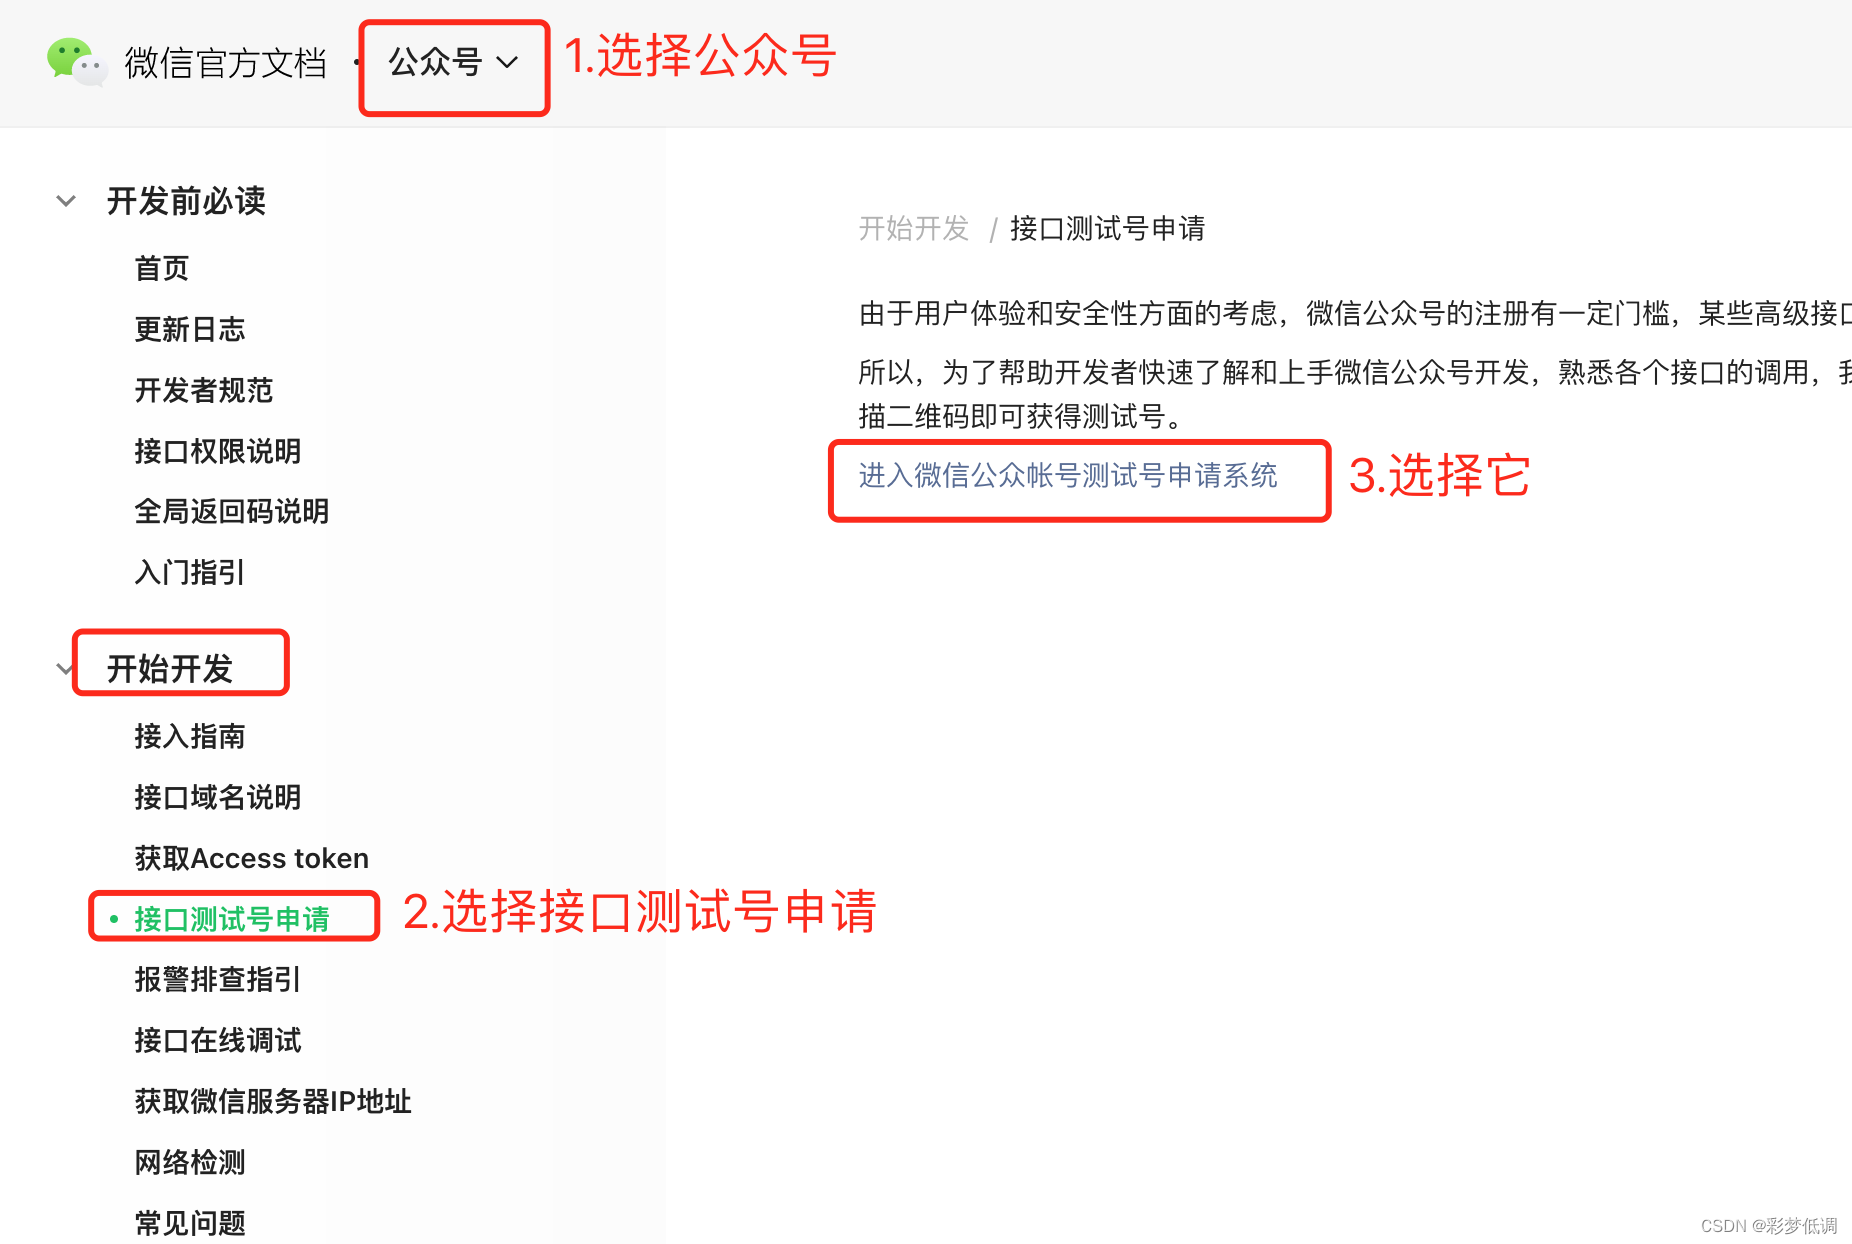
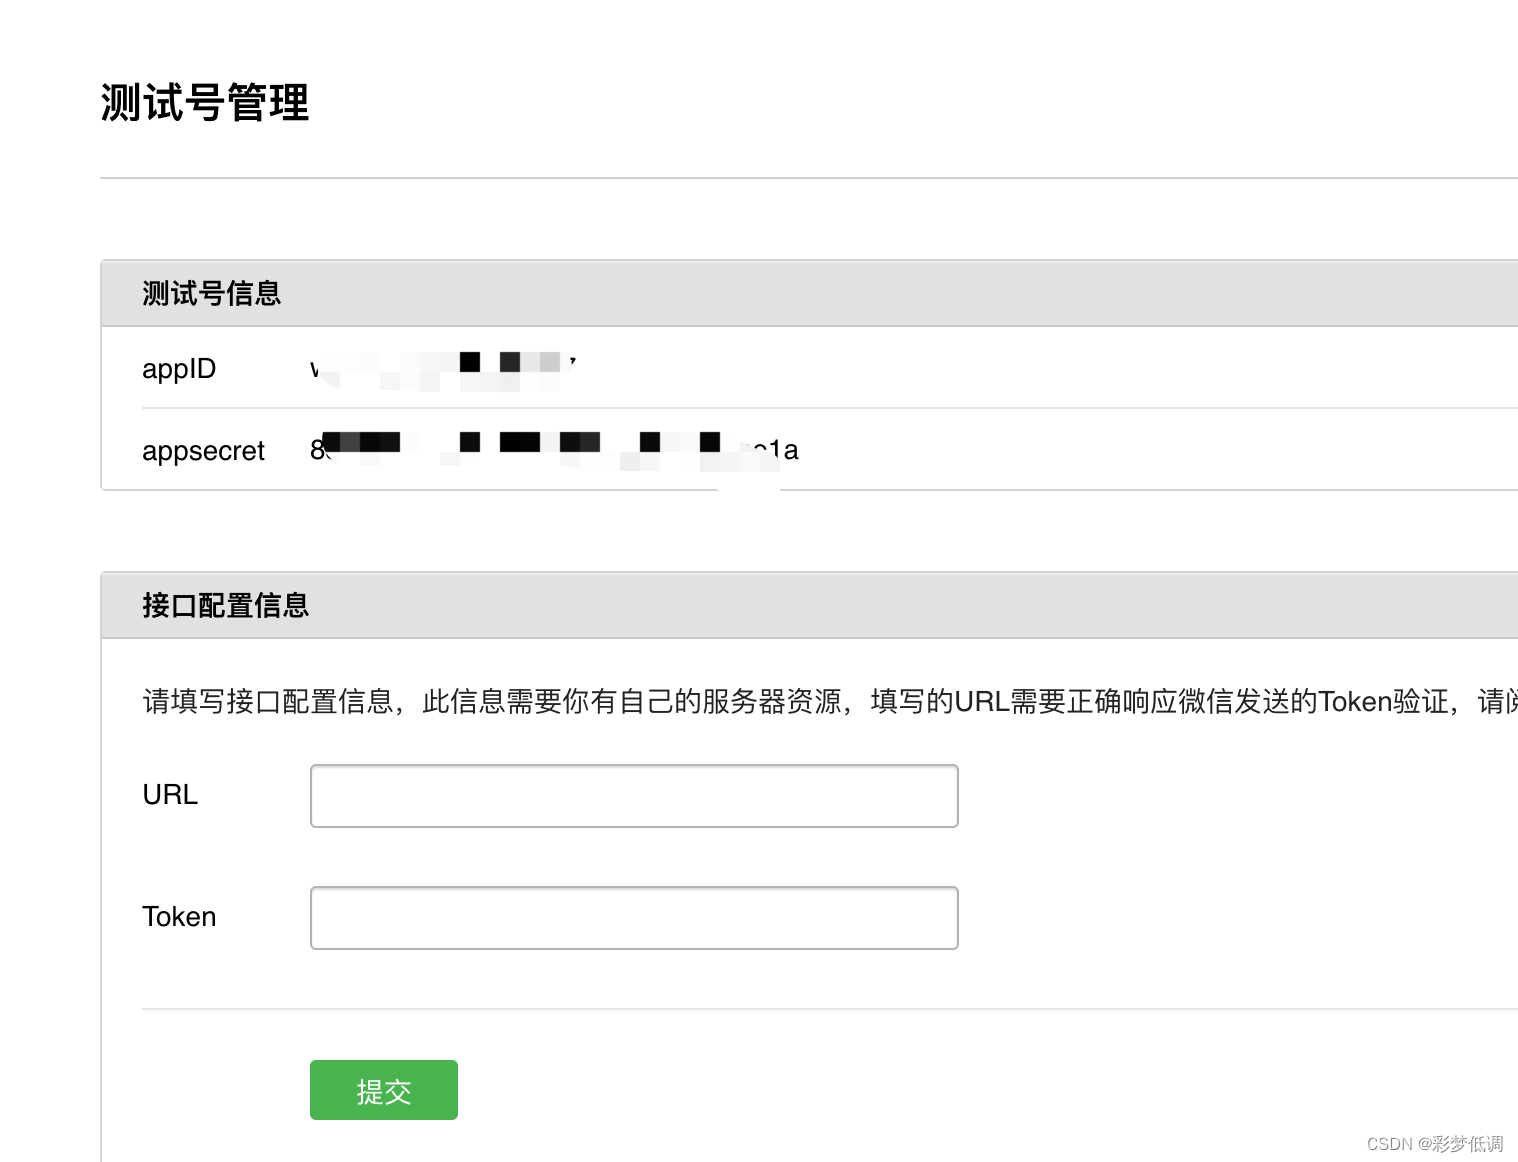
2.申请测试账号:
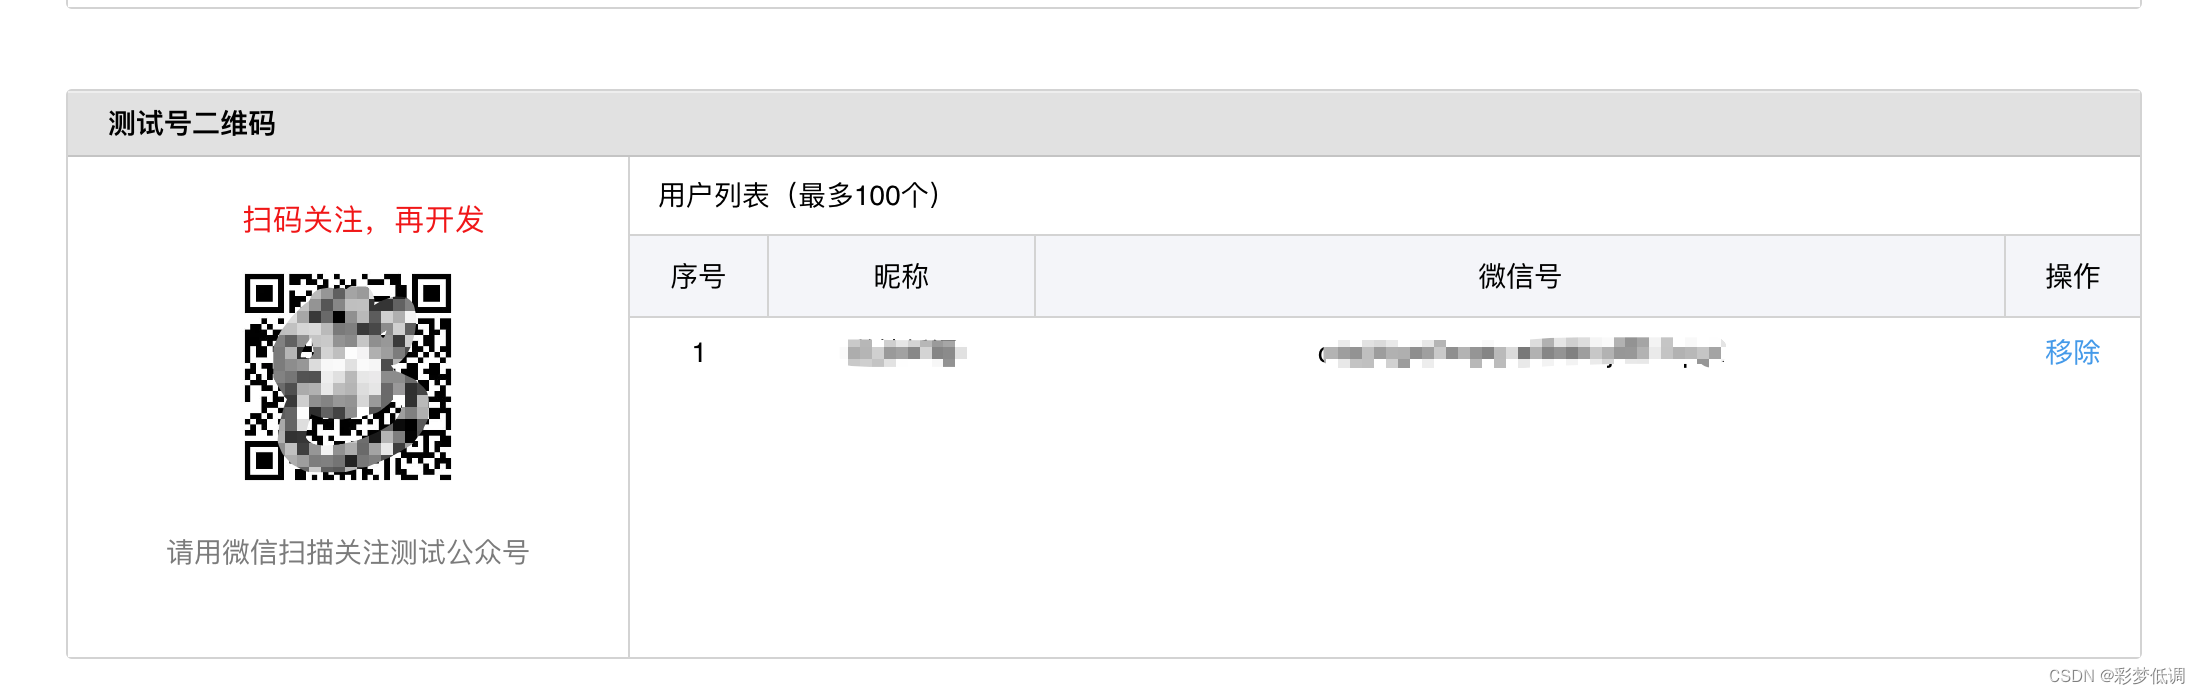
微信扫一扫,并往下翻,找到测试号二维码并扫码
3.使用微信开发者工具:
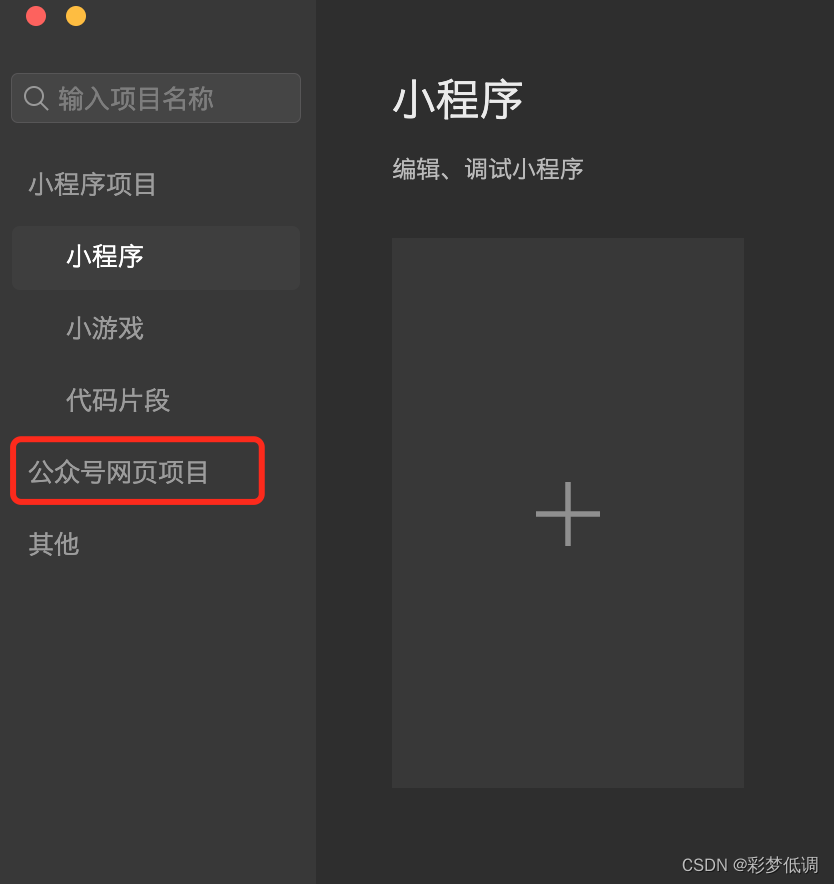
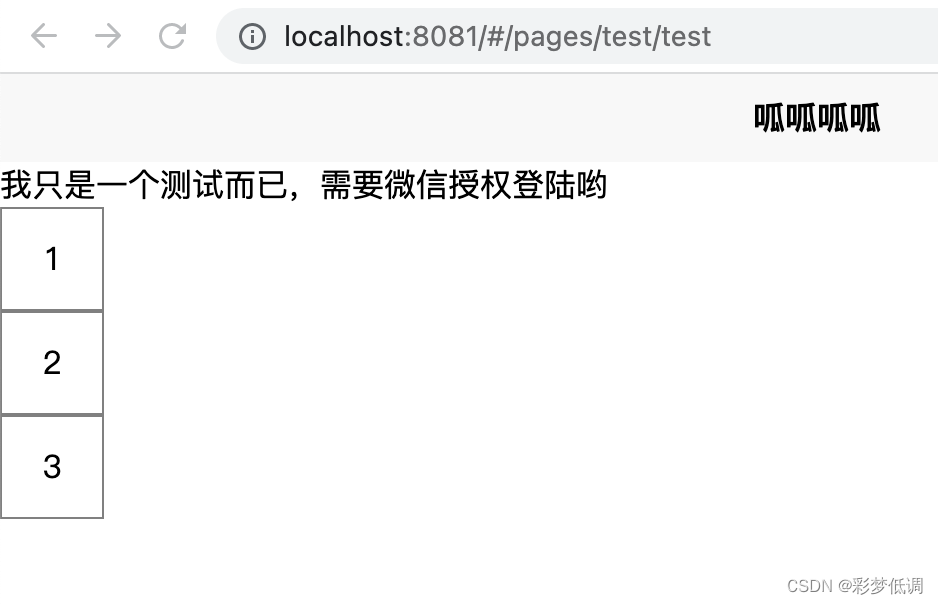
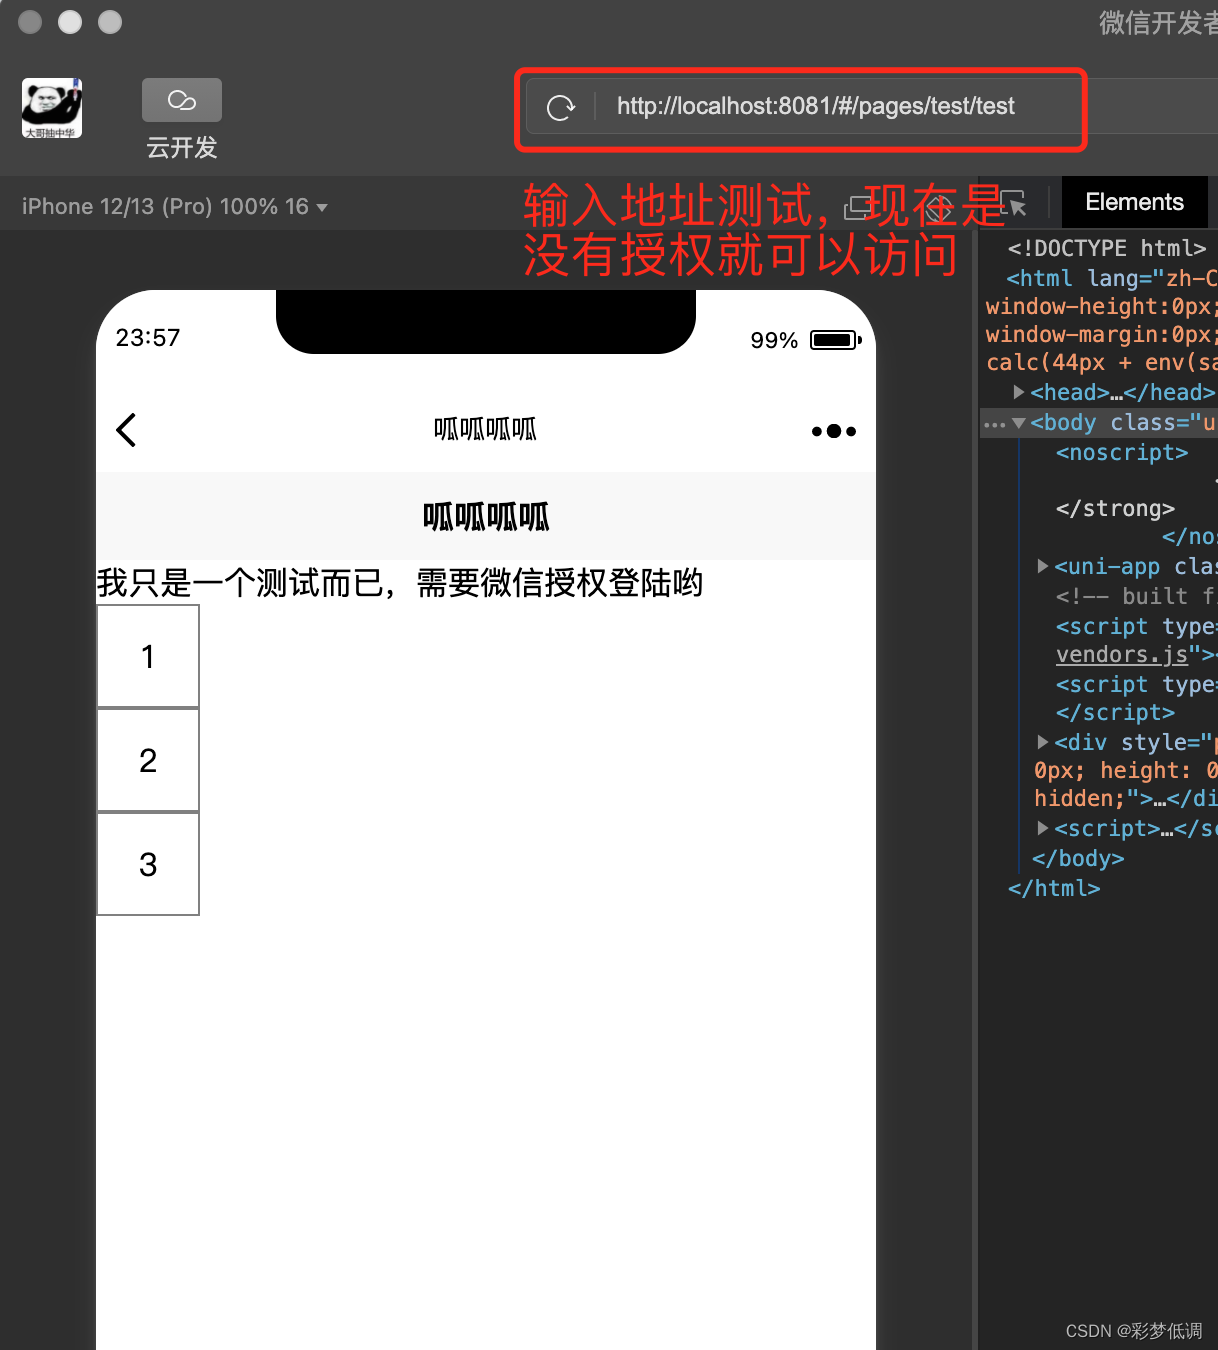
准备好开发好的界面,如下图所示:
4.前端界面编写
<template>
	<view class="box">
	<view>我只是一个测试而已,需要微信授权登陆哟</view>
	<view class="div">登录人的头像:<image :src="formData.touxiang" class="img"></image></view>
	<view class="div">微信昵称:{{formData.nice}}</view>
	<view class="div">性别:{{formData.sex}}</view>
	</view>
</template>

<script>
	export default {
		data() {
			return {
				baseUrl: "你的域名",  // 基础地址
				callbackurl: "你的域名",  // 前端项目回调地址(redirect_url)
				serverUrl: "你的域名",  // 后端服务接口地址前缀
				appid: "你的appid",
				formData: {
					touxiang: "",
					nice: "bbbbb",
					sex: "",
				},
			}
		},
		onLoad() {
			let flag = this.is_weixin();
			if (flag) {
				this.checkWeChatCode()
			} else {
				window.location.href = "https://open.weixin.qq.com/connect/oauth2/authorize?appid=888"
			}
		},
		methods: {
			// 判断是否是微信浏览器
			is_weixin() {
			   var ua = navigator.userAgent.toLowerCase();
			   if(ua.match(/MicroMessenger/i)=="micromessenger") {
			       return true;
			   } else {
			       return false;
			   }
			},
			// 获取code
			// 先判断url中有没有code,如果有code,表明已经授权,如果没有code,跳转微信授权链接
			getCode () {
				// 截取地址中的code,如果没有code就去微信授权,如果已经获取到code了就直接把code传给后台获取openId
				let code = this.getUrlCode('code')
				if (code === null || code === '') {
					window.location.href =
					'https://open.weixin.qq.com/connect/oauth2/authorize?appid=' + this.appid +
					'&redirect_uri=' + encodeURIComponent(this.callbackurl) +
					'&response_type=code&scope=snsapi_userinfo&state=STATE#wechat_redirect';

					// redirect_uri是授权成功后,跳转的url地址,微信会帮我们跳转到该链接,并且通过?的形式拼接code,这里需要用encodeURIComponent对链接进行处理。
					// 如果配置参数一一对应,那么此时已经通过回调地址刷新页面后,你就会再地址栏中看到code了。
					// http://127.0.0.1/pages/views/profile/login/login?code=001BWV4J1lRzz00H4J1J1vRE4J1BWV4q&state=1
				} else {
					this.code = code;
				}
			},
			checkWeChatCode() {
				let code = this.getUrlCode('code')
				if (code) {
					this.getOpenidAndUserinfo(code)
				} else {
					this.getCode()
				}
			},
			getUrlCode (name) {
				return decodeURIComponent((new RegExp('[?|&]' + name + '=' + '([^&;]+?)(&|#|;|$)').exec(location.href) || [, ''])[1].replace(/\+/g, '%20')) || null
			},
			getOpenidAndUserinfo(code) {
				console.log("ffff:", code)
				uni.request({
					url: this.serverUrl + '/rms/wxcallback',
					method:'GET',
					data: {code: code},
					success: (res) => {
						console.log('通过code获取openid和accessToken', res)
						if(res.data.code === 200) {
							// 登录成功,可以将用户信息和token保存到缓存中
							// uni.setStorageSync('userInfo', res.data.result.userInfo)
							// uni.setStorageSync('token', res.data.result.token)
							let data = res.data.data;
							console.log(data)
							this.formData.touxiang = data.headimgurl;
							this.formData.nice = data.nickname;
							this.formData.sex = data.sex == 0 ? "男" : "女";
						}
					}
				})
			},

		},
	}
</script>

<style scoped lang="scss">
	.box {
		display: flex;
		flex-direction: column;
	}
	.img {
		width: 50px;
		height: 50px;
		border: 1px solid red;
	}

	.div {
		width: 80%;
		height: 80px;
		line-height: 80px;
		text-align: center;
		border: 1px solid gray;
	}
</style>
5.后端代码
后端跨域
@Configuration
@Slf4j
public class CorsFilterConfig {

    private CorsConfiguration buildConfig() {
        CorsConfiguration corsConfiguration = new CorsConfiguration();
        corsConfiguration.addAllowedOriginPattern("*"); // 1允许任何域名使用
        corsConfiguration.addAllowedHeader("*"); // 2允许任何头
        corsConfiguration.addAllowedMethod("*"); // 3允许任何方法(post、get等)
        corsConfiguration.setAllowCredentials(true);
        return corsConfiguration;
    }

    @Bean
    public CorsFilter corsFilter() {
        UrlBasedCorsConfigurationSource source = new UrlBasedCorsConfigurationSource();
        source.registerCorsConfiguration("/**", buildConfig());
        return new CorsFilter(source);
    }
}
从application.yml配置文件中加载appid和appsecret
@Configuration
public class SettingConfig {

    @Value("${wechat.appID}")
    private String appID;

    @Value("${wechat.appsecret}")
    private String appsecret;

    @PostConstruct
    public void init() {
        ConstUtil.APPID = appID;
        ConstUtil.APPSECRET = appsecret;
        System.err.println("appid:" + ConstUtil.APPID);
        System.err.println("appsecret:" + ConstUtil.APPSECRET);
    }

}
根据code获取相关信息
@RestController
public class WechatController {

    @GetMapping("/wxcallback")
    public AjaxResult wxcallback(@RequestParam("code") String code) throws IOException {
        if (StringUtils.isBlank(code)) {
            throw new ServerException("code不能为空");
        }
        String url = "https://api.weixin.qq.com/sns/oauth2/access_token" +
                "?appid=" + ConstUtil.APPID +
                "&secret=" + ConstUtil.APPSECRET +
                "&code=" + code +
                "&grant_type=authorization_code";
        JSONObject object = HttpClientUtil.doGet(url);
        String access_token = object.getString("access_token");
        String openid = object.getString("openid");
        String refresh_token = object.getString("refresh_token");

        System.err.println("accessToken:" + access_token);
        System.err.println("openId:" + openid);
        System.err.println("refresh_token:" + refresh_token);


        url = "https://api.weixin.qq.com/sns/userinfo" +
                "?access_token=" + access_token +
                "&openid=" + openid +
                "&lang=zh_CN";
        JSONObject userInfo = HttpClientUtil.doGet(url);
        System.out.println(userInfo);
        return AjaxResult.success(userInfo);
    }

}
6.配置域名
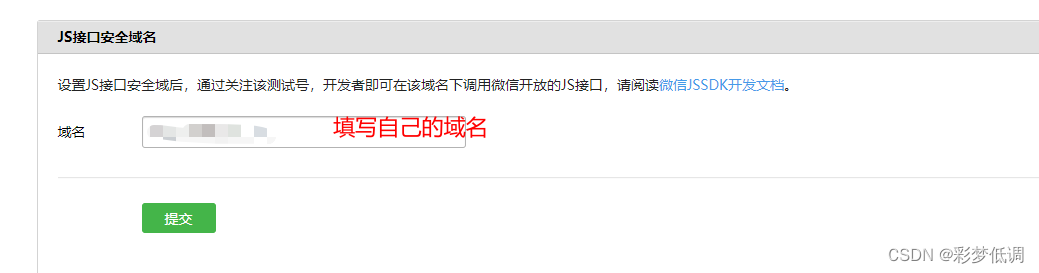
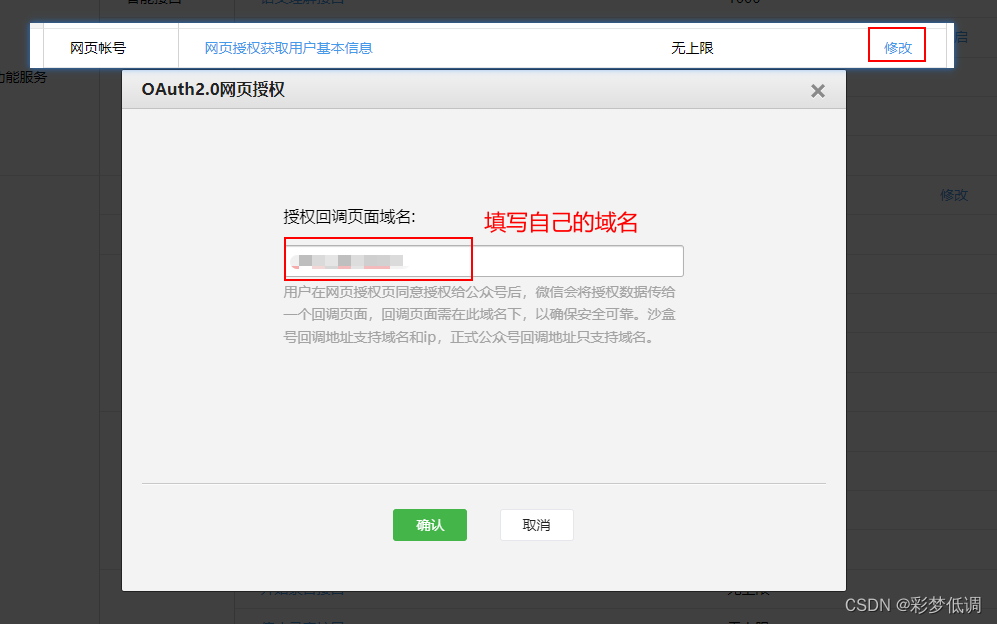
域名我当时用的花生壳去搞得免费域名, 网上一搜一大堆,不做展示,或者用一下方法,
这种方式应该也可以实现,未测试
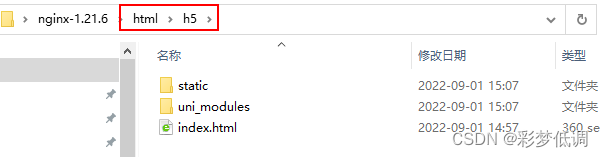
7.项目部署
将打包好的项目放在nginx中html文件夹中,并将后端项目运行起来
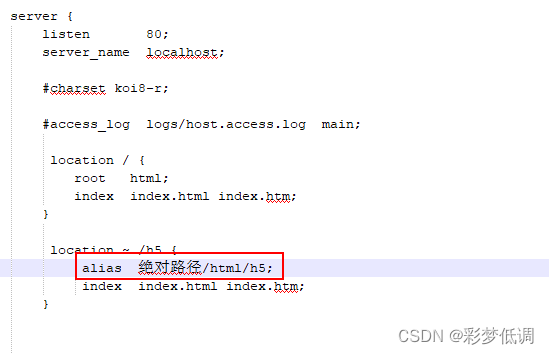
最后访问,localhost/h5就可以成功了
本文含有隐藏内容,请 开通VIP 后查看