目录
2.2 beforeCreate和created钩子函数间的生命周期
2.3 created钩子函数和beforeMount间的生命周期
2.4 beforeMount和mounted钩子函数间的生命周期
2.5 beforeUpdate钩子函数和updated钩子函数间的生命周期
2.6 beforeDestroy和destroyed钩子函数间的生命周期
一、 生命周期图
Vue实例的生命周期中有多个状态。

测试代码
<!DOCTYPE html>
<html lang="en">
<head>
	<meta charset="UTF-8">
	<title>Document</title>

</head>
<body>
	<div id="root">

	</div>
</body>
<script type="text/javascript" src="./vue.js"></script>
<script type="text/javascript">
  var vm = new Vue({
  	el : '#root',
	data(){
		return{
			msg:"111"
		}

	},
	template:'<div>{{msg}}</div>',
	beforeCreate:function(){
		console.log('beforeCreate');
	},
	created:function(){
		console.log('created');
	},
	beforeMount:function(){
		console.log(this.$el);
		console.log('beforeMount');
	},
	mounted:function(){
		console.log(this.$el);
		console.log('Mount');
	},

	beforeUpdate(){
		console.log("调用了beforeUpdate钩子函数");
	},
	updated(){
		console.log("调用了Update钩子函数");
	},
	beforeDestroy(){
		      console.log("调用了beforeDestroy钩子函数");
		    },
	destroyed(){
		      console.log("调用了destroyed钩子函数");
		    },
  })

</script>
</html>
<!DOCTYPE html>
<html lang="en">
<head>
<meta charset="UTF-8">
<title>Vue实例的生命周期</title>
</head>
<body>
<div id="app">
<h1>测试生命周期</h1>
<div>{{msg}}</div>
<hr>
<h3>测试beforeUpdate和update两个钩子函数</h3>
<button @click="handlerUpdate">更新数据</button>
</div>
<script src="../js/vue.js"></script>
<script>
const app = new Vue({
el: '#app',
data: {
msg: "12345"
},
methods: {
handlerUpdate() {
this.msg=this.msg.split("").reverse().join("")
}
},
//按照示意图依次调用
beforeCreate(){
console.log("调用了beforeCreate钩子函数");
},
created(){
console.log("调用了created钩子函数");
},
beforeMount(){
console.log('调用了beforeMount钩子函数');
},
mounted(){
console.log('调用了mounted钩子函数');
},
beforeUpdate(){
console.log("调用了beforeUpdate钩子函数")
},
updated(){
console.log("调用了updated钩子函数");
},
beforeDestroy(){
console.log("调用了beforeDestroy钩子函数");
},
destroyed(){
console.log("调用了destroyed钩子函数");
}
})
</script>
</body>
</html>如图所示: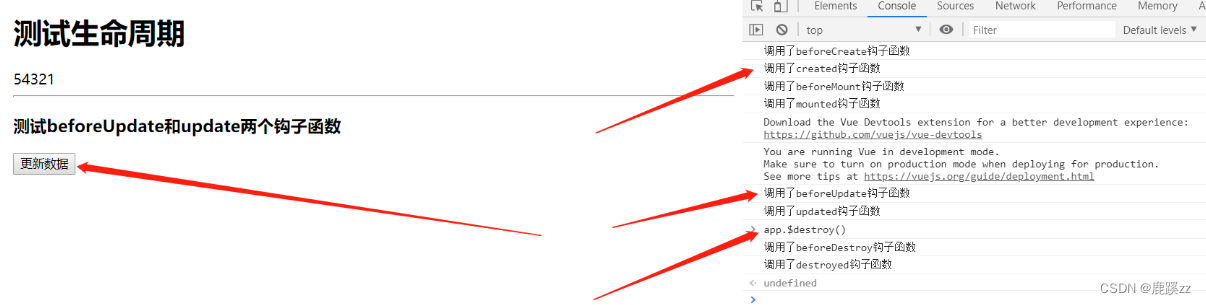
初始化页面依次调用了:
- 调用了beforeCreate钩子函数
- 调用了created钩子函数
- 调用了beforeMount钩子函数
- 调用了mounted钩子函数
点击更新数据后:
12345变成了54321,此时调用了:
- 调用了beforeUpdate钩子函数
- 调用了updated钩子函数
打开F12控制台 直接输入app.$destroy()主动销毁Vue实例调用:
- 调用了beforeDestroy钩子函数
- 调用了destroyed钩子函数
二、再探究
2.1 beforeCreate之前
初始化钩子函数和生命周期
2.2 beforeCreate和created钩子函数间的生命周期
在beforeCreate和created之间,进行数据观测(data observer) ,也就是在这个时候开始监控data中的数据变化了,同时初始化事件。
2.3 created钩子函数和beforeMount间的生命周期
对于created钩子函数和beforeMount有判断:
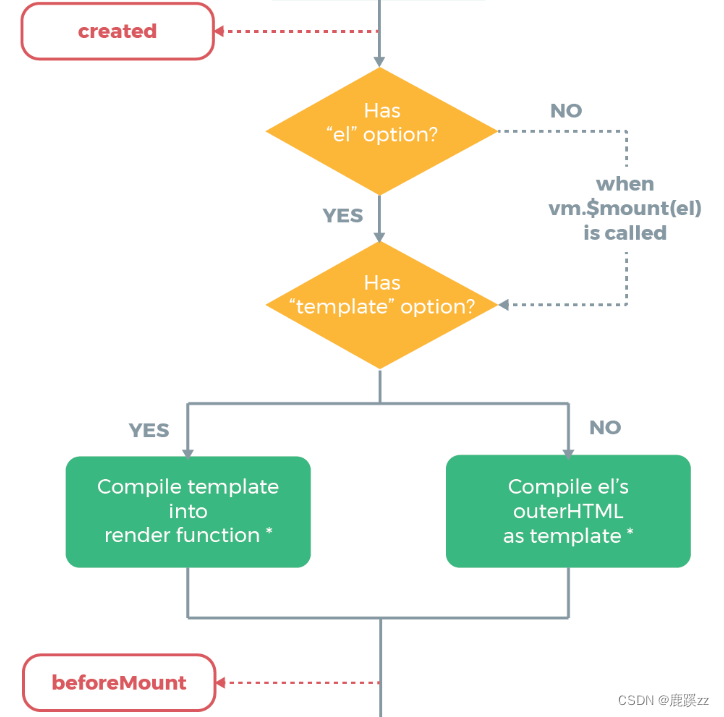
2.3.1 el选项对生命周期影响
- 有el选项
new Vue({
    el: '#app',
    beforeCreate: function () {
        console.log('调用了beforeCreat钩子函数')
    },
    created: function () {
        console.log('调用了created钩子函数')
    },
    beforeMount: function () {
        console.log('调用了beforeMount钩子函数')
    },
    mounted: function () {
        console.log('调用了mounted钩子函数')
    }
})
结果: 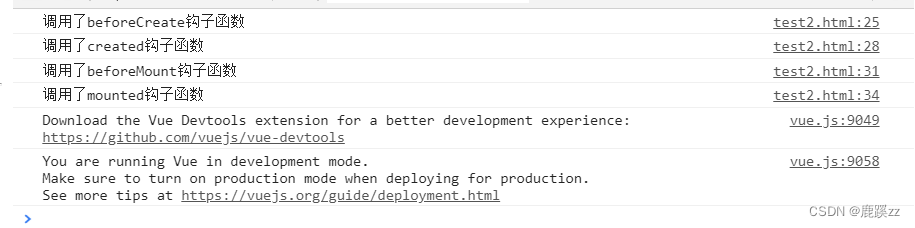
- 无el选项
new Vue({
    beforeCreate: function () {
        console.log('调用了beforeCreat钩子函数')
    },
    created: function () {
        console.log('调用了created钩子函数')
    },
    beforeMount: function () {
        console.log('调用了beforeMount钩子函数')
    },
    mounted: function () {
        console.log('调用了mounted钩子函数')
    }
})
结果: 
证明没有el选项,则停止编译,也意味着暂时停止了生命周期。生命周期到created钩子函数就结束了。而当我们不加el选项,但是手动执行vm.$mount(el)方法的话,也能够使暂停的生命周期进行下去,例如:
var app = new Vue({
    beforeCreate: function () {
        console.log('调用了beforeCreat钩子函数')
    },
    created: function () {
        console.log('调用了created钩子函数')
    },
    beforeMount: function () {
        console.log('调用了beforeMount钩子函数')
    },
    mounted: function () {
        console.log('调用了mounted钩子函数')
    }
})
app.$mount('#app')
结果: 
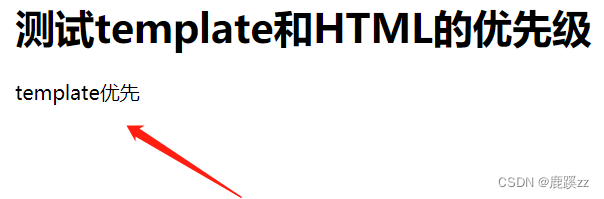
2.3.2 template
同时使用
template和HTML,查看优先级:
<h1>测试template和HTML的优先级</h1>
    <div id="app">
        <p>HTML优先</p>
    </div>
    <script>
        var app = new Vue({
            el:"#app",
            data:{
                msg:"template优先"
            },
            template:"<p>{{msg}}</p>",
        });
    </script>
结果:
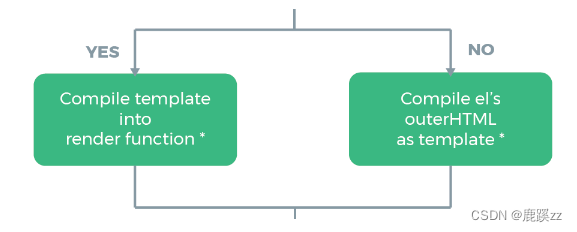
结论
- 如果Vue实例对象中有template参数选项,则将其作为模板编译成render函数
- 如果没有template参数选项,则将外部的HTML作为模板编译(template),也就是说,template参数选项的优先级要比外部的HTML高
- 如果1,2条件都不具备,则报错
注意
- Vue需要通过el去找对应的template,Vue实例通过el的参数,首先找自己有没有template,如果没有再去找外部的html,找到后将其编译成render函数。
- 也可以直接调用render选项,优先级:
render函数选项 > template参数 > 外部HTML。
new Vue({
    el: '#app',
    render (createElement) {
        return (....)
    }
})
<!DOCTYPE html>
<html lang="en">
<head>
<meta charset="UTF-8">
<title>Vue实例的生命周期</title>
</head>
<body>
<div id="app">
<h1>测试template和HTML的优先级</h1>
<div id="app">
<p>HTML优先</p>
</div>
</div>
<script src="https://cdn.jsdelivr.net/npm/vue@2.6.10/dist/vue.js"></script>
<script>
const app = new Vue({
data: {
msg:"template优先",
mg:'123'
},
template:"<p>{{msg}}</p>",
render:function(createElement){// --- render函数定义模板 ***
return createElement("div",{// --- 3个参数 (标签,样式,内容)
style:{
width:"100%",
height:"200px",
border:"1px solid #666"
}
},[
this.mg
])
},
methods: {
handlerUpdate() {
this.msg=this.msg.split("").reverse().join("")
}
},
//按照示意图依次调用
beforeCreate(){
console.log("调用了beforeCreate钩子函数");
},
created(){
console.log("调用了created钩子函数");
},
beforeMount(){
console.log('调用了beforeMount钩子函数');
},
mounted(){
console.log('调用了mounted钩子函数');
},
beforeUpdate(){
console.log("调用了beforeUpdate钩子函数")
},
updated(){
console.log("调用了updated钩子函数");
},
beforeDestroy(){
console.log("调用了beforeDestroy钩子函数");
},
destroyed(){
console.log("调用了destroyed钩子函数");
}
})
app.$mount('#app')
</script>
</body>
</html>2.4 beforeMount和mounted钩子函数间的生命周期
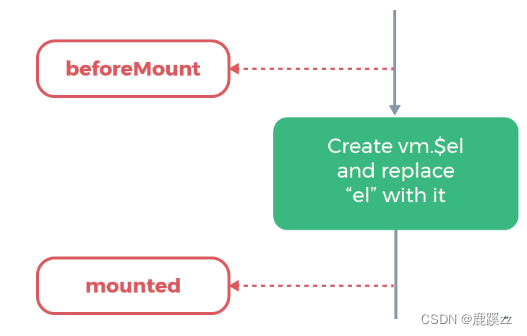
beforeMount
载入前(完成了data和el数据初始化),但是页面中的内容还是vue中的占位符,data中的message信息没有被挂在到Dom节点中,在这里可以在渲染前最后一次更改数据的机会,不会触发其他的钩子函数,一般可以在这里做初始数据的获取。
Mount
载入后html已经渲染(ajax请求可以放在这个函数中),把vue实例中的data里的message挂载到DOM节点中去
这里两个钩子函数间是载入数据。
2.5 beforeUpdate钩子函数和updated钩子函数间的生命周期
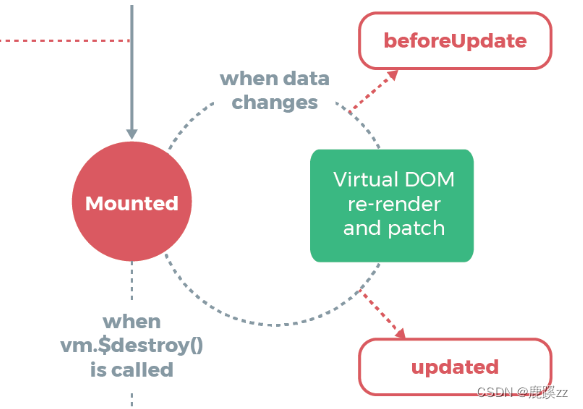
在Vue中,修改数据会导致重新渲染,依次调用beforeUpdate钩子函数和updated钩子函数
如果待修改的数据没有载入模板中,不会调用这里两个钩子函数
var app = new Vue({
    el: '#app',
    data: {
        msg: 1
    },
    template: '<div id="app"><p></p></div>',
    beforeUpdate: function () {
        console.log('调用了beforeUpdate钩子函数')
    },
    updated: function () {
        console.log('调用了updated钩子函数')
    }
})
app.msg = 2
结果: 
如果绑定了数据,会调用两个钩子函数:
<h1>测试有数据绑定修改数据,钩子函数调用情况</h1>
<div id="app">
</div>
<script>
    var app = new Vue({
        el:"#app",
        template:"<p>{{msg}}</p>",
        data:{
            msg:"原数据"
        },
        beforeUpdate: function () {
            console.log("调用了beforeUpdate钩子函数")
        },
        updated: function () {
            console.log("调用了updated钩子函数");
        },
    });
    app.msg = "数据被修改了";
</script>
结果: 
注意只有写入模板的数据才会被追踪
2.6 beforeDestroy和destroyed钩子函数间的生命周期
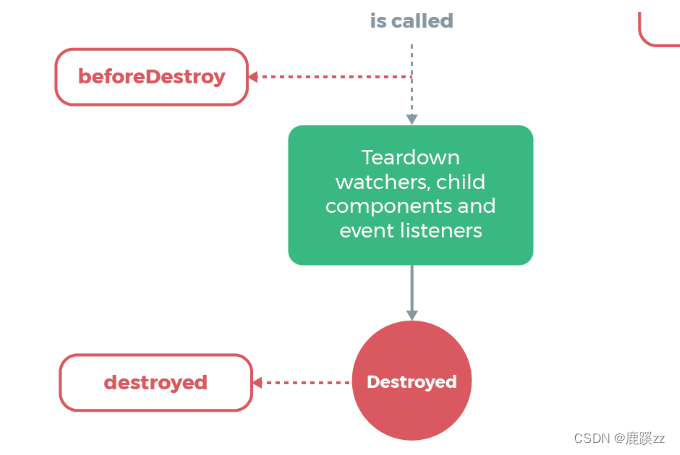
2.6.1 beforeDestroy
销毁前执行($destroy方法被调用的时候就会执行),一般在这里善后:清除计时器、清除非指令绑定的事件等等…’)
2.6.2 destroyed
销毁后 (Dom元素存在,只是不再受vue控制),卸载watcher,事件监听,子组件
三、总结
- beforecreate : 可以在这加个loading事件
- created :在这结束loading,还做一些初始数据的获取,实现函数自-执行
- mounted : 在这发起后端请求,拿回数据,配合路由钩子做一些事情
- beforeDestroy: 你确认删除XX吗?
- destroyed :当前组件已被删除,清空相关内容
总线机制 发布订阅者模式
<!DOCTYPE html>
<html lang="en">
<head>
	<meta charset="UTF-8">
	<title>Document</title>

</head>
<body>
	<div id="root">
       <child content="DELL"></child>
	   <child content="LEE"></child>
	</div>
</body>
<script type="text/javascript" src="./vue.js"></script>
<script type="text/javascript">
	Vue.prototype.bus = new Vue()
   Vue.component('child',{
	 data(){
		return {
			dcontent:this.content
		}
	  },
	props:{
		content:String
	},
	template:'<div @click="handelClick">{{dcontent}}</div>',
	methods:{
		handelClick(){
			this.bus.$emit('change',this.dcontent)
		}
	},
	mounted(){
		var that = this;
		this.bus.$on('change',function(msg){
			console.log(that);
			that.dcontent=msg
		})
	}
})
  var vm = new Vue({
  	el : '#root',
	data(){
		return{
			msg:"111"
		}

	},

  })

</script>
</html>
自定义指令(全局和局部) 全局
<!DOCTYPE html>
<html>
	<head>
		<meta charset="utf-8">
		<title></title>
	</head>
	<body>
		<div id="app">
		    <my-comp v-if="msg" :msg="msg"></my-comp>
		    <button @click="update">更新</button>
		    <button @click="uninstall">卸载</button>
		    <button @click="install">安装</button>
		</div>
		<script type="text/javascript" src="./vue.js"></script>
		<script type="text/javascript">
		    Vue.directive('hello', {
		        bind: function (el){
		            console.log('bind');
		        },
		        inserted: function (el){
		            console.log('inserted');
		        },
		        update: function (el){
		            console.log('update');
		        },
		        componentUpdated: function (el){
		            console.log('componentUpdated');
		        },
		        unbind: function (el){
		            console.log('unbind');
		        }
		    });

		    var myComp = {
		        template: '<h1 v-hello>{{msg}}</h1>',
		        props: {
		            msg: String
		        }
		    }

		    new Vue({
		        el: '#app',
		        data: {
		            msg: 'Hello'
		        },
		        components: {
		            myComp: myComp
		        },
		        methods: {
		            update: function (){
		                this.msg = 'Hi';
		            },
		            uninstall: function (){
		                this.msg = '';
		            },
		            install: function (){
		                this.msg = 'Hello';
		            }
		        }
		    })
		</script>
	</body>
</html>
局部
<!DOCTYPE html>
<html>
	<head>
		<meta charset="utf-8">
		<title></title>
	</head>
	<body>
		<div id="app">
		   <my-comp></my-comp>
		</div>
		<template id="cpn2">
			<div class="hello"><div v-test='name'></div></div>
		</template>
		<script type="text/javascript" src="./vue.js"></script>
		<script type="text/javascript">
		    new Vue({
		        el: '#app',
		        data: {
		            msg: 'Hello'
		        },
		        components: {
		            myComp:  {
						template:'#cpn2',
						data () {
						    return {
						     name:'我是名字2',
						    }
						},
						directives:{
						  	test:{
							    inserted: function (el,binding) {// 指令的定义
							       //el为绑定元素,可以对其进行dom操作
							       console.log(binding) //一个对象,包含很多属性属性
							    },
							    bind: function (el, binding, vnode) {
								    el.innerHTML = binding.value
								  }
						  	}
						  },
					}
		        }
		    })
		</script>
	</body>
</html>