三维场景Scene
const scene = new THREE.Scene();
物体形状:几何体 Geometry
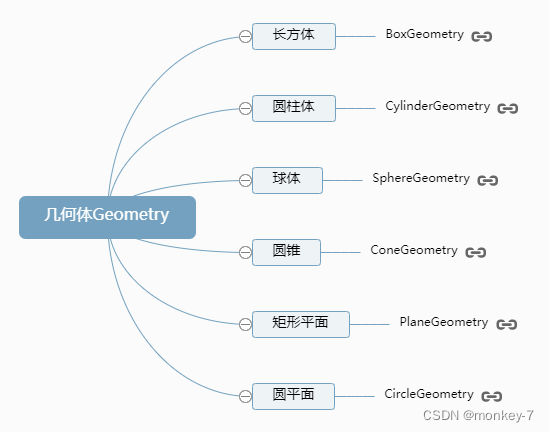
//创建一个长方体几何对象Geometry
const geometry = new THREE.BoxGeometry(100, 100, 100);
物体外观:材质Material
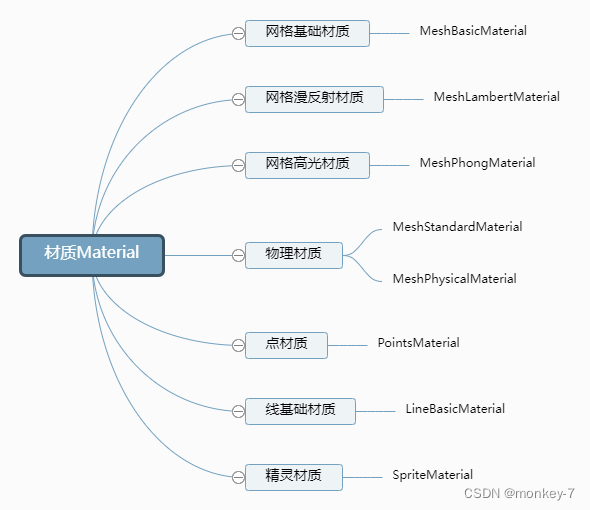
//创建一个材质对象Material
const material = new THREE.MeshBasicMaterial({
    color: 0xff0000,//0xff0000设置材质颜色为红色
});
物体:网格模型Mesh
// 两个参数分别为几何体geometry、材质material
const mesh = new THREE.Mesh(geometry, material); //网格模型对象Mesh
模型位置.position
const mesh = new THREE.Mesh(geometry, material); //网格模型对象Mesh
//设置网格模型在三维空间中的位置坐标,默认是坐标原点
mesh.position.set(0,10,0);
.add()方法
在threejs中你创建了一个表示物体的虚拟对象Mesh,需要通过.add()方法,把网格模型mesh添加到三维场景scene中。
scene.add(mesh);
透视投影相机PerspectiveCamera
模拟人眼观察这个世界的规律
// 实例化一个透视投影相机对象
const camera = new THREE.PerspectiveCamera();
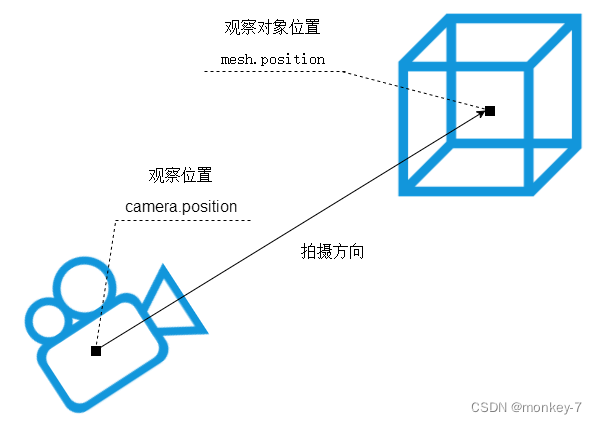
相机位置.position
//相机在Three.js三维坐标系中的位置
// 根据需要设置相机位置具体值
camera.position.set(200, 200, 200);
相机观察目标.lookAt()
相机镜头对准哪个物体或说哪个坐标
//相机观察目标指向Threejs 3D空间中某个位置
camera.lookAt(0, 0, 0); //坐标原点
camera.lookAt(0, 10, 0); //y轴上位置10
camera.lookAt(mesh.position);//指向mesh对应的位置
// 长方体尺寸100, 100, 100
const geometry = new THREE.BoxGeometry( 100, 100, 100 );
const mesh = new THREE.Mesh(geometry,material);
// 网格模型位置xyz坐标:0,10,0
mesh.position.set(0,10,0);
// 相机位置xyz坐标:200, 200, 200
camera.position.set(200, 200, 200);
透视投影相机PerspectiveCamera:视锥体
透视投影相机的四个参数fov, aspect, near, far构成一个四棱台3D空间,被称为视锥体,只有视锥体之内的物体,才会渲染出来,视锥体范围之外的物体不会显示在Canvas画布上。
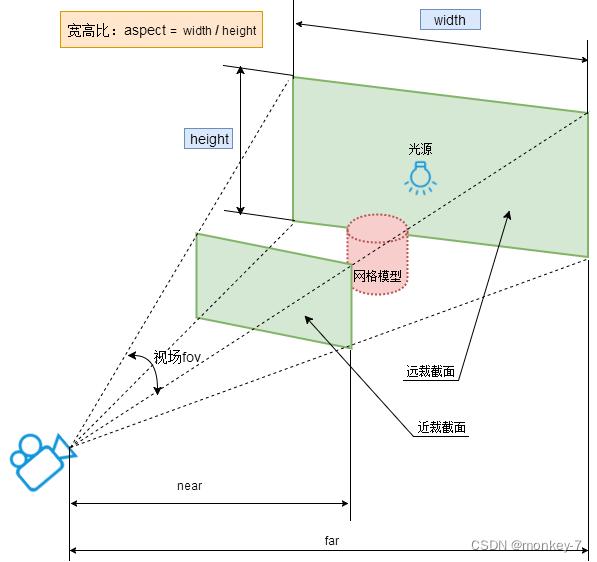
// width和height用来设置Three.js输出的Canvas画布尺寸(像素px)
const width = 800; //宽度
const height = 500; //高度
// 30:视场角度, width / height:Canvas画布宽高比, 1:近裁截面, 3000:远裁截面
const camera = new THREE.PerspectiveCamera(30, width / height, 1, 3000);

WebGL渲染器WebGLRenderer
// 创建渲染器对象
const renderer = new THREE.WebGLRenderer();
渲染器渲染方法.render()
渲染器WebGLRenderer执行渲染方法.render()就可以生成一个Canvas画布(照片),并把三维场景Scene呈现在canvas画布上面,你可以把.render()理解为相机的拍照动作“咔”。
renderer.render(scene, camera); //执行渲染操作
渲染器Canvas画布属性.domElement
渲染器WebGLRenderer通过属性.domElement可以获得渲染方法.render()生成的Canvas画布,.domElement本质上就是一个HTML元素:Canvas画布。
document.body.appendChild(renderer.domElement)
Canvas画布插入到任意HTML元素中
<div id="webgl" style="margin-top: 200px;margin-left: 100px;"></div>
document.getElementById('webgl').appendChild(renderer.domElement);
后面就有活忙起来啦 暂时没时间捋文档了
时间充裕的话 还是建议看看原作者的文档 非常详细 有很多小细节 通俗易懂 我这里都是摘的我自己想记的