返回:OpenCV系列文章目录(持续更新中......)
上一篇:OpenCV的查找命中或未命中
下一篇:OpenCV4.9图像金字塔-CSDN博客

目标
在本教程中,您将学习如何:
应用两个非常常见的形态运算符(即膨胀和侵蚀),并创建自定义内核,以便在水平轴和垂直轴上提取直线。为此,您将使用以下 OpenCV 函数:
-
- erode()
- dilate()
- getStructuringElement()
在一个示例中,您的目标是从乐谱中提取音符。
理论
形态操作
形态学是一组图像处理操作,这些操作基于预定义的结构元素(也称为内核)处理图像。输出图像中每个像素的值基于输入图像中相应像素与其相邻像素的比较。通过选择内核的大小和形状,可以构造对输入图像的特定形状敏感的形态操作。
两种最基本的形态操作是扩张和侵蚀。扩张会将像素添加到图像中物体的边界上,而侵蚀则恰恰相反。添加或删除的像素量分别取决于用于处理图像的结构元素的大小和形状。通常,这两个操作遵循的规则如下:
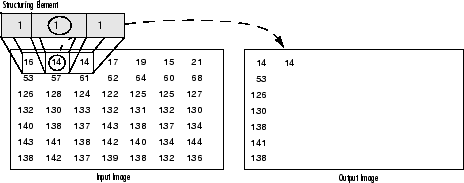
- 膨胀:输出像素的值是结构元素大小和形状范围内的所有像素的最大值。例如,在二进制图像中,如果输入图像的任何像素在内核范围内设置为值 1,则输出图像的相应像素也将设置为 1。后者适用于任何类型的图像(例如灰度、bgr 等)。

二进制图像上的扩张

灰度图像上的扩张
- 侵蚀:反之亦然。输出像素的值是结构化元素大小和形状范围内的所有像素的最小值。请看下面的示例图:

二进制映像上的侵蚀
灰度图像上的侵蚀
结构元素
如上所述,通常在任何形态操作中,用于探测输入图像的结构元素是最重要的部分。
结构元素是仅由 0 和 1 组成的矩阵,可以具有任意形状和大小。通常比正在处理的图像小得多,而值为 1 的像素定义邻域。结构元素的中心像素(称为原点)标识感兴趣的像素 - 正在处理的像素。
例如,下面演示了 7x7 大小的菱形结构单元。
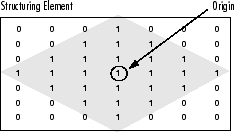
一种菱形结构元件及其起源
结构元素可以具有许多常见形状,例如线条、菱形、圆盘、周期线以及圆形和大小。通常,选择的结构化元素的大小和形状与要在输入图像中处理/提取的对象相同。例如,要在图像中查找线条,请创建一个线性结构元素,稍后将看到。
示例代码:
C++
本教程代码如下所示。
您也可以从这里下载。
#include <opencv2/core.hpp>
#include <opencv2/imgproc.hpp>
#include <opencv2/highgui.hpp>
#include <iostream>

void show_wait_destroy(const char* winname, cv::Mat img);

using namespace std;
using namespace cv;

int main(int argc, char** argv)
{
 CommandLineParser parser(argc, argv, "{@input | notes.png | input image}");
 Mat src = imread( samples::findFile( parser.get<String>("@input") ), IMREAD_COLOR);
 if (src.empty())
 {
 cout << "Could not open or find the image!\n" << endl;
 cout << "Usage: " << argv[0] << " <Input image>" << endl;
 return -1;
 }

 // Show source image
 imshow("src", src);

 // Transform source image to gray if it is not already
 Mat gray;

 if (src.channels() == 3)
 {
 cvtColor(src, gray, COLOR_BGR2GRAY);
 }
 else
 {
 gray = src;
 }

 // Show gray image
 show_wait_destroy("gray", gray);

 // Apply adaptiveThreshold at the bitwise_not of gray, notice the ~ symbol
 Mat bw;
 adaptiveThreshold(~gray, bw, 255, ADAPTIVE_THRESH_MEAN_C, THRESH_BINARY, 15, -2);

 // Show binary image
 show_wait_destroy("binary", bw);

 // Create the images that will use to extract the horizontal and vertical lines
 Mat horizontal = bw.clone();
 Mat vertical = bw.clone();

 // Specify size on horizontal axis
 int horizontal_size = horizontal.cols / 30;

 // Create structure element for extracting horizontal lines through morphology operations
 Mat horizontalStructure = getStructuringElement(MORPH_RECT, Size(horizontal_size, 1));

 // Apply morphology operations
 erode(horizontal, horizontal, horizontalStructure, Point(-1, -1));
 dilate(horizontal, horizontal, horizontalStructure, Point(-1, -1));

 // Show extracted horizontal lines
 show_wait_destroy("horizontal", horizontal);

 // Specify size on vertical axis
 int vertical_size = vertical.rows / 30;

 // Create structure element for extracting vertical lines through morphology operations
 Mat verticalStructure = getStructuringElement(MORPH_RECT, Size(1, vertical_size));

 // Apply morphology operations
 erode(vertical, vertical, verticalStructure, Point(-1, -1));
 dilate(vertical, vertical, verticalStructure, Point(-1, -1));

 // Show extracted vertical lines
 show_wait_destroy("vertical", vertical);

 // Inverse vertical image
 bitwise_not(vertical, vertical);
 show_wait_destroy("vertical_bit", vertical);

 // Extract edges and smooth image according to the logic
 // 1. extract edges
 // 2. dilate(edges)
 // 3. src.copyTo(smooth)
 // 4. blur smooth img
 // 5. smooth.copyTo(src, edges)

 // Step 1
 Mat edges;
 adaptiveThreshold(vertical, edges, 255, ADAPTIVE_THRESH_MEAN_C, THRESH_BINARY, 3, -2);
 show_wait_destroy("edges", edges);

 // Step 2
 Mat kernel = Mat::ones(2, 2, CV_8UC1);
 dilate(edges, edges, kernel);
 show_wait_destroy("dilate", edges);

 // Step 3
 Mat smooth;
 vertical.copyTo(smooth);

 // Step 4
 blur(smooth, smooth, Size(2, 2));

 // Step 5
 smooth.copyTo(vertical, edges);

 // Show final result
 show_wait_destroy("smooth - final", vertical);

 return 0;
}

void show_wait_destroy(const char* winname, cv::Mat img) {
 imshow(winname, img);
 moveWindow(winname, 500, 0);
 waitKey(0);
 destroyWindow(winname);
}
要点/结果
C++
从这里获取演示图像。
加载图像
 CommandLineParser parser(argc, argv, "{@input | notes.png | input image}");
 Mat src = imread( samples::findFile( parser.get<String>("@input") ), IMREAD_COLOR);
 if (src.empty())
 {
 cout << "Could not open or find the image!\n" << endl;
 cout << "Usage: " << argv[0] << " <Input image>" << endl;
 return -1;
 }

 // Show source image
 imshow("src", src);
灰度
 // Transform source image to gray if it is not already
 Mat gray;

 if (src.channels() == 3)
 {
 cvtColor(src, gray, COLOR_BGR2GRAY);
 }
 else
 {
 gray = src;
 }

 // Show gray image
 show_wait_destroy("gray", gray);
灰度转二进制图像
 // Apply adaptiveThreshold at the bitwise_not of gray, notice the ~ symbol
 Mat bw;
 adaptiveThreshold(~gray, bw, 255, ADAPTIVE_THRESH_MEAN_C, THRESH_BINARY, 15, -2);

 // Show binary image
 show_wait_destroy("binary", bw);
输出图像
现在我们准备应用形态运算来提取水平线和垂直线,从而将音符与乐谱分开,但首先让我们初始化我们将用于此原因的输出图像:
 // Create the images that will use to extract the horizontal and vertical lines
 Mat horizontal = bw.clone();
 Mat vertical = bw.clone();
结构元素
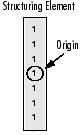
正如我们在理论中指出的那样,为了提取我们想要的对象,我们需要创建相应的结构元素。由于我们要提取水平线,因此用于该目的的相应结构元素将具有以下形状:
![]()
在源代码中,这由以下代码片段表示:
 // Specify size on horizontal axis
 int horizontal_size = horizontal.cols / 30;

 // Create structure element for extracting horizontal lines through morphology operations
 Mat horizontalStructure = getStructuringElement(MORPH_RECT, Size(horizontal_size, 1));

 // Apply morphology operations
 erode(horizontal, horizontal, horizontalStructure, Point(-1, -1));
 dilate(horizontal, horizontal, horizontalStructure, Point(-1, -1));

 // Show extracted horizontal lines
 show_wait_destroy("horizontal", horizontal);
这同样适用于具有相应结构元素的垂直线:
同样,这表示如下:
 // Specify size on vertical axis
 int vertical_size = vertical.rows / 30;

 // Create structure element for extracting vertical lines through morphology operations
 Mat verticalStructure = getStructuringElement(MORPH_RECT, Size(1, vertical_size));

 // Apply morphology operations
 erode(vertical, vertical, verticalStructure, Point(-1, -1));
 dilate(vertical, vertical, verticalStructure, Point(-1, -1));

 // Show extracted vertical lines
 show_wait_destroy("vertical", vertical);
优化边缘/结果
正如你所看到的,我们快到了。但是,在这一点上,您会注意到音符的边缘有点粗糙。出于这个原因,我们需要优化边缘以获得更平滑的结果:
 // Inverse vertical image
 bitwise_not(vertical, vertical);
 show_wait_destroy("vertical_bit", vertical);

 // Extract edges and smooth image according to the logic
 // 1. extract edges
 // 2. dilate(edges)
 // 3. src.copyTo(smooth)
 // 4. blur smooth img
 // 5. smooth.copyTo(src, edges)

 // Step 1
 Mat edges;
 adaptiveThreshold(vertical, edges, 255, ADAPTIVE_THRESH_MEAN_C, THRESH_BINARY, 3, -2);
 show_wait_destroy("edges", edges);

 // Step 2
 Mat kernel = Mat::ones(2, 2, CV_8UC1);
 dilate(edges, edges, kernel);
 show_wait_destroy("dilate", edges);

 // Step 3
 Mat smooth;
 vertical.copyTo(smooth);

 // Step 4
 blur(smooth, smooth, Size(2, 2));

 // Step 5
 smooth.copyTo(vertical, edges);

 // Show final result
 show_wait_destroy("smooth - final", vertical);
参考文献:
1、《Extract horizontal and vertical lines by using morphological operations》---Theodore Tsesmelis