目录
一,Spring IOC
Spring IoC容器是Spring框架的核心,它通过读取配置信息来自动创建对象(bean)、配置对象属性以及管理对象的生命周期。IoC容器利用依赖注入(DI)自动将对象的依赖关系注入到需要它们的其他对象中,从而减少代码间的耦合度。
容器支持多种bean作用域和生命周期管理,提供了事件处理、国际化消息和资源访问等高级功能。此外,Spring IoC与AOP(面向切面编程)紧密结合,支持通过切面来实现如日志、事务等横切关注点的处理。
上面是IOC的介绍,接下来我将去完成一个简单的IOC容器,剖析底层。
二,流程图设计

三,设计思路解析
扫描类路径下所有以Java结尾的文件: 在Spring框架中,通过使用
ClassPathScanningCandidateComponentProvider类,可以扫描指定的类路径下所有的.class文件。这个类通常与AnnotationConfigApplicationContext一起使用,后者是Spring中用于处理注解配置的上下文。获得需要被IoC管理的类: 通过类路径扫描,Spring容器会筛选出那些需要被IoC容器管理的类。这些类通常带有特定的注解,如
@Component、@Service、@Repository或@Controller等,这些注解表明了一个类将作为Spring容器中的一个bean。全类名加入到beanNames集合中: 将筛选出的类全限定名(即包名+类名)加入到一个名为
beanNames的集合中。这个集合是Spring容器内部用于跟踪所有候选bean的一个列表。反射为实例属性赋值: 对于每个候选的bean类,Spring容器会通过反射创建其实例,并通过反射机制为其属性赋值。这一过程涉及到处理
@Autowired注解,以及根据类型或名称自动装配依赖关系。完成依赖注入的过程: 依赖注入是Spring IoC容器的核心功能之一。Spring会根据bean的定义,解析和注入所有需要的依赖。这可能涉及到查找其他bean、处理复杂的依赖关系(如循环依赖)以及使用
BeanFactory来获取和注入依赖。反射获取类上的注解: 在处理每个bean时,Spring容器会通过反射获取类上的注解信息。这些注解可能会影响bean的创建、作用域、生命周期等。例如,
@Scope注解定义了bean的作用域,@PostConstruct注解指定了在构造之后执行的方法等。容器启动: 在所有bean都被创建并注入依赖之后,Spring容器会启动。这通常涉及到调用
ApplicationContext的refresh()方法,该方法会触发容器的启动过程,包括初始化所有的singleton beans、处理@PostConstruct注解的方法、以及发送ContextRefreshedEvent事件。启动结束: 一旦容器启动完成,Spring会发送一个
ContextClosedEvent事件,表明容器已经准备就绪,可以开始处理请求和执行业务逻辑。
三,开始写代码
我们将一步步按照流程图中所述的将IOC底层实现出来。
1.准备工作
编写注解和测试类(包含@Autowired和@Component)
import java.lang.annotation.ElementType;
import java.lang.annotation.Retention;
import java.lang.annotation.RetentionPolicy;
import java.lang.annotation.Target;

@Target(ElementType.FIELD)
@Retention(RetentionPolicy.RUNTIME)
public @interface Autowired {
}
@Target(ElementType.TYPE)
@Retention(RetentionPolicy.RUNTIME)
public @interface Component {
}@Component
public class UserService {
public void addUser(String name, int age) {
System.out.println(name);
System.out.println(age);
}
}@Component
public class TestController {
@Autowired
private UserService userService;
public void test(){
userService.addUser("zhangsan",18);
}
}2.扫描并加载类信息
(1)扫描类路径下的所有文件将其加入到集合中。
(2)将.java结尾的文件筛选出来
    //构造函数
    public SpringIOC() {
        initPath();
        try {
            scan();
        } catch (FileNotFoundException e) {
            e.printStackTrace();
        }
        beanNames= new ArrayList<>();
        initBeanNames();
    }

    private void initPath(){
        basePath="类路径自己指定";
        basePackage="自己指定扫描包";
    }
    /**
    * 将类路径下所有文件提取出来放到集合中
     */
    private void scan() throws FileNotFoundException {
        File file = new File(basePath);
        filePaths = new ArrayList<>();
        if(file.exists()){
            Queue<File> queue = new LinkedList<>();
            queue.add(file);
            while(!queue.isEmpty()){
                File poll = queue.poll();
                if(poll == null){
                    continue;
                }
                if(poll.isDirectory()){//目录下面的所有文件夹
                    File[] files = poll.listFiles();
                    for (File f : files) {
                        queue.add(f);
                    }
                }else {
                    filePaths.add(poll.getPath());//将单个文件放到filePaths当中
                }
            }
        }else {
            throw new FileNotFoundException(basePath+" not found");
        }
    }

    /**
     * 将所有的.java结尾的 全限定名放到 beanNames
     */
    public void  initBeanNames(){
        for (String s : filePaths) {//遍历刚才文件路径
            String replace = s.replace(basePath, "");
            if(replace.endsWith(".java")) {
                replace = replace.substring(0, replace.length()-5);
            }

            char[] chars = replace.toCharArray();
            for (int i = 0; i < chars.length; i++) {
                if(chars[i]=='\\'){
                    chars[i] = '.';
                }
            }
            beanNames.add(basePackage+"."+new String(chars));
        }
    }
3.初始化bean
在2中我们已经得到了所有java类的类名,这一步可以根据全类名来获取类的注解等各种信息。
(1)反射获取类上注解,筛选出被IOC管理的类并创建实例,封装到ioc容器中。
(2)为ioc容器中的bean反射设置属性(依赖注入)
    //非懒加载
    public void initBeans(){
        for (String beanName : beanNames) {
            System.out.println(beanName);
            try {
                Class<?> aClass = Class.forName(beanName);
                Annotation[] declaredAnnotations = aClass.getDeclaredAnnotations();//获取类上的所有注解
                for (Annotation declaredAnnotation : declaredAnnotations) {
                    if(declaredAnnotation instanceof Component){//反射获取带@Component的类
                        Object o = aClass.newInstance();//创建实例
                        beans.put(aClass.getName(),o);//将类名-实例放到beans容器当中
                    }
                }
            } catch (ClassNotFoundException | InstantiationException | IllegalAccessException e) {
                e.printStackTrace();
            }
        }
        System.out.println(beans);
        for (Map.Entry<String, Object> entry : beans.entrySet()) {//将实例从map中拿出来
            Field[] declaredFields = entry.getValue().getClass().getDeclaredFields();//获取实例的所有字段
            for (Field field : declaredFields) {
                Annotation[] declaredAnnotations = field.getDeclaredAnnotations();//字段上所有的注解
                for (Annotation annotation : declaredAnnotations) {
                    if (annotation instanceof Autowired) {//带@Autowired的注解
                        String name = field.getType().getName();//com.heaboy.springioc.entity.UserService
                        // 从beans 中获得对应的对象
                        Object o = beans.get(name);//beans是个map 只要里面有这样的类型 就能拿到
                        field.setAccessible(true);//设置可访问的权限
                        try {
                            field.set(entry.getValue(), o);//反射将o设置给字段
                        } catch (IllegalAccessException e) {
                            e.printStackTrace();
                        }
                    }
                }
            }
        }
    }
4.测试一下
3完成之后,此时加@Autowired和@Component注解的类已经在集合中了,属性也已经注入。我们来编写测试代码debug一下。
public class SpringIOCTest {
@Test
public void testScan() throws FileNotFoundException {
SpringIOC springIOC = new SpringIOC();//获取java类的全类名
springIOC.initBeans();
TestController instance = (TestController)springIOC.getInstance(TestController.class.getName());
instance.test();
}
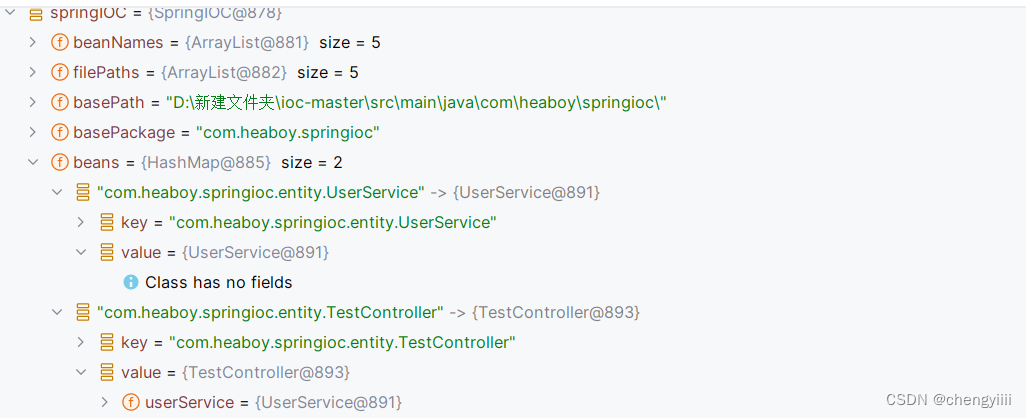
}可以看到两个bean实例以及他们之间的依赖关系。
完整代码获取可以去我的git: https://gitee.com/code0321/ioc
拜托可以给它点点赞哦~