1. v-viewer组件简介
一款基于 viewer.js 封装的Vue版插件,可用于图像查看,以及图片的旋转、缩放等功能预览
官网:v-viewer
- 文档说明:Vue3图片浏览组件v-viewer,支持旋转、缩放、翻转等操作
- 安装
npm install v-viewer@next viewerjs - 特点
- 支持移动设备触摸事件
- 支持响应式
- 支持放大/缩小
- 支持旋转(类似微博的图片旋转)
- 支持水平/垂直翻转
- 支持图片移动
- 支持键盘
- 支持全屏幻灯片模式(可做屏保)
- 支持缩略图
- 支持标题显示
- 支持多种自定义事件
2. 在vue项目使用
2.1 指令形式调用
只需要将v-viewer指令添加到任意元素即可,该元素下的所有img元素都会被viewer自动处理。
可以传入配置项:v-viewer=“{inline: true}”
如果有必要,可以先用选择器查找到目标元素,然后可以用el.$viewer来获取viewer实例。
- 指令修饰符static
添加修饰器后,viewer的创建只会在元素绑定指令时执行一次。
如果你确定元素内的图片不会再发生变化,使用它可以避免不必要的重建动作。<div class="images" v-viewer.static="{inline: true}"> <img v-for="src in images" :src="src" :key="src"> </div> - 指令修饰符rebuild
默认情况下当图片发生变更时(添加、删除或排序),viewer实例会使用update方法更新内容。
如果你遇到任何显示问题,尝试使用重建来代替更新。<div class="images" v-viewer.rebuild="{inline: true}"> <img v-for="src in images" :src="src" :key="src"> </div> - 组件中以指令形式使用,代码如下
<template>
  <div>
    <div ref="imagesDiv" class="images" v-show="false" v-viewer="{movable: false}">
      <img v-for="src in images" :src="src" :key="src">
    </div>
    <button type="button" @click="show">Show</button>
  </div>
</template>

<script lang="ts">
import { defineComponent, ref } from 'vue'
import 'viewerjs/dist/viewer.css'
import Viewer from 'viewerjs'
export default defineComponent({
  setup () {
    const imagesDiv = ref<any>(null)
    const images = ref<string[]>([
      'https://picsum.photos/200/200',
      'https://picsum.photos/300/200',
      'https://picsum.photos/250/200'
    ])
    function show () {
      const viewer = imagesDiv.value.viewer
      viewer.show()
    }
    return {
      imagesDiv,
      images,
      show
    }
  },
  directives: {
  // mounted钩子函数负责初始化Viewer实例,而beforeUnmount钩子函数负责在组件销毁前清理Viewer实例。你可以通过传递一个对象作为指令的参数来配置Viewer.js的选项。
    viewer: {
      mounted (el, binding) {
        // 确保只初始化一次
        if (!el.viewer) {
          el.viewer = new Viewer(el, binding.value || {})
        }
      },
      beforeUnmount (el) {
        // 组件销毁前销毁viewer实例
        if (el.viewer) {
          el.viewer.destroy()
        }
      }
    }
  }
})
</script>
<style scoped>
</style>

- 全局以指令形式使用,代码如下
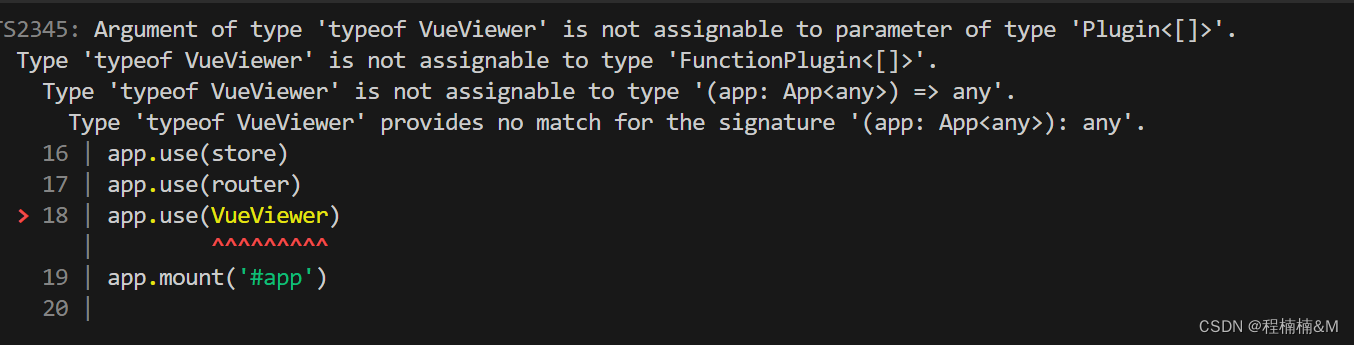
// main.ts
import VueViewer from 'v-viewer';
import 'viewerjs/dist/viewer.css';
const app = createApp(App1)
app.use(store)
app.use(router)
app.use(() => VueViewer)
app.mount('#app')
// 组件中的引用
<template>
  <div>
    <div ref="imagesDiv" class="images" v-show="false" v-viewer="{movable: false}">
      <img v-for="src in images" :src="src" :key="src">
    </div>
    <button type="button" @click="show">Show</button>
  </div>
</template>

<script lang="ts">
import { defineComponent, ref } from 'vue'
export default defineComponent({
  setup () {
    const imagesDiv = ref<any>(null)
    const images = ref<string[]>([
      'https://picsum.photos/200/200',
      'https://picsum.photos/300/200',
      'https://picsum.photos/250/200'
    ])
    function show () {
      const viewer = imagesDiv.value.$viewer
      viewer.show()
    }
    return {
      imagesDiv,
      images,
      show
    }
  }
})
</script>
<style scoped>
</style>
2.2 组件形式调用
可以单独引入全屏组件并局部注册它。
<template>
  <div>
    <Viewer class="images" v-show="false" ref="imagesDiv" :images="images" :options="viewOptions"  @inited="inited">
      <template #default="scope">
        <img v-for="src in scope.images" :src="src" :key="src">
        {{scope.options}}
      </template>
    </Viewer>
    <button type="button" @click="show">Show</button>
  </div>
</template>

<script lang="ts">
import { defineComponent, ref, reactive } from 'vue'
import 'viewerjs/dist/viewer.css'
import { component as Viewer } from 'v-viewer'
export default defineComponent({
  components: {
    Viewer
  },
  setup () {
    const imagesDiv = ref<any>(null)
    let viewerOne = ref<any>(null)
    const viewOptions = reactive({
      fullscreen: true,
      keyboard: false,
      loop: false

    })
    const images = ref<string[]>([
      'https://picsum.photos/200/200',
      'https://picsum.photos/300/200',
      'https://picsum.photos/250/200'
    ])
    function show () {
      viewerOne.value.show()
    }
    function inited (viewer: any) {
      viewerOne.value = viewer
    }
    return {
      imagesDiv,
      images,
      show,
      viewOptions,
      inited
    }
  }
})
</script>
<style scoped>
</style>
- images#
Type: Array - trigger
Type: Object
使用trigger来代替images, 从而传入任何类型的数据。
当trigger绑定的数据发生变更,组件就会自动更新。<viewer :trigger="externallyGeneratedHtmlWithImages"> <div v-html="externallyGeneratedHtmlWithImages"/> </viewer> - rebuild
Type: Boolean
Default: false
默认情况下当图片发生变更时(添加、删除或排序),viewer实例会使用update方法更新内容。
如果你遇到任何显示问题,尝试使用重建来代替更新。<viewer ref="viewer" :options="options" :images="images" rebuild class="viewer" @inited="inited" > <template #default="scope"> <img v-for="src in scope.images" :src="src" :key="src"> {{scope.options}} </template> </viewer> - 组件事件
- inited
viewer: Viewer
监听inited事件来获取viewer实例,或者也可以用this.refs.xxx.$viewer这种方法。
2.3 api形式调用
api形式只能使用modal模式。
可以直接执行函数: this.$viewerApi({options: {}, images: []}) 来展现画廊, 而不需要自己来渲染这些img元素.
函数会返回对应的viewer实例.
<template>
	<div>
		<button v-if="images?.length" @click="showImagesInViewer(images)">查看</button>
	<div>
<template>
<script lang="ts">
import { defineComponent, ref, reactive } from 'vue'
import 'viewerjs/dist/viewer.css'
import { api as viewerApi } from "v-viewer";
export default defineComponent({
 setup () {
 	const images = ref<string[]>([
      'https://picsum.photos/200/200',
      'https://picsum.photos/300/200',
      'https://picsum.photos/250/200'
    ])
	 const showImagesInViewer = (urls)=> {
 		const $viewer = viewerApi({
          options: {
            toolbar: true,
            url: 'data-source',
            initialViewIndex: 1
          },
          images: images.value
        })
	}
	return {
		images,
		showImagesInViewer
	}
  }
})
</script>
Viewer的配置项 & 方法
如果要更改全局默认选项,可以使用view . setdefaults(选项)
- 配置参数
| 参数名称 | 参数类型 | 默认值 | 说明 |
|---|---|---|---|
| initialViewIndex | Number | 0 | 定义用于查看的图像的初始索引 |
| inline | Boolean | false | 支持 inline mode |
| button | Boolean | true | 是否显示查看图片时右上角的关闭按钮 |
| navbar | Boolean / Number | true | 是否显示底部导航栏0 或者 false :不显示1 或者 true :显示2 :当屏幕宽度大于768px时显示3 :当屏幕宽度大于992px时显示4 :当屏幕宽度大于1200px时显示 |
| title | Boolean / Number /Function / Array | true | 0 或者 false 时不显示1或者true或者function或者array时显示2 :当屏幕宽度大于768px时显示3 :当屏幕宽度大于992px时显示4 :当屏幕宽度大于1200px时显示function 在函数体内返回标题array 第一个参数表示可见性(0-4) 第二个参数就是标题 |
| toolbar | Boolean / Number / Object | true | 标题栏是否显示和布局0 或者 false 时不显示1或者true或者时显示2 :当屏幕宽度大于768px时显示3 :当屏幕宽度大于992px时显示4 :当屏幕宽度大于1200px时显示 |
| tooltip | Boolean | true | 放大或缩小时显示的百分比的文字提示true : 显示false : 不显示 |
| movable | Boolean | true | 是否可以拖动图片 |
| zoomable | Boolean | true | 是否可以缩放图片 |
| rotatable | Boolean | true | 是否可以旋转图片 |
| scalable | Boolean | true | 是否可以缩放图片 |
| transition | Boolean | true | 为一些特殊元素启用CSS3转换。 |
| fullscreen | Boolean | true | 允许全屏播放 |
| keyboard | Boolean | true | 启用键盘支持 |
| backdrop | Boolean / String | true | 启用 modal 为false的时候不支持点击背景关闭 |
| loading | Boolean | true | 加载图片的时候的loading图标 |
| loop | Boolean | true | 是否可以循环查看图片 |
| interval | Number | 5000 | 定义图片查看器的最小的宽度 |
| minWidth | Number | 200 | 定义图片查看器的最小的高度 |
| minHeight | Number | 100 | 播放图片时 距离下一张图片的间隔时间 |
| zoomRatio | Number | 0.1 | 利用鼠标滚轮缩放图片时的比例 |
| minZoomRatio | Number | 0.01 | 缩小图片的最小比例 |
| maxZoomRatio | Number | 100 | 放大图片的放大比例 |
| zIndex | Number | 2015 | 定义查看器的CSS z-index值 modal 模式下 |
| zIndexInline | Number | 0 | 定义查看器的CSS z-index值 inline 模式下 |
| url | String / Function | src | 原始图像URL如果是一个字符串,应该图像元素的属性之一如果是一个函数,应该返回一个有效的图像URL |
| container | Element / String | body | 将查看器置于modal模式的容器只有在 inline为 false的时候才可以使用 |
| filter | Function | null | 过滤图像以便查看(如果图像是可见的,应该返回true) |
| toggleOnDblclick | Boolean | true | 当你放大或者缩小图片时 双击还原 |
| ready | Function | null | 当查看图片时被触发的函数 只会触发一次 |
| show | Function | null | 当查看图片时被触发的函数 每次查看都会触发 |
| shown | Function | null | 当查看图片时被触发的函数 每次查看都会触发 在show之后 |
| hide | Function | null | 当关闭图片查看器时被触发的函数 每次关闭都会触发 |
| hidden | Function | null | 当关闭图片查看器时被触发的函数 每次关闭都会触发 在hide之后 |
| view | Function | null | 当查看图片时被触发的函数 每次查看都会触发 在shown之后 |
| viewed | Function | null | 当查看图片时被触发的函数 每次查看都会触发 在view之后 |
| zoom | Function | null | 在图片缩放时触发 |
| zoomed | Function | null | 在图片缩放时触发 在 zoom之后 |
- toolbar Object详解
key值列表: “zoomIn”, “zoomOut”, “oneToOne”, “reset”, “prev”, “play”, “next”, “rotateLeft”, “rotateRight”, “flipHorizontal”, “flipVertical”
| key值名称 | 说明 |
|---|---|
| zoomIn | 放大图片的按钮 |
| zoomOut | 缩小图片的按钮 |
| reset | 重置图片大小的按钮 |
| prev | 查看上一张图片的按钮 |
| next | 查看上一张图片的按钮 |
| play | 播放图片的按钮 |
| rotateLeft | 向左旋转图片的按钮 |
| rotateRight | 向右旋转图片的按钮 |
| flipHorizontal | 图片左右翻转的按钮 |
| flipVertical | 图片上下翻转的按钮 |
{key:number|Boolean} 显示或者隐藏对应key的按钮 为Number的时候为可见性
{key: String } 自定义按钮的大小
{ key: Function } 自定义按钮点击的处理
{ key: { show: Boolean | Number, size: String, click: Function } 自定义按钮的每个属性
size的取值范围: small medium default large
bug
1:在main.ts配置中有时候会报错
import { createApp } from 'vue';
import App from './App.vue';
import router from './router';
import Viewer from 'viewerjs';
import 'viewerjs/dist/viewer.css';
Viewer.setDefaults({
  navbar: true,
  title: true,
  toolbar: {
    prev: true,
    next: true,
  },
});
const Vue = createApp(App);
Vue.use(router);
Vue.use(() => Viewer); //这样引入是为了兼容ts规定的类型,不用箭头函数方式会报错Argument of type 'typeof Viewer' is not assignable to parameter of type 'Plugin_2'.Property 'install' is missing in type 'typeof Viewer' but required in type '{ install: PluginInstallFunction; }'
Vue.mount('#app');
然而引入不报错了,却不能使用,这里如果那位大神解决了,烦劳告诉我一下解决办法;
索性我们还是局部引入吧,毕竟也不是每个组件都能用到,于是放弃了在main.ts中使用;
在2个项目中同时使用,一个正常的全局注入能够成功,一个不成功,目前还没找到原因。