1.Vuex
1.1 Vuex是什么
Vuex 是一个插件,可以帮我们管理 Vue 通用的数据。例如:购物车数据、个人信息数据。
1.2 vuex的使用
1.安装 vuex
安装 vuex 与 vue-router 类似,vuex 是一个独立存在的插件,如果脚手架初始化没有选 vuex,就需要额外安装。
yarn add vuex@3 或者 npm i vuex@32.新建store/index.js专门存放vuex
为了维护项目目录的整洁,在 src 目录下新建一个 store 目录其下放置一个 index.js 文件。 和 router/index.js 类似。
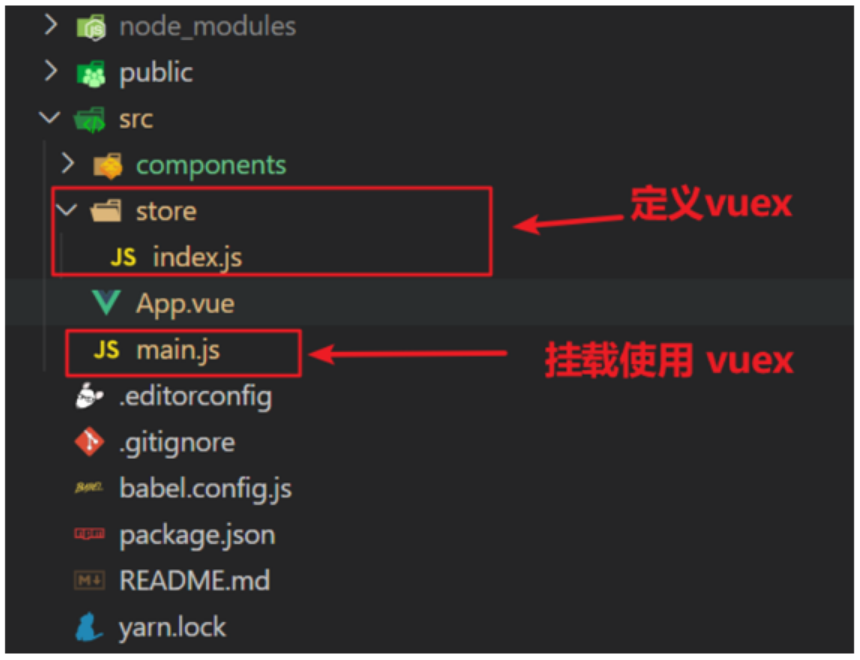
3.在store/index.js里创建仓库
// 导入 vue
import Vue from 'vue'
// 导入 vuex
import Vuex from 'vuex'
// vuex也是vue的插件, 需要use一下, 进行插件的安装初始化
Vue.use(Vuex)

// 创建仓库 store
const store = new Vuex.Store()

// 导出仓库
export default store
4.在main.js中导入挂载到Vue实例上
import Vue from 'vue'
import App from './App.vue'
import store from './store'

Vue.config.productionTip = false

new Vue({
  render: h => h(App),
  store
}).$mount('#app')
5.测试打印Vuex
created(){
  console.log(this.$store)
}
1.3 state
共享的数据都统一放到了 Store 中的 state 里存储。如果我们想要访问Vuex中的数据,只需访问 state 就可以了。
// 创建仓库 store
const store = new Vuex.Store({
  // state 状态, 即数据, 类似于vue组件中的data,
  // 区别:
  // 1.data 是组件自己的数据,
  // 2.state 中的数据整个vue项目的组件都能访问到
  state: {
    count: 101
  }
})
通过$store访问
//模板中访问
<h1>state的数据 - {

  { $store.state.count }}</h1>

//组件逻辑中访问
<h1>state的数据 - {

  { count }}</h1>
computed: { //把state中数据,定义在组件内的计算属性中
  count () {
    return this.$store.state.count
  }
}

//js文件中访问
import store from "@/store"
console.log(store.state.count)
1.4 mapState
上述获取state中的值是有些麻烦的,Vuex提供了辅助函数mapState来简化访问。mapState可以帮助我们把store中的数据映射成组件中的计算属性。比如
state: {
  state属性名1: 'value1',
  state属性名2: 'value2'
}
mapState['state属性名1', 'state属性名2']
会被转为如下形式
{
  state属性名1() {
    return this.$store.state.state属性名1;
  },
  state属性名2() {
    return this.$store.state.state属性名2;
  }
}
所以在组件中我们可以结合展开运算符按照下述方式使用:
1.导入mapState
import { mapState } from 'vuex'2.利用展开运算符将导出的状态映射给计算属性
computed: {
   ...mapState(['state属性名1', 'state属性名2'])
}
3.在模版中使用
<h1>state的Title数据 - {

  { $store.state.title }}</h1>
<div>state的Title数据 - {

  { $store.state.count }}</div>
1.5 mutations
mutations 是一个对象,对象中存放了同步修改 state 的方法。下面是通过 mutations 修改 state 数据的步骤。
1.定义mutations
const store  = new Vuex.Store({
  state: {
    count: 0
  },
  // 定义mutations
  mutations: {
    // 所有mutations方法的第一个参数都是当前模块的state
    // 调用mutaiions中方法的时候,传递过来的参数,如果有多个参数要传,可以传递一个对象。
    addCount (state, count) {
      state.count = count
    }
  },
})
2.在组件中使用mutations修改state
this.$store.commit('mutations中的方法名字', 参数)1.6 mapMutations
mapMutations和mapState类似,可以用来帮助我们把mutations中的方法映射到组件的methods。
//导入mapMutations
import  { mapMutations } from 'vuex'
methods: {
    ...mapMutations(['addCount'])
}
//具体使用
<button @click="addCount">值+1</button>1.7 actions
actions 是存放的是负责进行异步操作的方法。但是,它无法直接操作 state,需要调用 mutations 中的方法来操作 state。
//actions的定义
const store  = new Vuex.Store({
  state: {
    count: 0
  },

  mutations: {
    changeCount (state, newCount) {
      state.count = newCount
    }
  }

  actions: {
    //context:上下文对象,通过它可以访问Store模块中其它类型的成员,如state、mutations等等。
    //调用actions中方法的时候,传递过来的参数,如果有多个参数要传,可以传递一个对象。
    setAsyncCount (context, num) {
      // 一秒后, 给一个数, 去修改 num
      setTimeout(() => {
        context.commit('changeCount', num)
      }, 1000)
    }
  },
})
//组件模版中调用
$store.dispatch('setAsyncCount', 666)
//组件逻辑中调用
setAsyncCount () {
this.$store.dispatch('setAsyncCount', 666)
}1.8 mapActions
mapActions 是把位于 actions 中的方法提取了出来,映射到组件的 methods 中。
//导入mapActions
import { mapActions } from 'vuex'
methods: {
   ...mapActions(['changeCountAction'])
}
//具体使用
<button @click="changeCountAction(200)">+异步</button>1.9 getters
getters 用来定义计算属性。
1.定义getters
getters: {
   // getters函数的第一个参数是 state
   // 必须要有返回值
   filterList(state) {
     return state.list.filter(item => item > 5)
   }
}
2.使用getters
//模版中使用
<div>{

  { $store.getters.filterList }}</div>
//组件逻辑中使用
this.$store.getters.filterList
1.10 mapGetters
//辅助函数 - mapGetters
computed: {
    ...mapGetters(['filterList'])
}

<div>{

  { filterList }}</div>
1.11 Vuex的严格模式
我们需要明确,vuex 同样遵循单向数据流,组件中不能直接修改 vuex 的数据。但是,Vue 默认不会监测是否是直接修改的仓库数据,因为监测需要成本。如果需要则只需开启 vuex 严格模式。
const store = new Vuex.Store({
    //开启严格模式
    strict: true,
    state: {
        title: '仓库大标题',
        count: 100
    }
})
1.12 Vuex的模块化
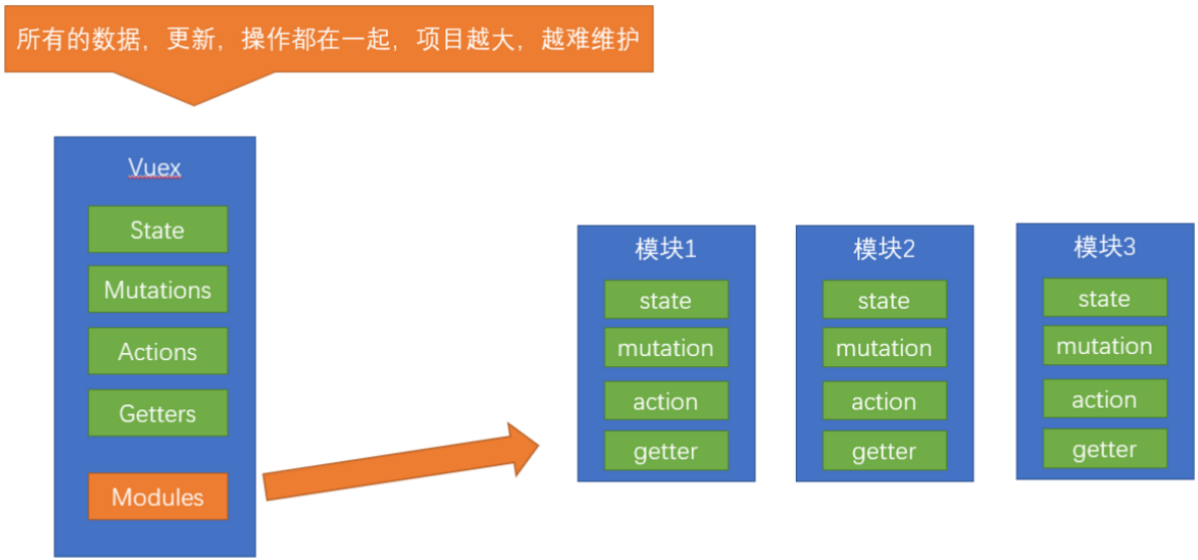
如果把 Vuex 的所有东西都放到一个文件中,当项目变得越来越大时,Vuex 会变得越来越难以维护。由此,又有了 Vuex 的模块化。
1.12.1 模块定义
定义两个模块 user 和 setting。
// user模块
const state = {
  userInfo: {
    name: 'zs',
    age: 18
  },
  score: 80
}
const mutations = {
  setUser (state, newUserInfo) {
    state.userInfo = newUserInfo
  }
}
const actions = {
  setUserSecond (context, newUserInfo) {
    // 将异步在action中进行封装
    setTimeout(() => {
      // 调用mutation   context上下文,默认提交的就是自己模块的action和mutation
      context.commit('setUser', newUserInfo)
    }, 1000)
  }
}
const getters = {
  // 分模块后,state指代子模块的state
  UpperCaseName (state) {
    return state.userInfo.name.toUpperCase()
  }
}

export default {
  namespaced: true, // 开启后,该模块的状态、 mutations、 actions 和 getters 在全局 store 中是独立的,不会与其他模块的同名属性发生冲突
  state,
  mutations,
  actions,
  getters
}
// setting模块
const state = {
  theme: 'light', // 主题色
  desc: '测试demo'
}
const mutations = {
  setTheme (state, newTheme) {
    state.theme = newTheme
  }
}
const actions = {}
const getters = {}

export default {
  namespaced: true,
  state,
  mutations,
  actions,
  getters
}
在store/index.js文件中的modules配置项中,注册这两个模块
import user from './modules/user'
import setting from './modules/setting'

const store = new Vuex.Store({
    modules:{
        user,
        setting
    }
})
1.12.2 获取模块的state
$store直接访问
//$store.state.模块名.state数据
$store.state.模块名.userInfo.name
在mapState辅助函数访问
//...mapState('模块名', ['userInfo']),
...mapState('user', ['userInfo']),
...mapState('setting', ['theme', 'desc']),
1.12.3 获取模块内的getters
直接访问getters
<!-- $store.getters['模块名/getters中的计算属性名'] -->
<div>{

  { $store.getters['user/UpperCaseName'] }}</div>
通过mapGetters访问
computed:{
  //...mapGetters('模块名', ['getters中的方法名'])
  ...mapGetters('user', ['UpperCaseName'])
}
1.12.4 获取模块内的mutations
<button @click="updateUser">更新个人信息</button>
<button @click="updateTheme">更新主题色</button>


export default {
  methods: {
    updateUser () {
      // $store.commit('模块名/mutation名', 额外传参)
      this.$store.commit('user/setUser', {
        name: 'xiaowang',
        age: 25
      })
    },
    updateTheme () {
      this.$store.commit('setting/setTheme', 'pink')
    }
  }
}
通过mapMutations访问
<button @click="setUser({ name: 'xiaoli', age: 80 })">更新个人信息</button>
<button @click="setTheme('skyblue')">更新主题</button>

methods:{
// 分模块的映射
...mapMutations('setting', ['setTheme']),
...mapMutations('user', ['setUser']),
}
1.12..5 获取模块内的actions
//模块中定义的action方法
const actions = {
  setUserSecond (context, newUserInfo) {
    // 将异步在action中进行封装
    setTimeout(() => {
      // 调用mutation   context上下文,默认提交的就是自己模块的action和mutation
      context.commit('setUser', newUserInfo)
    }, 1000)
  }
}
//通过store直接调用
<button @click="updateUser2">一秒后更新信息</button>
methods:{
updateUser2 () {
// 调用action dispatch
this.$store.dispatch('user/setUserSecond', {
name: 'xiaohong',
age: 28
})
},
}
//通过mapActions映射调用
<button @click="setUserSecond({ name: 'xiaoli', age: 80 })">一秒后更新信息</button>
methods:{
...mapActions('user', ['setUserSecond'])
}1.13 Vuex的持久化处理
一般在项目的 utils 文件夹下新建 storage.js 文件,封装持久化方法。
const INFO_KEY = 'hm_shopping_info'

// 获取个人信息
export const getInfo = () => {
  const result = localStorage.getItem(INFO_KEY)
  return result ? JSON.parse(result) : {
    token: '',
    userId: ''
  }
}

// 设置个人信息
export const setInfo = (info) => {
  localStorage.setItem(INFO_KEY, JSON.stringify(info))
}

// 移除个人信息
export const removeInfo = () => {
  localStorage.removeItem(INFO_KEY)
}
在 vuex 的 user 模块中进行持久化处理
import { getInfo, setInfo } from '@/utils/storage'
export default {
  namespaced: true,
  state () {
    return {
      userInfo: getInfo() // 从localStorage中获取数据
    }
  },
  mutations: {
    setUserInfo (state, obj) { // 往Vuex中存储数据时,也往浏览器的localStorage存一份
      state.userInfo = obj
      setInfo(obj)
    }
  },
  actions: {}
}
2.Vue项目打包优化
2.1 Vue项目打包
当我们开发完了一个项目,就需要将项目打包,参与上线。Vue Cli 已经提供了打包命令,直接在命令行中使用即可。
yarn build命令执行完成后,在项目的根目录会自动创建一个文件夹 dist,这个 dist 中的文件就是打包后的文件,只需要将 dist 放到服务器中即可。
2.2 打包优化
配置publicPath
打包后的项目,必须放到服务器的根目录,否则访问不到。解决这个问题,只需要在打包前,在项目中的 vue.config.js 文件里,添加以下内容:
module.exports = defineConfig({
  publicPath: './', // 添加 publicPath: './' 即可
  transpileDependencies
})
路由懒加载
在 Vue Router 当中可以配置路由懒加载。配置完后,不会一上来就将所有的组件都加载,而是访问到对应的路由了,才加载解析这个路由对应的所有组件,能够提高性能。
具体配置就是在Vue Router的配置文件中,将需要懒加载的组件导入方式修改成下方所示即可。
const ProDetail = () => import('@/views/prodetail')
const Pay = () => import('@/views/pay')
const MyOrder = () => import('@/views/myorder')