1,引入
UCI是openwrt的统一配置接口,所有的配置文件被存放在/etc/config/下,使用UCI工具操作具体可查询官网中的开发文章:
[OpenWrt Wiki] The UCI system![]() https://openwrt.org/docs/guide-user/base-system/uciconifg <section_type> <name>
https://openwrt.org/docs/guide-user/base-system/uciconifg <section_type> <name>
option xxxx xxxx
list xxx xxxx
本文是在此基础上,介绍一下UCI配置文件的相关命令是如何操作的。使用到UCI命令行工具:
# uci
Usage: uci [<options>] <command> [<arguments>]

Commands:
	batch
	export     [<config>]
	import     [<config>]
	changes    [<config>]
	commit     [<config>]
	add        <config> <section-type>
	add_list   <config>.<section>.<option>=<string>
	del_list   <config>.<section>.<option>=<string>
	show       [<config>[.<section>[.<option>]]]
	get        <config>.<section>[.<option>]
	set        <config>.<section>[.<option>]=<value>
	delete     <config>.<section>[.<option>]
	rename     <config>.<section>[.<option>]=<name>
	revert     <config>[.<section>[.<option>]]
	reorder    <config>.<section>=<position>

Options:
	-c <path>  set the search path for config files (default: /etc/config)
	-d <str>   set the delimiter for list values in uci show
	-f <file>  use <file> as input instead of stdin
	-m         when importing, merge data into an existing package
	-n         name unnamed sections on export (default)
	-N         don't name unnamed sections
	-p <path>  add a search path for config change files
	-P <path>  add a search path for config change files and use as default
	-q         quiet mode (don't print error messages)
	-s         force strict mode (stop on parser errors, default)
	-S         disable strict mode
	-X         do not use extended syntax on 'show'
2,UCI 命令行工具的使用
① 增加一个配置文件,向其中增加一个config配置项:home0
touch /etc/config/test   :增加一个配置文件test

uci add test home0  :向test配置文件中增加home0 [匿名]section

uci add test home1  :向test配置文件中增加home1 [匿名]section

uci export test  :导出配置信息
图1:
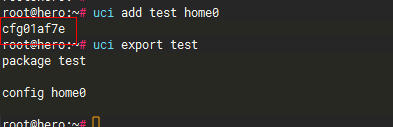
![]()
使用add增加的config的name字段是匿名的,我们看到的cfgxxxx是uci自动分配的
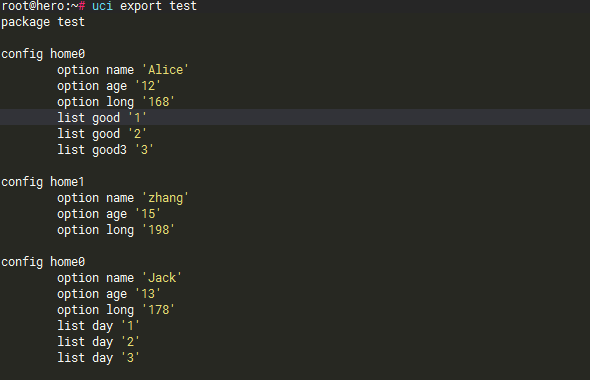
② 向test文件中home0和home1增加多个option和list (set、add_list)
uci add test home0  :再次向test中增加一个home0

//增加第一个home0的选项
uci set test.@home0[0].name='Alice'
uci set test.@home0[0].age=12
uci set test.@home0[0].long=168
uci add_list test.@home0[0].good=1
uci add_list test.@home0[0].good=2
uci add_list test.@home0[0].good3=3

//增加第二个home0的选项
uci set test.@home0[1].name='Jack'
uci set test.@home0[1].age=13
uci set test.@home0[1].long=178
uci add_list test.@home0[1].day=1
uci add_list test.@home0[1].day=2
//uci set test.@home0[1].day=3
uci add_list test.@home0[1].day=3

//增加第一个home1的选项
uci set test.@home1[0].name='zhang'
uci set test.@home1[0].age=15
uci set test.@home1[0].long=198


//修改其中的option的值
uci set test.@home0[0].long=999
图2:
注:
可以把每一个config数组,从上到下可以看成[第一个home0,最后一个home0],其次[home1 ...],UCI命令允许我们通过@home0[0]这样的方式操作第0个数组,其次也可以使用负数,如将上面的@home0[-1]:表示操作的最后一个home0
③ 删除其中的部分option和list
//删除所有config节点中的option: age
uci delete test.@home0[0].age
uci delete test.@home0[-1].age
uci delete test.@home1[0].age
//删除其中某一个list
uci del_list test.@home0[0].good=2
uci del_list test.@home0[-1].day=3图3:
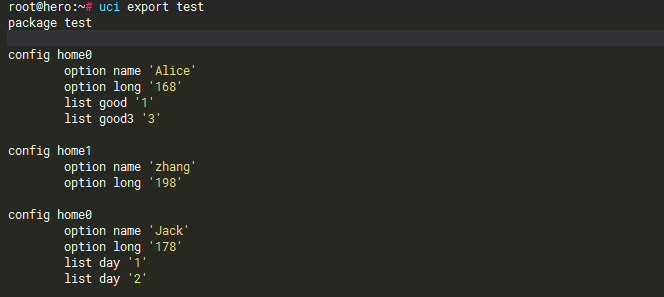
如上,我们删除了所有的age,同时删除了good=2,day=3选项
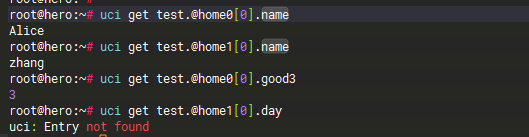
④ 使用get选项读取option值
uci get test.@home0[0].name
uci get test.@home1[0].name
uci get test.@home0[0].good3
uci get test.@home1[0].day //最后一个报错了,因为没有这个选项
uci get test.@home0[1].day
图4:
补充:
![]()
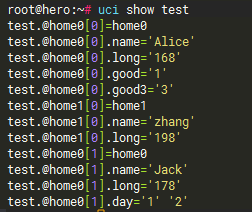
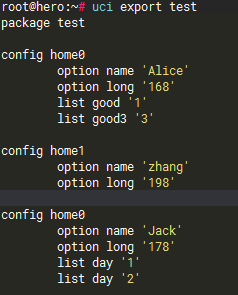
⑤ 可显示文件内容的命令
uci export test  : 显示配置文件内容
uci show test  :以get的方式显示
图5:
⑤ 使用uci commit 导出配置
uci commit

cat /etc/config/test :文件中有刚刚修改的内容
其他命令选项:
uci changes :查看当前已改变的配置

uci reorder test.@home0[1]=0  :将最后一个home0移动到第一个位置

uci rename test.@home0[0]='my0' : 为第一个config:home0 创建名字my0
uci rename test.@home0[1].long=longs : 为第二个config:long改名字longs

uci revert test.@home0[0] : 回退对第一个home0配置的修改

uci revert  test : 回退所有的修改 (需要再commit之前运行)
3,总结
本文介绍了UCI命令的一些用法,可以使用UCI命令生成一个简单的配置文件。