Spring 框架两大核心机制(IoC、AOP)
- IoC(控制反转)/ DI(依赖注入)
- AOP(面向切面编程)
Spring 是一个企业级开发框架,是软件设计层面的框架,优势在于可以将应用程序进行分层,开发者可以自主选择组件。
如何使用 IoC
- 创建 Maven 工程,pom.xml 添加依赖
<?xml version="1.0" encoding="UTF-8"?>
<project xmlns="http://maven.apache.org/POM/4.0.0"
         xmlns:xsi="http://www.w3.org/2001/XMLSchema-instance"
         xsi:schemaLocation="http://maven.apache.org/POM/4.0.0 http://maven.apache.org/xsd/maven-4.0.0.xsd">
    <modelVersion>4.0.0</modelVersion>

    <groupId>com.southwind</groupId>
    <artifactId>aispringioc</artifactId>
    <version>1.0-SNAPSHOT</version>

    <dependencies>
        <dependency>
            <groupId>org.springframework</groupId>
            <artifactId>spring-context</artifactId>
            <version>5.0.11.RELEASE</version>
        </dependency>
    </dependencies>

</project>
- 创建实体类 Student
package com.southwind.entity;

import lombok.Data;

@Data
public class Student {
    private long id;
    private String name;
    private int age;
}
- 传统的开发方式,手动 new Student
Student student = new Student();
student.setId(1L);
student.setName("张三");
student.setAge(22);
System.out.println(student);
- 通过 IoC 创建对象,在配置文件中添加需要管理的对象,XML 格式的配置文件,文件名可以自定义。
<?xml version="1.0" encoding="UTF-8"?>
<beans xmlns="http://www.springframework.org/schema/beans"
       xmlns:xsi="http://www.w3.org/2001/XMLSchema-instance"
       xmlns:context="http://www.springframework.org/schema/context"
       xmlns:p="http://www.springframework.org/schema/p"
       xsi:schemaLocation="http://www.springframework.org/schema/beans http://www.springframework.org/schema/beans/spring-beans-3.2.xsd
	http://www.springframework.org/schema/context http://www.springframework.org/schema/context/spring-context-4.3.xsd
">

    <bean id="student" class="com.southwind.entity.Student">
        <property name="id" value="1"></property>
        <property name="name" value="张三"></property>
        <property name="age" value="22"></property>
    </bean>

</beans>
- 从 IoC 中获取对象,通过 id 获取。
//加载配置文件
ApplicationContext applicationContext = new ClassPathXmlApplicationContext("spring.xml");
Student student = (Student) applicationContext.getBean("student");
System.out.println(student);
配置文件
通过配置
bean标签来完成对象的管理。id:对象名。class:对象的模版类(所有交给 IoC 容器来管理的类必须有无参构造函数,因为 Spring 底层是通过反射机制来创建对象,调用的是无参构造)
对象的成员变量通过
property标签完成赋值。name:成员变量名。value:成员变量值(基本数据类型,String 可以直接赋值,如果是其他引用类型,不能通过 value 赋值)ref:将 IoC 中的另外一个 bean 赋给当前的成员变量(DI)
<bean id="student" class="com.southwind.entity.Student">
    <property name="id" value="1"></property>
    <property name="name" value="张三"></property>
    <property name="age" value="22"></property>
    <property name="address" ref="address"></property>
</bean>

<bean id="address" class="com.southwind.entity.Address">
    <property name="id" value="1"></property>
    <property name="name" value="科技路"></property>
</bean>
IoC 底层原理
- 读取配置文件,解析 XML。
- 通过反射机制实例化配置文件中所配置所有的 bean。
package com.southwind.ioc;

import org.dom4j.Document;
import org.dom4j.DocumentException;
import org.dom4j.Element;
import org.dom4j.io.SAXReader;

import java.lang.reflect.Constructor;
import java.lang.reflect.Field;
import java.lang.reflect.InvocationTargetException;
import java.lang.reflect.Method;
import java.util.HashMap;
import java.util.Iterator;
import java.util.Map;

public class ClassPathXmlApplicationContext implements ApplicationContext {
    private Map<String,Object> ioc = new HashMap<String, Object>();
    public ClassPathXmlApplicationContext(String path){
        try {
            SAXReader reader = new SAXReader();
            Document document = reader.read("./src/main/resources/"+path);
            Element root = document.getRootElement();
            Iterator<Element> iterator = root.elementIterator();
            while(iterator.hasNext()){
                Element element = iterator.next();
                String id = element.attributeValue("id");
                String className = element.attributeValue("class");
                //通过反射机制创建对象
                Class clazz = Class.forName(className);
                //获取无参构造函数,创建目标对象
                Constructor constructor = clazz.getConstructor();
                Object object = constructor.newInstance();
                //给目标对象赋值
                Iterator<Element> beanIter = element.elementIterator();
                while(beanIter.hasNext()){
                    Element property = beanIter.next();
                    String name = property.attributeValue("name");
                    String valueStr = property.attributeValue("value");
                    String ref = property.attributeValue("ref");
                    if(ref == null){
                        String methodName = "set"+name.substring(0,1).toUpperCase()+name.substring(1);
                        Field field = clazz.getDeclaredField(name);
                        Method method = clazz.getDeclaredMethod(methodName,field.getType());
                        //根据成员变量的数据类型将 value 进行转换
                        Object value = null;
                        if(field.getType().getName() == "long"){
                            value = Long.parseLong(valueStr);
                        }
                        if(field.getType().getName() == "java.lang.String"){
                            value = valueStr;
                        }
                        if(field.getType().getName() == "int"){
                            value = Integer.parseInt(valueStr);
                        }
                        method.invoke(object,value);
                    }
                    ioc.put(id,object);
                }
            }
        } catch (DocumentException e) {
            e.printStackTrace();
        } catch (ClassNotFoundException e){
            e.printStackTrace();
        } catch (NoSuchMethodException e){
            e.printStackTrace();
        } catch (InstantiationException e){
            e.printStackTrace();
        } catch (IllegalAccessException e){
            e.printStackTrace();
        } catch (InvocationTargetException e){
            e.printStackTrace();
        } catch (NoSuchFieldException e){
            e.printStackTrace();
        }
    }

    public Object getBean(String id) {
        return ioc.get(id);
    }
}
通过运行时类获取 bean
ApplicationContext applicationContext = new ClassPathXmlApplicationContext("spring.xml");
Student student = (Student) applicationContext.getBean(Student.class);
System.out.println(student);
这种方式存在一个问题,配置文件中一个数据类型的对象只能有一个实例,否则会抛出异常,因为没有唯一的 bean。
通过有参构造创建 bean
- 在实体类中创建对应的有参构造函数。
- 配置文件
<bean id="student3" class="com.southwind.entity.Student">
    <constructor-arg name="id" value="3"></constructor-arg>
    <constructor-arg name="name" value="小明"></constructor-arg>
    <constructor-arg name="age" value="18"></constructor-arg>
    <constructor-arg name="address" ref="address"></constructor-arg>
</bean>
<bean id="student3" class="com.southwind.entity.Student">
    <constructor-arg index="0" value="3"></constructor-arg>
    <constructor-arg index="2" value="18"></constructor-arg>
    <constructor-arg index="1" value="小明"></constructor-arg>
    <constructor-arg index="3" ref="address"></constructor-arg>
</bean>
给 bean 注入集合
<bean id="student" class="com.southwind.entity.Student">
    <property name="id" value="2"></property>
    <property name="name" value="李四"></property>
    <property name="age" value="33"></property>
    <property name="addresses">
        <list>
            <ref bean="address"></ref>
            <ref bean="address2"></ref>
        </list>
    </property>
</bean>

<bean id="address" class="com.southwind.entity.Address">
    <property name="id" value="1"></property>
    <property name="name" value="科技路"></property>
</bean>

<bean id="address2" class="com.southwind.entity.Address">
    <property name="id" value="2"></property>
    <property name="name" value="高新区"></property>
</bean>
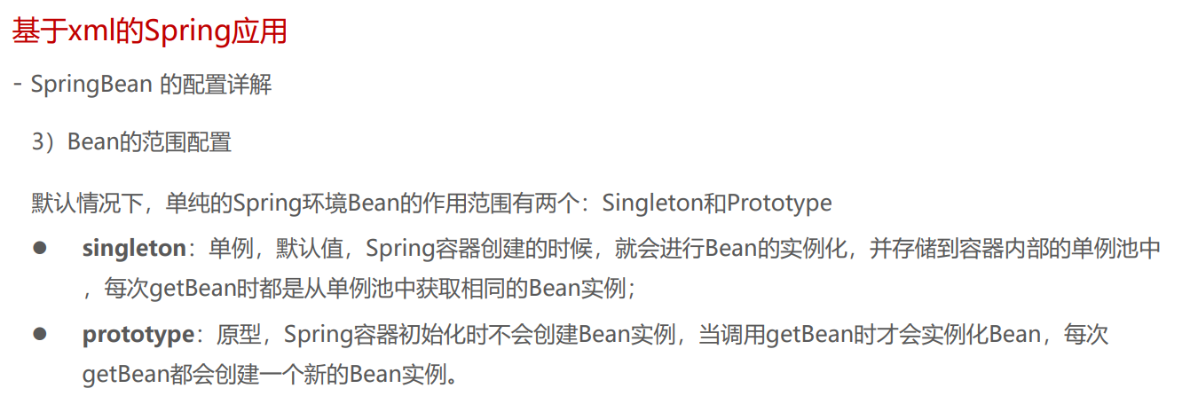
scope 作用域
Spring 管理的 bean 是根据 scope 来生成的,表示 bean 的作用域,共4种,默认值是 singleton。
- singleton:单例,表示通过 IoC 容器获取的 bean 是唯一的。
- prototype:原型,表示通过 IoC 容器获取的 bean 是不同的。
- request:请求,表示在一次 HTTP 请求内有效。
- session:会话,表示在一个用户会话内有效。
request 和 session 只适用于 Web 项目,大多数情况下,使用单例和原型较多。
prototype 模式当业务代码获取 IoC 容器中的 bean 时,Spring 才去调用无参构造创建对应的 bean。
singleton 模式无论业务代码是否获取 IoC 容器中的 bean,Spring 在加载 spring.xml 时就会创建 bean。
Spring 的继承
与 Java 的继承不同,Java 是类层面的继承,子类可以继承父类的内部结构信息;Spring 是对象层面的继承,子对象可以继承父对象的属性值。
<bean id="student2" class="com.southwind.entity.Student">
    <property name="id" value="1"></property>
    <property name="name" value="张三"></property>
    <property name="age" value="22"></property>
    <property name="addresses">
        <list>
            <ref bean="address"></ref>
            <ref bean="address2"></ref>
        </list>
    </property>
</bean>

<bean id="address" class="com.southwind.entity.Address">
    <property name="id" value="1"></property>
    <property name="name" value="科技路"></property>
</bean>

<bean id="address2" class="com.southwind.entity.Address">
    <property name="id" value="2"></property>
    <property name="name" value="高新区"></property>
</bean>

<bean id="stu" class="com.southwind.entity.Student" parent="student2">
    <property name="name" value="李四"></property>
</bean>
Spring 的继承关注点在于具体的对象,而不在于类,即不同的两个类的实例化对象可以完成继承,前提是子对象必须包含父对象的所有属性,同时可以在此基础上添加其他的属性。
Spring 的依赖
与继承类似,依赖也是描述 bean 和 bean 之间的一种关系,配置依赖之后,被依赖的 bean 一定先创建,再创建依赖的 bean,A 依赖于 B,先创建 B,再创建 A。
<?xml version="1.0" encoding="UTF-8"?>
<beans xmlns="http://www.springframework.org/schema/beans"
       xmlns:xsi="http://www.w3.org/2001/XMLSchema-instance"
       xsi:schemaLocation="http://www.springframework.org/schema/beans http://www.springframework.org/schema/beans/spring-beans-3.2.xsd
                           ">

    <bean id="student" class="com.southwind.entity.Student" depends-on="user"></bean>

    <bean id="user" class="com.southwind.entity.User"></bean>

</beans>
Spring 的 p 命名空间
p 命名空间是对 IoC / DI 的简化操作,使用 p 命名空间可以更加方便的完成 bean 的配置以及 bean 之间的依赖注入。
<?xml version="1.0" encoding="UTF-8"?>
<beans xmlns="http://www.springframework.org/schema/beans"
       xmlns:xsi="http://www.w3.org/2001/XMLSchema-instance"
       xmlns:context="http://www.springframework.org/schema/context"
       xmlns:p="http://www.springframework.org/schema/p"
       xsi:schemaLocation="http://www.springframework.org/schema/beans http://www.springframework.org/schema/beans/spring-beans-3.2.xsd
	http://www.springframework.org/schema/context http://www.springframework.org/schema/context/spring-context-4.3.xsd
">

    <bean id="student" class="com.southwind.entity.Student" p:id="1" p:name="张三" p:age="22" p:address-ref="address"></bean>

    <bean id="address" class="com.southwind.entity.Address" p:id="2" p:name="科技路"></bean>

</beans>
Spring 的工厂方法
IoC 通过工厂模式创建 bean 的方式有两种:
- 静态工厂方法
- 实例工厂方法
静态工厂方法
package com.southwind.entity;

import lombok.AllArgsConstructor;
import lombok.Data;
import lombok.NoArgsConstructor;

@Data
@AllArgsConstructor
@NoArgsConstructor
public class Car {
    private long id;
    private String name;
}
package com.southwind.factory;

import com.southwind.entity.Car;

import java.util.HashMap;
import java.util.Map;

public class StaticCarFactory {
    private static Map<Long, Car> carMap;
    static{
        carMap = new HashMap<Long, Car>();
        carMap.put(1L,new Car(1L,"宝马"));
        carMap.put(2L,new Car(2L,"奔驰"));
    }

    public static Car getCar(long id){
        return carMap.get(id);
    }
}
<!-- 配置静态工厂创建 Car -->
<bean id="car" class="com.southwind.factory.StaticCarFactory" factory-method="getCar">
    <constructor-arg value="2"></constructor-arg>
</bean>
实例工厂方法
package com.southwind.factory;

import com.southwind.entity.Car;

import java.util.HashMap;
import java.util.Map;

public class InstanceCarFactory {
    private Map<Long, Car> carMap;
    public InstanceCarFactory(){
        carMap = new HashMap<Long, Car>();
        carMap.put(1L,new Car(1L,"宝马"));
        carMap.put(2L,new Car(2L,"奔驰"));
    }

    public Car getCar(long id){
        return carMap.get(id);
    }
}
<!-- 配置实例工厂 bean -->
<bean id="carFactory" class="com.southwind.factory.InstanceCarFactory"></bean>

<!-- 赔偿实例工厂创建 Car -->
<bean id="car2" factory-bean="carFactory" factory-method="getCar">
    <constructor-arg value="1"></constructor-arg>
</bean>
IoC 自动装载(Autowire)
IoC 负责创建对象,DI 负责完成对象的依赖注入,通过配置 property 标签的 ref 属性来完成,同时 Spring 提供了另外一种更加简便的依赖注入方式:自动装载,不需要手动配置 property,IoC 容器会自动选择 bean 完成注入。
自动装载有两种方式:
- byName:通过属性名自动装载
- byType:通过属性的数据类型自动装载
byName
<bean id="cars" class="com.southwind.entity.Car">
    <property name="id" value="1"></property>
    <property name="name" value="宝马"></property>
</bean>

<bean id="person" class="com.southwind.entity.Person" autowire="byName">
    <property name="id" value="11"></property>
    <property name="name" value="张三"></property>
</bean>
byType
<bean id="car" class="com.southwind.entity.Car">
    <property name="id" value="2"></property>
    <property name="name" value="奔驰"></property>
</bean>

<bean id="person" class="com.southwind.entity.Person" autowire="byType">
    <property name="id" value="11"></property>
    <property name="name" value="张三"></property>
</bean>
byType 需要注意,如果同时存在两个及以上的符合条件的 bean 时,自动装载会抛出异常。
AOP
AOP:Aspect Oriented Programming 面向切面编程。
AOP 的优点:
- 降低模块之间的耦合度。
- 使系统更容易扩展。
- 更好的代码复用。
- 非业务代码更加集中,不分散,便于统一管理。
- 业务代码更加简洁存粹,不参杂其他代码的影响。
AOP 是对面向对象编程的一个补充,在运行时,动态地将代码切入到类的指定方法、指定位置上的编程思想就是面向切面编程。将不同方法的同一个位置抽象成一个切面对象,对该切面对象进行编程就是 AOP。
如何使用?
- 创建 Maven 工程,pom.xml 添加
<dependencies>
    <dependency>
        <groupId>org.springframework</groupId>
        <artifactId>spring-context</artifactId>
        <version>5.0.11.RELEASE</version>
    </dependency>

    <dependency>
        <groupId>org.springframework</groupId>
        <artifactId>spring-aop</artifactId>
        <version>5.0.11.RELEASE</version>
    </dependency>

    <dependency>
        <groupId>org.springframework</groupId>
        <artifactId>spring-aspects</artifactId>
        <version>5.0.11.RELEASE</version>
    </dependency>
</dependencies>
- 创建一个计算器接口 Cal,定义4个方法。
package com.southwind.utils;

public interface Cal {
    public int add(int num1,int num2);
    public int sub(int num1,int num2);
    public int mul(int num1,int num2);
    public int div(int num1,int num2);
}
- 创建接口的实现类 CalImpl。
package com.southwind.utils.impl;

import com.southwind.utils.Cal;

public class CalImpl implements Cal {
    public int add(int num1, int num2) {
        System.out.println("add方法的参数是["+num1+","+num2+"]");
        int result = num1+num2;
        System.out.println("add方法的结果是"+result);
        return result;
    }

    public int sub(int num1, int num2) {
        System.out.println("sub方法的参数是["+num1+","+num2+"]");
        int result = num1-num2;
        System.out.println("sub方法的结果是"+result);
        return result;
    }

    public int mul(int num1, int num2) {
        System.out.println("mul方法的参数是["+num1+","+num2+"]");
        int result = num1*num2;
        System.out.println("mul方法的结果是"+result);
        return result;
    }

    public int div(int num1, int num2) {
        System.out.println("div方法的参数是["+num1+","+num2+"]");
        int result = num1/num2;
        System.out.println("div方法的结果是"+result);
        return result;
    }
}
上述代码中,日志信息和业务逻辑的耦合性很高,不利于系统的维护,使用 AOP 可以进行优化,如何来实现 AOP?使用动态代理的方式来实现。
给业务代码找一个代理,打印日志信息的工作交个代理来做,这样的话业务代码就只需要关注自身的业务即可。
package com.southwind.utils;

import java.lang.reflect.InvocationHandler;
import java.lang.reflect.Method;
import java.lang.reflect.Proxy;
import java.util.Arrays;

public class MyInvocationHandler implements InvocationHandler {
    //接收委托对象
    private Object object = null;

    //返回代理对象
    public Object bind(Object object){
        this.object = object;
        //获取object的类加载器、所有接口(方法),this表示当前的类MyInvocationHandler
        return Proxy.newProxyInstance(object.getClass().getClassLoader(),object.getClass().getInterfaces(),this);
    }

    public Object invoke(Object proxy, Method method, Object[] args) throws Throwable {
        System.out.println(method.getName()+"方法的参数是:"+ Arrays.toString(args));
        Object result = method.invoke(this.object,args);
        System.out.println(method.getName()+"的结果是"+result);
        return result;
    }
}
以上是通过动态代理实现 AOP 的过程,比较复杂,不好理解,Spring 框架对 AOP 进行了封装,使用 Spring 框架可以用面向对象的思想来实现 AOP。
Spring 框架中不需要创建 InvocationHandler,只需要创建一个切面对象,将所有的非业务代码在切面对象中完成即可,Spring 框架底层会自动根据切面类以及目标类生成一个代理对象。
LoggerAspect
package com.southwind.aop;

import org.aspectj.lang.JoinPoint;
import org.aspectj.lang.annotation.*;
import org.springframework.stereotype.Component;

import java.util.Arrays;

@Aspect
@Component
public class LoggerAspect {

    @Before(value = "execution(public int com.southwind.utils.impl.CalImpl.*(..))")
    public void before(JoinPoint joinPoint){
        //获取方法名
        String name = joinPoint.getSignature().getName();
        //获取参数
        String args = Arrays.toString(joinPoint.getArgs());
        System.out.println(name+"方法的参数是:"+ args);
    }

    @After(value = "execution(public int com.southwind.utils.impl.CalImpl.*(..))")
    public void after(JoinPoint joinPoint){
        //获取方法名
        String name = joinPoint.getSignature().getName();
        System.out.println(name+"方法执行完毕");
    }

    @AfterReturning(value = "execution(public int com.southwind.utils.impl.CalImpl.*(..))",returning = "result")
    public void afterReturning(JoinPoint joinPoint,Object result){
        //获取方法名
        String name = joinPoint.getSignature().getName();
        System.out.println(name+"方法的结果是"+result);
    }

    @AfterThrowing(value = "execution(public int com.southwind.utils.impl.CalImpl.*(..))",throwing = "exception")
    public void afterThrowing(JoinPoint joinPoint,Exception exception){
        //获取方法名
        String name = joinPoint.getSignature().getName();
        System.out.println(name+"方法抛出异常:"+exception);
    }

}
LoggerAspect 类定义处添加的两个注解:
@Aspect:表示该类是切面类。@Component:将该类的对象注入到 IoC 容器。
具体方法处添加的注解:
@Before:表示方法执行的具体位置和时机。
CalImpl 也需要添加 @Component,交给 IoC 容器来管理。
package com.southwind.utils.impl;

import com.southwind.utils.Cal;
import org.springframework.stereotype.Component;

@Component
public class CalImpl implements Cal {
    public int add(int num1, int num2) {
        int result = num1+num2;
        return result;
    }

    public int sub(int num1, int num2) {
        int result = num1-num2;
        return result;
    }

    public int mul(int num1, int num2) {
        int result = num1*num2;
        return result;
    }

    public int div(int num1, int num2) {
        int result = num1/num2;
        return result;
    }
}
spring.xml 中配置 AOP。
<?xml version="1.0" encoding="UTF-8"?>
<beans xmlns="http://www.springframework.org/schema/beans"
       xmlns:xsi="http://www.w3.org/2001/XMLSchema-instance"
       xmlns:context="http://www.springframework.org/schema/context"
       xmlns:aop="http://www.springframework.org/schema/aop"
       xmlns:p="http://www.springframework.org/schema/p"
       xsi:schemaLocation="http://www.springframework.org/schema/aop http://www.springframework.org/schema/aop/spring-aop-4.3.xsd
       http://www.springframework.org/schema/beans http://www.springframework.org/schema/beans/spring-beans-4.3.xsd
	http://www.springframework.org/schema/context http://www.springframework.org/schema/context/spring-context-4.3.xsd
">

    <!-- 自动扫描 -->
    <context:component-scan base-package="com.southwind"></context:component-scan>

    <!-- 是Aspect注解生效,为目标类自动生成代理对象 -->
    <aop:aspectj-autoproxy></aop:aspectj-autoproxy>

</beans>
context:component-scan 将 com.southwind 包中的所有类进行扫描,如果该类同时添加了 @Component,则将该类扫描到 IoC 容器中,即 IoC 管理它的对象。即我们要使用注解,同时指定包扫描的路径,这样就交给IOC容器了。这两个要结合起来使用。
aop:aspectj-autoproxy 让 Spring 框架结合切面类和目标类自动生成动态代理对象。
- 切面Aspect:横切关注点被模块化的抽象对象,通知+切入点就是切面。
- 通知Advice:切面对象完成的工作。指哪些重复的内容,也就是共性功能。
- 目标对象Target:被通知的对象,即被横切的对象。
- 代理:切面、通知、目标混合之后的对象。
- 连接点JoinPoint:通知要插入业务代码的具体位置。
- 切点PointCut:AOP 通过切点定位到连接点,通知仅在切入点方法执行时被应用。
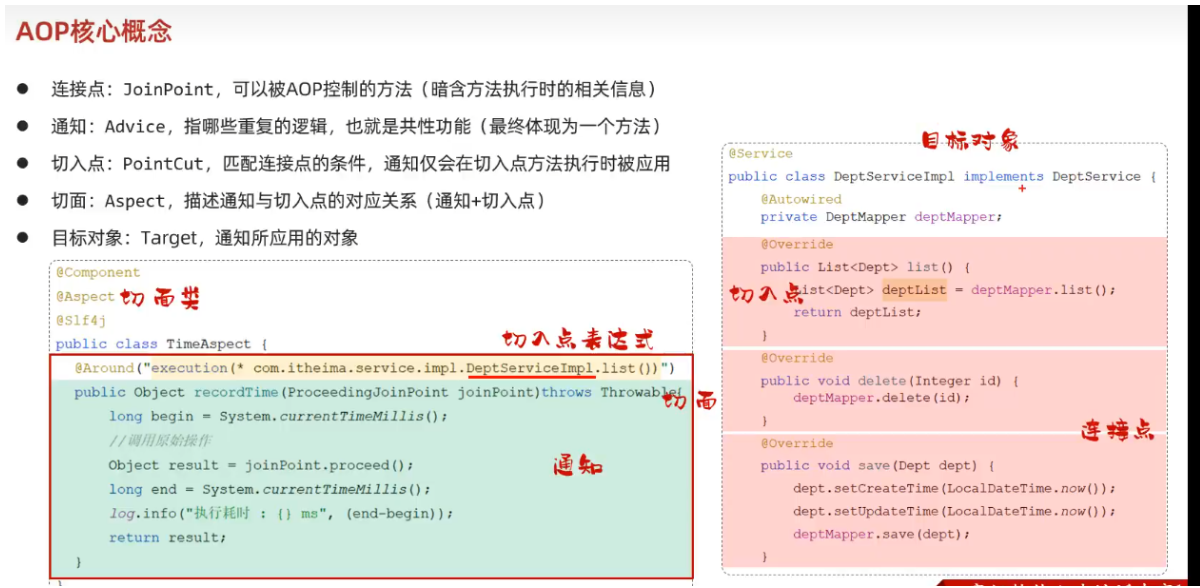
我们要统计DeptServiceImpl下的每个方法的执行时间。那么DeptServiceImpl这个类就是目标对象,它下面的方法就是连接点,表示要执行公共的AOP逻辑。而公共的AOP逻辑我们成为切面,它是由通知和切入点构成。通知就是公共逻辑,而切入点就是execution切入点表达式,这里指定哪些类要执行我们的公共方法。我们把这个AOP类称为切面类。
统计各个业务方法的执行耗时
- 导入依赖
<dependency>
    <groupId>org.springframework.boot</groupId>
    <artifactId>spring-boot-starter-aop</artifactId>
</dependency>
- 编写AOP程序
@Component
@Aspect
public class TimeAspect {
    @Around("execution(* com.southwind.controller.*.*(..))")
    public Object recordTime(ProceedingJoinPoint joinPoint) throws Throwable {
        Long begin = System.currentTimeMillis();

        Object result = joinPoint.proceed();

        Long end  = System.currentTimeMillis();
        System.out.println(joinPoint.getSignature()+"方法耗时:"+(end - begin) + "ms");
        return result;
    }
}
输出结果:
String com.southwind.controller.HelloController.hello()方法耗时:4ms
AOP使用场景
- 记录操作日志
- 权限控制
- 事务管理等
AOP进阶
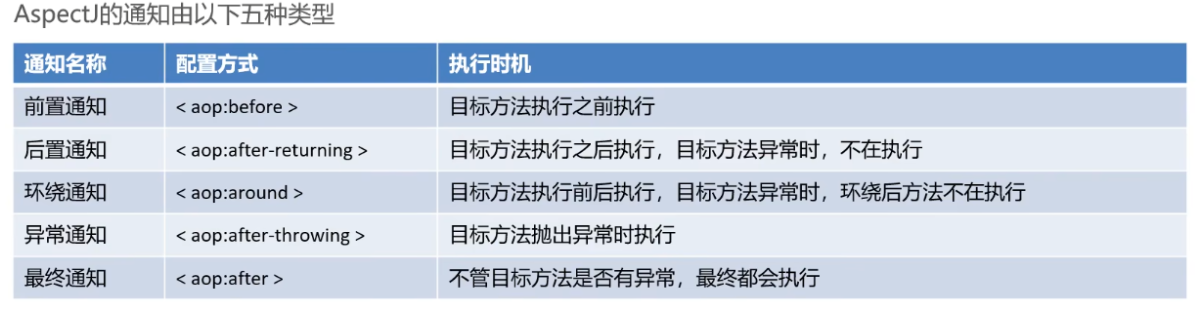
通知类型:
- @Around:环绕通知,此注解标注的通知方法在目标方法前后都被执行
- @Before:前置通知,此注解标注的通知方法在目标方法前被执行
- @After:后置通知,此注解标注的通知方法在目标方法后被执行,无论是否有异常都执行
- @AfterReturning:返回后通知,此注解标注的通知方法在目标方法后被执行,有异常不会执行
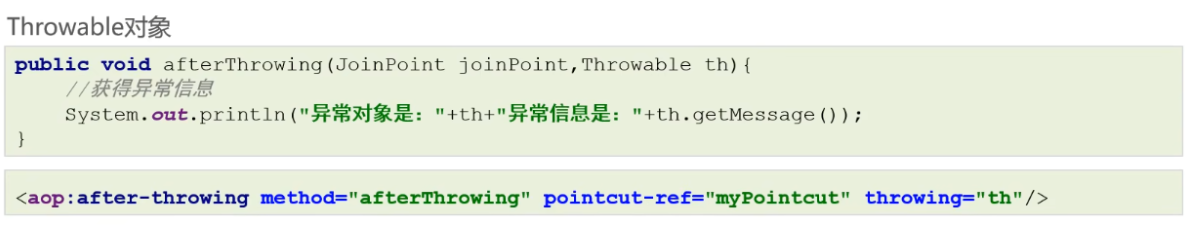
- @AfterThrowing:异常后通知,此注解标注的通知方法发生异常后执行。
a、bean依赖的注入方式
- set注入
- 构造方法注入
set注入
UserServiceImpl.java
public class UserServiceImpl implements UserService{

    public void setUserDao(UserDao userDao){
        System.out.println("注入userDao");
    }
}
UserDaoIml.java
public class UserDaoIml implements UserDao{
}
beans.xml配置
<bean id="userDao" class="com.southwind.UserDaoIml"></bean>

<bean id="userService" class="com.southwind.UserServiceImpl">
    <property name="userDao" ref="userDao"/>
</bean>
解释:我要在UserServiceImpl中注入UserDaoIml,这里提供set方法。然后在beans.xml配置UserServiceImpl和UserDaoIml,注入是通过set进行注入,userService的name属性对应的是setUserDao的UserDao首字母小写,ref引用的是userDao这个bean
构造方法注入
UserServiceImpl.java
public class UserServiceImpl implements UserService{

    public UserServiceImpl(UserDao userDao){
        System.out.println("有参构造创建对象");
    }
}
beans.xml配置
<bean id="userDao" class="com.southwind.UserDaoIml"></bean>

<bean id="userService" class="com.southwind.UserServiceImpl">
    <constructor-arg name="userDao" ref="userDao"/>
</bean>
a、bean的配置详情
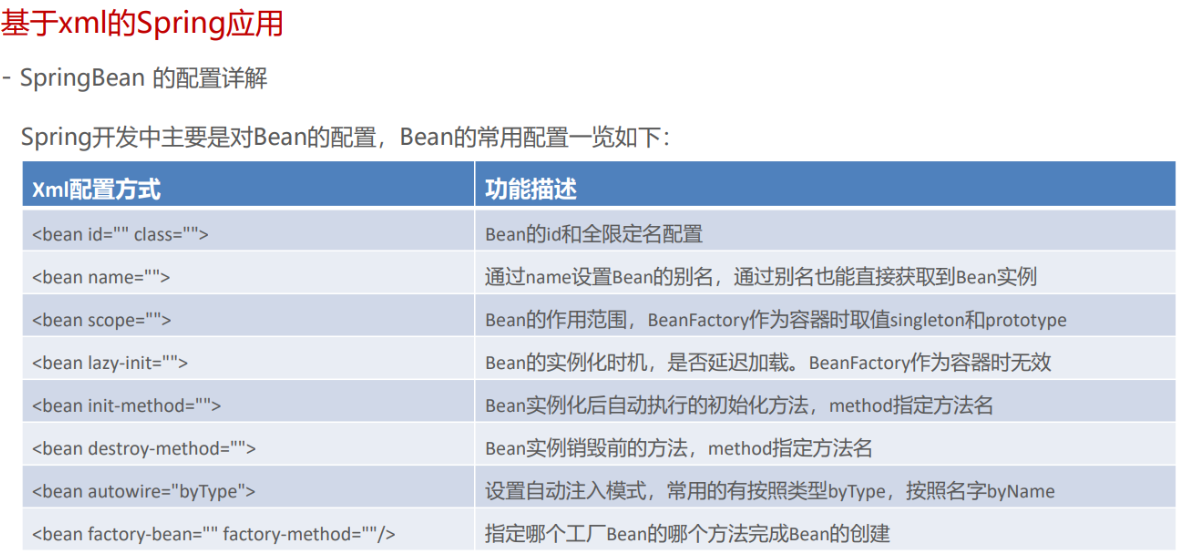
上面既有构造方法,又有初始化方法,执行顺序是,先执行构造方法创建对象,然后再执行初始化方法对对象进行初始化。

实现initializingBean接口,重写afterPropertiesSet()方法,这个方法就会被自动调用。
initializingBean的afterPropertiesSet方法调用,要先于init-method方法
静态工厂方法实例化bean
静态工厂BeanFactory1.java
public class BeanFactory1 {

    public static UserDao userDao(){
        return new UserDaoIml();
    }
}
beans.xml
<bean id="userDao" class="com.southwind.factory.BeanFactory1" factory-method="userDao"></bean>
分析:我们在beans.xml中配置的bean的id是userDao,class却是BeanFactory1,最后返回的类型不是BeanFactory1,是因为我们指定了factory-method,在创建对象时会自动调用userDao方法
实例工厂方法实例化bean
实例工厂BeanFactory2.java
public class BeanFactory2 {

    public UserDao userDao(){
        return new UserDaoIml();
    }
}
beans.xml
<bean id="beanFactory" class="com.southwind.factory.BeanFactory2"/>

<bean id="userDao" factory-bean="beanFactory" factory-method="userDao"/>
分析:我们要通过实例工厂BeanFactory2创造userDao,实例工厂要调用userDao()方法,首先要创建工厂对象,所以我们创建了beanFactory的配置。创建userDao对象时,指定factory-bean是beanFactory,factory-method是userDao
有参静态工厂、有参实例工厂方法实例化bean
这里以有参实例工厂方法实例化bean为例,有参静态工厂的代码类似
实例工厂BeanFactory2.java
public class BeanFactory2 {

    public UserDao userDao(String name){
        return new UserDaoIml();
    }
}
beans.xml
<bean id="beanFactory" class="com.southwind.factory.BeanFactory2"/>

<bean id="userDao" factory-bean="beanFactory" factory-method="userDao">
    <constructor-arg name="name" value="hihi"></constructor-arg>
</bean>
只需要在原来基础上,加上constructor-arg为形参name赋值即可
通过FactoryBean创建bean
FactoryBean是一个接口,翻译为工厂bean,任何一个类实现了这个接口,就可以成为一个bean工厂,然后就会自动调用getObject方法返回bean。
public interface FactoryBean<T> {
    String OBJECT_TYPE_ATTRIBUTE = "factoryBeanObjectType";

    @Nullable
    T getObject() throws Exception;

    @Nullable
    Class<?> getObjectType();

    default boolean isSingleton() {
        return true;
    }
}
BeanFactory.java,自定义类实现FactoryBean
public class BeanFactory implements FactoryBean<UserDao> {

    @Override
    public UserDao getObject() throws Exception {
        return new UserDaoIml();
    }

    @Override
    public Class<?> getObjectType() {
        return UserDao.class;
    }
}
beans.xml
<bean id="userDao" class="com.southwind.factory.BeanFactory"></bean>
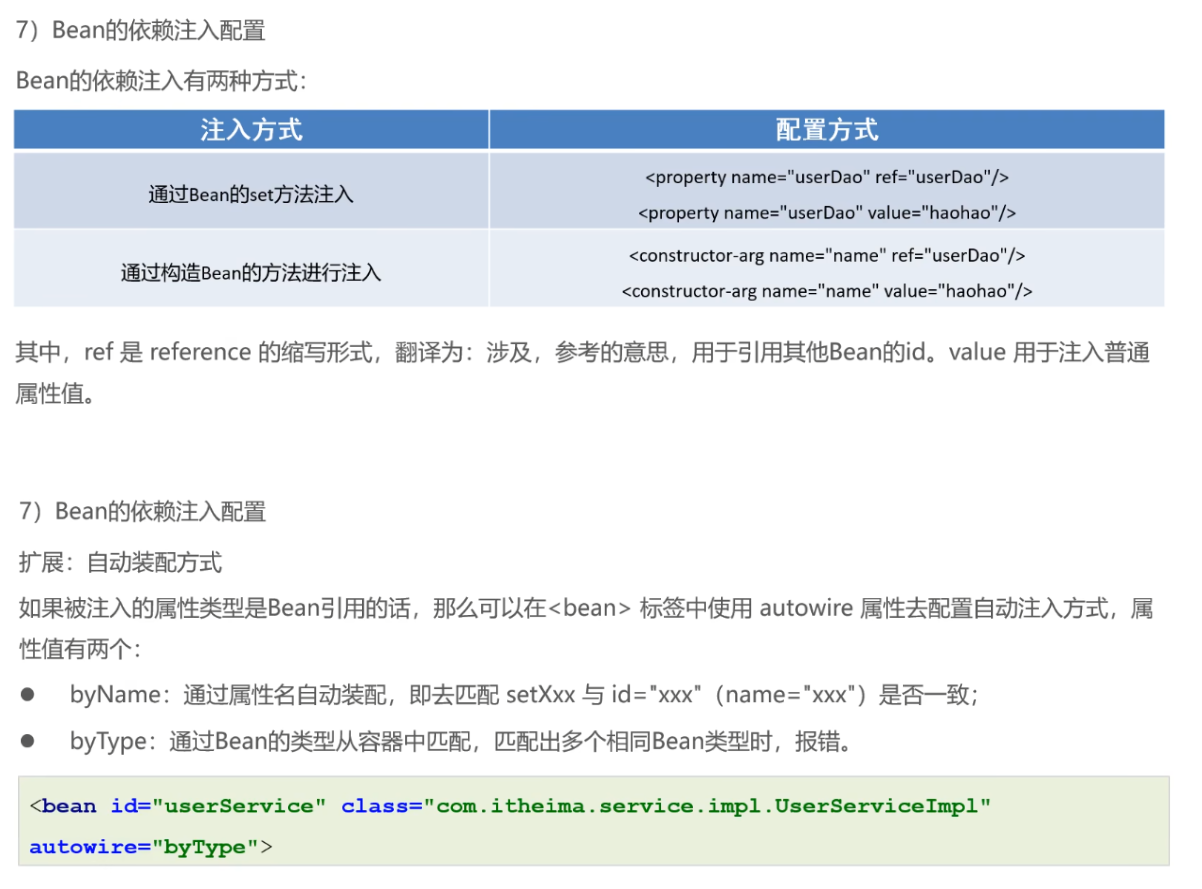
b、spring配置非自定义(第三方jar包中)的bean
- 配置DruidDataSource,这里的value值根据自已需要指定
<bean id="dataSource" class="com.alibaba.druid.pool.DruidDataSource">
    <property name="driverClassName" value=""/>
    <property name="url" value=""/>
    <property name="username" value=""/>
    <property name="password" value=""/>
</bean>
- 配置数据库连接Connection。Connection是通过DriverManager类的getConnection方法调用来获取的,集成到spring中,就需要通过静态工厂方法来获取
<!--加载MySQL驱动-->
<bean id="clazz" class="java.lang.Class" factory-method="forName">
    <constructor-arg name="className" value="com.mysql.cj.jdbc.Driver"/>
</bean>

<!-- 获取connection -->
<bean id="connection" class="java.sql.DriverManager" factory-method="getConnection">
    <constructor-arg name="url" value="jdbc:mysql://localhost:3306/db01"/>
    <constructor-arg name="user" value="root"/>
    <constructor-arg name="password" value="root"/>
</bean>
1、BeanFactory与ApplicationContext的关系
- BeanFactory是Spring的早期接口,称为Spring的Bean工厂,ApplicationContext是后期更高级接口,称之为Spring 容器
- ApplicationContext在BeanFactory基础上对功能进行了扩展,例如:监听功能、国际化功能等。BeanFactory的API更偏向底层,ApplicationContext的API大多数是对这些底层API的封装;
- Bean创建的主要逻辑和功能都被封装在BeanFactory中,ApplicationContext不仅继承了BeanFactory,而且ApplicationContext内部还维护着BeanFactory的引用,所以,ApplicationContext与BeanFactory既有继承关系(ApplicationContext继承了BeanFactory),又有融合关系(ApplicationContext内部维护着BeanFactory属性)。
- Bean的初始化时机不同,原始BeanFactory是在首次调用getBean时才进行Bean的创建,而ApplicationContext则是配置文件加载,容器一创建就将Bean都实例化并初始化好。
ApplicationContext 接口,是 BeanFactory 的子接口。它扩展了 BeanFactory 接口的功能,如:
- 国际化
- 通配符方式获取一组 Resource 资源
- 整合 Environment 环境(能通过它获取各种来源的配置信息)
- 事件发布与监听,实现组件之间的解耦
国际化
系统需要支持多种语言,一个key,如果语言是英文就翻译为英文;如果语言是中文就翻译为中文
public class TestMessageSource {
    public static void main(String[] args) {
        GenericApplicationContext context = new GenericApplicationContext();

        context.registerBean("messageSource", MessageSource.class, () -> {
            ResourceBundleMessageSource ms = new ResourceBundleMessageSource();
            ms.setDefaultEncoding("utf-8");
            ms.setBasename("messages");
            return ms;
        });

        context.refresh();

        System.out.println(context.getMessage("hi", null, Locale.ENGLISH));
        System.out.println(context.getMessage("hi", null, Locale.CHINESE));
        System.out.println(context.getMessage("hi", null, Locale.JAPANESE));
    }
}
国际化文件均在 src/resources 目录下
messages.properties(空)
messages_en.properties
hi=Hello
messages_ja.properties
hi=こんにちは
messages_zh.properties
hi=你好
注意
- ApplicationContext 中 MessageSource bean 的名字固定为 messageSource
- 使用 SpringBoot 时,国际化文件名固定为 messages
- 空的 messages.properties 也必须存在
发布事件
1、定义事件。public UserRegisteredEvent(Object source),这里是source表示由谁来发布事件
public class UserRegisteredEvent extends ApplicationEvent{
    public UserRegisteredEvent(Object source){
        log.debug("用户注册");
        super(source);
    }
}
2、发布事件
context.publishEvent(new UserRegisteredEvent(context));
3、接收事件。spring中任何一个类都可以作为监听器接收事件
@Component
public class MyComponent2{
    @EventListener
    public void test(UserRegisteredEvent event){
        log.debug("{}", event);
        log.debug("发送短信");
    }
}
事件是一种重要的解耦方式。比如我现在要实现用户注册,注册完成后发送短信或者发送邮件。但是发送短信还是发送邮件,功能会变化。那就不能把代码写死。解决方法就是发事件
如果一个属性上面,即加了@Autowired和@Resource注解,那么@Autowired注解先生效,因为@Autowired对应的bean后处理器顺序靠前
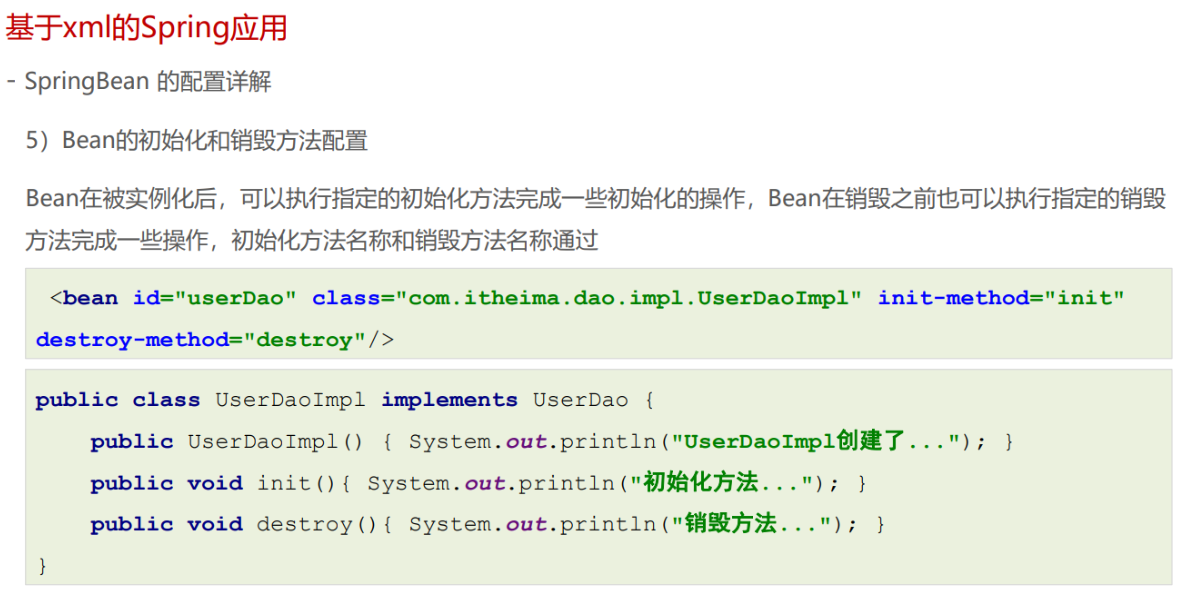
2、对象创建完成后,如果想要初始化怎么做
- 写一个初始化方法,在xml中配置该bean的init-method属性为该初始化方法
// 初始化方法
public void init(){
    System.out.println("初始化...");
}
<bean id="student" class="com.southwind.entity.Student" init-method="init">
</bean>
- 实现InitializingBean接口,重写afterPropertiesSet()方法
public class UserServiceImpl implements UserService, InitializingBean{
    @Override
    public void afterPropertiesSet() throw Exception{

    }
}
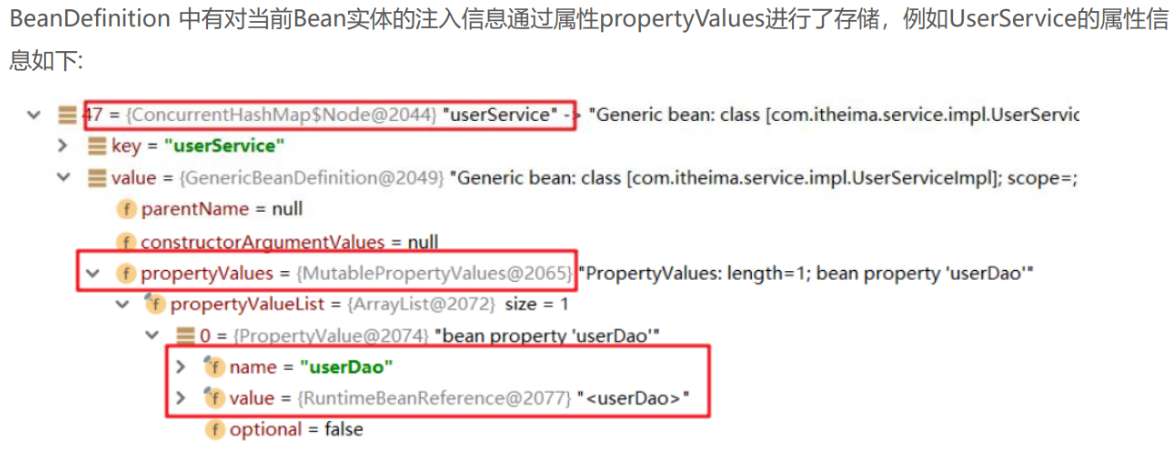
3、Bean的实例化的基本流程
Spring容器在进行初始化时,会将xml配置的<bean>的信息封装成一个BeanDefinition对象,所有的BeanDefinition存储到一个名为beanDefinitionMap的Map集合中去,Spring框架在对该Map进行遍历,使用反射创建Bean实例对象,创建好的Bean对象存储在一个名为singletonObjects的Map集合中,当调用getBean方法时则最终从该Map集合中取出Bean实例对象返回。
4、Spring的后处理器(特别重要)
Spring的很多功能都是通过BeanFactoryPostProcessor和BeanPostProcessor进行实现的
Spring的后处理器是Spring对外开发的重要扩展点,==允许我们介入到Bean的整个实例化流程中来,以达到动态注册BeanDefinition,动态修改BeanDefinition,以及动态修改Bean的作用。==Spring主要有两种后处理器:
- BeanFactoryPostProcessor:Bean工厂后处理器,在BeanDefinitionMap填充完毕,Bean实例化之前执行;(只执行一次,因为是在BeanDefinitionMap填充完毕执行)
- BeanPostProcessor:Bean后处理器,一般在Bean实例化之后,填充到单例池singletonObjects之前执行。(每个Bean创建完成之后都会执行一次)
4.1 BeanFactoryPostProcessor
BeanFactoryPostProcessor是一个接口规范,实现了该接口的类只要交由Spring容器管理的话,那么Spring就会回调该接口的方法,用于对BeanDefinition注册和修改的功能。

应用:
1、动态将一个类的实现类由类A修改为类B
类
public class UserServiceImpl implements UserService {
}

public class UserDaoImpl implements UserDao {
}
xml配置文件
<beans>
	<bean id="userDao" class="com.southwind.dao.impl.UserDaoImpl"></bean>

    <bean id="userService" class="com.southwind.service.impl.UserServiceImpl"></bean>

    <!-- 注册BeanFactoryPostProcessor -->
    <bean class="com.southwind.processor.MyBeanFactoryPostProcessor"></bean>
</beans>
自定义MyBeanFactoryPostProcessor,在上面的xml文件中,我们配置userService这个bean对应的是UserServiceImpl这个类。然后在MyBeanFactoryPostProcessor中将它的类名修改为UserDaoImpl
public class MyBeanFactoryPostProcessor implements BeanFactoryPostProcessor {
    @Override
    public void postProcessBeanFactory(ConfigurableListableBeanFactory beanFactory) throws BeansException {
        System.out.println("MyBeanFactoryPostProcessor");

        // 修改beanDefinition
        BeanDefinition beanDefinition = beanFactory.getBeanDefinition("userService");
        beanDefinition.setBeanClassName("com.southwind.dao.impl.UserDaoImpl");
    }
}
测试类:
public class Test {
    public static void main(String[] args) {
        ClassPathXmlApplicationContext context = new ClassPathXmlApplicationContext("beans.xml");
        Object userService = context.getBean("userService");
        System.out.println(userService);
    }
}
输出结果:发现MyBeanFactoryPostProcessor会调用。同时通过名称userService获取到的对象竟然是UserDaoImpl
MyBeanFactoryPostProcessor
com.southwind.dao.impl.UserDaoImpl@56ef9176
2、动态将一个bean注册到Spring容器
我们新增一个PersonDaoImpl,但是不在beans.xml中给它配置,而是将它在MyBeanFactoryPostProcessor进行配置,达到注册到Spring容器的效果。具体原理就是,创建PersonDaoImpl对应的BeanDefinition,然后将它放到BeanDefinitionMap中。Spring就会扫描BeanDefinitionMap,然后创建对象
PersonDaoImpl类
public class PersonDaoImpl implements PersonDao {
}
beans.xml
<beans>
	<bean id="userDao" class="com.southwind.dao.impl.UserDaoImpl"></bean>

    <bean id="userService" class="com.southwind.service.impl.UserServiceImpl"></bean>

    <bean class="com.southwind.processor.MyBeanFactoryPostProcessor"></bean>
</beans>
MyBeanFactoryPostProcessor类,在该类中注册PersonDaoImpl
public class MyBeanFactoryPostProcessor implements BeanFactoryPostProcessor {
    @Override
    public void postProcessBeanFactory(ConfigurableListableBeanFactory beanFactory) throws BeansException {
        // 注册。先创建beanDefinition,然后调用registerBeanDefinition方法进行注册
        BeanDefinition beanDefinition = new RootBeanDefinition();
        beanDefinition.setBeanClassName("com.southwind.dao.impl.PersonDaoImpl");
        DefaultListableBeanFactory defaultListableBeanFactory = (DefaultListableBeanFactory) beanFactory;
        defaultListableBeanFactory.registerBeanDefinition("personDao", beanDefinition);
    }
}
测试类:
public class Test {
    public static void main(String[] args) {
        ClassPathXmlApplicationContext context = new ClassPathXmlApplicationContext("beans.xml");
        Object personDao = context.getBean(PersonDao.class);
        System.out.println(personDao);
    }
}
输出结果:
com.southwind.dao.impl.PersonDaoImpl@69ea3742
4.2 BeanDefinitionRegistryPostProcessor
BeanFactoryPostProcessor可以实现注册功能,但是需要进行强制类型转换,比较麻烦。
Spring 提供了一个BeanFactoryPostProcessor的子接口BeanDefinitionRegistryPostProcessor专门用于注册BeanDefinition操作,一步到位
MyBeanDefinitionRegistryPostProcessor类
public class MyBeanDefinitionRegistryPostProcessor implements BeanDefinitionRegistryPostProcessor {
    @Override
    public void postProcessBeanDefinitionRegistry(BeanDefinitionRegistry beanDefinitionRegistry) throws BeansException {
        // 注册
        BeanDefinition beanDefinition = new RootBeanDefinition();
        beanDefinition.setBeanClassName("com.southwind.dao.impl.PersonDaoImpl");
        beanDefinitionRegistry.registerBeanDefinition("personDao", beanDefinition);
    }

    // 这个是从父接口BeanFactoryPostProcessor继承过来的
    @Override
    public void postProcessBeanFactory(ConfigurableListableBeanFactory configurableListableBeanFactory) throws BeansException {

    }
}
beans.xml
<bean class="com.southwind.processor.MyBeanDefinitionRegistryPostProcessor"></bean>
测试类:
public class Test {
    public static void main(String[] args) {
        ClassPathXmlApplicationContext context = new ClassPathXmlApplicationContext("beans.xml");
        Object personDao = context.getBean(PersonDao.class);
        System.out.println(personDao);
    }
}
输出结果:
com.southwind.dao.impl.PersonDaoImpl@3159c4b8
重点:使用Spring的BeanFactoryPostProcessor扩展点完成自定义注解扫描
要求如下:
- 自定义@MyComponent注解,使用在类上;
- 使用资料中提供好的包扫描器工具BaseClassScanUtils 完成指定包的类扫描;
- 自定义BeanFactoryPostProcessor完成注解@MyComponent的解析,解析后最终被Spring管理。
创建自定义注解MyComponent
@Target(ElementType.TYPE)
@Retention(RetentionPolicy.RUNTIME)
public @interface MyComponent {
    String value();
}
创建类OtherBean,并用MyComponent注解进行修饰。我们的最终目的是通过加注解的方式能够在Spring中创建该对象
@MyComponent("otherBean")
public class OtherBean {
}
类扫描工具。核心代码就是42-57行,判断哪个类上面带了MyComponent注解,然后获取类的全限定名和类的名称
package com.southwind.utils;

import com.southwind.anno.MyComponent;
import org.springframework.core.io.Resource;
import org.springframework.core.io.support.PathMatchingResourcePatternResolver;
import org.springframework.core.io.support.ResourcePatternResolver;
import org.springframework.core.type.classreading.CachingMetadataReaderFactory;
import org.springframework.core.type.classreading.MetadataReader;
import org.springframework.core.type.classreading.MetadataReaderFactory;
import org.springframework.util.ClassUtils;

import java.lang.annotation.Annotation;
import java.util.HashMap;
import java.util.List;
import java.util.Map;

public class BaseClassScanUtils {

    //设置资源规则
    private static final String RESOURCE_PATTERN = "/**/*.class";

    public static Map<String, Class> scanMyComponentAnnotation(String basePackage) {

        //创建容器存储使用了指定注解的Bean字节码对象
        Map<String, Class> annotationClassMap = new HashMap<String, Class>();

        //spring工具类,可以获取指定路径下的全部类
        ResourcePatternResolver resourcePatternResolver = new PathMatchingResourcePatternResolver();
        try {
            String pattern = ResourcePatternResolver.CLASSPATH_ALL_URL_PREFIX +
                    ClassUtils.convertClassNameToResourcePath(basePackage) + RESOURCE_PATTERN;
            Resource[] resources = resourcePatternResolver.getResources(pattern);
            //MetadataReader 的工厂类
            MetadataReaderFactory refractory = new CachingMetadataReaderFactory(resourcePatternResolver);
            for (Resource resource : resources) {
                //用于读取类信息
                MetadataReader reader = refractory.getMetadataReader(resource);
                //扫描到的class
                String classname = reader.getClassMetadata().getClassName();
                Class<?> clazz = Class.forName(classname);
                //判断是否属于指定的注解类型
                if(clazz.isAnnotationPresent(MyComponent.class)){
                    //获得注解对象
                    MyComponent annotation = clazz.getAnnotation(MyComponent.class);
                    //获得属value属性值
                    String beanName = annotation.value();
                    //判断是否为""
                    if(beanName!=null&&!beanName.equals("")){
                        //存储到Map中去
                        annotationClassMap.put(beanName,clazz);
                        continue;
                    }

                    //如果没有为"",那就把当前类的类名作为beanName
                    annotationClassMap.put(clazz.getSimpleName(),clazz);

                }
            }
        } catch (Exception exception) {
        }

        return annotationClassMap;
    }

    public static void main(String[] args) {
        Map<String, Class> stringClassMap = scanMyComponentAnnotation("com.southwind");
        System.out.println(stringClassMap);
    }
}
后处理器
public class MyComponentBeanFactoryPostProcessor implements BeanDefinitionRegistryPostProcessor {
    @Override
    public void postProcessBeanDefinitionRegistry(BeanDefinitionRegistry beanDefinitionRegistry) throws BeansException {
        // 使用扫描工具扫描指定目录,收集使用了MyComponent注解的类
        Map<String, Class> map = BaseClassScanUtils.scanMyComponentAnnotation("com.southwind");
        // 遍历map,组装beanDefinition,进行注册
        map.forEach((beanName, clazz)->{
            BeanDefinition beanDefinition = new RootBeanDefinition();
            beanDefinition.setBeanClassName(clazz.getName());
            beanDefinitionRegistry.registerBeanDefinition(beanName, beanDefinition);
        });
    }

    @Override
    public void postProcessBeanFactory(ConfigurableListableBeanFactory configurableListableBeanFactory) throws BeansException {

    }
}
beans.xml
<bean class="com.southwind.processor.MyComponentBeanFactoryPostProcessor"></bean>
测试类:
public class Test {
    public static void main(String[] args) {
        ClassPathXmlApplicationContext context = new ClassPathXmlApplicationContext("beans.xml");
        Object object = context.getBean(OtherBean.class);
        System.out.println(object);
    }
}
输出结果:
com.southwind.beans.OtherBean@a7e666
4.3 BeanPostProcessor
Bean被实例化后,到最终缓存到名为singletonObjects单例池之前,中间会经过Bean的初始化过程,例如:属性的填充、初始方法init的执行等,其中有一个对外进行扩展的点BeanPostProcessor,我们称为Bean后处理。跟上面的Bean工厂后处理器相似,它也是一个接口,实现了该接口并被容器管理的BeanPostProcessor,会在流程节点上被Spring自动调用。
BeanFactoryPostProcessor是对Bean定义的操作,BeanPostProcessor是对Bean对象的操作
1、在创建对象的时候不为属性赋值,而是在BeanPostProcessor中进行赋值
UserDaoImpl类
public class UserDaoImpl implements UserDao {
    private String name;

    public void setName(String name) {
        this.name = name;
    }

    public String getName() {
        return name;
    }

    public UserDaoImpl(){
        System.out.println("创建了UserDaoImpl对象");
    }
}
在beans.xml中只是配置了bean,没有为name属性赋值
<bean id="userDao" class="com.southwind.dao.impl.UserDaoImpl"></bean>
通过在MyBeanPostProcessor类中,获取UserDaoImpl对象,为它的name属性赋值为hahaha
public class MyBeanPostProcessor implements BeanPostProcessor {
    @Override
    public Object postProcessBeforeInitialization(Object bean, String beanName) throws BeansException {
        if(bean instanceof UserDaoImpl){
            UserDaoImpl userDao = (UserDaoImpl) bean;
            userDao.setName("hahaha");
        }

        System.out.println("before");
        return bean;
    }

    @Override
    public Object postProcessAfterInitialization(Object bean, String beanName) throws BeansException {
        System.out.println("after");
        return bean;
    }
}
在beans.xml中注册MyBeanPostProcessor
<bean class="com.southwind.processor.MyBeanPostProcessor"></bean>
测试类:
public class Test {
    public static void main(String[] args) {
        ClassPathXmlApplicationContext context = new ClassPathXmlApplicationContext("beans.xml");
        UserDaoImpl userDao = (UserDaoImpl) context.getBean("userDao");
        System.out.println(userDao.getName());
    }
}
输出结果:可以看到name属性有值了
创建了UserDaoImpl对象
before
after
hahaha
在上面的例子中,我们看到控制台先执行了before,然后执行了after方法。那么在before和after方法中间执行哪个方法?答案是对象的初始化方法
在UserDaoImpl中添加初始化方法init()
public class UserDaoImpl implements UserDao,InitializingBean {
    private String name;

    public void setName(String name) {
        this.name = name;
    }

    public String getName() {
        return name;
    }

    public UserDaoImpl(){
        System.out.println("创建了UserDaoImpl对象");
    }

    public void init(){
        System.out.println("init");
    }

    public void afterPropertySet(){
        System.out.println("afterPropertySet");
    }
}
在beans.xml中配置初始化方法init-method
<bean id="userDao" class="com.southwind.dao.impl.UserDaoImpl" init-method="init"></bean>
输出结果:
创建了UserDaoImpl对象
before
afterPropertySet
init
after
hahaha
2、对Bean方法进行执行时间日志增强,有点像AOP
要求如下:
- Bean的方法执行之前控制台打印当前时间;
- Bean的方法执行之后控制台打印当前时间。
分析:
- 对方法进行增强主要就是代理设计模式和包装设计模式;
- 由于Bean方法不确定,所以使用动态代理在运行期间执行增强操作;
- 在Bean实例创建完毕后,进入到单例池之前,使用Proxy代替真是的目标Bean
接口
public interface UserDao {
    void show();
}
实现类,我们的目标是在show方法调用前后打出当前时间
public class UserDaoImpl implements UserDao {
    @Override
    public void show() {
        System.out.println("show方法在执行");
    }
}
自定义TimeLogBeanPostProcessor,使用Proxy.newProxyInstance创建代理对象并返回,从而将singletonObjects单例池中的目标对象进行替换增强。最终调用show方法的时候对应的是代理对象
public class TimeLogBeanPostProcessor implements BeanPostProcessor {

    @Override
    public Object postProcessAfterInitialization(Object bean, String beanName) throws BeansException {
        // 对Bean进行动态代理,返回的是Proxy代理对象,进而存储到单例池singletonObjects中
        Object beanProxy = Proxy.newProxyInstance(
                bean.getClass().getClassLoader(),
                bean.getClass().getInterfaces(),
                new InvocationHandler() {
                    @Override
                    public Object invoke(Object proxy, Method method, Object[] args) throws Throwable {
                        // 1、输出开始时间
                        System.out.println("方法:" + method.getName() + "-开始时间" + new Date());
                        // 2、执行目标方法
                        Object result = method.invoke(bean, args);
                        // 3、输出结束时间
                        System.out.println("方法:" + method.getName() + "-结束时间" + new Date());
                        return result;
                    }
                }
        );

        return beanProxy;
    }
}
beans.xml
<bean class="com.southwind.processor.TimeLogBeanPostProcessor"></bean>
测试类
public class Test {
    public static void main(String[] args) {
        ClassPathXmlApplicationContext context = new ClassPathXmlApplicationContext("beans.xml");
        UserDao userDao = (UserDao) context.getBean("userDao");
        userDao.show();
    }
}
结果:
方法:show-开始时间Sat Dec 14 00:15:19 CST 2024
show方法在执行
方法:show-结束时间Sat Dec 14 00:15:19 CST 2024
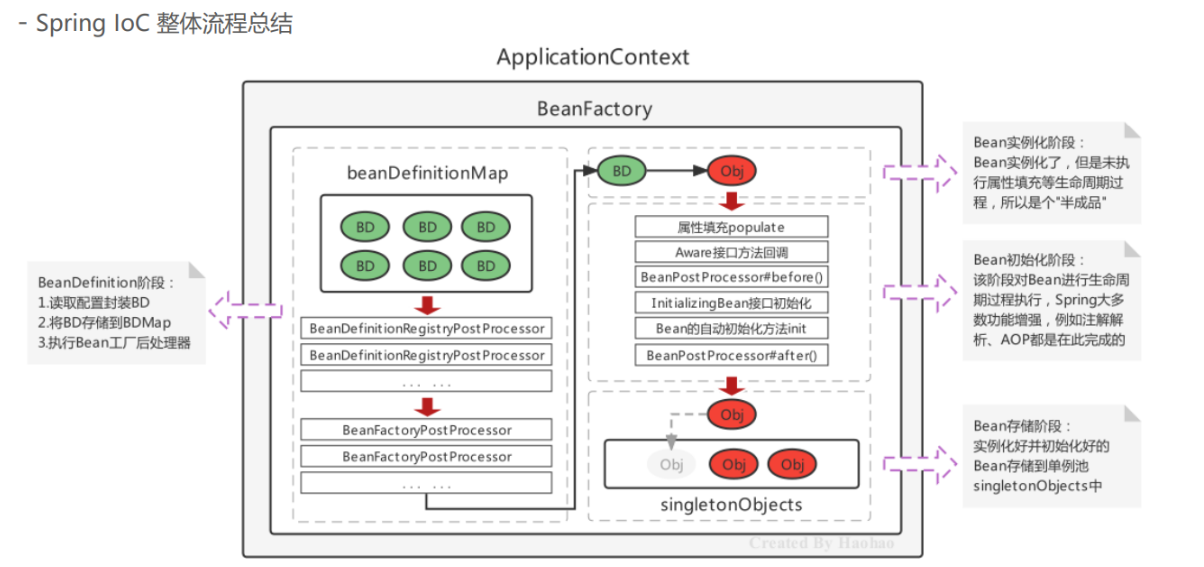
完整流程图
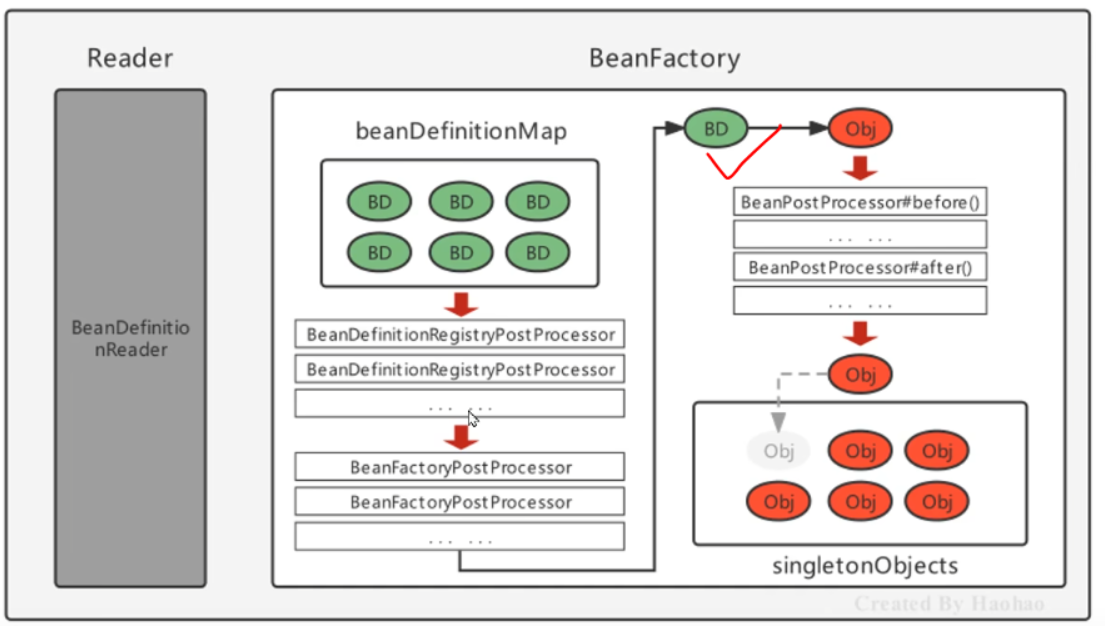
我们通过reader读取xml文件,然后解析xml中的bean标签,将每个bean标签封装为beanDefinition,放入到beanDefinitionMap当中。然后从它里面取出beanDefinition,经过BeanDefinitonRegistryPostProcessor、BeanFactoryPostProcessor对bean的定义进行修改,得到右上角的BD(beanDefinition)。然后通过反射创建该对象obj。然后执行BeanPostProcessor的before和after方法,对obj对象进行增强,将增强后的对象存入到singletonObjects单例池当中。
5、Spring Bean的生命周期(重要)
Spring Bean的生命周期是从 Bean 实例化之后,即通过反射创建出对象之后,到Bean成为一个完整对象,最终存储到单例池中,这个过程被称为Spring Bean的生命周期。Spring Bean的生命周期大体上分为三个阶段:
- Bean的实例化阶段:Spring框架会取出BeanDefinition的信息进行判断当前Bean的范围是否是singleton的,是否不是延迟加载的,是否不是FactoryBean等,最终将一个普通的singleton的Bean通过反射进行实例化;
- Bean的初始化阶段:Bean创建之后还仅仅是个"半成品",还需要对Bean实例的属性进行填充、执行一些Aware接口方法、执行BeanPostProcessor方法、执行InitializingBean接口的初始化方法、执行自定义初始化init方法等。该阶段是Spring最具技术含量和复杂度的阶段,Aop增强功能,后面要学习的Spring的注解功能等、spring高频面试题Bean的循环引用问题都是在这个阶段体现的;
- Bean的完成阶段:经过初始化阶段,Bean就成为了一个完整的Spring Bean,被存储到单例池singletonObjects中去了,即完成了Spring Bean的整个生命周期。
5.1 初始化阶段
Spring Bean的初始化过程涉及如下几个过程:这也是相应的执行顺序
- Bean实例的属性填充
- Aware接口属性注入
- BeanPostProcessor的before()方法回调
- InitializingBean接口的初始化方法回调
- 自定义初始化方法init回调
- BeanPostProcessor的after()方法回调
a、Bean实例属性填充
Spring在进行属性注入时,会分为如下几种情况:
- 注入普通属性,String、int或存储基本类型的集合时,直接通过set方法的反射设置进去;
- 注入单向对象引用属性时,从容器中getBean获取后通过set方法反射设置进去,如果容器中没有,则先创建被注入对象Bean实例(完成整个生命周期)后,在进行注入操作;
- 注入双向对象引用属性时,就比较复杂了,涉及了循环引用(循环依赖)问题,下面会详细阐述解决方案
b、循环依赖/循环引用
多个实体之间相互依赖并形成闭环的情况就叫做"循环依赖",也叫做"循环引用"
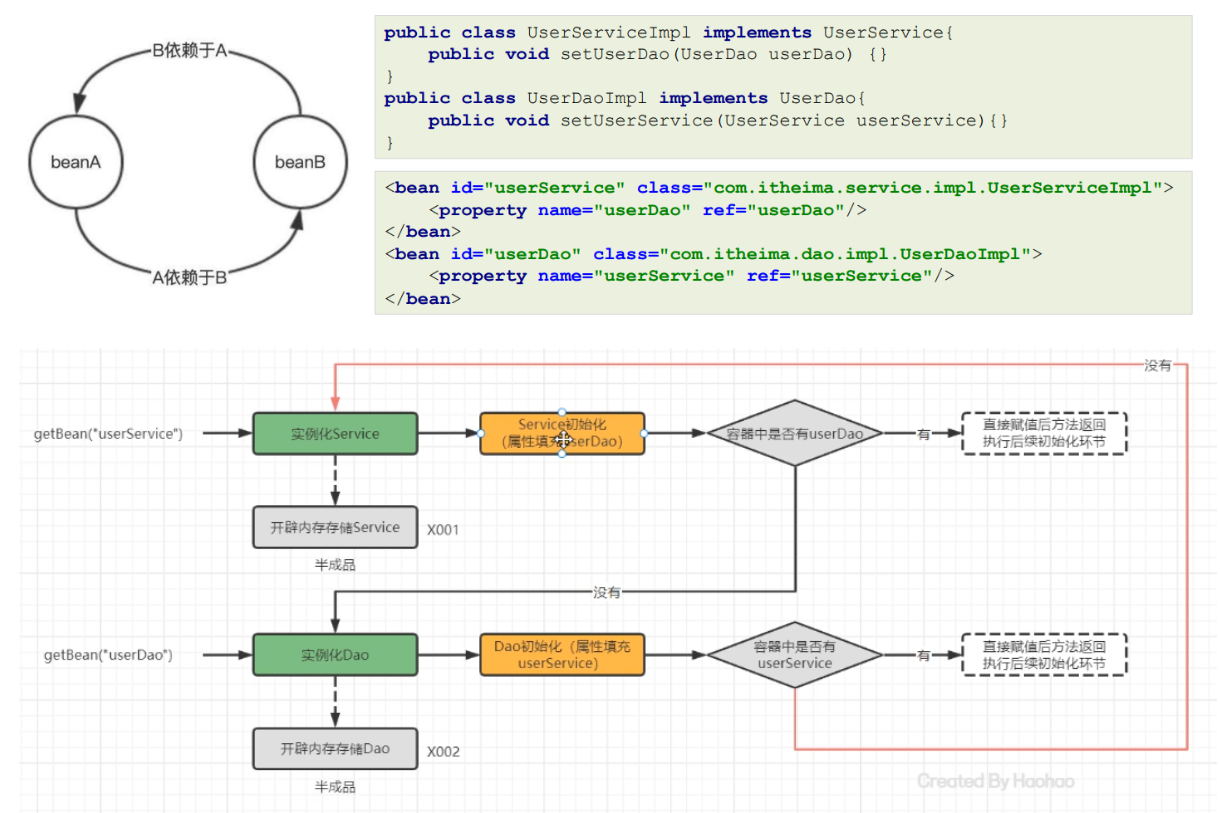
我们要获取userService对象,首先实例化该对象,只是在内存中开辟了地址,然后就要执行初始化为它的属性进行填充。去容器中查找发现没有userDao,则去创建userDao对象,发现在实例化userDao对象的过程中需要填充userService对象,于是又去创建userService对象。出现了死锁问题。
对于上述的循环引用问题产生的死锁,我们想的是,userDao已经实例化了,内存空间就有该对象了,我们直接给userService填充userDao属性(把userDao的引用给到userService),虽然属性不全,但是可以后期再进行属性填充,只要保持引用关系不变就可以了,这就解决了死锁问题。这就是下一步用到的方法了
c、Spring的三级缓存
Spring提供了三级缓存存储 完整Bean实例 和 半成品Bean实例 ,用于解决循环引用问题
在DefaultListableBeanFactory的上四级父类DefaultSingletonBeanRegistry中提供如下三个Map:
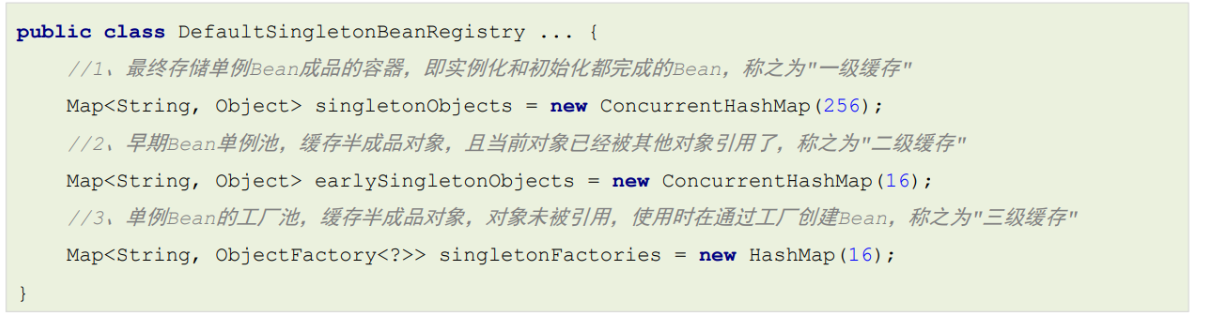
我们调用context.getBean是从singletonObjects中获取bean
执行完初始化方法,还未给该对象的属性赋值,且对象未被引用,则会将该对象放入三级缓存,key是bean的名称,value是ObjectFactory,它相当于是对当前对象进行了一次包装,通过调用该接口的getObject()方法就可以获取到该对象
UserService和UserDao循环依赖的过程结合上述三级缓存描述一下
- UserService 实例化对象,但尚未初始化,将UserService存储到三级缓存;
- UserService 属性注入,需要UserDao,从缓存中获取,没有UserDao;
- UserDao实例化对象,但尚未初始化,将UserDao存储到到三级缓存;
- UserDao属性注入,需要UserService,从三级缓存获取UserService,UserService从三级缓存移入二级缓存(因为到这一步userService已经从没有被引用变成了被引用,缓存位置需要变化)
- UserDao执行其他生命周期过程,最终成为一个完成Bean,存储到一级缓存,删除二三级缓存;
- UserService 注入UserDao;
- UserService执行其他生命周期过程,最终成为一个完成Bean,存储到一级缓存,删除二三级缓存
5.2 IOC整体流程总结
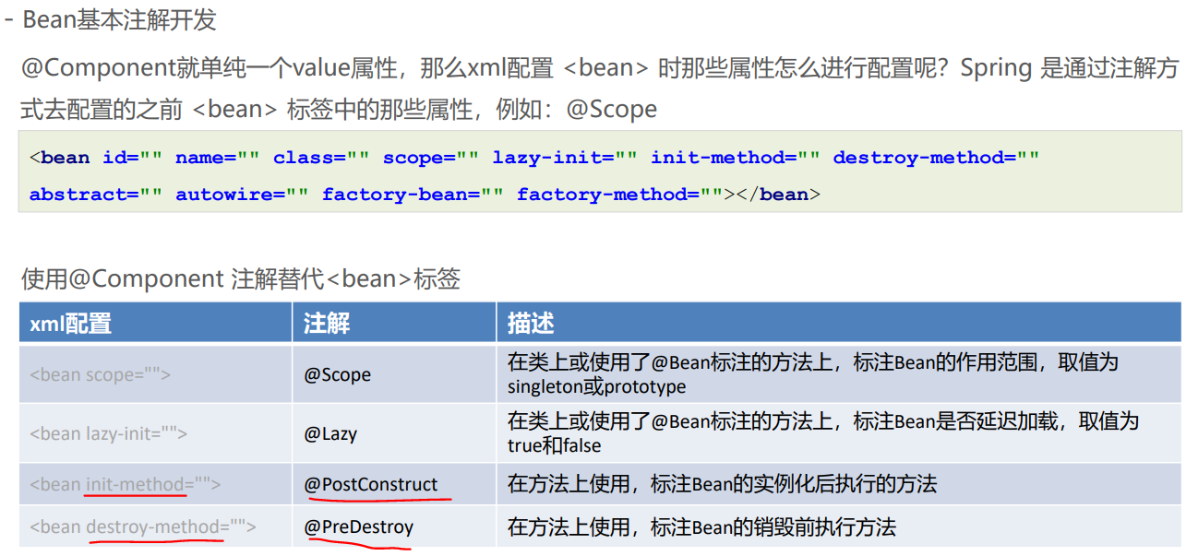
6、Spring的注解开发
注意,要添加注解扫描代码,不然即使加了注解也不生效
6.1 @Component
被该注解标识的类,会在指定扫描范围内被Spring加载并实例化
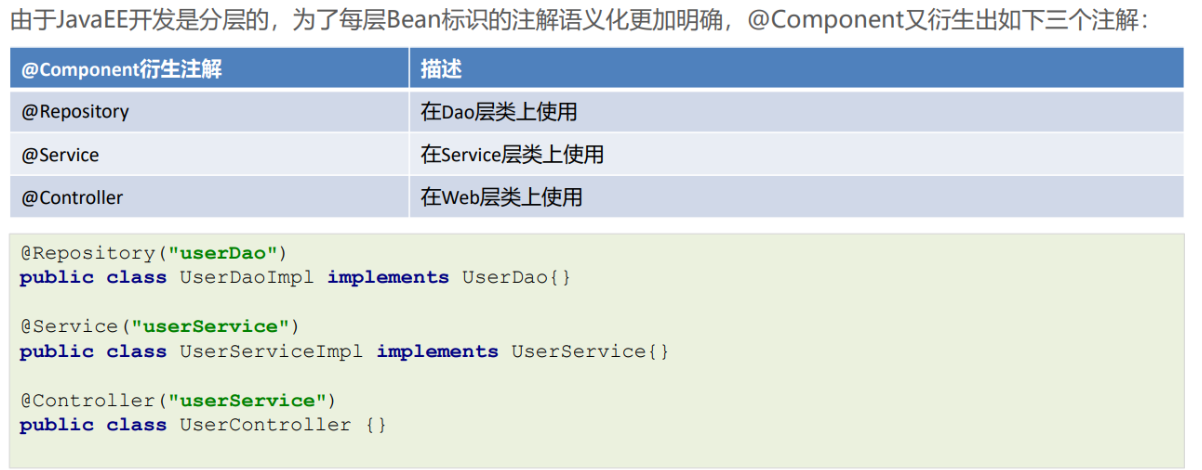
@Component的衍生注解
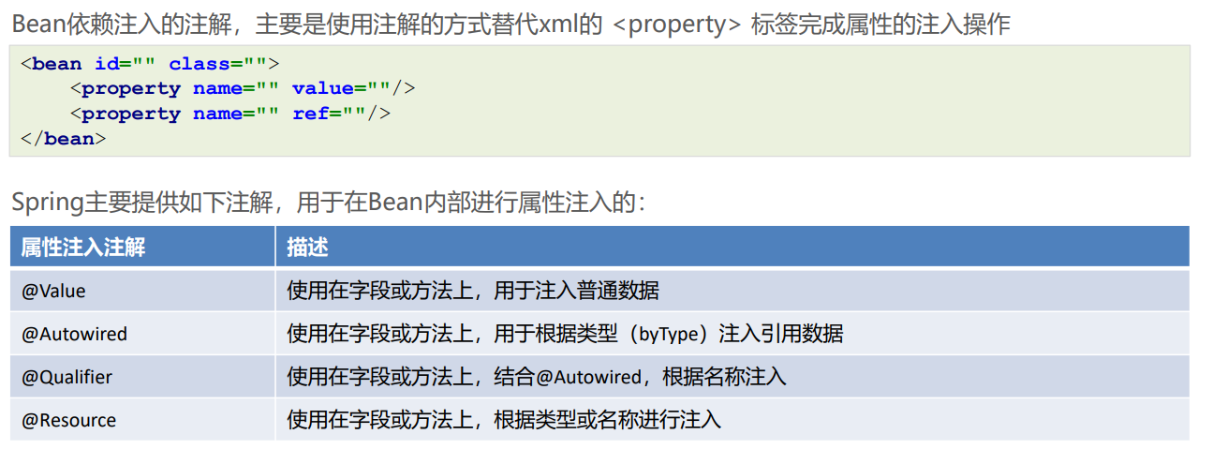
6.2 依赖注入相关注解
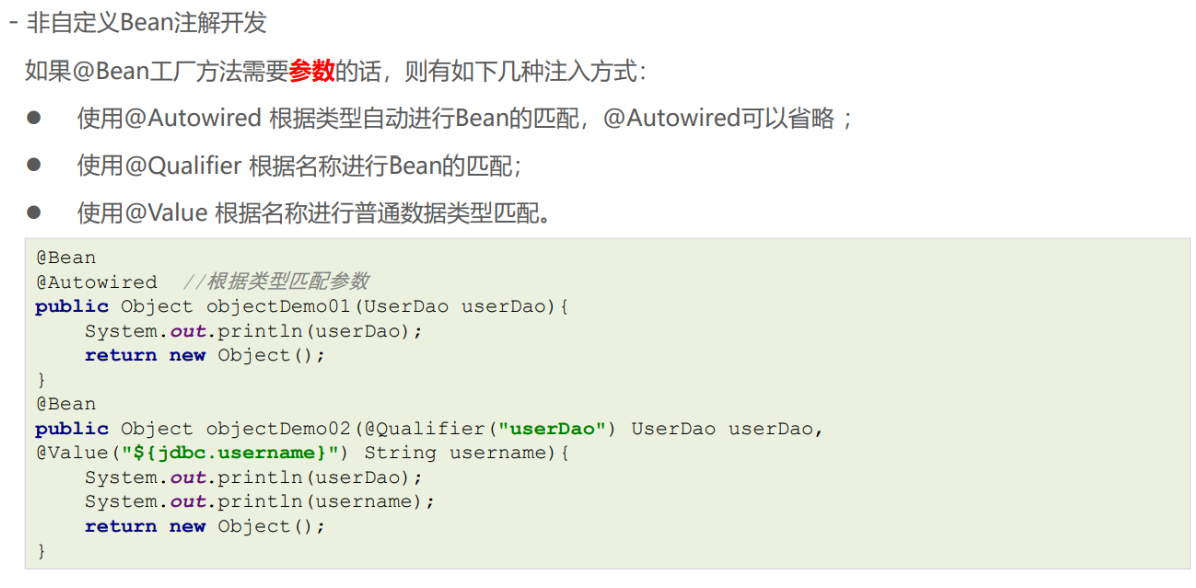
6.3 非自定义bean注解开发
上面说的几个注解适用于自定义bean(自己创建的bean),而非自定义bean(例如第三方jar包里面的bean,我们没办法在人家的源码或者jar包上加注解)就不适用了,需要使用非自定义bean注解。
非自定义Bean不能像自定义Bean一样使用@Component进行管理,非自定义Bean要通过工厂的方式进行实例化
使用@Bean标注方法即可,@Bean的属性为beanName,如不指定为当前工厂方法名称
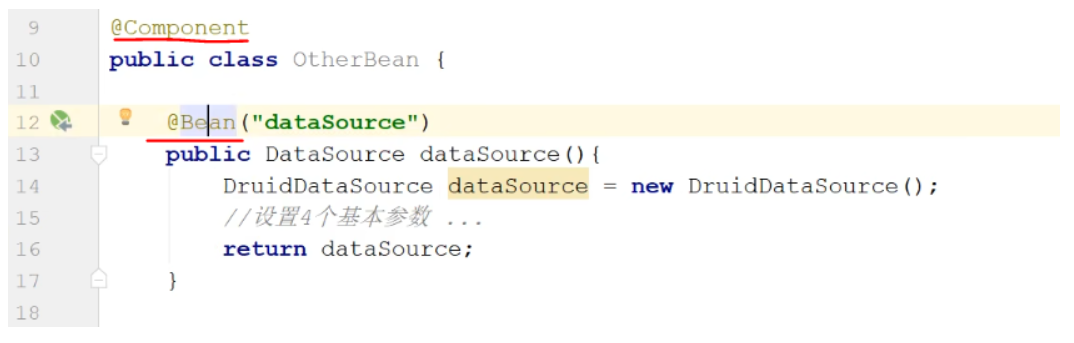
注意:工厂方法所在类必须要被Spring管理,上面的例子中OtherBean要加注解,交给Spring管理
6.4 Spring配置类的开发
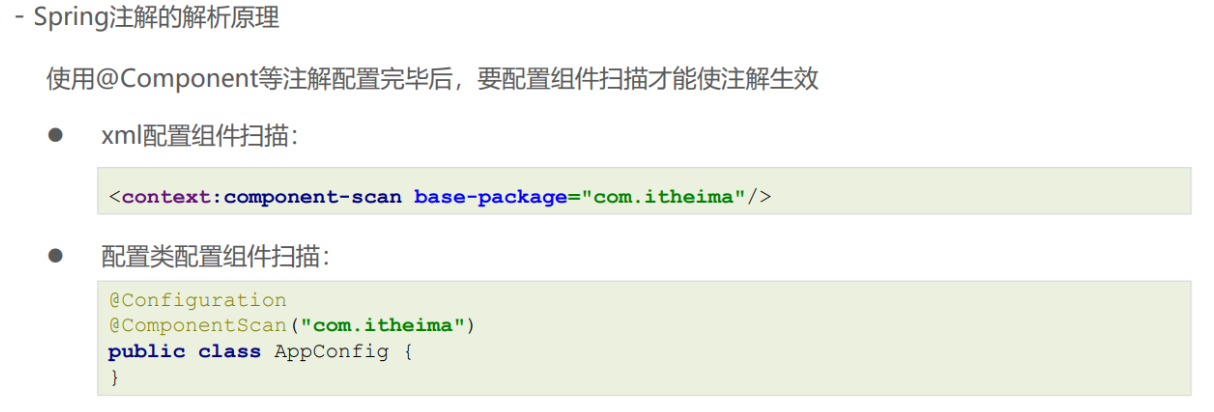
@Component等注解替代了<bean>标签,但是像<import>、<context:conponentScan> 等非<bean> 标签怎样去使用注解替代呢?

定义一个配置类替代原有的xml配置文件,<bean>标签以外的标签,一般都是在配置类上使用注解完成的
@Configuration注解标识的类为配置类,替代原有xml配置文件,该注解第一个作用是标识该类是一个配置类,第二个作用是具备@Component作用

@ComponentScan 组件扫描配置,替代原有xml文件中的<context:component-scan base-package=""/>

base-package的配置方式:
- 指定一个或多个包名:扫描指定包及其子包下使用注解的类
- 不配置包名:扫描当前@componentScan注解配置类所在包及其子包下的类
@PropertySource 注解用于加载外部properties资源配置,替代原有xml中的 <context:propertyplaceholder location=“”/> 配置

@Import 用于加载其他配置类,替代原有xml中的<import resource="classpath:beans.xml"/>配置

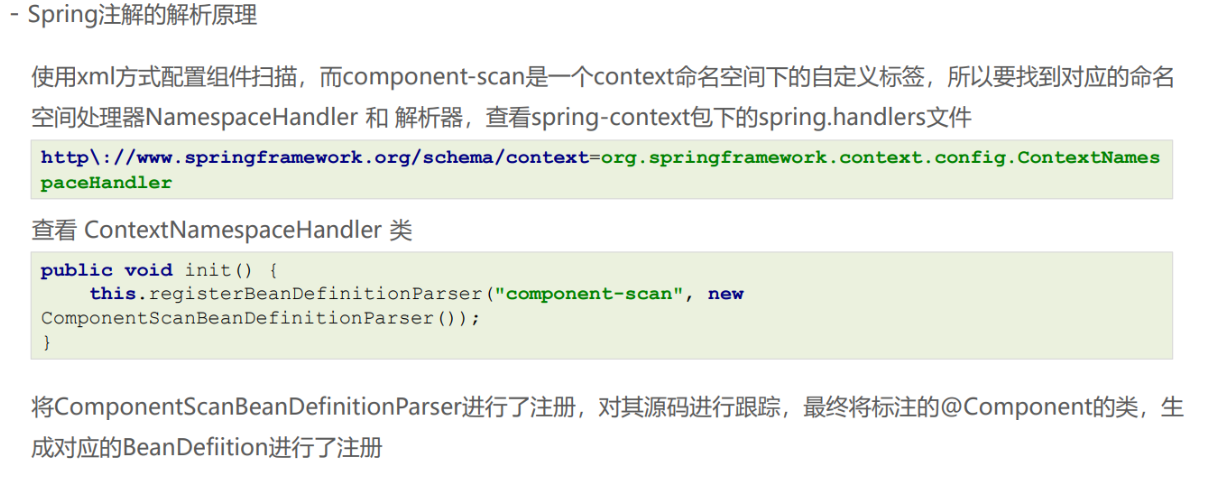
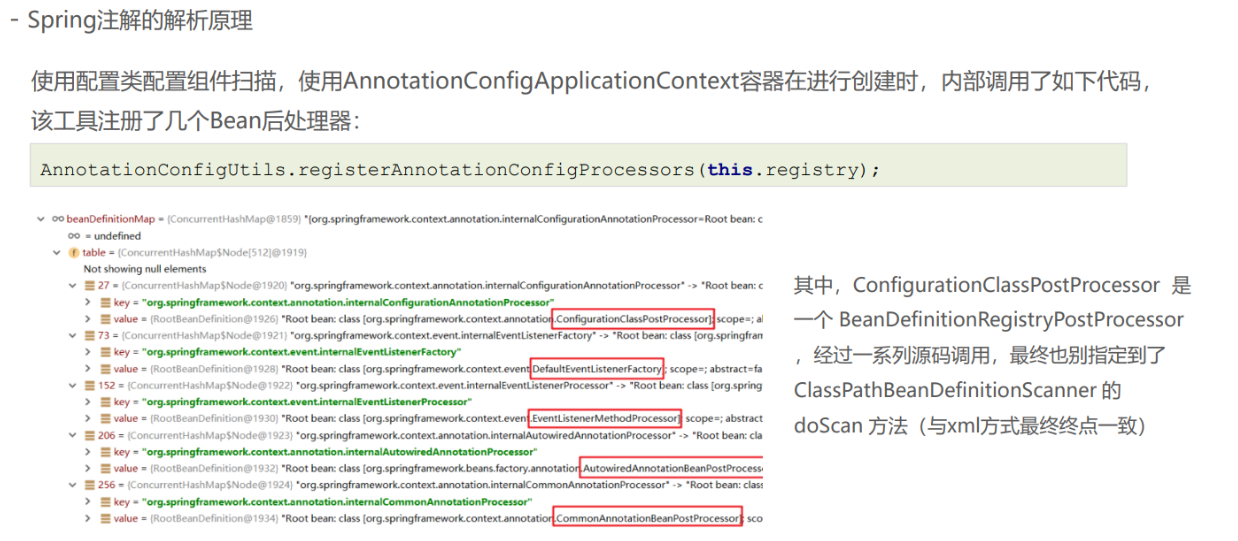
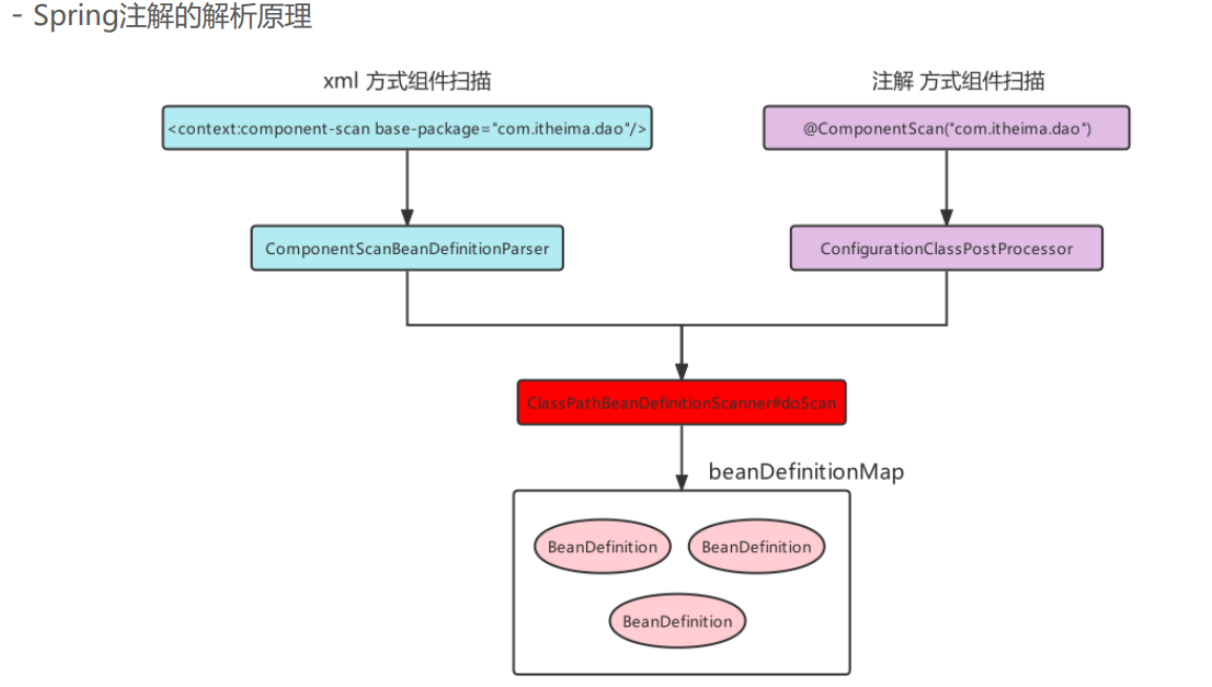
6.5 Spring注解的解析原理
7、AOP
AOP,Aspect Oriented Programming,面向切面编程,是对面向对象编程OOP的升华。OOP是纵向对一个事物的抽象,一个对象包括静态的属性信息,包括动态的方法信息等。而AOP是横向的对不同事物的抽象,属性与属性、方法与方法、对象与对象都可以组成一个切面,而用这种思维去设计编程的方式叫做面向切面编程。
7.1 AOP思想的实现方案
动态代理技术,在运行期间,对目标对象的方法进行增强,代理对象同名方法内可以执行原有逻辑,同时嵌入执行其他增强逻辑或其他对象的方法
7.2 模拟AOP的基础代码
先创建目标对象UserServiceImpl
public class UserServiceImpl implements UserService {
    @Override
    public void show1() {
        System.out.println("show1...");
    }

    @Override
    public void show2() {
        System.out.println("show2...");
    }
}
创建增强类,内部提供增强方法
public class MyAdvice {

    public void beforeAdvice(){
        System.out.println("前置增强...");
    }

    public void afterAdvice(){
        System.out.println("后置增强...");
    }
}
我们的目标是在调用show1和show2方法的前后,都会调用beforeAdvice和afterAdvice方法。这就联想到了之前学习的BeanPostProcessor
public class MockAopBeanPostProcessor implements BeanPostProcessor, ApplicationContextAware {
    private ApplicationContext applicationContext;

    @Override
    public Object postProcessAfterInitialization(Object bean, String beanName) throws BeansException {
        // 目的:对UserServiceImpl中的show1和show2方法进行增强,增强方法在MyAdvice类中
        // 问题1:需要进行bean名称和方法名的判断,因为postProcessAfterInitialization方法是所有bean都会执行,解决方法是加if判断
        // 问题2:MyAdvice类怎么获取,解决方法是将MyAdvice类放入到Spring容器中
        if(bean.getClass().getPackage().getName().equals("com.southwind.service.impl")){
            // 生成bean的proxy对象
            Object beanProxy = Proxy.newProxyInstance(
                    bean.getClass().getClassLoader(),
                    bean.getClass().getInterfaces(),
                    new InvocationHandler() {
                        @Override
                        public Object invoke(Object proxy, Method method, Object[] args) throws Throwable {
                            MyAdvice myAdvice = applicationContext.getBean(MyAdvice.class);
                            // 执行增强对象的before方法
                            myAdvice.beforeAdvice();

                            // 执行目标对象的目标方法
                            Object result = method.invoke(bean, args);

                            // 执行增强对象的after方法
                            myAdvice.afterAdvice();
                            return result;
                        }
                    }
            );

            // 属于增强的范围,则返回增强对象
            return beanProxy;
        }

        // 不属于增强的范围,则直接返回目标对象
        return bean;
    }

    @Override
    public void setApplicationContext(ApplicationContext applicationContext) throws BeansException {
        this.applicationContext = applicationContext;
    }
}
我们的目的:对UserServiceImpl中的show1和show2方法进行增强,增强方法在MyAdvice类中
问题1:需要进行bean名称和方法名的判断,因为postProcessAfterInitialization方法是所有bean都会执行,解决方法是加if判断
问题2:MyAdvice类怎么获取,解决方法是将MyAdvice类放入到Spring容器中
我们这里通过实现ApplicationContextAware接口,进而给applicationContext进行赋值,进而拿到MyAdvice对象
注意:属于增强的范围,则返回增强对象;不属于增强的范围,则直接返回目标对象
beas.xml
<bean id ="userService" class="com.southwind.service.impl.UserServiceImpl"></bean>

<bean id ="myAdvice" class="com.southwind.advice.MyAdvice"></bean>

<bean class="com.southwind.processor.MockAopBeanPostProcessor"></bean>
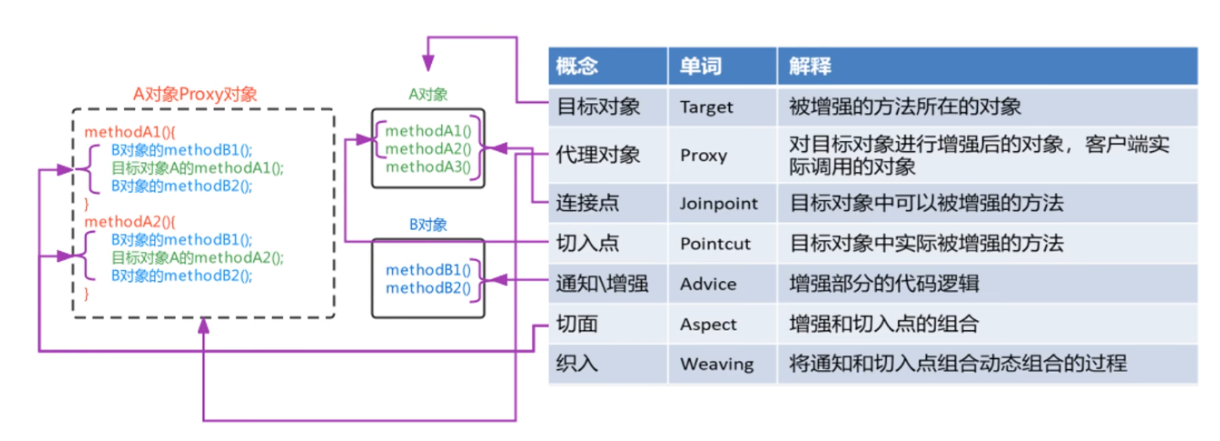
7.3 AOP相关概念
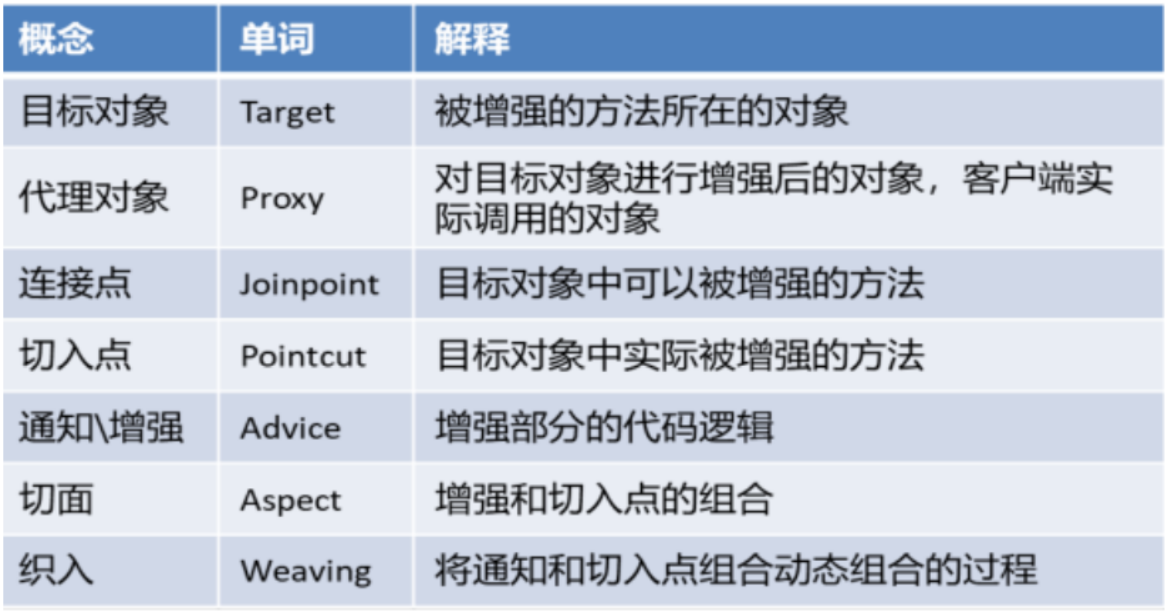
例如,我有一个userService类,里面有show1和show2方法,但是我的逻辑只对show1方法进行增强,则连接点就是show1和show2方法,而切入点就是show1方法
7.4 Spring的AOP开发
7.4.1 基于XML方式配置AOP
配置哪些包、哪些类、哪些方法需要被增强
配置目标方法要被哪些通知方法所增强,在目标方法执行之前还是之后执行增强
xml方式配置AOP的步骤:
1、导入AOP相关坐标;
2、准备目标类、准备增强类,并配置给Spring管理;
3、配置切点表达式(哪些方法被增强);
4、配置织入(切点被哪些通知方法增强,是前置增强还是后置增强)。
1、pom.xml
<dependency>
    <groupId>org.aspectj</groupId>
    <artifactId>aspectjweaver</artifactId>
    <version>1.9.7</version>
</dependency>
2、准备目标类、准备增强类,并配置给Spring管理
目标类UserServiceImpl
public class UserServiceImpl implements UserService {
    @Override
    public void show1() {
        System.out.println("show1...");
    }

    @Override
    public void show2() {
        System.out.println("show2...");
    }
}
增强类
public class MyAdvice {

    public void beforeAdvice(){
        System.out.println("前置增强...");
    }

    public void afterAdvice(){
        System.out.println("后置增强...");
    }
}
交给Spring管理,beans.xml
<bean id ="userService" class="com.southwind.service.impl.UserServiceImpl"></bean>

<bean id ="myAdvice" class="com.southwind.advice.MyAdvice"></bean>
3、配置切点表达式
只在beans.xml中进行配置
<?xml version="1.0" encoding="UTF-8"?>
<beans xmlns="http://www.springframework.org/schema/beans"
       xmlns:xsi="http://www.w3.org/2001/XMLSchema-instance"
       xmlns:aop="http://www.springframework.org/schema/aop"
       xsi:schemaLocation="http://www.springframework.org/schema/beans
       http://www.springframework.org/schema/beans/spring-beans.xsd
       http://www.springframework.org/schema/aop
       http://www.springframework.org/schema/aop/spring-aop.xsd"
>
    <!-- 目标对象 -->
    <bean id ="userService" class="com.southwind.service.impl.UserServiceImpl"></bean>

    <!-- 通知 -->
    <bean id ="myAdvice" class="com.southwind.advice.MyAdvice"></bean>

    <!-- aop配置 -->
    <aop:config>
        <!-- 配置切入点表达式,目的是指定哪些方法要被增强 -->
        <aop:pointcut id="myPointcut" expression="execution(void com.southwind.service.impl.UserServiceImpl.show1())"/>
        <!-- 配置织入,目的是指定哪些切点与哪些织入进行结合 -->
        <aop:aspect ref="myAdvice">
            <aop:before method="beforeAdvice" pointcut-ref="myPointcut"/>
            <aop:after method="afterAdvice" pointcut-ref="myPointcut"/>
        </aop:aspect>
    </aop:config>
</beans>
注意:
- 需要导入aop相应的命名空间
- 在
<aop:config>中进行aop相关的配置 - 在
<aop:pointcut>中指定切入点,目的是指定哪些方法要被增强。这里配置了只对show1()方法进行增强 - 在
<aop:aspect>中配置织入,目的是指定哪些切点与哪些织入进行结合。它的一个属性ref是对应的通知id,即myAdvice。然后通过<aop:before>配置前置通知,method是前置通知对应的前置增强方法,即myAdvice的beforeAdvice方法,pointcut-ref属性指定为哪个切入点添加前置通知。后置通知的原理类似
4、测试类
public class Test {
    public static void main(String[] args) {
        ClassPathXmlApplicationContext context = new ClassPathXmlApplicationContext("beans.xml");
        UserService userService = context.getBean(UserService.class);
        userService.show1();
    }
}
5、输出结果
前置增强...
show1...
后置增强...
7.4.2 xml方式AOP配置详解
五种通知类型
环绕通知的使用:
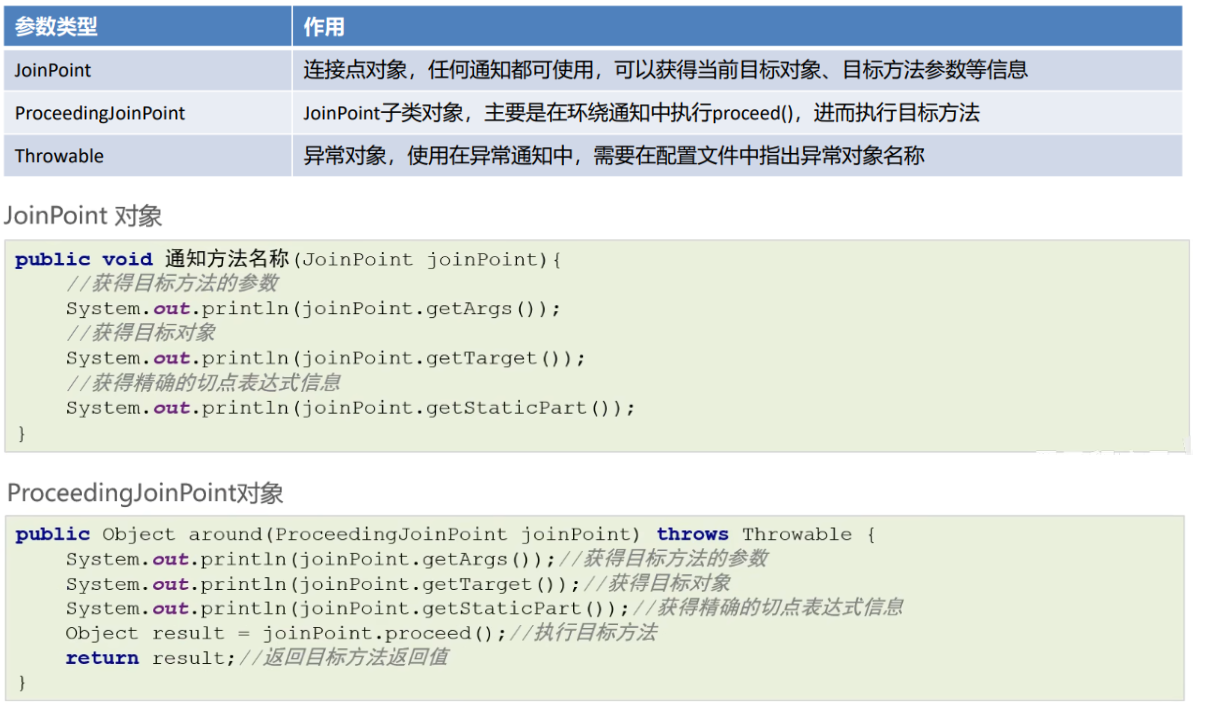
在MyAdvice中配置环绕通知方法。环绕通知是要在目标方法前后执行,所以这里around方法有参数ProceedingJoinPoint,正在执行的连接点,即切入点。调用joinPoint.proceed(),执行目标方法。
public class MyAdvice {

    public Object around(ProceedingJoinPoint joinPoint) throws Throwable {
        System.out.println("环绕前的增强");
        Object result = joinPoint.proceed();
        System.out.println("环绕后的增强");
        return result;
    }
}
beans.xml中配置环绕通知
<aop:config>
    <!-- 配置切入点表达式,目的是指定哪些方法要被增强 -->
    <aop:pointcut id="myPointcut" expression="execution(void com.southwind.service.impl.UserServiceImpl.show1())"/>
    <!-- 配置织入,目的是指定哪些切点与哪些织入进行结合 -->
    <aop:aspect ref="myAdvice">
        <aop:around method="around" pointcut-ref="myPointcut"/>
    </aop:aspect>
</aop:config>
通知方法在被调用时,Spring可以为其传递一些必要的参数
两种切面配置
AOP的XML有两种配置方式:
- 使用
<aspect>配置切面 - 使用
<advisor>配置切面
<aspect>配置方式前面已经学习过,这里学习<advisor>配置方式。
<advisor>配置方式:Spring定义了一个Advice接口,实现了该接口的类都可以作为通知类出现
public interface Advice{

}
看下advice配置的流程
1、由于Advice接口中没有任何方法,所以我们要实现的是Advice的子接口
通知类,这里实现MethodBeforeAdvice接口,重写before方法,相当于前置通知;实现AfterReturningAdvice接口,重写afterReturning方法,相当于后置通知
public class MyAdvice2 implements MethodBeforeAdvice, AfterReturningAdvice {
    @Override
    public void before(Method method, Object[] args, Object target) throws Throwable {
        System.out.println("前置通知...");
    }

    @Override
    public void afterReturning(Object returnValue, Method method, Object[] args, Object target) throws Throwable {
        System.out.println("后置通知...");
    }
}
2、beans.xml
<!-- 目标对象 -->
<bean id ="userService" class="com.southwind.service.impl.UserServiceImpl"></bean>

<!-- 通知 -->
<bean id ="myAdvice" class="com.southwind.advice.MyAdvice2"></bean>

<!-- aop配置 -->
<aop:config>
    <aop:pointcut id="myPointcut" expression="execution(void com.southwind.service.impl.UserServiceImpl.show1())"/>
    <aop:advisor advice-ref="myAdvice" pointcut-ref="myPointcut"/>
</aop:config>
3、执行结果:
前置通知...
show1...
后置通知...
相较于aspect方式需要在xml文件中指定哪个是前置通知,哪个是后置通知,advice在xml中不需要指定这些,它是通过实现对应的接口来实现的
aspect与advisor配置的不同点
1、语法形式不同:
- advisor是通过实现接口来确认通知的类型
- aspect是通过配置确认通知的类型,更加灵活
2、可配置的切面数量不同
- 一个advisor只能配置一个固定通知和一个切点表达式
- 一个aspect可以配置多个通知和多个切点表达式
3、使用场景不同
- 允许随意搭配情况下,可以使用aspect进行配置
- 如果通知类型单一、切面单一,可以使用advisor进行配置
- 在通知类型已经固定,不用人为指定通知类型时,可以使用advisor进行配置,例如后面要学习的Spring事务控制的配置
7.4.3 动态代理的实现
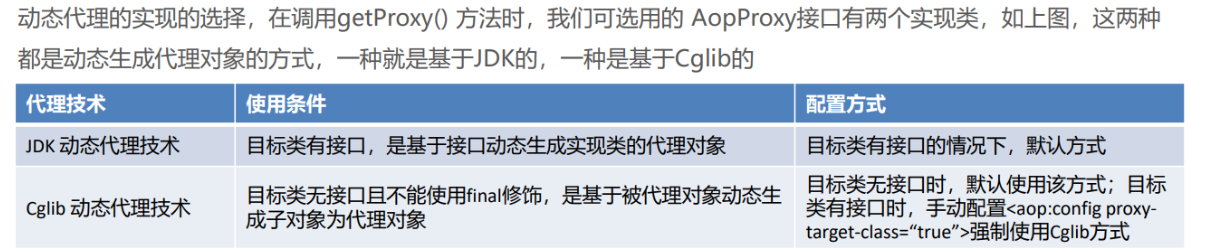
JDK动态代理是基于接口生成代理对象;Cglib动态代理是基于目标类生成子类作为代理对象,因为涉及到父子类,所以目标类不能使用final修饰,final修饰的类是不能被继承的,不存在父子类关系了;同时,目标类的目标方法不能加final修饰,因为final修改的类不能被重写,添加了代理就不会生效。

Cglib例子
1、目标对象Target
public class Target {
    public void show(){
        System.out.println("show...");
    }
}
2、通知对象MyAdvice
public class MyAdvice {

    public void beforeAdvice(){
        System.out.println("前置增强...");
    }

    public void afterAdvice(){
        System.out.println("后置增强...");
    }
}
3、生成代理对象
public class Test {
    public static void main(String[] args) {
        // 目标对象
        Target target = new Target();

        // 通知对象
        MyAdvice myAdvice = new MyAdvice();

        // 编写Cglib代码
        // 1、增强器对象
        Enhancer enhancer = new Enhancer();
        // 2、设置父类,生成的代理对象就是Target的子类
        enhancer.setSuperclass(Target.class);
        // 3、设置回调
        enhancer.setCallback(new MethodInterceptor() {
            @Override
            // intercept方法就相当于invoke方法
            public Object intercept(Object o, Method method, Object[] objects, MethodProxy methodProxy) throws Throwable {
                // 前置增强
                myAdvice.beforeAdvice();

                // 执行目标方法
                Object result = method.invoke(target, objects);

                // 后置增强
                myAdvice.afterAdvice();

                return result;
            }
        });

        // 4、创建代理对象
        Target proxy = (Target) enhancer.create();

        // 5、调用方法
        proxy.show();
    }
}
4、运行结果:
前置增强...
show...
后置增强...
7.4.4 基于注解的AOP
Spring的AOP也提供了注解方式配置,使用相应的注解替代之前的xml配置,xml配置AOP时,我们主要配置了三部分:目标类被Spring容器管理、通知类被Spring管理、通知与切点的织入(切面)
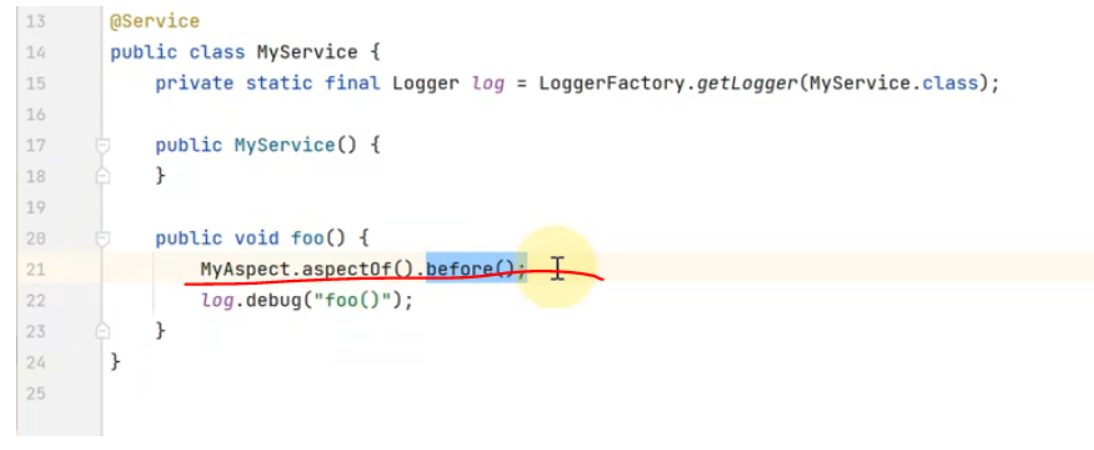
1、目标对象交给Spring管理,只需要添加@Service注解
@Service("userService")
public class UserServiceImpl implements UserService {
    @Override
    public void show1() {
        System.out.println("show1...");
    }

    @Override
    public void show2() {
        System.out.println("show2...");
    }
}
2、通知交给Spring管理,只需要添加@Component注解
@Component
public class MyAdvice {

    public void beforeAdvice(){
        System.out.println("前置增强...");
    }

    public void afterAdvice(){
        System.out.println("后置增强...");
    }
}
3、在MyAdvice类上添加@Aspect注解,表示它是一个切面类。然后在里面的方法上加@Before和@After注解,表示前置、后置通知
@Component
@Aspect
public class MyAdvice {

    @Before("execution(* com.southwind.service.impl.*.*(..))")
    public void beforeAdvice(){
        System.out.println("前置增强...");
    }

    @After("execution(* com.southwind.service.impl.*.*(..))")
    public void afterAdvice(){
        System.out.println("后置增强...");
    }
}
4、在beans.xml中进行配置
<!-- 组件扫描 -->
<context:component-scan base-package="com.southwind"/>

<!-- 使用注解配置AOP,需要开启AOP自动代理,让Spring解析,不加的话AOP不生效 -->
<aop:aspectj-autoproxy/>
开启组件扫描,因为是基于注解开发;还有是开启AOP自动代理,让Spring解析,不加的话AOP不生效
优化:上述的MyAdvice类中,前置、后置通知的execution是写在了方法之上,如果后期要修改,就需要修改两个地方。能不能将它抽象出来,只需要改动一次呢
@Component
@Aspect
public class MyAdvice {

    @Pointcut("execution(* com.southwind.service.impl.*.*(..))")
    public void myPointcut(){}

    @Before("MyAdvice.myPointcut()")
    public void beforeAdvice(){
        System.out.println("前置增强...");
    }

    @After("MyAdvice.myPointcut()")
    public void afterAdvice(){
        System.out.println("后置增强...");
    }
}
myPointcut就是抽象出来的公共地方,然后在前置、后置通知上指定公共地方。
7.5 基于AOP的声明式事务控制
7.5.1 Spring事务编程概述
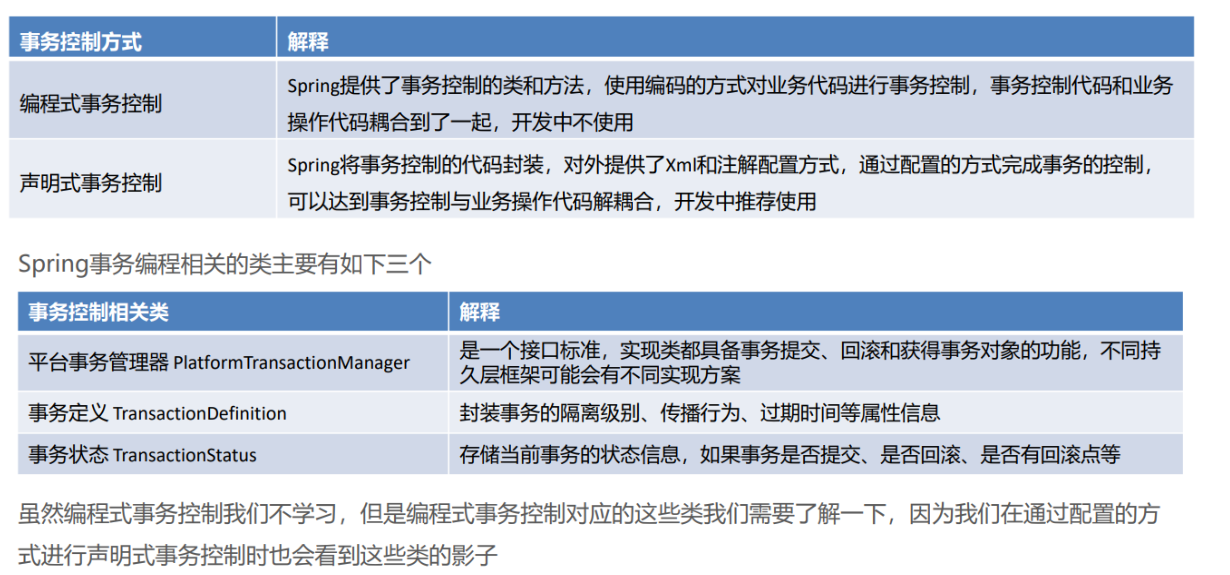
Spring的事务分为:编程式事务控制 和 声明式事务控制
7.5.2 基于xml声明式事务控制
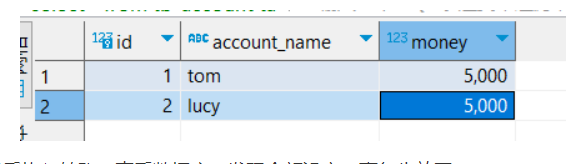
1、创建表tb_account,插入数据
create table tb_account(
id int primary key auto_increment,
account_name varchar(20),
money int
);
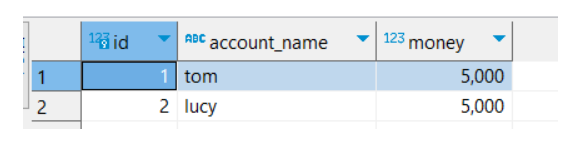
insert into tb_account values(null, 'tom', 5000);
insert into tb_account values(null, 'lucy', 5000);
2、导入pom依赖
<dependencies>
    <dependency>
        <groupId>org.springframework</groupId>
        <artifactId>spring-context</artifactId>
        <version>5.3.29</version>
    </dependency>

    <dependency>
        <groupId>org.aspectj</groupId>
        <artifactId>aspectjweaver</artifactId>
        <version>1.9.7</version>
    </dependency>

    <dependency>
        <groupId>org.mybatis</groupId>
        <artifactId>mybatis-spring</artifactId>
        <version>2.1.1</version>
    </dependency>

    <dependency>
        <groupId>org.springframework</groupId>
        <artifactId>spring-jdbc</artifactId>
        <version>5.3.27</version>
    </dependency>

    <dependency>
        <groupId>org.mybatis</groupId>
        <artifactId>mybatis</artifactId>
        <version>3.5.13</version>
    </dependency>

    <dependency>
        <groupId>mysql</groupId>
        <artifactId>mysql-connector-java</artifactId>
        <version>8.0.33</version>
    </dependency>

    <dependency>
      <groupId>com.alibaba</groupId>
      <artifactId>druid</artifactId>
      <version>1.2.20</version>
    </dependency>
</dependencies>
3、创建数据库配置文件jdbc.properties
jdbc.driver=com.mysql.jdbc.Driver
jdbc.url=jdbc:mysql://localhost:3306/test
jdbc.username=root
jdbc.password=root
4、创建tb_account表对应的AccountMapper文件,一个加钱方法,一个减钱方法
public interface AccountMapper {
    // 加钱
    @Update("update tb_account set money = money + #{money} where account_name = #{accountName}")
    public void incrMoney(@Param("accountName") String accountName, @Param("money") Integer money);

    // 减钱
    @Update("update tb_account set money = money - #{money} where account_name = #{accountName}")
    public void decrMoney(String accountName, Integer money);
}
5、创建service
public interface AccountService {
    public void transferMoney(String outAccount, String inAccount, Integer money);
}
@Service("accountService")
public class AccountServiceImpl implements AccountService {
    @Autowired
    private AccountMapper accountMapper;

    @Override
    public void transferMoney(String outAccount, String inAccount, Integer money) {
        accountMapper.decrMoney(outAccount, money);
        accountMapper.incrMoney(inAccount, money);
    }
}
6、beans.xml
<!-- 组件扫描 -->
<context:component-scan base-package="com.southwind"/>

<!-- 加载jdbc.properties文件 -->
<context:property-placeholder location="classpath:jdbc.properties"/>

<!-- 配置数据源 -->
<bean id="dataSource" class="com.alibaba.druid.pool.DruidDataSource">
    <property name="driverClassName" value="${jdbc.driver}"></property>
    <property name="url" value="${jdbc.url}"></property>
    <property name="username" value="${jdbc.username}"></property>
    <property name="password" value="${jdbc.password}"></property>
</bean>

<!-- 配置sqlSessionFactoryBean,将sqlSessionFactory存入到Spring容器 -->
<bean class="org.mybatis.spring.SqlSessionFactoryBean">
    <property name="dataSource" ref="dataSource"></property>
</bean>

<!-- MapperScannerConfigurer,扫描指定的包,产生对象存入到Spring容器中 -->
<bean class="org.mybatis.spring.mapper.MapperScannerConfigurer">
    <property name="basePackage" value="com.southwind.mapper"></property>
</bean>
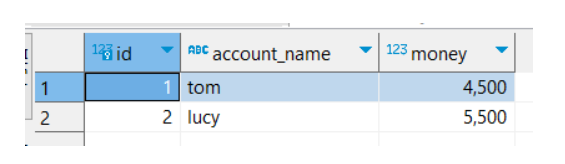
7、测试类,模拟tom向lucy转账5000
public class Test {
    public static void main(String[] args) {
        ClassPathXmlApplicationContext context = new ClassPathXmlApplicationContext("beans.xml");
        AccountService accountService = context.getBean(AccountService.class);
        accountService.transferMoney("tom", "lucy", 500);
    }
}
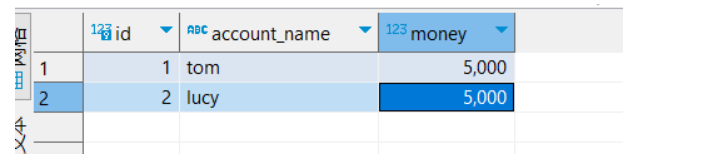
执行后的结果:
在上面的基础上,如果在业务实现类中手动添上1/0,再次执行
@Service("accountService")
public class AccountServiceImpl implements AccountService {
    @Autowired
    private AccountMapper accountMapper;

    @Override
    public void transferMoney(String outAccount, String inAccount, Integer money) {
        accountMapper.decrMoney(outAccount, money);

        int i = 1 / 0;

        accountMapper.incrMoney(inAccount, money);
    }
}
执行的时候会抛异常,同时tom少了500,而lucy没有多500,这就是缺少事务控制。
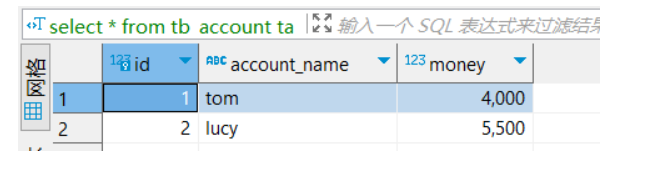
上面出问题的原因是,减钱是一个事务,加钱是另一个事务。我们要求的是这两个过程在一个事务中。
结合上面我们学习的AOP的技术,很容易就可以想到,可以使用AOP对Service的方法进行事务的增强。
- 目标类:AccountServiceImpl
- 切点:service业务类中的所有业务方法
- 通知类:Spring提供的,通知方法已经定义好,只需要配置即可
需要进行如下配置:
- 通知类是Spring提供的,需要导入Spring事务的相关的坐标;
- 配置目标类AccountServiceImpl;
- 使用advisor标签配置切面。
1、之前导入的spring-jdbc对应jar包下已经有Spring-tx事务对应jar包了

2、配置目标类AccountServiceImpl,我们在该类上面加了@Service注解,它已经交给Spring管理了
3、配置事务,在beans.xml中引入事务的命名空间tx
<?xml version="1.0" encoding="UTF-8"?>
<beans xmlns="http://www.springframework.org/schema/beans"
       xmlns:xsi="http://www.w3.org/2001/XMLSchema-instance"
       xmlns:aop="http://www.springframework.org/schema/aop"
       xmlns:tx="http://www.springframework.org/schema/tx"
       xmlns:context="http://www.springframework.org/schema/context"
       xsi:schemaLocation="http://www.springframework.org/schema/beans
       http://www.springframework.org/schema/beans/spring-beans.xsd
       http://www.springframework.org/schema/aop
       http://www.springframework.org/schema/aop/spring-aop.xsd
       http://www.springframework.org/schema/context
       https://www.springframework.org/schema/context/spring-context.xsd
       http://www.springframework.org/schema/tx
        http://www.springframework.org/schema/tx/spring-tx.xsd"
>
    <!-- 组件扫描 -->
    <context:component-scan base-package="com.southwind"/>

    <!-- 加载jdbc.properties文件 -->
    <context:property-placeholder location="classpath:jdbc.properties"/>

    <!-- 配置数据源 -->
    <bean id="dataSource" class="com.alibaba.druid.pool.DruidDataSource">
        <property name="driverClassName" value="${jdbc.driver}"></property>
        <property name="url" value="${jdbc.url}"></property>
        <property name="username" value="${jdbc.username}"></property>
        <property name="password" value="${jdbc.password}"></property>
    </bean>

    <!-- 配置sqlSessionFactoryBean,将sqlSessionFactory存入到Spring容器 -->
    <bean class="org.mybatis.spring.SqlSessionFactoryBean">
        <property name="dataSource" ref="dataSource"></property>
    </bean>

    <!-- MapperScannerConfigurer,扫描指定的包,产生对象存入到Spring容器中 -->
    <bean class="org.mybatis.spring.mapper.MapperScannerConfigurer">
        <property name="basePackage" value="com.southwind.mapper"></property>
    </bean>

    <!-- 配置平台事务管理器 -->
    <bean id="transactionManager" class="org.springframework.jdbc.datasource.DataSourceTransactionManager">
        <property name="dataSource" ref="dataSource"/>
    </bean>

    <!-- 配置Spring提供好的advice -->
    <tx:advice id="txAdvice" transaction-manager="transactionManager">
        <tx:attributes>
            <tx:method name="*"/>
        </tx:attributes>
    </tx:advice>

    <!-- 事务增强的AOP -->
    <aop:config>
        <!-- 切入点 -->
        <aop:pointcut id="txPoint" expression="execution(* com.southwind.service.impl.*.*(..))"/>
        <!-- 通知advice-ref引用Spring提供好的 -->
        <aop:advisor advice-ref="txAdvice" pointcut-ref="txPoint"/>
    </aop:config>
</beans>
4、将表中两人的金额恢复到5000
5、在service中抛出异常,测试事务是否生效
6、执行测试,控制台抛出异常,查看数据库中的结果,发现金额没变,事务生效了
问题:在<aop:pointcut>的execution中配置了表达式后,为什么还要<tx:method>中还要配置一遍?

<aop:pointcut>的execution是筛选出哪些方法要被增强,被事务控制。例如上图的A、B、C、D、E五个方法,只有A、C、D需要增强。
<tx:method>是为每个方法配置事务属性,比如不同的隔离级别,不同的事务传播行为。
平台事务管理器PlatformTransactionManager
它是基于DAO层的实现来决定的,像jdbc、mybatis(底层还是用的jdbc)都是对应DataSourceTransactionManager;如果是hibernate,就是另外一个平台事务管理器了
<tx:method>标签
用于配置不同方法的事务属性。常用属性:
- name:方法名称,可以指定具体的方法名。*代表通配符,任意方法都用当前的这套事务属性进行配置。事务属性都有默认值
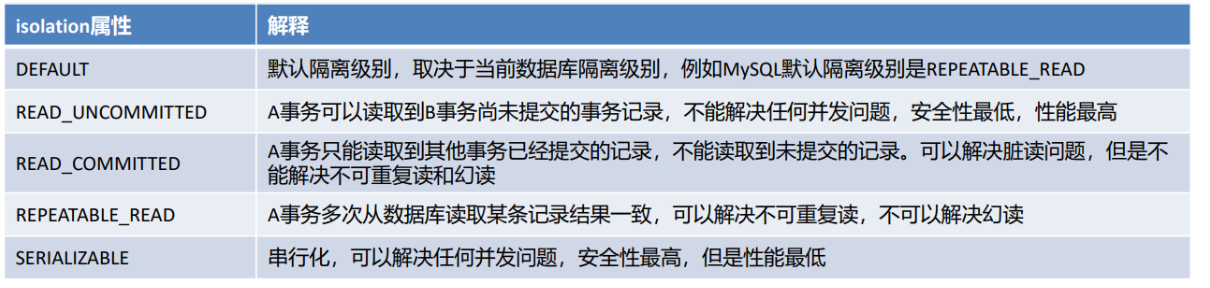
- isolation:指定事务的隔离级别,事务并发存在三大问题:脏读、不可重复读、幻读/虚读。可以通过设置事务的隔离级别来保证并发问题的出现,常用的是READ_COMMITTED 和 REPEATABLE_READ
timeout:设置事务执行的超时时间,单位是秒,如果超过该时间限制但事务还没有完成,则自动回滚事务,不在继续执行。默认值是-1,即没有超时时间限制
read-only:设置当前的只读状态,如果是查询则设置为true,可以提高查询性能,如果是更新(增删改)操作则设置为false
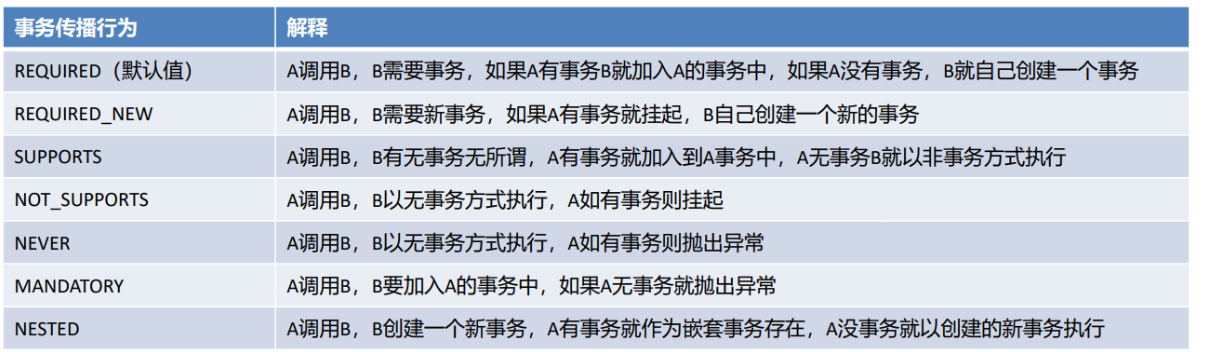
propagation:设置事务的传播行为,主要解决是A方法调用B方法时,事务的传播方式问题的,例如:使用单方的事务,还是A和B都使用自己的事务等。事务的传播行为有如下七种属性值可配置
原理
底层还是AOP

7.5.3 基于注解声明式事务控制
1、使用@Transactional注解指定,加到目标方法上,可以指定isolation和propagation等参数。加到哪个方法之上就是给哪个方法添加事务。如果要一个类下的所有方法都加事务,可以在类上加上该注解,表示该类下的所有方法共有这一套事务。
@Service("accountService")
public class AccountServiceImpl implements AccountService {
    @Autowired
    private AccountMapper accountMapper;

    @Override
    @Transactional
    public void transferMoney(String outAccount, String inAccount, Integer money) {
        accountMapper.decrMoney(outAccount, money);

        int i = 1 / 0;

        accountMapper.incrMoney(inAccount, money);
    }
}
2、beans.xml中去掉原来advice和aop的配置,同时添加事务的自动代理(注解驱动)
<?xml version="1.0" encoding="UTF-8"?>
<beans xmlns="http://www.springframework.org/schema/beans"
       xmlns:xsi="http://www.w3.org/2001/XMLSchema-instance"
       xmlns:aop="http://www.springframework.org/schema/aop"
       xmlns:tx="http://www.springframework.org/schema/tx"
       xmlns:context="http://www.springframework.org/schema/context"
       xsi:schemaLocation="http://www.springframework.org/schema/beans
       http://www.springframework.org/schema/beans/spring-beans.xsd
       http://www.springframework.org/schema/aop
       http://www.springframework.org/schema/aop/spring-aop.xsd
       http://www.springframework.org/schema/context
       https://www.springframework.org/schema/context/spring-context.xsd
       http://www.springframework.org/schema/tx
        http://www.springframework.org/schema/tx/spring-tx.xsd"
>
    <!-- 组件扫描 -->
    <context:component-scan base-package="com.southwind"/>

    <!-- 加载jdbc.properties文件 -->
    <context:property-placeholder location="classpath:jdbc.properties"/>

    <!-- 配置数据源 -->
    <bean id="dataSource" class="com.alibaba.druid.pool.DruidDataSource">
        <property name="driverClassName" value="${jdbc.driver}"></property>
        <property name="url" value="${jdbc.url}"></property>
        <property name="username" value="${jdbc.username}"></property>
        <property name="password" value="${jdbc.password}"></property>
    </bean>

    <!-- 配置sqlSessionFactoryBean,将sqlSessionFactory存入到Spring容器 -->
    <bean class="org.mybatis.spring.SqlSessionFactoryBean">
        <property name="dataSource" ref="dataSource"></property>
    </bean>

    <!-- MapperScannerConfigurer,扫描指定的包,产生对象存入到Spring容器中 -->
    <bean class="org.mybatis.spring.mapper.MapperScannerConfigurer">
        <property name="basePackage" value="com.southwind.mapper"></property>
    </bean>

    <!-- 配置平台事务管理器 -->
    <bean id="transactionManager" class="org.springframework.jdbc.datasource.DataSourceTransactionManager">
        <property name="dataSource" ref="dataSource"/>
    </bean>

    <!-- 事务的自动代理(注解驱动) -->
    <tx:annotation-driven/>
</beans>
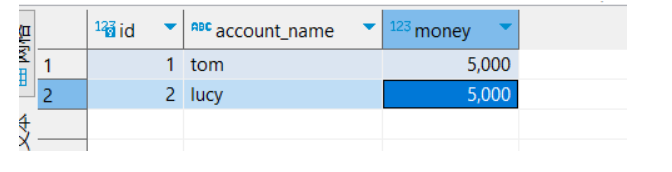
3、开始测试前查看数据库中的数据
4、在业务实现类中主动抛出异常,然后执行转账,查看数据库,发现金额没变,事务生效了

当然可以将上面的所有配置换成全注解方式配置:
配置类:
@Configuration
@ComponentScan("com.southwind")
@PropertySource("classpath:jdbc.properties")
@MapperScan("com.southwind.mapper")
@EnableTransactionManagement //相当于<tx:annotation-driven/>
public class SpringConfig {

    @Bean
    public DataSource dataSource(
            @Value("${jdbc.driver}") String driverClassName,
            @Value("${jdbc.url}") String url,
            @Value("${jdbc.username}") String username,
            @Value("${jdbc.password}") String password
    ){
        DruidDataSource dataSource = new DruidDataSource();
        dataSource.setDriverClassName(driverClassName);
        dataSource.setUrl(url);
        dataSource.setUsername(username);
        dataSource.setPassword(password);
        return dataSource;
    }

    @Bean
    public SqlSessionFactoryBean sqlSessionFactoryBean(DataSource dataSource){
        SqlSessionFactoryBean sqlSessionFactoryBean = new SqlSessionFactoryBean();
        sqlSessionFactoryBean.setDataSource(dataSource);
        return sqlSessionFactoryBean;
    }

    @Bean
    public DataSourceTransactionManager transactionManager(DataSource dataSource){
        DataSourceTransactionManager dataSourceTransactionManager = new DataSourceTransactionManager();
        dataSourceTransactionManager.setDataSource(dataSource);
        return dataSourceTransactionManager;
    }
}
测试类:
public class Test {
    public static void main(String[] args) {
        AnnotationConfigApplicationContext context = new AnnotationConfigApplicationContext(SpringConfig.class);
        AccountService accountService = context.getBean(AccountService.class);
        accountService.transferMoney("tom", "lucy", 500);
    }
}
7.6 AOP实现方式
- 上面讲的代理
- aspectj编译器
1、我们需要在pom.xml中引入acpectj编译器
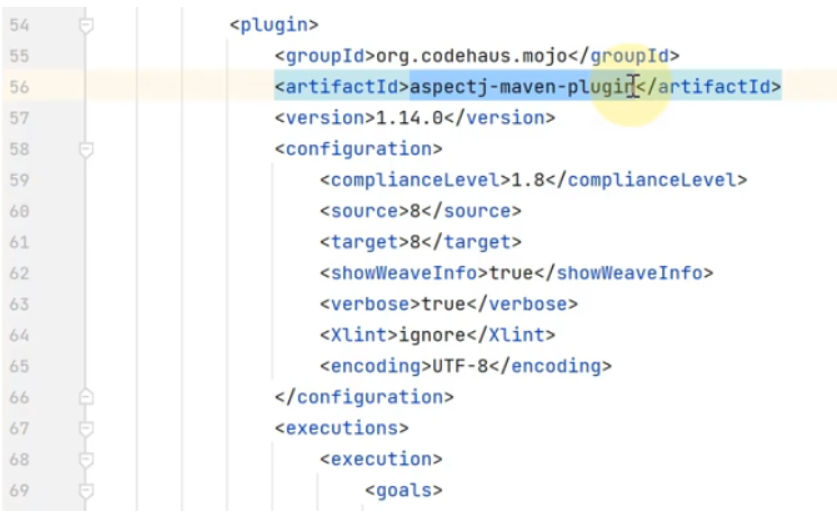
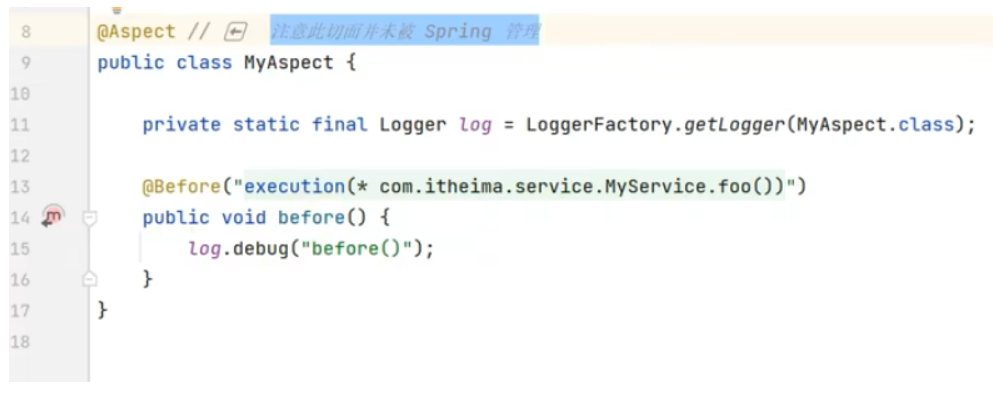
2、通知类
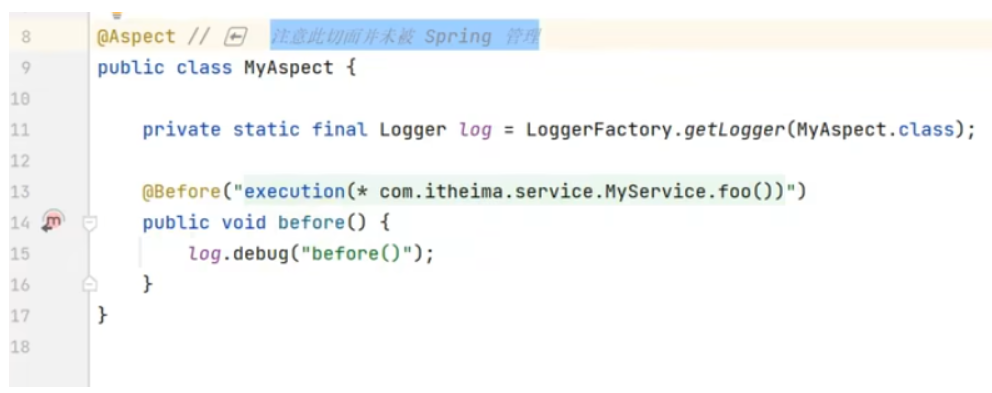
注意到,上面的通知类上面并没有添加像@Component这样的注解,即未添加到Spring容器中,但是确实实现了代理的功能。这是因为aspectj编译器修改了最终的字节码class,将通知类的逻辑加到了目标类上面
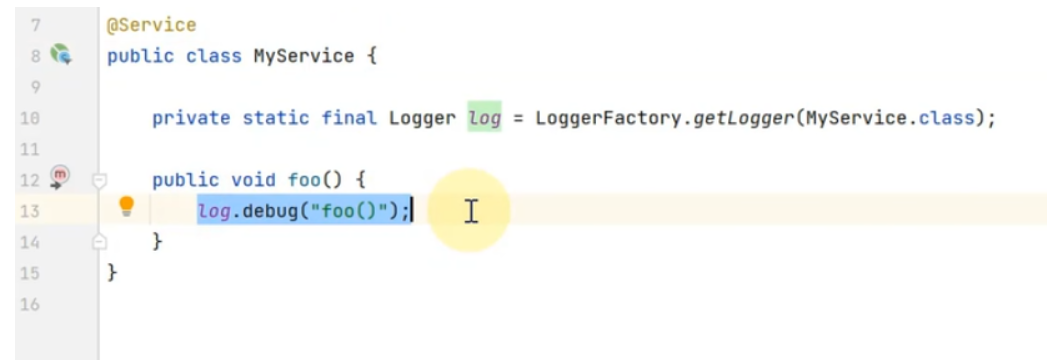
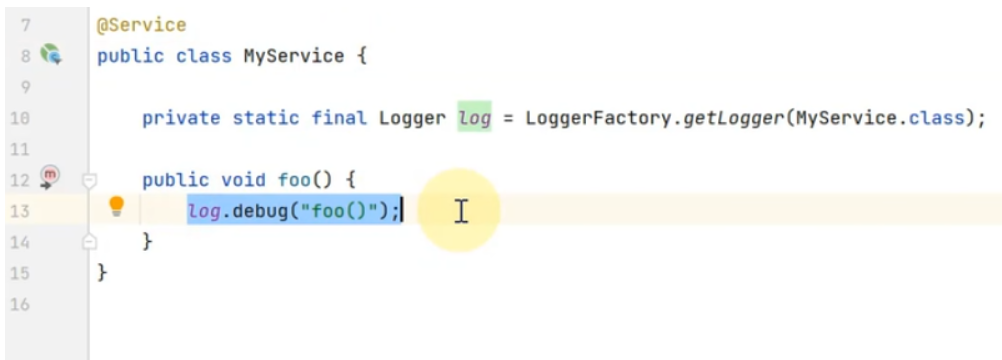
3、目标类
4、aspectj编译器修改了最终的字节码class
- agent类加载。在类加载阶段实现类的增强
1、通知类
2、目标类
注意到,上面的通知类上面并没有添加像@Component这样的注解,即未添加到Spring容器中
3、添加JVM启动参数
-javaagent aspectjweaver.jar
8、Spring整合web环境
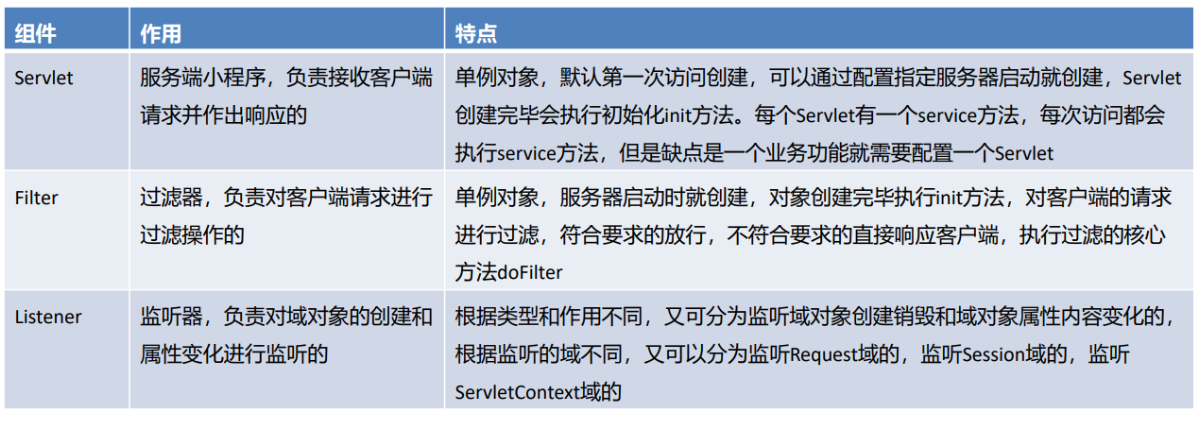
8.1 Javaweb三大组件
8.2 Spring整合web环境的思路及实现及环境特点
在进行Java开发时要遵循三层架构+MVC,Spring操作最核心的就是Spring容器,web层需要注入Service,service层需要注入Dao(Mapper),web层使用Servlet技术充当的话,需要在Servlet中获得Spring容器
web层代码如果都去编写创建AnnotationConfigApplicationContext的代码,那么配置类重复被加载了, Spring容器也重复被创建了,不能每次想从容器中获得一个Bean都得先创建一次容器,这样肯定是不允许。 所以,我们现在的诉求很简单,如下:
ApplicationContext创建一次,配置类加载一次;
最好web服务器启动时,就执行第1步操作,后续直接从容器中获取Bean使用即可;
ApplicationContext的引用需要在web层任何位置都可以获取到。
针对以上诉求我们给出解决思路,如下:
- 在ServletContextListener的contextInitialized方法中执行ApplicationContext的创建。或在Servlet的init方法中执行ApplicationContext的创建,并给Servlet的load-on-startup属性一个数字值,确保服务器启动Servlet就创建;
- 将创建好的ApplicationContext存储到ServletContext域(Application域,另外两个域是request、session)中,这样整个web层任何位置就都可以获取到了
代码实现
1、创建ContextLoaderListener,主要的实现流程都在这个类中
public class ContextLoaderListener implements ServletContextListener {
    @Override
    public void contextInitialized(ServletContextEvent sce) {
        System.out.println("init............");
        // 1、创建Spring容器
        ClassPathXmlApplicationContext context = new ClassPathXmlApplicationContext("beans.xml");

        // 2、将容器存储到ServletContext/application域中
        sce.getServletContext().setAttribute("applicationContext", context);
    }
}
首先,我们创建Spring容器。然后通过sce.getServletContext()获取ServletContext对象,调用它的setAttribute方法,将spring容器注入到application域中
2、在web.xml中配置该listener
<?xml version="1.0" encoding="UTF-8"?>
<web-app xmlns:xsi="http://www.w3.org/2001/XMLSchema-instance"
         xmlns="http://java.sun.com/xml/ns/javaee"
         xmlns:web="http://java.sun.com/xml/ns/javaee/web-app_2_5.xsd"
         xsi:schemaLocation="http://java.sun.com/xml/ns/javaee http://java.sun.com/xml/ns/javaee/web-app_2_5.xsd"
         version="2.5">

    <!-- 配置listener -->
    <listener>
        <listener-class>com.southwind.listener.ContextLoaderListener</listener-class>
    </listener>
</web-app>
3、AccountServlet代码,获取spring容器的方式有变化,这里先获取ServletContext对象,然后调用它的getAttribute方法获取spring容器
@WebServlet(urlPatterns = "/accountServlet")
public class AccountServlet extends HttpServlet {

    @Override
    protected void doGet(HttpServletRequest req, HttpServletResponse resp) throws ServletException, IOException {
        ServletContext servletContext = req.getServletContext();
        ApplicationContext context = (ApplicationContext) servletContext.getAttribute("applicationContext");
        AccountService accountService = context.getBean(AccountService.class);
        accountService.transferMoney("tom", "lucy", 500);
    }
}
上述的代码只是加深理解,实际开发都是调用第三方jar包已经写好的方法