API Gateway CLI 实操入门笔记(基于 LocalStack)
Categories: Cloud
Google Rank Proof: No
Last edited time: May 26, 2025 4:18 AM
Status: Early draft
Tags: aws
主要先简单的走一下流程,熟悉一下在 terminal 操作 API Gateway
local stack 配置
这里主要用的就是 docker 去启动一个 docker 的容器,运行 local stack,直接 cv docker-compose 就行:
version: "3.8"

services:
  localstack:
    image: localstack/localstack:latest
    container_name: localstack_main
    ports:
      - "4566:4566" # main edge port
      - "4571:4571"
    environment:
      - SERVICES=SERVICES=lambda,dynamodb,apigateway,iam,logs,s3,ec2,cloudformation,sts,ssm,secretsmanager
      - DEBUG=1
      - LAMBDA_EXECUTOR=docker
      - DOCKER_HOST=unix:///var/run/docker.sock
    volumes:
      - "./localstack:/var/lib/localstack"
      - "/var/run/docker.sock:/var/run/docker.sock"、
安装 aws cli
其实准确的说是 awscli 和 awslocal,后者是用来跑 awslocal,也就是和 local stack 对接的,整体脚本如下:
❯ brew install awscli

==> Auto-updating Homebrew...
Adjust how often this is run with HOMEBREW_AUTO_UPDATE_SECS or disable with
HOMEBREW_NO_AUTO_UPDATE. Hide these hints with HOMEBREW_NO_ENV_HINTS (see `man brew`).
==> Downloading https://ghcr.io/v2/homebrew/portable-ruby/portable-ruby/blobs/sha256:9fd394a40fb1467f89206a9c89c1274d9dc053af688176667a0cac0c3014113f
######################################################################### 100.0%
# ...

❯ aws --version
aws-cli/2.27.22 Python/3.13.3 Darwin/23.4.0 source/x86_64

❯ pip3 install "awscli-local[ver1]" --upgrade
Defaulting to user installation because normal site-packages is not writeable
Collecting awscli-local[ver1]
  Downloading awscli-local-0.22.0.tar.gz (11 kB)
Collecting localstack-client
  Downloading localstack_client-2.10.tar.gz (11 kB)
Collecting awscli

❯ awslocal --version
aws-cli/1.40.22 Python/3.9.6 Darwin/23.4.0 botocore/1.38.23

❯ awslocal lambda list-functions

{
    "Functions": []
}
这个步骤用 homebrew 去安装 aws cli,然后用 pip 安装 awscli-local——运行的时候直接跑 awslocal
另外一个需要注意的就是,要把 python 安装的 package 添加到 env variable 里
小试 API Gateway
local stack 是 没有 UI 的,所以一切的操作都会在 terminal 上运行
API Gateway 结构
UI 上显示的树状结构如下:
API Gateway
└── APIs
    └── [my-api-name]
        ├── Resources                # Route paths + HTTP methods
        ├── Stages                  # Deployment environments (dev, prod, etc.)
        ├── Authorizers             # Cognito or Lambda-based authorizers
        ├── Models                  # JSON schema models for validation
        ├── Documentation           # API documentation parts or export (e.g. Swagger)
        ├── Binary Media Types      # Supported binary MIME types (e.g. image/png)
        ├── Gateway Responses       # Custom error responses (403, 404, etc.)
        ├── Settings                # Stage-level settings: variables, tracing, caching
        ├── Dashboard               # Traffic and integration visual overview
└── Usage Plans                    # Rate limiting and quota plans
└── API Keys                       # Issued access keys for API clients
└── Custom Domain Names
└── Client Certificates
└── Settings
有注释的部分,是会主要涉及到的部分
一些 get commands
开篇前先放一些可能会用得到的 get request,首先需要注意的是,除了 get-rest-apis 之外,其他的操作都需要用到 --rest-api-id 这个 flag,所以 get-rest-apis 可以说是所有 query 相关的基础
awslocal apigateway get-rest-apis                         # → all API
awslocal apigateway get-resources --rest-api-id <id>      # → path tree
awslocal apigateway get-stages --rest-api-id <id>         # → deployed stage
awslocal apigateway get-authorizers --rest-api-id <id>    # → JWT / Lambda Auth
awslocal apigateway get-models --rest-api-id <id>         # → Request / Response Model
创建一个新的测试 GET
这里 9 步,其实在 UI 操作挺简单的,不过 API 的话……嗨……不是为了省点钱嘛……
创建新的 rest api
本质上来说,创建的是一个新的 API 的 namespace/project/service,官方的解释说:
an API refers to a collection of resources and methods that can be invoked through HTTPS endpoints
# create a new rest api
❯ API_ID=$(awslocal apigateway create-rest-api \
  --name first-api-test \
  --query 'id' --output text)
echo "API_ID = $API_ID"
API_ID = pgvkwbu238

# retrieve the api
❯ awslocal apigateway get-rest-apis

{
    "items": [
        {
            "id": "pgvkwbu238",
            "name": "first-api-test",
            "createdDate": 1748215219.0,
            "apiKeySource": "HEADER",
            "endpointConfiguration": {
                "types": [
                    "EDGE"
                ]
            },
            "disableExecuteApiEndpoint": false,
            "rootResourceId": "imbynwu6qd"
        }
    ]
}
获取 root resource id,也就是
/的 id❯ PARENT_ID=$(awslocal apigateway get-resources \ --rest-api-id $API_ID \ --query 'items[?path==`/`].id' --output text) echo "ROOT_ID = $PARENT_ID" ROOT_ID = imbynwu6qd创建新的资源(resource)
❯ RESOURCE_ID=$(awslocal apigateway create-resource \
  --rest-api-id $API_ID \
  --parent-id $PARENT_ID \
  --path-part first-api-test \
  --query 'id' --output text)
echo "RESOURCE_ID = $RESOURCE_ID"
RESOURCE_ID = e3b1j0zyih
在新的资源下创建一个 GET 方法
# for aws ver2, using authorization-type
# for aws ver1, should be using autorization
❯ awslocal apigateway put-method \
  --rest-api-id $API_ID \
  --resource-id $RESOURCE_ID \
  --http-method GET \
  --authorization-type NONE
{
    "httpMethod": "GET",
    "authorizationType": "NONE",
    "apiKeyRequired": false
}
mock 实现
这一步是很重要的,因为这个方法并没有绑定 lambda 或者是任何服务,所以需要 mock 一个服务
也就是说,当抵达这个 method 的时候,API Gateway 会返回一个 dummy 数据,让下一步操作可以正常进行
❯ awslocal apigateway put-integration \
  --rest-api-id $API_ID \
  --resource-id $RESOURCE_ID \
  --http-method GET \
  --type MOCK \
  --request-templates '{"application/json":"{\"statusCode\": 200}"}' \
  --integration-http-method GET

{
    "type": "MOCK",
    "requestTemplates": {
        "application/json": "{\"statusCode\": 200}"
    },
    "passthroughBehavior": "WHEN_NO_MATCH",
    "timeoutInMillis": 29000,
    "cacheNamespace": "e3b1j0zyih",
    "cacheKeyParameters": []
}
设置 integration response
也就是设定返回数据
❯ awslocal apigateway put-integration-response \
  --rest-api-id $API_ID \
  --resource-id $RESOURCE_ID \
  --http-method GET \
  --status-code 200 \
  --response-templates '{
    "application/json": "{\n  \"message\": \"Hello from first-api-test! This API was successfully created.\"\n}"
  }'
{
    "statusCode": "200",
    "responseTemplates": {
        "application/json": "{\n  \"message\": \"Hello from first-api-test! This API was successfully created.\"\n}"
    }
}
设置 method response
这里主要设定的是 model 和返回的 status code
具体的周期会在后面细说,但是这个实现确实有点反直觉
❯ awslocal apigateway put-method-response \
  --rest-api-id $API_ID \
  --resource-id $RESOURCE_ID \
  --http-method GET \
  --status-code 200 \
  --response-models '{"application/json": "Empty"}'

{
    "statusCode": "200",
    "responseModels": {
        "application/json": "Empty"
    }
}
部署到
devstage这一步也会创建一个新的 stage
❯ awslocal apigateway create-deployment \
  --rest-api-id $API_ID \
  --stage-name dev

{
    "id": "e0ypqaj7kw",
    "createdDate": 1748217426.0
}
验证
local stack 不会启用任何的 custom domain,所以只能通过这个固定的 URL 访问
❯ curl http://localhost:4566/restapis/$API_ID/dev/_user_request_/first-api-test
{
  "message": "Hello from first-api-test! This API was successfully created."
}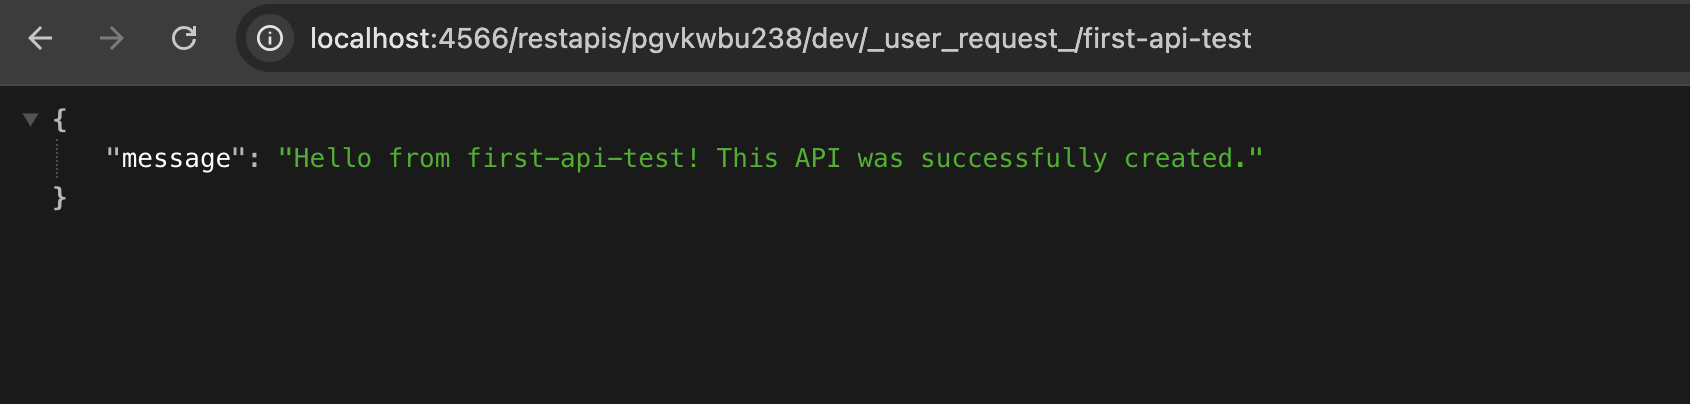
创建一个 API Keys 和 usage plan
🔍 在 LocalStack 中,即使设置了 apiKeyRequired: true 并配置 Usage Plan,使用 MOCK integration 时可能还是没办法触发 API Key 校验机制。之后有机会换到 HTTP 或 AWS_PROXY integration 去试试看
其实最好有机会的话,在 AWS 实际环境中验证效果应该是最好的,但是那个 cost 啊……
Anywa,下面也是按照步骤熟悉一下创建 API Key 和 Usage Plan
创建一个新的 API Key
❯ awslocal apigateway create-api-key \
  --name "test-key" \
  --enabled \
  --description "Key for external access"
{
    "id": "3bqhpkxiy4",
    "value": "DCA6GNt8S5pLkbelM1rYUFXInVHczfmZxjJOKTPB",
    "name": "test-key",
    "description": "Key for external access",
    "enabled": true,
    "createdDate": 1748222725.0,
    "lastUpdatedDate": 1748222725.0,
    "stageKeys": []
}
创建一个新的 Usage Plan
这里我踩过一个雷,想要先创建 Usage Plan,再绑定到对应的 API Stage,不过最后失败了
找了一下资料,大概是说 API Stage 必须要在 Usage Plan 创建的时候就进行绑定,不知道 UI 操作是怎么样的……可能设置默认值……?
❯ awslocal apigateway create-usage-plan \
  --name "correct-usage-plan" \
  --api-stages apiId=$API_ID,stage=dev \
  --throttle burstLimit=10,rateLimit=5 \
  --quota limit=100,period=DAY
{
    "id": "yjxybm75wk",
    "name": "correct-usage-plan",
    "apiStages": [
        {
            "apiId": "pgvkwbu238",
            "stage": "dev"
        }
    ],
    "throttle": {
        "burstLimit": 10,
        "rateLimit": 5.0
    },
    "quota": {
        "limit": 100,
        "offset": 0,
        "period": "DAY"
    }
}
将 Usage Plan 和 API Key 进行绑定
我这里没有设置 variable,就用了明文,将就着看吧
❯ awslocal apigateway create-usage-plan-key \
  --usage-plan-id yjxybm75wk \
  --key-id 3bqhpkxiy4 \
  --key-type "API_KEY"
{
    "id": "3bqhpkxiy4",
    "type": "API_KEY",
    "value": "DCA6GNt8S5pLkbelM1rYUFXInVHczfmZxjJOKTPB",
    "name": "test-key"
}

# verify
❯ awslocal apigateway get-usage-plans

{
    "items": [
        {
            "id": "yjxybm75wk",
            "name": "correct-usage-plan",
            "apiStages": [
                {
                    "apiId": "pgvkwbu238",
                    "stage": "dev"
                }
            ],
            "throttle": {
                "burstLimit": 10,
                "rateLimit": 5.0
            },
            "quota": {
                "limit": 100,
                "offset": 0,
                "period": "DAY"
            }
        }
    ]
}
这里的配置表明设定是完成了,毕竟 stage,apiId 都绑定了,不过本地没办法验证
request-response 生命周期
简单来说,生命周期是这样的:
Client Request
    ↓
Method Request
    ↓
Integration Request
    ↓
Backend (Lambda / HTTP / Mock)
    ↓
Integration Response
    ↓
Method Response
    ↓
Client
这也是上面步骤为什么要先创建 integration request( put-integration ),再到 Integration Response( put-integration-response) 的关系,需要跟着这个生命周期去走
它们具体负责的功能为:
- Method Request
- Purpose: 预处理 client end 发送到后端的请求
- Configurable:
- Authorization (e.g., Cognito, Lambda authorizer)
- Request validation (query params, headers, body schema/request body, which can be associated with the models designed under current resource)
- API key enforcement (就是上面配置的 API Key,这里可以检查是否存在)
- Request models
- 在这一步,请求是可以被 blocked 的
- 这里同样会出现 ARN (Amazon Resource Name)
这是对每个方法都是不一样的,也是一个 unique identifier,可以用在 IAM 中去控制对应 API 方法的访问/操作权限
- Integration Request
- Purpose: 将从 API Gateway 接受的请求,转化成后端接受的数据
- Configurable:
- Mapping templates (from method request to backend format)
- Headers, query string, path parameters
- Choose integration type: HTTP / AWS Lambda / MOCK / VPC Link
我个人觉得这一步有点像是 Model → Model DTO 的转换……不是百分百的准确,做个类比
- Integration Response
- Purpose: 将后端传送的数据,转化成客户端所需要的格式
- Configurable:
- Mapping templates to reshape backend response (JSON → user-friendly)
- Status code mapping (e.g., 200/400/500)
- Mapping the response headers set in the Method Response
- Catch backend errors and normalize response
这里就是我觉得像 Model DTO → Model 的转化过程,当然,这里处理的更多一些,也包含对报错的处理
UI 方面的操作是这样的,Status Code Mapping 必须要保证 Method Response 中要出现对应的 status code……从我个人的角度来说有些反直觉,大体来说,也最好是先吧 Method Response 配置完再配置这个部分吧
- Method Response
- Purpose: 显示最终会传给客户端的数据
- Configurable:
- Status codes (200, 400, 500, etc.)
- Response headers
- Response models (optional schema enforcement)
这一步也是可以进行 models/schema 的检查的,就像是 Method Request 做的那样