Cilium动手实验室: 精通之旅---4.Cilium Gateway API - Lab
1. 环境准备
Lab环境访问
https://isovalent.com/labs/gateway-api/
本套环境1 control 2个worker
cilium install --version v1.17.1 \
  --namespace kube-system \
  --set kubeProxyReplacement=true \
  --set gatewayAPI.enabled=true
确认环境状态
root@server:~# kubectl get crd \
  gatewayclasses.gateway.networking.k8s.io \
  gateways.gateway.networking.k8s.io \
  httproutes.gateway.networking.k8s.io \
  referencegrants.gateway.networking.k8s.io \
  tlsroutes.gateway.networking.k8s.io
NAME                                        CREATED AT
gatewayclasses.gateway.networking.k8s.io    2025-05-27T23:51:41Z
gateways.gateway.networking.k8s.io          2025-05-27T23:51:41Z
httproutes.gateway.networking.k8s.io        2025-05-27T23:51:41Z
referencegrants.gateway.networking.k8s.io   2025-05-27T23:51:42Z
tlsroutes.gateway.networking.k8s.io         2025-05-27T23:51:42Z
root@server:~# cilium status --wait
    /¯¯\
 /¯¯\__/¯¯\    Cilium:             OK
 \__/¯¯\__/    Operator:           OK
 /¯¯\__/¯¯\    Envoy DaemonSet:    OK
 \__/¯¯\__/    Hubble Relay:       disabled
    \__/       ClusterMesh:        disabled

DaemonSet              cilium                   Desired: 3, Ready: 3/3, Available: 3/3
DaemonSet              cilium-envoy             Desired: 3, Ready: 3/3, Available: 3/3
Deployment             cilium-operator          Desired: 1, Ready: 1/1, Available: 1/1
Containers:            cilium                   Running: 3
                       cilium-envoy             Running: 3
                       cilium-operator          Running: 1
                       clustermesh-apiserver
                       hubble-relay
Cluster Pods:          3/3 managed by Cilium
Helm chart version:    1.17.1
Image versions         cilium             quay.io/cilium/cilium:v1.17.1@sha256:8969bfd9c87cbea91e40665f8ebe327268c99d844ca26d7d12165de07f702866: 3
                       cilium-envoy       quay.io/cilium/cilium-envoy:v1.31.5-1739264036-958bef243c6c66fcfd73ca319f2eb49fff1eb2ae@sha256:fc708bd36973d306412b2e50c924cd8333de67e0167802c9b48506f9d772f521: 3
                       cilium-operator    quay.io/cilium/operator-generic:v1.17.1@sha256:628becaeb3e4742a1c36c4897721092375891b58bae2bfcae48bbf4420aaee97: 1
root@server:~# k get nodes
NAME                 STATUS   ROLES           AGE    VERSION
kind-control-plane   Ready    control-plane   3h2m   v1.31.0
kind-worker          Ready    <none>          3h1m   v1.31.0
kind-worker2         Ready    <none>          3h1m   v1.31.0
root@server:~# cilium config view | grep -w "enable-gateway-api"
enable-gateway-api                                true
enable-gateway-api-alpn                           false
enable-gateway-api-app-protocol                   false
enable-gateway-api-proxy-protocol                 false
enable-gateway-api-secrets-sync                   true
验证一下 GatewayClass 是否已部署并接受:
root@server:~# kubectl get GatewayClass
NAME     CONTROLLER                     ACCEPTED   AGE
cilium   io.cilium/gateway-controller   True       4m59s
GatewayClass 是一种可以部署的 Gateway:换句话说,它是一个模板。这样做是为了让基础设施提供商提供不同类型的网关。然后,用户可以选择他们喜欢的 Gateway。
例如,基础设施提供商可以创建两个名为 internet 和 private 的 GatewayClass,以反映定义面向 Internet 与私有内部应用程序的 Gateway。
在我们的例子中,Cilium Gateway API (io.cilium/gateway-controller) 将被实例化。
下面的架构表示网关 API 使用的各种组件。使用 Ingress 时,所有功能都在一个 API 中定义。通过将入口路由要求解构为多个 API,用户可以从更通用、更灵活和面向角色的模型中受益。
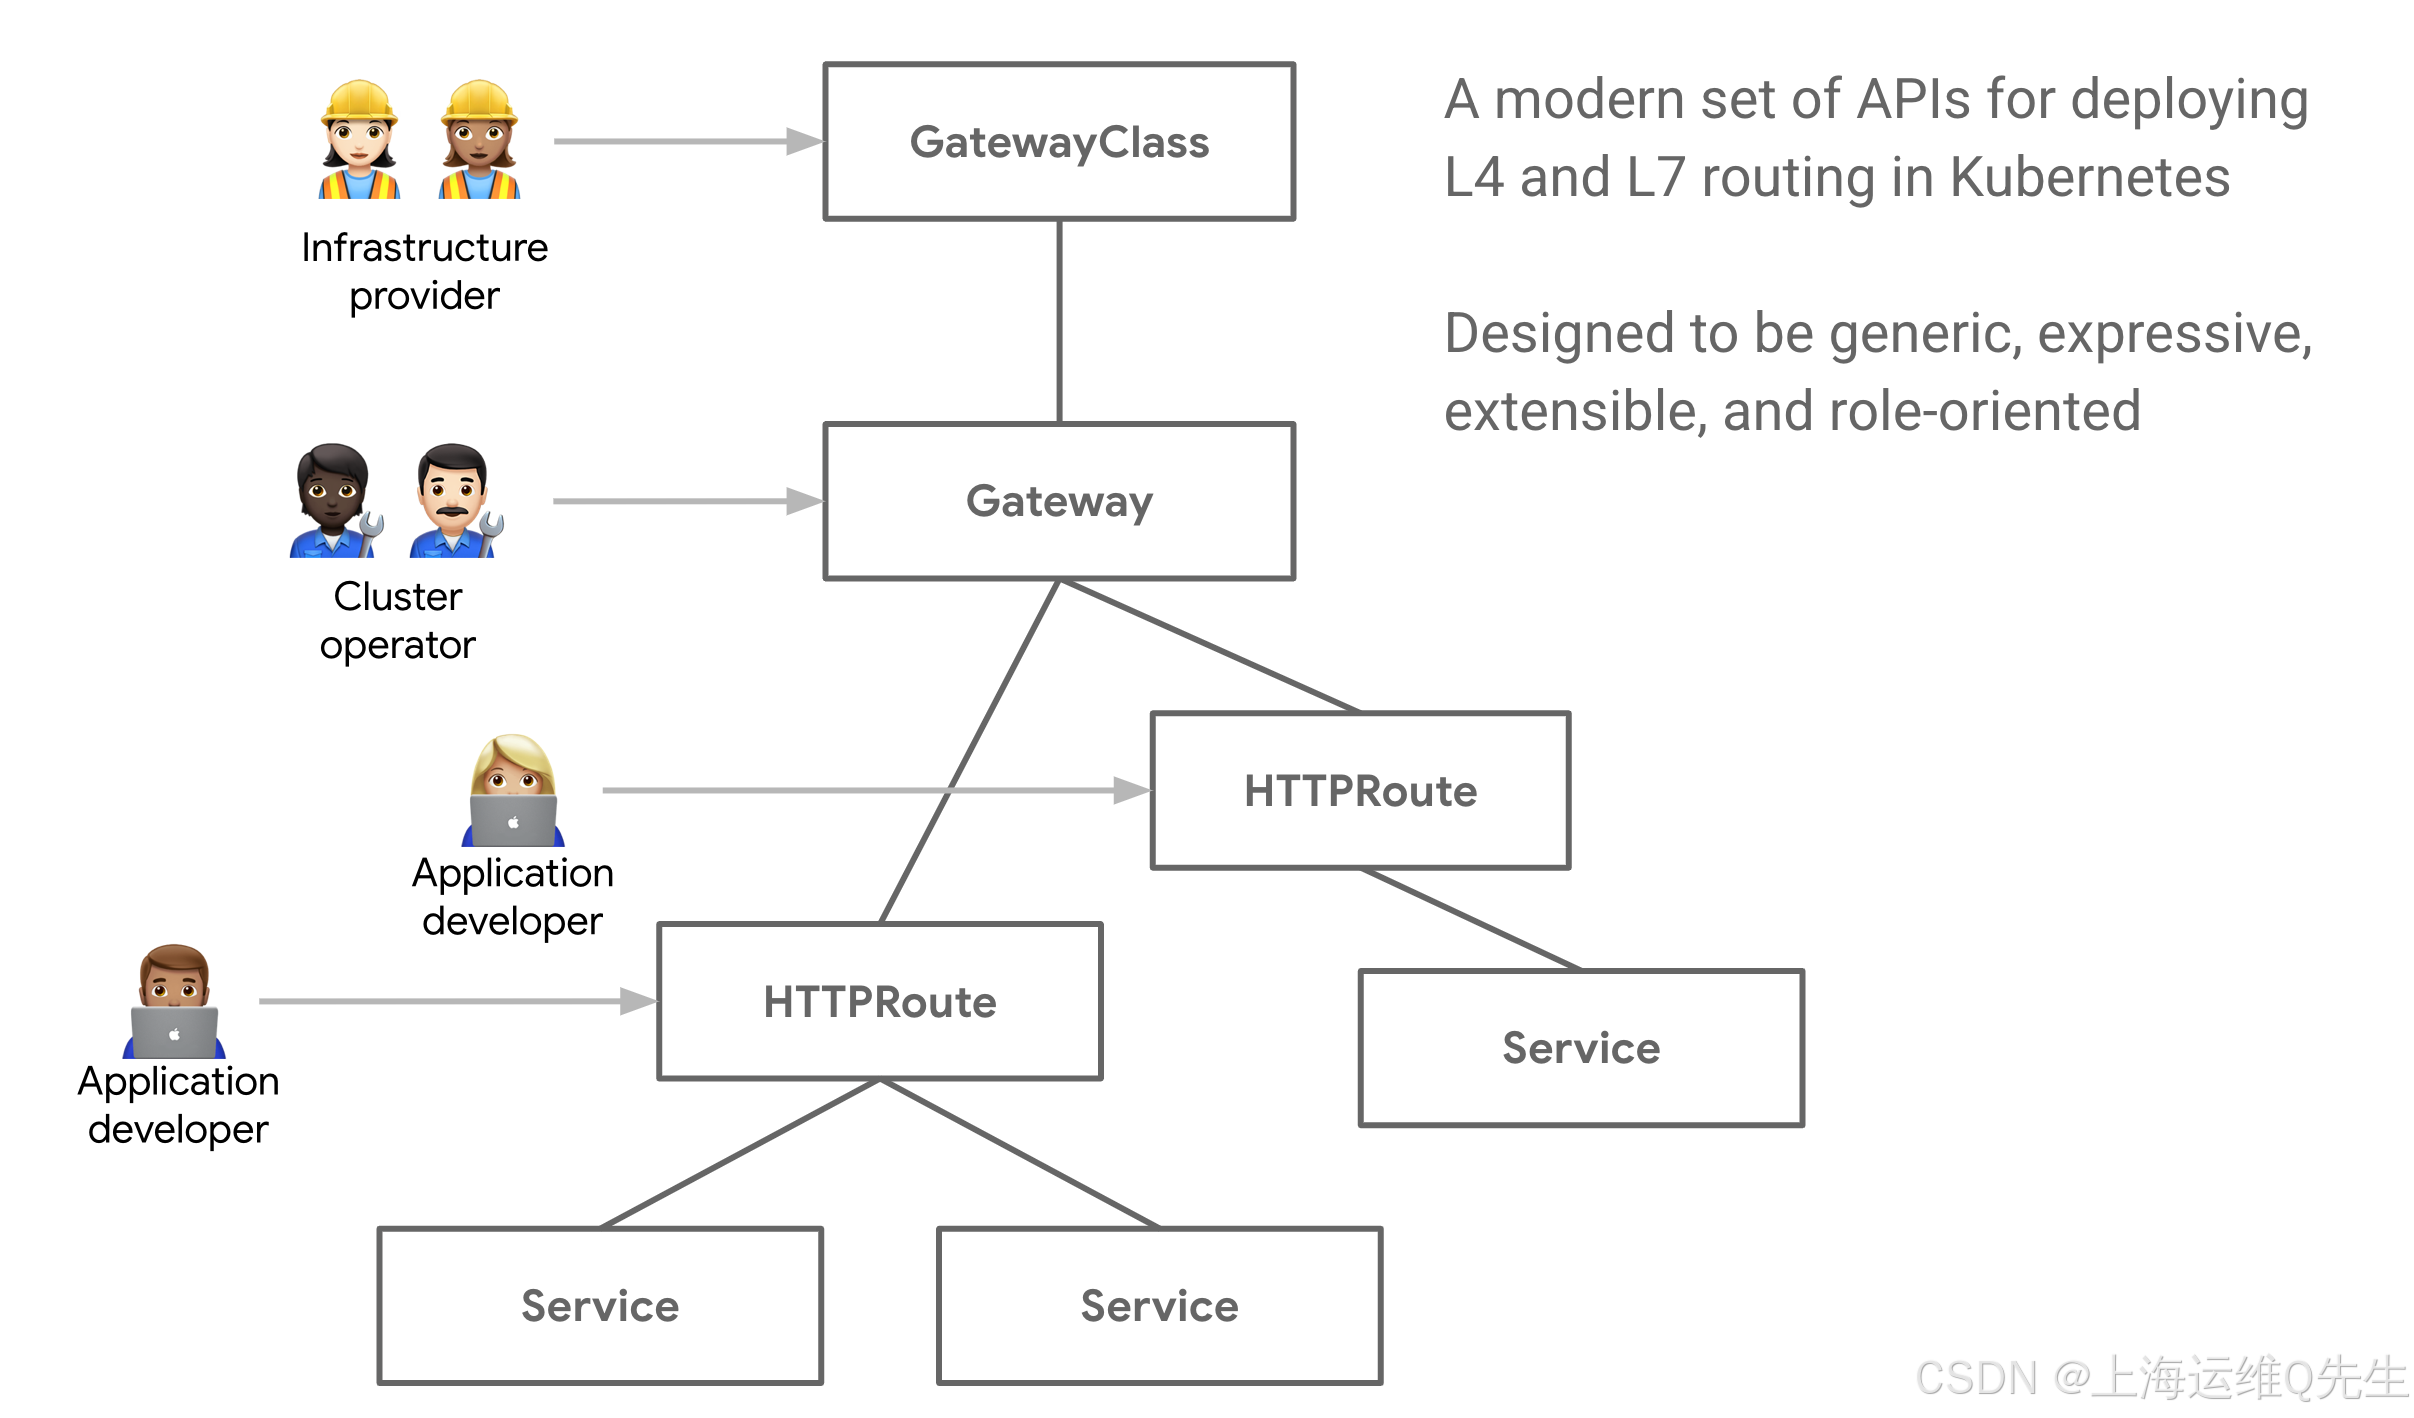
实际的 L7 流量规则在 HTTPRoute API 中定义。
2. API 网关–HTTP
2.1 部署应用
这个项目也是老演员了,Istio的Bookinfo.
- 🔍
details - ⭐
ratings - ✍
reviews - 📕
productpage
使用其中一些服务作为 Gateway API 的基础。
项目的内容
root@server:~# yq /opt/bookinfo.yml
# Copyright Istio Authors
#
#   Licensed under the Apache License, Version 2.0 (the "License");
#   you may not use this file except in compliance with the License.
#   You may obtain a copy of the License at
#
#       http://www.apache.org/licenses/LICENSE-2.0
#
#   Unless required by applicable law or agreed to in writing, software
#   distributed under the License is distributed on an "AS IS" BASIS,
#   WITHOUT WARRANTIES OR CONDITIONS OF ANY KIND, either express or implied.
#   See the License for the specific language governing permissions and
#   limitations under the License.

##################################################################################################
# This file defines the services, service accounts, and deployments for the Bookinfo sample.
#
# To apply all 4 Bookinfo services, their corresponding service accounts, and deployments:
#
#   kubectl apply -f samples/bookinfo/platform/kube/bookinfo.yaml
#
# Alternatively, you can deploy any resource separately:
#
#   kubectl apply -f samples/bookinfo/platform/kube/bookinfo.yaml -l service=reviews # reviews Service
#   kubectl apply -f samples/bookinfo/platform/kube/bookinfo.yaml -l account=reviews # reviews ServiceAccount
#   kubectl apply -f samples/bookinfo/platform/kube/bookinfo.yaml -l app=reviews,version=v3 # reviews-v3 Deployment
##################################################################################################

##################################################################################################
# Details service
##################################################################################################
apiVersion: v1
kind: Service
metadata:
  name: details
  labels:
    app: details
    service: details
spec:
  ports:
    - port: 9080
      name: http
  selector:
    app: details
---
apiVersion: v1
kind: ServiceAccount
metadata:
  name: bookinfo-details
  labels:
    account: details
---
apiVersion: apps/v1
kind: Deployment
metadata:
  name: details-v1
  labels:
    app: details
    version: v1
spec:
  replicas: 1
  selector:
    matchLabels:
      app: details
      version: v1
  template:
    metadata:
      labels:
        app: details
        version: v1
    spec:
      serviceAccountName: bookinfo-details
      containers:
        - name: details
          image: docker.io/istio/examples-bookinfo-details-v1:1.16.2
          imagePullPolicy: IfNotPresent
          ports:
            - containerPort: 9080
          securityContext:
            runAsUser: 1000
---
##################################################################################################
# Ratings service
##################################################################################################
apiVersion: v1
kind: Service
metadata:
  name: ratings
  labels:
    app: ratings
    service: ratings
spec:
  ports:
    - port: 9080
      name: http
  selector:
    app: ratings
---
apiVersion: v1
kind: ServiceAccount
metadata:
  name: bookinfo-ratings
  labels:
    account: ratings
---
apiVersion: apps/v1
kind: Deployment
metadata:
  name: ratings-v1
  labels:
    app: ratings
    version: v1
spec:
  replicas: 1
  selector:
    matchLabels:
      app: ratings
      version: v1
  template:
    metadata:
      labels:
        app: ratings
        version: v1
    spec:
      serviceAccountName: bookinfo-ratings
      containers:
        - name: ratings
          image: docker.io/istio/examples-bookinfo-ratings-v1:1.16.2
          imagePullPolicy: IfNotPresent
          ports:
            - containerPort: 9080
          securityContext:
            runAsUser: 1000
---
##################################################################################################
# Reviews service
##################################################################################################
apiVersion: v1
kind: Service
metadata:
  name: reviews
  labels:
    app: reviews
    service: reviews
spec:
  ports:
    - port: 9080
      name: http
  selector:
    app: reviews
---
apiVersion: v1
kind: ServiceAccount
metadata:
  name: bookinfo-reviews
  labels:
    account: reviews
---
apiVersion: apps/v1
kind: Deployment
metadata:
  name: reviews-v1
  labels:
    app: reviews
    version: v1
spec:
  replicas: 1
  selector:
    matchLabels:
      app: reviews
      version: v1
  template:
    metadata:
      labels:
        app: reviews
        version: v1
    spec:
      serviceAccountName: bookinfo-reviews
      containers:
        - name: reviews
          image: docker.io/istio/examples-bookinfo-reviews-v1:1.16.2
          imagePullPolicy: IfNotPresent
          env:
            - name: LOG_DIR
              value: "/tmp/logs"
          ports:
            - containerPort: 9080
          volumeMounts:
            - name: tmp
              mountPath: /tmp
            - name: wlp-output
              mountPath: /opt/ibm/wlp/output
          securityContext:
            runAsUser: 1000
      volumes:
        - name: wlp-output
          emptyDir: {}
        - name: tmp
          emptyDir: {}
---
apiVersion: apps/v1
kind: Deployment
metadata:
  name: reviews-v2
  labels:
    app: reviews
    version: v2
spec:
  replicas: 1
  selector:
    matchLabels:
      app: reviews
      version: v2
  template:
    metadata:
      labels:
        app: reviews
        version: v2
    spec:
      serviceAccountName: bookinfo-reviews
      containers:
        - name: reviews
          image: docker.io/istio/examples-bookinfo-reviews-v2:1.16.2
          imagePullPolicy: IfNotPresent
          env:
            - name: LOG_DIR
              value: "/tmp/logs"
          ports:
            - containerPort: 9080
          volumeMounts:
            - name: tmp
              mountPath: /tmp
            - name: wlp-output
              mountPath: /opt/ibm/wlp/output
          securityContext:
            runAsUser: 1000
      volumes:
        - name: wlp-output
          emptyDir: {}
        - name: tmp
          emptyDir: {}
---
apiVersion: apps/v1
kind: Deployment
metadata:
  name: reviews-v3
  labels:
    app: reviews
    version: v3
spec:
  replicas: 1
  selector:
    matchLabels:
      app: reviews
      version: v3
  template:
    metadata:
      labels:
        app: reviews
        version: v3
    spec:
      serviceAccountName: bookinfo-reviews
      containers:
        - name: reviews
          image: docker.io/istio/examples-bookinfo-reviews-v3:1.16.2
          imagePullPolicy: IfNotPresent
          env:
            - name: LOG_DIR
              value: "/tmp/logs"
          ports:
            - containerPort: 9080
          volumeMounts:
            - name: tmp
              mountPath: /tmp
            - name: wlp-output
              mountPath: /opt/ibm/wlp/output
          securityContext:
            runAsUser: 1000
      volumes:
        - name: wlp-output
          emptyDir: {}
        - name: tmp
          emptyDir: {}
---
##################################################################################################
# Productpage services
##################################################################################################
apiVersion: v1
kind: Service
metadata:
  name: productpage
  labels:
    app: productpage
    service: productpage
spec:
  ports:
    - port: 9080
      name: http
  selector:
    app: productpage
---
apiVersion: v1
kind: ServiceAccount
metadata:
  name: bookinfo-productpage
  labels:
    account: productpage
---
apiVersion: apps/v1
kind: Deployment
metadata:
  name: productpage-v1
  labels:
    app: productpage
    version: v1
spec:
  replicas: 1
  selector:
    matchLabels:
      app: productpage
      version: v1
  template:
    metadata:
      labels:
        app: productpage
        version: v1
    spec:
      serviceAccountName: bookinfo-productpage
      containers:
        - name: productpage
          image: docker.io/istio/examples-bookinfo-productpage-v1:1.16.2
          imagePullPolicy: IfNotPresent
          ports:
            - containerPort: 9080
          volumeMounts:
            - name: tmp
              mountPath: /tmp
          securityContext:
            runAsUser: 1000
      volumes:
        - name: tmp
          emptyDir: {}
---
部署应用
kubectl apply -f /opt/bookinfo.yml
检查应用程序是否已正确部署:
root@server:~# kubectl apply -f /opt/bookinfo.yml
service/details created
serviceaccount/bookinfo-details created
deployment.apps/details-v1 created
service/ratings created
serviceaccount/bookinfo-ratings created
deployment.apps/ratings-v1 created
service/reviews created
serviceaccount/bookinfo-reviews created
deployment.apps/reviews-v1 created
deployment.apps/reviews-v2 created
deployment.apps/reviews-v3 created
service/productpage created
serviceaccount/bookinfo-productpage created
deployment.apps/productpage-v1 created
root@server:~# kubectl get pods
NAME                              READY   STATUS    RESTARTS   AGE
details-v1-67894999b5-hswsw       1/1     Running   0          51s
productpage-v1-7bd5bd857c-shr9z   1/1     Running   0          51s
ratings-v1-676ff5568f-w467l       1/1     Running   0          51s
reviews-v1-f5b4b64f-sjk2s         1/1     Running   0          51s
reviews-v2-74b7dd9f45-rk2n6       1/1     Running   0          51s
reviews-v3-65d744df5c-zqljm       1/1     Running   0          51s
root@server:~# kubectl get svc
NAME          TYPE        CLUSTER-IP      EXTERNAL-IP   PORT(S)    AGE
details       ClusterIP   10.96.188.110   <none>        9080/TCP   93s
kubernetes    ClusterIP   10.96.0.1       <none>        443/TCP    3h10m
productpage   ClusterIP   10.96.173.43    <none>        9080/TCP   93s
ratings       ClusterIP   10.96.118.245   <none>        9080/TCP   93s
reviews       ClusterIP   10.96.33.54     <none>        9080/TCP   93s
请注意,使用 Cilium Service Mesh 时,没有在每个演示应用程序微服务旁边创建 Envoy sidecar。使用 sidecar 实现,输出将显示 2/2 READY: 一个用于微服务,一个用于 Envoy sidecar。
2.2 部署网关
配置文件
root@server:~# yq basic-http.yaml
---
apiVersion: gateway.networking.k8s.io/v1beta1
kind: Gateway
metadata:
  name: my-gateway
spec:
  gatewayClassName: cilium
  listeners:
    - protocol: HTTP
      port: 80
      name: web-gw
      allowedRoutes:
        namespaces:
          from: Same
---
apiVersion: gateway.networking.k8s.io/v1beta1
kind: HTTPRoute
metadata:
  name: http-app-1
spec:
  parentRefs:
    - name: my-gateway
      namespace: default
  rules:
    - matches:
        - path:
            type: PathPrefix
            value: /details
      backendRefs:
        - name: details
          port: 9080
    - matches:
        - headers:
            - type: Exact
              name: magic
              value: foo
          queryParams:
            - type: Exact
              name: great
              value: example
          path:
            type: PathPrefix
            value: /
          method: GET
      backendRefs:
        - name: productpage
          port: 9080
部署网关
root@server:~# kubectl apply -f basic-http.yaml
gateway.gateway.networking.k8s.io/my-gateway created
httproute.gateway.networking.k8s.io/http-app-1 created
网关使用的配置:
spec:
  gatewayClassName: cilium
  listeners:
  - protocol: HTTP
    port: 80
    name: web-gw
    allowedRoutes:
      namespaces:
        from: Same
首先,请注意 Gateway 部分中的 gatewayClassName 字段使用值 cilium。这是指之前配置的 Cilium GatewayClass。
网关将在端口 80 上侦听南向进入集群的 HTTP 流量。allowedRoutes 用于指定 Route 可以附加到此 Gateway 的命名空间。Same 表示此 Gateway 只能使用同一命名空间中的路由。
请注意,如果我们要使用 All 而不是 Same,我们将允许此网关与任何命名空间中的路由相关联,并且它将使我们能够跨多个命名空间使用单个网关,这些命名空间可能由不同的团队管理。
我们可以在 HTTPRoutes 中指定不同的命名空间 。
现在,让我们回顾一下 HTTPRoute 清单。HTTPRoute 是一种 GatewayAPI 类型,用于指定从网关侦听器到 Kubernetes 服务的 HTTP 请求的路由行为。
它由 Rules 组成,可根据您的要求引导流量。
第一条规则本质上是一个简单的 L7 代理路由:对于路径以 /details 开头的 HTTP 流量,通过端口 9080 将流量转发到 details Service。
  rules:
  - matches:
    - path:
        type: PathPrefix
        value: /details
    backendRefs:
    - name: details
      port: 9080
第二条规则类似,但它利用了不同的匹配标准。如果 HTTP 请求具有:
- 名称设置为
magic且值为foo的 HTTP 标头 - HTTP 方法是 “GET”
- HTTP 查询参数命名为
great,值为example,则流量将通过 9080 端口发送到productpage服务。
 rules:
  - matches:
   - headers:
      - type: Exact
        name: magic
        value: foo
      queryParams:
      - type: Exact
        name: great
        value: example
      path:
        type: PathPrefix
        value: /
      method: GET
    backendRefs:
    - name: productpage
      port: 9080
如您所见,您可以部署一致的复杂 L7 流量规则(使用 Ingress API,通常需要注释来实现此类路由目标,并且这会造成一个 Ingress 控制器与另一个 Ingress 控制器之间的不一致)。
这些新 API 的好处之一是 Gateway API 基本上被拆分为单独的功能 – 一个用于描述 Gateway,另一个用于到后端服务的路由。通过拆分这两个功能,它使运营商能够更改和交换网关,但保持相同的路由配置。
换句话说:如果您决定要改用其他 Gateway API 控制器,您将能够重复使用相同的清单。
现在,我们再看一下 Services,因为 Gateway 已经部署了:
root@server:~# kubectl get svc
NAME                        TYPE           CLUSTER-IP      EXTERNAL-IP      PORT(S)        AGE
cilium-gateway-my-gateway   LoadBalancer   10.96.212.15    172.18.255.200   80:30157/TCP   3m2s
details                     ClusterIP      10.96.188.110   <none>           9080/TCP       7m4s
kubernetes                  ClusterIP      10.96.0.1       <none>           443/TCP        3h15m
productpage                 ClusterIP      10.96.173.43    <none>           9080/TCP       7m4s
ratings                     ClusterIP      10.96.118.245   <none>           9080/TCP       7m4s
reviews                     ClusterIP      10.96.33.54     <none>           9080/TCP       7m4s
您将看到一个名为 cilium-gateway-my-gateway 的 LoadBalancer 服务 它是为 Gateway API 创建的。
相同的外部 IP 地址也与网关关联:
root@server:~# kubectl get gateway
NAME         CLASS    ADDRESS          PROGRAMMED   AGE
my-gateway   cilium   172.18.255.200   True         3m22s
让我们检索此 IP 地址:
GATEWAY=$(kubectl get gateway my-gateway -o jsonpath='{.status.addresses[0].value}')
echo $GATEWAY
2.3 HTTP路径匹配
现在,我们来检查基于 URL 路径的流量是否由 Gateway API 代理。
检查是否可以向该外部地址发出 HTTP 请求:
root@server:~# curl --fail -s http://$GATEWAY/details/1 | jq
{
  "id": 1,
  "author": "William Shakespeare",
  "year": 1595,
  "type": "paperback",
  "pages": 200,
  "publisher": "PublisherA",
  "language": "English",
  "ISBN-10": "1234567890",
  "ISBN-13": "123-1234567890"
}
由于路径以 /details 开头,因此此流量将与第一条规则匹配,并将通过端口 9080 代理到 details Service。
2.4 HTTP头匹配
这一次,我们将根据 HTTP 参数(如标头值、方法和查询参数)路由流量。运行以下命令:
root@server:~# curl -v -H 'magic: foo' "http://$GATEWAY?great=example"
*   Trying 172.18.255.200:80...
* Connected to 172.18.255.200 (172.18.255.200) port 80
> GET /?great=example HTTP/1.1
> Host: 172.18.255.200
> User-Agent: curl/8.5.0
> Accept: */*
> magic: foo
>
< HTTP/1.1 200 OK
< content-type: text/html; charset=utf-8
< content-length: 1683
< server: envoy
< date: Wed, 28 May 2025 00:11:15 GMT
< x-envoy-upstream-service-time: 9
<
<!DOCTYPE html>
<html>
  <head>
    <title>Simple Bookstore App</title>
<meta charset="utf-8">
<meta http-equiv="X-UA-Compatible" content="IE=edge">
<meta name="viewport" content="width=device-width, initial-scale=1">

<!-- Latest compiled and minified CSS -->
<link rel="stylesheet" href="static/bootstrap/css/bootstrap.min.css">

<!-- Optional theme -->
<link rel="stylesheet" href="static/bootstrap/css/bootstrap-theme.min.css">

  </head>
  <body>


<p>
    <h3>Hello! This is a simple bookstore application consisting of three services as shown below</h3>
</p>

<table class="table table-condensed table-bordered table-hover"><tr><th>name</th><td>http://details:9080</td></tr><tr><th>endpoint</th><td>details</td></tr><tr><th>children</th><td><table class="table table-condensed table-bordered table-hover"><tr><th>name</th><th>endpoint</th><th>children</th></tr><tr><td>http://details:9080</td><td>details</td><td></td></tr><tr><td>http://reviews:9080</td><td>reviews</td><td><table class="table table-condensed table-bordered table-hover"><tr><th>name</th><th>endpoint</th><th>children</th></tr><tr><td>http://ratings:9080</td><td>ratings</td><td></td></tr></table></td></tr></table></td></tr></table>

<p>
    <h4>Click on one of the links below to auto generate a request to the backend as a real user or a tester
    </h4>
</p>
<p><a href="/productpage?u=normal">Normal user</a></p>
<p><a href="/productpage?u=test">Test user</a></p>


<!-- Latest compiled and minified JavaScript -->
<script src="static/jquery.min.js"></script>

<!-- Latest compiled and minified JavaScript -->
<script src="static/bootstrap/js/bootstrap.min.js"></script>

  </body>
</html>
* Connection #0 to host 172.18.255.200 left intact
curl 查询应成功,并返回成功的 200 代码和详细的 HTML 回复(注意 Hello! This is a simple bookstore application consisting of three services as shown below )
3. API网关–HTTPS
3.1 创建TLS证书和私钥
在此任务中,我们将使用 Gateway API 进行 HTTPS 流量路由;因此,我们需要一个 TLS 证书进行数据加密。
出于演示目的,我们将使用由虚构的自签名证书颁发机构 (CA) 签名的 TLS 证书。一种简单的方法是使用 mkcert
创建一个证书来验证 bookinfo.cilium.rocks 和 hipstershop.cilium.rocks,因为这些是此网关示例中使用的主机名:
root@server:~# mkcert '*.cilium.rocks'
Created a new local CA 💥
Note: the local CA is not installed in the system trust store.
Run "mkcert -install" for certificates to be trusted automatically ⚠️

Created a new certificate valid for the following names 📜
 - "*.cilium.rocks"

Reminder: X.509 wildcards only go one level deep, so this won't match a.b.cilium.rocks ℹ️

The certificate is at "./_wildcard.cilium.rocks.pem" and the key at "./_wildcard.cilium.rocks-key.pem" ✅

It will expire on 28 August 2027 🗓
Mkcert 创建了一个密钥 ( _wildcard.cilium.rocks-key.pem ) 和一个证书 (_wildcard.cilium.rocks.pem),我们将用于 Gateway 服务。
使用此密钥和证书创建 Kubernetes TLS 密钥:
root@server:~# kubectl create secret tls demo-cert \
  --key=_wildcard.cilium.rocks-key.pem \
  --cert=_wildcard.cilium.rocks.pem
secret/demo-cert created
3.2 部署HTTPS网关
查看当前目录中提供的 HTTPS Gateway API 示例:
root@server:~# yq basic-https.yaml
apiVersion: gateway.networking.k8s.io/v1beta1
kind: Gateway
metadata:
  name: tls-gateway
spec:
  gatewayClassName: cilium
  listeners:
    - name: https-1
      protocol: HTTPS
      port: 443
      hostname: "bookinfo.cilium.rocks"
      tls:
        certificateRefs:
          - kind: Secret
            name: demo-cert
    - name: https-2
      protocol: HTTPS
      port: 443
      hostname: "hipstershop.cilium.rocks"
      tls:
        certificateRefs:
          - kind: Secret
            name: demo-cert
---
apiVersion: gateway.networking.k8s.io/v1beta1
kind: HTTPRoute
metadata:
  name: https-app-route-1
spec:
  parentRefs:
    - name: tls-gateway
  hostnames:
    - "bookinfo.cilium.rocks"
  rules:
    - matches:
        - path:
            type: PathPrefix
            value: /details
      backendRefs:
        - name: details
          port: 9080
---
apiVersion: gateway.networking.k8s.io/v1beta1
kind: HTTPRoute
metadata:
  name: https-app-route-2
spec:
  parentRefs:
    - name: tls-gateway
  hostnames:
    - "hipstershop.cilium.rocks"
  rules:
    - matches:
        - path:
            type: PathPrefix
            value: /
      backendRefs:
        - name: productpage
          port: 9080
它与我们之前评论的几乎相同。只需在 Gateway 清单中注意以下内容:
spec:
  gatewayClassName: cilium
  listeners:
  - name: https-1
    protocol: HTTPS
    port: 443
    hostname: "bookinfo.cilium.rocks"
    tls:
      certificateRefs:
      - kind: Secret
        name: demo-cert
以及 HTTPRoute 清单中的以下内容:
spec:
  parentRefs:
  - name: tls-gateway
  hostnames:
  - "bookinfo.cilium.rocks"
HTTPS Gateway API 示例基于 HTTP 示例中所做的作,并为两个 HTTP 路由添加了 TLS 终止:
/details前缀将路由到 HTTP 质询中部署的detailsHTTP 服务/前缀将被路由到 HTTP 挑战赛中部署的productpageHTTP 服务
这些服务将通过 TLS 进行保护,并可通过两个域名访问:
bookinfo.cilium.rockshipstershop.cilium.rocks
在我们的示例中,网关为对 bookinfo.cilium.rocks 和 hipstershop.cilium.rocks 的所有请求提供 demo-cert Secret 资源中定义的 TLS 证书。
现在,让我们将 Gateway 部署到集群:
root@server:~# kubectl apply -f basic-https.yaml
gateway.gateway.networking.k8s.io/tls-gateway created
httproute.gateway.networking.k8s.io/https-app-route-1 created
httproute.gateway.networking.k8s.io/https-app-route-2 created
这将创建一个 LoadBalancer 服务,大约 30 秒后,该服务应填充一个外部 IP 地址。
验证网关是否分配了负载均衡器 IP 地址:
root@server:~# kubectl get gateway tls-gateway
NAME          CLASS    ADDRESS          PROGRAMMED   AGE
tls-gateway   cilium   172.18.255.201   True         49s
root@server:~# GATEWAY=$(kubectl get gateway tls-gateway -o jsonpath='{.status.addresses[0].value}')
echo $GATEWAY
172.18.255.201
3.3 HTTPS请求测试
将 Mkcert CA 安装到您的系统中,以便 cURL 可以信任它:
root@server:~# mkcert -install
The local CA is now installed in the system trust store! ⚡️
现在让我们向 Gateway 发出请求:
root@server:~# curl -s \
  --resolve bookinfo.cilium.rocks:443:${GATEWAY} \
  https://bookinfo.cilium.rocks/details/1 | jq
{
  "id": 1,
  "author": "William Shakespeare",
  "year": 1595,
  "type": "paperback",
  "pages": 200,
  "publisher": "PublisherA",
  "language": "English",
  "ISBN-10": "1234567890",
  "ISBN-13": "123-1234567890"
}
应使用 HTTPS 正确检索数据(因此,正确实现了 TLS 握手)。
4. API网关–TLS 路由
4.1 部署应用
我们将使用 NGINX Web 服务器。查看 NGINX 配置。
root@server:~# cat nginx.conf
events {
}

http {
  log_format main '$remote_addr - $remote_user [$time_local]  $status '
  '"$request" $body_bytes_sent "$http_referer" '
  '"$http_user_agent" "$http_x_forwarded_for"';
  access_log /var/log/nginx/access.log main;
  error_log  /var/log/nginx/error.log;

  server {
    listen 443 ssl;

    root /usr/share/nginx/html;
    index index.html;

    server_name nginx.cilium.rocks;
    ssl_certificate /etc/nginx-server-certs/tls.crt;
    ssl_certificate_key /etc/nginx-server-certs/tls.key;
  }
}
如您所见,它在端口 443 上侦听 SSL 流量。请注意,它指定了之前创建的证书和密钥。
在部署服务器时,我们需要将文件挂载到正确的路径 (/etc/nginx-server-certs)。
NGINX 服务器配置保存在 Kubernetes ConfigMap 中。让我们创建它。
root@server:~# kubectl create configmap nginx-configmap --from-file=nginx.conf=./nginx.conf
configmap/nginx-configmap created
查看 NGINX 服务器 Deployment 和它前面的 Service:
root@server:~# yq tls-service.yaml
---
apiVersion: v1
kind: Service
metadata:
  name: my-nginx
  labels:
    run: my-nginx
spec:
  ports:
    - port: 443
      protocol: TCP
  selector:
    run: my-nginx
---
apiVersion: apps/v1
kind: Deployment
metadata:
  name: my-nginx
spec:
  selector:
    matchLabels:
      run: my-nginx
  replicas: 1
  template:
    metadata:
      labels:
        run: my-nginx
    spec:
      containers:
        - name: my-nginx
          image: nginx
          ports:
            - containerPort: 443
          volumeMounts:
            - name: nginx-index-file
              mountPath: /usr/share/nginx/html/
            - name: nginx-config
              mountPath: /etc/nginx
              readOnly: true
            - name: nginx-server-certs
              mountPath: /etc/nginx-server-certs
              readOnly: true
      volumes:
        - name: nginx-index-file
          configMap:
            name: index-html-configmap
        - name: nginx-config
          configMap:
            name: nginx-configmap
        - name: nginx-server-certs
          secret:
            secretName: demo-cert
如您所见,我们正在部署一个带有 nginx 镜像的容器,挂载多个文件,例如 HTML 索引、NGINX 配置和证书。请注意,我们正在重复使用之前创建的 demo-cert TLS 密钥。
root@server:~# kubectl apply -f tls-service.yaml
service/my-nginx created
deployment.apps/my-nginx created
验证 Service 和 Deployment 已成功部署:
root@server:~# kubectl get svc,deployment my-nginx
NAME               TYPE        CLUSTER-IP     EXTERNAL-IP   PORT(S)   AGE
service/my-nginx   ClusterIP   10.96.76.254   <none>        443/TCP   27s

NAME                       READY   UP-TO-DATE   AVAILABLE   AGE
deployment.apps/my-nginx   1/1     1            1           27s
4.2 部署网关
查看当前目录中提供的 Gateway API 配置文件:
root@server:~# yq tls-gateway.yaml \
   tls-route.yaml
---
apiVersion: gateway.networking.k8s.io/v1beta1
kind: Gateway
metadata:
  name: cilium-tls-gateway
spec:
  gatewayClassName: cilium
  listeners:
    - name: https
      hostname: "nginx.cilium.rocks"
      port: 443
      protocol: TLS
      tls:
        mode: Passthrough
      allowedRoutes:
        namespaces:
          from: All
---
apiVersion: gateway.networking.k8s.io/v1alpha2
kind: TLSRoute
metadata:
  name: nginx
spec:
  parentRefs:
    - name: cilium-tls-gateway
  hostnames:
    - "nginx.cilium.rocks"
  rules:
    - backendRefs:
        - name: my-nginx
          port: 443
它们与我们在前面的任务中回顾的几乎相同。只需注意 Gateway 清单中设置的 Passthrough 模式即可:
spec:
  gatewayClassName: cilium
  listeners:
  - name: https
    hostname: "nginx.cilium.rocks"
    port: 443
    protocol: TLS
    tls:
      mode: Passthrough
    allowedRoutes:
      namespaces:
        from: All
以前,我们使用 HTTPRoute 资源。这一次,我们使用的是 TLSRoute:
apiVersion: gateway.networking.k8s.io/v1beta1
kind: TLSRoute
metadata:
  name: nginx
spec:
  parentRefs:
  - name: cilium-tls-gateway
  hostnames:
  - "nginx.cilium.rocks"
  rules:
  - backendRefs:
    - name: my-nginx
      port: 443
您之前了解了如何在网关上终止 TLS 连接。那是在 Terminate 模式下使用 Gateway API。在本例中,网关处于直通模式:区别在于,流量在客户端和 Pod 之间始终保持加密状态。
在 Terminate 中:
- Client -> Gateway: HTTPS
- Gateway -> Pod: HTTP
在 Passthrough 中:
- Client -> Gateway: HTTPS
- Gateway -> Pod: HTTPS
除了使用 SNI 标头进行路由外,网关实际上不会检查流量。实际上,hostnames 字段定义了一组 SNI 名称,这些名称应与 TLS 握手中 TLS ClientHello 消息的 SNI 属性匹配。
现在,让我们将 Gateway 和 TLSRoute 部署到集群中:
root@server:~# kubectl apply -f tls-gateway.yaml -f tls-route.yaml
gateway.gateway.networking.k8s.io/cilium-tls-gateway created
tlsroute.gateway.networking.k8s.io/nginx created
验证网关是否已分配 LoadBalancer IP 地址:
root@server:~# kubectl get gateway cilium-tls-gateway
NAME                 CLASS    ADDRESS          PROGRAMMED   AGE
cilium-tls-gateway   cilium   172.18.255.202   True         25s
root@server:~# GATEWAY=$(kubectl get gateway cilium-tls-gateway -o jsonpath='{.status.addresses[0].value}')
echo $GATEWAY
172.18.255.202
我们还要仔细检查 TLSRoute 是否已成功预置并已连接到网关。
root@server:~# kubectl get tlsroutes.gateway.networking.k8s.io -o json | jq '.items[0].status.parents[0]'
{
  "conditions": [
    {
      "lastTransitionTime": "2025-05-28T00:30:09Z",
      "message": "Accepted TLSRoute",
      "observedGeneration": 1,
      "reason": "Accepted",
      "status": "True",
      "type": "Accepted"
    },
    {
      "lastTransitionTime": "2025-05-28T00:30:09Z",
      "message": "Service reference is valid",
      "observedGeneration": 1,
      "reason": "ResolvedRefs",
      "status": "True",
      "type": "ResolvedRefs"
    }
  ],
  "controllerName": "io.cilium/gateway-controller",
  "parentRef": {
    "group": "gateway.networking.k8s.io",
    "kind": "Gateway",
    "name": "cilium-tls-gateway"
  }
}
4.3 测试TLS请求
现在,让我们通过 HTTPS 向网关发出请求:
root@server:~# curl -v \
  --resolve "nginx.cilium.rocks:443:$GATEWAY" \
  "https://nginx.cilium.rocks:443"
* Added nginx.cilium.rocks:443:172.18.255.202 to DNS cache
* Hostname nginx.cilium.rocks was found in DNS cache
*   Trying 172.18.255.202:443...
* Connected to nginx.cilium.rocks (172.18.255.202) port 443
* ALPN: curl offers h2,http/1.1
* TLSv1.3 (OUT), TLS handshake, Client hello (1):
*  CAfile: /etc/ssl/certs/ca-certificates.crt
*  CApath: /etc/ssl/certs
* TLSv1.3 (IN), TLS handshake, Server hello (2):
* TLSv1.3 (IN), TLS handshake, Encrypted Extensions (8):
* TLSv1.3 (IN), TLS handshake, Certificate (11):
* TLSv1.3 (IN), TLS handshake, CERT verify (15):
* TLSv1.3 (IN), TLS handshake, Finished (20):
* TLSv1.3 (OUT), TLS change cipher, Change cipher spec (1):
* TLSv1.3 (OUT), TLS handshake, Finished (20):
* SSL connection using TLSv1.3 / TLS_AES_256_GCM_SHA384 / X25519 / RSASSA-PSS
* ALPN: server accepted http/1.1
* Server certificate:
*  subject: O=mkcert development certificate; OU=root@server
*  start date: May 28 00:13:47 2025 GMT
*  expire date: Aug 28 00:13:47 2027 GMT
*  subjectAltName: host "nginx.cilium.rocks" matched cert's "*.cilium.rocks"
*  issuer: O=mkcert development CA; OU=root@server; CN=mkcert root@server
*  SSL certificate verify ok.
*   Certificate level 0: Public key type RSA (2048/112 Bits/secBits), signed using sha256WithRSAEncryption
*   Certificate level 1: Public key type RSA (3072/128 Bits/secBits), signed using sha256WithRSAEncryption
* using HTTP/1.x
> GET / HTTP/1.1
> Host: nginx.cilium.rocks
> User-Agent: curl/8.5.0
> Accept: */*
>
* TLSv1.3 (IN), TLS handshake, Newsession Ticket (4):
* TLSv1.3 (IN), TLS handshake, Newsession Ticket (4):
* old SSL session ID is stale, removing
< HTTP/1.1 200 OK
< Server: nginx/1.27.5
< Date: Wed, 28 May 2025 00:31:30 GMT
< Content-Type: text/html
< Content-Length: 100
< Last-Modified: Wed, 28 May 2025 00:27:14 GMT
< Connection: keep-alive
< ETag: "68365862-64"
< Accept-Ranges: bytes
<
<html>
<h1>Welcome to our webserver listening on port 443.</h1>
</br>
<h1>Cilium rocks.</h1>
</html
* Connection #0 to host nginx.cilium.rocks left intact
应使用 HTTPS 正确检索数据(因此,正确实现了 TLS 握手)。
输出中有几点需要注意。
- 它应该是成功的(您应该在最后看到一个带有
Cilium rocks的 HTML 输出。 - 连接是通过端口 443 建立的 - 您应该会看到
Connected to nginx.cilium.rocks (172.18.255.200) port 443。 - 您应该会看到 TLS handshake 和 TLS version negotiation。预计协商将导致使用 TLSv1.3。
- 预期会看到成功的证书验证(注意
SSL 证书验证正常)。
5. API网关–流量拆分
5.1 部署应用
首先,让我们在集群中部署一个示例 echo 应用程序。应用程序将回复客户端,并在回复正文中包含有关接收原始请求的 Pod 和节点的信息。我们将使用此信息来说明流量在多个 Kubernetes 服务之间分配。
使用以下命令查看 YAML 文件。您将看到我们正在部署多个 Pod 和服务。这些服务称为 echo-1 和 echo-2,流量将在这些服务之间分配。
root@server:~# yq echo-servers.yaml
---
apiVersion: v1
kind: Service
metadata:
  labels:
    app: echo-1
  name: echo-1
spec:
  ports:
    - port: 8080
      name: high
      protocol: TCP
      targetPort: 8080
  selector:
    app: echo-1
---
apiVersion: apps/v1
kind: Deployment
metadata:
  labels:
    app: echo-1
  name: echo-1
spec:
  replicas: 1
  selector:
    matchLabels:
      app: echo-1
  template:
    metadata:
      labels:
        app: echo-1
    spec:
      containers:
        - image: gcr.io/kubernetes-e2e-test-images/echoserver:2.2
          name: echo-1
          ports:
            - containerPort: 8080
          env:
            - name: NODE_NAME
              valueFrom:
                fieldRef:
                  fieldPath: spec.nodeName
            - name: POD_NAME
              valueFrom:
                fieldRef:
                  fieldPath: metadata.name
            - name: POD_NAMESPACE
              valueFrom:
                fieldRef:
                  fieldPath: metadata.namespace
            - name: POD_IP
              valueFrom:
                fieldRef:
                  fieldPath: status.podIP
---
apiVersion: v1
kind: Service
metadata:
  labels:
    app: echo-2
  name: echo-2
spec:
  ports:
    - port: 8090
      name: high
      protocol: TCP
      targetPort: 8080
  selector:
    app: echo-2
---
apiVersion: apps/v1
kind: Deployment
metadata:
  labels:
    app: echo-2
  name: echo-2
spec:
  replicas: 1
  selector:
    matchLabels:
      app: echo-2
  template:
    metadata:
      labels:
        app: echo-2
    spec:
      containers:
        - image: gcr.io/kubernetes-e2e-test-images/echoserver:2.2
          name: echo-2
          ports:
            - containerPort: 8080
          env:
            - name: NODE_NAME
              valueFrom:
                fieldRef:
                  fieldPath: spec.nodeName
            - name: POD_NAME
              valueFrom:
                fieldRef:
                  fieldPath: metadata.name
            - name: POD_NAMESPACE
              valueFrom:
                fieldRef:
                  fieldPath: metadata.namespace
            - name: POD_IP
              valueFrom:
                fieldRef:
                  fieldPath: status.podIP
部署应用
root@server:~# kubectl apply -f echo-servers.yaml
service/echo-1 created
deployment.apps/echo-1 created
service/echo-2 created
deployment.apps/echo-2 created
检查应用程序是否已正确部署:
root@server:~# kubectl get pods
NAME                              READY   STATUS    RESTARTS   AGE
details-v1-67894999b5-hswsw       1/1     Running   0          33m
echo-1-597b976bc7-5r4xb           1/1     Running   0          88s
echo-2-7ccd4fd567-2mgnn           1/1     Running   0          88s
my-nginx-7bd456664-s7mpc          1/1     Running   0          7m53s
productpage-v1-7bd5bd857c-shr9z   1/1     Running   0          33m
ratings-v1-676ff5568f-w467l       1/1     Running   0          33m
reviews-v1-f5b4b64f-sjk2s         1/1     Running   0          33m
reviews-v2-74b7dd9f45-rk2n6       1/1     Running   0          33m
reviews-v3-65d744df5c-zqljm       1/1     Running   0          33m
快速浏览一下部署的服务:
root@server:~# kubectl get svc
NAME                                TYPE           CLUSTER-IP      EXTERNAL-IP      PORT(S)         AGE
cilium-gateway-cilium-tls-gateway   LoadBalancer   10.96.57.24     172.18.255.202   443:30846/TCP   5m20s
cilium-gateway-my-gateway           LoadBalancer   10.96.212.15    172.18.255.200   80:30157/TCP    29m
cilium-gateway-tls-gateway          LoadBalancer   10.96.211.194   172.18.255.201   443:31647/TCP   18m
details                             ClusterIP      10.96.188.110   <none>           9080/TCP        33m
echo-1                              ClusterIP      10.96.235.22    <none>           8080/TCP        110s
echo-2                              ClusterIP      10.96.204.162   <none>           8090/TCP        110s
kubernetes                          ClusterIP      10.96.0.1       <none>           443/TCP         3h42m
my-nginx                            ClusterIP      10.96.76.254    <none>           443/TCP         8m15s
productpage                         ClusterIP      10.96.173.43    <none>           9080/TCP        33m
ratings                             ClusterIP      10.96.118.245   <none>           9080/TCP        33m
reviews                             ClusterIP      10.96.33.54     <none>           9080/TCP        33m
5.2 负载均衡流量
让我们回顾一下 HTTPRoute 清单。
root@server:~# yq load-balancing-http-route.yaml
---
apiVersion: gateway.networking.k8s.io/v1beta1
kind: HTTPRoute
metadata:
  name: load-balancing-route
spec:
  parentRefs:
    - name: my-gateway
  rules:
    - matches:
        - path:
            type: PathPrefix
            value: /echo
      backendRefs:
        - kind: Service
          name: echo-1
          port: 8080
          weight: 50
        - kind: Service
          name: echo-2
          port: 8090
          weight: 50
让我们使用以下清单部署 HTTPRoute:
root@server:~# kubectl apply -f load-balancing-http-route.yaml
httproute.gateway.networking.k8s.io/load-balancing-route created
此规则本质上是一个简单的 L7 代理路由:对于路径以 /echo 开头的 HTTP 流量,分别通过端口 8080 和 8090 将流量转发到 echo-1 和 echo-2 服务。
    backendRefs:
    - kind: Service
      name: echo-1
      port: 8080
      weight: 50
    - kind: Service
      name: echo-2
      port: 8090
      weight: 50
5.3 流量拆分-- 50%比50%
让我们再次检索与网关关联的 IP 地址:
GATEWAY=$(kubectl get gateway my-gateway -o jsonpath='{.status.addresses[0].value}')
echo $GATEWAY
现在,我们来检查基于 URL 路径的流量是否由 Gateway API 代理。
检查是否可以向该外部地址发出 HTTP 请求:
root@server:~# GATEWAY=$(kubectl get gateway my-gateway -o jsonpath='{.status.addresses[0].value}')
echo $GATEWAY
172.18.255.200
root@server:~# curl --fail -s http://$GATEWAY/echo


Hostname: echo-2-7ccd4fd567-2mgnn

Pod Information:
        node name:      kind-worker
        pod name:       echo-2-7ccd4fd567-2mgnn
        pod namespace:  default
        pod IP: 10.244.1.161

Server values:
        server_version=nginx: 1.12.2 - lua: 10010

Request Information:
        client_address=10.244.2.110
        method=GET
        real path=/echo
        query=
        request_version=1.1
        request_scheme=http
        request_uri=http://172.18.255.200:8080/echo

Request Headers:
        accept=*/*
        host=172.18.255.200
        user-agent=curl/8.5.0
        x-envoy-internal=true
        x-forwarded-for=172.18.0.1
        x-forwarded-proto=http
        x-request-id=b17459aa-5d2c-4cb4-9d93-ebdcc123a286

Request Body:
        -no body in request-
在回复中,获得接收查询的 Pod 的名称。
Hostname: echo-2-7ccd4fd567-2mgnn
请注意,您还可以在原始请求中看到标头。这在即将到来的任务中非常有用。
您应该会看到回复在两个 Pod/节点之间均匀平衡。
root@server:~# curl --fail -s http://$GATEWAY/echo|grep Hostname
Hostname: echo-1-597b976bc7-5r4xb
root@server:~# curl --fail -s http://$GATEWAY/echo|grep Hostname
Hostname: echo-2-7ccd4fd567-2mgnn
root@server:~# curl --fail -s http://$GATEWAY/echo|grep Hostname
Hostname: echo-1-597b976bc7-5r4xb
root@server:~# curl --fail -s http://$GATEWAY/echo|grep Hostname
Hostname: echo-1-597b976bc7-5r4xb
root@server:~# curl --fail -s http://$GATEWAY/echo|grep Hostname
Hostname: echo-2-7ccd4fd567-2mgnn
让我们通过运行循环并计算请求数来仔细检查流量是否在多个 Pod 之间均匀分配:
for _ in {1..500}; do
  curl -s -k "http://$GATEWAY/echo" >> curlresponses.txt;
done
验证响应是否已(或多或少)均匀分布。
root@server:~# for _ in {1..500}; do
  curl -s -k "http://$GATEWAY/echo" >> curlresponses.txt;
done
root@server:~# grep -o "Hostname: echo-." curlresponses.txt | sort | uniq -c
    258 Hostname: echo-1
    242 Hostname: echo-2
可以看到,流量几乎是1比1的.这也正符合我们配置的设定.我们再次回顾下配置文件
    backendRefs:
    - kind: Service
      name: echo-1
      port: 8080
      weight: 50
    - kind: Service
      name: echo-2
      port: 8090
      weight: 50
5.4 流量拆分-- 99%比1%
这一次,我们将应用权重改为99比1,并应用配置。
root@server:~# yq load-balancing-http-route.yaml
---
apiVersion: gateway.networking.k8s.io/v1beta1
kind: HTTPRoute
metadata:
  name: load-balancing-route
spec:
  parentRefs:
    - name: my-gateway
  rules:
    - matches:
        - path:
            type: PathPrefix
            value: /echo
      backendRefs:
        - kind: Service
          name: echo-1
          port: 8080
          weight: 99
        - kind: Service
          name: echo-2
          port: 8090
          weight: 1
root@server:~# kubectl apply -f load-balancing-http-route.yaml
httproute.gateway.networking.k8s.io/load-balancing-route configured
让我们运行另一个循环,并使用以下命令再次计算回复:
for _ in {1..500}; do
  curl -s -k "http://$GATEWAY/echo" >> curlresponses991.txt;
done
验证响应是否分散,其中大约 99% 的响应分布到 echo-1,大约 1% 的响应分布到 echo-2。
root@server:~# for _ in {1..500}; do
  curl -s -k "http://$GATEWAY/echo" >> curlresponses991.txt;
done
root@server:~# grep -o "Hostname: echo-." curlresponses991.txt | sort | uniq -c
    498 Hostname: echo-1
      2 Hostname: echo-2
5.5 小测试
×	Ingress API is the long-term replacement for Gateway API
√	One of the benefits of Gateway APIs is that it is role-oriented.
×	The Gateway and HTTPRoute configuration is all defined in a single API resource.
√	Cilium Gateway API requires Kube-Proxy Replacement.
×	Cilium Gateway API does not support L7 HTTP Routing.
6. 测验
6.1 题目
为了结束本实验,我们以一个简单的实验结束。我们将重用之前创建的服务(称为 echo-1 和 echo-2)。
要成功通过考试,我们需要:
- 可通过网关 API 访问的服务以及
- 基于 PrefixPath
/exam到达服务的 HTTP 流量 - 在
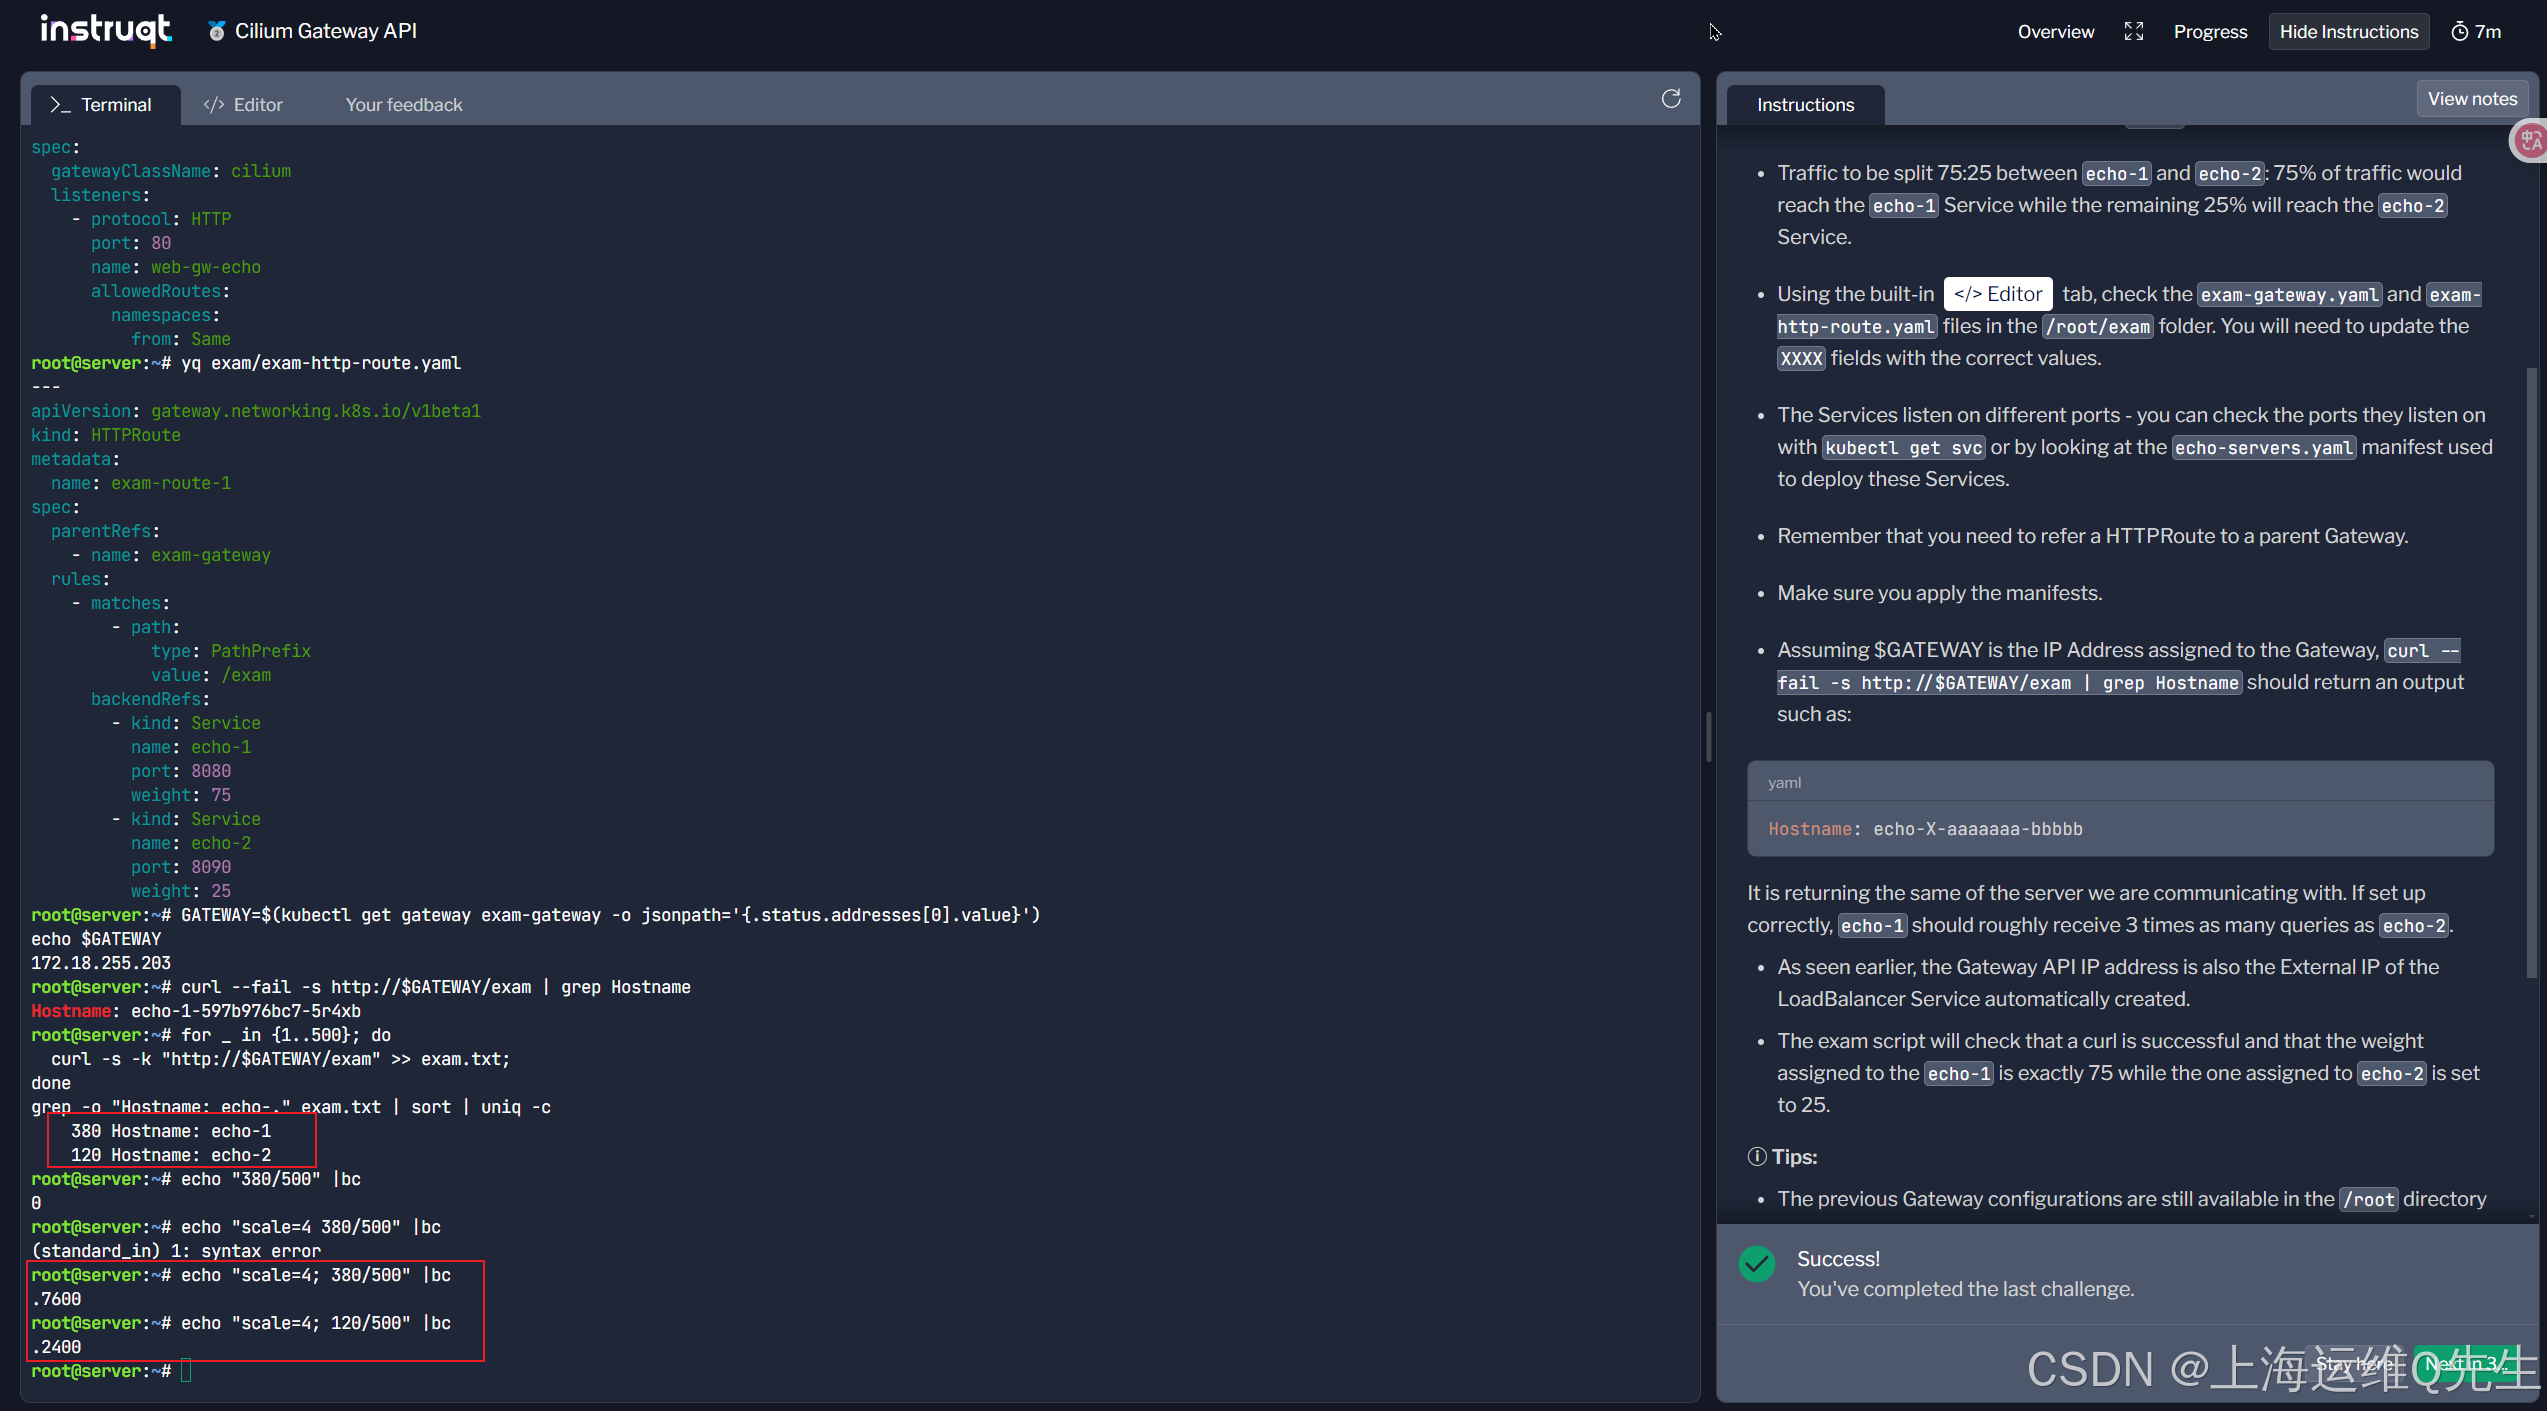
echo-1和echo-2之间按 75:25 的比例分配流量:75% 的流量将到达echo-1服务,而其余 25% 的流量将到达echo-2服务。 - 检查
/root/exam文件夹中的exam-gateway.yaml和exam-http-route.yaml文件。您需要使用正确的值更新XXXX字段。 - 服务监听不同的端口 - 你可以使用
kubectl get svc检查它们监听的端口,或者查看用于部署这些服务的echo-servers.yaml清单。 - 请记住,您需要将 HTTPRoute 引用到父 Gateway。
- 确保应用清单。
- 假设 G A T E W A Y 是分配给网关的 I P 地址, ‘ c u r l − − f a i l − s h t t p : / / GATEWAY 是分配给网关的 IP 地址, `curl --fail -s http:// GATEWAY是分配给网关的IP地址,‘curl−−fail−shttp://GATEWAY/exam | grep Hostname` 则应返回如下输出:
Hostname: echo-X-aaaaaaa-bbbbb
它返回的服务器与我们正在通信的服务器相同。如果设置正确,echo-1 应该接收大约 3 倍的查询 echo-2。
- 如前所述,Gateway API IP 地址也是自动创建的 LoadBalancer Service 的外部 IP。
- 检查脚本将检查 curl 是否成功,以及分配给
echo-1的权重是否正好为 75,而分配给echo-2的权重是否设置为 25。
6.2 解题
根据题意配置exam-gateway.yaml和exam-http-route.yaml
root@server:~# k get svc| grep echo-
echo-1                              ClusterIP      10.96.235.22    <none>           8080/TCP        18m
echo-2                              ClusterIP      10.96.204.162   <none>           8090/TCP        18m
root@server:~# yq exam/exam-gateway.yaml
---
apiVersion: gateway.networking.k8s.io/v1beta1
kind: Gateway
metadata:
  name: exam-gateway
spec:
  gatewayClassName: cilium
  listeners:
    - protocol: HTTP
      port: 80
      name: web-gw-echo
      allowedRoutes:
        namespaces:
          from: Same
root@server:~# yq exam/exam-http-route.yaml
---
apiVersion: gateway.networking.k8s.io/v1beta1
kind: HTTPRoute
metadata:
  name: exam-route-1
spec:
  parentRefs:
    - name: exam-gateway
  rules:
    - matches:
        - path:
            type: PathPrefix
            value: /exam
      backendRefs:
        - kind: Service
          name: echo-1
          port: 8080
          weight: 75
        - kind: Service
          name: echo-2
          port: 8090
          weight: 25
部署gateway和route
root@server:~# k apply -f exam/exam-gateway.yaml
gateway.gateway.networking.k8s.io/exam-gateway created
root@server:~# k apply -f exam/exam-http-route.yaml
httproute.gateway.networking.k8s.io/exam-route-1 created
测试
获取gateway地址
GATEWAY=$(kubectl get gateway exam-gateway -o jsonpath='{.status.addresses[0].value}')
echo $GATEWAY
测试访问
curl --fail -s http://$GATEWAY/exam | grep Hostname
比例测试
for _ in {1..500}; do
  curl -s -k "http://$GATEWAY/exam" >> exam.txt;
done
grep -o "Hostname: echo-." exam.txt | sort | uniq -c
测下来也符合我们的预期,76%比24%
新徽章GET!