系列文章目录
Vue3 组合式 API 进阶:深入解析 customRef 的设计哲学与实战技巧
Vue3 watchEffect 进阶使用指南:这些特性你可能不知道
Vue3高级特性:深入理解effectScope及其应用场景

前言
在Vue3的响应式系统中,effectScope 是一个用于批量管理响应式副作用(effects) 的高级 API。它主要用于在复杂场景(如组件卸载、Composable 函数)中集中控制一组副作用的生命周期。本文将带您全面了解这个高级API,探索它如何优雅地管理复杂的副作用场景。
一、核心概念
1、什么是 effectScope?
effectScope 是 Vue3 引入的一个副作用作用域工具,用于将多个响应式副作用(effect、watch、computed 等)包裹在一个独立的作用域中,实现批量管理。当作用域被销毁时,内部所有副作用会被自动清理,避免内存泄漏并简化代码逻辑。
2、副作用(Effect)
Vue 的响应式系统依赖于副作用(如 watch, watchEffect, computed),这些副作用会在依赖变化时重新运行。
3、作用域(Scope)
effectScope 创建一个作用域,该作用域可以捕获在其内部创建的所有副作用,并支持统一管理(暂停、停止、重新开始)这些副作用。
快速上手示例:
import { effectScope, reactive, watchEffect } from 'vue';

// 1. 创建作用域
const scope = effectScope();

scope.run(() => {
  const state = reactive({ count: 0 });

  // 2. 在作用域内创建副作用(自动收集)
  watchEffect(() => {
    console.log('Count:', state.count);
  });

  // 3. 模拟依赖变化
  state.count++;
});

// 4. 停止作用域内的所有副作用
scope.stop(); // 停止监听,控制台不再输出变化
二、为什么需要effectScope?
1、分散的清理逻辑
当组件中使用多个 watch/watchEffect/computed/setInterval 时,需要在 onUnmounted 中逐个清理:
// 没有effectScope时的典型代码
    const timer = setInterval(/*...*/)//定时器
    const handler = eventEmitter.on(/*...*/)//全局事件
    const watchStop = watch(/*...*/)//watch监听
    const computedRef = computed(/*...*/)//计算属性

    //卸载清理副作用
    onUnmounted(() => {
      clearInterval(timer)
      handler.off()
      watchStop()
      // 忘记清理computedRef?
    })
  }
}
这种手动管理方式存在几个问题:
需要为每个副作用单独维护清理逻辑
容易遗漏某些副作用的清理
代码组织混乱,随着逻辑复杂化,这种手动维护会变得臃肿且易遗漏。
2、可组合性挑战
在可复用的组合函数中创建副作用时,调用者可能无法知晓内部需要清理的资源:
// useMouse.js 组合函数
export function useMouse() {
  const pos = ref({ x: 0, y: 0 })
  const handler = e => { ... } // 副作用
  window.addEventListener('mousemove', handler)
  // 问题:如何让调用者清理事件监听?
}
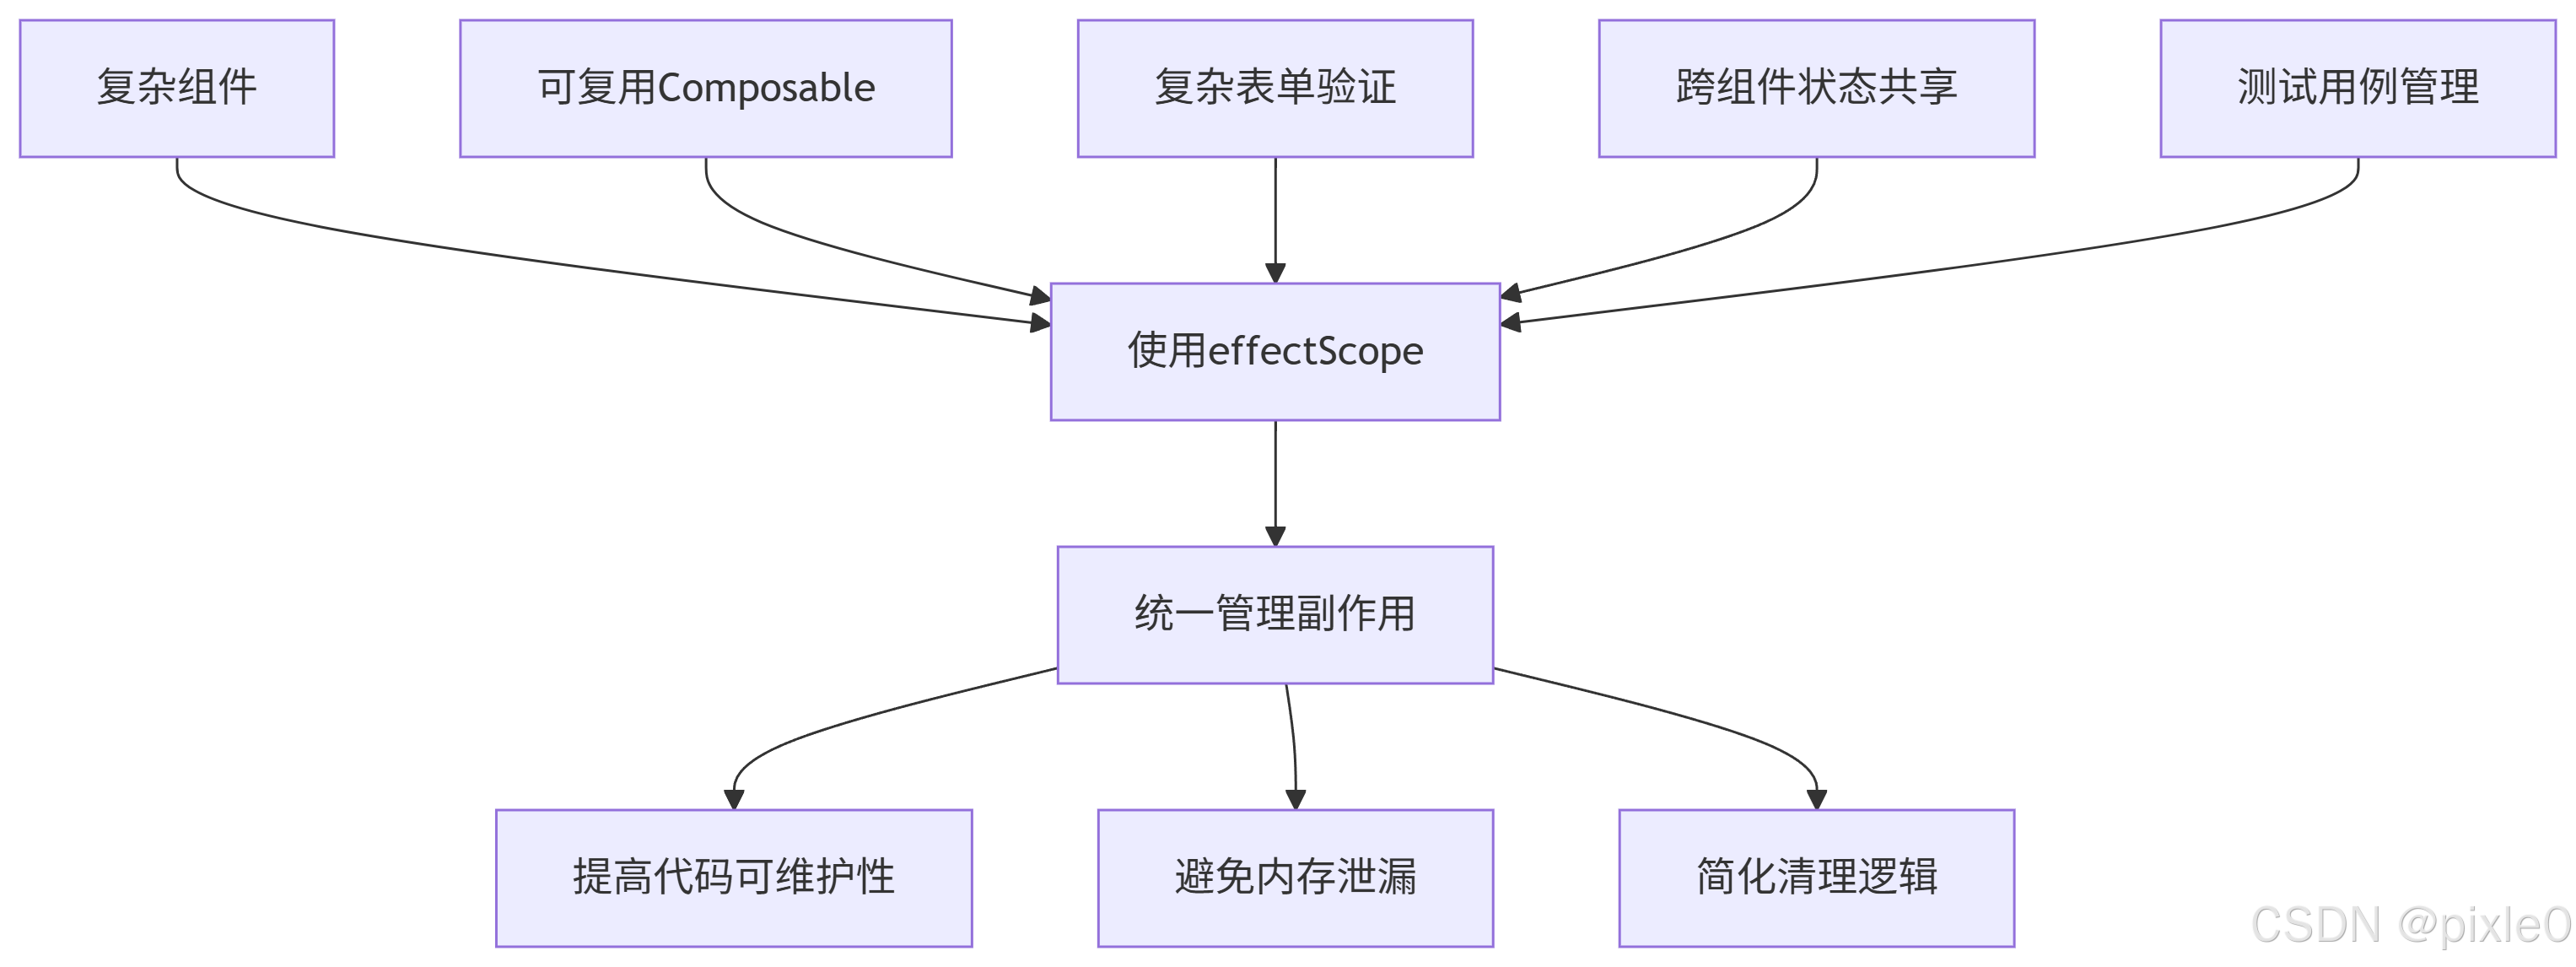
effectScope正是为了解决这些问题而生!
effectScope 的核心价值
- 批量管理:批量管理副作用生命周期,替代手动调用多个 stop(),简化代码逻辑。
- 避免泄漏:组合函数可自主管理内部副作用,向调用者暴露简洁的控制接口,防止内存泄漏。
- 灵活层级:嵌套作用域链式停止,天然支持逻辑树状结构,符合组件化设计思维。
- 架构清晰:为复杂功能建立明确的资源管理边界。
三、effectScope API详解
导入
import { effectScope} from 'vue';
3.1 创建作用域
调用effectScope函数可以创建独立作用域
function effectScope(detached?: boolean): EffectScope

interface EffectScope {
  run<T>(fn: () => T): T | undefined
  stop(): void
  pause():void
  resume():void
  active: boolean
}
参数:
detached (可选): 是否创建独立作用域(默认false)
false: 嵌套在父作用域中,父作用域停止时会自动停止子作用域
true: 独立作用域,不受父作用域影响
返回值:
run(): 执行函数并捕获其中创建的所有副作用
stop(): 停止作用域内所有副作用
pause():暂停作用域内所有副作用(可恢复)
resume():恢复被暂停的所有副作用
active: 作用域是否处于活动状态(未停止)
关键特性
1. 批量停止副作用
const scope = effectScope();

scope.run(() => {
  watchEffect(fn1); // 副作用1
  watchEffect(fn2); // 副作用2
});

// 一次性停止 fn1 和 fn2
scope.stop();
2.暂停和恢复副作用
```javascript
const scope = effectScope();

scope.run(() => {
  watchEffect(fn1); // 副作用1
  watchEffect(fn2); // 副作用2
});

// 暂停fn1、fn2副作用
scope.pause();

//恢复fn1、fn2副作用
scope.resume();
3. 嵌套作用域
子作用域会随父作用域停止而自动停止
const parentScope = effectScope();

parentScope.run(() => {
  const childScope = effectScope();

  childScope.run(() => {
    watchEffect(fn); // 子作用域的副作用
  });
});

parentScope.stop(); // 自动停止子作用域中的副作用
4. 独立作用域(detached: true)
创建不受父作用域影响的作用域:
const parent = effectScope();
const child = effectScope({ detached: true }); // 独立作用域

parent.run(() => {
  child.run(/* ... */);
});

parent.stop(); // child 中的副作用不受影响
3.2 run(fn) 方法详解
function run<T>(fn: () => T): T
功能:在作用域内执行一个函数,并捕获函数中创建的所有响应式副作用。
参数:fn 是包含响应式操作的函数。
返回值:返回 fn 的执行结果。
1、自动收集副作用
const scope = effectScope();
scope.run(() => {
  const count = ref(0);
  watch(count, () => console.log('Count changed')); // 被作用域收集
});
2、返回执行结果
const result = scope.run(() => 100); // result = 100
使用示例
import { effectScope, ref, watch, watchEffect } from 'vue';

// 1. 创建作用域
const scope = effectScope();

// 2. 在作用域内执行函数
const state = scope.run(() => {
  const count = ref(0);

  // 副作用自动注册到作用域
  watch(count, (val) => console.log('Watch:', val));
  watchEffect(() => console.log('Effect:', count.value));

  return { count }; // 返回状态
});

// 修改值触发副作用
state.count.value++; // 输出 "Watch: 1" 和 "Effect: 1"

// 3. 一键停止所有副作用
scope.stop(); // 所有 watch/watchEffect 停止响应
state.count.value++; // 无输出
3.3 onScopeDispose 方法详解
onScopeDispose是一个注册回调函数的方法,该回调会在所属的 effectScope 被停止 (scope.stop()) 时执行
基本使用
import { onScopeDispose } from 'vue';

const scope = effectScope();
scope.run(() => {
  const count = ref(0);
  //定时器计数
  let intervalId = setInterval(() => {
    count.value++;
    console.log(count.value, "count");
  }, 1000);
  watchEffect(() => {
    console.log(count.value, "Count changed");
  });

  //在作用域停止时清理定时器
  onScopeDispose(() => {
    clearInterval(intervalId);
  });
});

// 当调用 stop 时,作用域内定时器会被清理
scope.stop();
四、使用场景示例
场景 1:封装可复用的组合式函数
在开发组合式函数时,可能会创建多个响应式副作用。使用 effectScope 可以确保这些副作用在组件卸载时被正确清理,或者在需要时手动停止
需求:创建一个带自动清理功能的计时器组合函数
useTimer.js
import { effectScope, ref, watch, onScopeDispose } from "vue";

// 可复用的计时器逻辑
export function useTimer(interval = 1000) {
  const scope = effectScope(); // 创建作用域

  return scope.run(() => {
    const count = ref(0);
    const isActive = ref(true);

    let intervalId = null;

    // 副作用 1:响应式计时器
    watch(
      isActive,
      (active) => {
        if (active) {
          intervalId = setInterval(() => count.value++, interval);
          console.log("开始计时");
        } else {
          clearInterval(intervalId);
          console.log("暂停计时");
        }
      },
      { immediate: true }
    );

    // 副作用 2:自动清理
    onScopeDispose(() => {
      clearInterval(intervalId);
      console.log("停止计时");
    });

    // 暴露给使用者的 API
    return {
      count,
      pause: () => (isActive.value = false),//暂停
      resume: () => (isActive.value = true),//重新开始
      stop: () => scope.stop(), // 关键:一键停止所有副作用
    };
  });
}
使用:
<template>
  <div class="container">
    <p>Count: {{ count }}</p>
    <button @click="pause">暂停</button>
    <button @click="resume">重新开始</button>
    <button @click="stop">停止</button>
  </div>
</template>

<script setup>
import {onUnmounted} from 'vue'
import { useTimer } from "./useTimer.js";
const { count, pause, resume, stop } = useTimer();
// 在组件卸载时停止所有副作用
onUnmounted(() => {
  stop();
});
运行结果:

说明:
一键清理:调用 stop() 会同时清除定时器和所有响应式依赖
内存安全:避免组件卸载后定时器仍在运行的 BUG
封装性:副作用生命周期被严格封装在组合函数内部
场景 2:Vue 插件/库开发
为第三方库提供自动清理能力以及确保插件产生的副作用不会影响主应用
示例1:开发一个地图插件页面卸载自动清理资源
useMapLibrary.js
// 模拟地图库插件
export function useMapLibrary(containerRef) {
  const scope = effectScope()

  return scope.run(() => {
    const map = ref(null)
    const markers = []

    watchEffect(() => {
      if (containerRef.value) {
        // 初始化地图(伪代码)
        map.value = new ThirdPartyMap(containerRef.value)

        // 添加示例标记
        markers.push(
          map.value.addMarker({ lat: 31.23, lng: 121.47 })
        )
      }
    })

    // 库资源清理
    onScopeDispose(() => {
      markers.forEach(marker => marker.remove())
      map.value?.destroy()
      console.log('Map resources released')
    })

    return {
      map,
      addMarker: (pos) => markers.push(map.value.addMarker(pos)),
      destroy: () => scope.stop() // 暴露销毁 API
    }
  })!
}
使用:
<template>
  <div ref="container" ></div>
  <button @click="addShanghaiMarker">Add Marker</button>
</template>

<script setup>
import { ref, onUnmounted } from 'vue'
import { useMapLibrary } from './mapLibrary'

const container = ref(null)
const { addMarker, destroy } = useMapLibrary(container)

// 添加额外标记
const addShanghaiMarker = () => {
  addMarker({ lat: 31.23, lng: 121.47 })
}

// 组件卸载时销毁地图
onUnmounted(() => destroy())
</script>
说明:
资源管理:确保销毁地图时同步清理所有相关资源
接口简洁:用户只需调用 destroy() 无需了解内部实现
防止泄漏:避免第三方库造成的内存泄漏
示例2:开发一个实时通信插件,在应用卸载时自动关闭连接,避免内存泄漏。
// socket-plugin.js
import { effectScope, onScopeDispose } from 'vue'

export const SocketPlugin = {
  install(app, options) {
    // 创建插件专属作用域
    const socketScope = effectScope()

    socketScope.run(() => {
      // 1. 初始化 WebSocket 连接
      const socket = new WebSocket(options.url)
      let isConnected = false

      // 2. 监听连接状态
      socket.onopen = () => {
        isConnected = true
        //全局变量$emit需提前定义
        app.config.globalProperties.$emit('socket:open')
      }

      socket.onmessage = (event) => {
        app.config.globalProperties.$emit('socket:message', event.data)
      }

      // 3. 提供发送消息的全局方法
      //全局变量$socketSend需提前定义
      app.config.globalProperties.$socketSend = (data) => {
        if (isConnected) socket.send(JSON.stringify(data))
      }

      // 4. 作用域销毁时的清理逻辑(关键)
      onScopeDispose(() => {
        if (socket.readyState === WebSocket.OPEN) {
          socket.close(1000, '应用卸载') // 正常关闭连接
        }
        console.log('WebSocket 资源已清理')
      })
    })

    // 5. 重写unmount 函数达到监听应用卸载,触发作用域清理
    const originalUnmount = app.unmount
    app.unmount = () => {
      socketScope.stop() // 手动停止作用域,触发 onScopeDispose
      originalUnmount.call(app) // 执行原生卸载逻辑
    }
  }
}
使用:
// main.js
import { createApp } from 'vue'
import App from './App.vue'
import { SocketPlugin } from './socket-plugin'

const app = createApp(App)
app.use(SocketPlugin, { url: 'ws://localhost:3000' })
app.mount('#app')
说明:
当执行 app.unmount() (应用卸载)时,会自动触发:
1、socketScope.stop()→ 执行 onScopeDispose 清理 WebSocket,
2、完成应用卸载
ps:注意应用的生命周期不等于组件生命周期,应用生命周期通过createApp()、app.mount()、app.unmount()等创建/捕获
场景 3:复杂表单验证
<script setup>
import { effectScope, reactive, computed } from 'vue'

const scope = effectScope()
const form = reactive({
  username: '',
  email: '',
  password: '',
  confirmPassword: ''
})

const errors = reactive({})
const isValid = computed(() =>
  Object.keys(errors).length === 0
)

scope.run(() => {
  // 用户名验证
  watch(() => form.username, (username) => {
    if (!username) {
      errors.username = '用户名不能为空'
    } else if (username.length < 3) {
      errors.username = '用户名至少3个字符'
    } else {
      delete errors.username
    }
  })

  // 邮箱验证
  watch(() => form.email, (email) => {
    const emailRegex = /^[^\s@]+@[^\s@]+\.[^\s@]+$/
    if (!email) {
      errors.email = '邮箱不能为空'
    } else if (!emailRegex.test(email)) {
      errors.email = '邮箱格式不正确'
    } else {
      delete errors.email
    }
  })

  // 密码一致性验证
  watch([() => form.password, () => form.confirmPassword],
    ([password, confirmPassword]) => {
      if (password !== confirmPassword) {
        errors.password = '两次输入的密码不一致'
      } else {
        delete errors.password
      }
    }
  )
})

// 组件卸载时清理所有验证逻辑
onUnmounted(scope.stop)
</script>
表单草稿状态暂停验证
// 用户点击"保存草稿"时暂停验证
const saveDraft=()=>{
  //暂停验证
  scope.pause()
  //提交数据逻辑
}
// 用户编辑草稿时恢复验证
const editDraft=()=>{
//恢复验证
  scope.resume()
}
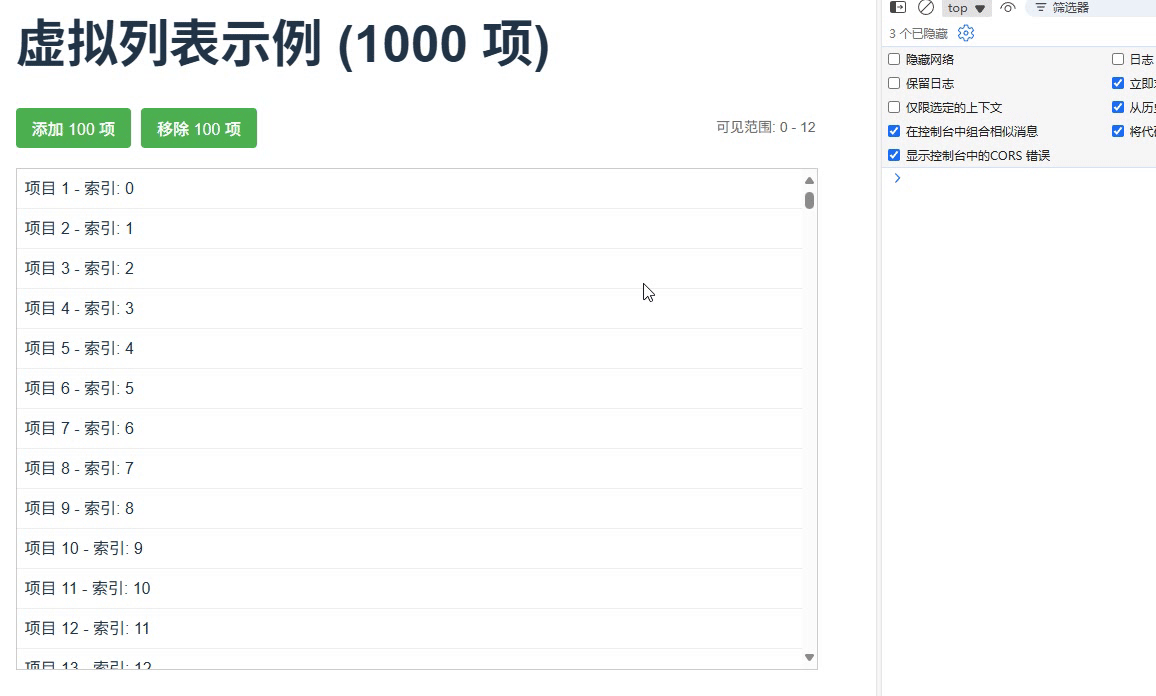
场景 4:虚拟滚动列表优化
为大型列表创建虚拟滚动,仅渲染可视区域的项,并管理其副作用
VirtualList.vue
<template>
  <div
    ref="containerRef"
    class="virtual-list"
    style="height: 500px; overflow: auto; position: relative"
  >
    <!-- 总高度占位元素 -->
    <div
      ref="itemsContainerRef"
      :style="{
        height: `${props.items.length * props.itemHeight}px`,
        position: 'relative',
      }"
    >
      <!-- 渲染可见项 -->
      <div
        v-for="item in visibleItems"
        :key="item.id"
        :style="{
          position: 'absolute',
          top: `${item.position}px`,
          width: '100%',
          height: `${props.itemHeight}px`,
          boxSizing: 'border-box',
        }"
        class="virtual-item"
      >
        {{ item.name }} - 索引:
        {{ props.items.findIndex((i) => i.id === item.id) }}
      </div>
    </div>
  </div>
</template>
<script setup>
import {
  ref,
  onMounted,
  onUnmounted,
  effectScope,
  onScopeDispose,
  nextTick,
  computed,
} from "vue";

const props = defineProps({
  items: {
    type: Array,
    required: true,
  },
  itemHeight: {
    type: Number,
    default: 40,
  },
  visibleCount: {
    type: Number,
    default: 20,
  },
  bufferSize: {
    type: Number,
    default: 5,
  },
});

const containerRef = ref(null);
const itemsContainerRef = ref(null);
const visibleStartIndex = ref(0);
const visibleEndIndex = ref(0);
// 真实可见范围
const realVisibleStartIndex = ref(0);
const realVisibleEndIndex = ref(0);

const itemScopes = new Map(); // 存储每个项的 effectScope
let pendingFrame = null; // 用于 requestAnimationFrame 的 ID

// 创建项的 effectScope
const createItemScope = (index) => {
  const scope = effectScope();

  scope.run(() => {
    // 为每个项创建独立的响应式状态
    const itemState = ref({ ...props.items[index], index });

    // 模拟项的副作用(如定时更新、动画等)
    const timer = setInterval(() => {
      itemState.value = {
        ...itemState.value,
        updatedAt: new Date().toISOString(),
      };
    }, 5000);

    // 清理副作用
    onScopeDispose(() => {
      console.log(index, "清理副作用");
      clearInterval(timer);
    });

    return itemState;
  });

  return scope;
};

// 更新可见区域
const updateVisibleRange = () => {
  if (!containerRef.value) return;

  const { scrollTop, clientHeight } = containerRef.value;

  // 计算真实可见区域(不含缓冲区)
  const realStart = Math.floor(scrollTop / props.itemHeight);
  const realEnd = Math.min(
    props.items.length - 1,
    Math.floor((scrollTop + clientHeight) / props.itemHeight)
  );

  // 更新真实可见范围
  realVisibleStartIndex.value = realStart;
  realVisibleEndIndex.value = realEnd;

  // 计算带缓冲区的可见区域
  const newStartIndex = Math.max(0, realStart - props.bufferSize);
  const newEndIndex = Math.min(
    props.items.length - 1,
    realEnd + props.bufferSize
  );

  // 仅在必要时更新
  if (
    newStartIndex !== visibleStartIndex.value ||
    newEndIndex !== visibleEndIndex.value
  ) {
    // 清理不再可见的项的 effectScope
    itemScopes.forEach((scope, index) => {
      if (index < newStartIndex || index > newEndIndex) {
        scope.stop();
        itemScopes.delete(index);
      }
    });

    // 为新可见的项创建 effectScope
    for (let i = newStartIndex; i <= newEndIndex; i++) {
      if (!itemScopes.has(i) && props.items[i]) {
        const scope = createItemScope(i);
        itemScopes.set(i, scope);
      }
    }

    // 更新可见范围
    visibleStartIndex.value = newStartIndex;
    visibleEndIndex.value = newEndIndex;
  }
};

// 优化的滚动处理
const handleScroll = () => {
  // 使用 requestAnimationFrame 避免频繁更新
  if (pendingFrame) {
    cancelAnimationFrame(pendingFrame);
  }

  pendingFrame = requestAnimationFrame(() => {
    updateVisibleRange();
  });
};

// 初始化
onMounted(() => {
  if (!containerRef.value) return;

  // 初始计算可见区域
  updateVisibleRange();

  // 添加滚动监听
  containerRef.value.addEventListener("scroll", handleScroll);

  // 监听数据变化,更新可见区域
  const dataObserver = new MutationObserver(updateVisibleRange);
  dataObserver.observe(itemsContainerRef.value, { childList: true });
});

// 清理资源
onUnmounted(() => {
  if (containerRef.value) {
    containerRef.value.removeEventListener("scroll", handleScroll);
  }

  if (pendingFrame) {
    cancelAnimationFrame(pendingFrame);
  }

  // 清理所有 effectScope
  itemScopes.forEach((scope) => scope.stop());
  itemScopes.clear();
});

// 计算当前可见的项
const visibleItems = computed(() => {
  return props.items
    .slice(visibleStartIndex.value, visibleEndIndex.value + 1)
    .map((item) => ({
      ...item,
      // 添加位置信息
      position:
        props.itemHeight *
        (props.items.findIndex((i) => i.id === item.id) || 0),
    }));
});

// 暴露必要的属性给父组件
defineExpose({
  visibleItems,
  visibleStartIndex,
  visibleEndIndex,
  realVisibleStartIndex,
  realVisibleEndIndex,
});
</script>


<style scoped>
.virtual-list {
  border: 1px solid #ccc;
  margin-top: 20px;
  width: 100%;
}

.virtual-item {
  border-bottom: 1px solid #eee;
  padding: 8px;
  background-color: white;
  transition: opacity 0.1s ease;
}
</style>
页面使用:
<!-- demo.vue -->
<template>
  <div class="container">
    <h1>虚拟列表示例 ({{ totalItems }} 项)</h1>

    <div class="controls">
      <button @click="addItems" class="btn">添加 100 项</button>
      <button @click="removeItems" class="btn">移除 100 项</button>
      <div class="stats">

        可见范围: {{range }}
      </div>
    </div>

    <VirtualList
      ref="virtualListRef"
      :items="items"
      :itemHeight="itemHeight"
      :visibleCount="visibleCount"
      :bufferSize="bufferSize"
    />
  </div>
</template>

<script setup>
import { ref, computed, onMounted } from "vue";
import VirtualList from "./VirtualList.vue";

// 生成大量数据
const generateItems = (count, startId = 0) => {
  return Array.from({ length: count }, (_, i) => ({
    id: startId + i,
    name: `项目 ${startId + i + 1}`,
    created: new Date().toISOString(),
  }));
};

const items = ref(generateItems(1000));
const itemHeight = ref(40);
const visibleCount = ref(20);
const bufferSize = ref(5);
const virtualListRef = ref(null);

const addItems = () => {
  const startId = items.value.length;
  const newItems = generateItems(100, startId);
  items.value = [...items.value, ...newItems];
};

const removeItems = () => {
  if (items.value.length > 100) {
    items.value = items.value.slice(0, -100);
  }
};

const totalItems = computed(() => items.value.length);

// 初始聚焦到列表
onMounted(() => {
  setTimeout(() => {
    if (virtualListRef.value) {
      virtualListRef.value.$el.scrollTop = 0;
    }
  }, 100);
});


// 可见范围
const range = computed(() => {
  const start = virtualListRef.value?.realVisibleStartIndex || 0
  const end = virtualListRef.value?.realVisibleEndIndex || 0
  return `${start} - ${end}`
})
</script>

<style>
.container {
  max-width: 800px;
  margin: 0 auto;
  padding: 20px;
  font-family: Arial, sans-serif;
}

.controls {
  display: flex;
  gap: 10px;
  margin-bottom: 20px;
  align-items: center;
}

.btn {
  padding: 8px 16px;
  background-color: #4caf50;
  color: white;
  border: none;
  border-radius: 4px;
  cursor: pointer;
}

.btn:hover {
  background-color: #45a049;
}

.stats {
  margin-left: auto;
  font-size: 14px;
  color: #666;
  text-align: right;
}
</style>
运行结果
场景5:测试用例管理
import { effectScope } from 'vue'

//describe 是 JavaScript 测试框架(如 Jest、Mocha、Jasmine、Vitest 等)中的核心函数,用于组织和分组测试用例
describe('复杂组件测试', () => {
  let scope

  beforeEach(() => {
    // 每个测试前创建新作用域
    scope = effectScope()
  })

  afterEach(() => {
    // 测试结束后清理所有副作用
    scope.stop()
  })

  it('应正确处理数据加载', async () => {
    await scope.run(async () => {
      // 执行包含副作用的测试代码
      const { result, isLoading } = useDataFetcher()

      await flushPromises()

      expect(isLoading.value).toBe(false)
      expect(result.value).toEqual({ /* ... */ })
    })
  })

  it('应处理错误状态', async () => {
    // ...
  })
})
说明:测试用例中使用effectScope能避免状态污染、自动清理复杂副作用、支持异步、嵌套作用域管理测试等优势
五、总结
effectScope是管理复杂副作用的终极解决方案。通过它,您可以:
将相关副作用组织到逻辑单元中
通过单个stop()调用清理所有资源
创建自包含的可复用逻辑单元
确保组件卸载时完全清理
简化测试和状态管理
在以下场景中优先考虑使用effectScope:
包含3个以上副作用的组件
需要管理定时器/事件监听的可复用逻辑
涉及多个响应式依赖的复杂表单
需要在组件间共享的有状态逻辑
需要精确控制副作用的测试用例
掌握effectScope将使您的Vue3应用更健壮、更易维护,特别在处理复杂场景时,它能显著提升代码质量和开发体验。