目录
一、软件介绍
1、软件概述
Apache DolphinScheduler 是一个分布式易扩展的可视化DAG工作流任务调度开源系统。适用于企业级场景,提供了一个可视化操作任务、工作流和全生命周期数据处理过程的解决方案。
Apache DolphinScheduler 旨在解决复杂的大数据任务依赖关系,并为应用程序提供数据和各种 OPS 编排中的关系。 解决数据研发ETL依赖错综复杂,无法监控任务健康状态的问题。 DolphinScheduler 以 DAG(Directed Acyclic Graph,DAG)流式方式组装任务,可以及时监控任务的执行状态,支持重试、指定节点恢复失败、暂停、恢复、终止任务等操作。
官网:https://dolphinscheduler.apache.org/zh-cn
官方文档:https://dolphinscheduler.apache.org/zh-cn/docs/3.2.2
DolphinScheduler 的主要特性如下:
- 易于部署,提供四种部署方式,包括Standalone、Cluster、Docker和Kubernetes
- 易于使用,可以通过四种方式创建和管理工作流,包括Web UI、Python SDK和Open API
- 高可靠高可用,多主多从的去中心化架构,原生支持横向扩展
- 高性能,性能比其他编排平台快N倍,每天可支持千万级任务
- Cloud Native,DolphinScheduler支持编排多云/数据中心工作流,支持自定义任务类型
- 对工作流和工作流实例(包括任务)进行版本控制
- 工作流和任务的多种状态控制,支持随时暂停/停止/恢复它们
- 多租户支持
- 其他如补数支持(Web UI 原生),包括项目和数据源的权限控制
2、发展历史
2019年3月,易观决定将DolphinScheduler项目开源,在GitHub上发布了第一个开源版本(1.0.0)。开源后,吸引了众多开发者的关注,社区开始逐渐形成,为项目的后续发展奠定了基础。
2020年7月,DolphinScheduler顺利进入Apache软件基金会进行孵化,这标志着项目得到了更广泛的认可和支持。进入Apache孵化期后,项目遵循Apache的开源治理模式,吸引了更多来自不同企业和组织的开发者参与贡献,进一步推动了项目的发展。
2021年11月,DolphinScheduler从Apache孵化器顺利毕业,成为Apache顶级项目(TLP)。这是项目发展的一个重要里程碑,意味着DolphinScheduler在技术、社区、治理等方面都达到了较高的水平,得到了Apache软件基金会的充分肯定。
3、名词解释
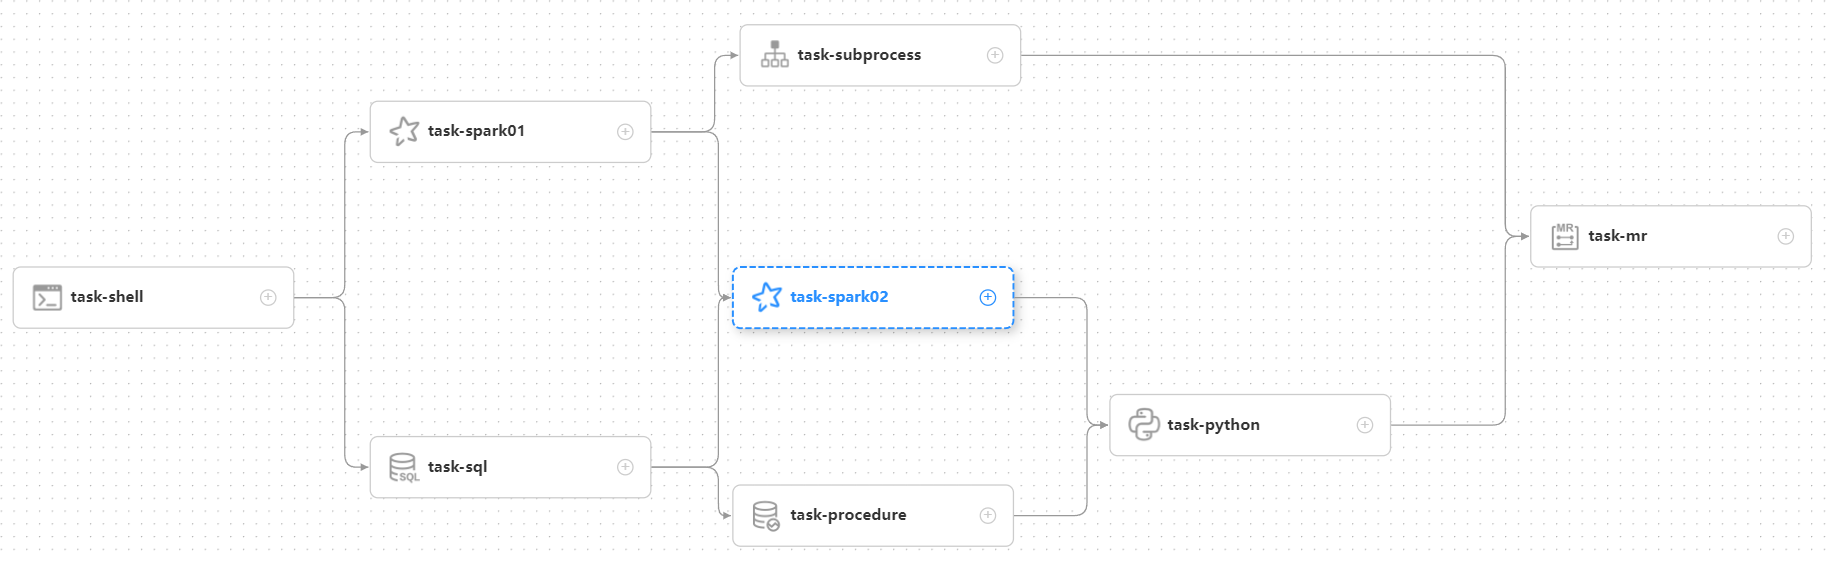
DAG: 全称 Directed Acyclic Graph,简称 DAG。工作流中的 Task 任务以有向无环图的形式组装起来,从入度为零的节点进行拓扑遍历,直到无后继节点为止。举例如下图:
流程定义:通过拖拽任务节点并建立任务节点的关联所形成的可视化DAG
流程实例:流程实例是流程定义的实例化,可以通过手动启动或定时调度生成。每运行一次流程定义,产生一个流程实例
任务实例:任务实例是流程定义中任务节点的实例化,标识着某个具体的任务
任务类型:目前支持有 SHELL、SQL、SUB_WORKFLOW(子工作流)、PROCEDURE、MR、SPARK、PYTHON、DEPENDENT(依赖),同时计划支持动态插件扩展,注意:其中 SUB_WORKFLOW类型的任务需要关联另外一个流程定义,被关联的流程定义是可以单独启动执行的
调度方式:系统支持基于 cron 表达式的定时调度和手动调度。命令类型支持:启动工作流、从当前节点开始执行、恢复被容错的工作流、恢复暂停流程、从失败节点开始执行、补数、定时、重跑、暂停、停止、恢复等待线程。 其中 恢复被容错的工作流 和 恢复等待线程 两种命令类型是由调度内部控制使用,外部无法调用
定时调度:系统采用 quartz 分布式调度器,并同时支持cron表达式可视化的生成
依赖:系统不单单支持 DAG 简单的前驱和后继节点之间的依赖,同时还提供任务依赖节点,支持流程间的自定义任务依赖
优先级 :支持流程实例和任务实例的优先级,如果流程实例和任务实例的优先级不设置,则默认是先进先出
邮件告警:支持 SQL任务 查询结果邮件发送,流程实例运行结果邮件告警及容错告警通知
失败策略:对于并行运行的任务,如果有任务失败,提供两种失败策略处理方式,继续是指不管并行运行任务的状态,直到流程失败结束。结束是指一旦发现失败任务,则同时Kill掉正在运行的并行任务,流程失败结束
补数:补历史数据,支持区间并行和串行两种补数方式,其日期选择方式包括日期范围和日期枚举两种
4、模块介绍
dolphinscheduler-master master模块,提供工作流管理和编排服务。
dolphinscheduler-worker worker模块,提供任务执行管理服务。
dolphinscheduler-alert 告警模块,提供 AlertServer 服务。
dolphinscheduler-api web应用模块,提供 ApiServer 服务。
dolphinscheduler-common 通用的常量枚举、工具类、数据结构或者基类
dolphinscheduler-dao 提供数据库访问等操作。
dolphinscheduler-extract extract模块,包含master/worker/alert的sdk
dolphinscheduler-service service模块,包含Quartz、Zookeeper、日志客户端访问服务,便于server模块和api模块调用
dolphinscheduler-ui 前端模块
二、软件部署
安装参考:https://dolphinscheduler.apache.org/en-us/docs/3.2.2/guide/installation/standalone
1、下载发布包
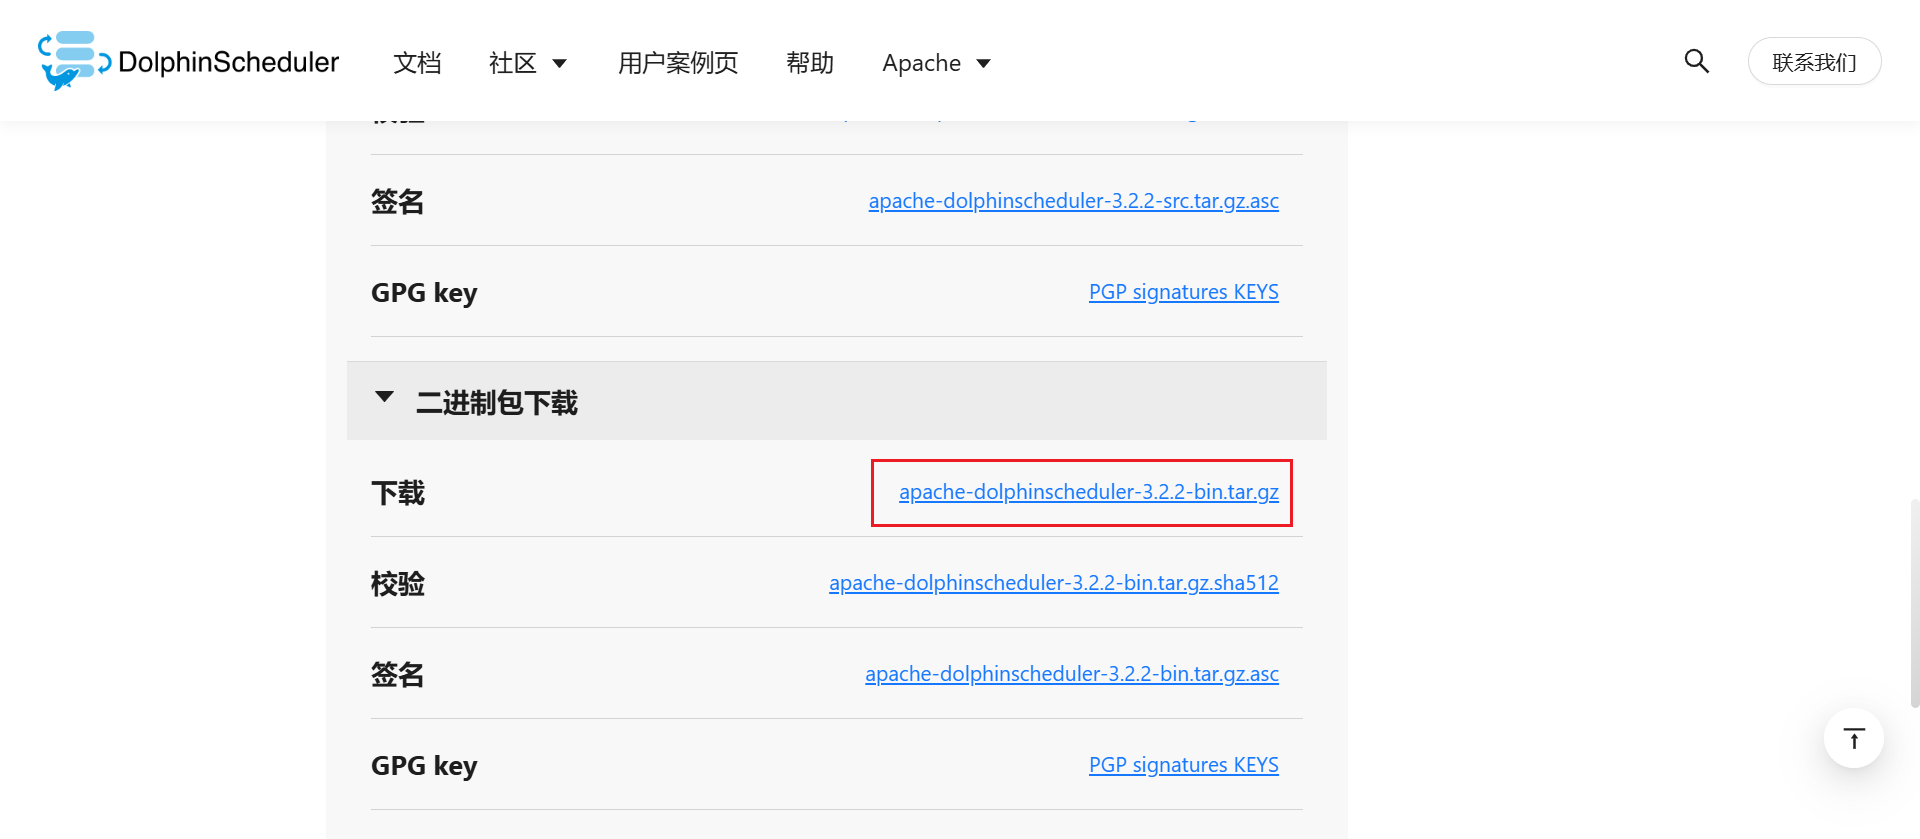
软件地址:https://dolphinscheduler.apache.org/zh-cn/download/3.2.2
2、上传与解压
cd /usr/local/soft/
tar -zxvf apache-dolphinscheduler-3.2.2-bin.tar.gz
3、配置元数据库
在 Standalone 模式下,DolphinScheduler 默认使用嵌入式数据库,可查看/usr/local/soft/apache-dolphinscheduler-3.2.2-bin/standalone-server/conf/application.yaml。本案例使用外部数据库 MySQL,方便后续直接操作相关数据
a、添加mysql依赖
将mysql-connector-java-8.0.15.jar放置到/usr/local/soft/apache-dolphinscheduler-3.2.2-bin/standalone-server/libs/standalone-server/文件夹下
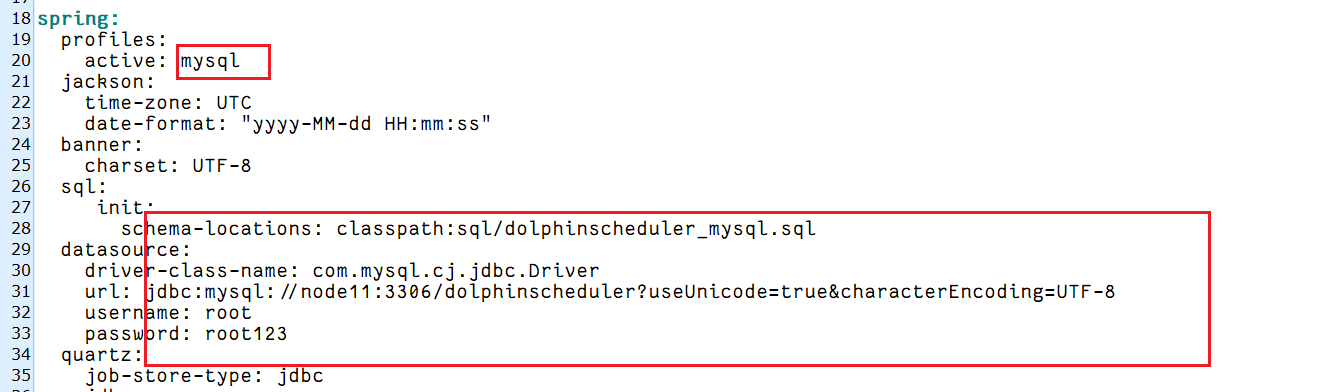
b、修改数据库参数
修改/usr/local/soft/apache-dolphinscheduler-3.2.2-bin/standalone-server/conf/application.yaml中数据库参数,参考如下:
#
# Licensed to the Apache Software Foundation (ASF) under one or more
# contributor license agreements.  See the NOTICE file distributed with
# this work for additional information regarding copyright ownership.
# The ASF licenses this file to You under the Apache License, Version 2.0
# (the "License"); you may not use this file except in compliance with
# the License.  You may obtain a copy of the License at
#
#     http://www.apache.org/licenses/LICENSE-2.0
#
# Unless required by applicable law or agreed to in writing, software
# distributed under the License is distributed on an "AS IS" BASIS,
# WITHOUT WARRANTIES OR CONDITIONS OF ANY KIND, either express or implied.
# See the License for the specific language governing permissions and
# limitations under the License.
#

spring:
  profiles:
    active: mysql
  jackson:
    time-zone: UTC
    date-format: "yyyy-MM-dd HH:mm:ss"
  banner:
    charset: UTF-8
  sql:
     init:
       schema-locations: classpath:sql/dolphinscheduler_mysql.sql
  datasource:
    driver-class-name: com.mysql.cj.jdbc.Driver
    url: jdbc:mysql://node11:3306/dolphinscheduler?useUnicode=true&characterEncoding=UTF-8
    username: root
    password: root123
  quartz:
    job-store-type: jdbc
    jdbc:
      initialize-schema: never
    properties:
      org.quartz.threadPool.threadPriority: 5
      org.quartz.jobStore.isClustered: true
      org.quartz.jobStore.class: org.springframework.scheduling.quartz.LocalDataSourceJobStore
      org.quartz.scheduler.instanceId: AUTO
      org.quartz.jobStore.tablePrefix: QRTZ_
      org.quartz.jobStore.acquireTriggersWithinLock: true
      org.quartz.scheduler.instanceName: DolphinScheduler
      org.quartz.threadPool.class: org.quartz.simpl.SimpleThreadPool
      org.quartz.jobStore.useProperties: false
      org.quartz.threadPool.makeThreadsDaemons: true
      org.quartz.threadPool.threadCount: 25
      org.quartz.jobStore.misfireThreshold: 60000
      org.quartz.scheduler.makeSchedulerThreadDaemon: true
      org.quartz.jobStore.driverDelegateClass: org.quartz.impl.jdbcjobstore.StdJDBCDelegate
      org.quartz.jobStore.clusterCheckinInterval: 5000
      org.quartz.scheduler.batchTriggerAcquisitionMaxCount: 1
  servlet:
    multipart:
      max-file-size: 1024MB
      max-request-size: 1024MB
  messages:
    basename: i18n/messages
  jpa:
    hibernate:
      ddl-auto: none
  mvc:
    pathmatch:
      matching-strategy: ANT_PATH_MATCHER
  cloud.discovery.client.composite-indicator.enabled: false

mybatis-plus:
  mapper-locations: classpath:org/apache/dolphinscheduler/dao/mapper/*Mapper.xml
  type-aliases-package: org.apache.dolphinscheduler.dao.entity
  configuration:
    cache-enabled: false
    call-setters-on-nulls: true
    map-underscore-to-camel-case: true
    jdbc-type-for-null: NULL
  global-config:
    db-config:
      id-type: auto
    banner: false

registry:
  type: zookeeper
  zookeeper:
    namespace: dolphinscheduler
    connect-string: localhost:2181
    retry-policy:
      base-sleep-time: 60ms
      max-sleep: 300ms
      max-retries: 5
    session-timeout: 30s
    connection-timeout: 9s
    block-until-connected: 600ms
    digest: ~

security:
  authentication:
    # Authentication types (supported types: PASSWORD,LDAP,CASDOOR_SSO)
    type: PASSWORD
    # IF you set type `LDAP`, below config will be effective
    ldap:
      # ldap server config
      urls: ldap://ldap.forumsys.com:389/
      base-dn: dc=example,dc=com
      username: cn=read-only-admin,dc=example,dc=com
      password: password
      user:
        # admin userId when you use LDAP login
        admin: read-only-admin
        identity-attribute: uid
        email-attribute: mail
        # action when ldap user is not exist (supported types: CREATE,DENY)
        not-exist-action: CREATE
      ssl:
        enable: false
        # jks file absolute path && password
        trust-store: "/ldapkeystore.jks"
        trust-store-password: ""
    casdoor:
      user:
        admin: admin
    oauth2:
      enable: false
      provider:
        github:
          authorizationUri: "https://github.com/login/oauth/authorize"
          redirectUri: "http://localhost:12345/dolphinscheduler/redirect/login/oauth2"
          clientId: ""
          clientSecret: ""
          tokenUri: "https://github.com/login/oauth/access_token"
          userInfoUri: "https://api.github.com/user"
          callbackUrl: "http://localhost:5173/login"
          iconUri: ""
          provider: github
        gitee:
          authorizationUri: "https://gitee.com/oauth/authorize"
          redirectUri: "http://127.0.0.1:12345/dolphinscheduler/redirect/login/oauth2"
          clientId: ""
          clientSecret: ""
          tokenUri: "https://gitee.com/oauth/token?grant_type=authorization_code"
          userInfoUri: "https://gitee.com/api/v5/user"
          callbackUrl: "http://127.0.0.1:5173/login"
          iconUri: ""
          provider: gitee

casdoor:
  # Your Casdoor server url
  endpoint: http://localhost:8000
  client-id: ""
  client-secret: ""
  # The certificate may be multi-line, you can use `|-` for ease
  certificate: ""
  # Your organization name added in Casdoor
  organization-name: built-in
  # Your application name added in Casdoor
  application-name: dolphinscheduler
  # Doplhinscheduler login url
  redirect-url: http://localhost:5173/login


master:
  listen-port: 5678
  # master prepare execute thread number to limit handle commands in parallel
  pre-exec-threads: 10
  # master execute thread number to limit process instances in parallel
  exec-threads: 10
  # master dispatch task number per batch
  dispatch-task-number: 3
  # master host selector to select a suitable worker, default value: LowerWeight. Optional values include random, round_robin, lower_weight
  host-selector: lower_weight
  # master heartbeat interval
  max-heartbeat-interval: 10s
  # master commit task retry times
  task-commit-retry-times: 5
  # master commit task interval
  task-commit-interval: 1s
  state-wheel-interval: 5s
  server-load-protection:
    enabled: true
    # Master max system cpu usage, when the master's system cpu usage is smaller then this value, master server can execute workflow.
    max-system-cpu-usage-percentage-thresholds: 0.9
    # Master max jvm cpu usage, when the master's jvm cpu usage is smaller then this value, master server can execute workflow.
    max-jvm-cpu-usage-percentage-thresholds: 0.9
    # Master max System memory usage , when the master's system memory usage is smaller then this value, master server can execute workflow.
    max-system-memory-usage-percentage-thresholds: 0.9
    # Master max disk usage , when the master's disk usage is smaller then this value, master server can execute workflow.
    max-disk-usage-percentage-thresholds: 0.9
  # failover interval
  failover-interval: 10m
  # kill yarn/k8s application when failover taskInstance, default true
  kill-application-when-task-failover: true
  worker-group-refresh-interval: 10s
  command-fetch-strategy:
    type: ID_SLOT_BASED
    config:
      # The incremental id step
      id-step: 1
      # master fetch command num
      fetch-size: 10

worker:
  # worker listener port
  listen-port: 1234
  # worker execute thread number to limit task instances in parallel
  exec-threads: 10
  # worker heartbeat interval
  max-heartbeat-interval: 10s
  # worker host weight to dispatch tasks, default value 100
  host-weight: 100
  server-load-protection:
    enabled: true
    # Worker max system cpu usage, when the worker's system cpu usage is smaller then this value, worker server can be dispatched tasks.
    max-system-cpu-usage-percentage-thresholds: 0.9
    # Worker max jvm cpu usage, when the worker's jvm cpu usage is smaller then this value, worker server can be dispatched tasks.
    max-jvm-cpu-usage-percentage-thresholds: 0.9
    # Worker max System memory usage , when the worker's system memory usage is smaller then this value, worker server can be dispatched tasks.
    max-system-memory-usage-percentage-thresholds: 0.9
    # Worker max disk usage , when the worker's disk usage is smaller then this value, worker server can be dispatched tasks.
    max-disk-usage-percentage-thresholds: 0.9
  task-execute-threads-full-policy: REJECT
  tenant-config:
    # tenant corresponds to the user of the system, which is used by the worker to submit the job. If system does not have this user, it will be automatically created after the parameter worker.tenant.auto.create is true.
    auto-create-tenant-enabled: true
    # Scenes to be used for distributed users. For example, users created by FreeIpa are stored in LDAP. This parameter only applies to Linux, When this parameter is true, worker.tenant.auto.create has no effect and will not automatically create tenants.
    distributed-tenant: false
    # If set true, will use worker bootstrap user as the tenant to execute task when the tenant is `default`;
    default-tenant-enabled: true

alert:
  port: 50052
  # Mark each alert of alert server if late after x milliseconds as failed.
  # Define value is (0 = infinite), and alert server would be waiting alert result.
  wait-timeout: 0
  max-heartbeat-interval: 60s
  # The maximum number of alerts that can be processed in parallel
  sender-parallelism: 5

api:
  audit-enable: false
  # Traffic control, if you turn on this config, the maximum number of request/s will be limited.
  # global max request number per second
  # default tenant-level max request number
  traffic-control:
    global-switch: false
    max-global-qps-rate: 300
    tenant-switch: false
    default-tenant-qps-rate: 10
      #customize-tenant-qps-rate:
    # eg.
    #tenant1: 11
    #tenant2: 20
  python-gateway:
    # Weather enable python gateway server or not. The default value is true.
    enabled: true
    # Authentication token for connection from python api to python gateway server. Should be changed the default value
    # when you deploy in public network.
    auth-token: jwUDzpLsNKEFER4*a8gruBH_GsAurNxU7A@Xc
    # The address of Python gateway server start. Set its value to `0.0.0.0` if your Python API run in different
    # between Python gateway server. It could be be specific to other address like `127.0.0.1` or `localhost`
    gateway-server-address: 0.0.0.0
    # The port of Python gateway server start. Define which port you could connect to Python gateway server from
    # Python API side.
    gateway-server-port: 25333
    # The address of Python callback client.
    python-address: 127.0.0.1
    # The port of Python callback client.
    python-port: 25334
    # Close connection of socket server if no other request accept after x milliseconds. Define value is (0 = infinite),
    # and socket server would never close even though no requests accept
    connect-timeout: 0
    # Close each active connection of socket server if python program not active after x milliseconds. Define value is
    # (0 = infinite), and socket server would never close even though no requests accept
    read-timeout: 0

server:
  port: 12345
  servlet:
    session:
      timeout: 120m
    context-path: /dolphinscheduler/
  compression:
    enabled: true
    mime-types: text/html,text/xml,text/plain,text/css,text/javascript,application/javascript,application/json,application/xml
  jetty:
    max-http-form-post-size: 5000000
    accesslog:
      enabled: true
      custom-format: '%{client}a - %u %t "%r" %s %O %{ms}Tms'

management:
  endpoints:
    web:
      exposure:
        include: health,metrics,prometheus
  endpoint:
    health:
      enabled: true
      show-details: always
  health:
    db:
      enabled: true
    defaults:
      enabled: false
  metrics:
    tags:
      application: ${spring.application.name}

metrics:
  enabled: true

# Override by profile
---
spring:
  config:
    activate:
      on-profile: postgresql
  quartz:
    properties:
      org.quartz.jobStore.driverDelegateClass: org.quartz.impl.jdbcjobstore.PostgreSQLDelegate
  datasource:
    driver-class-name: org.postgresql.Driver
    url: jdbc:postgresql://127.0.0.1:5432/dolphinscheduler
    username: root
    password: root

---
spring:
  config:
    activate:
      on-profile: mysql
  sql:
     init:
       schema-locations: classpath:sql/dolphinscheduler_mysql.sql
  datasource:
    driver-class-name: com.mysql.cj.jdbc.Driver
    url: jdbc:mysql://node11:3306/dolphinscheduler?useUnicode=true&characterEncoding=UTF-8
    username: root
    password: root123
c、创建库表
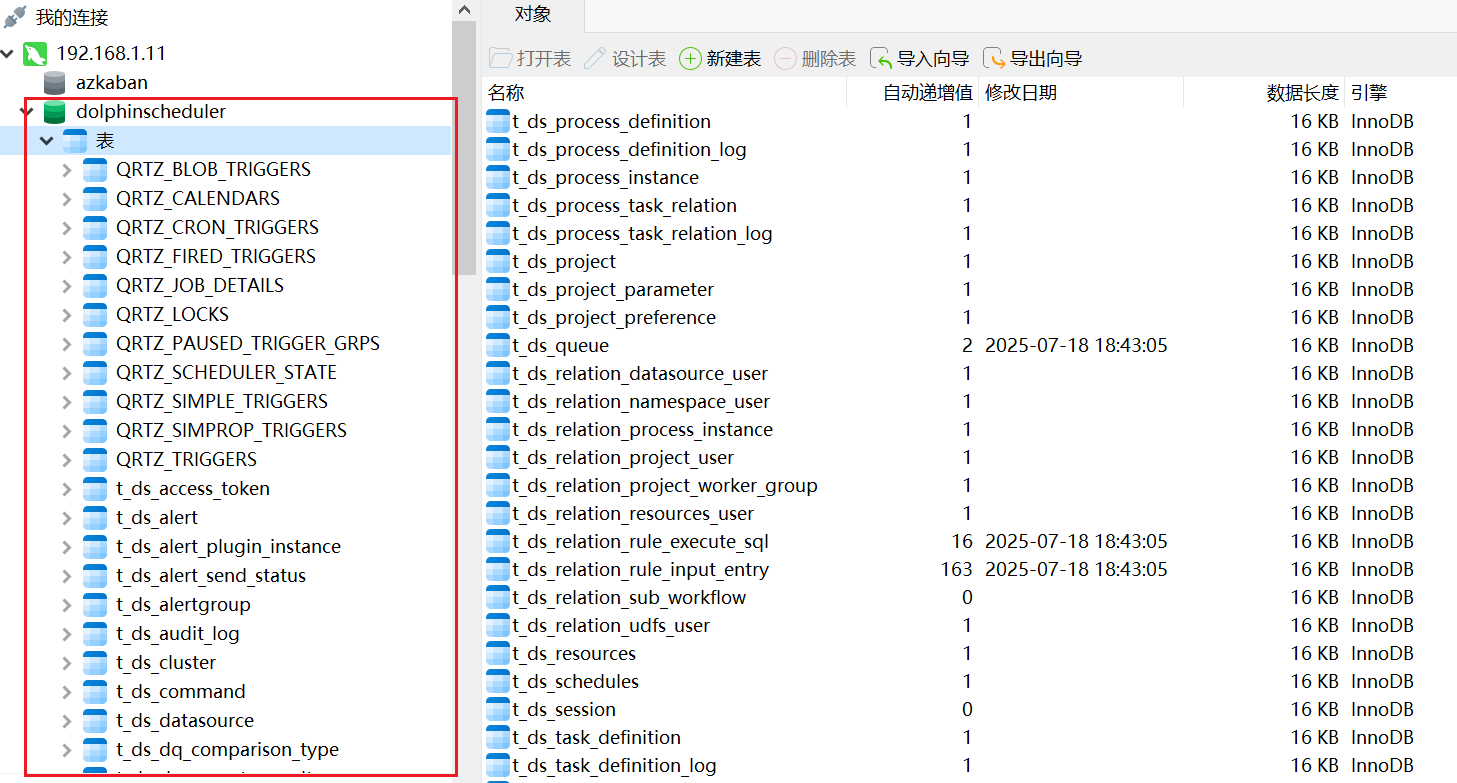
登录数据库,创建名为dolphinscheduler的数据库,然后将/usr/local/soft/apache-dolphinscheduler-3.2.2-bin/standalone-server/conf/sql/dolphinscheduler_mysql.sql表文件导入进去
4、启动
cd /usr/local/soft/apache-dolphinscheduler-3.2.2-bin
./bin/dolphinscheduler-daemon.sh start standalone-server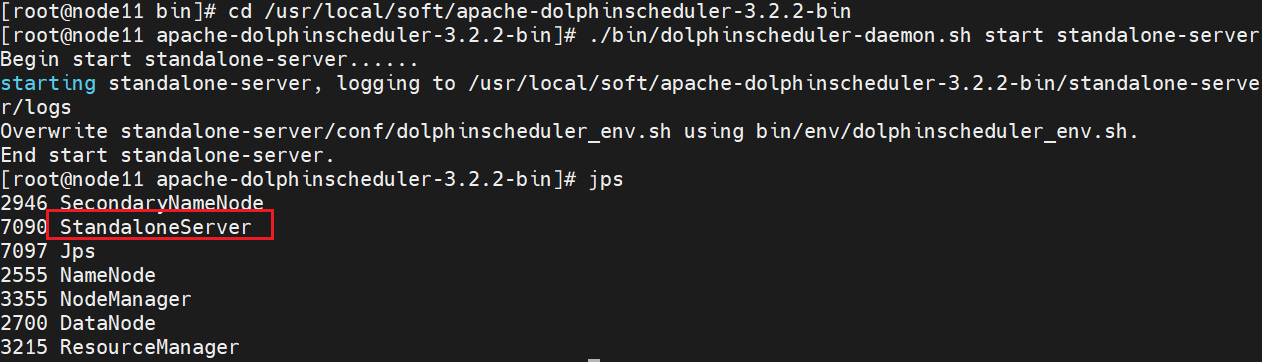 5、浏览器验证
浏览器输入:http://node11:12345/dolphinscheduler/ui/login
用户名admin 密码dolphinscheduler123
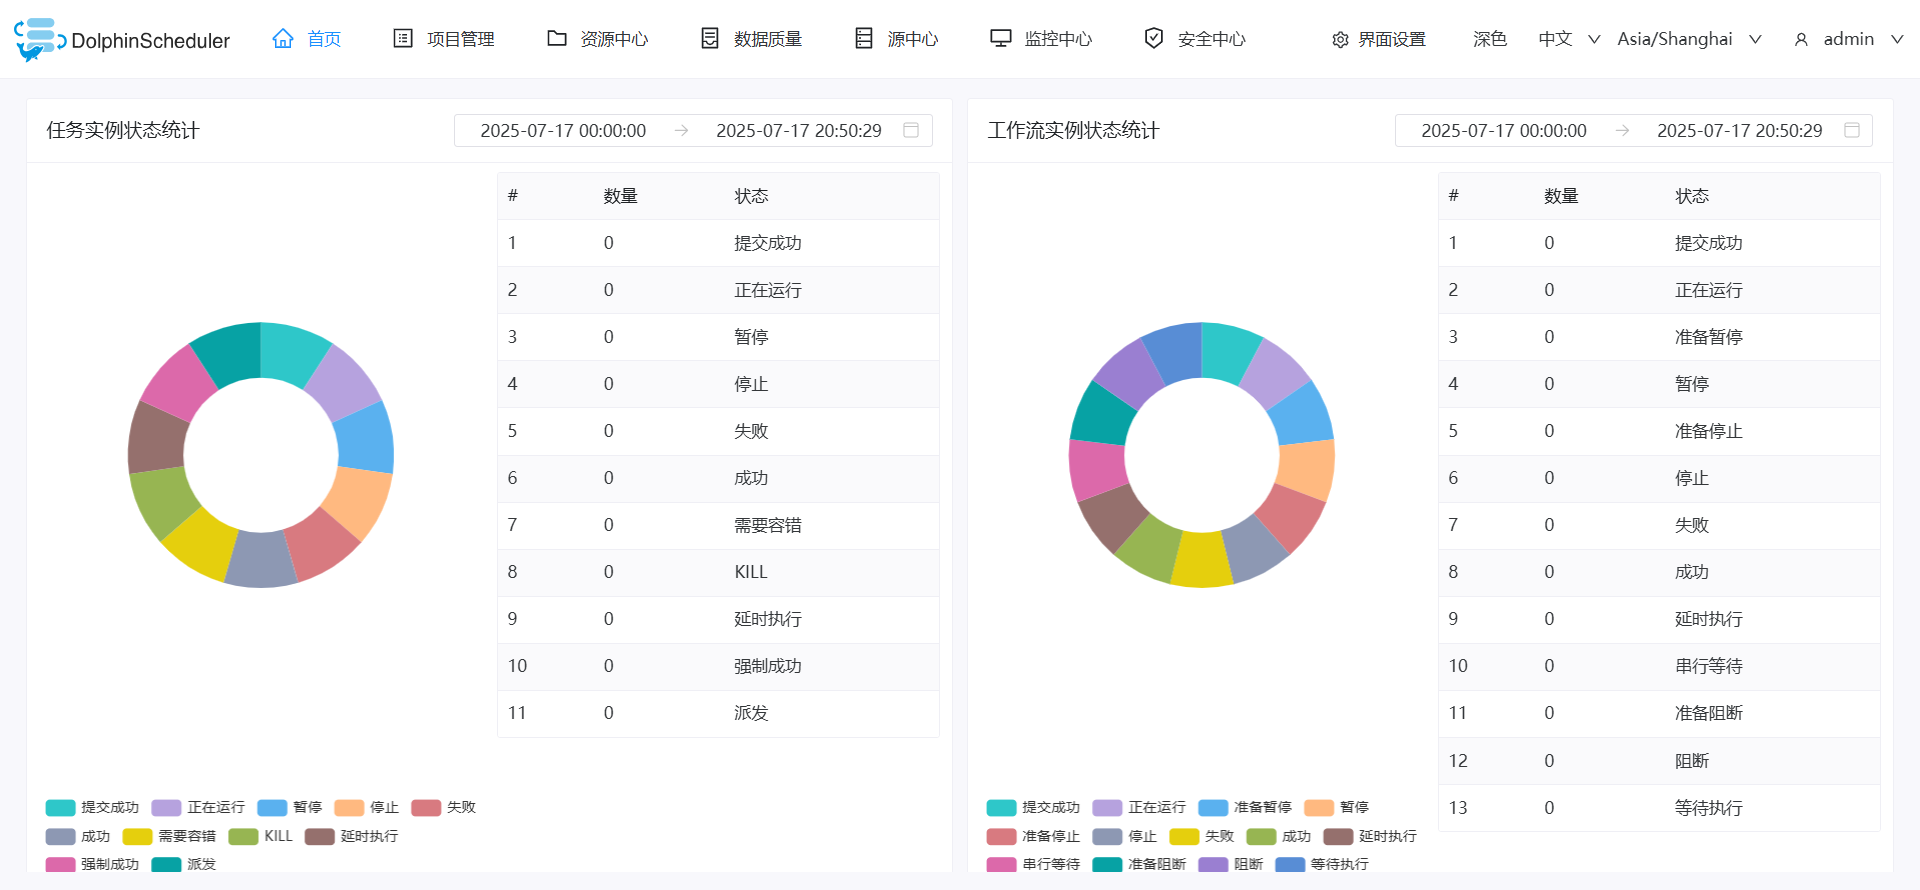
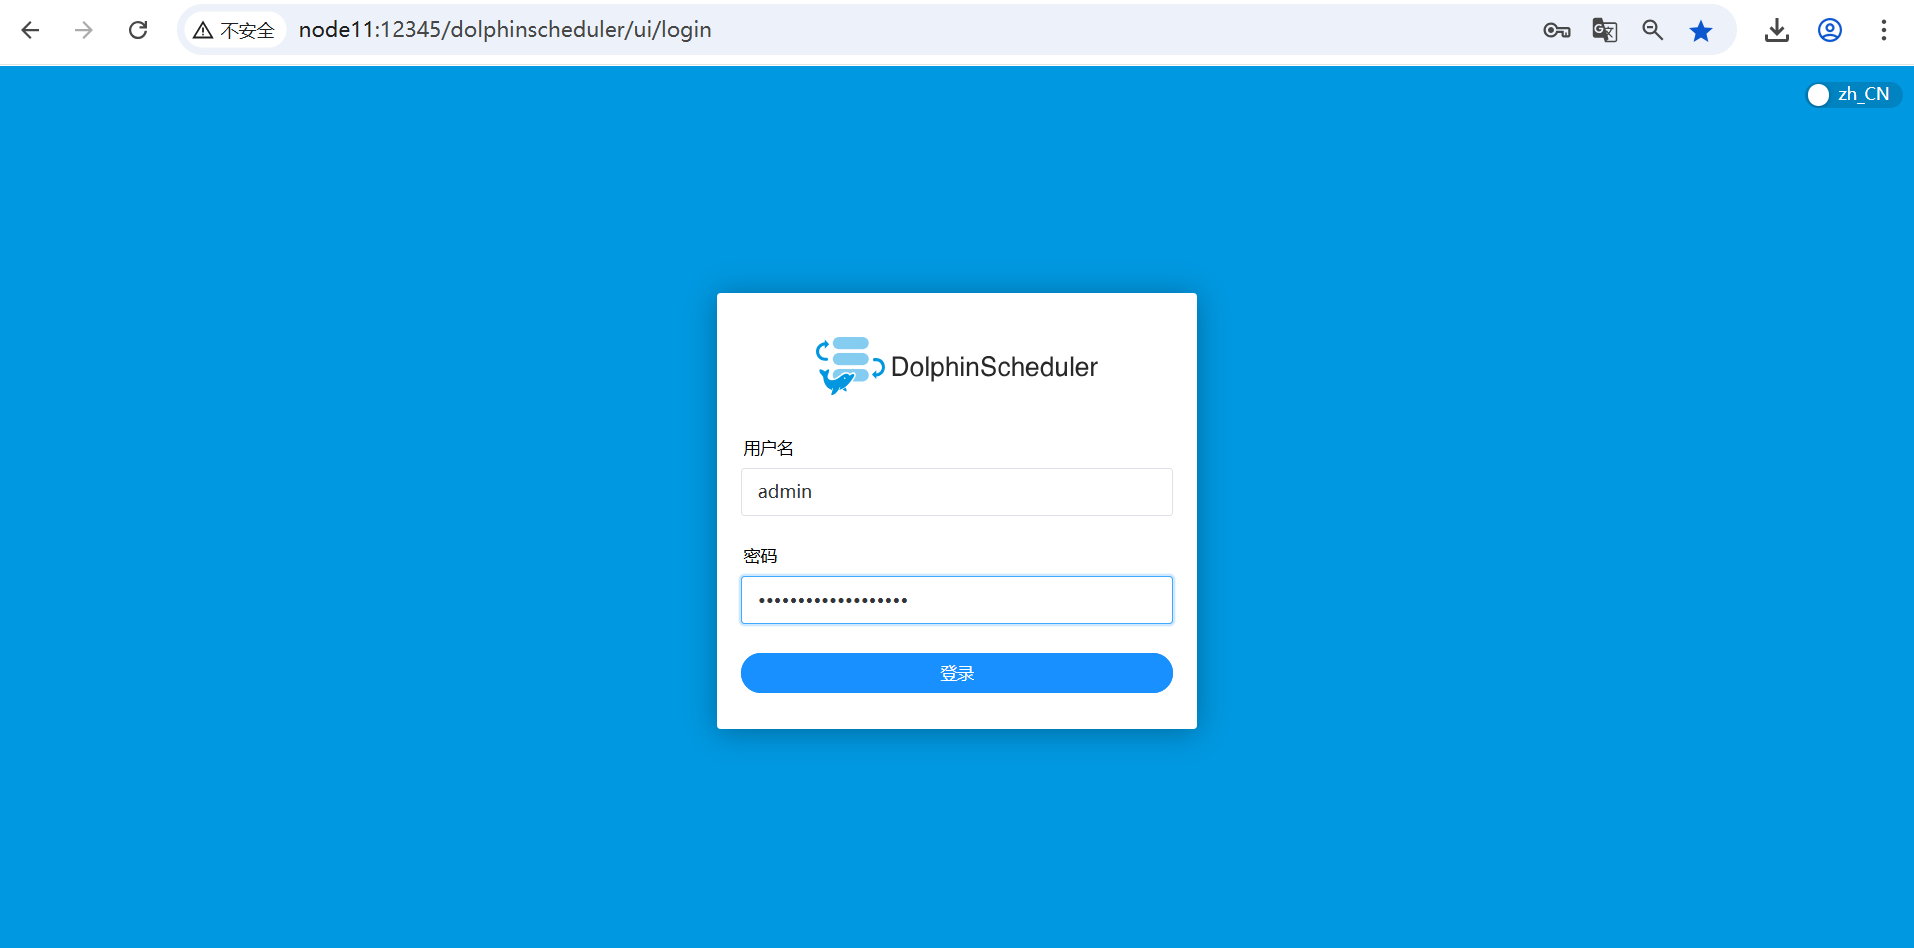 点击登录,查看界面
三、常见库表
删除实例
SET FOREIGN_KEY_CHECKS = 0;
TRUNCATE TABLE dolphinscheduler.t_ds_task_instance;
SET FOREIGN_KEY_CHECKS = 1;