一、为什么需要MCP?
随着大语言模型的兴起,越来越多的应用系统开始转向Agent架构
- 用户输入 → 智能体规划任务 → 调用模型完成任务 → 汇总回复
但是在真正的工程实践中,往往不止一个模型:
- LLM模型:用于生成、对话、总结
- Embedding 模型:用于向量检索与语义匹配
- 多模态模型:图像、语音、视频理解
- 工具模型:SQL 生成、代码补全、文档解析
于是就有了MCP,来统一调度模型服务
二、什么是MCP服务?
MCP(Model Compute Platform) 是一种面向 Agent 的后端服务,用于注册、统一封装、调度调用底层模型能力。
MCP 本质上是一种 模型能力路由与编排平台,其目标是让上层 Agent “只管调用,不管细节”。
你可能听着很懵,举个简单的例子:
比如用户提问:帮我生成一个小猫弹琴的视频吧
Agent 调用 MCP 的两步链路:
- 使用**文生图模型(Text-to-Image)**根据 prompt 生成一张“弹琴小猫”图片
- 使用视频生成模型或图像动画模型(Image-to-Video)将静态图转成视频
代码类似这种:
// 第一步,文字生成图片
const imageResponse = await MCP.call("generateImage", {
  prompt: "一只小猫坐在钢琴前弹琴",
  resolution: "512x512"
});
const imageUrl = imageResponse.url;

// 第二步,图片生成视频
const videoResponse = await MCP.call("imageToVideo", {
  imageUrl,
  duration: 8
});

// 返回视频链接给用户
return `视频已生成,观看链接:${videoResponse.videoUrl}`;
三、MCP的角色和结构
http相当于浏览器和服务器之间的协议,有一些标准化的规则,Agent与服务之前也有标准化的通信协议。
- 工具调用方式(Tools)
- 资源访问方式(Resources)
- 输入输出的结构(inputSchema)
MCP的角色
| 角色 | 说明 |
|---|---|
| Agent | 使用服务的一方(比如一个大模型、插件、UI 工具) |
| MCP Server | 提供服务的一方(比如调用文生图,图生视频的服务) |
| Tool | MCP Server 中注册的一个功能(可被 Agent 调用) |
| Resource | MCP Server 中注册的资源(按 URI 模板动态生成内容) |
| Transport | MCP Server 和 Agent 之间的通信通道(如 Stdio、WebSocket、HTTP) |
MCP也可以理解为扩充了大模型的能力,大模型借助MCP服务还可以去做一些操作本地文件,打开浏览器等等
四、MCP-DEMO
当前mcp提供了两个tools,打开本地应用和计算数字加法
1. 导入模块
import { McpServer } from "@modelcontextprotocol/sdk/server/mcp.js";
import { StdioServerTransport } from "@modelcontextprotocol/sdk/server/stdio.js";
import { z } from "zod";
import { exec } from "child_process";
- McpServer:MCP 服务器核心类,用于创建和管理 MCP 服务。
- StdioServerTransport:基于标准输入输出(stdin/stdout)的通信传输机制,实现服务端与客户端的消息收发。
- z(Zod):声明式校验库,用于定义输入参数的类型和结构。
2. 函数 openLocalApp(appName)
这个函数的作用是根据传入的应用名称,结合当前操作系统,拼接对应的系统命令来打开该应用。
function openLocalApp(appName) {
  const platform = process.platform;
  let command;

  // 根据操作系统构造打开命令
  if (platform === "win32") {
    // Windows
    switch (appName.toLowerCase()) {
      case "chrome":
        command = `start chrome`;
        break;
      case "notepad":
        command = `start notepad`;
        break;
      default:
        throw new Error(`Unknown app: ${appName}`);
    }
  } else if (platform === "darwin") {
    // macOS
    switch (appName.toLowerCase()) {
      case "chrome":
        command = `open -a "Google Chrome"`;
        break;
      case "textedit":
        command = `open -a TextEdit`;
        break;
      default:
        throw new Error(`Unknown app: ${appName}`);
    }
  } else if (platform === "linux") {
    // Linux
    switch (appName.toLowerCase()) {
      case "chrome":
        command = `google-chrome`;
        break;
      case "gedit":
        command = `gedit`;
        break;
      default:
        throw new Error(`Unknown app: ${appName}`);
    }
  } else {
    throw new Error("Unsupported platform: " + platform);
  }

  return new Promise((resolve, reject) => {
    exec(command, (error) => {
      if (error) {
        reject(error);
      } else {
        resolve(`Opened ${appName} successfully`);
      }
    });
  });
}
3. 主函数 main()
- 创建 MCP 服务器并注册工具,启动服务监听通信
创建 MCP 服务器实例,名字为 local-app-opener,版本 1.0.0 - 注册工具 openApp
注册一个工具名叫 openApp,代表打开本地应用,里面还包含一些工具元信息,其中 inputSchema定义了输入参数格式 - 启动通信传输层并连接
实例化 StdioServerTransport,通过标准输入输出流和Agent通信
async function main() {
  const server = new McpServer({
    name: "local-app-opener",
    version: "1.0.0",
  });

  server.registerTool(
    "openApp",
    {
      title: "Open Local Application",
      description: "Open a local application by name, e.g. chrome, notepad",
      inputSchema: { appName: z.string() },
    },
    async ({ appName }) => {
      try {
        const result = await openLocalApp(appName);
        return {
          content: [{ type: "text", text: result }],
        };
      } catch (err) {
        return {
          content: [{ type: "text", text: `Failed to open app: ${err.message}` }],
        };
      }
    }
  );
  server.registerTool("add", {
    title: "Add Numbers",
    description: "Add two numbers",
    inputSchema: { a: z.number(), b: z.number() },
  }, async ({ a, b }) => {
    return {
      content: [{ type: "text", text: `Sum: ${a + b}` }],
    };
  });

  const transport = new StdioServerTransport();
  await server.connect(transport);
}

main();
4. 使用展示:
1. 配置MCP:
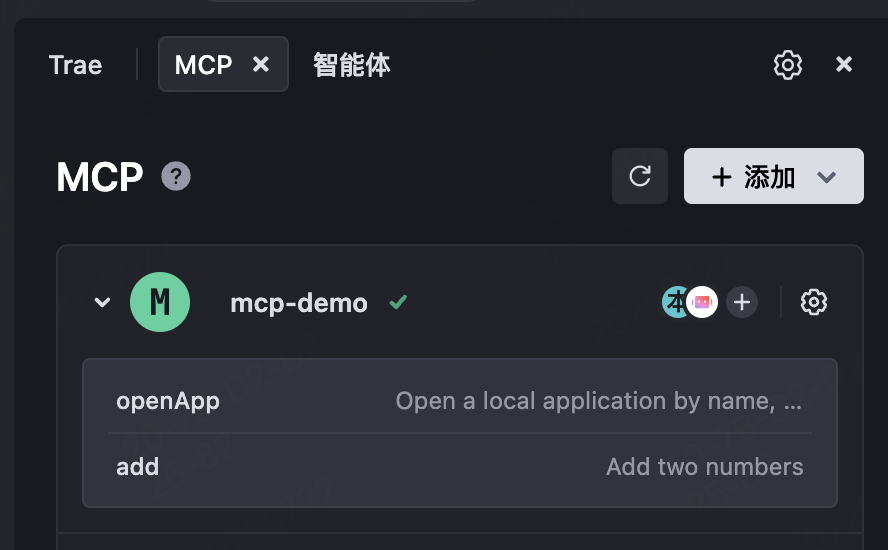
2. 测试MCP:

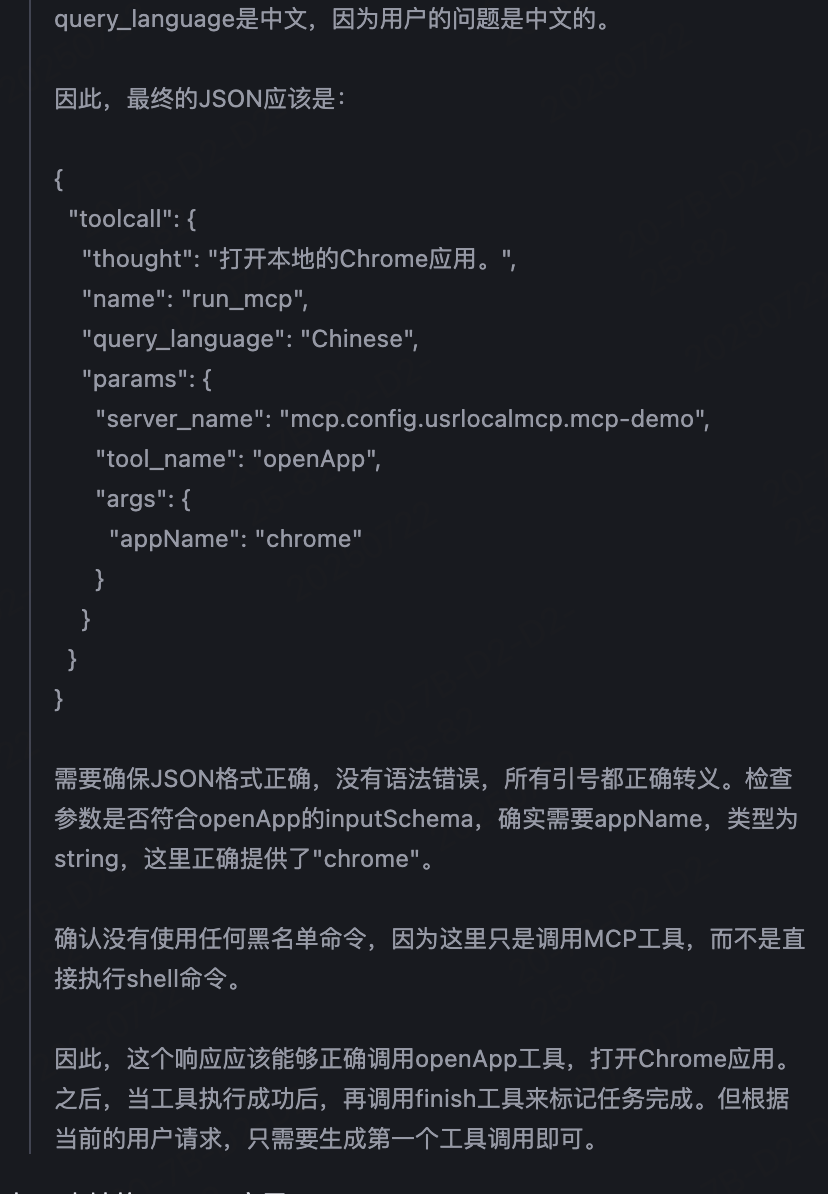
在经过思考过程之后,最终整合了输入格式:
我测试用的是Trae,可以直接配置下面的json体验一下:
{
  "mcpServers": {
    "mcp-demo": {
      "command": "npx",
      "args": [
        "-y",
        "mcp-test-zhuling"
      ]
    }
  }
}