Asp.Net Core 6.0 MVC 入门
简介
此教程在轻松愉快的氛围中介绍一个具有控制器和视图的 ASP.NET Core MVC Web 图书管理应用。
QQ群:577922290

目标
对于初学者而言,在教程结束时,你将拥有一个管理和显示图书数据的简单应用,同时你还将会对自身的编程技术充满信心。
Visual Studio 2022下载安装操作不在本教程范围内,因为操作基本就是选择,然后下一步。如果安装失败,可自行百度!
下载地址:https://visualstudio.microsoft.com/zh-hans/free-developer-offers/
第一章 创建Asp.Net Core Web应用
- 启动Visual Studio 2022,单击创建新项目(N) ;
- 在创建新项目对话框中选择ASP.NET Core Web 应用(模型-视图-控制器) 单击下一步;

- 在配置新项目对话框中输入”项目名称“为BookQuerySystem(可自行命名),自行选择位置(L),单击下一步;

- 在配置其他信息对话框中,框架(F) 选择”.NET 6.0(长期支持)“、身份验证类型(A) 选”无“、勾上配置HTTPS(H) 选择框,单击创建;

在几秒钟的等待之后Visual Studio 2022 使用默认项目模板为我们创建了一个叫BookQuerySystem的MVC项目。 这是一个简单的项目,接下来我们按 Ctrl+F5来运行它。
按Ctrl+F5 是在非调试情况下启动应用,在这情况下我们依然可以更改代码、保存文件和刷新浏览器查看代码更改后的页面效果。
如果项目没有配置使用 SSL,Visual Studio 会弹出对话框:
- 如果信任 IIS Express SSL 证书,请选择“是”;
- 如果你同意信任开发证书,请选择“是”;
- 以上内容看不懂没有关系,目前你只需要选择"是"。
- 如果项目已配置使用 SSL,则不会弹出对话框。
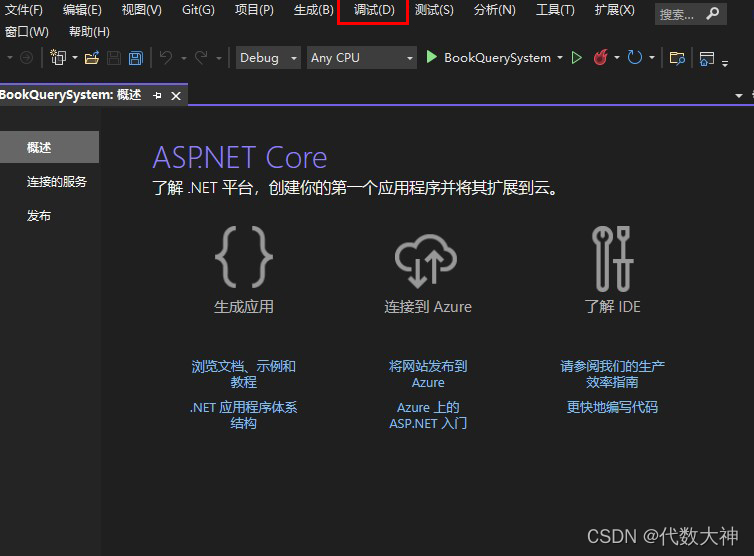
同时我们也可以从“调试”菜单中以调试或非调试模式启动应用;
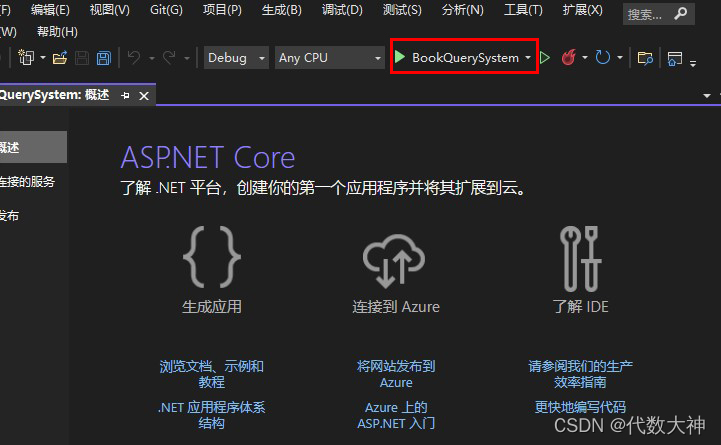
也可以通过选择工具栏中的“BookQuerySystem”按钮来调试应用;
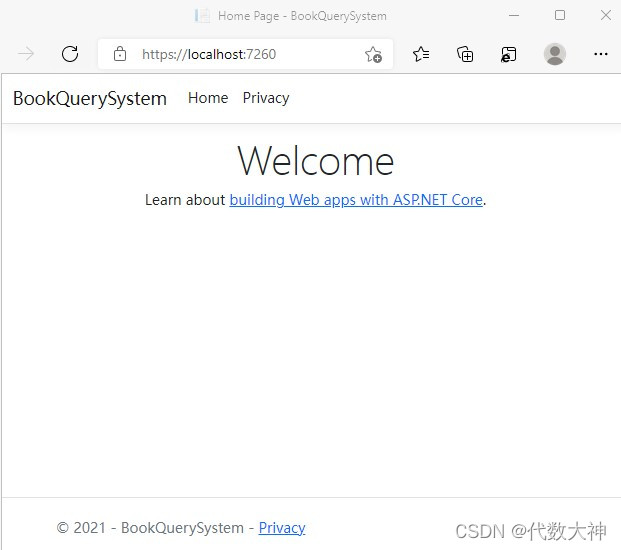
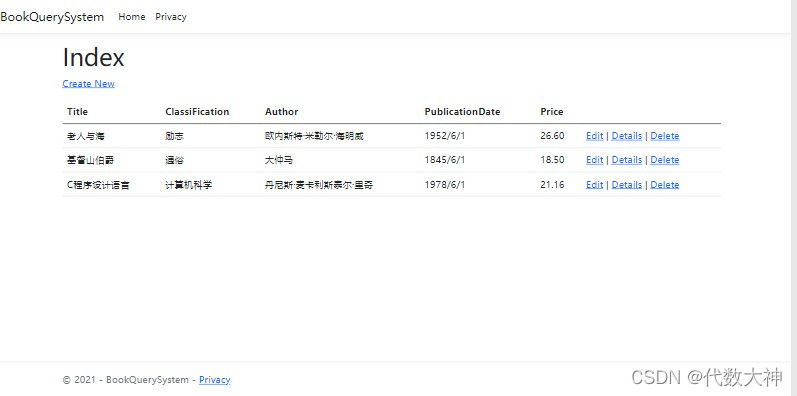
下图是应用在Microsoft Edge浏览器上的运行效果!
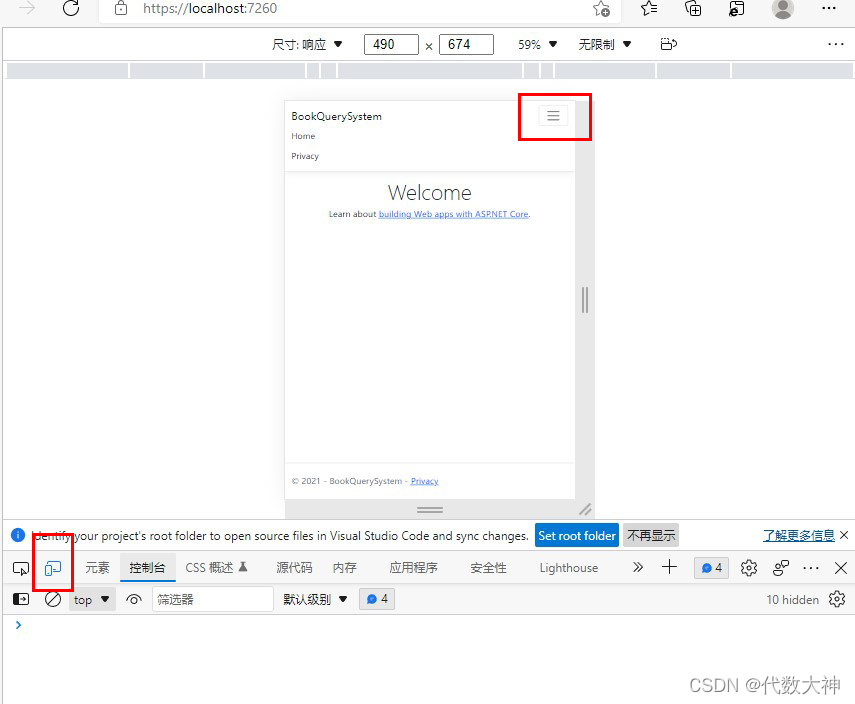
在Microsoft Edge浏览器中按F12会调用开发者工具,单击左下方红框里的 切换仿真设备按钮 ,浏览器会模仿移动端网页尺寸。当窗口缩小到移动尺寸时,网页内容会智能调整显示位置,网页右上方红框位置会出现下拉框,我们通常称这种网页布局为响应式布局。
网页响应式布局归功于一个叫做Bootstrap的前端框架,如果你目前不懂什么是Bootstrap也没有关系,在以后的教程中我们会学到相关知识,你现在只要知道Bootstrap懂你就可以了!本教程的宗旨是用通俗易懂的语言让你站在整体的高度上来理解Asp.Net Core Mvc,而不是让你深陷于每一个细节的泥潭中!
也许这是你创建的第一个应用程序,虽然一行代码也没有输入,但还是要恭喜你,你成功了!多一些愉悦,少一些挫败感,快乐的编程!
第二章 从Model开始
上一章我已经创建了程序,但是程序中什么也没有,这并不是我们希望看到的。
图书数据是放在数据库中的,本章我们创建专门用来管理数据库中图书数据的类。这些类就是MVC中的Model部分。
首先创建一个叫Book的模型类,它定义了数据库中图书数据的属性。什么是图书数据的属性?比如说图书的Title、Id、price等都是图书属性。
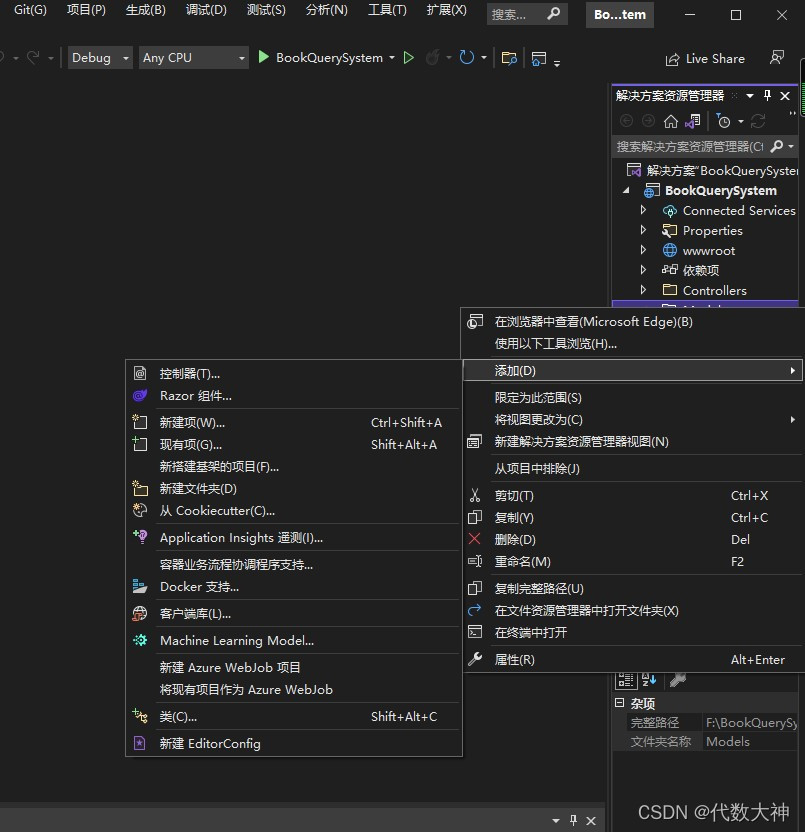
右键单击 Models 文件夹,单击“添加” -> “类” 。 文件命名为Book.cs
namespace BookQuerySystem.Models
{
    public class Book
    {

        public int Id { get; set; }
        public string Title { get; set; }
        public string ClassiFication { get; set; }
        public string Author { get; set; }
        [DataType(DataType.Date)]
        public DateTime PublicationDate { get; set; }
        public decimal price { get; set; }

    }
}
Book 类包含一个 Id ,也是数据的主键。什么是数据的主键?简单理解就是唯一的编号,用来检索。
Book还包含这些属性:Title(书名)、ClassiFication(分类)、Author(作者)、PublicationDate(出版日期),Price(价格)。
PublicationDate上的DataType 特性声明了数据的类型 为Date。 那么特性又是什么东西?简单理解这里的特性就是在PublicationDate属性前面加一个 [ ] 方括号,然后把要给PublicationDate声明的信息放在方括号里。
现在我们收到了一个错误提示:
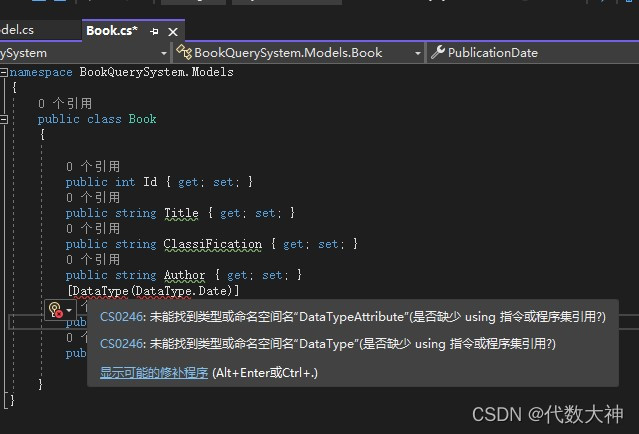
错误 CS0246 未能找到类型或命名空间名“DataTypeAttribute”(是否缺少 using 指令或程序集引用?) BookQuerySystem
解决这个错误的方法很简单,把鼠标放在红线上左键单击显示可能的修补程序。
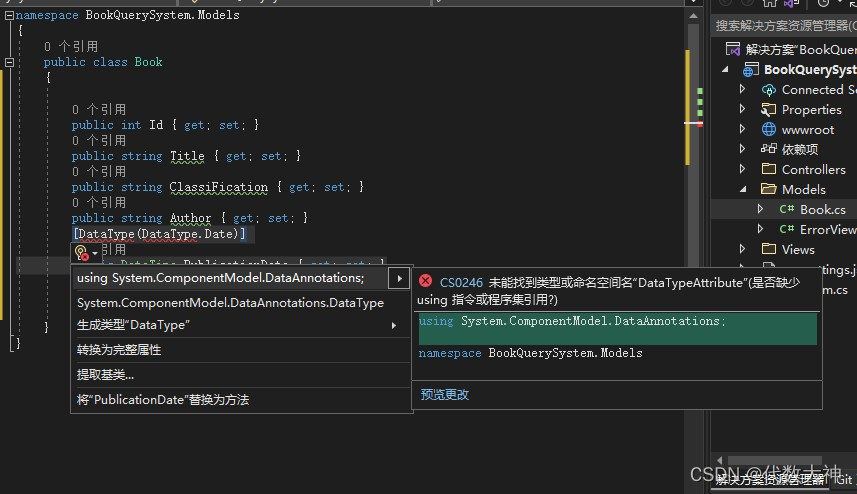
左键单击using System.ComponentModel.DataAnnotations;
现在Book类的代码如下:
using System.ComponentModel.DataAnnotations;

namespace BookQuerySystem.Models
{
    public class Book
    {

        public int Id { get; set; }
        public string Title { get; set; }
        public string ClassiFication { get; set; }
        public string Author { get; set; }
        [DataType(DataType.Date)]
        public DateTime PublicationDate { get; set; }
        public decimal Price { get; set; }

    }
}
到这里,一个清晰明了的Book数据模型创建成功了,你通关了!恭喜你再一次站在了人生的巅峰!
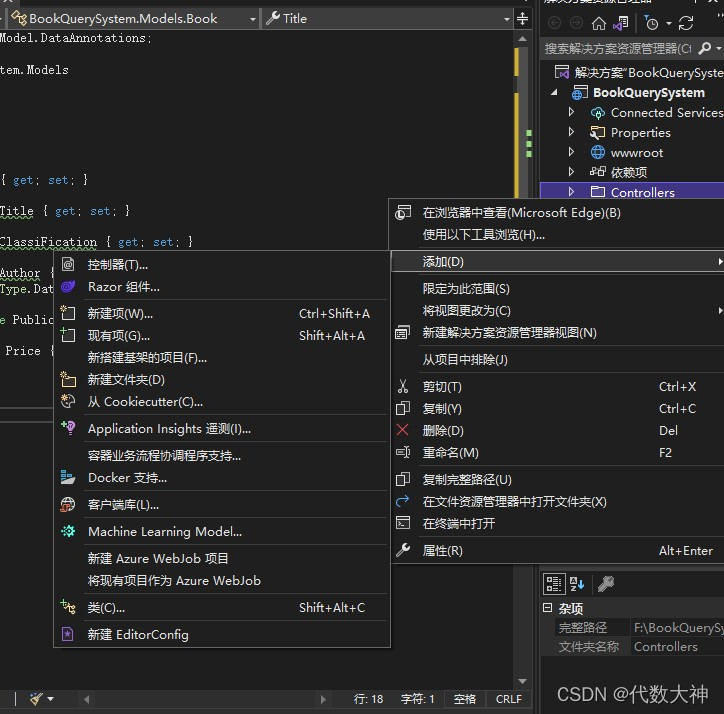
第三章 Model之后皆基架
上一章我们创建了一个Book数据模型类,通常我们称呼这个类为实体类。那么问题来了,这个实体类是做什么用的?你猜对了,当然是用来和数据库中的Book数据相互映射的。
映射: 在代数里,映射是个术语名词,指两个元素的集之间的元素相互“对应”的关系。
简单理解就是实体Book类和数据中的Book数据是一根绳上的蚂蚱!而Entity Framework Core 就是这根绳。
Entity Framework Core:轻量、可扩展、跨平台、开源的Entity Framework数据访问框架。
我们可以通过Entity Framework Core来连接数据库,并可以用Book实体类来处理数据库中的Book数据以实现底层数据的增、删、改、查。没错,藏在数据库中的数据我们称它为底层数据。
下面我们先安装Entity Framework Core:
添加 NuGet 包
工具(T)->NuGet 包管理器(N)->包管理器控制台(O)

左键单击下方程序包管理器控制台,在红框位置PM>后输入命令(建议你粘贴复制下方代码):
Install-Package Microsoft.EntityFrameworkCore.Design

3.6164887秒之后,EF Core终于安装完毕。你用了多少秒,可以在下方留言告诉我,看看谁用时最短!

- 使用**基架工具(脚手架)**给Book实体类生成 Create、Delete、Update和Read (增、删、改、查) 页面,脚手架一词在百度百科中是这样解释的:脚手架是为了保证各施工过程顺利进行而搭设的工作平台。
- 在右侧“解决方案资源管理器”中,右键单击“Controllers”文件夹->“添加”>“新建基架项目”。
- 在弹出的“添加已搭建基架的新项”对话框中,选择“视图使用Entity Framework”的MVC控制器->“添加” 。
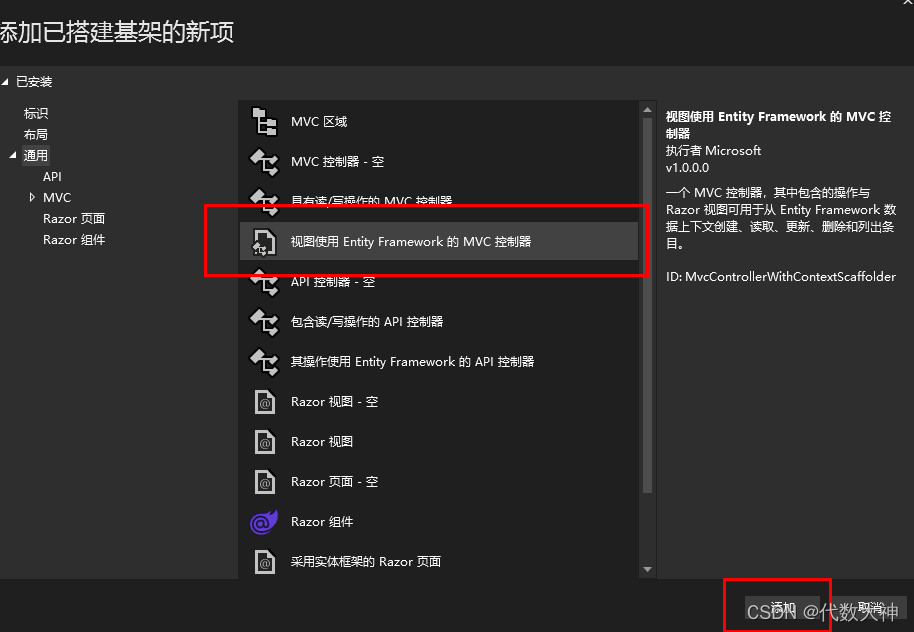
- “添加视图使用Entity Framework 的 MVC控制器”对话框中选择如下:
- “模型类(M)”下拉列表中,选择“Book (BookQuerySystem.models)”。
- “数据上下文类(D)”行中,选择 +(加号) 。
- “添加数据上下文”对话框中,将自动生成类名 BookQuerySystem.Data.BookQuerySystemContext,选择添加 。
- “视图”和“控制器名称(C)”,保持默认并选择添加 。
别怕,你电脑没死机!休息,休息一会儿!
事实证明基架就是打工人,我们才是老板!一番等待之后,基架为我们干了很多活:
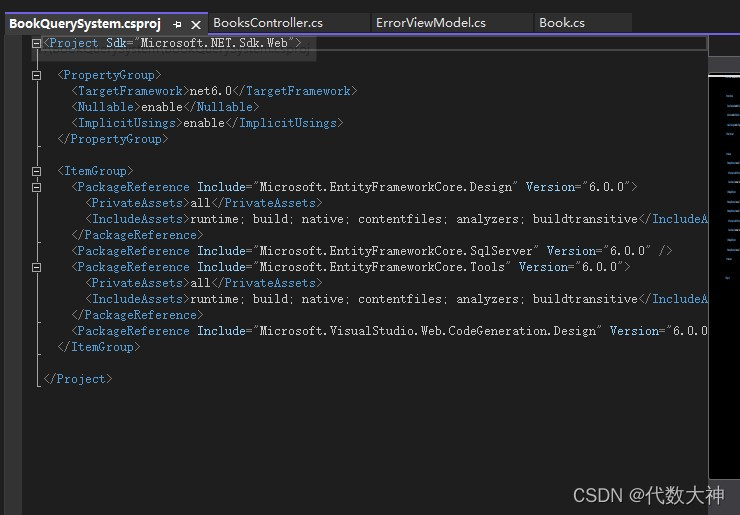
- 基架在 BookQuerySystem.csproj 项目文件中插入所需的包引用。(什么?你没找到BookQuerySystem.csproj 项目文件?在解决方案资源管理器中双击BookQuerySystem)(什么?你找不到解决方案资源管理器?好吧!等我给你截个图)

在 Program.cs 文件的依赖注入容器中注册了数据库上下文。

基架将数据库连接字符串添加到 appsettings.json 文件。
我们之前谈过基架的职能,目前只要知道基架更新了什么就可以,至于它是怎么更新的并不重要。
基架还为我们创建了以下内容:
- BooksController:Controllers/BooksController.cs

“创建(Create)”、“删除(Delete)”、“详细信息(Details)”、“编辑(Edit)”和“索引(Index)”的Razor视图文件:Views/Books/*.cshtml

数据库上下文类:Data/BookQuerySystemContext.cs)”

目前只要知道基架创建了什么就可以,不要强迫自己把每一个细节搞清楚,要站在全局的高度看问题,细节就先留给基架吧。
实体类的工作已经做完,现在我们使用EF Core的迁移功能来创建数据库。
迁移:是一组创建和更新数据库以匹配实体类的工具。
迁移功能的用法也非常简单:
- 工具->NuGet 包管理器->程序包包管理器控制台。
在程序包管理器控制台的PM>后输入代码
Add-Migration InitialCreate
InitialCreate单词的翻译是初始创建,未必非要用这个词,你也可以自行命名。
现在项目中多出了一个Migrations文件夹,里面的{timestamp}_InitialCreate.cs 迁移文件包含了创建书库的代码,timestamp根据时间不同而定,我的就是20211206090830_InitialCreate.cs。
现在用于创建数据库的代码已经存在,我们用Update-Database命令来真正的创建数据库。
- 在程序包管理器控制台的PM>后输入代码
Update-Database
Update-Database:将数据库更新到上一个最近创建的迁移,我们上一个迁移是20211206090830_InitialCreate.cs,现在数据库和它保持同步了。Update-Database命令本质就是运行了一下20211206090830_InitialCreate.cs中的Up方法,一点都不神秘。
using System;
using Microsoft.EntityFrameworkCore.Migrations;

#nullable disable

namespace BookQuerySystem.Migrations
{
    public partial class InitialCreate : Migration
    {
        protected override void Up(MigrationBuilder migrationBuilder)
        {
            migrationBuilder.CreateTable(
                name: "Book",
                columns: table => new
                {
                    Id = table.Column<int>(type: "int", nullable: false)
                        .Annotation("SqlServer:Identity", "1, 1"),
                    Title = table.Column<string>(type: "nvarchar(max)", nullable: false),
                    ClassiFication = table.Column<string>(type: "nvarchar(max)", nullable: false),
                    Author = table.Column<string>(type: "nvarchar(max)", nullable: false),
                    PublicationDate = table.Column<DateTime>(type: "datetime2", nullable: false),
                    Price = table.Column<decimal>(type: "decimal(18,2)", nullable: false)
                },
                constraints: table =>
                {
                    table.PrimaryKey("PK_Book", x => x.Id);
                });
        }

        protected override void Down(MigrationBuilder migrationBuilder)
        {
            migrationBuilder.DropTable(
                name: "Book");
        }
    }
}
凭借阅读英文,大家也能猜出Up方法大概都做了什么。这个也不重要,我们知道有这么一回事就行了,不用深究。
第四章 运行应用
小伙伴们,下面是见证奇迹的时刻,让我们把应用运行起来吧!老规矩,按Ctrl+F5 在非调试情况下启动应用。

惊不惊喜?意不意外?(可以留言告诉我!)
第一章啥样,现在还啥样!网页一点变化也没有。为什么会这样?

一个 HTTP 终点是 Web 应用程序中的Url目标,如 https://localhost:7260/Books ,Books就是目标。
https://localhost:{PORT}/Books ,将 {PORT} 替换为你自己的端口号。看不明白就在刚才你打开的网页网址后加上/Books就行了。
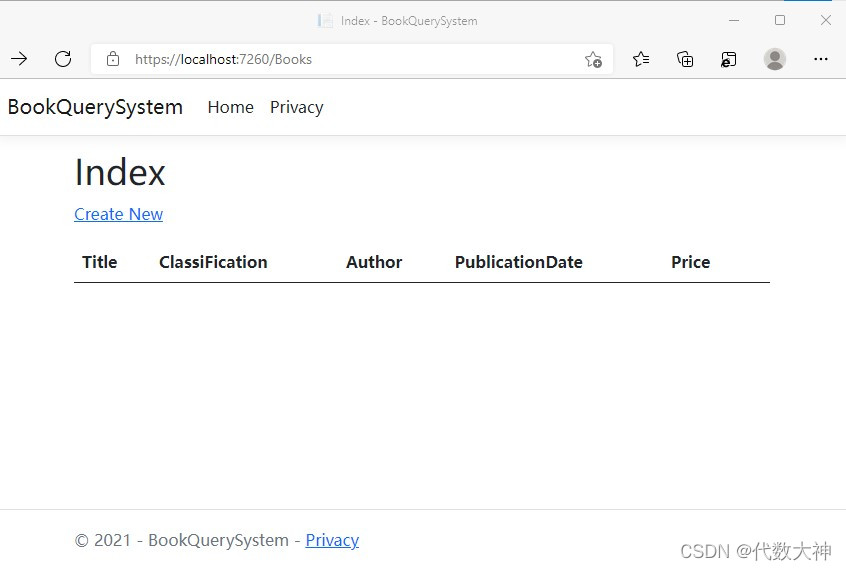
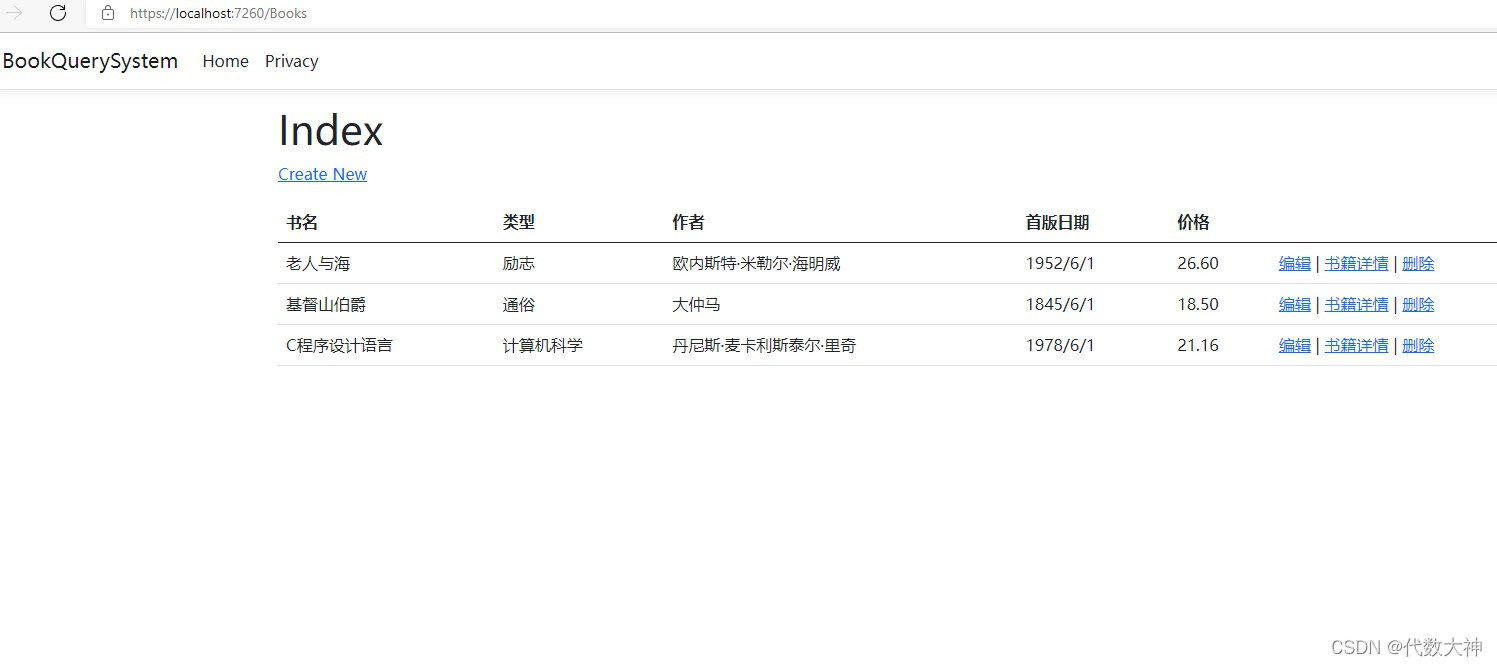
打开https://localhost:7260/Books后才会看我们的劳动成果!

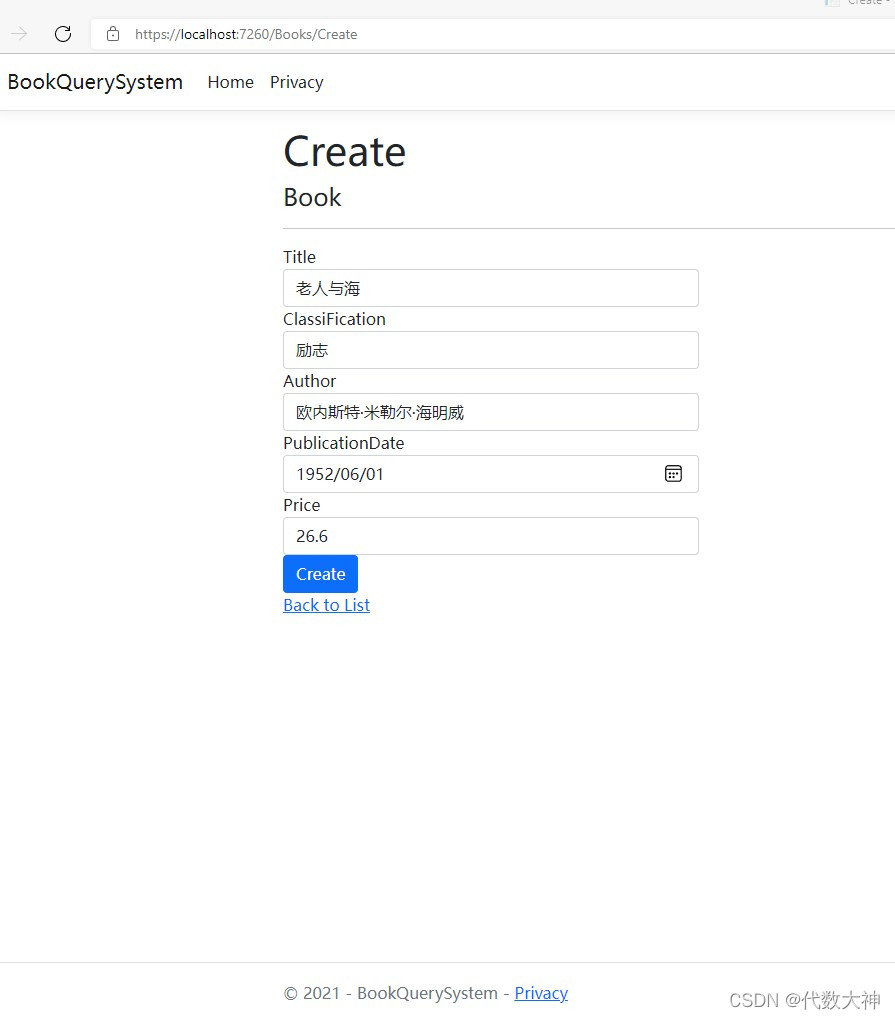
现在我们试试创建图书功能,左键单击网页中的Create New。在创建页面填写书籍信息后点击Create提交创建信息:
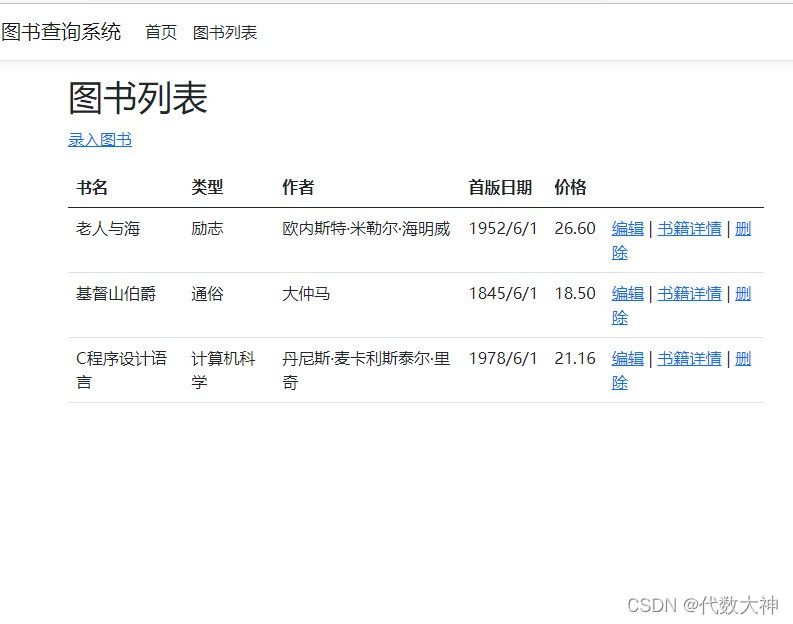
现在Books页面显示了新添加书籍的信息。

在Price(Price)26.6之后,我们看到了Edit(编辑)、Detail(查看详情)和Delete(删除)选项,请自行测试一遍。
一本书看起来很孤独,我们再自行添加几本书。
页面现在看起来顺眼多了,但是如何才能把英语换成汉语那?
打开Models文件夹下的Books.cs实体类:
在除了Id属性之外的属性上添加[Display(Name=" 中文")],我们之前讲过,这种写法叫做给属性添加特性。
using System.ComponentModel.DataAnnotations;

namespace BookQuerySystem.Models
{
    public class Book
    {

        public int Id { get; set; }

        [Display(Name ="书名")]
        public string Title { get; set; }

        [Display(Name ="类型")]
        public string ClassiFication { get; set; }

        [Display(Name ="作者")]
        public string Author { get; set; }

        [Display(Name ="首版日期")]
        [DataType(DataType.Date)]
        public DateTime PublicationDate { get; set; }

        [Display(Name ="价格")]
        public decimal Price { get; set; }

    }
}
重新启动应用:

添加特性的Book实体类各个属性都以中文方式显示在了页面上。从字面上我们也能理解Display是显示的意思。[Display(Name=" “)]就是把他修饰的元素名显示为” “里的内容,比如说[Display(Name=” 价格")]。
把Edit、Details、Delete也改成汉语:
打开Views/Books/Index.cshtml文件
@model IEnumerable<BookQuerySystem.Models.Book>

@{
    ViewData["Title"] = "Index";
}

<h1>Index</h1>

<p>
    <a asp-action="Create">Create New</a>
</p>
<table class="table">
    <thead>
        <tr>
            <th>
                @Html.DisplayNameFor(model => model.Title)
            </th>
            <th>
                @Html.DisplayNameFor(model => model.ClassiFication)
            </th>
            <th>
                @Html.DisplayNameFor(model => model.Author)
            </th>
            <th>
                @Html.DisplayNameFor(model => model.PublicationDate)
            </th>
            <th>
                @Html.DisplayNameFor(model => model.Price)
            </th>
            <th></th>
        </tr>
    </thead>
    <tbody>
@foreach (var item in Model) {
        <tr>
            <td>
                @Html.DisplayFor(modelItem => item.Title)
            </td>
            <td>
                @Html.DisplayFor(modelItem => item.ClassiFication)
            </td>
            <td>
                @Html.DisplayFor(modelItem => item.Author)
            </td>
            <td>
                @Html.DisplayFor(modelItem => item.PublicationDate)
            </td>
            <td>
                @Html.DisplayFor(modelItem => item.Price)
            </td>
            <td>
                <a asp-action="Edit" asp-route-id="@item.Id">Edit</a> |
                <a asp-action="Details" asp-route-id="@item.Id">Details</a> |
                <a asp-action="Delete" asp-route-id="@item.Id">Delete</a>
            </td>
        </tr>
}
    </tbody>
</table>
Index.cshtml最后几行找到代码

修改如下:

左键点击热重载:

刷新浏览器:
还是Views/Books/Index.cshtm文件,在上面找到

修改代码:

热重载:
修改之后网页终于大部分显示的都是汉语了,不过细心的小伙伴会发现页面中竟然还有英语。之前修改的是Views/Books/Index.cshtm文件中的内容,在Program.cs文件中路由格式如下:
app.MapControllerRoute(
    name: "default",
    pattern: "{controller=Home}/{action=Index}/{id?}");
这是一种路由格式,controller就是控制器,action指明控制器中的方法,在本例中id就是图书Id编号。id后面加一个?号表示这个id可空,可空就是在路由过程中可以写,也可以省略。
https://localhost:7260/Books是一个Url,也就是网址,当访问这个网址时,我们实际访问的是https://localhost:7260/Books/Index页面,Books是控制器,Index是Books控制器中的方法,/Books=/Books/Index就是Program.cs文件中路由定义好的默认规则。如果直接启动应用,Url将默认是https://localhost:7260/ , /=/Home/Index 是默认路由。(以上路由知识如果没看懂则可以直接无视,这并不影响应用运行)
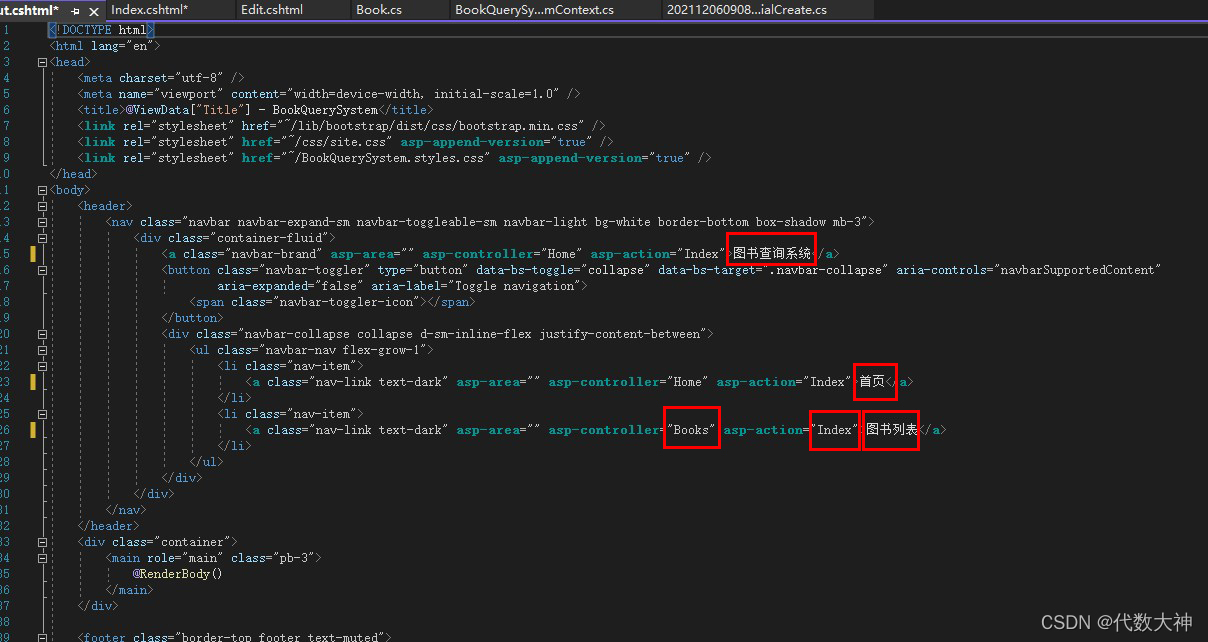
打开Views/Shared/_layout.cshtml文件,代码修改如下:
<!DOCTYPE html>
<html lang="en">
<head>
<meta charset="utf-8" />
<meta name="viewport" content="width=device-width, initial-scale=1.0" />
<title>@ViewData["Title"] - 图书查询系统</title>
<link rel="stylesheet" href="~/lib/bootstrap/dist/css/bootstrap.min.css" />
<link rel="stylesheet" href="~/css/site.css" asp-append-version="true" />
<link rel="stylesheet" href="~/BookQuerySystem.styles.css" asp-append-version="true" />
</head>
<body>
<header>
<nav class="navbar navbar-expand-sm navbar-toggleable-sm navbar-light bg-white border-bottom box-shadow mb-3">
<div class="container-fluid">
<a class="navbar-brand" asp-area="" asp-controller="Home" asp-action="Index">图书查询系统</a>
<button class="navbar-toggler" type="button" data-bs-toggle="collapse" data-bs-target=".navbar-collapse" aria-controls="navbarSupportedContent"
aria-expanded="false" aria-label="Toggle navigation">
<span class="navbar-toggler-icon"></span>
</button>
<div class="navbar-collapse collapse d-sm-inline-flex justify-content-between">
<ul class="navbar-nav flex-grow-1">
<li class="nav-item">
<a class="nav-link text-dark" asp-area="" asp-controller="Home" asp-action="Index">首页</a>
</li>
<li class="nav-item">
<a class="nav-link text-dark" asp-area="" asp-controller="Books" asp-action="Index">图书列表</a>
</li>
</ul>
</div>
</div>
</nav>
</header>
<div class="container">
<main role="main" class="pb-3">
@RenderBody()
</main>
</div>
<footer class="border-top footer text-muted">
<div class="container">
© 2021 - 图书查询系统 - <a asp-area="" asp-controller="Home" asp-action="Privacy">Privacy</a>
</div>
</footer>
<script src="~/lib/jquery/dist/jquery.min.js"></script>
<script src="~/lib/bootstrap/dist/js/bootstrap.bundle.min.js"></script>
<script src="~/js/site.js" asp-append-version="true"></script>
@await RenderSectionAsync("Scripts", required: false)
</body>
</html>
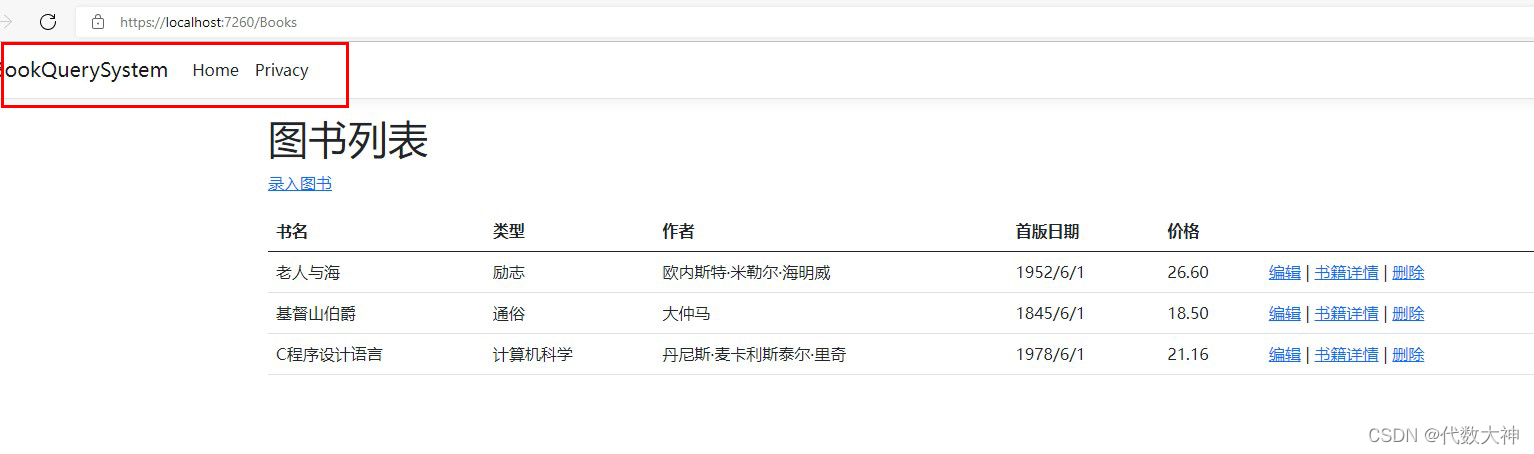
这是布局页面,把其它网页中重复出现的共用内容写在布局页里。日后维护时修改共用内容只需修改这一页即可!其他页面内容都在@RenderBody()位置呈现,除此之外都是各页面的共用内容。依照下图修改红框中内容:
热重载:
修改Views/Books/Create.cshtml文件:

修改后代码:
@model BookQuerySystem.Models.Book

@{
    ViewData["Title"] = "录入图书";
}

<h1>图书录入</h1>

<h4>图书</h4>
<hr />
<div class="row">
    <div class="col-md-4">
        <form asp-action="Create">
            <div asp-validation-summary="ModelOnly" class="text-danger"></div>
            <div class="form-group">
                <label asp-for="Title" class="control-label"></label>
                <input asp-for="Title" class="form-control" />
                <span asp-validation-for="Title" class="text-danger"></span>
            </div>
            <div class="form-group">
                <label asp-for="ClassiFication" class="control-label"></label>
                <input asp-for="ClassiFication" class="form-control" />
                <span asp-validation-for="ClassiFication" class="text-danger"></span>
            </div>
            <div class="form-group">
                <label asp-for="Author" class="control-label"></label>
                <input asp-for="Author" class="form-control" />
                <span asp-validation-for="Author" class="text-danger"></span>
            </div>
            <div class="form-group">
                <label asp-for="PublicationDate" class="control-label"></label>
                <input asp-for="PublicationDate" class="form-control" />
                <span asp-validation-for="PublicationDate" class="text-danger"></span>
            </div>
            <div class="form-group">
                <label asp-for="Price" class="control-label"></label>
                <input asp-for="Price" class="form-control" />
                <span asp-validation-for="Price" class="text-danger"></span>
            </div>
            <div class="form-group">
                <input type="submit" value="创建" class="btn btn-primary" />
            </div>
        </form>
    </div>
</div>

<div>
    <a asp-action="Index">返回图书列表</a>
</div>

@section Scripts {
    @{await Html.RenderPartialAsync("_ValidationScriptsPartial");}
}
Views/Books/Delete.cshtml文件修改后代码:
@model BookQuerySystem.Models.Book

@{
    ViewData["Title"] = "删除";
}

<h1>删除</h1>

<h3>你确定要删除这本书?</h3>
<div>
    <h4>图书</h4>
    <hr />
    <dl class="row">
        <dt class = "col-sm-2">
            @Html.DisplayNameFor(model => model.Title)
        </dt>
        <dd class = "col-sm-10">
            @Html.DisplayFor(model => model.Title)
        </dd>
        <dt class = "col-sm-2">
            @Html.DisplayNameFor(model => model.ClassiFication)
        </dt>
        <dd class = "col-sm-10">
            @Html.DisplayFor(model => model.ClassiFication)
        </dd>
        <dt class = "col-sm-2">
            @Html.DisplayNameFor(model => model.Author)
        </dt>
        <dd class = "col-sm-10">
            @Html.DisplayFor(model => model.Author)
        </dd>
        <dt class = "col-sm-2">
            @Html.DisplayNameFor(model => model.PublicationDate)
        </dt>
        <dd class = "col-sm-10">
            @Html.DisplayFor(model => model.PublicationDate)
        </dd>
        <dt class = "col-sm-2">
            @Html.DisplayNameFor(model => model.Price)
        </dt>
        <dd class = "col-sm-10">
            @Html.DisplayFor(model => model.Price)
        </dd>
    </dl>

    <form asp-action="Delete">
        <input type="hidden" asp-for="Id" />
        <input type="submit" value="删除" class="btn btn-danger" /> |
        <a asp-action="Index">返回</a>
    </form>
</div>
Views/Books/Details.cshtml文件修改后代码:
@model BookQuerySystem.Models.Book

@{
    ViewData["Title"] = "详情";
}

<h1>详情</h1>

<div>
    <h4>图书</h4>
    <hr />
    <dl class="row">
        <dt class = "col-sm-2">
            @Html.DisplayNameFor(model => model.Title)
        </dt>
        <dd class = "col-sm-10">
            @Html.DisplayFor(model => model.Title)
        </dd>
        <dt class = "col-sm-2">
            @Html.DisplayNameFor(model => model.ClassiFication)
        </dt>
        <dd class = "col-sm-10">
            @Html.DisplayFor(model => model.ClassiFication)
        </dd>
        <dt class = "col-sm-2">
            @Html.DisplayNameFor(model => model.Author)
        </dt>
        <dd class = "col-sm-10">
            @Html.DisplayFor(model => model.Author)
        </dd>
        <dt class = "col-sm-2">
            @Html.DisplayNameFor(model => model.PublicationDate)
        </dt>
        <dd class = "col-sm-10">
            @Html.DisplayFor(model => model.PublicationDate)
        </dd>
        <dt class = "col-sm-2">
            @Html.DisplayNameFor(model => model.Price)
        </dt>
        <dd class = "col-sm-10">
            @Html.DisplayFor(model => model.Price)
        </dd>
    </dl>
</div>
<div>
    <a asp-action="Edit" asp-route-id="@Model.Id">编辑</a> |
    <a asp-action="Index">返回</a>
</div>
Views/Books/Edit.cshtml文件修改后代码:
@model BookQuerySystem.Models.Book

@{
    ViewData["Title"] = "编辑";
}

<h1>编辑</h1>

<h4>图书</h4>
<hr />
<div class="row">
    <div class="col-md-4">
        <form asp-action="Edit">
            <div asp-validation-summary="ModelOnly" class="text-danger"></div>
            <input type="hidden" asp-for="Id" />
            <div class="form-group">
                <label asp-for="Title" class="control-label"></label>
                <input asp-for="Title" class="form-control" />
                <span asp-validation-for="Title" class="text-danger"></span>
            </div>
            <div class="form-group">
                <label asp-for="ClassiFication" class="control-label"></label>
                <input asp-for="ClassiFication" class="form-control" />
                <span asp-validation-for="ClassiFication" class="text-danger"></span>
            </div>
            <div class="form-group">
                <label asp-for="Author" class="control-label"></label>
                <input asp-for="Author" class="form-control" />
                <span asp-validation-for="Author" class="text-danger"></span>
            </div>
            <div class="form-group">
                <label asp-for="PublicationDate" class="control-label"></label>
                <input asp-for="PublicationDate" class="form-control" />
                <span asp-validation-for="PublicationDate" class="text-danger"></span>
            </div>
            <div class="form-group">
                <label asp-for="Price" class="control-label"></label>
                <input asp-for="Price" class="form-control" />
                <span asp-validation-for="Price" class="text-danger"></span>
            </div>
            <div class="form-group">
                <input type="submit" value="保存" class="btn btn-primary" />
            </div>
        </form>
    </div>
</div>

<div>
    <a asp-action="Index">返回</a>
</div>

@section Scripts {
    @{await Html.RenderPartialAsync("_ValidationScriptsPartial");}
}
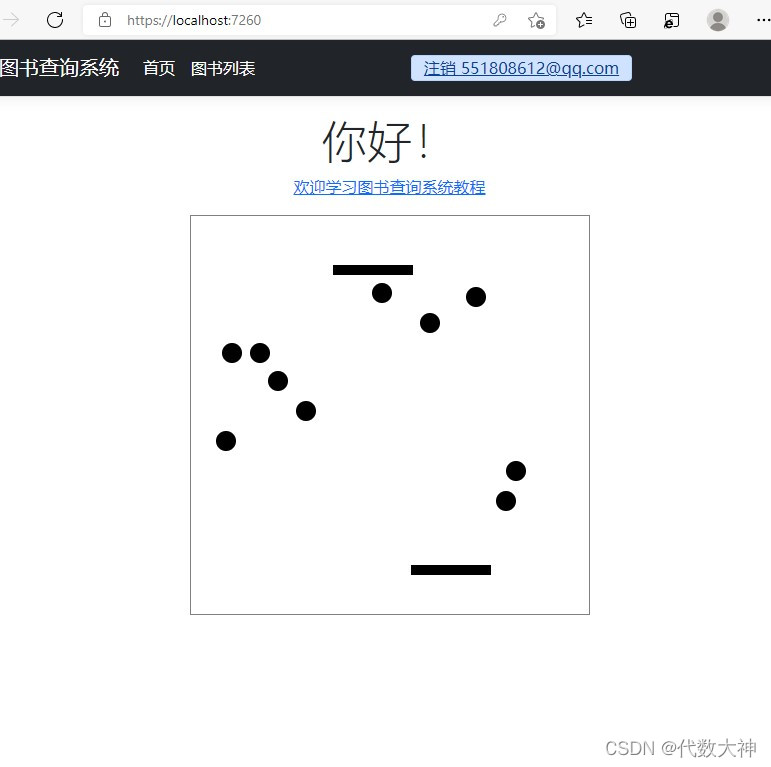
现在我们修改欢迎页面Views/Home/Index.cshtml :
@{
    ViewData["Title"] = "主页";
}

<div class="text-center">
    <h1 class="display-4">你好!</h1>
    <p> <a href="https://blog.csdn.net/baidu_38495508/article/details/121731637">欢迎学习图书查询系统教程</a></p>
</div>
第五章 数据搜索
试想一下,如果数据库中存储着一万本书,你要找到其中一本书的数据,一条一条的翻找信息既费时又费力。既然是图书查询系统,那么应该有查询功能。
- 更新Controllers/BooksController.cs 中的 Index 方法,代码如下:
 public async Task<IActionResult> Index(string search)
        {
            var books = from b in _context.Book
                        select b;
            if (!string.IsNullOrEmpty(search))
            {
                books = books.Where(s=>s.Title!.Contains(search));
            }
            return View(await books.ToListAsync());
        }
- 更新Views/Books/Index.cshtml文件代码如下:
@model IEnumerable<BookQuerySystem.Models.Book>

@{
    ViewData["Title"] = "图书列表";
}

<h1>图书列表</h1>

<p>
    <a asp-action="Create">录入图书</a>
</p>


<form asp-controller="Books" asp-action="Index">
    <p>
        书名: <input type="text" name="search" />
        <input type="submit" value="搜索" />
    </p>
</form>


<table class="table">
    <thead>
        <tr>
            <th>
                @Html.DisplayNameFor(model => model.Title)
            </th>
            <th>
                @Html.DisplayNameFor(model => model.ClassiFication)
            </th>
            <th>
                @Html.DisplayNameFor(model => model.Author)
            </th>
            <th>
                @Html.DisplayNameFor(model => model.PublicationDate)
            </th>
            <th>
                @Html.DisplayNameFor(model => model.Price)
            </th>
            <th></th>
        </tr>
    </thead>
    <tbody>
@foreach (var item in Model) {
        <tr>
            <td>
                @Html.DisplayFor(modelItem => item.Title)
            </td>
            <td>
                @Html.DisplayFor(modelItem => item.ClassiFication)
            </td>
            <td>
                @Html.DisplayFor(modelItem => item.Author)
            </td>
            <td>
                @Html.DisplayFor(modelItem => item.PublicationDate)
            </td>
            <td>
                @Html.DisplayFor(modelItem => item.Price)
            </td>
            <td>
                <a asp-action="Edit" asp-route-id="@item.Id">编辑</a> |
                <a asp-action="Details" asp-route-id="@item.Id">详情</a> |
                <a asp-action="Delete" asp-route-id="@item.Id">删除</a>
            </td>
        </tr>
}
    </tbody>
</table>
热重载:
在搜索框中输入“老人”。
左键单击“搜索”。
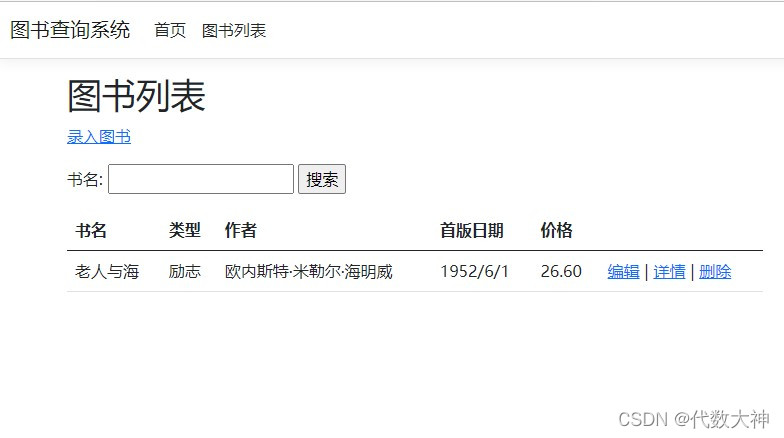
系统通过输入内容为我们搜索并匹配到了老人与海这本书。如果我们想通过书的类型搜索数据又应该怎么做那?
右键单击解决方案资源管理器中的BookQuerySystem->添加->新建文件夹,文件夹命名为ViewModels。
创建新类文件ViewModels/BookClassiFicationViewModel.cs ,类名有点长!好在易懂。
namespace BookQuerySystem.ViewModels
{
    public class BookClassiFicationViewModel
    {
        public List<Book>? Books { get; set; }
        public SelectList? ClassiFications { get; set; }
        public string? BookClassiFication { get; set; }
        public string? Search { get; set; }
    }
}
- 更新Controllers/BooksController.cs:
using Microsoft.AspNetCore.Mvc;
using Microsoft.AspNetCore.Mvc.Rendering;
using Microsoft.EntityFrameworkCore;
using BookQuerySystem.Data;
using BookQuerySystem.Models;
using BookQuerySystem.ViewModels;

namespace BookQuerySystem.Controllers
{
    public class BooksController : Controller
    {
        private readonly BookQuerySystemContext _context;

        public BooksController(BookQuerySystemContext context)
        {
            _context = context;
        }

        // GET: Books
        public async Task<IActionResult> Index(string bookClassiFication , string search)
        {
            IQueryable<string> classiFicationQuery = from c in _context.Book
                                                     orderby c.ClassiFication
                                                     select c.ClassiFication;
            var books = from b in _context.Book
                        select b;
            if (!string.IsNullOrEmpty(search))
            {
                books = books.Where(s=>s.Title!.Contains(search));
            }

            if (!string.IsNullOrEmpty(bookClassiFication))
            {
                books = books.Where(b=>b.ClassiFication==bookClassiFication);
            }

            var bookClassiFicationVM = new BookClassiFicationViewModel
            {
                ClassiFications = new SelectList(await classiFicationQuery.Distinct().ToListAsync()),
                Books = await books.ToListAsync()
            };

            return View(bookClassiFicationVM);
        }

        // GET: Books/Details/5
        public async Task<IActionResult> Details(int? id)
        {
            if (id == null)
            {
                return NotFound();
            }

            var book = await _context.Book
                .FirstOrDefaultAsync(m => m.Id == id);
            if (book == null)
            {
                return NotFound();
            }

            return View(book);
        }

        // GET: Books/Create
        public IActionResult Create()
        {
            return View();
        }

        // POST: Books/Create
        // To protect from overposting attacks, enable the specific properties you want to bind to.
        // For more details, see http://go.microsoft.com/fwlink/?LinkId=317598.
        [HttpPost]
        [ValidateAntiForgeryToken]
        public async Task<IActionResult> Create([Bind("Id,Title,ClassiFication,Author,PublicationDate,Price")] Book book)
        {
            if (ModelState.IsValid)
            {
                _context.Add(book);
                await _context.SaveChangesAsync();
                return RedirectToAction(nameof(Index));
            }
            return View(book);
        }

        // GET: Books/Edit/5
        public async Task<IActionResult> Edit(int? id)
        {
            if (id == null)
            {
                return NotFound();
            }

            var book = await _context.Book.FindAsync(id);
            if (book == null)
            {
                return NotFound();
            }
            return View(book);
        }

        // POST: Books/Edit/5
        // To protect from overposting attacks, enable the specific properties you want to bind to.
        // For more details, see http://go.microsoft.com/fwlink/?LinkId=317598.
        [HttpPost]
        [ValidateAntiForgeryToken]
        public async Task<IActionResult> Edit(int id, [Bind("Id,Title,ClassiFication,Author,PublicationDate,Price")] Book book)
        {
            if (id != book.Id)
            {
                return NotFound();
            }

            if (ModelState.IsValid)
            {
                try
                {
                    _context.Update(book);
                    await _context.SaveChangesAsync();
                }
                catch (DbUpdateConcurrencyException)
                {
                    if (!BookExists(book.Id))
                    {
                        return NotFound();
                    }
                    else
                    {
                        throw;
                    }
                }
                return RedirectToAction(nameof(Index));
            }
            return View(book);
        }

        // GET: Books/Delete/5
        public async Task<IActionResult> Delete(int? id)
        {
            if (id == null)
            {
                return NotFound();
            }

            var book = await _context.Book
                .FirstOrDefaultAsync(m => m.Id == id);
            if (book == null)
            {
                return NotFound();
            }

            return View(book);
        }

        // POST: Books/Delete/5
        [HttpPost, ActionName("Delete")]
        [ValidateAntiForgeryToken]
        public async Task<IActionResult> DeleteConfirmed(int id)
        {
            var book = await _context.Book.FindAsync(id);
            _context.Book.Remove(book);
            await _context.SaveChangesAsync();
            return RedirectToAction(nameof(Index));
        }

        private bool BookExists(int id)
        {
            return _context.Book.Any(e => e.Id == id);
        }
    }
}
- 更新Views/Books/Index.cshtml文件代码如下:
@model BookQuerySystem.ViewModels.BookClassiFicationViewModel

@{
    ViewData["Title"] = "图书列表";
}

<h1>图书列表</h1>

<p>
    <a asp-action="Create">录入图书</a>
</p>


<form asp-controller="Books" asp-action="Index" method="get">
    <p>
        <select asp-for="BookClassiFication" asp-items="Model.ClassiFications">
            <option value="">所有类别</option>
        </select>

        书名: <input type="text" name="Search" />
        <input type="submit" value="搜索" />
    </p>
</form>


<table class="table">
    <thead>
        <tr>
            <th>
                @Html.DisplayNameFor(model => model.Books[0].Title)
            </th>
            <th>
                @Html.DisplayNameFor(model => model.Books[0].ClassiFication)
            </th>
            <th>
                @Html.DisplayNameFor(model => model.Books[0].Author)
            </th>
            <th>
                @Html.DisplayNameFor(model => model.Books[0].PublicationDate)
            </th>
            <th>
                @Html.DisplayNameFor(model => model.Books[0].Price)
            </th>
            <th></th>
        </tr>
    </thead>
    <tbody>
@foreach (var item in Model.Books) {
        <tr>
            <td>
                @Html.DisplayFor(modelItem => item.Title)
            </td>
            <td>
                @Html.DisplayFor(modelItem => item.ClassiFication)
            </td>
            <td>
                @Html.DisplayFor(modelItem => item.Author)
            </td>
            <td>
                @Html.DisplayFor(modelItem => item.PublicationDate)
            </td>
            <td>
                @Html.DisplayFor(modelItem => item.Price)
            </td>
            <td>
                <a asp-action="Edit" asp-route-id="@item.Id">编辑</a> |
                <a asp-action="Details" asp-route-id="@item.Id">详情</a> |
                <a asp-action="Delete" asp-route-id="@item.Id">删除</a>
            </td>
        </tr>
}
    </tbody>
</table>
热重载:

入门教程到这里就结束了,编程是不是很简单,很快乐?
代码下载
教程最后还会提供加上会员管理系统的代码码,使项目功能完整。小伙伴们可以下载源码自行修改。
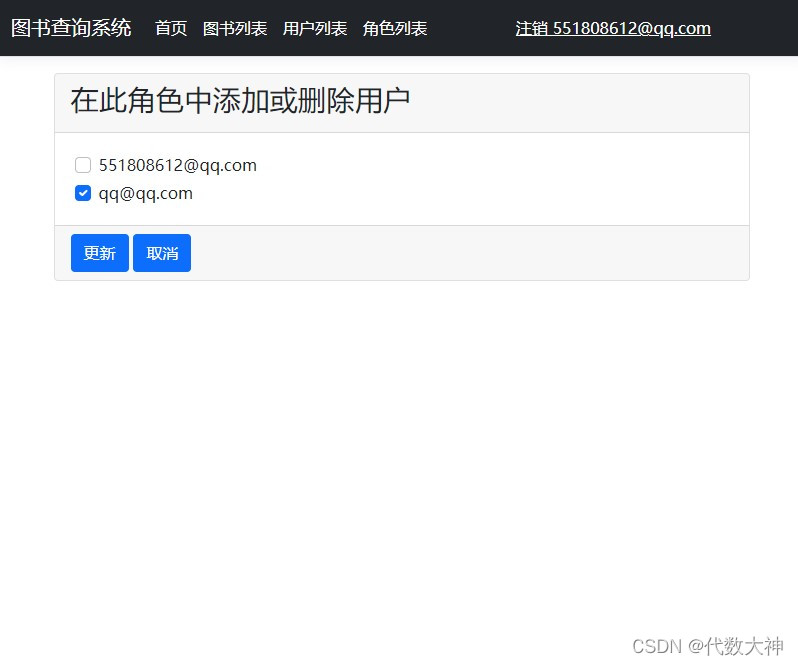
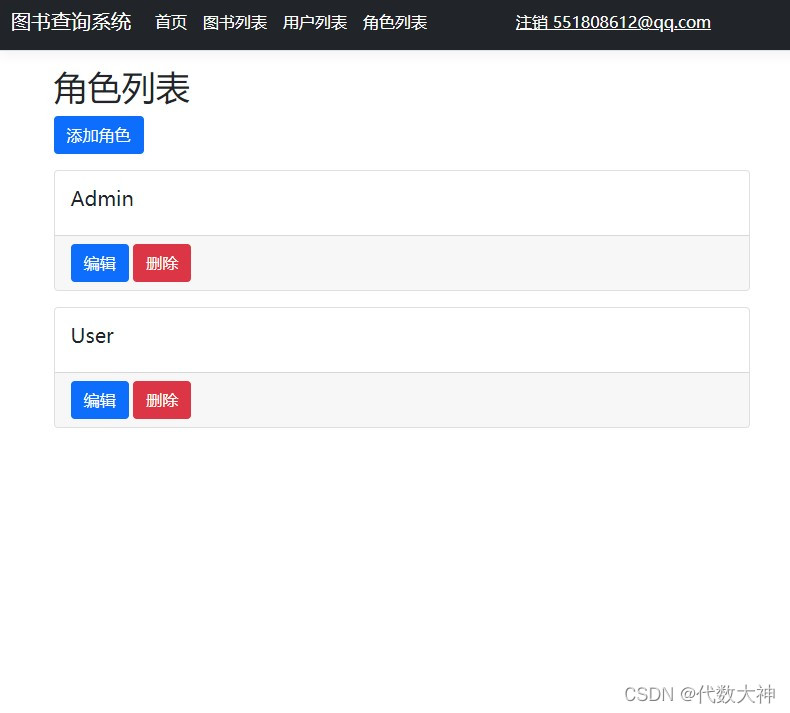
- 预览下加入会员管理系统的应用效果::
效果还行 ,在没有注册登录之前只可以浏览注册和登录页面,现在非用户已经无法看到你书库的图书信息了。
角色已经添加完毕,效果如下:


小伙伴们可以下载代码自行阅读,修改,使用。
代码在 QQ群:577922290 群文件中共享。