项目场景:
在电商、支付等领域,往往会有这样的场景,用户下单后放弃支付了,那这笔订单会在指定的时间段后进行关闭操作,细心的你一定发现了像某宝、某东都有这样的逻辑,而且时间很准确,误差在1s内;那他们是怎么实现的呢?
一般实现的方法有几种:使用 redisson、rocketmq、rabbitmq等消息队列的延时投递功能。
解决方案:
一般项目集成redis的比较多,所以我这篇文章就说下redisson延迟队列,如果使用rocketmq或rabbitmq需要额外集成中间件,比较麻烦一点。
1.集成redisson
maven依赖
<dependency>
	<groupId>org.redisson</groupId>
	<artifactId>redisson-spring-boot-starter</artifactId>
	<version>3.21.1</version>
</dependency>
yml配置,单节点配置可以兼容redis的配置方式
# redis配置
spring:
  redis:
    database: 0
    host: 127.0.0.1
    password: redis@pass
port: 6001更详细的配置参考:Spring Boot整合Redisson的两种方式-CSDN博客
2.配置多线程
因为延迟队列可能会多个任务同时执行,所以需要多线程处理。
import org.springframework.context.annotation.Bean;
import org.springframework.context.annotation.Configuration;
import org.springframework.scheduling.annotation.EnableAsync;
import org.springframework.scheduling.concurrent.ThreadPoolTaskExecutor;

import java.util.concurrent.ThreadPoolExecutor;

@Configuration
@EnableAsync
public class ExecutorConfig {
    /**
     * 异步任务自定义线程池
     */
    @Bean(name = "taskExecutor")
    public ThreadPoolTaskExecutor asyncServiceExecutor() {
    	ThreadPoolTaskExecutor executor = new ThreadPoolTaskExecutor();
        //配置核心线程数
        executor.setCorePoolSize(50);
        //配置最大线程数
        executor.setMaxPoolSize(500);
        //配置队列大小
        executor.setQueueCapacity(300);
        //允许线程空闲时间
        executor.setKeepAliveSeconds(60);
        //配置线程池中的线程的名称前缀
        executor.setThreadNamePrefix("taskExecutor-");
        // rejection-policy:当pool已经达到max size的时候,如何处理新任务
        // CALLER_RUNS:不在新线程中执行任务,而是有调用者所在的线程来执行
        executor.setRejectedExecutionHandler(new ThreadPoolExecutor.CallerRunsPolicy());
        //调用shutdown()方法时等待所有的任务完成后再关闭
        executor.setWaitForTasksToCompleteOnShutdown(true);
        //等待所有任务完成后的最大等待时间
		executor.setAwaitTerminationSeconds(60);
        return executor;
    }
}
3.具体业务
比如消息通知、关闭订单等 ,这里加上了@Async注解,可以异步执行
import org.springframework.scheduling.annotation.Async;
import org.springframework.stereotype.Service;

import java.text.SimpleDateFormat;
import java.util.Date;

@Service
public class AsyncService {

	@Async
	public void executeQueue(Object value) {
		System.out.println();
		System.out.println("当前线程:"+Thread.currentThread().getName());
		System.out.println("执行任务:"+value);

		//打印时间方便查看
		SimpleDateFormat sdf = new SimpleDateFormat("yyyy-MM-dd HH:mm:ss");
		System.out.println("执行任务的时间:"+sdf.format(new Date()));
		//自己的业务逻辑,可以根据id发送通知消息等
		//......
	}
}
4.延迟队列(关键代码)
这里包括添加延迟队列,和消费延迟队列,@PostConstruct注解的意思是服务启动加载一次,参考
Spring Boot项目启动时执行指定的方法-CSDN博客Spring Boot中多个PostConstruct注解执行顺序控制_多个postconstruct执行顺序-CSDN博客
import org.redisson.api.RBlockingQueue;
import org.redisson.api.RDelayedQueue;
import org.redisson.api.RedissonClient;
import org.springframework.beans.factory.annotation.Autowired;
import org.springframework.scheduling.concurrent.ThreadPoolTaskExecutor;
import org.springframework.stereotype.Service;

import javax.annotation.PostConstruct;
import javax.annotation.Resource;
import java.text.SimpleDateFormat;
import java.util.Date;
import java.util.concurrent.TimeUnit;

@Service
public class TestService {

	@Resource
	private AsyncService asyncService;
	@Resource
	private ThreadPoolTaskExecutor executor;
	@Autowired
	private RedissonClient redissonClient;

	/**
	 * 添加延迟任务
	 */
	public void addQueue() {
		//获取延迟队列
		RBlockingQueue<Object> blockingQueue = redissonClient.getBlockingQueue("delayedQueue");
		RDelayedQueue<Object> delayedQueue = redissonClient.getDelayedQueue(blockingQueue);
		for (int i = 1; i <= 10; i++) {
			long delayTime = 5+i; //延迟时间(秒)
//			long delayTime = 5; //这里时间统一,可以测试并发执行
			delayedQueue.offer("延迟任务"+i, delayTime, TimeUnit.SECONDS);
		}
		//打印时间方便查看
		SimpleDateFormat sdf = new SimpleDateFormat("yyyy-MM-dd HH:mm:ss");
		System.out.println("添加任务的时间:"+sdf.format(new Date()));
	}

	/**
	 *	服务启动时加载,开始消费延迟队列
	 */
	@PostConstruct
	public void consumer() {
		System.out.println("服务启动时加载>>>>>>");
		//获取延迟队列
		RBlockingQueue<Object> delayedQueue = redissonClient.getBlockingQueue("delayedQueue");

		//启用一个线程来消费这个延迟队列
		executor.execute(() ->{
			while (true){
				try {
//					System.out.println("while中的线程:"+Thread.currentThread().getName());
					//获取延迟队列中的任务
					Object value = delayedQueue.poll();
					if(value == null){
						//如果没有任务就休眠1秒,休眠时间根据业务自己定义
						Thread.sleep(1000);	//这里休眠时间越短,误差就越小
						continue;
					}
					//异步处理延迟队列中的消息
					asyncService.executeQueue(value);
				} catch (Exception e) {
					e.printStackTrace();
				}
			}
		});
	}
}
5.测试接口
import com.test.service.TestService;
import org.springframework.beans.factory.annotation.Autowired;
import org.springframework.web.bind.annotation.GetMapping;
import org.springframework.web.bind.annotation.RequestMapping;
import org.springframework.web.bind.annotation.RestController;

@RestController
@RequestMapping("/test")
public class TestController {

	@Autowired
	private TestService testService;

	/*
	 * 添加延迟任务
	 */
	@GetMapping(value = "/addQueue")
	public String addQueue() {
		testService.addQueue();
		return "success";
	}

}
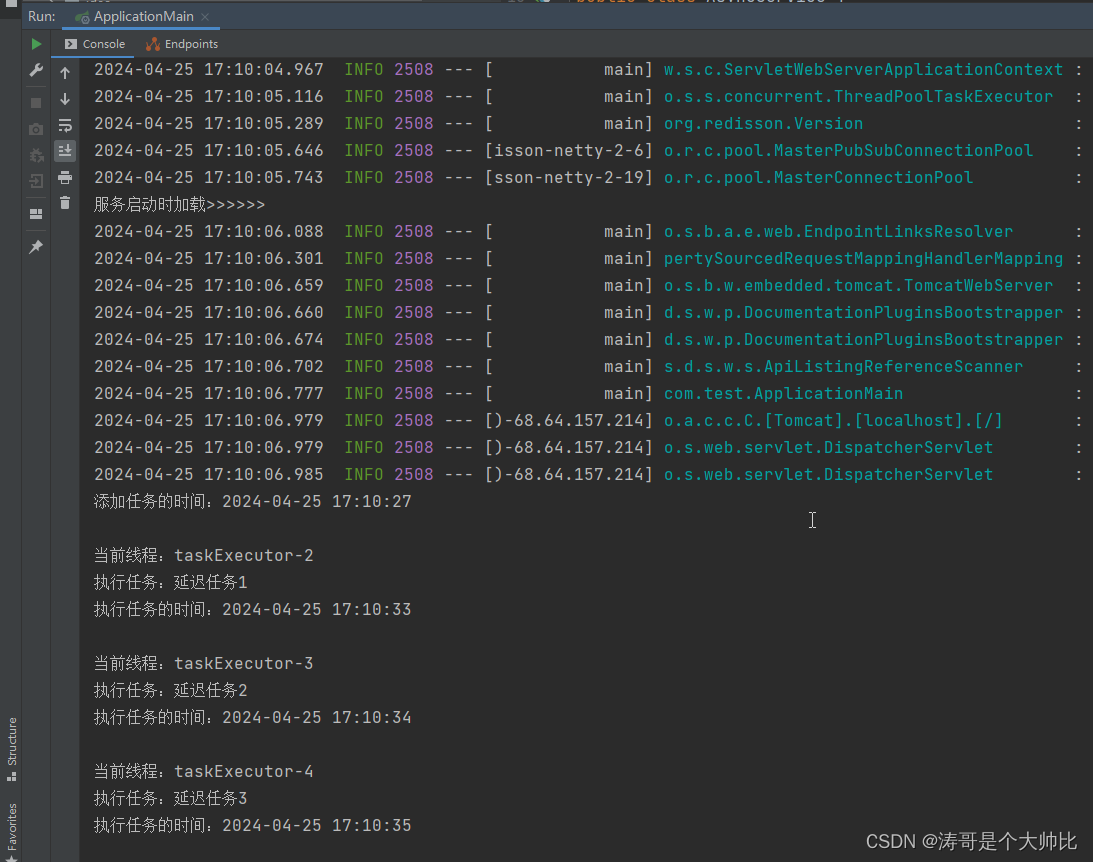
6.测试结果

总结:
- Redisson的的RDelayedQueue是基于Redis实现的,而Redis本身并不保证数据的持久性。如果Redis服务器宕机,那么所有在RDelayedQueue中的数据都会丢失。因此,我们需要在应用层面进行持久化设计,例如定期将RDelayedQueue中的数据持久化到数据库。
- 在设计延迟任务时,我们应该根据实际需求来合理设置延迟时间,避免设置过长的延迟时间导致内存占用过高。