结合视频一起学习——66_尚硅谷_SpringMVC_@RequestBody注解获取请求体信息_哔哩哔哩_bilibili
1. 概述
HttpMessageConverter(报文信息转换器)
想象一下,你的电脑想要告诉另一台电脑一些信息。但是,它们不能直接用语言交流,它们需要用一种特殊的代码来交流,这种代码就是HTTP。
在Web应用中,客户端和服务器之间通常通过HTTP请求和响应来交换数据。这些数据通常以特定的格式存在,比如JSON、XML等。HttpMessageConverter的作用就是帮助将这些数据转换为Java对象,或者将Java对象转换为客户端能够理解的格式。
相关注解和类型
- @RequestBody
-
- 这个注解用于告诉Spring框架,某个方法的参数应该直接从HTTP请求体中获取数据,而不是通过表单参数或其他方式。换句话说,它允许你将请求体中的数据(如JSON或XML)直接映射到Java对象中。
- 想象你收到了一封电子邮件,你不需要手动复制邮件内容,@RequestBody就像是一个自动帮你把邮件内容转换成你可以理解的格式的工具。
- @ResponseBody
-
- 与
@RequestBody相反,@ResponseBody注解告诉Spring框架,方法的返回值应该被转换为客户端能够理解的格式(如JSON或XML),并作为HTTP响应体发送回去。这意味着你不需要返回一个视图或视图名称,Spring会自动处理。 - 这就像你回复邮件时,不需要自己手动把回复内容转换成邮件格式,@ResponseBody会自动帮你做这个工作。
- 与
- RequestEntity
-
RequestEntity是一个类,它封装了一个HTTP请求的所有信息,包括头信息、方法和正文。你可以使用这个类来构建复杂的请求,或者在客户端模拟HTTP请求。- 就像你写邮件时,不仅写正文,还可以添加附件、设置主题等。RequestEntity就是一个可以帮你构建这样一封完整邮件的工具。
- ResponseEntity
-
ResponseEntity是一个类,它封装了HTTP响应的所有信息,包括状态码、头信息和正文。当你想要控制响应的每个细节时,可以使用这个类。- 这就像你收到了一封邮件,ResponseEntity可以让你看到邮件的所有信息,包括附件、主题等,并且可以对这些信息进行操作。
举个例子
假设你在网上购物,你选择了一个商品并提交了订单:
{
  "productId": "12345",
  "quantity": 2
}
这是你发给网站的一个请求,告诉它你想买什么。
在网站的服务器上,使用@RequestBody,服务器能够自动理解你的请求,知道你想要购买的商品编号和数量。
然后,服务器处理你的请求,准备给你一个确认信息,比如:
{
  "status": "success",
  "message": "Your order has been placed."
}
服务器使用@ResponseBody来自动将这个确认信息发送回给你,你就能在你的浏览器上看到这个消息了。
2. 初始化项目 demo05
前面学了那么多,从新再来一个如何创建一个新的 SpringMVC 项目
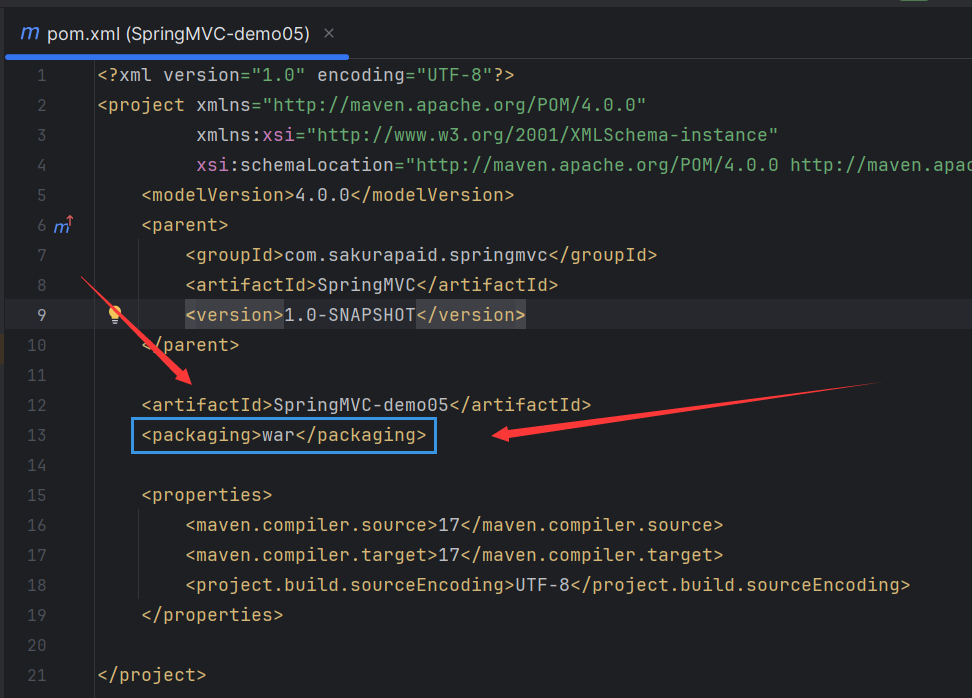
2.1. 新建项目 -- SpringMVC-demo05
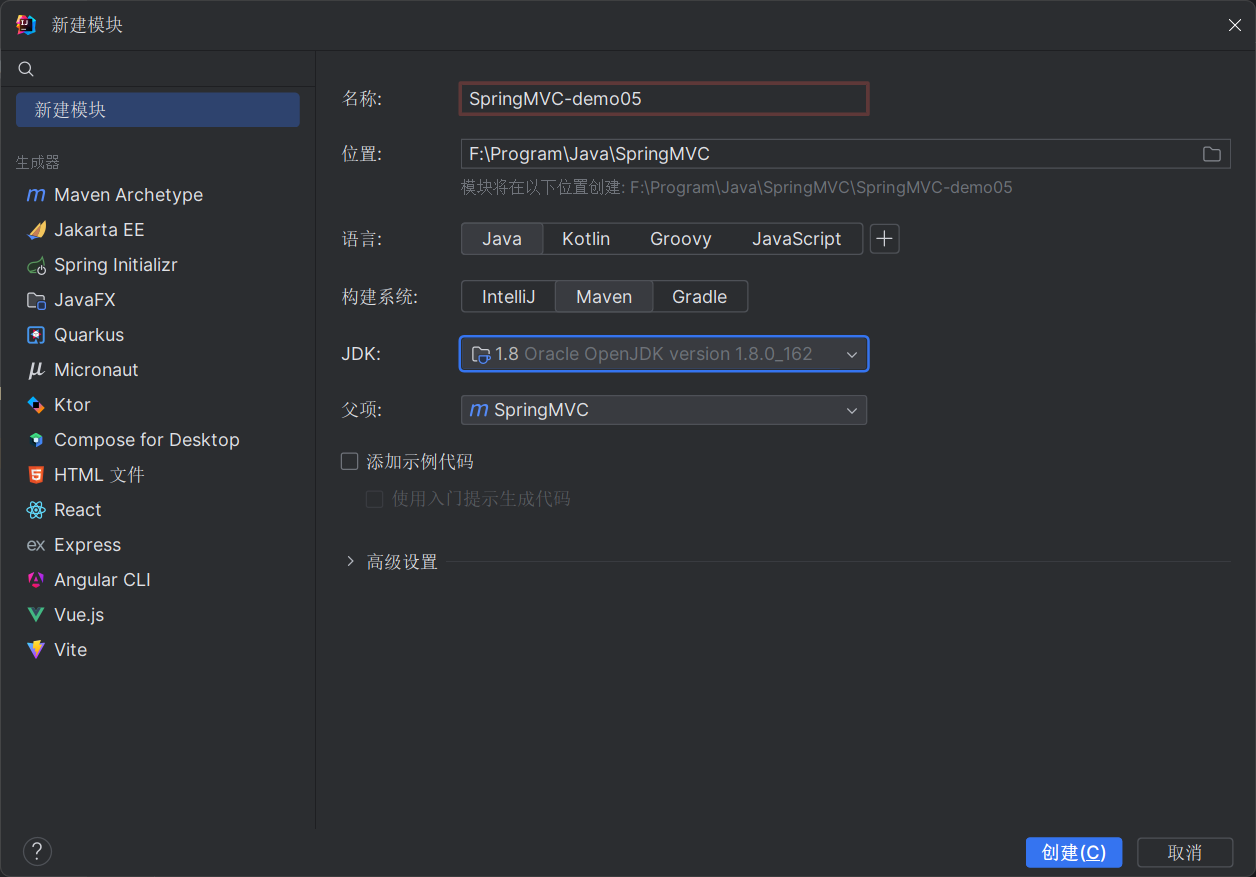
对应 pom 文件打 war 包
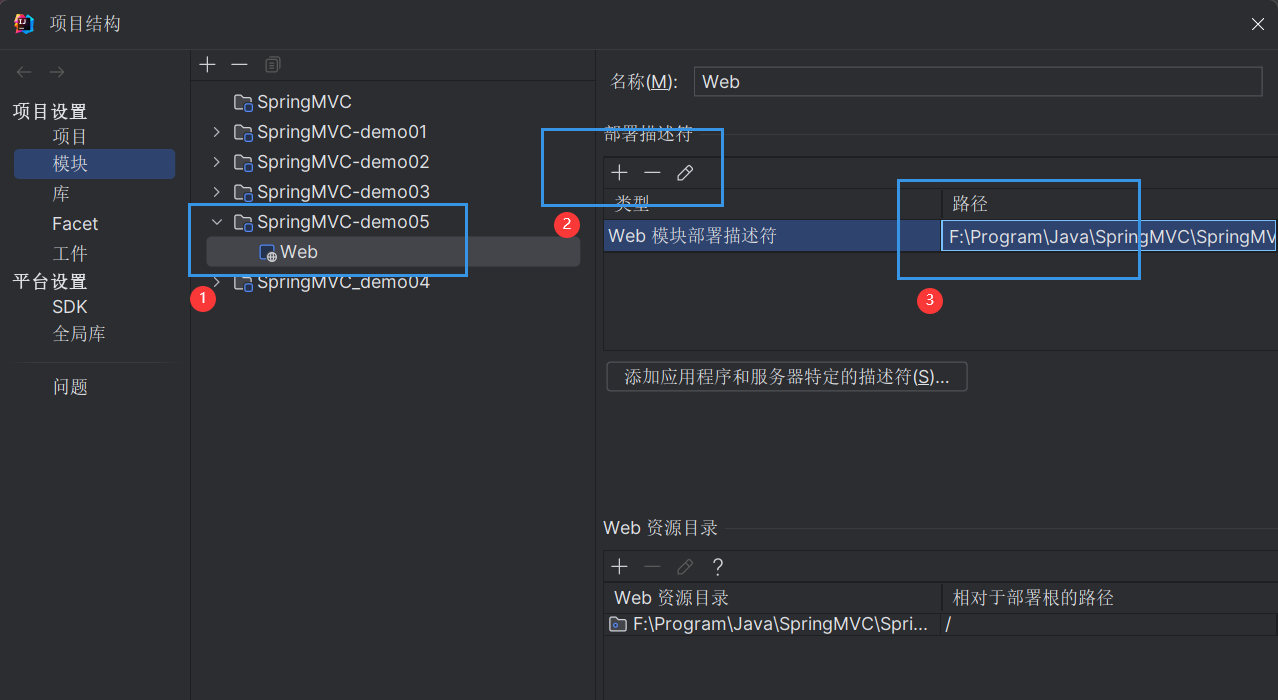
2.2. 配置 web.xml 文件
创建 webapp 文件夹
注意,需要图标带个小点点才算成功,且和 java、resources 文件夹同级

创建 web.xml 文件
注意要正确的 web.xml 文件路径
我这里是
F:\Program\Java\SpringMVC\SpringMVC-demo05\src\main\webapp\WEB-INF\web.xml
需要自己手动加上\src\main\webapp\
2.3. web.xml 配置
编码过滤器、HiddenHttpMethodFilter、前端控制器
顺序不能错,编码要在最前
<?xml version="1.0" encoding="UTF-8"?>
<web-app xmlns="http://xmlns.jcp.org/xml/ns/javaee"
         xmlns:xsi="http://www.w3.org/2001/XMLSchema-instance"
         xsi:schemaLocation="http://xmlns.jcp.org/xml/ns/javaee http://xmlns.jcp.org/xml/ns/javaee/web-app_4_0.xsd"
         version="4.0">
    <!--编码过滤器、HiddenHttpMethodFilter、前端控制器-->
    <!-- 配置springMVC的编码过滤器 -->
    <filter>
        <filter-name>CharacterEncodingFilter</filter-name>
        <filter-class>org.springframework.web.filter.CharacterEncodingFilter</filter-class>
        <init-param>
            <param-name>encoding</param-name>
            <param-value>UTF-8</param-value>
        </init-param>
        <init-param>
            <param-name>forceResponseEncoding</param-name>
            <param-value>true</param-value>
        </init-param>
    </filter>
    <filter-mapping>
        <filter-name>CharacterEncodingFilter</filter-name>
        <url-pattern>/*</url-pattern>
    </filter-mapping>

    <!-- 配置HiddenHttpMethodFilter -->
    <filter>
        <filter-name>HiddenHttpMethodFilter</filter-name>
        <filter-class>org.springframework.web.filter.HiddenHttpMethodFilter</filter-class>
    </filter>
    <filter-mapping>
        <filter-name>HiddenHttpMethodFilter</filter-name>
        <url-pattern>/*</url-pattern>
    </filter-mapping>

    <!--配置Spring MVC核心控制器(DispatcherServlet)-->
    <servlet>
        <servlet-name>springmvc05</servlet-name>
        <servlet-class>org.springframework.web.servlet.DispatcherServlet</servlet-class>
        <init-param>
            <param-name>contextConfigLocation</param-name>
            <param-value>classpath:springmvc-servlet.xml</param-value>
        </init-param>
        <load-on-startup>1</load-on-startup>
    </servlet>
    <servlet-mapping>
        <servlet-name>springmvc05</servlet-name>
        <url-pattern>/</url-pattern>
    </servlet-mapping>

</web-app>
2.4. 配置 spring 文件
配置前端 dispatcherServlet 需要对应的 spring 配置文件,不然这里会爆红

在 resources 文件夹中创建上文代码中对应名称的 spring 配置文件
即 springmvc-servlet.xml 文件,名称可以随意,符合命名规范即可
要求如下:
- 组件扫描:告诉Spring在哪些地方寻找你的代码中的特定部分(比如控制器),然后自动把它们加入到应用中。
- Thymeleaf视图解析器:Thymeleaf是一个工具,用来生成用户看到的网页。视图解析器告诉Spring怎么使用Thymeleaf来显示这些网页。
- servlet-handler处理静态资源:静态资源是指网站上不会变的东西,比如图片、CSS样式表和JavaScript文件。这个设置让Spring知道怎么正确地发送这些文件给请求它们的用户。
- 启动注解驱动:注解是一种特殊的标记,你可以加在代码中。启动注解驱动就是让Spring注意这些注解,并根据它们来设置应用的行为。
- view-controller视图默认映射:这设置了一个“首页”,当用户访问你的网站,但没有明确说要看哪个页面时,就会看到这个“首页”。
<?xml version="1.0" encoding="UTF-8"?>
<!-- Spring核心 beans 命名空间 -->
<beans xmlns="http://www.springframework.org/schema/beans"
       xmlns:xsi="http://www.w3.org/2001/XMLSchema-instance"
       xmlns:context="http://www.springframework.org/schema/context"
       xmlns:mvc="http://www.springframework.org/schema/mvc"
       xsi:schemaLocation="
           http://www.springframework.org/schema/beans
           http://www.springframework.org/schema/beans/spring-beans.xsd
           http://www.springframework.org/schema/context
           https://www.springframework.org/schema/context/spring-context.xsd
           http://www.springframework.org/schema/mvc
           http://www.springframework.org/schema/mvc/spring-mvc.xsd">

    <!--组件扫描、Thymeleaf视图解析器、servlet-handler处理静态资源、启动注解驱动-->
    <!--view-controller视图默认映射-->

    <!--开启组件扫描-->
    <context:component-scan base-package="com.sakurapaid.mvc"/>

    <!-- Thymeleaf视图解析器 -->
    <!-- 配置Thymeleaf视图解析器,用于将控制器返回的逻辑视图名解析为实际的HTML页面 -->
    <bean id="viewResolver" class="org.thymeleaf.spring5.view.ThymeleafViewResolver">
        <property name="order" value="1"/> <!-- 解析器的优先级 -->
        <property name="characterEncoding" value="UTF-8"/> <!-- 解析结果的字符编码 -->
        <property name="templateEngine">
            <bean class="org.thymeleaf.spring5.SpringTemplateEngine">
                <property name="templateResolver">
                    <bean class="org.thymeleaf.spring5.templateresolver.SpringResourceTemplateResolver">

                        <!-- 设置视图的前缀,例如:如果逻辑视图名为home,则实际查找的路径为/WEB-INF/templates/home.html -->
                        <property name="prefix" value="/WEB-INF/html/"/>

                        <!-- 设置视图的后缀,即视图文件的扩展名 -->
                        <property name="suffix" value=".html"/>
                        <property name="templateMode" value="HTML5"/> <!-- 指定模板解析模式为HTML5 -->
                        <property name="characterEncoding" value="UTF-8"/> <!-- 模板的字符编码 -->
                    </bean>
                </property>
            </bean>
        </property>
    </bean>

    <!--servlet-handler处理静态资源-->
    <mvc:default-servlet-handler/>
    <!--<mvc:resources mapping="/static/**" location="/static/"/>-->

    <!--view-controller视图默认映射-->
    <mvc:view-controller path="/" view-name="index"/>

    <!--启动注解驱动-->
    <mvc:annotation-driven/>
</beans>
2.5. 测试首页 index.html
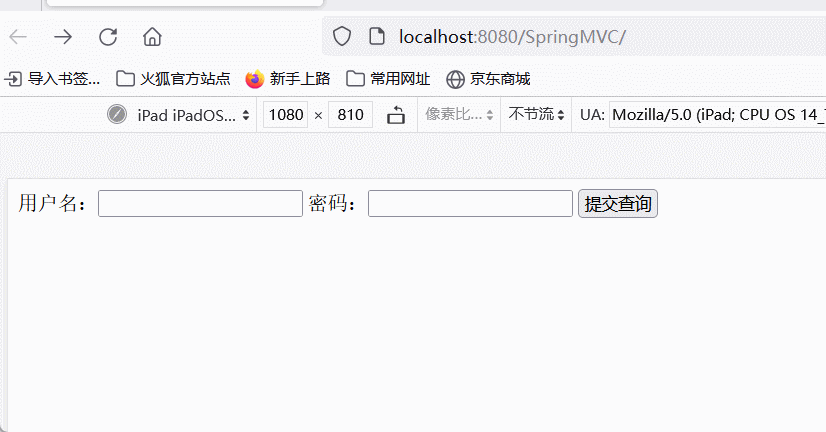
根据视图解析器在对应的位置创建 index 文件

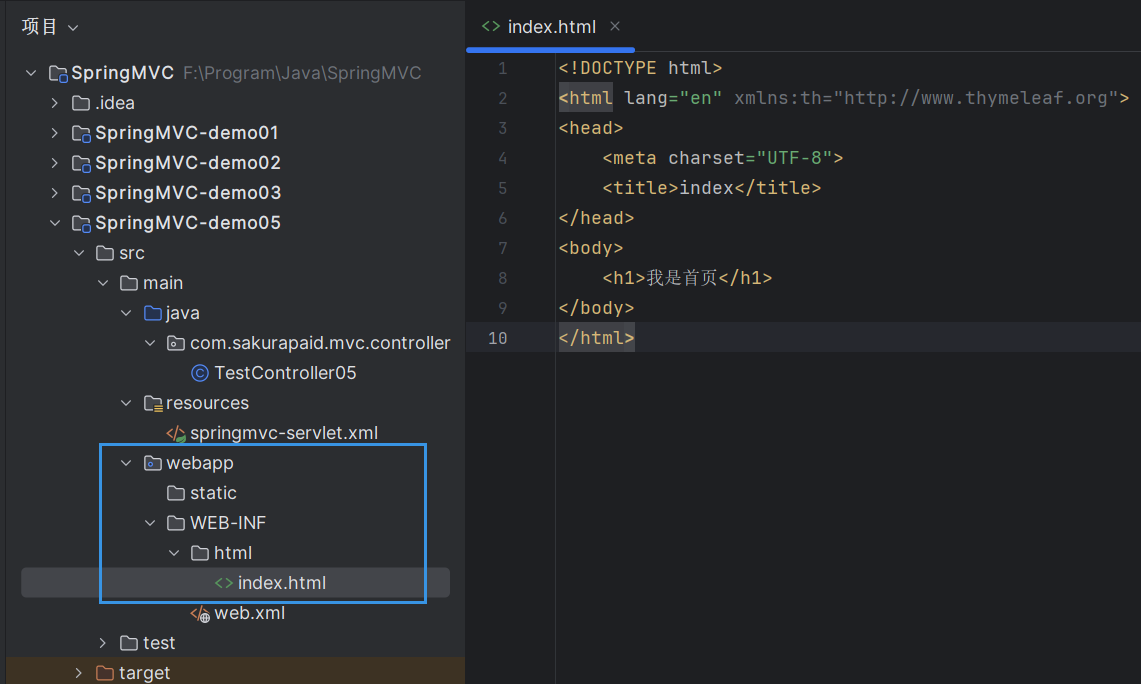
配置 Tomcat 服务器

3. @RequestBody
@RequestBody注解获取请求体信息
@RequestBody是一个告诉Spring框架,你想要直接从HTTP请求体中读取数据的注解。它通常用在处理非表单类型的数据,比如JSON或XML格式的数据。
@RequestBody可以获取请求体,需要在控制器方法设置一个形参,使用@RequestBody进行标识,当前请求的请求体就会为当前注解所标识的形参赋值
例子解释
有一个HTML表单,用户可以输入用户名和密码,然后提交表单:
- 修改 index.html
<!DOCTYPE html>
<html lang="en" xmlns:th="http://www.thymeleaf.org">
<head>
    <meta charset="UTF-8">
    <title>index</title>
</head>
<body>
    <form th:action="@{/demo05/testRequestBody}" method="post">
        用户名:<input type="text" name="username">
        密码:<input type="password" name="password">
        <input type="submit">
    </form>
</body>
</html>当用户填写表单并点击提交时,浏览器会将表单中的数据以application/x-www-form-urlencoded格式发送到服务器。
然后,有一个Spring的控制器方法,它用@RequestBody注解来获取这个数据:
- 创建 TestController05 控制器
package com.sakurapaid.mvc.controller;

import org.springframework.stereotype.Controller;
import org.springframework.web.bind.annotation.RequestBody;
import org.springframework.web.bind.annotation.RequestMapping;

@Controller
@RequestMapping("/demo05")
public class TestController05 {

    /**
     * 测试请求体的函数
     *
     * @param requestBody 请求体内容,以字符串形式传入
     * @return 返回一个表示操作成功的字符串
     */
    @RequestMapping("/testRequestBody")
    public String testRequestBody(@RequestBody String requestBody){
        // 打印请求体内容
        System.out.println("requestBody:"+requestBody);
        return "success";
    }
}
在这个例子中,@RequestBody注解告诉Spring,我们想要将请求体中的数据直接作为一个字符串传递给requestBody参数。
- success.html 文件
<!DOCTYPE html>
<html lang="en" xmlns:th="http://www.thymeleaf.org">
<head>
    <meta charset="UTF-8">
    <title>Success</title>
</head>
<body>
    <h1>Success</h1>
</body>
</html>
输出结果

当你提交表单时,服务器上的testRequestBody方法会被调用,并且会打印出请求体的内容:
requestBody:username=admin&password=123456这意味着,表单中的数据(用户名和密码)被作为请求体发送,并且被@RequestBody注解的方法参数接收为一个字符串。
注意
通常,我们不会用@RequestBody来处理表单数据,因为表单数据通常是键值对的形式,而不是JSON或XML。对于表单数据,我们通常会使用@RequestParam注解来获取每个表单字段的值。
4. @RequestEntity
RequestEntity封装请求报文的一种类型,需要在控制器方法的形参中设置该类型的形参,当前请求的请求报文就会赋值给该形参,可以通过getHeaders()获取请求头信息,通过getBody()获取请求体信息。
RequestEntity是一个更高级的类,它不仅包含了请求体,还包含了请求头、HTTP方法、URI等信息。当你需要获取整个请求的详细信息时,可以使用RequestEntity。
- 修改 index.html
<!DOCTYPE html>
<html lang="en" xmlns:th="http://www.thymeleaf.org">
<head>
    <meta charset="UTF-8">
    <title>index</title>
</head>
<body>
    <form th:action="@{/demo05/testRequestBody}" method="post">
        用户名:<input type="text" name="username">
        密码:<input type="password" name="password">
        <input type="submit" value="测试RequestBody">
    </form>
    <hr>
    <form th:action="@{/demo05/testRequestEntity}" method="post">
        用户名:<input type="text" name="username">
        密码:<input type="password" name="password">
        <input type="submit" value="测试RequestEntity">
    </form>
</body>
</html>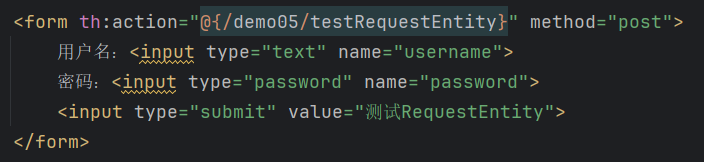
- 修改后端控制器
package com.sakurapaid.mvc.controller;
import org.springframework.http.RequestEntity;
import org.springframework.stereotype.Controller;
import org.springframework.web.bind.annotation.RequestBody;
import org.springframework.web.bind.annotation.RequestMapping;
@Controller
@RequestMapping("/demo05")
public class TestController05 {
@RequestMapping("/testRequestBody")
public String testRequestBody(@RequestBody String requestBody){
// 打印请求体内容
System.out.println("requestBody:"+requestBody);
return "success";
}
@RequestMapping("/testRequestEntity")
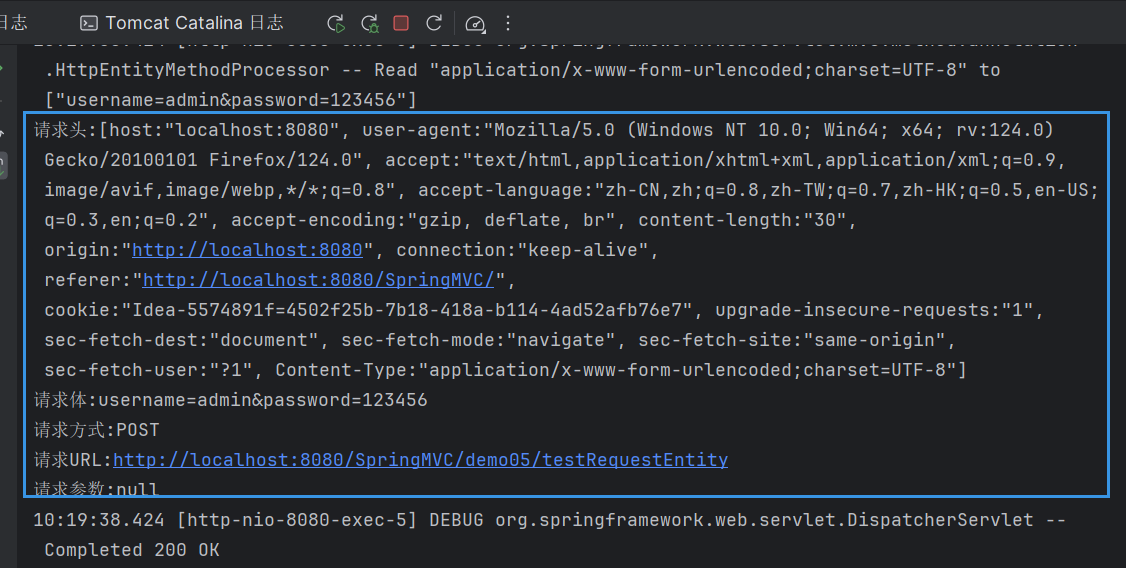
public String testRequestEntity(RequestEntity<String> requestEntity){
// 当前requestEntity对象中包含了请求头、请求体、请求方式等信息
System.out.println("请求头:" + requestEntity.getHeaders());
System.out.println("请求体:" + requestEntity.getBody());
System.out.println("请求方式:" + requestEntity.getMethod());
System.out.println("请求URL:" + requestEntity.getUrl());
System.out.println("请求参数:" + requestEntity.getUrl().getQuery());
return "success";
}
}
- 测试输出
5. @ResponseBody
5.1. HttpServletResponse 响应数据
回顾以前的通过 ServletAPI 去响应数据
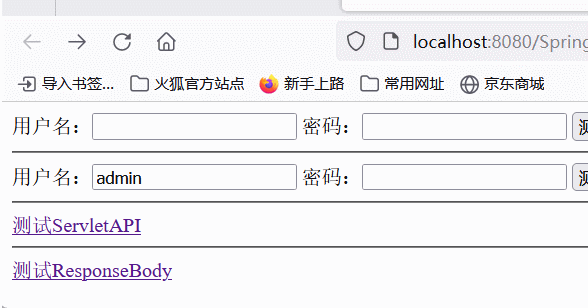
- 修改 index.html
<!DOCTYPE html>
<html lang="en" xmlns:th="http://www.thymeleaf.org">
<head>
    <meta charset="UTF-8">
    <title>index</title>
</head>
<body>
    <form th:action="@{/demo05/testRequestBody}" method="post">
        用户名:<input type="text" name="username">
        密码:<input type="password" name="password">
        <input type="submit" value="测试RequestBody">
    </form>
    <hr>
    <form th:action="@{/demo05/testRequestEntity}" method="post">
        用户名:<input type="text" name="username">
        密码:<input type="password" name="password">
        <input type="submit" value="测试RequestEntity">
    </form>
    <hr>
    <a th:href="@{/demo05/testServletAPI}">测试ServletAPI</a>
</body>
</html>
- 添加控制器
package com.sakurapaid.mvc.controller;

import org.springframework.http.RequestEntity;
import org.springframework.stereotype.Controller;
import org.springframework.web.bind.annotation.RequestBody;
import org.springframework.web.bind.annotation.RequestMapping;

import javax.servlet.http.HttpServletResponse;
import java.io.IOException;

@Controller
@RequestMapping("/demo05")
public class TestController05 {

    @RequestMapping("/testRequestBody")
    public String testRequestBody(@RequestBody String requestBody){
        // 打印请求体内容
        System.out.println("requestBody:"+requestBody);
        return "success";
    }

    @RequestMapping("/testRequestEntity")
    public String testRequestEntity(RequestEntity<String> requestEntity){
        // 当前requestEntity对象中包含了请求头、请求体、请求方式等信息
        System.out.println("请求头:" + requestEntity.getHeaders());
        System.out.println("请求体:" + requestEntity.getBody());
        System.out.println("请求方式:" + requestEntity.getMethod());
        System.out.println("请求URL:" + requestEntity.getUrl());
        System.out.println("请求参数:" + requestEntity.getUrl().getQuery());
        return "success";
    }

    @RequestMapping("/testServletAPI")
    public void toResponse(HttpServletResponse response) throws IOException {
        response.getWriter().print("hello,response");
    }
}
- 测试输出

5.2. @ResponseBody 注解
@ResponseBody 是一个注解,它告诉Spring框架,某个方法的返回值应该直接作为HTTP响应的正文发送给客户端,而不是被渲染成视图(如HTML页面)。这样,当客户端发送请求到服务器,服务器处理完请求后,可以直接将处理结果以文本、JSON或XML等格式返回给客户端,而不是返回一个视图模板。这在开发RESTful Web服务时非常有用,因为客户端通常期望收到可以直接处理的数据,而不是一个网页视图。
@ResponseBody用于标识一个控制器方法,可以将该方法的返回值直接作为响应报文的响应体响应到浏览器。
- index.html
<!DOCTYPE html>
<html lang="en" xmlns:th="http://www.thymeleaf.org">
<head>
    <meta charset="UTF-8">
    <title>index</title>
</head>
<body>
    <form th:action="@{/demo05/testRequestBody}" method="post">
        用户名:<input type="text" name="username">
        密码:<input type="password" name="password">
        <input type="submit" value="测试RequestBody">
    </form>
    <hr>
    <form th:action="@{/demo05/testRequestEntity}" method="post">
        用户名:<input type="text" name="username">
        密码:<input type="password" name="password">
        <input type="submit" value="测试RequestEntity">
    </form>
    <hr>
    <a th:href="@{/demo05/testServletAPI}">测试ServletAPI</a>
    <hr>
    <a th:href="@{/demo05/testResponseBody}">测试ResponseBody</a>
</body>
</html>
- 控制器
package com.sakurapaid.mvc.controller;
import org.springframework.http.RequestEntity;
import org.springframework.stereotype.Controller;
import org.springframework.web.bind.annotation.RequestBody;
import org.springframework.web.bind.annotation.RequestMapping;
import org.springframework.web.bind.annotation.ResponseBody;
import javax.servlet.http.HttpServletResponse;
import java.io.IOException;
@Controller
@RequestMapping("/demo05")
public class TestController05 {
@RequestMapping("/testRequestBody")
public String testRequestBody(@RequestBody String requestBody){
// 打印请求体内容
System.out.println("requestBody:"+requestBody);
return "success";
}
@RequestMapping("/testRequestEntity")
public String testRequestEntity(RequestEntity<String> requestEntity){
// 当前requestEntity对象中包含了请求头、请求体、请求方式等信息
System.out.println("请求头:" + requestEntity.getHeaders());
System.out.println("请求体:" + requestEntity.getBody());
System.out.println("请求方式:" + requestEntity.getMethod());
System.out.println("请求URL:" + requestEntity.getUrl());
System.out.println("请求参数:" + requestEntity.getUrl().getQuery());
return "success";
}
@RequestMapping("/testServletAPI")
public void toResponse(HttpServletResponse response) throws IOException {
response.getWriter().print("hello,response");
}
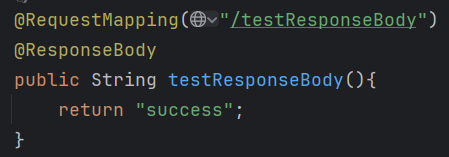
@RequestMapping("/testResponseBody")
@ResponseBody
public String testResponseBody(){
return "success";
}
}
有@ResponseBody 注解的情况

没有@ResponseBody 注解的情况

6. SpringMVC处理JSON
6.1. 回顾 JSON
参考视频
71_尚硅谷_SpringMVC_回顾json_哔哩哔哩_bilibili
6.2. @ResponseBody处理json的步骤
- 添加Jackson库依赖
Jackson是一个流行的Java库,用于将Java对象转换成JSON格式的字符串,也可以将JSON字符串转换成Java对象。在你的项目中,你需要添加Jackson库,以便Spring能够将Java对象转换为JSON格式。
<dependency>
    <groupId>com.fasterxml.jackson.core</groupId>
    <artifactId>jackson-databind</artifactId>
    <version>2.12.1</version>
</dependency>- 启用注解驱动
在Spring的配置文件中,你需要启用注解驱动。这样做可以让Spring识别并处理用注解标记的方法,比如@RequestMapping和@ResponseBody。
<mvc:annotation-driven />- 使用
@ResponseBody注解
在你的控制器方法上使用@ResponseBody注解,这样Spring就知道这个方法的返回值需要直接作为响应体发送给客户端,而不是渲染成页面。
@RequestMapping("/testResponseUser")
@ResponseBody
public User testResponseUser(){
return new User(1001,"admin","123456",23,"男");
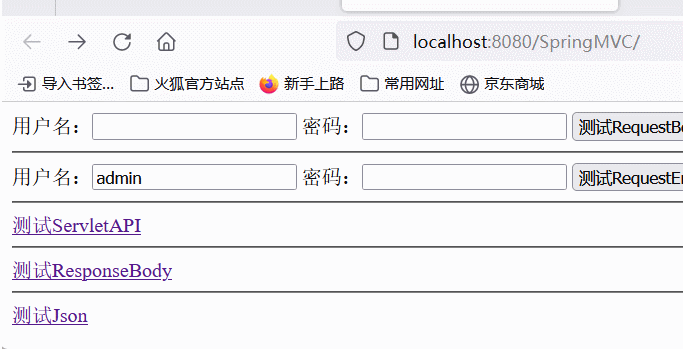
}同时修改 index.html 页面
<!DOCTYPE html>
<html lang="en" xmlns:th="http://www.thymeleaf.org">
<head>
    <meta charset="UTF-8">
    <title>index</title>
</head>
<body>
    <form th:action="@{/demo05/testRequestBody}" method="post">
        用户名:<input type="text" name="username">
        密码:<input type="password" name="password">
        <input type="submit" value="测试RequestBody">
    </form>
    <hr>
    <form th:action="@{/demo05/testRequestEntity}" method="post">
        用户名:<input type="text" name="username">
        密码:<input type="password" name="password">
        <input type="submit" value="测试RequestEntity">
    </form>
    <hr>
    <a th:href="@{/demo05/testServletAPI}">测试ServletAPI</a>
    <hr>
    <a th:href="@{/demo05/testResponseBody}">测试ResponseBody</a>
    <hr>
    <a th:href="@{/demo05/testResponseUser}">测试Json</a>
</body>
</html>
- 返回Java对象
在你的控制器方法中,你可以直接返回一个Java对象。由于前面已经启用了注解驱动并添加了@ResponseBody注解,Spring会使用Jackson库将这个Java对象转换成JSON格式的字符串,并发送给客户端。
/ 假设User是一个简单的Java类,包含id, username, password, age, sex等属性
public class User {
    private int id;
    private String username;
    private String password;
    private int age;
    private String sex;
    // 构造方法、getter和setter省略
}- 结果
当客户端请求/testResponseUser这个URL时,浏览器会收到一个JSON格式的响应,如下所示:
{
  "id": 1001,
  "username": "admin",
  "password": "123456",
  "age": 23,
  "sex": "男"
}
这样,你就可以在客户端(比如浏览器或者移动应用)直接使用这个JSON数据了。
7. SpringMVC处理ajax
请求超链接
通过vue和axios处理点击事件
<!-- 应用容器 -->
<div id="app">
    <!-- 点击触发 testAjax 方法的链接 -->
    <a th:href="@{/demo05/testAjax}" @click="testAjax">testAjax</a><br>
</div>

<!-- 引入 Vue.js 库 -->
<script type="text/javascript" th:src="@{/static/js/vue.js}"></script>
<!-- 引入 axios 请求库 -->
<script type="text/javascript" th:src="@{/static/js/axios.min.js}"></script>

<!-- Vue 实例定义 -->
<script type="text/javascript">
    const vue = new Vue({
        el: "#app", // 挂载点为 id 为 app 的 div 元素
        methods: {
            /**
             * 发起 AJAX 请求的方法
             * @param event 鼠标点击事件对象
             */
            testAjax: function (event) {
                // 使用 axios 发起 POST 请求
                axios({
                    method: "post", // 请求方法
                    url: event.target.href, // 请求地址,来自点击的链接
                    params: { // 请求参数
                        username: "admin",
                        password: "123456"
                    }
                }).then(function (response) { // 请求成功后的处理
                    alert(response.data); // 显示响应数据
                });
                event.preventDefault(); // 阻止默认行为,即阻止链接跳转
            }
        }
    });
</script>
控制器方法
@RequestMapping("/testAjax")
@ResponseBody
public String testAjax(String username, String password){
    System.out.println("username:"+username+",password:"+password);
    return "hello,ajax";
}
测试输出

8. @RestController注解
在Spring MVC框架中,我们通常会用到两种注解来创建一个控制器:
@Controller:这个注解用来标记一个类是一个控制器,它负责处理用户的请求并返回响应。@ResponseBody:这个注解用来标记一个方法,表示该方法的返回值将直接作为响应体返回,而不是返回一个视图(View)。
@RestController是一个复合注解,它相当于同时包含了@Controller和@ResponseBody的功能。当你在一个类上使用@RestController注解时,你就不需要在该类的方法上单独使用@ResponseBody注解了,因为@RestController已经包含了它的功能。
import org.springframework.stereotype.Controller;
import org.springframework.web.bind.annotation.GetMapping;
import org.springframework.web.bind.annotation.ResponseBody;

// 使用@RestController注解,这个类就成为了一个控制器
// 并且类中的所有方法都会将返回值作为响应体返回
@RestController
public class MyController {

    // 使用@GetMapping注解,这个请求会映射到"/hello"这个URL
    @GetMapping("/hello")
    // 由于类上有@RestController注解,这里不需要@ResponseBody注解
    public String sayHello() {
        return "Hello, World!";
    }
}在这个例子中,我们创建了一个名为MyController的控制器类,并使用@RestController注解标记它。然后,我们在这个类中定义了一个名为sayHello的方法,并用@GetMapping("/hello")注解来映射到URL /hello。当用户访问这个URL时,sayHello方法会被调用,并且它返回的字符串"Hello, World!"将直接作为响应体返回给用户。
这样,你就不需要在sayHello方法上使用@ResponseBody注解,因为@RestController已经包含了这个功能。这使得代码更加简洁。
9. ResponseEntity 类
ResponseEntity是一个在Spring MVC中用来构建HTTP响应的类。当你需要对HTTP响应进行更细致的控制时,比如设置状态码、添加响应头或者自定义响应体,就可以使用ResponseEntity。
简单来说,ResponseEntity允许你构造一个完整的HTTP响应,包括:
- 状态码(如200 OK, 404 Not Found等)
- 响应头(如Content-Type, Cache-Control等)
- 响应体(即返回给客户端的数据)
下面是一个使用ResponseEntity的简单Spring MVC代码示例:
import org.springframework.http.HttpHeaders;
import org.springframework.http.HttpStatus;
import org.springframework.http.ResponseEntity;
import org.springframework.web.bind.annotation.GetMapping;
import org.springframework.web.bind.annotation.RestController;

@RestController
public class MyController {

    @GetMapping("/greeting")
    public ResponseEntity<String> getGreeting() {
        // 创建一个响应对象
        HttpHeaders headers = new HttpHeaders();
        // 添加一个响应头,告诉浏览器这是一个HTML内容
        headers.add("Content-Type", "text/plain; charset=UTF-8");

        // 设置HTTP状态码为200 OK
        HttpStatus status = HttpStatus.OK;

        // 响应体的内容
        String body = "Hello, this is a custom response!";

        // 构建ResponseEntity对象
        ResponseEntity<String> response = new ResponseEntity<>(body, headers, status);

        // 返回ResponseEntity对象
        return response;
    }
}在这个例子中,我们定义了一个名为getGreeting的方法,它返回一个ResponseEntity<String>类型的值。我们首先创建了一个HttpHeaders对象,并添加了一个Content-Type响应头,指定内容类型为纯文本。然后,我们指定了HTTP状态码为HttpStatus.OK,这表示请求成功。接下来,我们定义了响应体的内容,即字符串"Hello, this is a custom response!"。最后,我们使用这些信息创建了一个ResponseEntity对象,并将其返回。
当客户端调用/getGreeting这个URL时,服务器将返回一个状态码为200的响应,响应头中包含Content-Type,且响应体为"Hello, this is a custom response!"。通过这种方式,你可以更灵活地控制HTTP响应的各个方面。