1 Namespace是什么?
linux的namespace机制有点类似于数据库中的schema,可以为不同的进程提供各自的命名空间,命名空间互相隔离,进程跑在自己的namespace中资源互相隔离。
docker使用了namespace的机制,将进程隔离在某个namespace中,而在某一个命名空间内的进程可以感知到其他进程的存在,但是对空间外部的进程一无所知。以一种轻量级的方式实现了虚拟化技术。
namespace提供了多种资源的隔离:
| Namespace | clone(...flag...) | 所隔离的资源 |
|---|---|---|
| Cgroup | CLONE_NEWCGROUP | Cgroup 根目录 |
| IPC | CLONE_NEWIPC | System V IPC,POSIX 消息队列 |
| Network | CLONE_NEWNET | 网络设备、协议栈、端口等 |
| Mount | CLONE_NEWNS | 挂载点 |
| PID | CLONE_NEWPID | 进程 ID |
| User | CLONE_NEWUSER | 用户和组 ID |
| UTS | CLONE_NEWUTS | 主机名和域名 |
多种类型的资源隔离可以让我们从文件系统开始,到进程通信、网络通信、用户权限管理、主机管理,一步步的实现各方面资源的隔离,使进程运行在一个虚拟化的环境中。本文讨论的namespace实现针对Linux内核3.8及其以后的版本。
下面我们针对六种命名空间的API做一些实例讲解,亲身体验隔离的实现底层机制。
【文章福利】小编在群文件上传了一些个人觉得比较好得学习书籍、视频资料,有需要的可以进群【977878001】领取!!!额外赠送一份价值699的内核资料包(含视频教程、电子书、实战项目及代码)
内核资料直通车:Linux内核源码技术学习路线+视频教程代码资料
学习直通车(腾讯课堂免费报名):Linux内核源码/内存调优/文件系统/进程管理/设备驱动/网络协议栈
2 Namespace实战
关于namespace的系统调用主要有三个:
- clone() – 实现线程的系统调用,用来创建一个新的进程,并可以通过设计上述参数达到隔离。
- unshare() – 使某进程脱离某个namespace
- setns() – 把某进程加入到某个namespace
结合一段代码来介绍几个namespace
#define _GNU_SOURCE
#include <sys/types.h>
#include <sys/wait.h>
#include <stdio.h>
#include <sched.h>
#include <signal.h>
#include <unistd.h>

#define STACK_SIZE (1024 * 1024)
static char container_stack[STACK_SIZE];

char* const container_args[] = {
    "/bin/bash",
    NULL
};

int container_main(void* arg)
{
    printf("Container - inside the container!\n");
    execv(container_args[0], container_args);
    printf("Something's wrong!\n");
    return 1;
}

int main()
{
    printf("Parent - start a container!\n");
    int container_pid = clone(container_main, container_stack+STACK_SIZE, SIGCHLD, NULL);
    waitpid(container_pid, NULL, 0);
    printf("Parent - container stopped!\n");
    return 0;
}
2.1 UTS Namespace
#define _GNU_SOURCE
#include <sys/types.h>
#include <sys/wait.h>
#include <stdio.h>
#include <sched.h>
#include <signal.h>
#include <unistd.h>

#define STACK_SIZE (1024 * 1024)
static char container_stack[STACK_SIZE];

char* const container_args[] = {
    "/bin/bash",
    NULL
};

int container_main(void* arg)
{
    printf("Container - inside the container!\n");
    sethostname("container",10);
    execv(container_args[0], container_args);
    printf("Something's wrong!\n");
    return 1;
}

int main()
{
    printf("Parent - start a container!\n");
    int container_pid = clone(container_main, container_stack+STACK_SIZE, SIGCHLD | CLONE_NEWUTS, NULL);
    waitpid(container_pid, NULL, 0);
    printf("Parent - container stopped!\n");
    return 0;
}
hostname已经变了
[root@iZbp1d4tisi44j6vxze02fZ tmp]# vi c1.c
[root@iZbp1d4tisi44j6vxze02fZ tmp]# gcc c1.c
[root@iZbp1d4tisi44j6vxze02fZ tmp]# ./a.out
Parent - start a container!
Container - inside the container!
[root@container tmp]# hostname
container
[root@container tmp]# uname -n
container
[root@container tmp]# exit
exit
Parent - container stopped!
[root@iZbp1d4tisi44j6vxze02fZ tmp]#
2.2 UTS Namespace
IPC全称 Inter-Process Communication,是Unix/Linux下进程间通信的一种方式,IPC有共享内存、信号量、消息队列等方法。所以,为了隔离,我们也需要把IPC给隔离开来,这样,只有在同一个Namespace下的进程才能相互通信。
如果你熟悉IPC的原理的话,你会知道,IPC需要有一个全局的ID,即然是全局的,那么就意味着我们的Namespace需要对这个ID隔离,不能让别的Namespace的进程看到。
#define _GNU_SOURCE
#include <sys/types.h>
#include <sys/wait.h>
#include <stdio.h>
#include <sched.h>
#include <signal.h>
#include <unistd.h>

#define STACK_SIZE (1024 * 1024)
static char container_stack[STACK_SIZE];

char* const container_args[] = {
    "/bin/bash",
    NULL
};

int container_main(void* arg)
{
    printf("Container - inside the container!\n");
    sethostname("container",10);
    execv(container_args[0], container_args);
    printf("Something's wrong!\n");
    return 1;
}

int main()
{
    printf("Parent - start a container!\n");
    int container_pid = clone(container_main, container_stack+STACK_SIZE,
                              SIGCHLD | CLONE_NEWUTS | CLONE_NEWIPC, NULL);
    waitpid(container_pid, NULL, 0);
    printf("Parent - container stopped!\n");
    return 0;
}
ipcs用法 ipcs -a 是默认的输出信息 打印出当前系统中所有的进程间通信方式的信息 ipcs -m 打印出使用共享内存进行进程间通信的信息 ipcs -q 打印出使用消息队列进行进程间通信的信息 ipcs -s 打印出使用信号进行进程间通信的信息
创建查询ipcs
[root@iZbp1d4tisi44j6vxze02fZ tmp]# ipcmk -Q
Message queue id: 0

[root@iZbp1d4tisi44j6vxze02fZ tmp]# ipcs -q

------ Message Queues --------
key        msqid      owner      perms      used-bytes   messages
0x3b786aa7 0          root       644        0            0
查看所有ipcs
[root@iZbp1d4tisi44j6vxze02fZ tmp]# ipcs -a

------ Message Queues --------
key        msqid      owner      perms      used-bytes   messages
0x3b786aa7 0          root       644        0            0

------ Shared Memory Segments --------
key        shmid      owner      perms      bytes      nattch     status
0x00000000 65536      root       600        524288     2          dest
0x00000000 229377     root       600        524288     2          dest
0x00000000 7143426    root       600        16777216   2          dest
0x00802c81 400392195  mingjie.gm 600        56         6
0x00000000 491524     root       600        524288     2          dest
0x00000000 212926469  mingjie.gm 640        2928640    164
0x00000000 212959238  mingjie.gm 640        1677721600 82
0x00000000 884743     root       600        524288     2          dest
0x00000000 212992008  mingjie.gm 640        13848576   82
0xb4ce0a78 213024777  mingjie.gm 640        12288      82
0x00803069 388169738  mingjie.gm 600        56         6

#define _GNU_SOURCE
------ Semaphore Arrays --------
key        semid      owner      perms      nsems
0x671cfa8c 6422528    mingjie.gm 640        152
0x671cfa8d 6455297    mingjie.gm 640        152
0x671cfa8e 6488066    mingjie.gm 640        152
执行程序
[root@iZbp1d4tisi44j6vxze02fZ tmp]# gcc c2.c -o ipc
[root@iZbp1d4tisi44j6vxze02fZ tmp]# ./ipc
Parent - start a container!
Container - inside the container!
[root@container tmp]#
[root@container tmp]# ipcs -a

------ Message Queues --------
key        msqid      owner      perms      used-bytes   messages

------ Shared Memory Segments --------
key        shmid      owner      perms      bytes      nattch     status

------ Semaphore Arrays --------
key        semid      owner      perms      nsems
IPC已经被隔离了!
2.3 PID Namespace
#define _GNU_SOURCE
#include <sys/types.h>
#include <sys/wait.h>
#include <stdio.h>
#include <sched.h>
#include <signal.h>
#include <unistd.h>

#define STACK_SIZE (1024 * 1024)
static char container_stack[STACK_SIZE];

char* const container_args[] = {
    "/bin/bash",
    NULL
};

int container_main(void* arg)
{
    printf("Container [%5d] - inside the container!\n", getpid());
    sethostname("container",10);
    execv(container_args[0], container_args);
    printf("Something's wrong!\n");
    return 1;
}

int main()
{
    printf("Parent - start a container!\n");
    int container_pid = clone(container_main, container_stack+STACK_SIZE,
                              SIGCHLD | CLONE_NEWUTS | CLONE_NEWIPC | CLONE_NEWPID
                              , NULL);
    waitpid(container_pid, NULL, 0);
    printf("Parent - container stopped!\n");
    return 0;
}
运行结果如下(我们可以看到,子进程的pid是1了):
[root@iZbp1d4tisi44j6vxze02fZ tmp]# gcc c3.c -o pid
[root@iZbp1d4tisi44j6vxze02fZ tmp]# ./pid
Parent - start a container!
Container [    1] - inside the container!
[root@container tmp]# echo $$
1
你可能会问,PID为1有个毛用啊?我们知道,在传统的UNIX系统中,PID为1的进程是init,地位非常特殊。他作为所有进程的父进程,有很多特权(比如:屏蔽信号等),另外,其还会为检查所有进程的状态,我们知道,如果某个子进程脱离了父进程(父进程没有wait它),那么init就会负责回收资源并结束这个子进程。所以,要做到进程空间的隔离,首先要创建出PID为1的进程,最好就像chroot那样,把子进程的PID在容器内变成1。
但是,我们会发现,在子进程的shell里输入ps,top等命令,我们还是可以看得到所有进程。说明并没有完全隔离。这是因为,像ps, top这些命令会去读/proc文件系统,所以,因为/proc文件系统在父进程和子进程都是一样的,所以这些命令显示的东西都是一样的。
所以,我们还需要对文件系统进行隔离。
2.4 Mount Namespace
下面的例程中,我们在启用了mount namespace并在子进程中重新mount了/proc文件系统。
#define _GNU_SOURCE
#include <sys/types.h>
#include <sys/wait.h>
#include <stdio.h>
#include <sched.h>
#include <signal.h>
#include <unistd.h>

#define STACK_SIZE (1024 * 1024)
static char container_stack[STACK_SIZE];

char* const container_args[] = {
    "/bin/bash",
    NULL
};

int container_main(void* arg)
{
    printf("Container [%5d] - inside the container!\n", getpid());
    sethostname("container",10);
    /* 重新mount proc文件系统到 /proc下 */
    system("mount -t proc proc /proc");
    execv(container_args[0], container_args);
    printf("Something's wrong!\n");
    return 1;
}

int main()
{
    printf("Parent [%5d] - start a container!\n", getpid());
    int container_pid = clone(container_main, container_stack+STACK_SIZE,
                              SIGCHLD | CLONE_NEWUTS | CLONE_NEWIPC | CLONE_NEWPID | CLONE_NEWNS
                              , NULL);
    waitpid(container_pid, NULL, 0);
    printf("Parent - container stopped!\n");
    return 0;
}
运行结果如下:
[root@iZbp1d4tisi44j6vxze02fZ tmp]# gcc c4.c
[root@iZbp1d4tisi44j6vxze02fZ tmp]# ./a.out
Parent [16901] - start a container!
Container [    1] - inside the container!
[root@container tmp]# ps -elf
F S UID        PID  PPID  C PRI  NI ADDR SZ WCHAN  STIME TTY          TIME CMD
4 S root         1     0  0  80   0 - 29185 do_wai 20:04 pts/3    00:00:00 /bin/bash
0 R root        35     1  0  80   0 - 38833 -      20:05 pts/3    00:00:00 ps -elf
在通过CLONE_NEWNS创建mount namespace后,父进程会把自己的文件结构复制给子进程中。而子进程中新的namespace中的所有mount操作都只影响自身的文件系统,而不对外界产生任何影响。这样可以做到比较严格地隔离。
上面的代码是在子进程中重新mount了一次,否则还是会看到父进程的proc目录!
2.5 User Namespace
User Namespace主要是用了CLONE_NEWUSER的参数。使用了这个参数后,内部看到的UID和GID已经与外部不同了,默认显示为65534。那是因为容器找不到其真正的UID所以,设置上了最大的UID(其设置定义在/proc/sys/kernel/overflowuid)。
要把容器中的uid和真实系统的uid给映射在一起,需要修改 /proc//uid_map 和 /proc//gid_map 这两个文件。这两个文件的格式为: ID-inside-ns ID-outside-ns length
其中:
- 第一个字段ID-inside-ns表示在容器显示的UID或GID,
- 第二个字段ID-outside-ns表示容器外映射的真实的UID或GID。
- 第三个字段表示映射的范围,一般填1,表示一一对应。 比如,把真实的uid=1000映射成容器内的uid=0
$ cat /proc/2465/uid_map
         0       1000          1
再比如下面的示例:表示把namespace内部从0开始的uid映射到外部从0开始的uid,其最大范围是无符号32位整形
$ cat /proc/$$/uid_map
         0          0          4294967295
User Namespace是以普通用户运行,但是别的Namespace需要root权限,那么,如果我要同时使用多个Namespace,该怎么办呢?一般来说,我们先用一般用户创建User Namespace,然后把这个一般用户映射成root,在容器内用root来创建其它的Namesapce。
2.6 Network Namespace
https://coolshell.cn/articles/17029.html
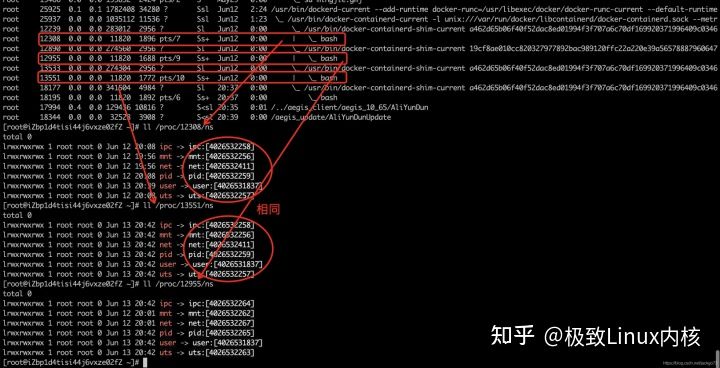
2.7 Namespace文件
同一个容器的进程在一个NS下。
- - 内核技术中文网 - 构建全国最权威的内核技术交流分享论坛
原文地址:一文了解Linux内核Namespace如何隔离测试code - 操作系统 - 内核技术中文网 - 构建全国最权威的内核技术交流分享论坛(版权归原作者所有,侵删)