本次示例使用 Spring Boot 作为脚手架来快速集成 Knife4j,Spring Boot 版本2.3.5.RELEASE,Knife4j 版本2.0.7,完整代码可以去参考 knife4j-spring-boot-fast-demo
pom.xml 完整文件代码如下
<?xml version="1.0" encoding="UTF-8"?>
<project xmlns="http://maven.apache.org/POM/4.0.0" xmlns:xsi="http://www.w3.org/2001/XMLSchema-instance"
         xsi:schemaLocation="http://maven.apache.org/POM/4.0.0 https://maven.apache.org/xsd/maven-4.0.0.xsd">
    <modelVersion>4.0.0</modelVersion>
    <parent>
        <groupId>org.springframework.boot</groupId>
        <artifactId>spring-boot-starter-parent</artifactId>
        <version>2.3.5.RELEASE</version>
        <relativePath/>
    </parent>
    <groupId>com.github.xiaoymin</groupId>
    <artifactId>knife4j-spring-boot-fast-demo</artifactId>
    <version>1.0</version>
    <name>knife4j-spring-boot-fast-demo</name>
    <description>Demo project for Spring Boot</description>

    <properties>
        <java.version>1.8</java.version>
    </properties>

    <dependencies>
        <dependency>
            <groupId>org.springframework.boot</groupId>
            <artifactId>spring-boot-starter-web</artifactId>
        </dependency>
        <dependency>
            <groupId>com.github.xiaoymin</groupId>
            <artifactId>knife4j-spring-boot-starter</artifactId>
            <version>2.0.9</version>
        </dependency>

        <dependency>
            <groupId>org.springframework.boot</groupId>
            <artifactId>spring-boot-starter-test</artifactId>
            <scope>test</scope>
            <exclusions>
                <exclusion>
                    <groupId>org.junit.vintage</groupId>
                    <artifactId>junit-vintage-engine</artifactId>
                </exclusion>
            </exclusions>
        </dependency>
    </dependencies>

    <build>
        <plugins>
            <plugin>
                <groupId>org.springframework.boot</groupId>
                <artifactId>spring-boot-maven-plugin</artifactId>
            </plugin>
        </plugins>
    </build>

</project>
第一步:在 maven 项目的pom.xml中引入 Knife4j 的依赖包,代码如下:
<dependency>
    <groupId>com.github.xiaoymin</groupId>
    <artifactId>knife4j-spring-boot-starter</artifactId>
    <version>2.0.9</version>
</dependency>
第二步:创建 Swagger 配置依赖,代码如下:
import org.springframework.context.annotation.Bean;
import org.springframework.context.annotation.Configuration;
import springfox.documentation.builders.ApiInfoBuilder;
import springfox.documentation.builders.PathSelectors;
import springfox.documentation.builders.RequestHandlerSelectors;
import springfox.documentation.service.ApiInfo;
import springfox.documentation.service.Contact;
import springfox.documentation.spi.DocumentationType;
import springfox.documentation.spring.web.plugins.Docket;
import springfox.documentation.swagger2.annotations.EnableSwagger2WebMvc;

@Configuration
@EnableSwagger2WebMvc
public class Knife4jConfiguration {

    @Bean(value = "defaultApi2")
    public Docket defaultApi2() {
        return new Docket(DocumentationType.SWAGGER_2)
                .apiInfo(getInfo())
                //分组名称
                .groupName("2.X版本")
                .select()
                //这里指定Controller扫描包路径
                .apis(RequestHandlerSelectors.basePackage("com.test.controller"))
                .paths(PathSelectors.any())
                .build();
    }

    private static ApiInfo getInfo() {
        return new ApiInfoBuilder()
                .title("xxxxx软件系统")
                .description("# xxxx是基于 xx平台的新一代 软件系统")
                .termsOfServiceUrl("http://www.test.com/")
                .contact(new Contact("mabh","http://www.test.com","test@test.com"))
                .version("1.0")
                .build();
    }
}
RequestHandlerSelectors.basePackage 要改成你自己的。
IndexController.java包含一个简单的 RESTful 接口, 代码示例如下:
import com.test.TabaseWebDemo.Sex;
import com.test.TabaseWebDemo.UserModel;
import io.swagger.annotations.Api;
import io.swagger.annotations.ApiImplicitParam;
import io.swagger.annotations.ApiOperation;
import io.swagger.annotations.ApiParam;
import org.springframework.http.MediaType;
import org.springframework.http.ResponseEntity;
import org.springframework.web.bind.annotation.*;
import springfox.documentation.annotations.ApiIgnore;

import java.util.Arrays;
import java.util.List;

@Api(tags = "首页模块")
@RestController
public class IndexController {

    @ApiImplicitParam(name = "name",value = "姓名",required = true)
    @ApiOperation(value = "向客人问好")
    @GetMapping(value = "/sayHi",produces = MediaType.APPLICATION_JSON_VALUE)
    public ResponseEntity<String> sayHi(@RequestParam(value = "name") String name){
        return ResponseEntity.ok("Hi:"+name);
    }

    @GetMapping("/user")
    @ApiOperation("获取用户信息接口")
    public String getUser(
            @ApiParam(value = "用户ID", required = true) @RequestParam("id") String userId) {
        // 根据用户ID获取用户信息
        return "用户信息:" + userId;
    }


    @PostMapping("/user")
    @ApiOperation("创建用户接口")
    @ApiImplicitParam(name = "user", value = "用户对象", required = true, dataType = "User")
    public String createUser(@RequestBody UserModel user) {
        // 处理用户创建逻辑
        return "用户创建成功!";
    }


    // 获取所有
    @GetMapping(value = "/users",produces = MediaType.APPLICATION_JSON_VALUE)
    @ApiOperation("获取所有用户接口")
    public List<UserModel> getAllUsers() {

        // 处理获取所有用户逻辑
        return Arrays.asList(
                new UserModel("张三", Sex.man,18),

                new UserModel("李四", Sex.woman,20),

                new UserModel("王五", Sex.man,22),

                new UserModel("赵六", Sex.woman,24)
                );
    }

    @ApiIgnore
    @GetMapping("/ignore")
    public String ignore() {
        return "这个接口被忽略";
    }

}
import io.swagger.annotations.ApiModelProperty;

public class UserModel {
    @ApiModelProperty(value = "用户名", required = true)
    private String username;

    @ApiModelProperty(value = "性别", required = true)
    private Sex sex;

    @ApiModelProperty(value = "年龄", required = true)
    private int age;

    public UserModel() {
    }

    public UserModel(String username, Sex sex, int age) {
        this.username = username;
        this.sex = sex;
        this.age = age;
    }

    public String getUsername() {
        return username;
    }

    public void setUsername(String username) {
        this.username = username;
    }

    public Sex getSex() {
        return sex;
    }

    public void setSex(Sex sex) {
        this.sex = sex;
    }

    public int getAge() {
        return age;
    }

    public void setAge(int age) {
        this.age = age;
    }
}
public enum Sex {
    man,woman
}
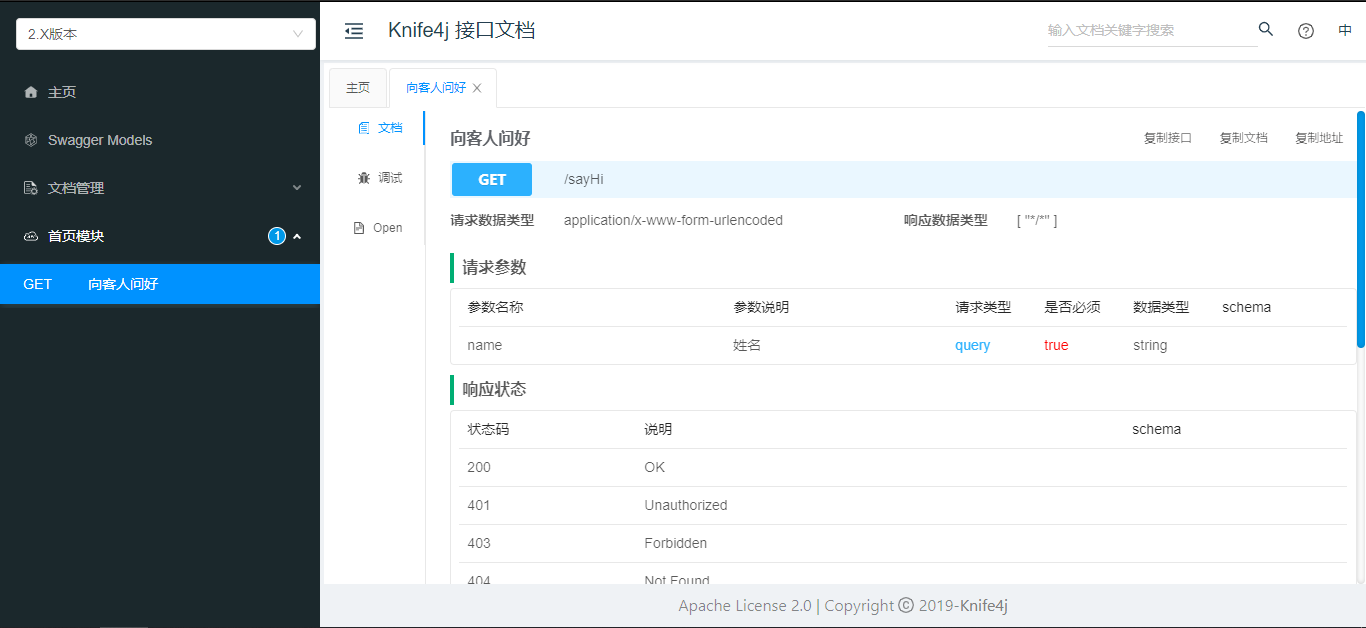
此时,启动 Spring Boot 工程,在浏览器中访问:http://localhost:8080/doc.html
更多注解使用方法:
https://github.com/swagger-api/swagger-core/wiki/Annotations
界面效果图如下: