前言
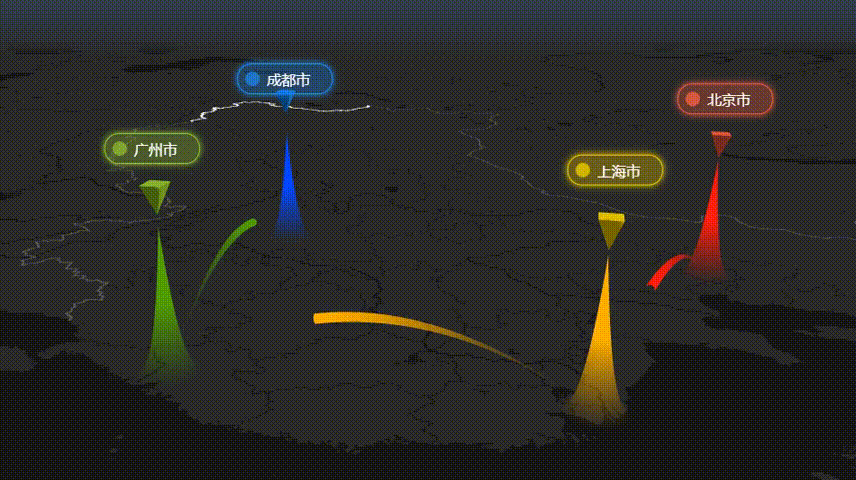
地图经常使用标牌来标注地点位置,是时候来点炫酷的效果了!用高德地图+Three.js,带你实现飞线、运动边界和炫酷标牌。
实现思路
一、高德地图+Three.js
可以参考官方示例 高德地图-自定义图层-GLCustomLayer 结合 THREE
初始化高德3D地图
this.map = new AMap.Map(this.container, {//缩放范围zooms: [2, 20],zoom: 4.5,//倾斜角度pitch: 0,//隐藏标签showLabel: false,//3D地图模式viewMode: '3D',//初始化地图中心点center: this.center,//暗色风格mapStyle: 'amap://styles/dark'});
自定义高德地图经纬度转px工具,即墨卡托投影坐标转换
// 数据转换工具this.customCoords = this.map.customCoords;//设置坐标转换中心this.customCoords.setCenter(this.center);
高德地图添加WebGL自定义图层,初始化Three.js配置
// 创建 GL 图层var gllayer = new AMap.GLCustomLayer({//zIndex: 10,// 初始化的操作,创建图层过程中执行一次。init: (gl) => {//初始化Three相机this.camera = new THREE.PerspectiveCamera(60,this.container.offsetWidth / this.container.offsetHeight,1,1 << 30);//初始化Three渲染器this.renderer = new THREE.WebGLRenderer({context: gl // 地图的 gl 上下文});this.renderer.setPixelRatio(window.devicePixelRatio);// 自动清空画布这里必须设置为 false,否则地图底图将无法显示this.renderer.autoClear = false;//初始化场景this.scene = new THREE.Scene();this.createChart();},render: () => {// 这里必须执行!!重新设置 three 的 gl 上下文状态。this.renderer.resetState();//设置坐标转换中心this.customCoords.setCenter(this.center);var { near, far, fov, up, lookAt, position } = this.customCoords.getCameraParams();// 这里的顺序不能颠倒,否则可能会出现绘制卡顿的效果。this.camera.near = near;this.camera.far = far;this.camera.fov = fov;this.camera.position.set(...position);this.camera.up.set(...up);this.camera.lookAt(...lookAt);this.camera.updateProjectionMatrix();//渲染器渲染场景this.renderer.render(this.scene, this.camera);// 这里必须执行!!重新设置 three 的 gl 上下文状态。this.renderer.resetState();}});this.map.add(gllayer);
二、绘制运动边界
行政区边界可以通过地理小工具获取。
https://datav.aliyun.com/portal/school/atlas/area_selector
高德地图折线polyline经常使用,但是让折线运动起来,你可能很少其实只需要添加几行代码就能实现。
实现逻辑:添加边界折线,然后截取折线的一段,让它跟着时间往后移动,即开始索引递增,截取相同折线,即可让折线运动起来。
//绘制中国大陆运动边界createChinaLine() {return new Promise((resolve) => {fetch('https://geo.datav.aliyun.com/areas_v3/bound/100000.json').then((res) => res.json()).then((res) => {let path = res.features[0].geometry.coordinates[0][0];//截取10%的线段let len = Math.floor(path.length * 0.1);//边界折线let polyline = new AMap.Polyline({path: path,strokeWeight: 4,strokeColor: 'white',lineJoin: 'round',strokeOpacity: 1});this.map.add(polyline);//利用Tween创建动画new TWEEN.Tween({ start: 0 }).to({ start: path.length }, 3000)//无限循环动画.repeat(Infinity).onUpdate((obj) => {if (obj.start + len < path.length) {polyline.setPath(path.slice(obj.start, obj.start + len));} else {const c = path.length - obj.start;//头尾相接时截取尾部+头部各一段polyline.setPath([].concat(path.slice(obj.start, path.length), path.slice(0, len - c)));}}).start();resolve();});});}//Tween动画animateAction() {if (TWEEN.getAll().length) {TWEEN.update();}}
运动边界实现简单,但效果一级棒!并且2D和3D地图都能用,优秀!
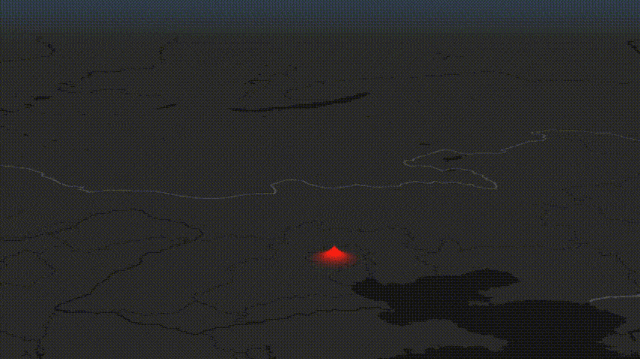
三、绘制升起山峰
在对应的坐标点上升起一座尖尖的山峰,这里使用Plane平面实现。
顶点着色器
precision mediump float;uniform float uTime;uniform float uHeight;varying float vD;float PI = acos(-1.0);vec2 center = vec2(0.5);void main(void) {//离中线的距离float d = length(uv - center) * 2.0;//沿中心点往外减少vD = pow(1.0 - d, 3.0);//山峰高度,随着uTime变化float h = vD * uHeight * uTime;vec3 pos = vec3(position.x * 0.5, position.y * 0.5, h);gl_Position = projectionMatrix * modelViewMatrix * vec4(pos, 1.0);}
片元着色器
precision mediump float;uniform vec3 uColor;varying float vD;void main(void) {if(vD < 0.01)//透明度太小则不渲染颜色discard;else//透明度随着距离中心点的变化gl_FragColor = vec4(uColor, vD * 2.0);}
添加shaderMaterial的平面
const material = new THREE.ShaderMaterial({uniforms: {//随时间变化uTime: { value: 0 },//高度uHeight: { value: this.size },//颜色uColor: { value: new THREE.Color(data.color) }},//开启透明度transparent: true,vertexShader: ``,fragmentShader: ``});this.material = material;//平面形状,方便复用if (!this.ageometry) {//平面的面数一定要足够才能形成山峰const geometry = new THREE.PlaneGeometry(this.size, this.size, 500, 500);this.ageometry = geometry;}const plane = new THREE.Mesh(this.ageometry, material);//转换经纬度作为pxconst d = this.customCoords.lngLatToCoord(data.pos);plane.position.set(d[0], d[1], 0);this.scene.add(plane);
注意:
1、平面的面数一定要足够才能形成山峰。
2、平面的大小和高度要足够大,在中国地图上才能看到,这里的this.size=500000,500k。在小的地图范围内,大小也要对应缩小。
3、高德地图坐标与three.js的坐标有些许不同,经纬度lng,lat对应xy,而高度对应z坐标。
其中提到的高度数据为虚拟数据。
添加山峰升起动画
addAnimate(start, end, time, update) {return new Promise((resolve) => {const tween = new TWEEN.Tween(start).to(end, time).onUpdate(update).easing(TWEEN.Easing.Quadratic.In).onComplete(() => {resolve(tween);}).start();});}const tw = await this.addAnimate({ time: 0 }, { time: 1 }, 1000, (obj) => {this.material.uniforms.uTime.value = obj.time;});//播放完删除动画TWEEN.remove(tw);
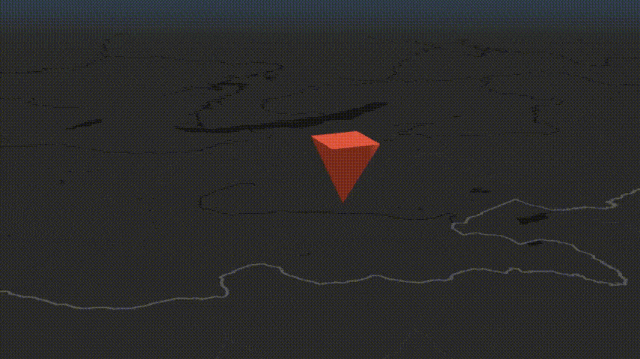
四、绘制浮动四棱锥
//转换经纬度坐标const d = this.customCoords.lngLatToCoord(data.pos);const r = this.size * 0.1;//四棱锥图形,方便复用if (!this.cgeometry) {const geometry = new THREE.ConeGeometry(r, r * 2, 4, 1);this.cgeometry = geometry;}const material = new THREE.MeshLambertMaterial({ color: new THREE.Color(data.color) });//创建四棱锥网格const cone = new THREE.Mesh(this.cgeometry, material);//旋转90度,让四棱锥倒立cone.rotateX(-Math.PI * 0.5);//设置位置cone.position.set(d[0], d[1], this.size * 1.1);this.scene.add(cone);//收集四棱锥this.cones.push({ obj: cone, step: this.speed });
设置垂直高度坐标,让四棱锥上下浮动:遇到最大或最小高度时改变速度speed方向。
animateAction() {if (this.cones.length) {this.cones.forEach((c) => {//高低浮动if (c.obj.position.z >= this.maxHeight) {//最大高度c.step = -this.speed;} else if (c.obj.position.z <= this.minHeight) {//最小高度c.step = this.speed;}c.obj.position.z += c.step;});}}
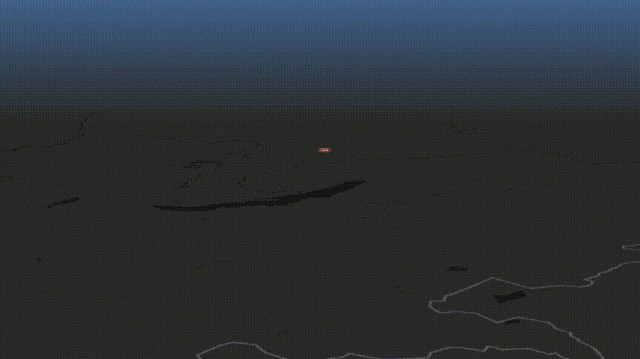
五、绘制文本标牌
原本尝试用Marker的自定义内容content来实现html标签的,但文档上说Marker高度属性height只有在2.1版本生效,但目前只有2.0版本,暂时无法使用高度属性。

通过咨询高德地图官方,官方推荐用Loca数据可视化里面的ZMarkerLayer。

以下代码来源于 高德地图-Loca API标牌点-某片区房价信息
https://lbs.amap.com/demo/loca-v2/demos/zmarker/house-price
var triangleZMarker = new Loca.ZMarkerLayer({loca: loca,zIndex: 119,depth: false,});triangleZMarker.setSource(geo);//设置数据集triangleZMarker.setStyle({content: (i, feat) => {//html自定义内容return ('<div style="width: 120px; height: 120px; background: url(https://a.amap.com/Loca/static/loca-v2/demos/images/triangle_'+ (feat.properties.price < 60000 ? 'blue' : 'yellow')+ '.png);"></div>');},unit: 'meter',rotation: 0,alwaysFront: true,size: [60, 60],altitude: 15,//高度});triangleZMarker.addAnimate({//动画key: 'altitude',value: [0, 1],random: true,transform: 1000,delay: 2000,yoyo: true,repeat: 999999,});
ZMarker添加整一个图层Layer生成一批Marker,官方的示例很漂亮。因为我想控制一个个的Marker,故改用Three.js的CSS2DRender来实现。
在GLCustomLayer的init中添加初始化CSS2DRender
let labelRenderer = new CSS2DRenderer();labelRenderer.setSize(container.offsetWidth, container.offsetHeight);labelRenderer.domElement.style.position = 'absolute';labelRenderer.domElement.style.top = '0px';//不妨碍界面上点击冲突labelRenderer.domElement.style.pointerEvents = 'none';this.container.appendChild(labelRenderer.domElement);this.labelRenderer = labelRenderer;
在GLCustomLayer的init中添加CSS2DRender渲染
this.labelRenderer.render(this.scene, this.camera);添加Label标牌
addLabel(dom, pos) {//label的dom可以触发事件dom.style.pointerEvents = 'auto';const label = new CSS2DObject(dom);label.position.set(...pos);this.scene.add(label);return label;}addALabel(data) {const div = document.createElement('div');div.innerHTML = `<div class="tip-box" style="background:${data.bg};--base-color:${data.color}"><span class="circle" ></span><span class="text">${data.name}</span></div>`;//坐标转换const d = this.customCoords.lngLatToCoord(data.pos);const label = this.addLabel(div, [d[0], d[1], this.size * 1.5]);}
标牌动画和样式直接用css
//变大弹出@keyframes big {0% {transform: scale(0);}100% {transform: scale(1);}}//闪烁@keyframes flash {0% {opacity: 0.3;}100% {opacity: 1;}}.tip-box {--base-color: dodgerblue;border: solid 1px var(--base-color);background-color: rgba(30, 144, 255, 0.3);color: white;white-space: nowrap;padding-left: 8px;padding-right: 16px;height: 32px;animation: big 1s ease-in;border-radius: 16px;display: flex;align-items: center;box-shadow: 0 0 8px var(--base-color);}.tip-box .circle {background-color: var(--base-color);height: 16px;width: 16px;border-radius: 50%;animation: flash 0.5s ease-in alternate infinite;}.tip-box .text {margin: 0 8px;}
注意:
DOM对象上如果有动画css请在外部包裹一层,避免css样式冲突,导致动画失效。
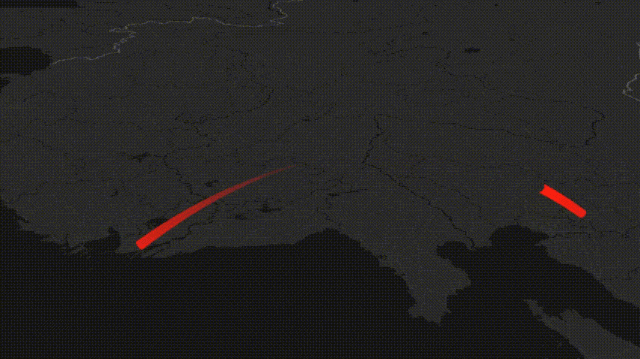
六、绘制飞线
飞线由管道形状绘制,通过着色器来改成头大尾小的形状。
顶点着色器
float PI = acos(-1.0);varying float vT;varying float vS;uniform float uTime;uniform float uSize;uniform float uLen;void main(void) {//取模循环float d = mod(uv.x - uTime, 1.0);//截取uLen长度vS = smoothstep(0.0, uLen, d);//不在范围内不渲染if(vS < 0.01 || d > uLen)return;//头大尾小的飞线坐标点vec3 pos = position + normal * sin(PI * 0.5 * (vS - 0.6)) * uSize;gl_Position = projectionMatrix * modelViewMatrix * vec4(pos, 1.0);}
片元着色器
varying float vS;uniform vec3 uColor;void main(void) {//透明度随着飞线头尾变小gl_FragColor = vec4(uColor, vS);}
添加管道飞线,用贝塞尔曲线形成弯曲
addLine(posList, color) {//经纬度坐标点统一转换const d = this.customCoords.lngLatsToCoords(posList);//贝塞尔曲线形成弯曲const curve = new THREE.QuadraticBezierCurve3(new THREE.Vector3(d[0][0], d[0][1], 0),//取中间点new THREE.Vector3((d[0][0] + d[1][0]) * 0.5, (d[0][1] + d[1][1]) * 0.5, this.size),new THREE.Vector3(d[1][0], d[1][1], 0));const geometry = new THREE.TubeGeometry(curve, 32, 10000, 8, false);const material = new THREE.ShaderMaterial({uniforms: {//随时间变化uTime: { value: 0.0 },//飞线长度uLen: { value: 0.6 },//飞线宽度uSize: { value: 10000 },//飞线颜色uColor: { value: new THREE.Color(color) }},//开启透明度transparent: true,vertexShader: ``,fragmentShader: ``});const line = new THREE.Mesh(geometry, material);this.scene.add(line);}
添加飞线动画,让飞线动起来
new TWEEN.Tween({ time: 0 }).to({ time: 1.0 }, 1000)//重复动画.repeat(Infinity).onUpdate((obj) => {material.uniforms.uTime.value = obj.time;}).start();
七、动画连续起来
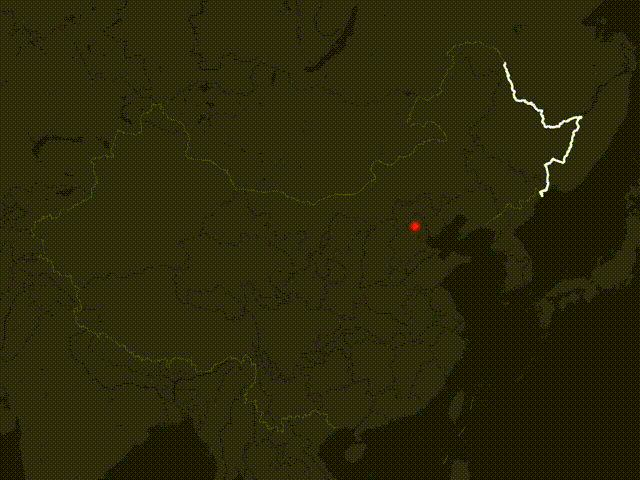
最终效果:地图绘制运动边界,镜头放大倾斜,对应地点长出尖尖的“山峰”,然后弹出一个上下浮动四棱锥和文本标牌,随即生出一条飞线,镜头跟随,跳到下一个景点,再次弹出四棱锥和文本标牌,重复,走过所有地点后,定格到最终视角。
//运动边界线await this.createChinaLine();//绘制山峰await this.createA(this.tags[0]);//视角变化this.map.setPitch(68, false, 3000);this.map.setRotation(24, false, 3000);await this.sleep(2000);{//升起山峰const tw = await this.addAnimate({ time: 0 }, { time: 1 }, 1000, (obj) => {this.material.uniforms.uTime.value = obj.time;});TWEEN.remove(tw);//添加标牌this.addALabel(this.tags[0]);}await this.sleep(2000);//绘制飞线this.addLine([this.tags[0].pos, this.tags[1].pos], this.tags[0].color);for (let i = 1; i < this.tags.length; i++) {const data = this.tags[i];//视角跟随到新地点this.map.setCenter(data.pos, false, 1000);this.map.setZoom(6, false, 1000);await this.sleep(1000);//绘制山峰await this.createA(data);//升起山峰const tw = await this.addAnimate({ time: 0 }, { time: 1 }, 1000, (obj) => {this.material.uniforms.uTime.value = obj.time;});TWEEN.remove(tw);this.addALabel(data);await this.sleep(1000);//添加飞线if (i < this.tags.length - 1) {this.addLine([data.pos, this.tags[i + 1].pos], data.color);} else {//最终视角this.map.setPitch(73.2, false, 3000);this.map.setZoom(5, false, 1000);this.map.setRotation(58.7, false, 3000);this.map.setCenter([101.6, 35.6], false, 1000);}}
高德地图3D地图视角设置真的很方便,还自带动画功能,效果真的很棒!
setZoom设置缩放大小
setPitch设置倾斜角度
setCenter设置地图中心经纬度
setRotation设置旋转角度
八、GitHub地址
https://github.com/xiaolidan00/my-earth

高德开放平台第一期实战案例,一等奖作品
作者:萧利丹