在CentOS上安装WordPress是一个相对直接的过程,可以通过多种方法完成,包括使用LAMP(Linux, Apache, MySQL, PHP)栈或使用更现代的LEMP(Linux, Nginx, MySQL, PHP)栈。
我选择的是(Linux, Nginx, MySQL, PHP)
基础安装教程
虚拟机安装linux,我这里忽略,有很多虚拟机安装centos的教程。
安装Nginx的链接 https://blog.csdn.net/xiaoyaozizai1/article/details/105552639
安装 MySQL https://blog.csdn.net/xiaoyaozizai1/article/details/145666645
安装 PHP https://blog.csdn.net/xiaoyaozizai1/article/details/145648982
以上是准备工作
下载wordpress源码包
cd /www/html
wget https://cn.wordpress.org/latest-zh_CN.zip

解压,如果没有unzip需要使用yum安装!
unzip latest-zh_CN.zip
![]()
配置nginx
cd /data/nginx-1.24.0/conf
vi nginx.conf
![]()
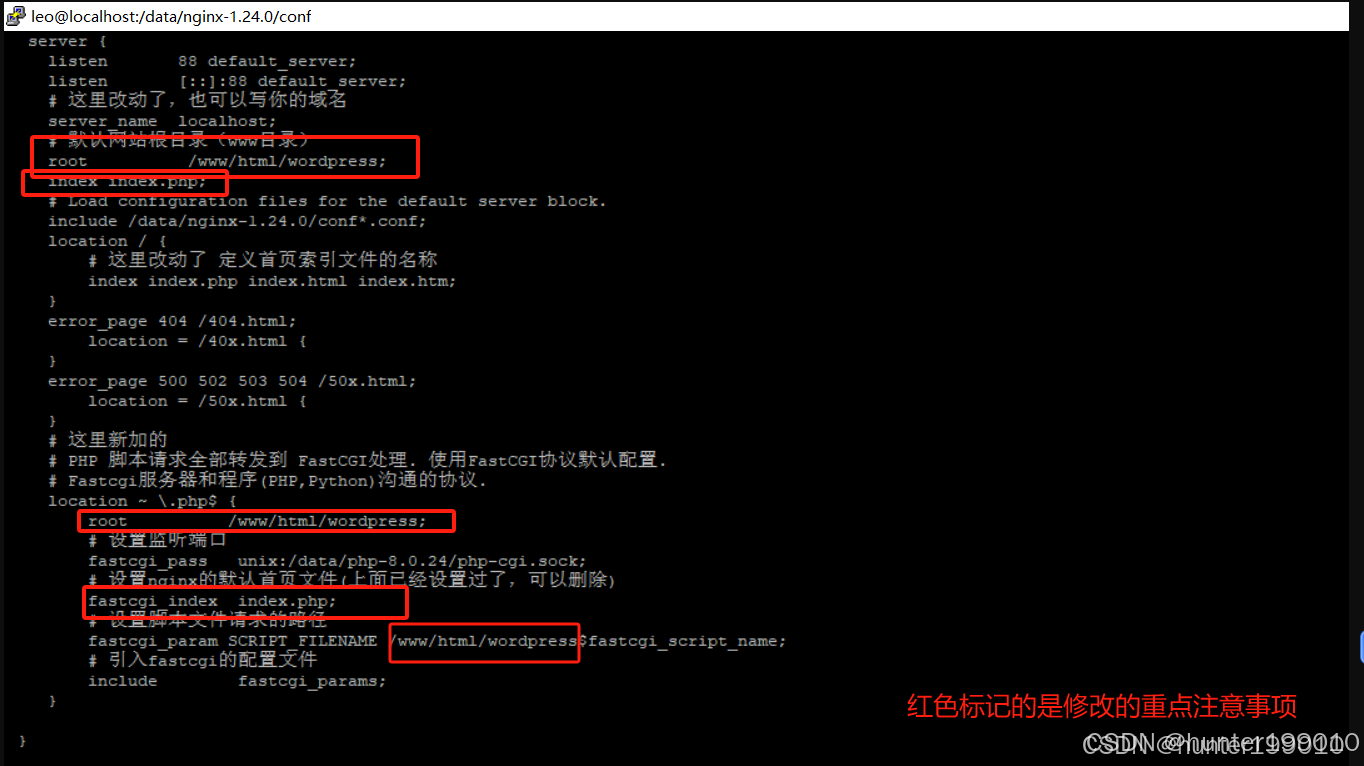
配置文件如下:
server {
listen 88 default_server;
listen [::]:88 default_server;
# 这里改动了,也可以写你的域名
server_name localhost;
# 默认网站根目录(www目录)
root /www/html/wordpress;
index index.php;
# Load configuration files for the default server block.
include /data/nginx-1.24.0/conf*.conf;
location / {
# 这里改动了 定义首页索引文件的名称
index index.php index.html index.htm;
}
error_page 404 /404.html;
location = /40x.html {
}
error_page 500 502 503 504 /50x.html;
location = /50x.html {
}
# 这里新加的
# PHP 脚本请求全部转发到 FastCGI处理. 使用FastCGI协议默认配置.
# Fastcgi服务器和程序(PHP,Python)沟通的协议.
location ~ \.php$ {
root /www/html/wordpress;
# 设置监听端口
fastcgi_pass unix:/data/php-8.0.24/php-cgi.sock;
# 设置nginx的默认首页文件(上面已经设置过了,可以删除)
fastcgi_index index.php;
# 设置脚本文件请求的路径
fastcgi_param SCRIPT_FILENAME /www/html/wordpress$fastcgi_script_name;
# 引入fastcgi的配置文件
include fastcgi_params;
}
}
保存 nginx.conf
重新启动nginx
sudo systemctl restart nginx
浏览器输入192.168.0.111:88 验证

这个是nginx指向wordpress文件成功
在网页安装wordpress
点击现在就开始


在浏览器输入原来的地址,可以看到自己的一个网站
