文章目录
更好的阅读体验:传送门
服务器:800TA2
芯片:910B3
模型:Qwen2.5-14B-Instruct
数据集:魔搭自定义数据集,alpaca格式
1. 使用docker安装
1.1 配置docker
配置docker镜像源:
sudo vi /etc/docker/daemon.json
填入:
{
  "registry-mirrors": [
    "https://2t697950.mirror.aliyuncs.com",
    "https://docker.1ms.run",
    "https://docker.xuanyuan.me"
  ]
}
安装 docker-compose
sudo curl -L https://github.com/docker/compose/releases/download/v2.33.0/docker-compose-linux-aarch64 -o /usr/local/bin/docker-compose
chmod 777 /usr/local/bin/docker-compose
docker-compose -v
1. 2 拉取 LLaMA-Factory
# 以下环境都基于路径  /home/aicc1
mkdir  /home/aicc1
cd  /home/aicc1
git clone https://github.com/hiyouga/LLaMA-Factory.git
cd LLaMA-Factory/docker/docker-npu
1.3 修改配置
请保证docker镜像源已配置完毕。
修改Dockerfile 、 docker-compose.yml,中挂载的设备数量、python镜像源。
默认只挂载了一个卡,下面的配置通过添加devices挂载了8张卡。
挂载了目录
/home/aicc1,用于与宿主机数据交互。具体请修改为你自己的文件路径
docker-compose.yml:
services:
  llamafactory:
    build:
      dockerfile: ./docker/docker-npu/Dockerfile
      context: ../..
      args:
        INSTALL_DEEPSPEED: "false"
        PIP_INDEX: https://pypi.tuna.tsinghua.edu.cn/simple
    container_name: llamafactory
    volumes:
      - ../../hf_cache:/root/.cache/huggingface
      - ../../ms_cache:/root/.cache/modelscope
      - ../../om_cache:/root/.cache/openmind
      - ../../data:/app/data
      - ../../output:/app/output
      - /usr/local/dcmi:/usr/local/dcmi
      - /usr/local/bin/npu-smi:/usr/local/bin/npu-smi
      - /usr/local/Ascend/driver:/usr/local/Ascend/driver
      - /etc/ascend_install.info:/etc/ascend_install.info
      - /home/aicc1:/home/aicc1
      - /home/aicc2:/home/aicc2
    ports:
      - "7860:7860"
      - "8000:8000"
    ipc: host
    tty: true
    shm_size: "16gb"
    stdin_open: true
    command: bash
    devices:
      - /dev/davinci0
      - /dev/davinci1
      - /dev/davinci2
      - /dev/davinci3
      - /dev/davinci4
      - /dev/davinci5
      - /dev/davinci6
      - /dev/davinci7
      - /dev/davinci_manager
      - /dev/devmm_svm
      - /dev/hisi_hdc
    restart: unless-stopped
Dockerfile :
# Use the Ubuntu 22.04 image with CANN 8.0.rc1
# More versions can be found at https://hub.docker.com/r/ascendai/cann/tags
# FROM ascendai/cann:8.0.rc1-910-ubuntu22.04-py3.8
FROM ascendai/cann:8.0.0-910b-ubuntu22.04-py3.10
# FROM ascendai/cann:8.0.rc1-910-openeuler22.03-py3.8
# FROM ascendai/cann:8.0.rc1-910b-openeuler22.03-py3.8

# Define environments
ENV DEBIAN_FRONTEND=noninteractive

# Define installation arguments
ARG INSTALL_DEEPSPEED=false
ARG PIP_INDEX=https://pypi.tuna.tsinghua.edu.cn/simple
ARG TORCH_INDEX=https://mirrors.aliyun.com/pytorch-wheels/cpu
ARG HTTP_PROXY=

# Set the working directory
WORKDIR /app

# Set http proxy
RUN if [ -n "$HTTP_PROXY" ]; then \
        echo "Configuring proxy..."; \
        export http_proxy=$HTTP_PROXY; \
        export https_proxy=$HTTP_PROXY; \
    fi

# Install the requirements
COPY requirements.txt /app
# RUN python -m pip install --upgrade pip && \
#     pip config set global.index-url "$PIP_INDEX" && \
#     pip config set global.extra-index-url "$TORCH_INDEX" && \
#     if [ -n "$HTTP_PROXY" ]; then \
#         python -m pip install -i https://pypi.tuna.tsinghua.edu.cn/simple --proxy=$HTTP_PROXY -r requirements.txt; \
#     else \
#         python -m pip install -i https://pypi.tuna.tsinghua.edu.cn/simple -r requirements.txt; \
#     fi

RUN python -m pip install --upgrade pip && \
    pip config set global.index-url "$PIP_INDEX" && \
    pip config set global.extra-index-url "$TORCH_INDEX" && \
    pip install --retries=3 --timeout=60 \
        -r requirements.txt \
        -i "$PIP_INDEX" \
        --extra-index-url "$TORCH_INDEX"
# Copy the rest of the application into the image
COPY . /app

# Install the LLaMA Factory
RUN EXTRA_PACKAGES="torch-npu,metrics"; \
    if [ "$INSTALL_DEEPSPEED" == "true" ]; then \
        EXTRA_PACKAGES="${EXTRA_PACKAGES},deepspeed"; \
    fi; \
    if [ -n "$HTTP_PROXY" ]; then \
        pip install --proxy=$HTTP_PROXY -e ".[$EXTRA_PACKAGES]"; \
    else \
        pip install -e ".[$EXTRA_PACKAGES]"; \
    fi

# Unset http proxy
RUN if [ -n "$HTTP_PROXY" ]; then \
        unset http_proxy; \
        unset https_proxy; \
    fi

# Set up volumes
VOLUME [ "/root/.cache/huggingface", "/root/.cache/modelscope", "/app/data", "/app/output" ]

# Expose port 7860 for the LLaMA Board
ENV GRADIO_SERVER_PORT 7860
EXPOSE 7860

# Expose port 8000 for the API service
ENV API_PORT 8000
EXPOSE 8000
2. 下载模型
ps:请修改为你要训练的模型
# 进入容器
docker exec -it llamafactory bash
# 下载模型
pip install modelscope
modelscope download --model Qwen/Qwen2.5-14B-Instruct --local_dir /home/aicc1/Qwen2.5-14B-Instruct/
3. 准备训练数据
3.1 下载数据集
使用魔搭上一个医疗的数据,大小:580M,格式:Alpaca。
数据处理或格式要求请查看官方文档:
传送门
ps:如果认为数据集太大(训练时间会加长),可以下载后删除大部分,保留几百条数据去测试
# 在宿主机上 (容器中没有下载wget)
cd /home/aicc1/LLaMA-Factory/data
wget https://modelscope.cn/datasets/swift/Alpaca-CoT/resolve/master/Chinese-medical/chinesemedical.json
3.2 自定义数据集配置
如果使用自定义数据集,需要配置LLaMA-Factory
vim /home/aicc1/LLaMA-Factory/data/dataset_info.json
在其中添加:
"my_dataset": {
  "file_name": "chinesemedical.json",
  "columns": {
    "prompt": "instruction",
    "query": "input",
    "response": "output"
  }
},
4. 训练
4.1 训练配置
mkdir /home/aicc1/LLaMA-Factory/qwen_config
cd /home/aicc1/LLaMA-Factory/qwen_config
tourch qwen2_5_lora_sft_ds.yaml
qwen2_5_lora_sft_ds.yaml 配置:
该配置采用文档中qwen1.5的训练配置。传送门
### model
model_name_or_path: /home/aicc1/Qwen2.5-14B-Instruct

### method
stage: sft
do_train: true
finetuning_type: lora
lora_target: q_proj,v_proj

### ddp
ddp_timeout: 180000000
deepspeed: examples/deepspeed/ds_z0_config.json

### dataset
dataset: identity,my_dataset
template: qwen
cutoff_len: 1024
max_samples: 1000
overwrite_cache: true
preprocessing_num_workers: 16

### output
output_dir: saves/Qwen2.5-14B/lora/sft
logging_steps: 10
save_steps: 500
plot_loss: true
overwrite_output_dir: true

### train
per_device_train_batch_size: 1
gradient_accumulation_steps: 2
learning_rate: 0.0001
num_train_epochs: 10.0
lr_scheduler_type: cosine
warmup_ratio: 0.1
fp16: true

### eval
val_size: 0.1
per_device_eval_batch_size: 1
eval_strategy: steps
eval_steps: 500
请注意一些关键参数:
model_name_or_path:下载的模型路径
dataset:数据集
num_train_epochs:训练轮次
本篇用到的数据集为 LLaMA-Factory 自带的 identity 和 自定义的my_dataset,对 identity 数据集进行如下全局替换即可实现定制指令:
{{name}} 替换为 Ascend-helper
{{author}} 替换为 Ascend
执行下方命令替换:
sed -i 's/{{name}}/Ascend-helper/g; s/{{author}}/Ascend/g' /home/aicc1/LLaMA-Factorydata/identity.json

4.2 启动训练
cd /home/aicc1/LLaMA-Factory
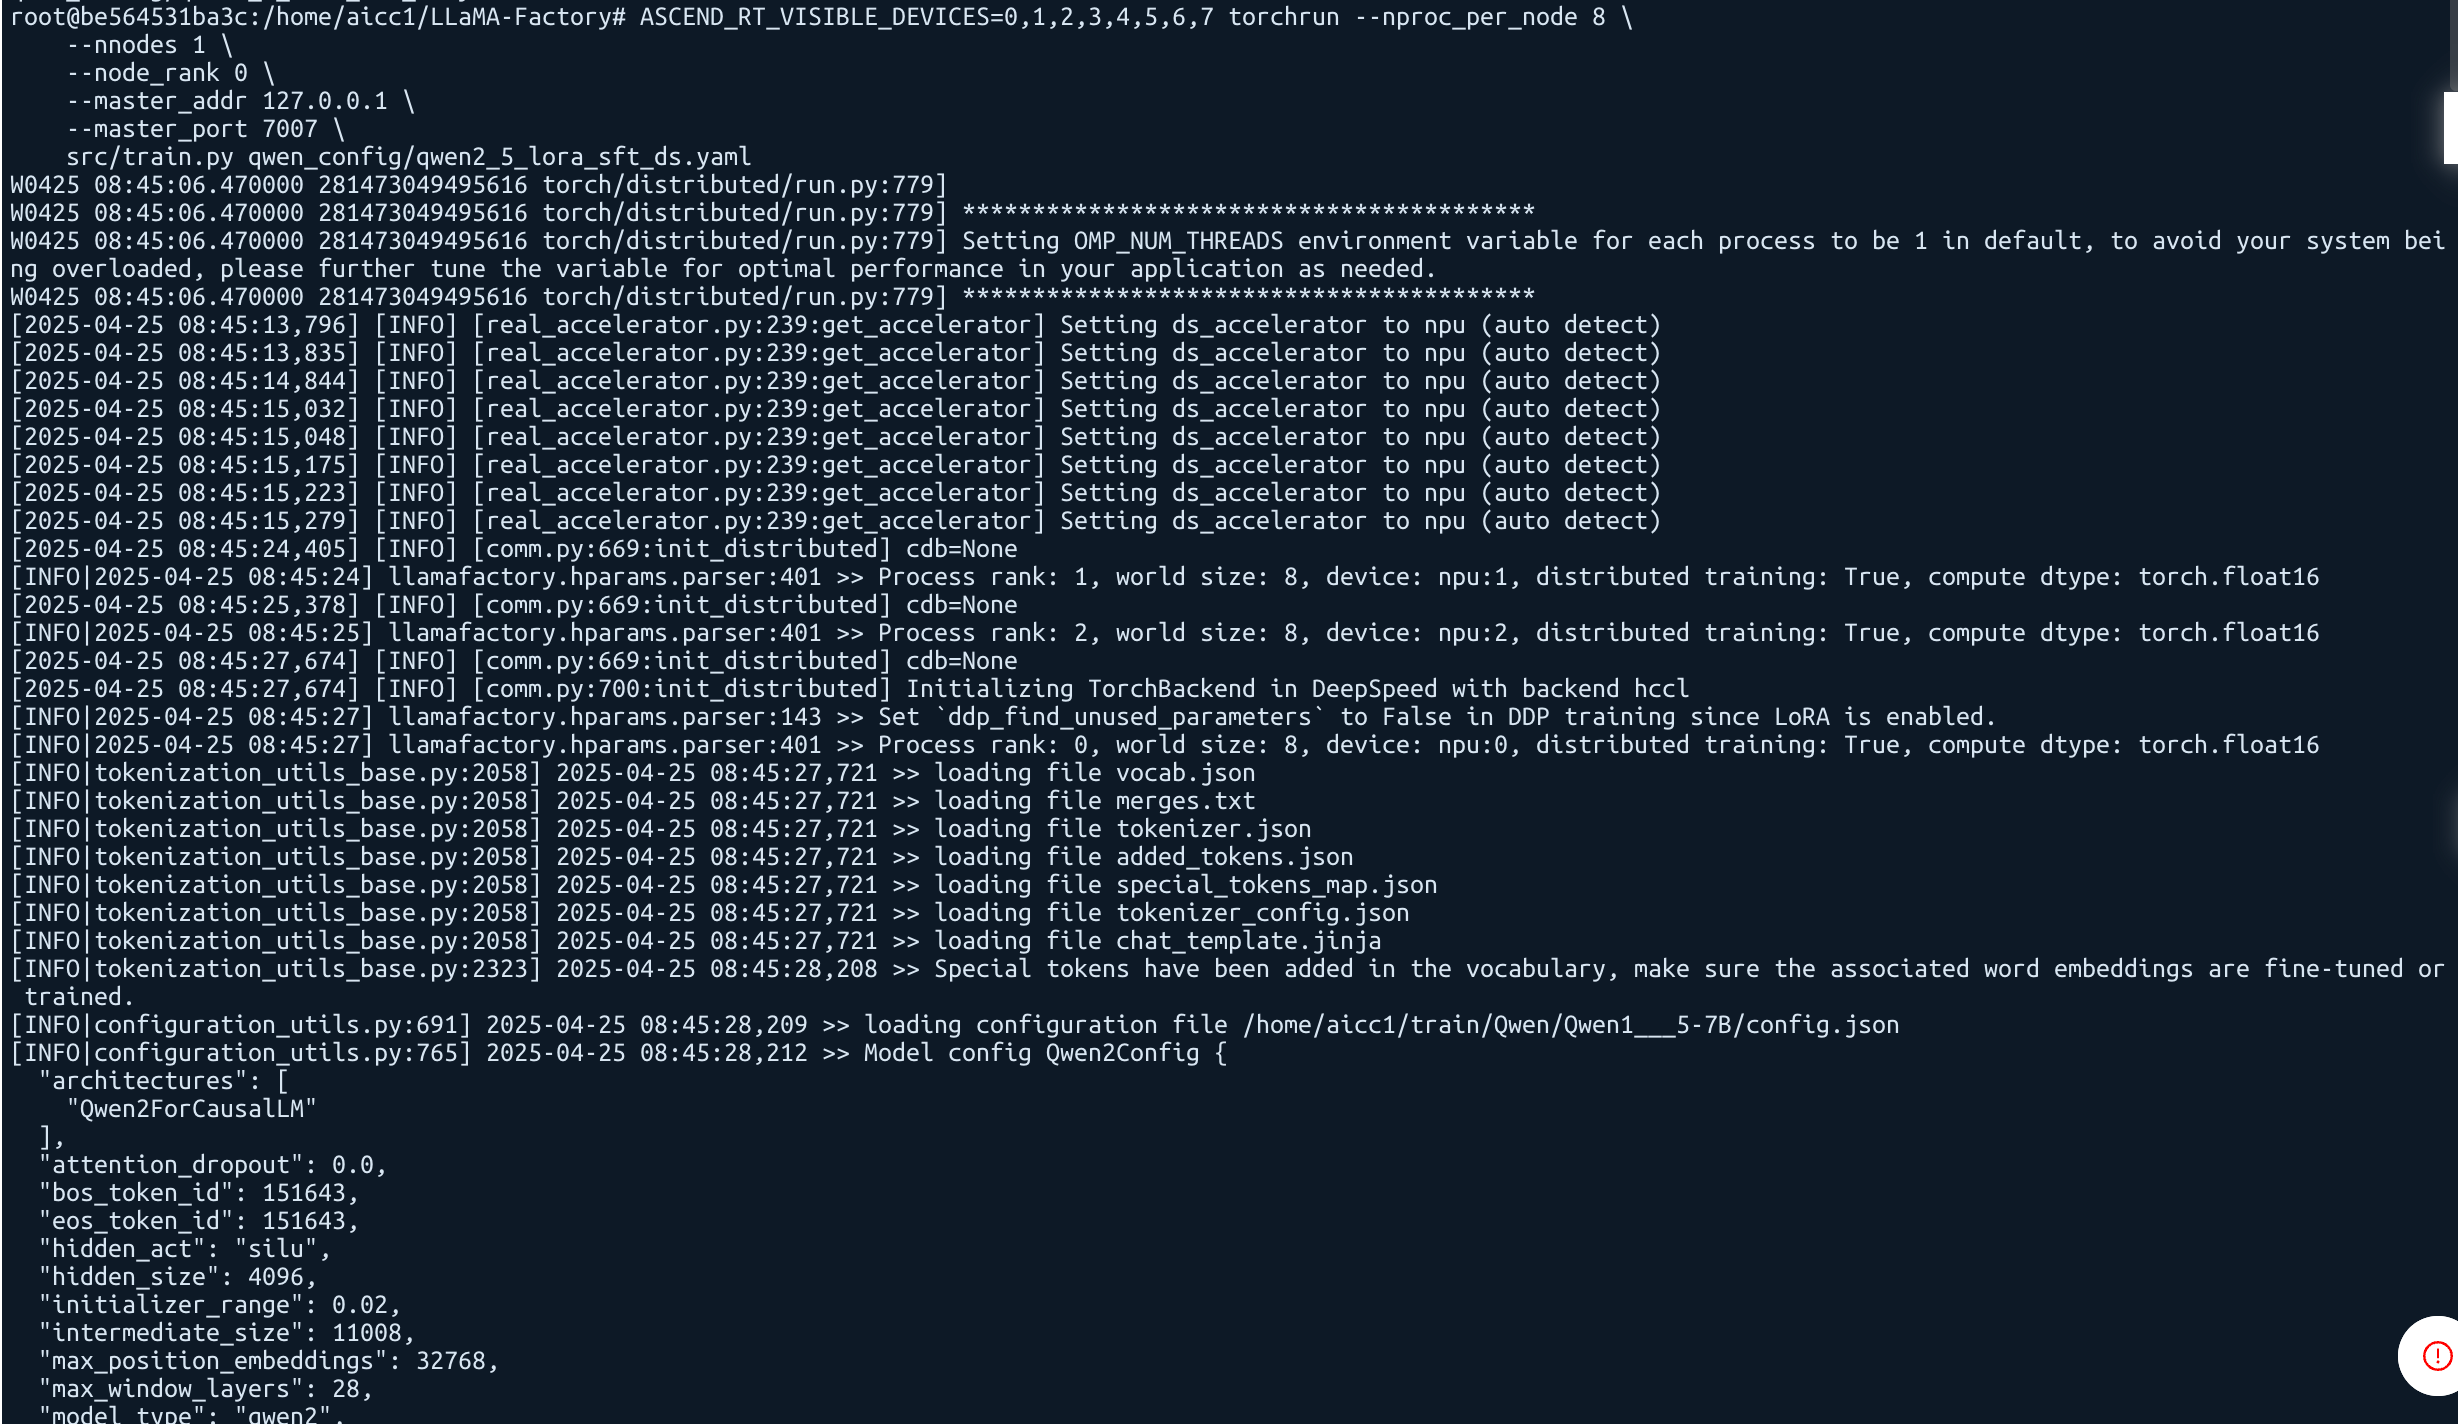
ASCEND_RT_VISIBLE_DEVICES=0,1,2,3,4,5,6,7 torchrun --nproc_per_node 8 \
--nnodes 1 \
--node_rank 0 \
--master_addr 127.0.0.1 \
--master_port 7007 \
src/train.py qwen_config/qwen2_5_lora_sft_ds.yaml
训练开始:
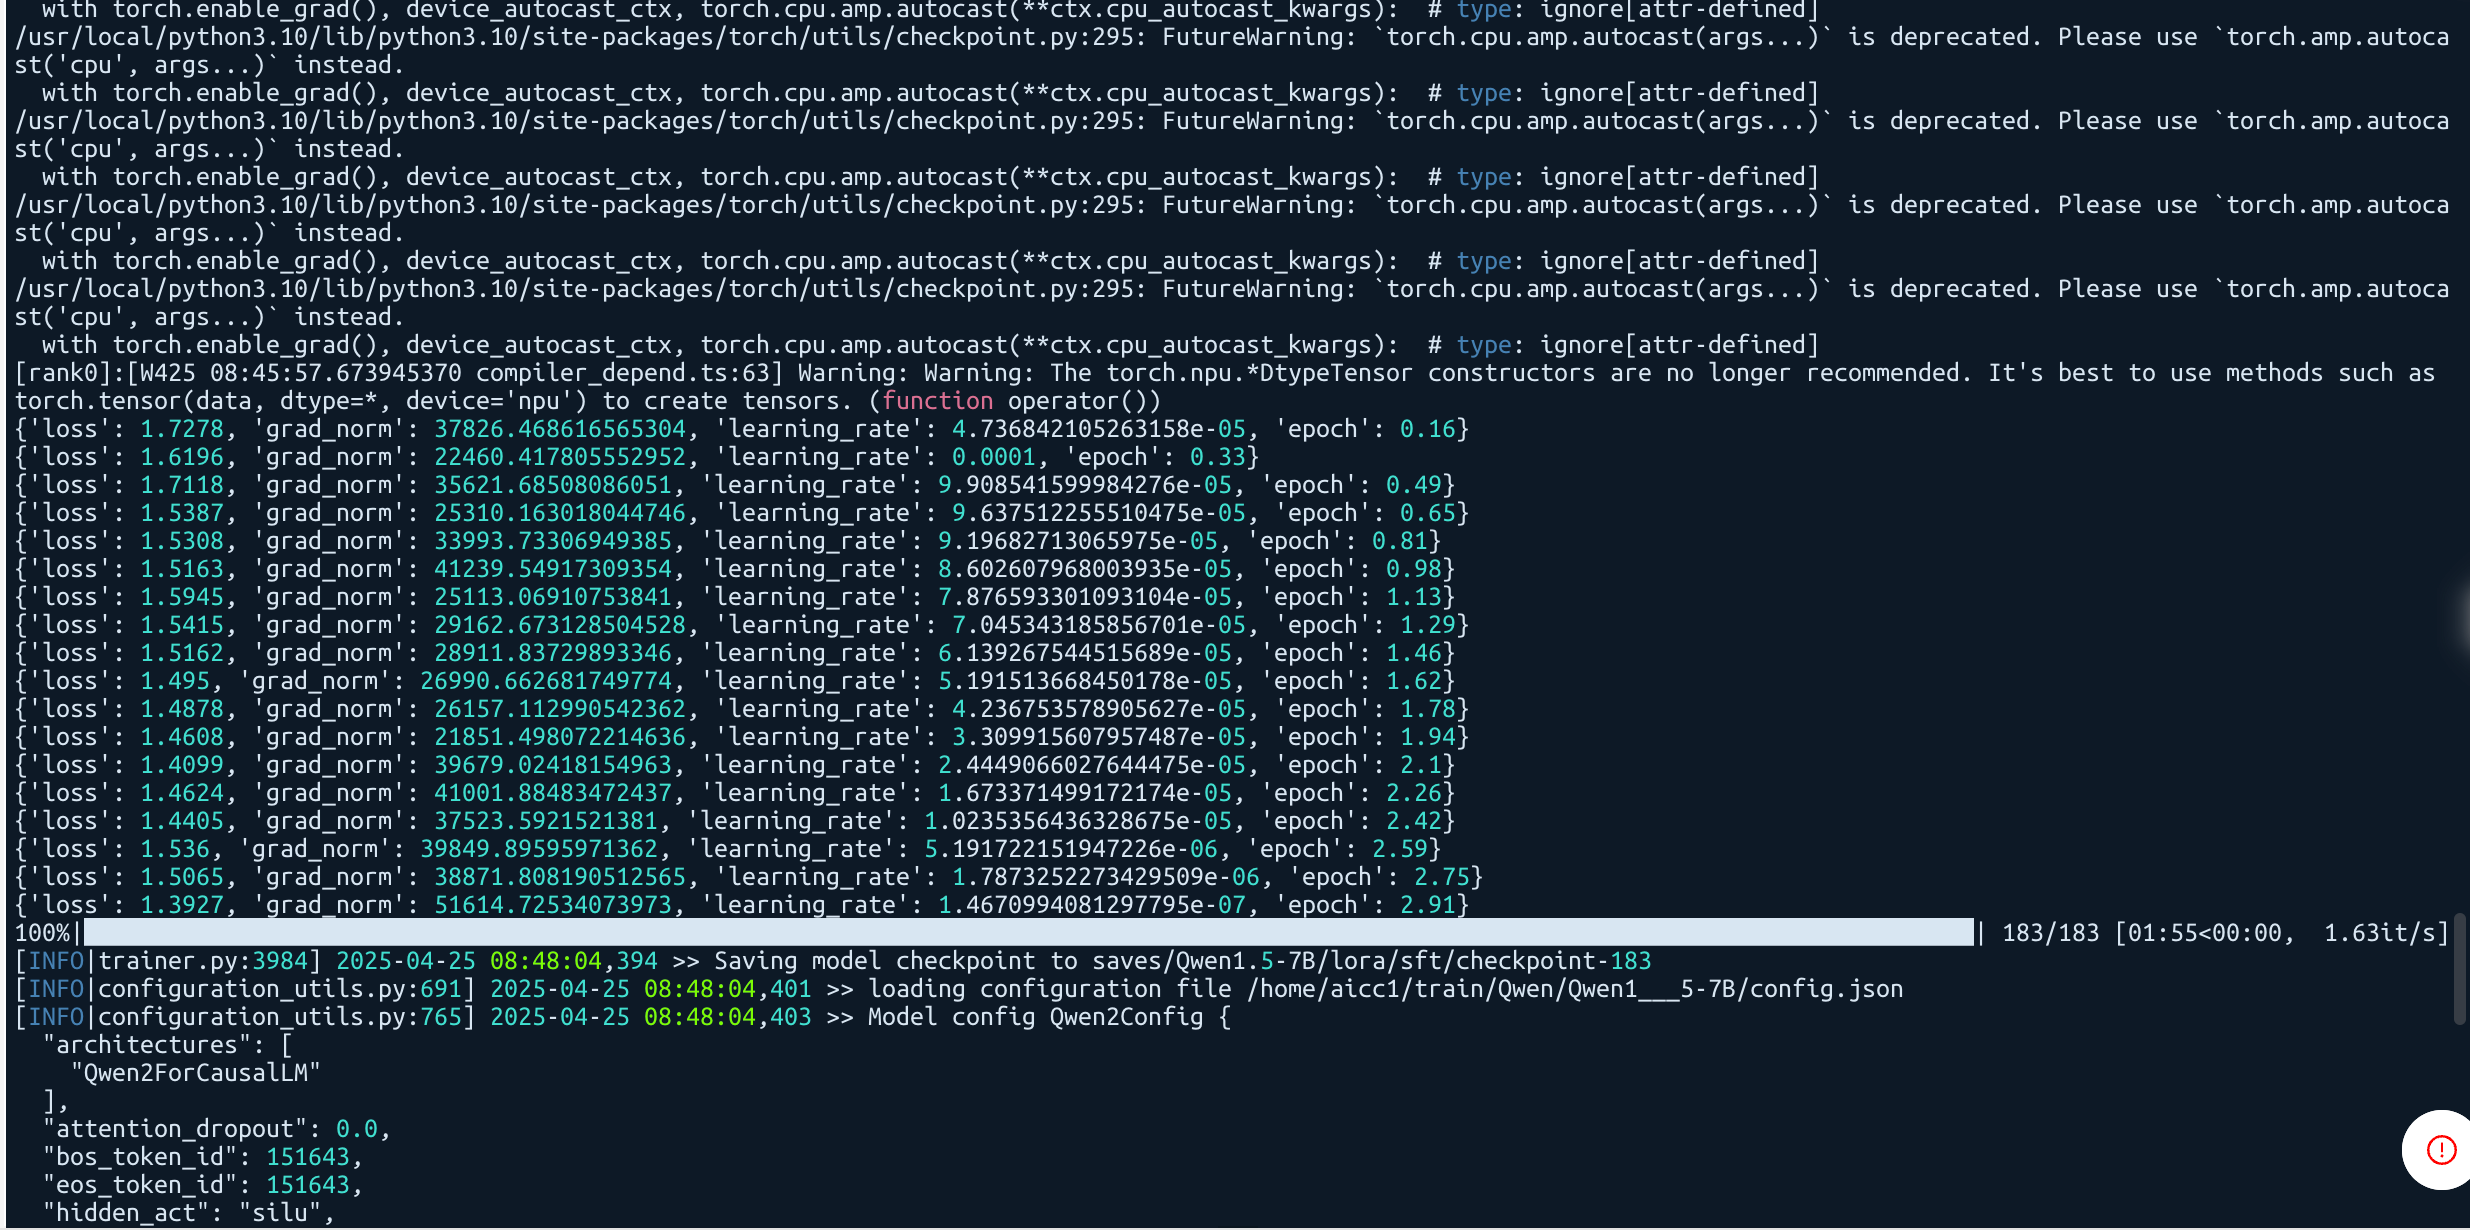
训练中间:
训练结束:
输出关于训练、评估的指标信息
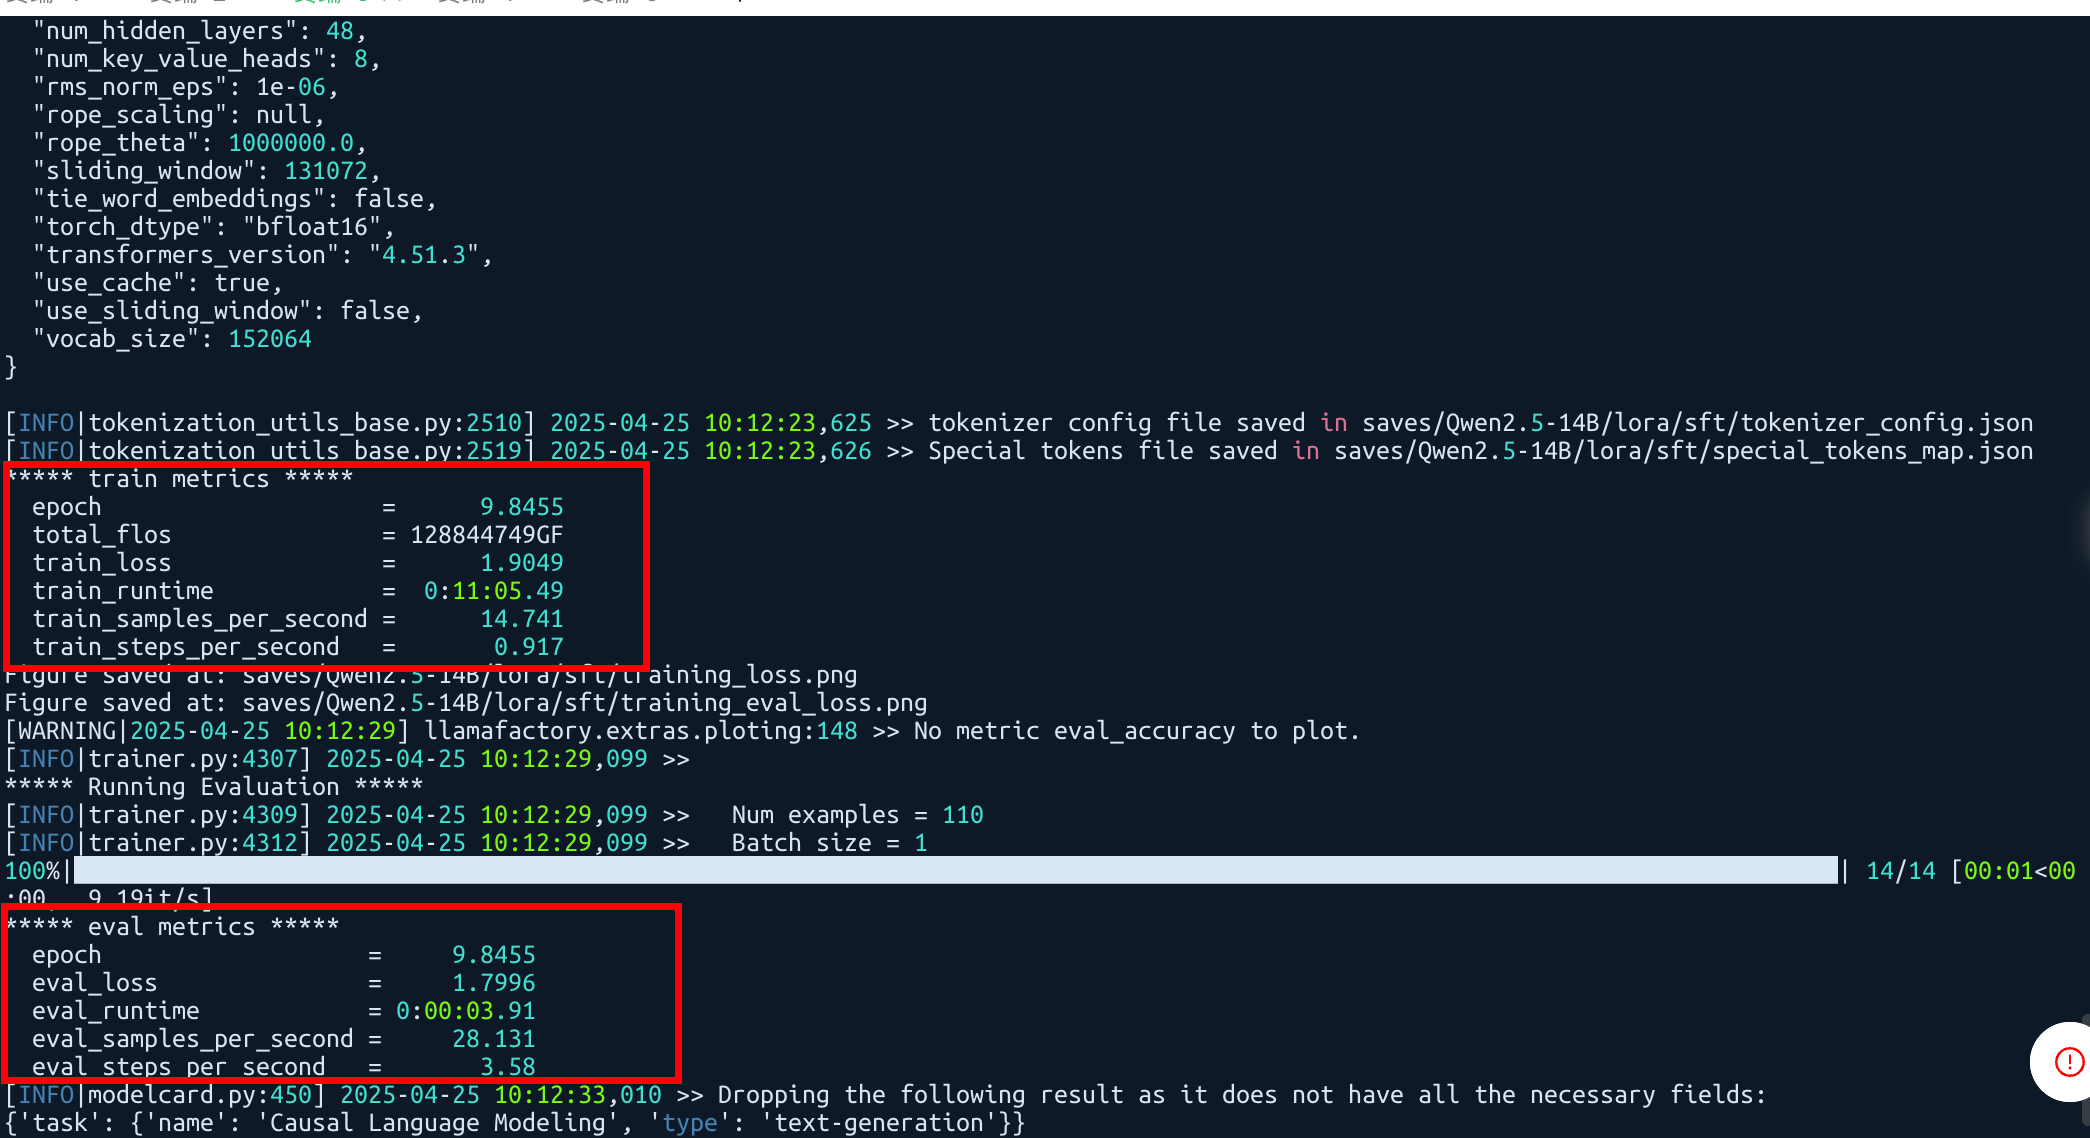
结果保存在saves文件夹下
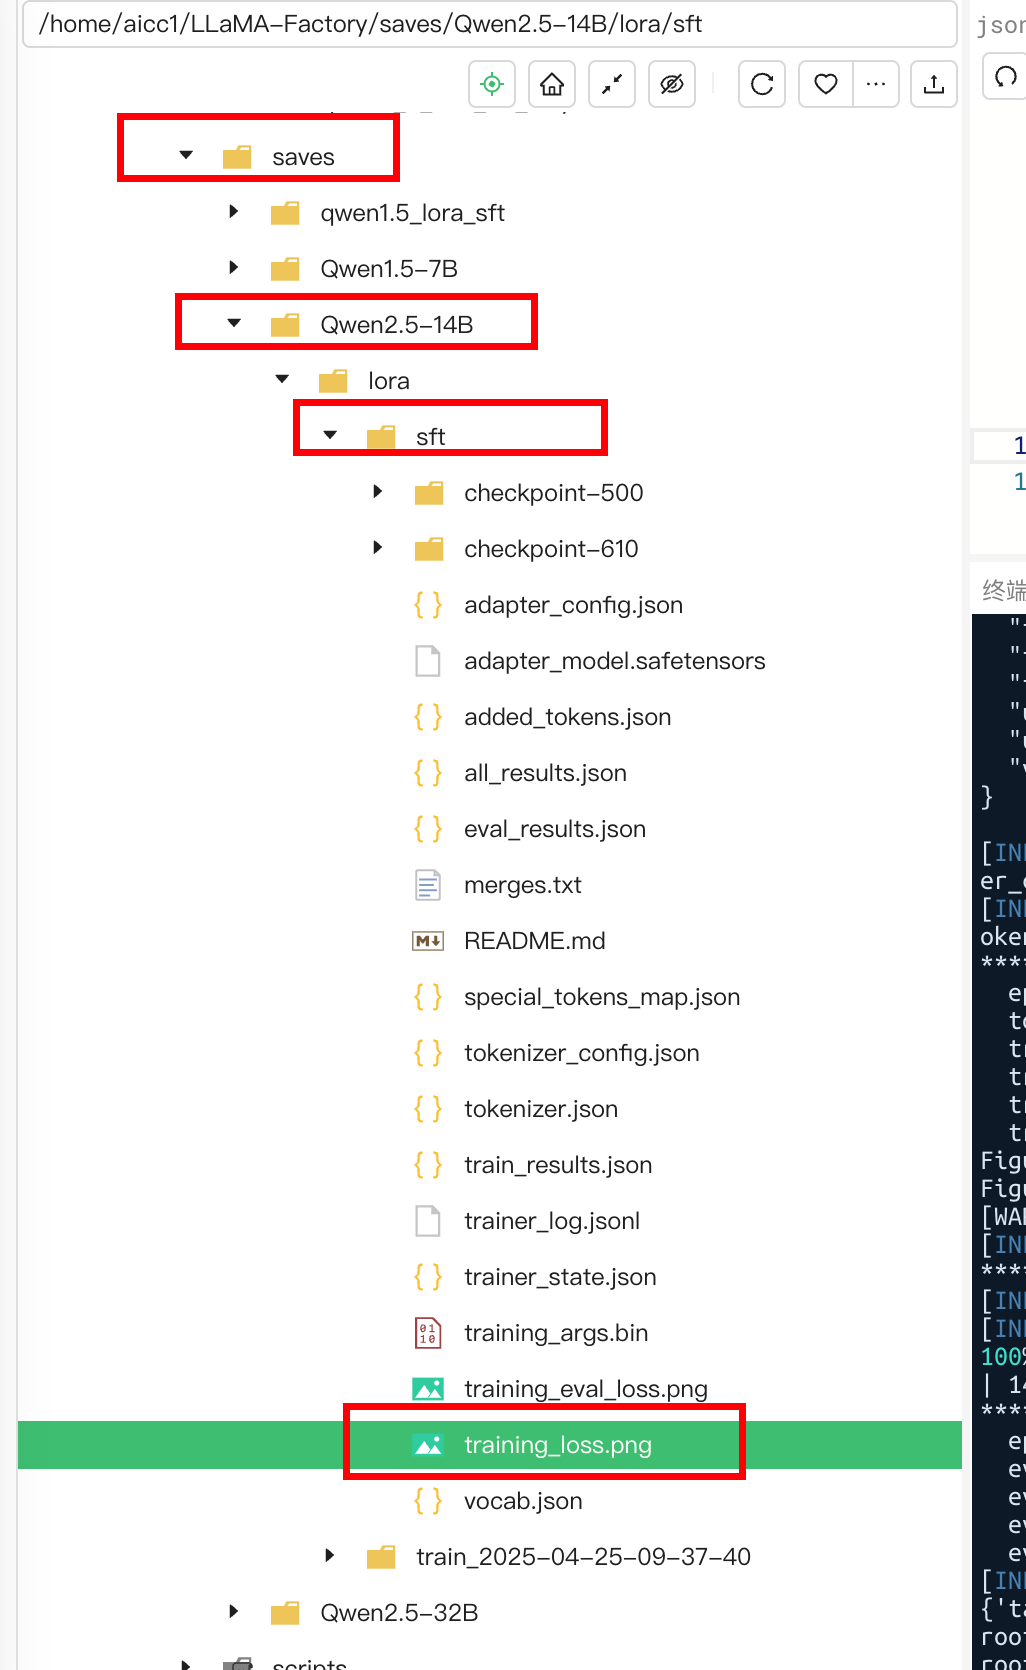
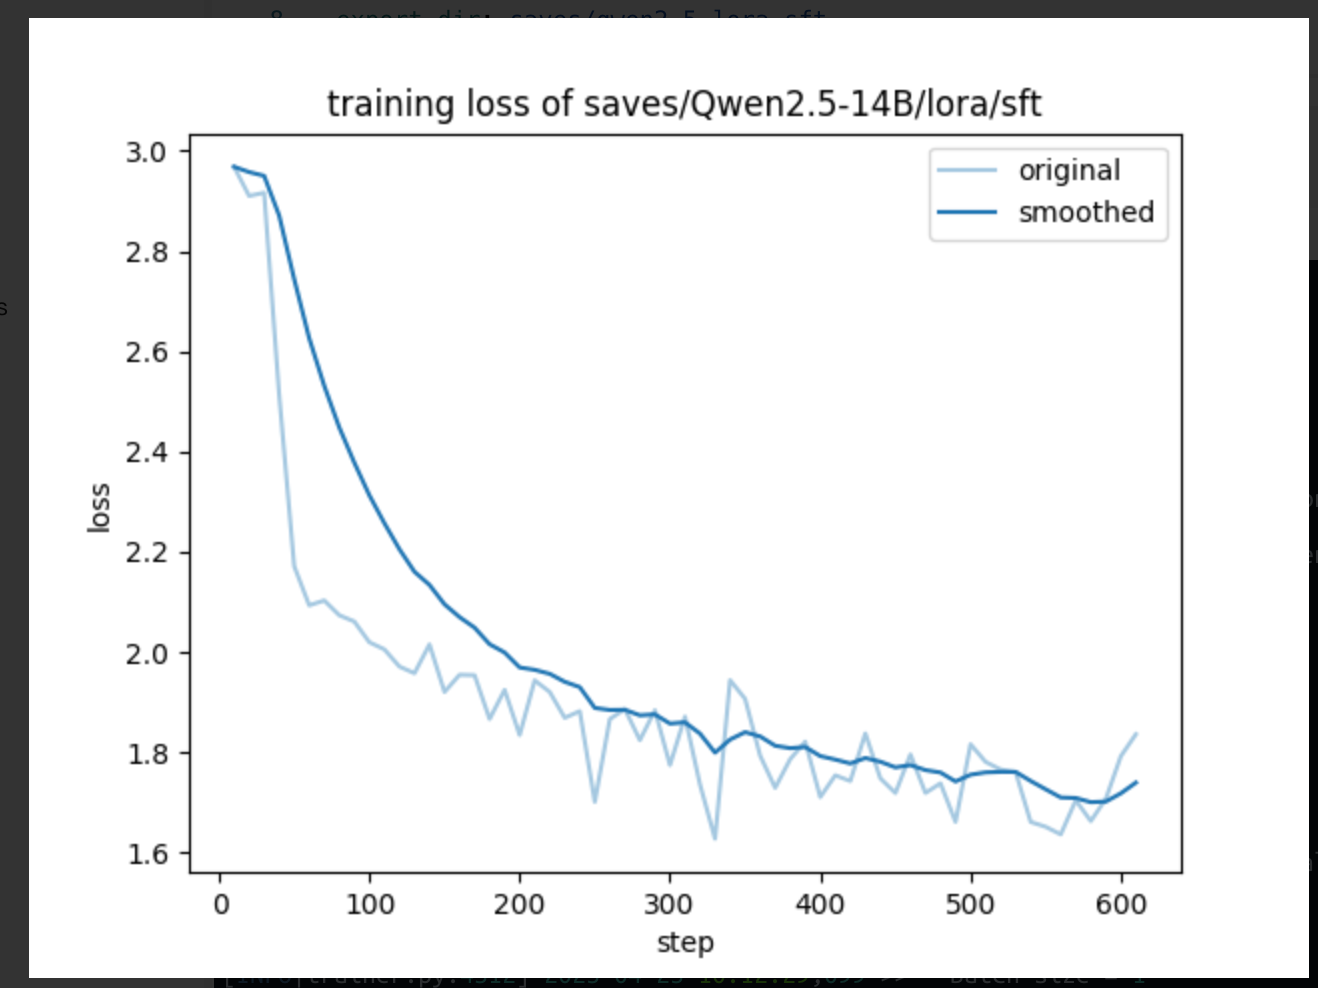
Loss下降的感觉还不错:
4.3 训练效果测试
指定原始模型路径、训练后lora路径。
llamafactory-cli chat --model_name_or_path /home/aicc1/Qwen2.5-14B-Instruct \
            --adapter_name_or_path /home/aicc1/LLaMA-Factory/saves/Qwen2.5-14B/lora/sft \
            --template qwen \
            --finetuning_type lora
询问identity数据集内容,返回成功。如图所示:

5. 合并权重
ASCEND_RT_VISIBLE_DEVICES=0,1,2,3,4,5,6,7 llamafactory-cli export \
            --model_name_or_path /home/aicc1/Qwen2.5-14B-Instruct \
            --adapter_name_or_path ./saves/Qwen2.5-14B/lora/sft  \
            --template qwen \
            --finetuning_type lora \
            --export_dir ./saves/Qwen2.5-14B/lora/megred-model-path \
            --export_size 2 \
            --export_device auto \
            --export_legacy_format False