内容简牍
一.Loading展示
1.1. Loading组件搭建

1.2. Loading状态保存

1.3. Loading状态改变
  - hyRequest中的拦截器中
二.详情页
2.1. 点击item跳转

2.2 详情页导航搭建

2.3. 详情页数据请求和管理
  - 页面管理数据 props传递

2.4. 详情页数据展示
  - 轮播图
  - 自定义指示器

2.5 描述信息的搭建

2.6. detail-section组件搭建

2.7. 搭建内容部分
  - 设施
  - 房东
  - 评论
  - 须知

2.8. 引入百度地图

2.9. tabControl控制
  2.9.1. tabControl的搭建
    - 使用之前封装组件

  2.9.2. 控制tabControl的显示
    - 监听页面滚动
      - 监听元素的滚动
    - >= 300时显示

  2.9.3. tabControl的点击
    - 获取组件的根元素的offsetTop,ref绑定函数的方式
    - 监听点击:找到元素,滚动对应的位置
    - 动态的组件的names,传递给tabControl
详细笔记
4.1.网络请求添加请求动画
-
- 搭建loading组件,在App.vue中引入
原因:
- 因为所有的请求都需要使用请求动画,放到App.vue中,那么所有的页面都可以使用,不用每个页面都引入一次
- 在App.vue中引入loading组件
- App.vue根组件:
<template>
<div class="app">
<!-- 根据路由元信息是否显示 tabBar -->
<router-view></router-view>
<tab-bar v-if="!route.meta.hideTabBar"/>
<loading />
</div>
</template>
<script setup>
import tabBar from '@/components/tab-bar/tab-bar.vue';
import { useRoute } from 'vue-router';
import Loading from '@/components/loading/loading.vue';
const route = useRoute()
</script>
<style scoped>
</style>
- loading.vue组件:
  <template>
    <div
      class="loading"
      v-if="mainStore.isLoading"
      @click="loadingClick">
      <div class="bg">
        <img src="@/assets/img/home/full-screen-loading.gif" alt="">
      </div>
    </div>
  </template>

  <script setup>
  import useMainStore from '@/stores/modules/main';

  const mainStore =  useMainStore()

  const loadingClick = () => {
    mainStore.isLoading = false
  }
  </script>
  <style lang="less" scoped>
    .loading {
      position: fixed;
      top: 0;
      left: 0;
      right: 0;
      bottom: 0;
      display: flex;
      justify-content: center;
      align-items: center;
      background-color: rgba(0, 0, 0, 0.5);
      .bg {
        width: 104px;
        height: 104px;
        display: flex;
        justify-content: center;
        align-items: center;
        background: url(@/assets/img/home/loading-bg.png) 0 0 / 100% 100%;

        img{
          width: 70px;
          height: 70px;
          margin-bottom: 10px;
        }
      }
    }
  </style>
-
- 在公共的mianStore中存储一个loading状态,默认为false
  import { defineStore } from "pinia";
  const useMainStore = defineStore('main', {
    state: () => ({
      isLoading: true
    })
  })

  export default useMainStore
-
- 每次请求都需要显示请求动画,所以在请求拦截器显示请求动画,在响应拦截器中,关闭请求动画设置loading为false
this.instance.interceptors.request.use((config) => {
mainStore.isLoading = true
return config
}, err => {
return err
})
this.instance.interceptors.response.use((res) => {
mainStore.isLoading = false
return res
}, err => {
mainStore.isLoading = false
return err
})
import axios from 'axios'
import { BASE_URL, TIME_OUT } from './config'
import useMainStore from '@/stores/modules/main'
const mainStore = useMainStore()
class HyRequest {
constructor(baseURL, timeout = 10000) {
this.instance = axios.create({
baseURL,
timeout
})
this.instance.interceptors.request.use((config) => {
mainStore.isLoading = true
return config
}, err => {
return err
})
this.instance.interceptors.response.use((res) => {
mainStore.isLoading = false
return res
}, err => {
mainStore.isLoading = false
return err
})
}
request(config) {
return new Promise((resolve, reject) => {
this.instance.request(config).then(res => {
resolve(res.data)
}).catch(err => {
reject(err)
})
})
}
get (config) {
return this.request({...config, method: 'get'})
}
post (config) {
return this.request({...config, method: 'post'})
}
}
export default new HyRequest(BASE_URL, TIME_OUT)
4.2.父组件添加click事件场景
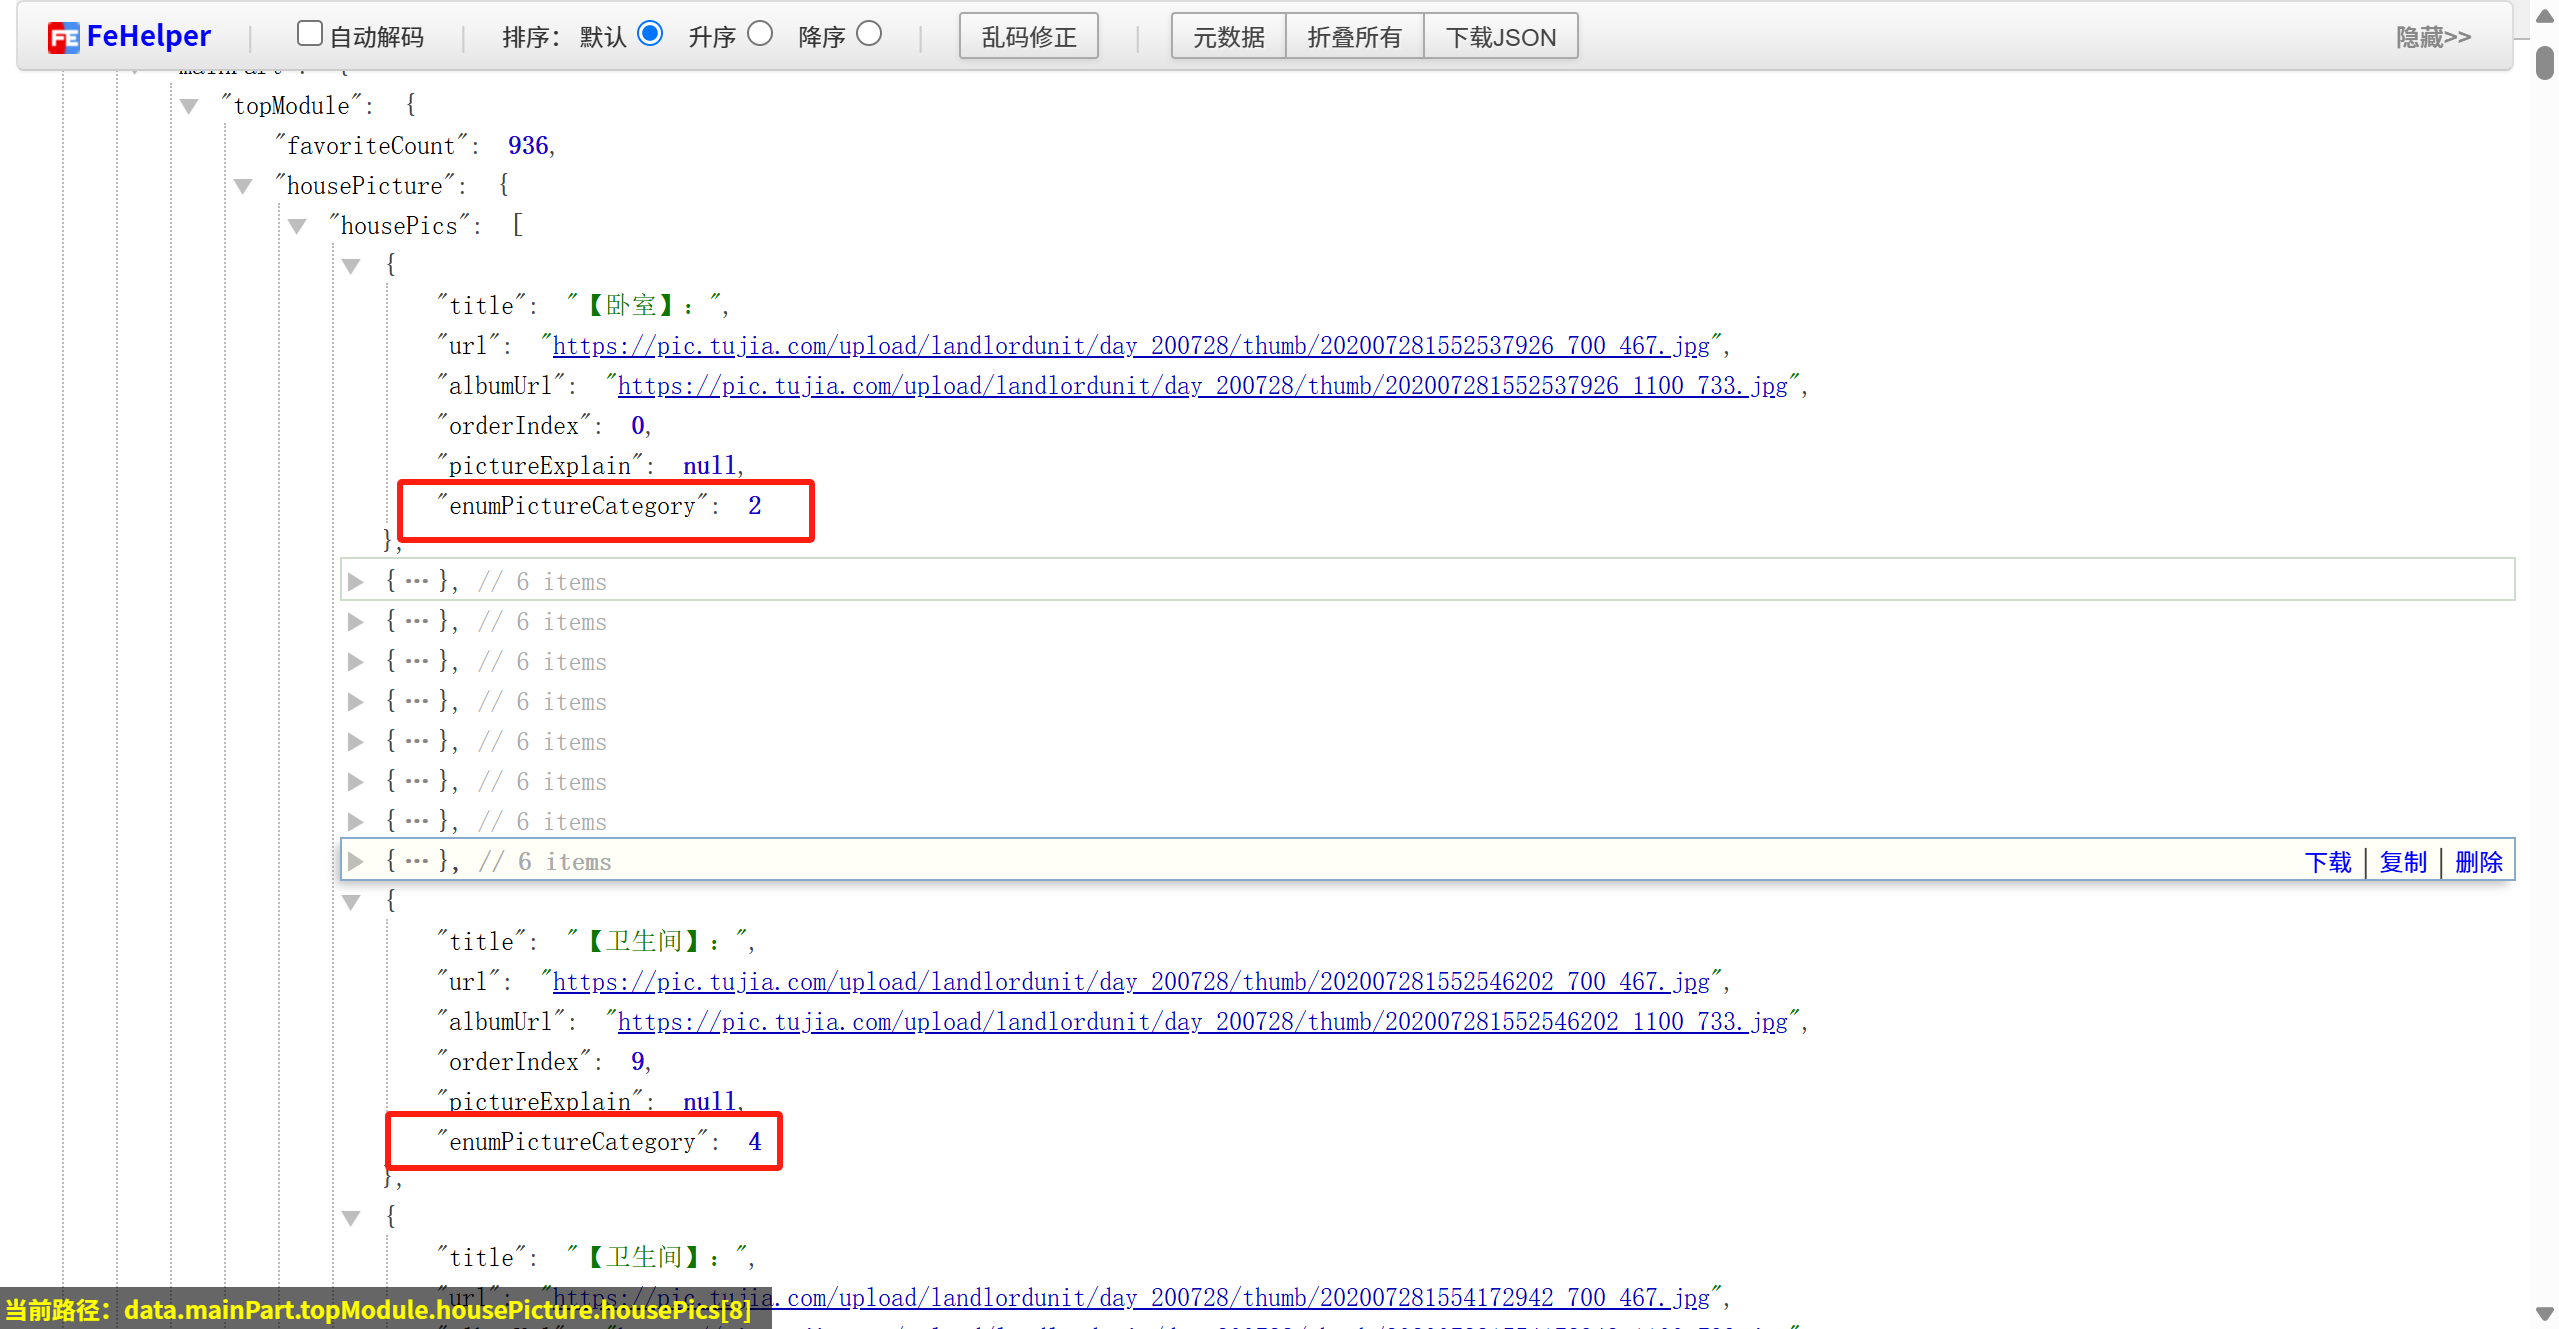
4.3.封装轮播图组件
-
- 观察轮播图组件:发现指示器需要使用插槽自定义,然后需要自己写包裹指示器数据
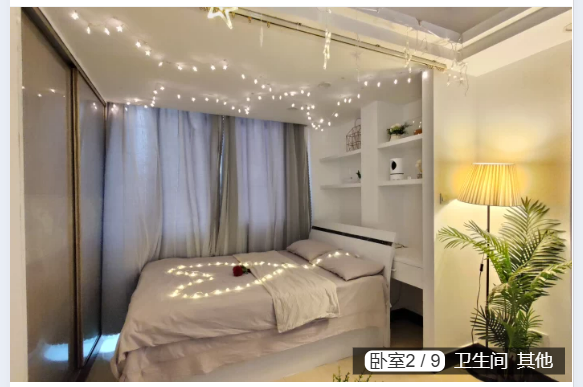
-
- 封装轮播图组件的思路:
-
- 利用vant组件中的swiper组件,然后使用v-slot自定义指示器
-
- 完整代码如下:
<template>
<div class="swipe">
<van-swipe class="swipe-list" :autoplay="3000" indicator-color="white">
<van-swipe-item
class="swipe-item"
v-for="(item, index) in swipeData"
:key="index"
>
<img :src="item.url" alt="" />
</van-swipe-item>
<!-- 具名插槽 作用域插槽解构 -->
<template #indicator="{ active, total }">
<div class="indicator">
<template v-for="(value, key, index) in swipeGroup" :key="key">
<span
class="item"
:class="{ active: swipeData[active]?.enumPictureCategory == key }">
<span class="text"> {{ getName(value[0].title) }}</span>
<span class="count" v-if="swipeData[active]?.enumPictureCategory == key">
{{ getCategoryIndex(swipeData[active]) }} / {{ value.length }}
</span>
</span>
</template>
</div>
</template>
</van-swipe>
</div>
</template>
<script setup>
const props = defineProps({
swipeData: {
type: Array,
default: () => [],
},
});
const swipeGroup = {};
for (const item of props.swipeData) {
let valueArr = swipeGroup[item.enumPictureCategory];
if (!valueArr) {
valueArr = [];
swipeGroup[item.enumPictureCategory] = valueArr;
}
valueArr.push(item);
}
console.log("swipeGroup===", swipeGroup);
const getName = (title) => {
const nameRegex = /【(.*?)】/i;
const result = nameRegex.exec(title);
return result ? result[1] : title;
};
const getCategoryIndex = (item) => {
const valueArr = swipeGroup[item.enumPictureCategory]
return valueArr.findIndex(data => data === item) + 1
}
</script>
<style lang="less" scoped>
.swipe {
.swipe-list {
.swipe-item {
img {
width: 100%;
}
}
.indicator {
position: absolute;
right: 5px;
bottom: 5px;
display: flex;
padding: 2px 5px;
font-size: 12px;
color: #fff;
background: rgba(0, 0, 0, 0.6);
.item {
margin: 0 3px;
&.active {
padding: 0 3px;
border-radius: 5px;
color: #333;
background-color: #fff;
}
}
}
}
}
</style>
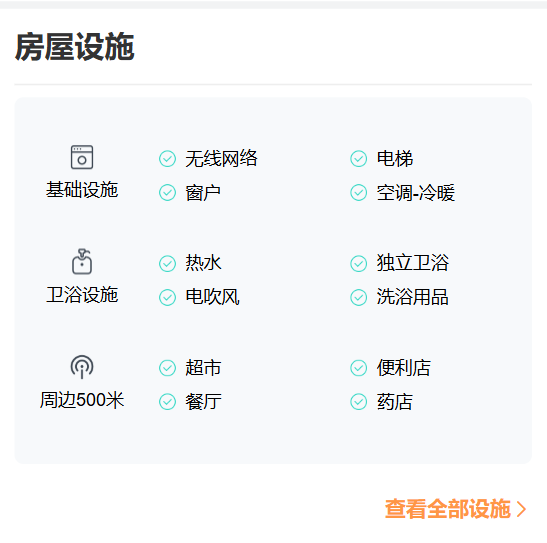
4.4.封装业务组件的思路
-
- 观察下图已知:头部和查看更多是一样的样式,内容是动态的使用插槽
-
- 封装业务组件的思路:
- 2.1 在components中创建一个组件,组件名:detail-section
- 2.2 在组件中写头部和查看更多的样式,内容写上一个默认插槽。
- 2.3 在组件中写一个props,用来接收title和moreText,数据类型为String,默认为空字符串。
- 2.4 详细代码如下:
  <template>
    <div class="section">
      <div class="header">
        <h2 class="title">{{title}}</h2>
      </div>
      <div class="content">
        <slot>
          <h3>我是默认内容</h3>
        </slot>
      </div>
      <div class="footer" v-if="moreText.length">
        <span class="more">{{moreText}}</span>
        <van-icon name="arrow" />
      </div>
  </div>
</template>

<script setup>
  defineProps({
    title: {
      type: String,
      default: '默认标题'
    },
    moreText: {
      type: String,
      default: ''
    }
  })
</script>

<style lang="less" scoped>
  .section {
    padding: 0 15px;
    margin-top: 12px;
    border-top: 5px solid #f2f3f4;
    background-color: #fff;
    .header {
      height: 50px;
      line-height: 50px;
      border-bottom: 1px solid #eee;

      .title {
        font-size: 20px;
        color: #333;
      }
    }

    .content {
      padding: 8px 0;
    }

    .footer {
      display: flex;
      justify-content: flex-end;
      align-items: center;
      height: 44px;
      line-height: 44px;
      color: #ff9645;
      font-size: 14px;
      font-weight: 600;
    }
  }
</style>
-
- 封装业务组件调用:
- 3.1 引入组件
import detailSection from '@/components/detail-section/detail-section.vue';
- 3.2 页面中使用组件
<div class="facility">
  <detail-section title="房屋设施" more-text="查看全部设施">
    <div class="facility-inner"></div>

  </detail-section>
</div>
4.5.引入百度地图
-
- 打开百度地图开发者平台,认证个人开发者
-
- 在应用管理里,创建应用,填写应用名,选择web应用,允许访问的域名,没有可以写*,点击提交,生成密钥
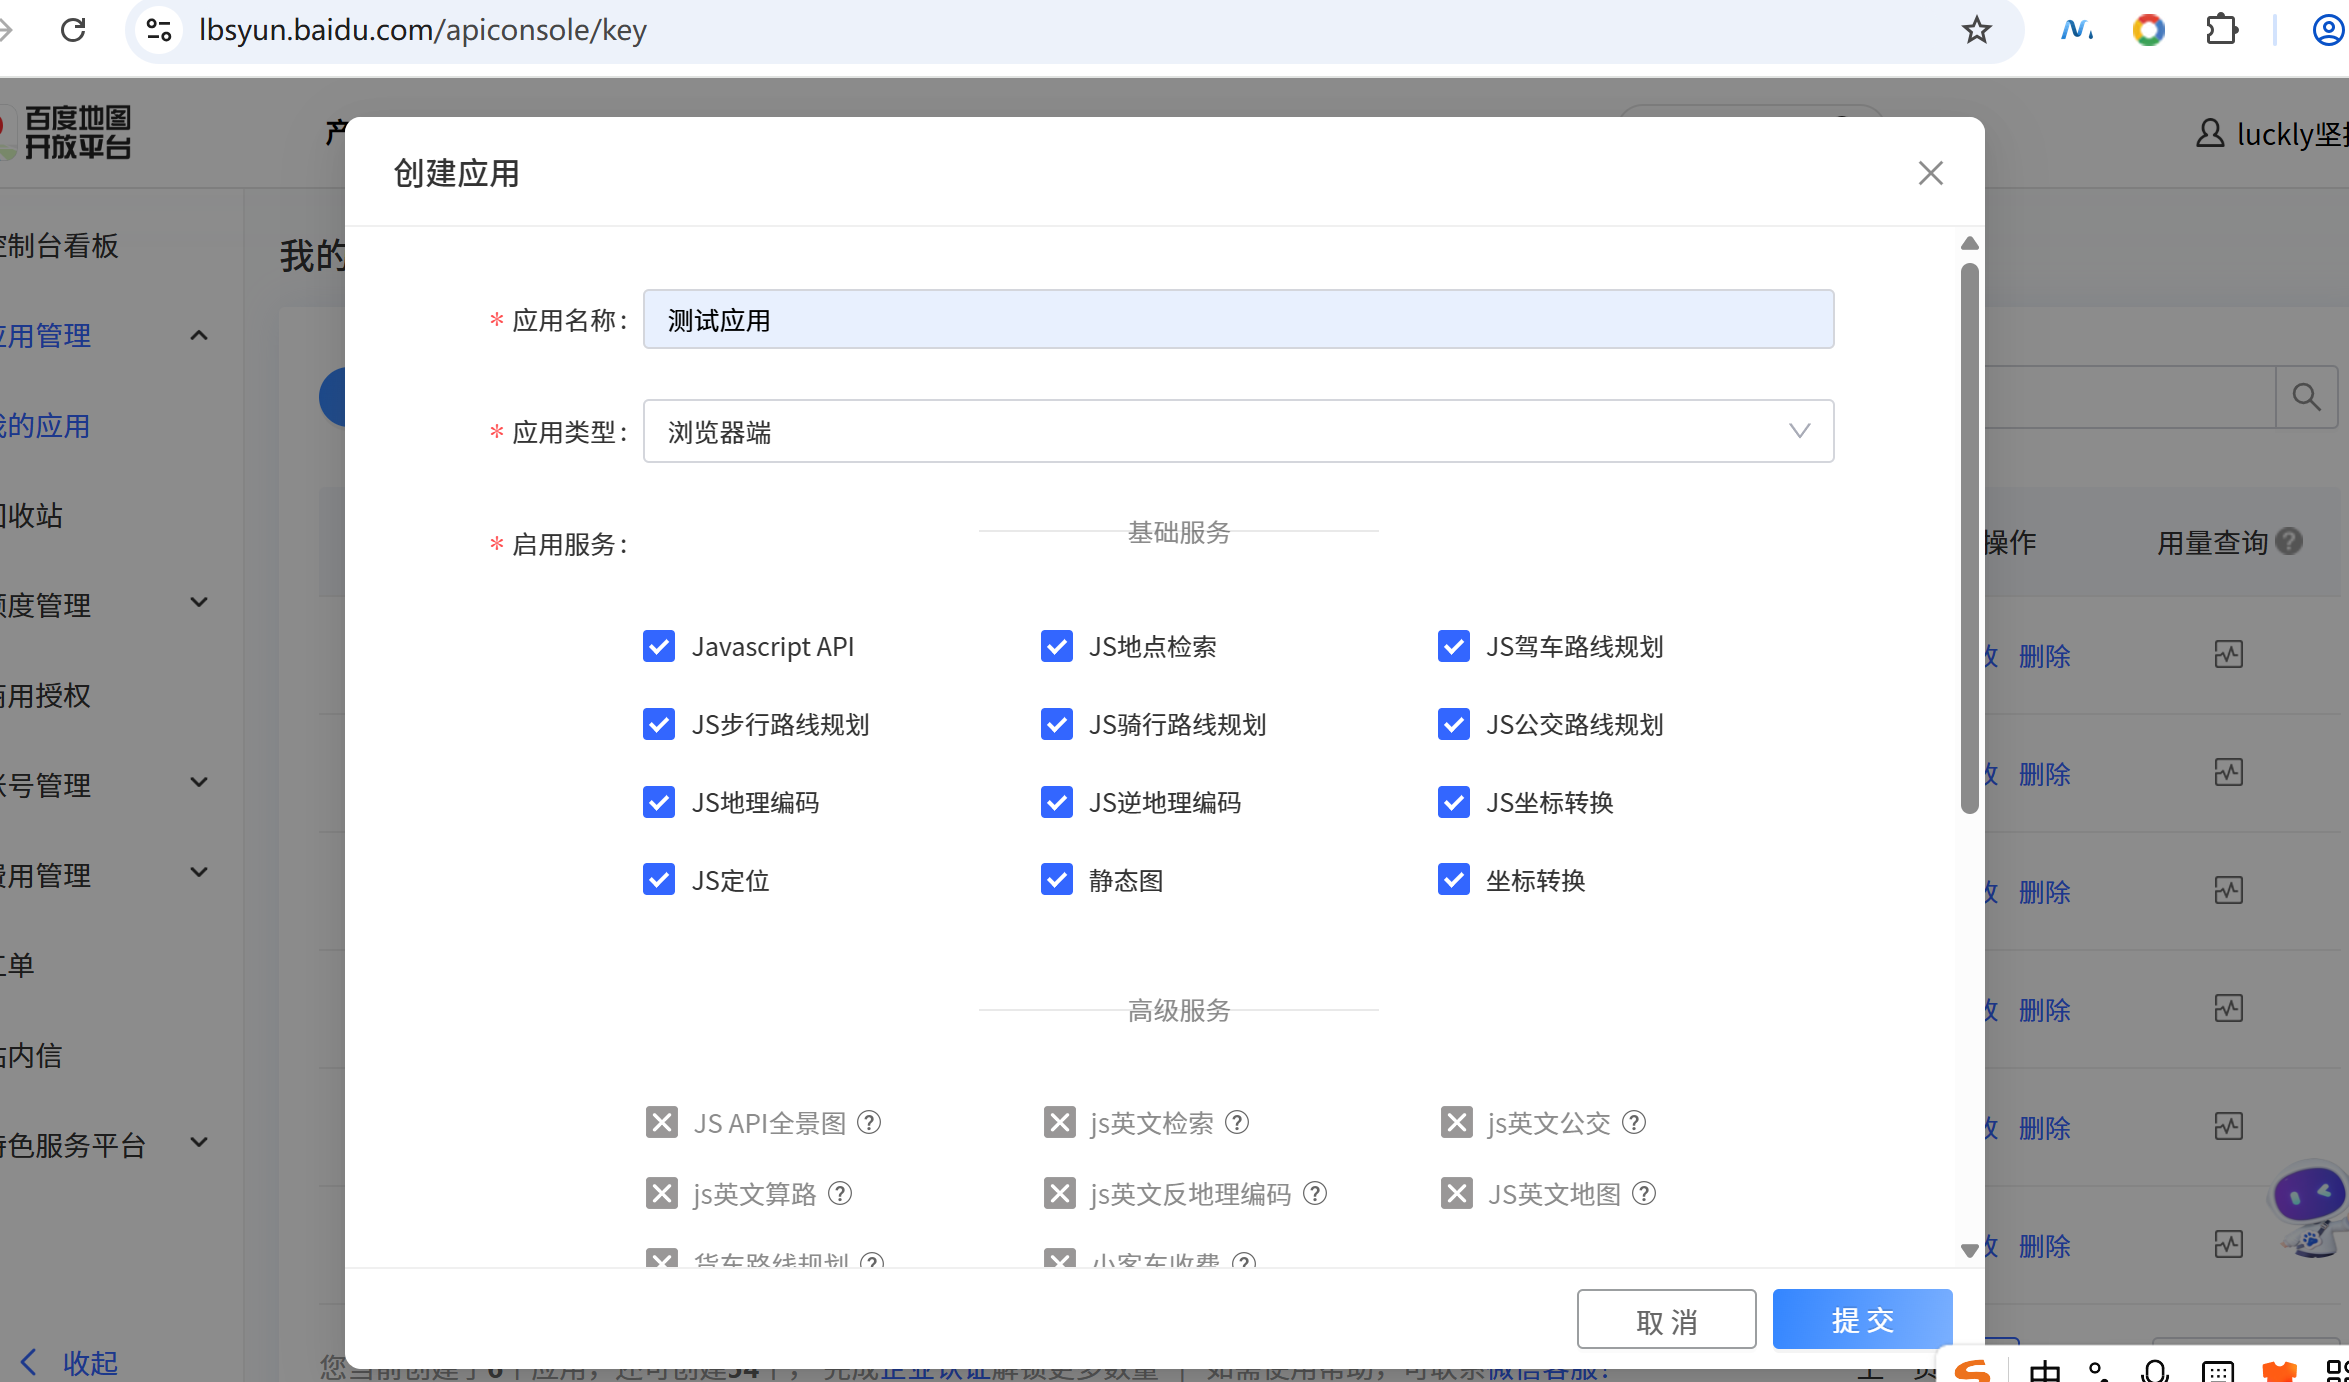
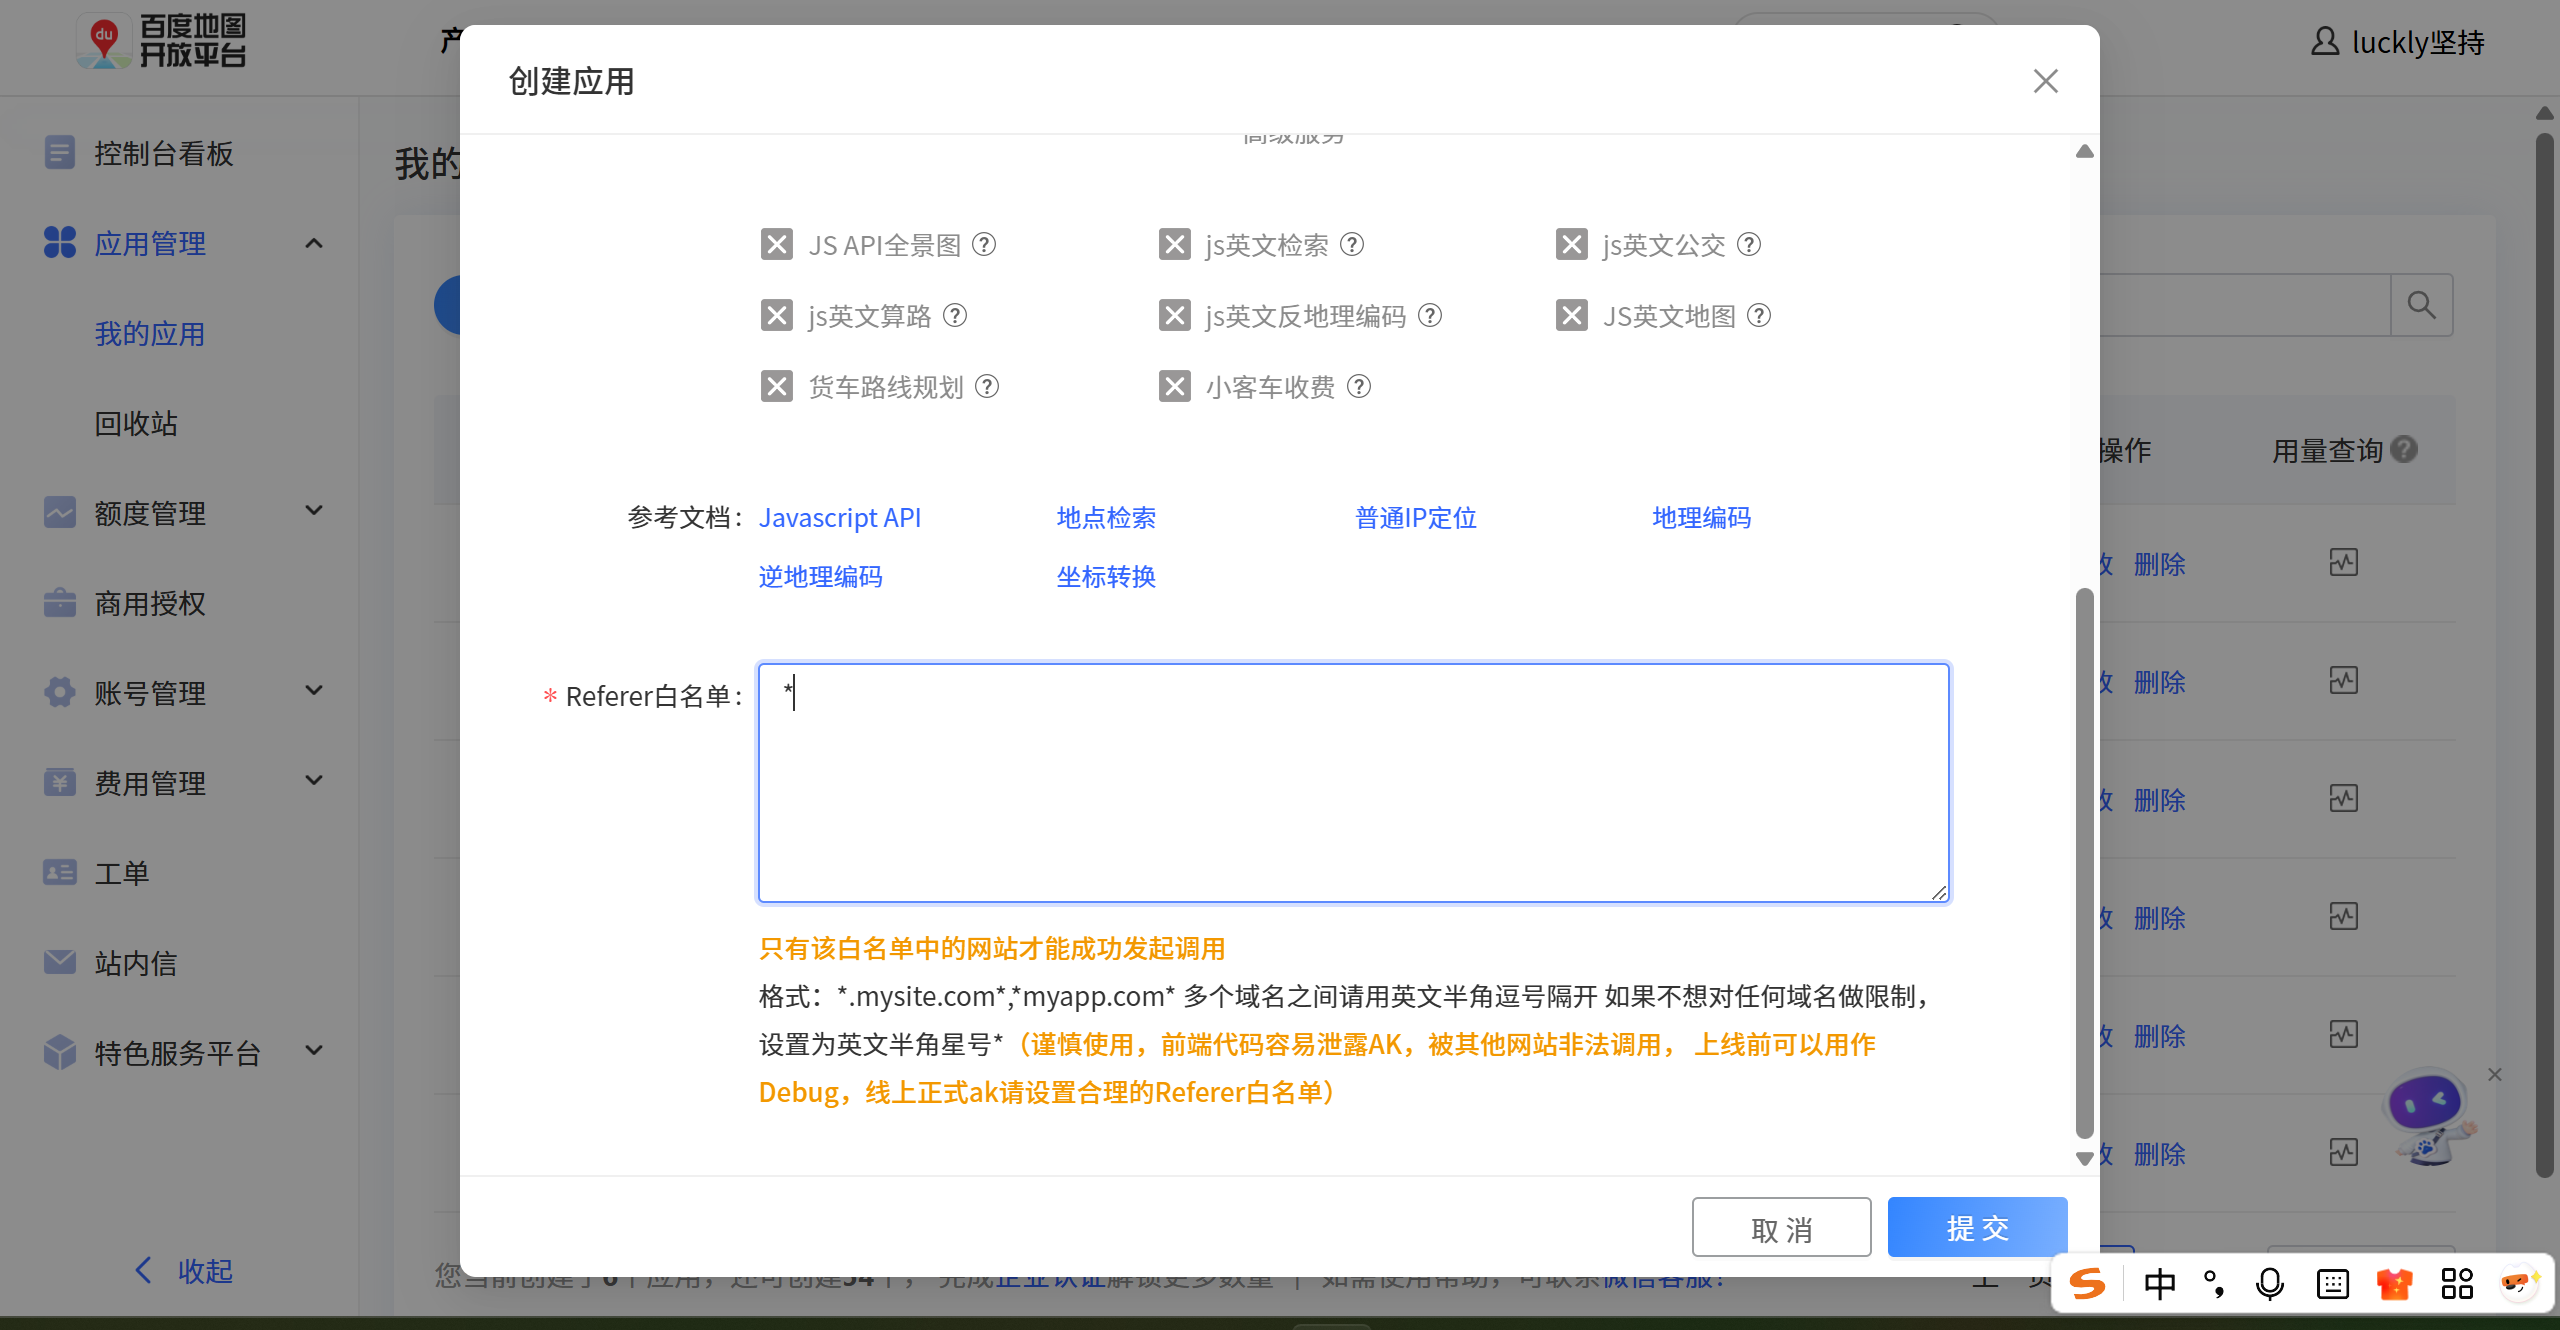
-
- 在index.html中引入百度地图API文件
<script setup>
import detailSection from '@/components/detail-section/detail-section.vue';
import { onMounted, ref } from 'vue';
const mapRef = ref();
const props = defineProps({
position: {
type: Object,
default: () => ({})
}
})
onMounted(() => {
const map = new BMapGL.Map(mapRef.value);
const point = new BMapGL.Point(props.position.longitude, props.position.latitude);
map.centerAndZoom(point, 15);
const marker = new BMapGL.Marker(point);
map.addOverlay(marker);
})
</script>
4.6.点击tabBar组件滚动相应位置
-
- 开发思路:
- 1.1. 开发出来一个tabControl组件
- 1.2. 监听滚动
- 1.3. 监听tabcontrol点击,点击后滚动到正确的位置
-
- 详细步骤点:
- 2.1. 创建一个tabControl组件,组件名:tabControl,引入tabControl,点击时将数据的index传递给父组件
- 2.2. 监听滚动。
- 2.2.1. 这个页面是元素滚动,不是window滚动,所以需要修改useScroll方法,获取滚动的元素,把滚动的元素作为参数传递给useScroll
import { ref, onActivated, onDeactivated, onMounted, onUnmounted } from 'vue'
import { throttle } from 'underscore'
export default function useScroll(elRef) {
let el = window
const isReachBottom = ref(false)
const clientHeight = ref(0)
const scrollTop = ref(0)
const scrollHeight = ref(0)
const scrollListenerHandler = throttle((reachBottomCB) => {
if(el === window) {
clientHeight.value = document.documentElement.clientHeight
scrollTop.value = document.documentElement.scrollTop
scrollHeight.value = document.documentElement.scrollHeight
} else {
clientHeight.value = el.clientHeight
scrollTop.value = el.scrollTop
scrollHeight.value = el.scrollHeight
}
if (clientHeight.value + scrollTop.value >= scrollHeight.value) {
isReachBottom.value = true
}
}, 100)
onMounted(() => {
if(elRef) el = elRef.value
el.addEventListener('scroll', scrollListenerHandler)
})
onUnmounted(() => {
el.removeEventListener('scroll', scrollListenerHandler)
})
onActivated(() => {
el.addEventListener('scroll', scrollListenerHandler)
})
onDeactivated(() => {
el.removeEventListener('scroll', scrollListenerHandler)
})
return {
isReachBottom,
clientHeight,
scrollTop,
scrollHeight,
}
}
- 2.2.2. 控制tabControl的显示,监听滚动相应位置显示
  const detailRef = ref(null)
  const { scrollTop } = useScroll(detailRef)
  const showTabControl = computed(() => {
    return scrollTop.value >= 300
  })
- 2.2.3. 需要动态绑定ref,然后获取每个组件根元素,然后获取到offsetTop,然后滚动到相应位置
<template>
<div class="detail top-page" ref="detailRef">
<van-nav-bar
title="房屋详情"
left-text="返回"
left-arrow
@click-left="onClickLeft"
/>
<tab-control
class="tabs"
v-if="showTabControl"
:titles="names"
@tabItemClick="tabClick"
/>
<!-- 内容部分 -->
<div class="main" v-if="mainPart" v-memo="[mainPart]">
<!-- 轮播组件 -->
<detail-swipe :swipe-data="mainPart.topModule.housePicture.housePics" />
<!-- 动态绑定Ref:在处理复杂组件结构和动态数据时通过动态绑定Ref,我们可以更灵活地访问和操作DOM元素或组件实例,实现更高效的交互和状态管理 -->
<detail-infos name="描述" :ref="getSectionRef" :topInfos="mainPart.topModule"/>
<detail-facility name="设施" :house-facility="mainPart.dynamicModule.facilityModule.houseFacility"/>
<!-- :landload="mainPart.dynamicModule.landloadModule.houseLandload" -->
<detail-landlord name="房东" :ref="getSectionRef" :landlord="mainPart.dynamicModule.landlordModule"/>
<detail-comment name="评论" :ref="getSectionRef" :comment="mainPart.dynamicModule.commentModule"/>
<detail-notice name="须知" :ref="getSectionRef" :order-rules="mainPart.dynamicModule.rulesModule.orderRules"/>
<detail-map name="周边" :ref="getSectionRef" :position="mainPart.dynamicModule.positionModule" />
<detail-intro :priceIntro="mainPart.introductionModule"/>
</div>
<div class="footer">
<img src="@/assets/img/detail/icon_ensure.png" alt="">
<div class="text">弘源旅途, 永无止境!</div>
</div>
</div>
</template>
<script setup>
import { computed, ref } from 'vue';
const sectionEls = {}
const names = []
const getSectionRef = (value) => {
console.log('value===', value);
const name = value.$el.getAttribute('name')
names.push(name)
sectionEls[name] = value.$el
}
const tabClick = (index) => {
const key = Object.keys(sectionEls)[index]
const el = sectionEls[key]
let instance = el.offsetTop
if(index !== 0) {
instance = instance - 44
}
detailRef.value.scrollTo({
top: instance,
behavior: 'smooth'
})
}
</script>