1.环境搭建,与初步运行
找到一个合适的文件夹,cmd
D:\gitee>pnpm install -g @tarojs/cli

   ╭──────────────────────────────────────────╮
   │                                          │
   │   Update available! 10.10.0 → 10.11.0.   │
   │   Changelog: https://pnpm.io/v/10.11.0   │
   │     To update, run: pnpm self-update     │
   │                                          │
   ╰──────────────────────────────────────────╯

 WARN  9 deprecated subdependencies found: @babel/plugin-proposal-object-rest-spread@7.20.7, @humanwhocodes/config-array@0.11.14, @humanwhocodes/object-schema@2.0.3, @swc/register@0.1.10, @types/sass@1.45.0, eslint@8.41.0, glob@7.2.3, inflight@1.0.6, rimraf@3.0.2
Packages: +45 -1
+++++++++++++++++++++++++++++++++++++++++++++-
Progress: resolved 654, reused 568, downloaded 8, added 8, done

C:\Users\Administrator\AppData\Local\pnpm\global\5:
- @tarojs/cli 3.6.37
+ @tarojs/cli 4.1.1

╭ Warning ──────────────────────────────────────────────────────────────────────────────────────╮
│                                                                                               │
│   Ignored build scripts: @parcel/watcher, @tarojs/binding, @tarojs/cli, esbuild.              │
│   Run "pnpm approve-builds -g" to pick which dependencies should be allowed to run scripts.   │
│                                                                                               │
╰───────────────────────────────────────────────────────────────────────────────────────────────╯

Done in 20.6s using pnpm v10.10.0
项目初始化
React 与 Preact 是功能相似但设计理念不同的两个前端库,以下是它们的核心区别与联系:
---
### **核心联系**
1. **相似的 API 设计**
Preact 与 React 的 API 高度兼容,包括组件模型、虚拟 DOM 和 JSX 语法。开发者可以轻松迁移 React 项目到 Preact,或反之。2. **共享生态系统**
通过 `preact/compat` 兼容层,Preact 可以直接使用 React 生态中的组件库(如 Redux、React Router),减少迁移成本。3. **相同的开发范式**
两者均支持函数组件、类组件、Hooks(Preact 需单独导入 `preact/hooks`)和状态管理,开发体验相似。---
### **主要区别**
#### 1. **体积与性能**
- **Preact**:压缩后仅约 **3-4KB**,远小于 React(约 42KB)。其轻量级虚拟 DOM 和精简代码库带来更快的渲染速度和更低的内存占用,适合性能敏感场景(如移动端、PWA)。
- **React**:功能更全面(如合成事件、复杂调试工具),但体积更大,性能略逊于 Preact。#### 2. **事件系统**
- **Preact**:直接使用浏览器原生事件(如 `onInput` 替代 `onChange`),不实现 React 的合成事件系统。事件行为与原生 DOM 一致,但可能影响跨浏览器一致性。
- **React**:合成事件系统抽象了浏览器差异,提供统一事件对象,但增加了包体积和性能开销。#### 3. **API 与语法差异**
- **属性命名**:Preact 支持原生 HTML 属性(如 `class`、`for`),而 React 需使用 `className`、`htmlFor`。
- **SVG 属性**:Preact 允许直接使用 SVG 原生属性(如 `stroke-width`),React 需驼峰命名(如 `strokeWidth`)。
- **上下文 API**:Preact 默认传递所有上下文属性,无需 `contextTypes` 声明。#### 4. **调试与工具**
- **Preact**:需手动导入 `preact/debug` 启用警告和开发者工具,调试信息较少但更轻量。
- **React**:内置丰富的调试工具(如 React DevTools),通过环境变量自动剥离生产环境调试代码。#### 5. **生态与兼容性**
- **Preact**:社区较小,但兼容 React 生态(通过 `preact/compat`)。适合轻量级项目或需要极致性能的场景。
- **React**:拥有庞大生态和社区支持,适合复杂应用(如单页应用、企业级项目)。---
### **如何选择?**
1. **选 Preact**:
- 项目需要极致轻量与高性能(如移动端、嵌入式应用)。
- 已有 React 经验且希望减少依赖体积。2. **选 React**:
- 需要复杂功能(如高阶组件、合成事件)。
- 依赖丰富生态(如 Next.js、Ant Design)。---
### **迁移与共存**
- **迁移指南**:通过别名替换(如 `react` → `preact/compat`)和修改事件处理逻辑,可逐步迁移 React 项目到 Preact。
- **框架支持**:Taro 等框架已支持 Preact,进一步降低集成成本。---
### **总结**
Preact 是 React 的轻量化替代方案,适合追求性能和体积优化的场景,而 React 更适合复杂生态需求。两者通过 `preact/compat` 实现生态共享,开发者可根据项目需求灵活选择。
根据你的需求(**使用 Taro-UI 开发小程序**),推荐选择 **Sass**,以下是详细原因和后续操作指南:
---
### **为什么选择 Sass?**
1. **Taro-UI 官方依赖**
Taro-UI 的组件样式默认基于 **Sass** 编写,选择 Sass 可以直接兼容其源码样式,无需额外配置预处理转换,避免潜在兼容性问题。2. **主题定制便捷性**
若需修改 Taro-UI 的默认主题(如颜色、间距),可通过 Sass 变量覆盖实现,这是官方推荐的自定义方式,比 CSS 原生变量更灵活。3. **Taro 官方工具链集成**
Taro 对 Sass 的支持最完善,内置 `sass-loader` 和默认配置,无需手动添加编译插件,开箱即用。---
### **后续操作步骤**
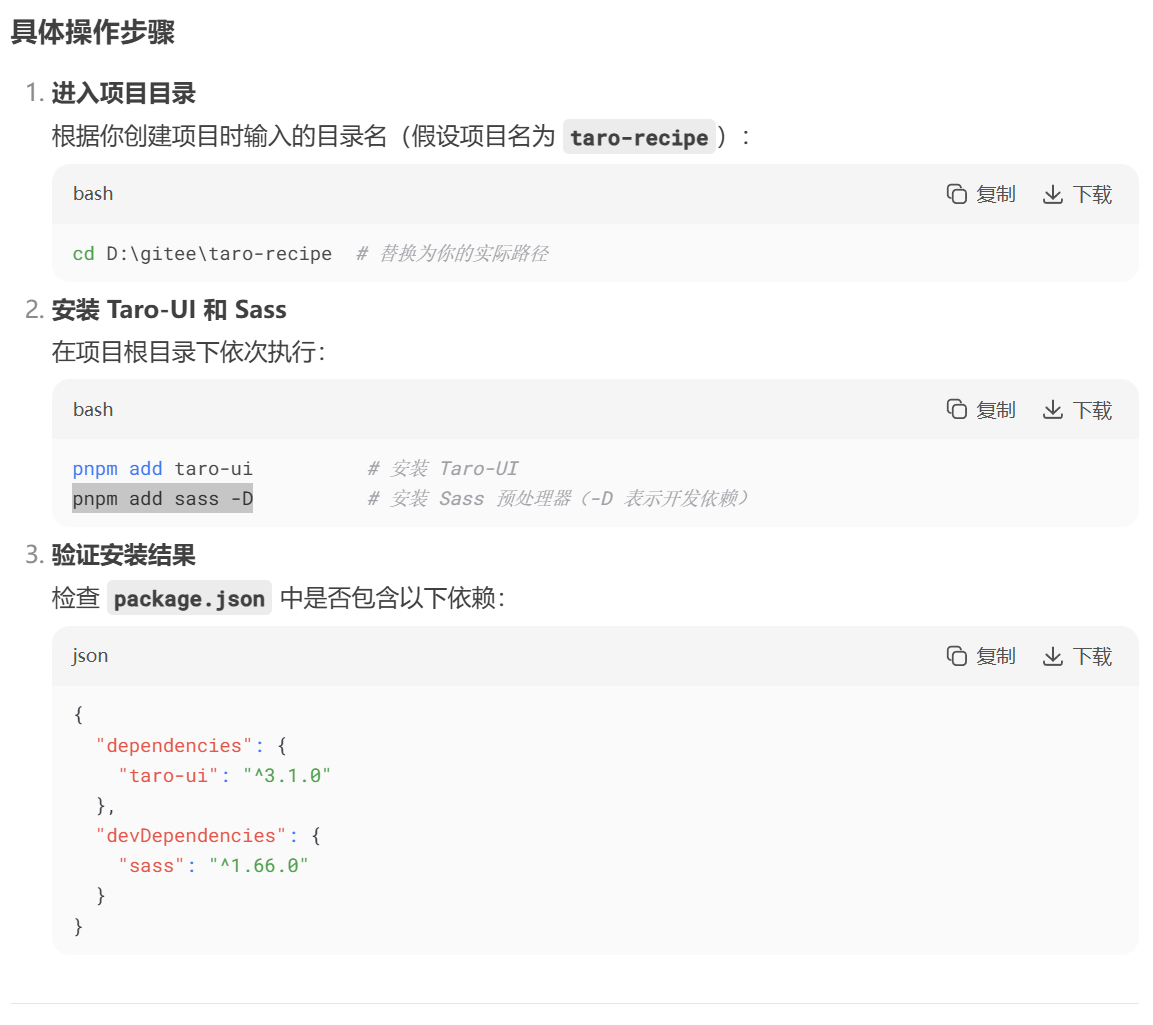
1. **安装 Taro-UI**
初始化项目后,安装 Taro-UI 及其 Sass 依赖:
```bash
pnpm add taro-ui
# 确保安装 Sass(Taro 4.x+ 推荐使用 Dart Sass)
pnpm add sass -D
```2. **引入组件与样式**
在页面或全局样式中导入 Taro-UI 的 Sass 文件(通常在 `app.scss`):
```scss
/* app.scss */
@import "taro-ui/dist/style/index.scss"; // 全局基础样式
```3. **按需加载组件**
在 React 组件中按需引入 Taro-UI 组件:
```tsx
import { AtButton } from 'taro-ui'
export default function Index() {
return <AtButton type="primary">按钮</AtButton>
}
```4. **自定义主题(可选)**
创建 `src/styles/variables.scss`,覆盖 Taro-UI 的 Sass 变量:
```scss
/* variables.scss */
$color-brand: #FF6B6B; // 修改品牌主色
```
在 `app.scss` 中优先导入自定义变量:
```scss
@import "./styles/variables.scss";
@import "taro-ui/dist/style/index.scss";
```---
### **注意事项**
- **小程序样式限制**
小程序环境中部分 Sass 高级语法(如嵌套过深、复杂混合宏)可能编译异常,建议保持样式简洁。
- **Taro-UI 兼容性**
确认 Taro-UI 版本与当前 Taro 版本兼容(Taro 4.x 需使用 Taro-UI 3.x+)。---
### **其他选项风险说明**
- **Less/Stylus**:需手动配置预处理器,且需处理 Taro-UI 的 Sass 源码转换,增加维护成本。
- **无预处理器**:无法直接使用 Taro-UI 的样式文件,需手动转换为 CSS,极不推荐。选择 **Sass** 可最大程度保证开发流畅性,与 Taro-UI 深度整合。
根据你的需求(**开发 AI 生成菜谱的小程序 + 使用 Taro-UI**),推荐选择 **默认模板**,以下是详细分析和后续操作建议:
---
### **模板选择分析**
| 模板选项 | 适用场景 | 你的需求匹配度 |
|---------|---------|---------------|
| **默认模板** | 最基础的 Taro 项目结构,无额外集成 | ✅ **最佳选择**<br>- 干净无冗余代码,适合从头开发<br>- 可自由集成 Taro-UI 或其他库 |
| default-youshu/h5-youshu | 集成腾讯有数统计 SDK | ❌ 不推荐<br>- 除非需要埋点统计功能<br>- 增加无关依赖 |
| harmony | 鸿蒙系统开发 | ❌ 不适用<br>- 目标平台是小程序 |
| mobx | 集成 MobX 状态管理 | ⚠️ 按需选择<br>- 若计划用 MobX 管理状态可选<br>- 否则增加冗余代码 |
| pwa/react-native | PWA/React Native 应用 | ❌ 目标不符 |---
### **选择「默认模板」的理由**
1. **最小化初始配置**
默认模板已包含 `React + TypeScript + Sass + Webpack5` 的基础配置,与你之前的选项完全匹配,无需二次调整。2. **无冗余依赖**
其他模板(如 MobX、有数统计)会预装特定库,而你的项目暂不需要这些功能,避免后期清理负担。3. **灵活集成 Taro-UI**
默认模板提供纯净环境,方便按需安装和配置 Taro-UI,避免预设模板可能存在的版本冲突。---
### **下一步操作指南**
1. **安装 Taro-UI**
```bash
pnpm add taro-ui
# 安装 Sass 支持(若未自动安装)
pnpm add sass -D
```2. **配置 Taro-UI 按需加载**
修改 `config/index.ts`,添加 `babel` 配置以优化体积:
```ts
// config/index.ts
export default {
// ...
babel: {
plugins: [
['import', { libraryName: 'taro-ui', libraryDirectory: 'dist/components', style: true }, 'taro-ui']
]
}
}
```3. **全局引入 Taro-UI 样式**
在 `src/app.scss` 中导入基础样式:
```scss
@import "taro-ui/dist/style/index.scss"; // 核心样式
@import "taro-ui/dist/style/components/button.scss"; // 按需加载组件样式(推荐)
```4. **使用组件**
在页面文件中按需引入组件(示例):
```tsx
// src/pages/index/index.tsx
import { AtButton } from 'taro-ui'
export default function Index() {
return <AtButton type="primary">生成菜谱</AtButton>
}
```---
### **注意事项**
1. **Taro-UI 版本兼容性**
- Taro 4.x 需使用 Taro-UI 3.x+
- 安装时确认版本匹配:
```bash
pnpm add taro-ui@latest
```2. **小程序样式限制**
- 避免使用 `:global` 等高级 Sass 特性
- 组件样式需通过 `className` 而非 `styled-components` 编写3. **TypeScript 类型支持**
Taro-UI 自带类型定义,若遇类型报错可尝试更新 `@types/taro-ui`:
```bash
pnpm add @types/taro-ui -D
```---
### **其他模板风险提示**
- **MobX 模板**:除非明确需要状态管理库,否则会引入不必要的学习成本和包体积。
- **有数统计模板**:集成监控 SDK 可能违反部分地区的隐私政策(如 GDPR),需谨慎评估。选择 **默认模板** 可最大化控制权,后续扩展灵活。
D:\gitee>taro init cookbook
👽 Taro v3.6.37

‼ 获取 taro 全局配置文件失败,不存在全局配置文件:C:\Users\Administrator\.taro-global-config\index.json


Taro 即将创建一个新项目!
Need help? Go and open issue: https://tls.jd.com/taro-issue-helper

? 请输入项目介绍 这是一个小程序,结合AI生成菜谱的小工具。
? 请选择框架 React
? 是否需要使用 TypeScript ? Yes
? 请选择 CSS 预处理器(Sass/Less/Stylus) Sass
? 请选择编译工具 Webpack5
? 请选择包管理工具 pnpm
? 请选择模板源 Gitee(最快)
√ 拉取远程模板仓库成功!
? 请选择模板 默认模板

✔ 创建项目: cookbook
✔ 创建文件: D:\gitee\cookbook\babel.config.js
✔ 创建文件: D:\gitee\cookbook\config/dev.ts
✔ 创建文件: D:\gitee\cookbook\config/index.ts
✔ 创建文件: D:\gitee\cookbook\config/prod.ts
✔ 创建文件: D:\gitee\cookbook\jest.config.ts
✔ 创建文件: D:\gitee\cookbook\package.json
✔ 创建文件: D:\gitee\cookbook\project.config.json
✔ 创建文件: D:\gitee\cookbook\project.tt.json
✔ 创建文件: D:\gitee\cookbook\src/app.config.ts
✔ 创建文件: D:\gitee\cookbook\src/app.scss
✔ 创建文件: D:\gitee\cookbook\src/app.ts
✔ 创建文件: D:\gitee\cookbook\src/index.html
✔ 创建文件: D:\gitee\cookbook\src/pages/index/index.config.ts
✔ 创建文件: D:\gitee\cookbook\src/pages/index/index.scss
✔ 创建文件: D:\gitee\cookbook\src/pages/index/index.tsx
✔ 创建文件: D:\gitee\cookbook\tsconfig.json
✔ 创建文件: D:\gitee\cookbook\types/global.d.ts
✔ 创建文件: D:\gitee\cookbook\.editorconfig
✔ 创建文件: D:\gitee\cookbook\.env.development
✔ 创建文件: D:\gitee\cookbook\.env.production
✔ 创建文件: D:\gitee\cookbook\.env.test
✔ 创建文件: D:\gitee\cookbook\.eslintrc
✔ 创建文件: D:\gitee\cookbook\.gitignore
✔ 创建文件: D:\gitee\cookbook\__tests__/index.test.js

✔ 初始化 git 成功
执行安装项目依赖 pnpm install, 需要一会儿...
✘ 安装项目依赖失败,请自行重新安装!
2.初始化微信小程序
举例如下:
# 进入项目根目录
$ cd myApp

# 使用 pnpm 安装依赖
$ pnpm install

安装 taro-ui
pnpm add taro-ui

安装 sass 支持
pnpm add sass -D
用vscode打开文件夹。编译一下。
(base) PS D:\gitee\cookbook> pnpm run dev:weapp

> cookbook@1.0.0 dev:weapp D:\gitee\cookbook
> npm run build:weapp -- --watch


> cookbook@1.0.0 build:weapp
> taro build --type weapp --watch

👽 Taro v3.6.37

⚠ 获取 taro 全局配置文件失败,不存在全局配置文件:C:\Users\Administrator\.taro-global-config\index.json
Tips:
1. 预览模式生成的文件较大,设置 NODE_ENV 为 production 可以开启压缩。
Example:
$ set NODE_ENV=production && taro build --type weapp --watch
2. 建议开启持久化缓存功能,能有效提升二次编译速度,详情请参考: https://docs.taro.zone/docs/config-detail#cache。


提示  appid     touristappid
生成  工具配置  D:\gitee\cookbook\dist/project.config.json
启动  开发者工具-项目目录  D:\gitee\cookbook\dist
Prebundle dependencies:
     @tarojs/plugin-framework-react/dist/runtime
     @tarojs/plugin-platform-weapp/dist/runtime
     @tarojs/runtime
     @tarojs/taro
     react
     react-dom
     react/jsx-runtime


✔ Webpack
  Compiled successfully in 789.83ms

→ Watching... [2025/5/19 09:28:55]


✔ Webpack
  Compiled successfully in 17.12s

编译  发现入口  src/app.ts
编译  发现页面  src/pages/index/index.tsx
→ Watching... [2025/5/19 09:29:20]
使用 Taro 的
build命令可以把 Taro 代码编译成不同端的代码,然后在对应的开发工具中查看效果。Taro 编译分为
dev和build模式:
- dev 模式(增加 --watch 参数) 将会监听文件修改。
- build 模式(去掉 --watch 参数) 将不会监听文件修改,并会对代码进行压缩打包。
- dev 模式生成的文件较大,设置环境变量
NODE_ENV为production可以开启压缩,方便预览,但编译速度会下降。
# yarn
$ yarn dev:weapp
$ yarn build:weapp
# npm script
$ npm run dev:weapp
$ npm run build:weapp
# 仅限全局安装
$ taro build --type weapp --watch
$ taro build --type weapp
# npx 用户也可以使用
$ npx taro build --type weapp --watch
$ npx taro build --type weapp
# watch 同时开启压缩
$ set NODE_ENV=production && taro build --type weapp --watch # CMD
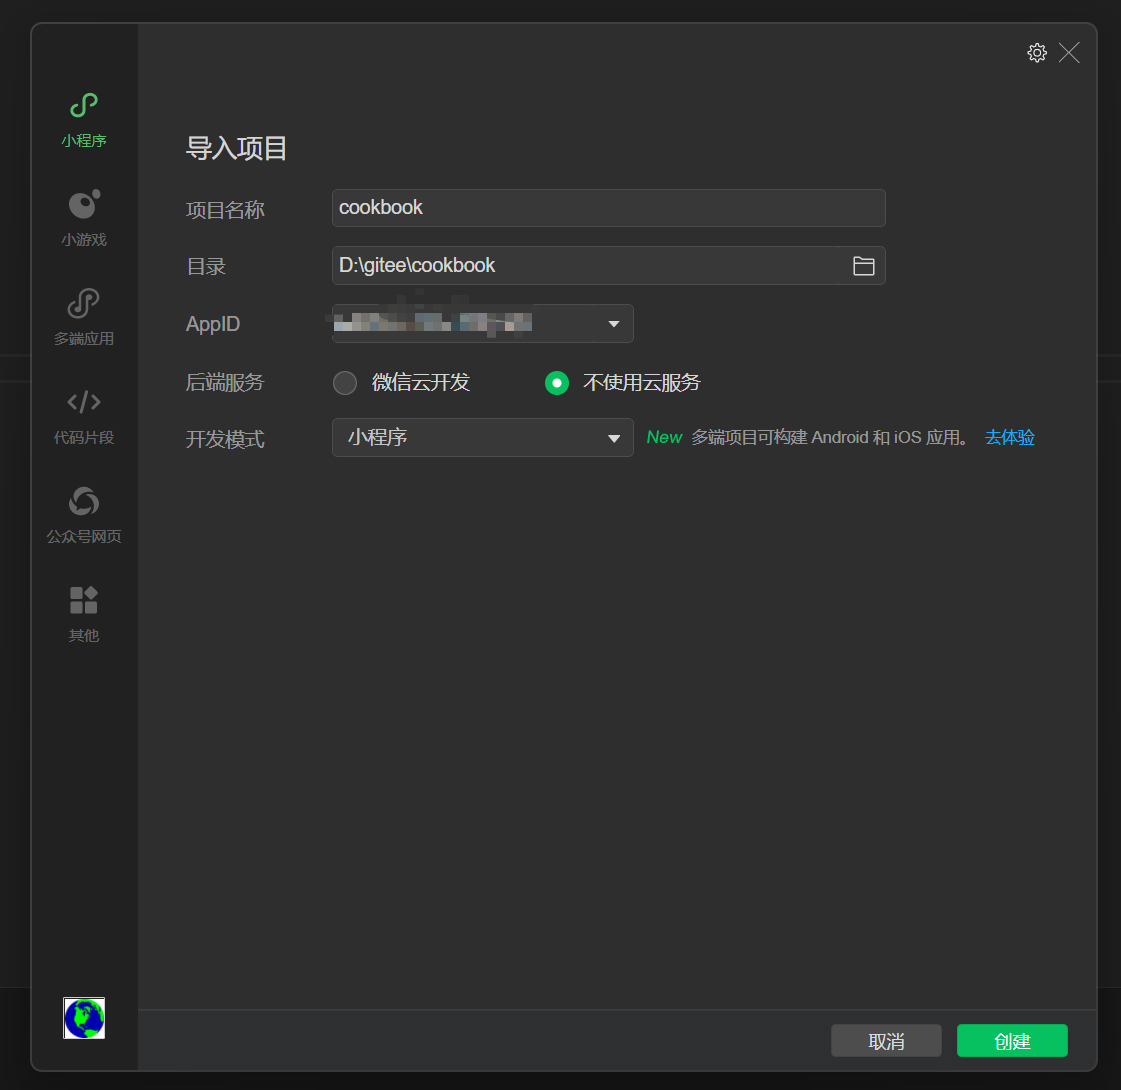
$ NODE_ENV=production taro build --type weapp --watch # Bash。用微信开发工具打开文件夹。
二、好了一切正常了。现在我们要开始规划了。
首先要规划一下。极菜谱的生成条件。
计划,
首页是生成条件:本地、菜系、风格,资金等。
次页是生成菜名,需要一个prompt,将上一页的参数传入。然后生成菜谱,用于用户勾选。点选后,可以存储在本地。方便以后使用。存储前要设置名称。
第三页是生成每一道菜的的做法与注意点。注意prompt的细节描述,返回的格式等,做法上的任务清单的方式,用于使用者进行勾选进度。添加一个直接购买的方式,方便 从某团或
第四页是一个综合的材料清单,可以导出成树状结构,方便以文本的方式发送,后期计划在每一个清单处添加一个自动购买链接。
学习者:下厨房
三、基于原来的一些问题
在开始时就要设定一下。
计划在小程序的底部有如下几个页面选项:“吃什么”,“上菜单”,“做个菜”,我的菜等四个选项卡。
安装相应的组件。
pnpm install taro-ui @tarojs/components/*
* @Author: DuYicheng
* @Date: 2025-05-19 09:15:12
* @LastEditors: DuYicheng
* @LastEditTime: 2025-05-19 10:15:17
* @Description:
* @FilePath: \cookbook\src\app.config.ts
*/
export default defineAppConfig({
pages: [
'pages/index/index',
'pages/upload/index',
'pages/cook/index',
'pages/profile/index'
],
window: {
backgroundTextStyle: 'light',
navigationBarBackgroundColor: '#fff',
navigationBarTitleText: '大厨就是我',
navigationBarTextStyle: 'black'
},
tabBar: {
color: '#666',
selectedColor: '#ff6b6b',
backgroundColor: '#fff',
borderStyle: 'black',
list: [
{
pagePath: 'pages/index/index',
text: '吃什么',
iconPath: './assets/icons/eat.png',
selectedIconPath: './assets/icons/eat-active.png'
},
{
pagePath: 'pages/upload/index',
text: '上菜单',
iconPath: './assets/icons/upload.png',
selectedIconPath: './assets/icons/upload-active.png'
},
{
pagePath: 'pages/cook/index',
text: '做个菜',
iconPath: './assets/icons/cook.png',
selectedIconPath: './assets/icons/cook-active.png'
},
{
pagePath: 'pages/profile/index',
text: '我的菜',
iconPath: './assets/icons/profile.png',
selectedIconPath: './assets/icons/profile-active.png'
}
]
}
})缺少的图标,自己到icon上找,注意要放对位置。
封装一个获取本地位置的组件。
import Taro from '@tarojs/taro';

interface LocationInfo {
  latitude: number;
  longitude: number;
  city?: string;
  district?: string;
  province?: string;
}

export const LocationService = {
  async getCurrentLocation(): Promise<LocationInfo> {
    try {
      console.log('开始获取位置信息...');
      const location = await Taro.getLocation({ type: 'gcj02' });
      console.log('获取到原始位置信息:', location);

      const locationInfo = await this.getLocationDetails(location.latitude, location.longitude);
      console.log('解析后的位置信息:', locationInfo);

      return locationInfo;
    } catch (error) {
      console.error('获取位置信息失败:', error);
      throw error;
    }
  },

  async getLocationDetails(latitude: number, longitude: number): Promise<LocationInfo> {
    try {
      const res = await Taro.request({
        url: 'https://apis.map.qq.com/ws/geocoder/v1/',
        data: {
          location: `${latitude},${longitude}`,
          key: 'YOUR_TENCENT_MAP_KEY', // 需要替换成你的腾讯地图 Key
          get_poi: 0
        }
      });

      const { result } = res.data;
      return {
        latitude,
        longitude,
        province: result.address_component.province,
        city: result.address_component.city,
        district: result.address_component.district
      };
    } catch (error) {
      console.error('解析位置详情失败:', error);
      throw error;
    }
  }
};
修改首页:
import { View, Text } from '@tarojs/components'
import { useLoad } from '@tarojs/taro'
import { LocationService } from '@/utils/location'
import './index.scss'
export default function Index() {
useLoad(() => {
initLocation()
})
const initLocation = async () => {
try {
const locationInfo = await LocationService.getCurrentLocation()
console.log('当前位置信息:', locationInfo)
// 可以将位置信息存储到全局状态管理中
} catch (error) {
console.error('初始化位置信息失败:', error)
}
}
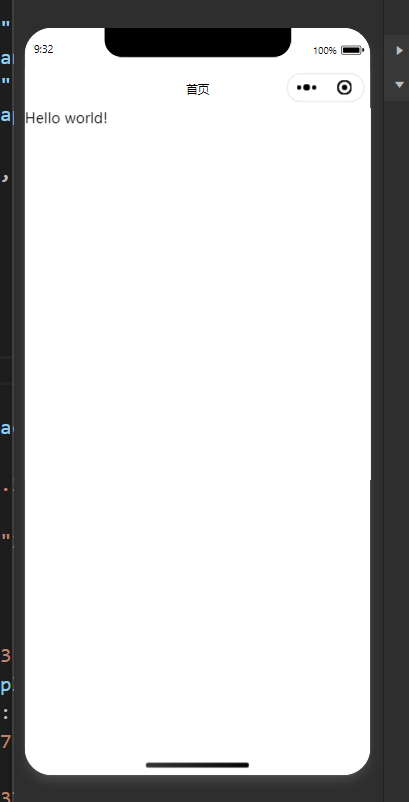
return (
<View className='index'>
<Text>Hello world!</Text>
</View>
)
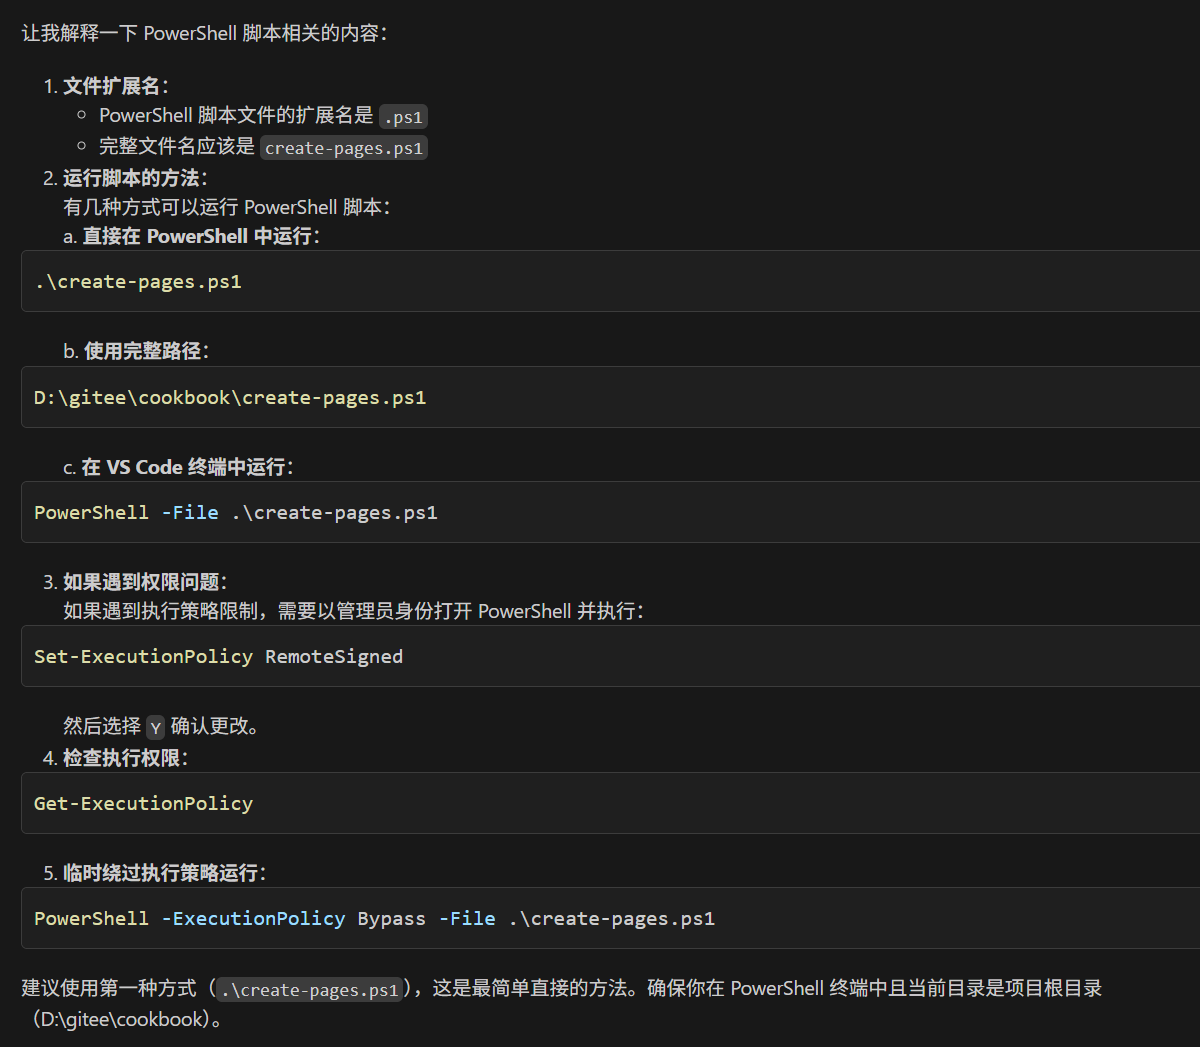
}创建批量创建文件脚本:
# 创建批量创建页面的脚本
# filepath: d:\gitee\cookbook\create-pages.ps1
$pages = @('upload', 'cook', 'profile')
$baseDir = ".\src\pages"

foreach ($page in $pages) {
    $pageDir = Join-Path $baseDir $page

    # 创建目录
    New-Item -ItemType Directory -Path $pageDir -Force

    # 创建 index.tsx
    @"
import { View, Text } from '@tarojs/components'
import { useLoad } from '@tarojs/taro'
import './index.scss'

export default function $($page.Substring(0,1).ToUpper() + $page.Substring(1)) () {
  useLoad(() => {
    console.log('Page loaded.')
  })

  return (
    <View className='$page'>
      <Text>$($page.Substring(0,1).ToUpper() + $page.Substring(1)) Page</Text>
    </View>
  )
}
"@ | Out-File -FilePath "$pageDir\index.tsx" -Encoding utf8

    # 创建 index.scss
    @"
.$page {
  width: 100%;
  min-height: 100vh;
}
"@ | Out-File -FilePath "$pageDir\index.scss" -Encoding utf8

    # 创建 index.config.ts
    @"
export default definePageConfig({
  navigationBarTitleText: '$($page.Substring(0,1).ToUpper() + $page.Substring(1))'
})
"@ | Out-File -FilePath "$pageDir\index.config.ts" -Encoding utf8
}
运行脚本:
.\create-pages.ps1
 获取位置失败了
需要在小程序配置文件中声明获取位置的权限。让我们修改配置文件:
修改 app.config.ts
export default defineAppConfig({
  pages: [
    'pages/index/index',
    'pages/upload/index',
    'pages/cook/index',
    'pages/profile/index'
  ],
  window: {
    backgroundTextStyle: 'light',
    navigationBarBackgroundColor: '#fff',
    navigationBarTitleText: '大厨就是我',
    navigationBarTextStyle: 'black'
  },
  // 添加位置权限声明
  requiredPrivateInfos: [
    "getLocation",
    "chooseLocation"
  ],
  // 配置位置权限
  permission: {
    "scope.userLocation": {
      "desc": "您的位置信息将用于获取当地特色菜品推荐"
    }
  },
  // ...existing code for tabBar...
})
在:project.config.json中添加,如不存在,也创建
 "permission": {
    "scope.userLocation": {
      "desc": "您的位置信息将用于获取当地特色菜品推荐"
    }
  }
再次编译,不在合法域名中。进入小程序。
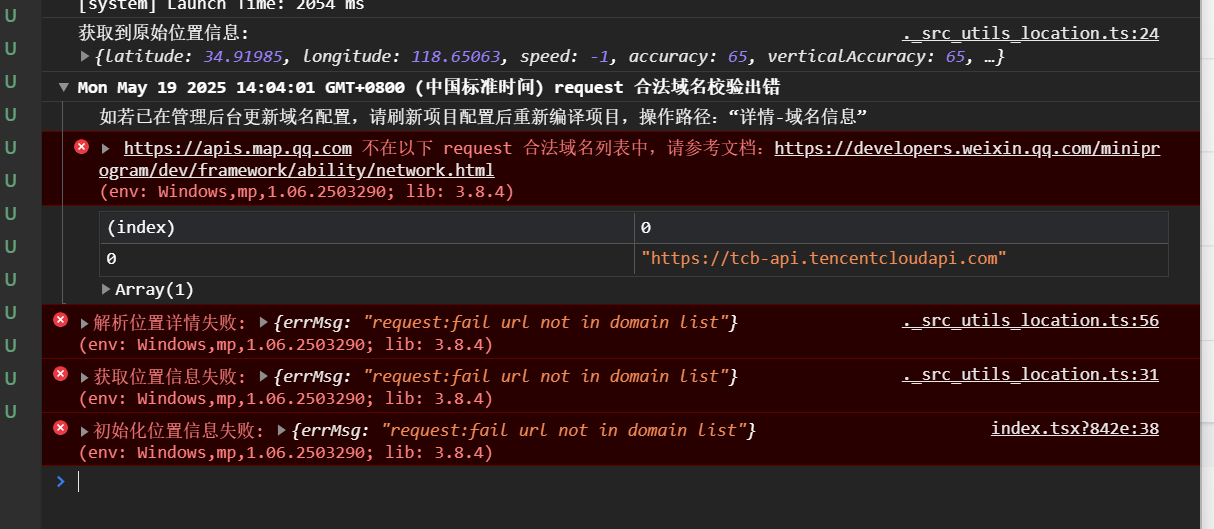
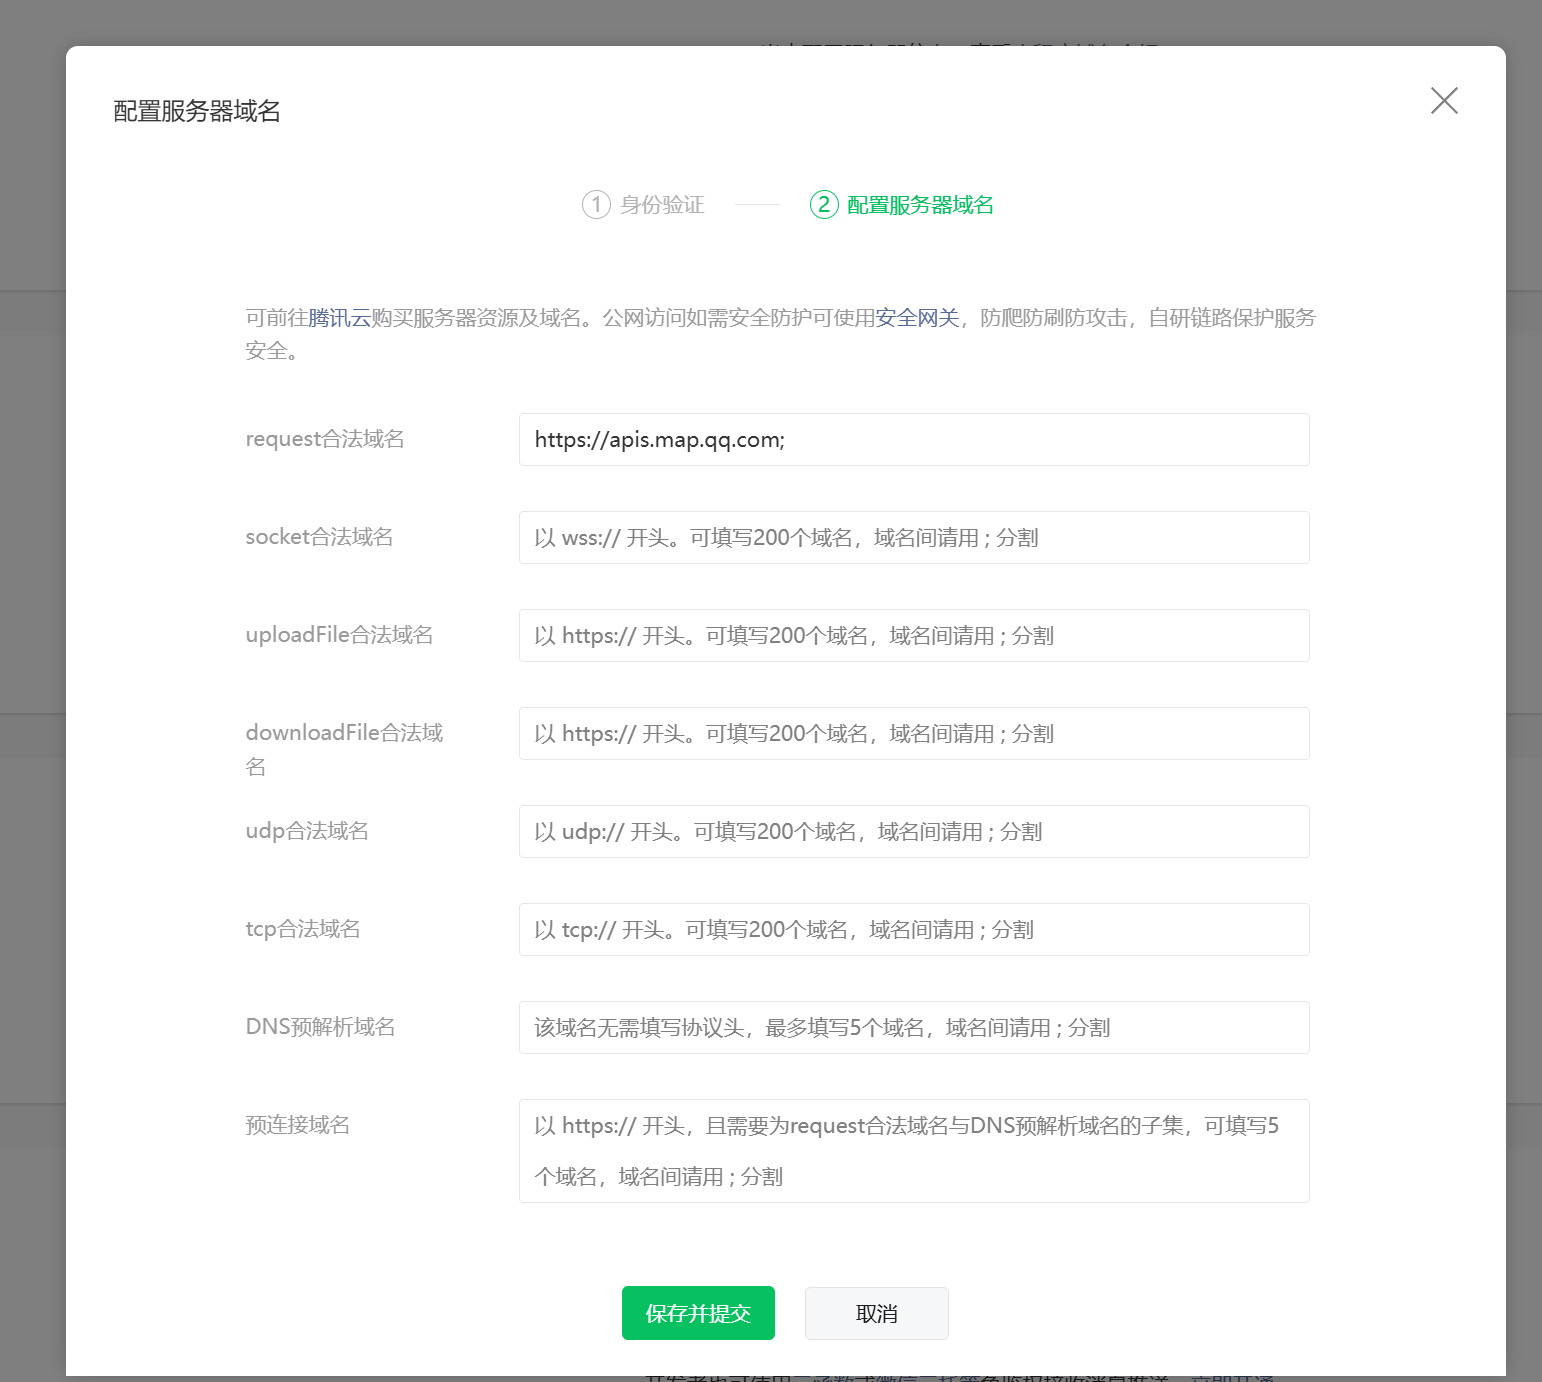
在vscode上,重新编译。在工具上,详细域名信息刷新。

解析失败:修改location.ts
import Taro from '@tarojs/taro';

interface LocationInfo {
  latitude: number;
  longitude: number;
  city?: string;
  district?: string;
  province?: string;
}

export const LocationService = {
  async getCurrentLocation(): Promise<LocationInfo> {
    try {
      console.log('开始获取位置信息...');
      const location = await Taro.getLocation({ type: 'gcj02' });
      console.log('获取到原始位置信息:', location);

      const locationInfo = await this.getLocationDetails(location.latitude, location.longitude);
      console.log('解析后的位置信息:', locationInfo);

      return locationInfo;
    } catch (error) {
      console.error('获取位置信息失败:', error);
      throw error;
    }
  },

  async getLocationDetails(latitude: number, longitude: number): Promise<LocationInfo> {
    try {
      const res = await Taro.request({
        url: 'https://apis.map.qq.com/ws/geocoder/v1/',
        data: {
          location: `${latitude},${longitude}`,
          key: '换成你自己的。',
          get_poi: 0
        }
      });

      console.log('腾讯地图API返回数据:', res.data);

      // 检查返回状态
      if (res.data.status !== 0) {
        throw new Error(`地理编码请求失败: ${res.data.message}`);
      }

      // 检查数据结构
      if (!res.data.result || !res.data.result.address_component) {
        console.error('返回数据结构异常:', res.data);
        return {
          latitude,
          longitude,
          province: '未知省份',
          city: '未知城市',
          district: '未知地区'
        };
      }

      const { address_component } = res.data.result;
      return {
        latitude,
        longitude,
        province: address_component.province || '未知省份',
        city: address_component.city || '未知城市',
        district: address_component.district || '未知地区'
      };
    } catch (error) {
      console.error('解析位置详情失败:', error);
      // 返回基本位置信息而不是抛出错误
      return {
        latitude,
        longitude,
        province: '未知省份',
        city: '未知城市',
        district: '未知地区'
      };
    }
  }
};
key值上限了。修改吧。


 记得要多处重新编译,否则不行。
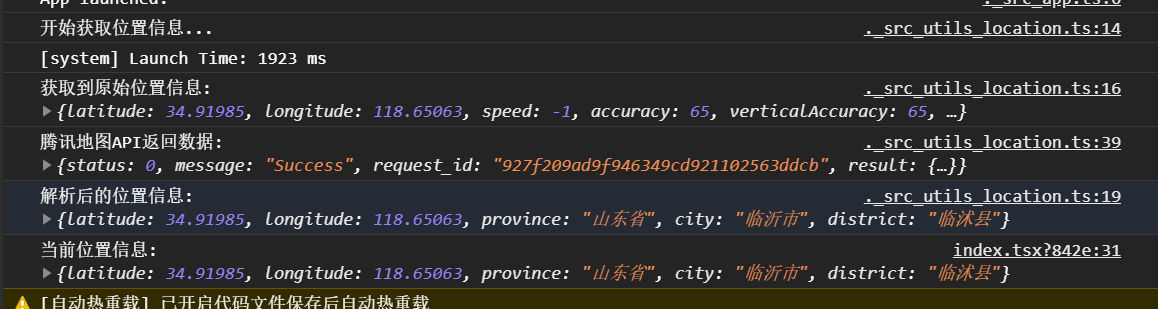
可以正常得到信息了。
四、接入AI
上面已经完成了4个页面的预设。及本地地址的获取。现在需要接入ai了。我自己有deepseek的api
先安装pnpm install openai
修改ai.ts
import OpenAI from 'openai';
import { API_KEYS } from '@/config/keys';

interface AIResponse {
    success: boolean;
    data?: any;
    error?: string;
}

const openai = new OpenAI({
    baseURL: 'https://api.deepseek.com',
    apiKey: API_KEYS.DEEPSEEK
});

export const AIService = {
    async generateMenu(prompt: string): Promise<AIResponse> {
        try {
            const completion = await openai.chat.completions.create({
                messages: [
                    {
                        role: "system",
                        content: "You are a professional Chinese chef assistant."
                    },
                    {
                        role: "user",
                        content: prompt
                    }
                ],
                model: "deepseek-chat",
            });

            const content = completion.choices[0].message.content;
            return {
                success: true,
                data: JSON.parse(content)
            };
        } catch (error) {
            console.error('AI生成菜单失败:', error);
            return {
                success: false,
                error: error.message
            };
        }
    },

    async generateRecipe(prompt: string): Promise<AIResponse> {
        try {
            const completion = await openai.chat.completions.create({
                messages: [
                    {
                        role: "system",
                        content: "You are a professional Chinese chef that provides detailed cooking instructions."
                    },
                    {
                        role: "user",
                        content: prompt
                    }
                ],
                model: "deepseek-chat",
            });

            const content = completion.choices[0].message.content;
            return {
                success: true,
                data: JSON.parse(content)
            };
        } catch (error) {
            console.error('AI生成菜谱失败:', error);
            return {
                success: false,
                error: error.message
            };
        }
    }
};
prompts.ts
interface MenuPrompt {
    role: string;
    content: string;
}

interface MenuItem {
    id: string;
    name: string;
    description: string;
    price: string;
    spicyLevel: number;
}

interface MenuCategory {
    name: string;
    dishes: MenuItem[];
}

interface MenuResponse {
    categories: MenuCategory[];
}

interface RecipeIngredient {
    name: string;
    amount: string;
}

interface RecipeStep {
    step: number;
    description: string;
    tips: string;
}

interface RecipeResponse {
    name: string;
    ingredients: RecipeIngredient[];
    steps: RecipeStep[];
    cookingTime: string;
    difficulty: number;
    tips: string;
}

export const generateMenuPrompt = (location: string): MenuPrompt => ({
    role: 'user',
    content: `作为一个专业的中餐厨师,请根据用户所在地区"${location}"的特点,生成一份完整的菜单。
    要求:
    1. 包含以下分类:家常菜、下酒菜、特色菜、养生菜、汤等
    2. 每个分类下至少包含5道菜
    3. 考虑该地区的饮食特点和季节性
    4. 返回JSON格式,确保完全符合 MenuResponse 接口定义
    5. spicyLevel 必须是 0-3 的数字
    6. 所有 id 必须是唯一的字符串
    7. price 格式为 "XX.XX" 的字符串`
});

export const generateRecipePrompt = (dishName: string, location: string): MenuPrompt => ({
    role: 'user',
    content: `请为位于${location}的用户详细介绍如何制作${dishName}。
    要求:
    1. 返回JSON格式,确保完全符合 RecipeResponse 接口定义
    2. 步骤要详细且清晰
    3. difficulty 必须是 1-5 的整数
    4. cookingTime 格式为 "XX分钟" 或 "XX小时XX分钟"
    5. 每个步骤都必须包含实用的操作要点
    6. 配料用量要准确`
});

// 导出类型定义供其他文件使用
export type {
    MenuPrompt,
    MenuItem,
    MenuCategory,
    MenuResponse,
    RecipeIngredient,
    RecipeStep,
    RecipeResponse
};
首页
import { View, Text } from '@tarojs/components'
import { useLoad } from '@tarojs/taro'
import { useState } from 'react'
import { LocationService } from '@/utils/location'
import { AIService } from '@/utils/ai'
import { generateMenuPrompt } from '@/config/prompts'
import './index.scss'

export default function Index() {
  const [menu, setMenu] = useState(null)

  useLoad(() => {
    initLocation()
  })

  const initLocation = async () => {
    try {
      const locationInfo = await LocationService.getCurrentLocation()
      console.log('当前位置信息:', locationInfo)

      // 测试菜单生成
      const prompt = generateMenuPrompt(`${locationInfo.province}${locationInfo.city}`)
      const menuResult = await AIService.generateMenu(prompt)

      if (menuResult.success && menuResult.data) {
        setMenu(menuResult.data)
        console.log('生成的菜单:', menuResult.data)
      }
    } catch (error) {
      console.error('初始化失败:', error)
    }
  }

  return (
    <View className='index'>
      {menu ? (
        <View className='menu'>
          {menu.categories.map(category => (
            <View key={category.name} className='category'>
              <Text className='category-title'>{category.name}</Text>
              {category.dishes.map(dish => (
                <View key={dish.id} className='dish-item'>
                  <Text>{dish.name}</Text>
                  <Text className='description'>{dish.description}</Text>
                </View>
              ))}
            </View>
          ))}
        </View>
      ) : (
        <Text>加载中...</Text>
      )}
    </View>
  )
}
域名白名单,api.deepseek.com不要忘 了。
今天周二,接着。
我艹,昨天无论如何调试都收不到数据,今天直接行了。这是什么鬼东西。就是费用有点高,一次1分钱。
API响应状态: 200
._src_utils_ai.ts:49 解析前的内容: ```json
{
  "menu": {
    "homelyDishes": [
      {
        "id": "hd001",
        "name": "临沂炒鸡",
        "description": "选用当地散养土鸡,肉质鲜嫩,搭配临沂特有的辣椒和香料炒制而成。",
        "price": "68.00",
        "spicyLevel": 2
      },
      {
        "id": "hd002",
        "name": "红烧鲤鱼",
        "description": "选用微山湖鲤鱼,红烧入味,肉质鲜美。",
        "price": "58.00",
        "spicyLevel": 1
      },
      {
        "id": "hd003",
        "name": "地锅鸡",
        "description": "传统农家做法,鸡肉与土豆、粉条一起炖煮,味道浓郁。",
        "price": "62.00",
        "spicyLevel": 1
      },
      {
        "id": "hd004",
        "name": "蒜泥白肉",
        "description": "选用五花肉,煮熟后切片,搭配蒜泥酱汁,肥而不腻。",
        "price": "45.00",
        "spicyLevel": 1
      },
      {
        "id": "hd005",
        "name": "醋溜白菜",
        "description": "新鲜白菜醋溜而成,酸甜爽口。",
        "price": "28.00",
        "spicyLevel": 0
      }
    ],
    "appetizers": [
      {
        "id": "ap001",
        "name": "五香花生米",
        "description": "花生米用五香调料炒制,香脆可口。",
        "price": "22.00",
        "spicyLevel": 0
      },
      {
        "id": "ap002",
        "name": "麻辣鸭脖",
        "description": "鸭脖腌制后卤制,麻辣鲜香。",
        "price": "38.00",
        "spicyLevel": 3
      },
      {
        "id": "ap003",
        "name": "酱牛肉",
        "description": "牛肉用秘制酱料卤制,切片后食用。",
        "price": "48.00",
        "spicyLevel": 1
      },
      {
        "id": "ap004",
        "name": "凉拌黄瓜",
        "description": "黄瓜拍碎后凉拌,清爽开胃。",
        "price": "18.00",
        "spicyLevel": 1
      },
      {
        "id": "ap005",
        "name": "卤水拼盘",
        "description": "多种卤味拼盘,包括豆腐、鸡蛋、猪耳等。",
        "price": "42.00",
        "spicyLevel": 1
      }
    ],
    "specialties": [
      {
        "id": "sp001",
        "name": "临沂煎饼",
        "description": "传统手工煎饼,薄如纸,可卷各种菜肴。",
        "price": "15.00",
        "spicyLevel": 0
      },
      {
        "id": "sp002",
        "name": "糁汤",
        "description": "临沂特色早餐汤,用牛肉、麦仁等熬制,味道浓郁。",
        "price": "20.00",
        "spicyLevel": 1
      },
      {
        "id": "sp003",
        "name": "沂蒙山炒鸡",
        "description": "选用沂蒙山散养鸡,搭配当地辣椒炒制,香辣可口。",
        "price": "78.00",
        "spicyLevel": 2
      },
      {
        "id": "sp004",
        "name": "蒙山全羊汤",
        "description": "选用蒙山羊肉熬制,汤鲜肉嫩。",
        "price": "65.00",
        "spicyLevel": 1
      },
      {
        "id": "sp005",
        "name": "临沂豆腐箱",
        "description": "豆腐挖空后填入肉馅,蒸制而成,造型独特。",
        "price": "45.00",
        "spicyLevel": 0
      }
    ],
    "healthyDishes": [
      {
        "id": "he001",
        "name": "清炒时蔬",
        "description": "当季新鲜蔬菜清炒,保留原汁原味。",
        "price": "32.00",
        "spicyLevel": 0
      },
      {
        "id": "he002",
        "name": "山药炖排骨",
        "description": "山药与排骨一起炖煮,滋补养生。",
        "price": "58.00",
        "spicyLevel": 0
      },
      {
        "id": "he003",
        "name": "银耳羹",
        "description": "银耳与红枣、枸杞炖煮,润肺养颜。",
        "price": "28.00",
        "spicyLevel": 0
      },
      {
        "id": "he004",
        "name": "蒸南瓜",
        "description": "南瓜蒸制,甜糯可口。",
        "price": "25.00",
        "spicyLevel": 0
      },
      {
        "id": "he005",
        "name": "百合炒西芹",
        "description": "百合与西芹清炒,清淡爽口。",
        "price": "38.00",
        "spicyLevel": 0
      }
    ],
    "soups": [
      {
        "id": "so001",
        "name": "酸辣汤",
        "description": "酸辣开胃,配料丰富。",
        "price": "25.00",
        "spicyLevel": 2
      },
      {
        "id": "so002",
        "name": "紫菜蛋花汤",
        "description": "紫菜与鸡蛋煮制,简单美味。",
        "price": "18.00",
        "spicyLevel": 0
      },
      {
        "id": "so003",
        "name": "排骨玉米汤",
        "description": "排骨与玉米炖煮,汤鲜味美。",
        "price": "42.00",
        "spicyLevel": 0
      },
      {
        "id": "so004",
        "name": "西红柿牛腩汤",
        "description": "西红柿与牛腩炖煮,酸甜开胃。",
        "price": "48.00",
        "spicyLevel": 0
      },
      {
        "id": "so005",
        "name": "冬瓜排骨汤",
        "description": "冬瓜与排骨炖煮,清热解暑。",
        "price": "38.00",
        "spicyLevel": 0
      }
    ]
  }
}
五、新的一天,接着开始。
原打算修改一下,prompts,又想到等用户量上来根据用户的需要来改吧。目前应该够用的。
好的,下一步是让其生成合适的方式,让使用的朋友勾选。
5.1修复返回的数据及提取
export const AIService = {
    async generateMenu(prompt: string): Promise<AIResponse> {
        try {
            // ...existing code...

            // 修复 JSON 解析问题
            const content = response.data.choices[0].message.content;
            console.log('解析前的内容:', content);

            // 处理返回的内容,移除 markdown 标记
            const cleanContent = content.replace(/```json\n|\n```/g, '');
            const jsonData = JSON.parse(cleanContent);

            // 转换数据结构以匹配 MenuResponse 接口
            const transformedData = {
                categories: [
                    { name: '家常菜', dishes: jsonData.menu.homelyDishes },
                    { name: '下酒菜', dishes: jsonData.menu.appetizers },
                    { name: '特色菜', dishes: jsonData.menu.specialties },
                    { name: '养生菜', dishes: jsonData.menu.healthyDishes },
                    { name: '汤类', dishes: jsonData.menu.soups }
                ]
            };

            return {
                success: true,
                data: transformedData
            };
        } catch (error) {
            // ...existing code...
        }
    }
};
5.2修改主页面
/*
 * @Author: DuYicheng
 * @Date: 2025-05-20 07:24:41
 * @LastEditors: DuYicheng
 * @LastEditTime: 2025-05-20 08:08:44
 * @Description:
 * @FilePath: \cookbook\src\pages\index\index.tsx
 */
import { View, Text, Button, Ad, Checkbox } from '@tarojs/components'
import { useLoad } from '@tarojs/taro'
import { useState } from 'react'
import { LocationService } from '@/utils/location'
import { AIService } from '@/utils/ai'
import { generateMenuPrompt } from '@/config/prompts'
import './index.scss'


interface SelectedDish {
  id: string;
  name: string;
  categoryName: string;
}
export default function Index() {
  const [menu, setMenu] = useState(null)
  const [loading, setLoading] = useState(false)
  const [error, setError] = useState('')
  const [selectedDishes, setSelectedDishes] = useState<SelectedDish[]>([])


  useLoad(() => {
    console.log('页面加载完成')
  })

  const handleTestClick = async () => {
    setLoading(true)
    setError('')
    try {
      const locationInfo = await LocationService.getCurrentLocation()
      console.log('当前位置信息:', locationInfo)

      const prompt = generateMenuPrompt(`${locationInfo.province}${locationInfo.city}`)
      console.log('生成的prompt:', prompt)

      const menuResult = await AIService.generateMenu(prompt.content)
      console.log('AI返回结果:', menuResult)

      if (menuResult.success && menuResult.data) {
        setMenu(menuResult.data)
        console.log('解析后的菜单:', menuResult.data)
      } else {
        setError(menuResult.error || '获取菜单失败')
      }
    } catch (error) {
      console.error('操作失败:', error)
      setError(error.message || '操作失败')
    } finally {
      setLoading(false)
    }
  }

  const handleDishSelect = (dish, categoryName: string, checked: boolean) => {
    if (checked) {
      setSelectedDishes(prev => [...prev, { ...dish, categoryName }])
    } else {
      setSelectedDishes(prev => prev.filter(item => item.id !== dish.id))
    }
  }

  return (
    <View className='index'>
      <Button
        className='test-btn'
        onClick={handleTestClick}
        loading={loading}
        disabled={loading}
      >
        生成菜单
      </Button>

      {loading && (
        <View className='loading-container'>
          {/* 广告位 */}
          <Ad
            unitId='your-ad-unit-id'
            adType='video'
            adTheme='white'
          />
          <Text className='loading-text'>正在生成菜单,请稍候...</Text>
        </View>
      )}

      {error && (
        <View className='error-message'>
          <Text>{error}</Text>
        </View>
      )}

      {menu && !loading && (
        <View className='menu-container'>
          {/* 已选菜品列表 */}
          {selectedDishes.length > 0 && (
            <View className='selected-dishes'>
              <Text className='section-title'>已选菜品:</Text>
              {selectedDishes.map(dish => (
                <View key={dish.id} className='selected-dish'>
                  <Text>{dish.categoryName} - {dish.name}</Text>
                </View>
              ))}
              <Button
                className='generate-recipe-btn'
                onClick={() => {/* TODO: 生成菜谱 */ }}
              >
                生成详细菜谱
              </Button>
            </View>
          )}

          {/* 菜单选择区域 */}
          <View className='menu'>
            {menu.categories?.map(category => (
              <View key={category.name} className='category'>
                <Text className='category-title'>{category.name}</Text>
                {category.dishes?.map(dish => (
                  <View key={dish.id} className='dish-item'>
                    <View className='dish-header'>
                      <Checkbox
                        className='dish-checkbox'
                        checked={selectedDishes.some(item => item.id === dish.id)}
                        onChange={e => handleDishSelect(dish, category.name, e.detail.value)}
                      />
                      <Text className='dish-name'>{dish.name}</Text>
                      <Text className='dish-price'>¥{dish.price}</Text>
                    </View>
                    <Text className='dish-desc'>{dish.description}</Text>
                    <Text className='spicy-level'>辣度: {'🌶'.repeat(dish.spicyLevel)}</Text>
                  </View>
                ))}
              </View>
            ))}
          </View>
        </View>
      )}
    </View>
  )
}
5.3接着完善,本地保存每次结果
1.本次生成的json结果,保存到最后一个页面上,我的记录。以年月日时分为名称。同时为了节约资源,每10分钟(参数,后期可通过看激励广告取消)限制生成一次。prompts中关于菜品ID以年月日时分秒为依据按照规则生成。
2.显示下一级菜单,用于被 用户选择。结果同样存储在本地,用户选择,在第一页上,下方增加一个按钮,我选好了。点击后,将选择结果展示在第二个页面上。同样将结果也存储在本地。
3.在第二页的下方,有一个按钮:生成做法和材料清单。将生成结果同样保存在本地。同时以合理的方式展示在第一个页面上。
4.所有存储的结果,以合理的方式存储在第四页上。方便用户随时查看,
不知我还有什么没想到吗?先让程序跑起来,然后再美化优化。当然一次性到位更好。
1.创建一个存储服务 测试状态下一分钏吧。
import Taro from '@tarojs/taro'

export interface StorageMenu {
  id: string;
  createTime: string;
  location: string;
  menu: any;
}

export interface StorageRecipe {
  id: string;
  menuId: string;
  createTime: string;
  dishes: any[];
  recipe: any;
}

export const StorageService = {
  // 生成唯一ID
  generateId(prefix: string = ''): string {
    const now = new Date()
    return `${prefix}${now.getFullYear()}${String(now.getMonth() + 1).padStart(2, '0')}${String(now.getDate()).padStart(2, '0')}${String(now.getHours()).padStart(2, '0')}${String(now.getMinutes()).padStart(2, '0')}${String(now.getSeconds()).padStart(2, '0')}`
  },

  // 检查是否可以生成新菜单
  async canGenerateMenu(): Promise<boolean> {
    try {
      const lastGenTime = await Taro.getStorage({ key: 'lastGenTime' })
      const now = Date.now()
      return (now - lastGenTime.data) > 10 * 60 * 1000 // 10分钟限制
    } catch {
      return true
    }
  },

  // 保存菜单
  async saveMenu(location: string, menu: any): Promise<string> {
    const id = this.generateId('menu_')
    const menuData: StorageMenu = {
      id,
      createTime: new Date().toISOString(),
      location,
      menu
    }

    try {
      const menus = await this.getMenus()
      menus.unshift(menuData)
      await Taro.setStorage({ key: 'menus', data: menus })
      await Taro.setStorage({ key: 'lastGenTime', data: Date.now() })
      return id
    } catch (error) {
      console.error('保存菜单失败:', error)
      throw error
    }
  },

  // 保存用户选择的菜品
  async saveSelectedDishes(menuId: string, dishes: any[]): Promise<void> {
    try {
      const selections = await this.getSelections()
      selections.unshift({
        id: this.generateId('sel_'),
        menuId,
        createTime: new Date().toISOString(),
        dishes
      })
      await Taro.setStorage({ key: 'selections', data: selections })
    } catch (error) {
      console.error('保存选择失败:', error)
      throw error
    }
  },

  // 保存菜谱
  async saveRecipe(menuId: string, dishes: any[], recipe: any): Promise<void> {
    try {
      const recipes = await this.getRecipes()
      recipes.unshift({
        id: this.generateId('recipe_'),
        menuId,
        createTime: new Date().toISOString(),
        dishes,
        recipe
      })
      await Taro.setStorage({ key: 'recipes', data: recipes })
    } catch (error) {
      console.error('保存菜谱失败:', error)
      throw error
    }
  },

  // 获取所有菜单
  async getMenus(): Promise<StorageMenu[]> {
    try {
      const res = await Taro.getStorage({ key: 'menus' })
      return res.data || []
    } catch {
      return []
    }
  },

  // 获取所有选择
  async getSelections(): Promise<any[]> {
    try {
      const res = await Taro.getStorage({ key: 'selections' })
      return res.data || []
    } catch {
      return []
    }
  },

  // 获取所有菜谱
  async getRecipes(): Promise<StorageRecipe[]> {
    try {
      const res = await Taro.getStorage({ key: 'recipes' })
      return res.data || []
    } catch {
      return []
    }
  }
}
2.修改首页
什么狗屁玩意。原来是deepseek原因,又不返回数据了。超时。我以为是什么鬼,等早上开发吧。