Vditor编辑器图片上传功能
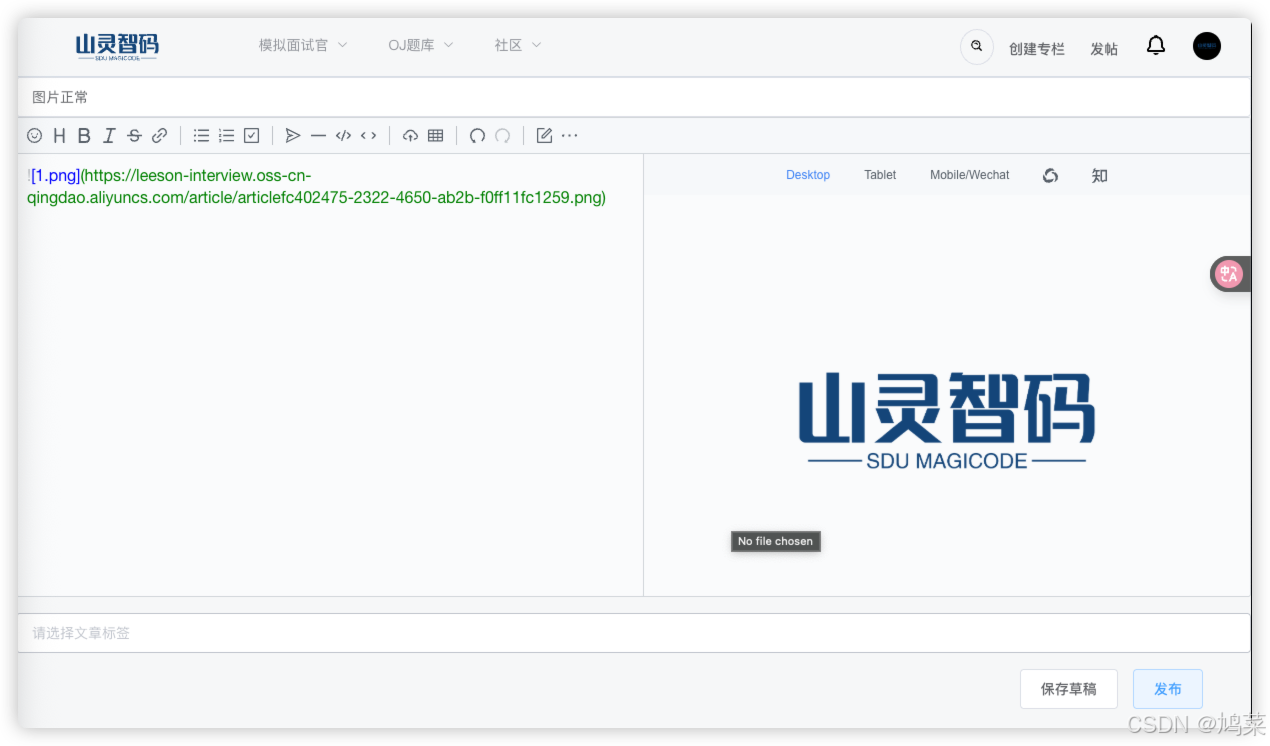
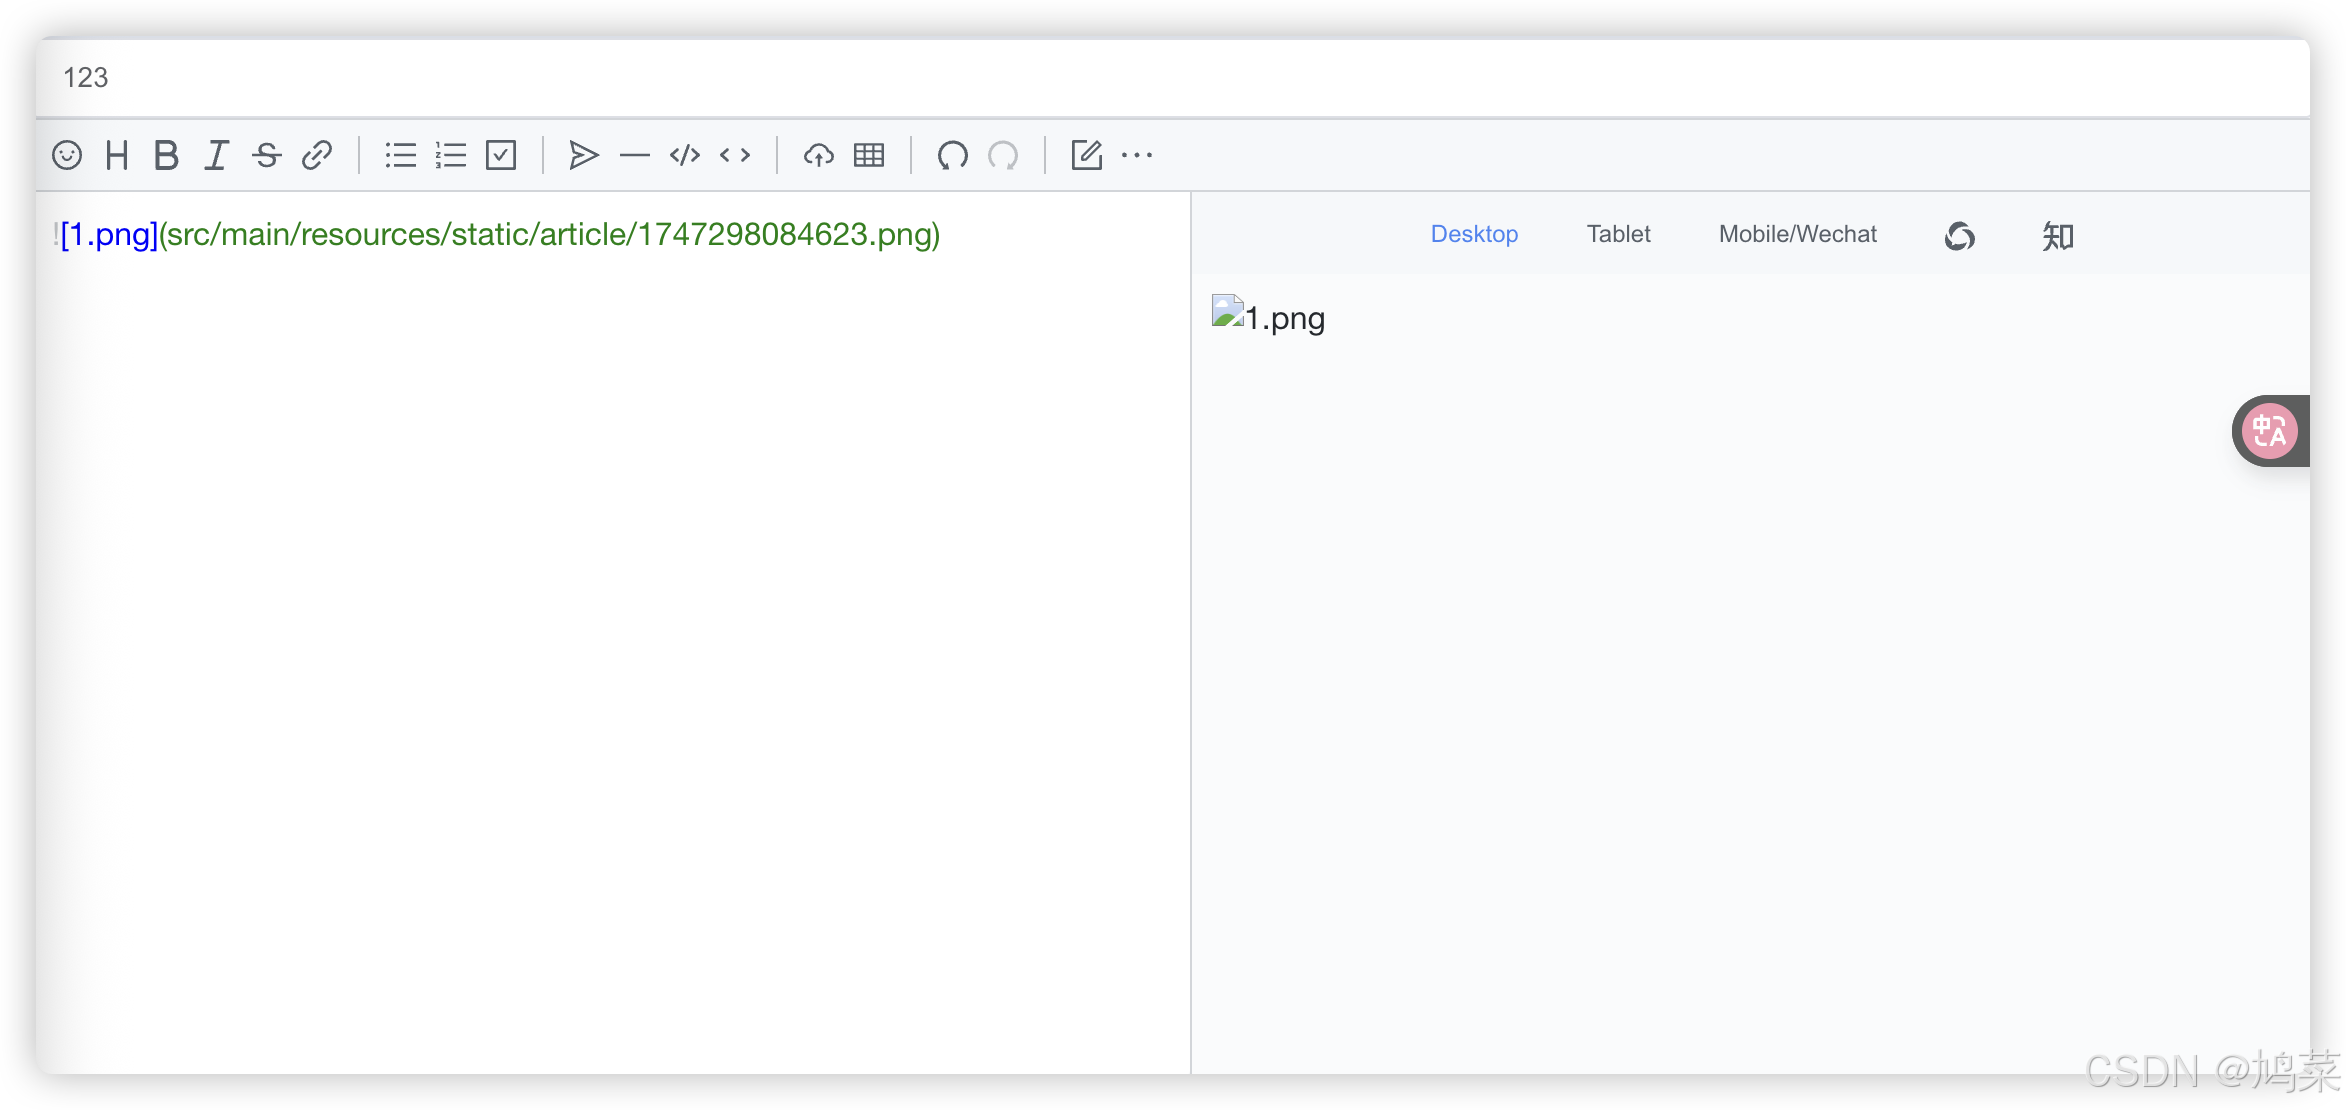
使用Vditor进行图片上传时,会返回图片在后端的相对路径,这在前端是无法进行显示的(如下图)
于是为了将图片正常·显示,我采取了和头像上传一样的解决方案,使用阿里云图床进行存储。
实现步骤
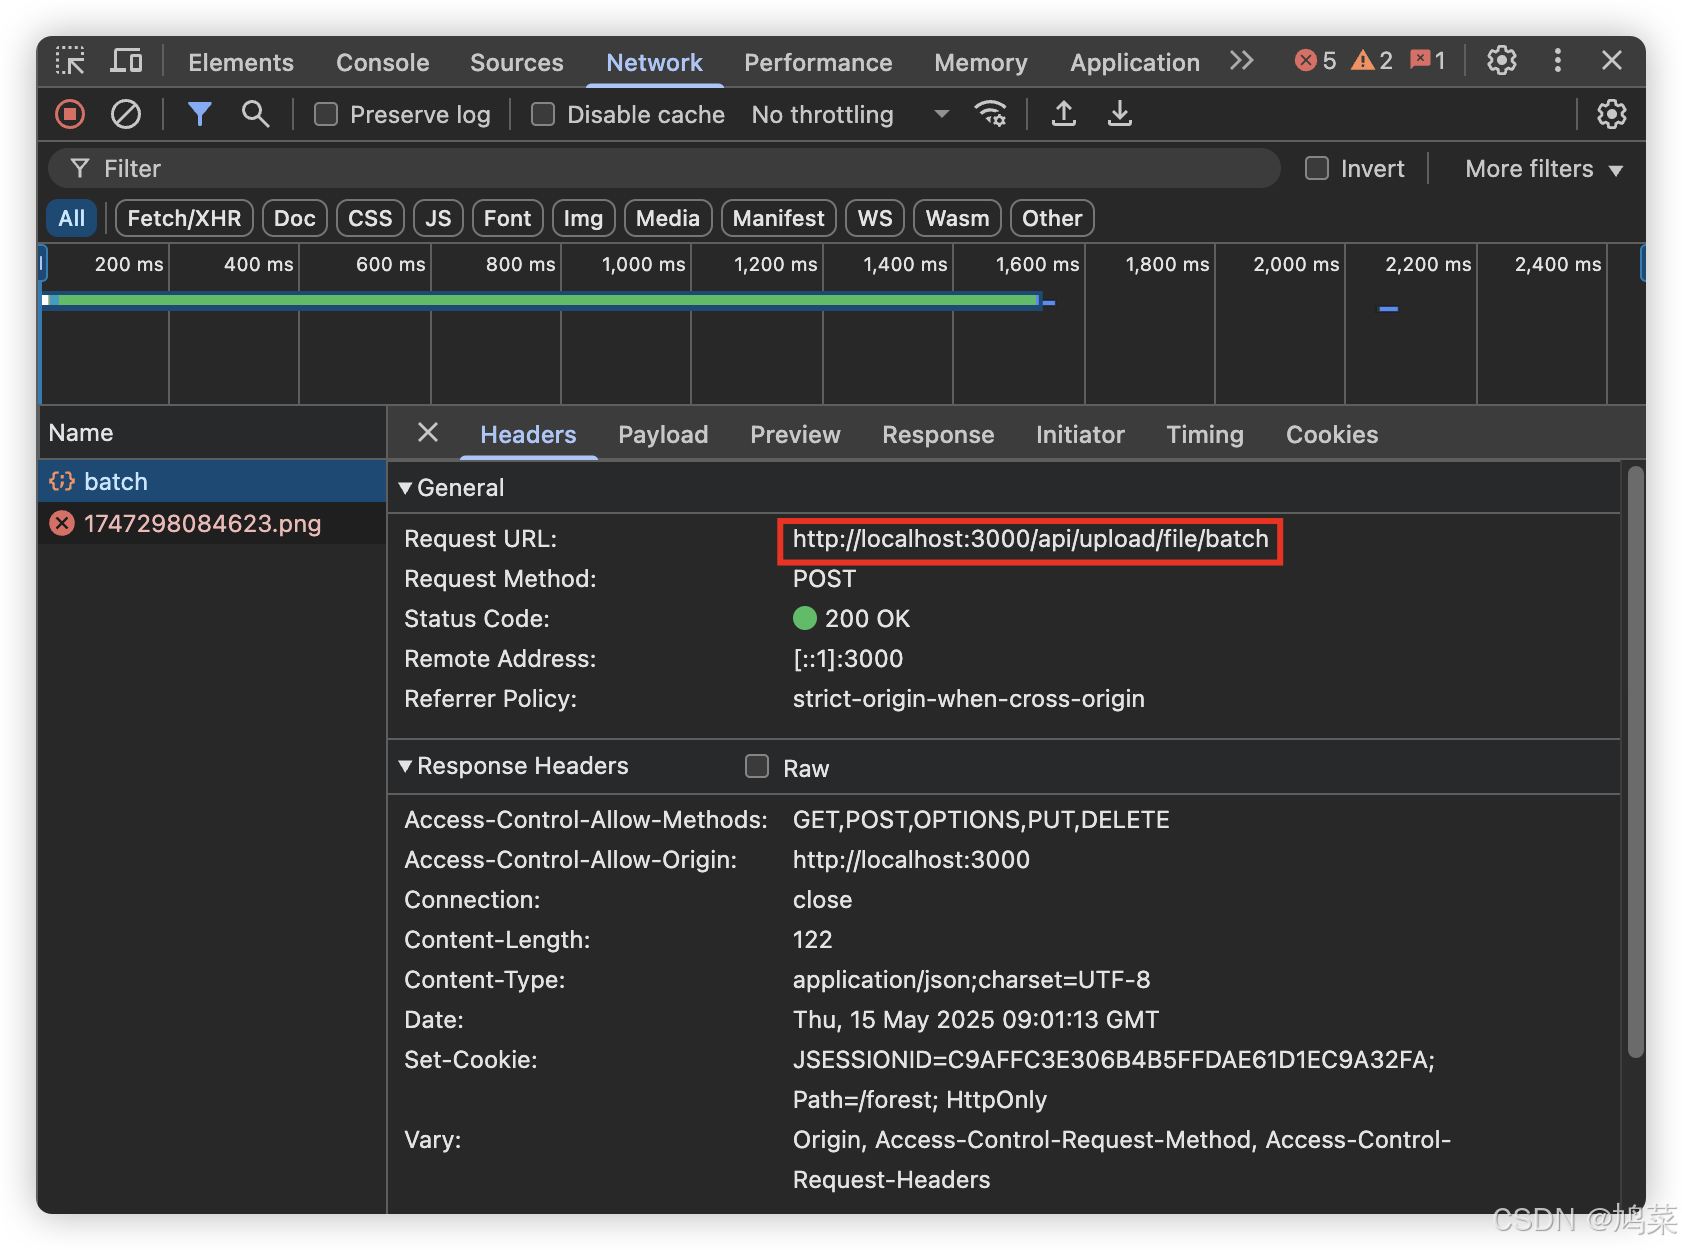
首先定位Vditor编辑器向后端发送的请求,根据浏览器的开发者工具,我们找到了具体的API(如下图)
下面是UploadController.java文件中的与该次请求相关的方法。
    @PostMapping("/file/batch")
    @Transactional(rollbackFor = Exception.class)
    public GlobalResult<JSONObject> batchFileUpload(@RequestParam(value = "file[]", required = false) MultipartFile[] multipartFiles, @RequestParam(defaultValue = "1") Integer type, HttpServletRequest request) {
        TokenUser tokenUser = getTokenUser(request);
        File file = genFile(type);
        String typePath = FilePath.getPath(type);
        String localPath = Utils.getProperty("resource.file-path") + "/" + typePath + "/";
        Map<String, String> successMap = new HashMap<>(16);
        Set<String> errFiles = new HashSet<>();

        for (MultipartFile multipartFile : multipartFiles) {
            String orgName = multipartFile.getOriginalFilename();

            if (multipartFile.getSize() == 0) {
                errFiles.add(orgName);
                continue;
            }
            String fileType = FileUtils.getExtend(orgName);
            try {
                String md5 = DigestUtils.md5DigestAsHex(multipartFile.getBytes());
                String fileUrl = forestFileService.getFileUrlByMd5(md5, tokenUser.getIdUser(), fileType);
                if (StringUtils.isNotEmpty(fileUrl)) {
                    successMap.put(orgName, fileUrl);
                    continue;
                }
                String fileName = System.currentTimeMillis() + fileType;
                String savePath = file.getPath() + File.separator + fileName;
                File saveFile = new File(savePath);
                fileUrl = localPath + fileName;
                FileCopyUtils.copy(multipartFile.getBytes(), saveFile);
                forestFileService.insertForestFile(fileUrl, savePath, md5, tokenUser.getIdUser(), multipartFile.getSize(), fileType);
                successMap.put(orgName, localPath + fileName);
            } catch (IOException e) {
                errFiles.add(orgName);
            }

        }
        JSONObject data = new JSONObject(2);
        data.put("errFiles", errFiles);
        data.put("succMap", successMap);
        return GlobalResultGenerator.genSuccessResult(data);
    }
这段代码实现了一个批量文件上传的功能:
- 主要逻辑部分:
- 检查文件大小,跳过空文件
- 计算文件MD5值用于去重
- 检查数据库中是否已存在相同MD5的文件,如果存在则直接返回已有URL
- 生成唯一文件名(时间戳+文件扩展名)
- 构建文件保存路径
- 将文件内容复制到目标位置
- 在数据库中记录文件信息
- 将文件URL添加到成功列表
- 使用MD5进行文件去重,避免重复存储相同内容的文件
- 使用事务确保数据一致性
- 分别记录成功和失败的文件,提供完整的上传结果
要修改的就是file_url相关的部分,根据数据库表结构可以知道有两个列与路径有关,分别是file_path和file_url,原本这两个列存储的是相同的值,现在进行修改将file_url改为存储真正的阿里云图床的URL。
首先在OSSUpload.java里添加一个新的上传方法:
    /**
     * 上传MultipartFile文件到OSS
     *
     * @param file MultipartFile文件
     * @param folder 文件夹路径
     * @return 访问URL
     * @throws IOException IO异常
     */
    public String uploadFileToOSS(MultipartFile file, String folder) throws IOException {
        try {
            // 1. 获取文件名和扩展名
            String originalFilename = file.getOriginalFilename();
            String fileType = originalFilename.substring(originalFilename.lastIndexOf("."));

            // 2. 生成唯一文件名
            String fileName = folder + UUID.randomUUID() + fileType;

            // 3. 上传文件到OSS
            ossClient.putObject(
                    ossConfig.getBucketName(),
                    fileName,
                    new ByteArrayInputStream(file.getBytes())
            );

            // 4. 返回访问URL
            return "https://" + ossConfig.getBucketName() + "." + ossConfig.getEndpoint() + "/" + fileName;
        } catch (Exception e) {
            throw new RuntimeException("上传文件到OSS失败: " + e.getMessage(), e);
        }
    }
然后修改batchFileUpload方法的逻辑:
    @PostMapping("/file/batch")
    @Transactional(rollbackFor = Exception.class)
    public GlobalResult<JSONObject> batchFileUpload(@RequestParam(value = "file[]", required = false) MultipartFile[] multipartFiles, @RequestParam(defaultValue = "1") Integer type, HttpServletRequest request) {
        TokenUser tokenUser = getTokenUser(request);
        File file = genFile(type);
        String typePath = FilePath.getPath(type);
        String localPath = Utils.getProperty("resource.file-path") + "/" + typePath + "/";
        Map<String, String> successMap = new HashMap<>(16);
        Set<String> errFiles = new HashSet<>();

        for (MultipartFile multipartFile : multipartFiles) {
            String orgName = multipartFile.getOriginalFilename();

            if (multipartFile.getSize() == 0) {
                errFiles.add(orgName);
                continue;
            }
            String fileType = FileUtils.getExtend(orgName);
            try {
                String md5 = DigestUtils.md5DigestAsHex(multipartFile.getBytes());
                String fileUrl = forestFileService.getFileUrlByMd5(md5, tokenUser.getIdUser(), fileType);
                if (StringUtils.isNotEmpty(fileUrl)) {
                    successMap.put(orgName, fileUrl);
                    continue;
                }
                String fileName = System.currentTimeMillis() + fileType;
                String savePath = file.getPath() + File.separator + fileName;
                File saveFile = new File(savePath);
//                fileUrl = localPath + fileName;
                // 使用OSS上传文件
                fileUrl = ossUpload.uploadFileToOSS(multipartFile, typePath + "/article");
                successMap.put(orgName, fileUrl);
                FileCopyUtils.copy(multipartFile.getBytes(), saveFile);
                forestFileService.insertForestFile(fileUrl, savePath, md5, tokenUser.getIdUser(), multipartFile.getSize(), fileType);
//                successMap.put(orgName, localPath + fileName);
            } catch (IOException e) {
                errFiles.add(orgName);
            }

        }
        JSONObject data = new JSONObject(2);
        data.put("errFiles", errFiles);
        data.put("succMap", successMap);
        return GlobalResultGenerator.genSuccessResult(data);
    }
最后,图片能够正常上传和显示: