
更多有趣的代码示例,可参考【Programming】
1、功能描述
给出一张含有缺陷的样品,识别里面正常的样品和缺陷的样品
2、代码实现
读取图片并可视化

if __name__ == "__main__":
global src
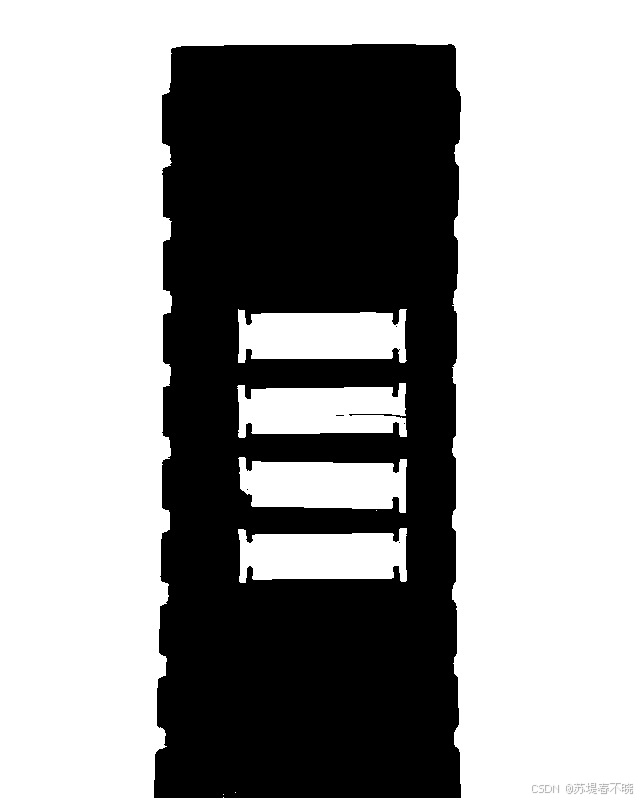
src = cv2.imread("1.jpg") # (800, 640, 3)
src_copy = src.copy()
cv2.imshow("input", src)
图像转为灰度图并二值化
    # 图像二值化
    gray = cv2.cvtColor(src, cv2.COLOR_BGR2GRAY)
    ret, binary = cv2.threshold(gray, 0, 255, cv2.THRESH_BINARY_INV | cv2.THRESH_OTSU)
形态学开运算
    # 形态学开运算
    se = cv2.getStructuringElement(cv2.MORPH_RECT, (3, 3), (-1, -1))
    binary = cv2.morphologyEx(binary, cv2.MORPH_OPEN, se)
    cv2.imshow("binary", binary)

提取轮廓,注意不同版本的 opencv cv2.findContours 返回值数量不一样
    # 轮廓提取
    # out, contours, hierarchy = cv2.findContours(binary, cv2.RETR_LIST, cv2.CHAIN_APPROX_SIMPLE)
    contours, hierarchy = cv2.findContours(binary, cv2.RETR_LIST, cv2.CHAIN_APPROX_SIMPLE)
    height, width = src.shape[:2]
    rects = []
筛选轮廓,轮廓的最小外接矩阵的高大于原图高的二分之一舍弃掉,轮廓面积小于 150 像素的舍弃掉
    # 轮廓筛选
    for c in range(len(contours)):
        # 轮廓外接矩形
        x, y, w, h = cv2.boundingRect(contours[c])
        # 轮廓面积
        area = cv2.contourArea(contours[c])
        if h > (height//2):
            continue
        if area < 150:
            continue
        rects.append([x, y, w, h])
排序下轮廓,按照纵坐标从小到大排序,并打印出来,轮廓数值表示形式为左上角横纵坐标和宽高
    # 排序轮廓(按照rect中y值排序也就是纵坐标从小到大)
    rects = sorted(rects, key = lambda x:x[1])

    for i in range(len(rects)):
        print(rects[i])
output
[238, 309, 168, 54]
[238, 383, 169, 55]
[239, 457, 168, 56]
[238, 528, 169, 55]
调用 get_template,获取正常样品的模板
    # 获取模板ROI
    template = get_template(binary, rects)
    cv2.imshow("template", template)
get_template 的实现如下
def get_template(binary, boxes):
    x, y, w, h = boxes[0]
    roi = binary[y:y+h, x:x+w]
    return roi
可以看出,就是把第一个轮廓作为正常样品,也即模板
把边缘都绘制出来看看
    # 填充边缘
    for c in range(len(contours)):
        x, y, w, h = cv2.boundingRect(contours[c])
        area = cv2.contourArea(contours[c])
        if h > (height//2):
            continue
        if area < 150:
            continue
        cv2.drawContours(src_copy, contours, c, (0, 0, 255), 2, 8)
        # cv2.drawContours(binary, contours, c, (0), 2, 8)
    cv2.imshow("src_copy", src_copy)
调用 detect_defect 函数,进行缺陷检测,传入二值化的原图,轮廓坐标,模板图片
    # 检测缺陷
    defect_boxes = detect_defect(binary, rects, template)
下面具体看看 detect_defect 函数,先遍历每个样品,resize 到和模板一样的大小,cv2.subtract 计算得到样品与模板的差异 mask
形态学、二值化处理下 mask,找到缺陷区域的轮廓,标记成黄色,将缺陷区域叠加到原图(仅在缺陷位置更新)
统计缺陷像素数量 count,如果缺陷像素(二值图里面的白色)高于阈值,则判定该样品是缺陷样品
def detect_defect(binary, boxes, tpl):
    global src
    height, width = tpl.shape
    index = 1
    defect_rois = []

    for x, y, w, h in boxes:
        # 1. 提取当前ROI并调整大小与模板一致
        roi = binary[y:y + h, x:x + w]
        roi = cv2.resize(roi, (width, height))

        # 2. 计算模板与ROI的差异(掩模)
        mask = cv2.subtract(tpl, roi)

        # 3. 形态学开运算去除噪声
        se = cv2.getStructuringElement(cv2.MORPH_RECT, (5, 5), (-1, -1))
        mask = cv2.morphologyEx(mask, cv2.MORPH_OPEN, se)

        # 4. 二值化处理
        ret, mask = cv2.threshold(mask, 0, 255, cv2.THRESH_BINARY)

        # 5. 查找缺陷区域(轮廓)
        contours, hierarchy = cv2.findContours(mask, cv2.RETR_EXTERNAL, cv2.CHAIN_APPROX_SIMPLE)

        # 6. 可视化缺陷区域(黄色标记)
        color_mask = cv2.cvtColor(mask, cv2.COLOR_GRAY2BGR)
        cv2.drawContours(color_mask, contours, -1, (0, 255, 255), -1, 8)

        # 7. 将缺陷区域叠加到原图(仅在缺陷位置更新)
        mask_roi = src[y:y + height, x:x + width]
        cv2.bitwise_or(color_mask, mask_roi, mask_roi, mask=mask)

        # 8. 统计缺陷像素数量
        count = 0
        for row in range(height):
            for col in range(width):
                pv = mask[row, col]
                if pv == 255:
                    count += 1

        # 9. 判断是否存在缺陷
        if count > 20:
            defect_rois.append([x, y, w, h])  # 记录缺陷区域
        else:
            cv2.rectangle(src, (x, y), (x+w, y+h), (0, 255, 0), 2, 8, 0)  # 标记OK
            cv2.putText(src, "OK", (x, y - 2), cv2.FONT_HERSHEY_SIMPLEX, 0.7, (0, 255, 0), 2)

        cv2.imwrite("mask%d.png"%index, mask)  # 保存中间结果
        index += 1

    return defect_rois
看看保存的 mask 细节
样品 1 就是模板,全黑

样品 2

样品 3

样品 4

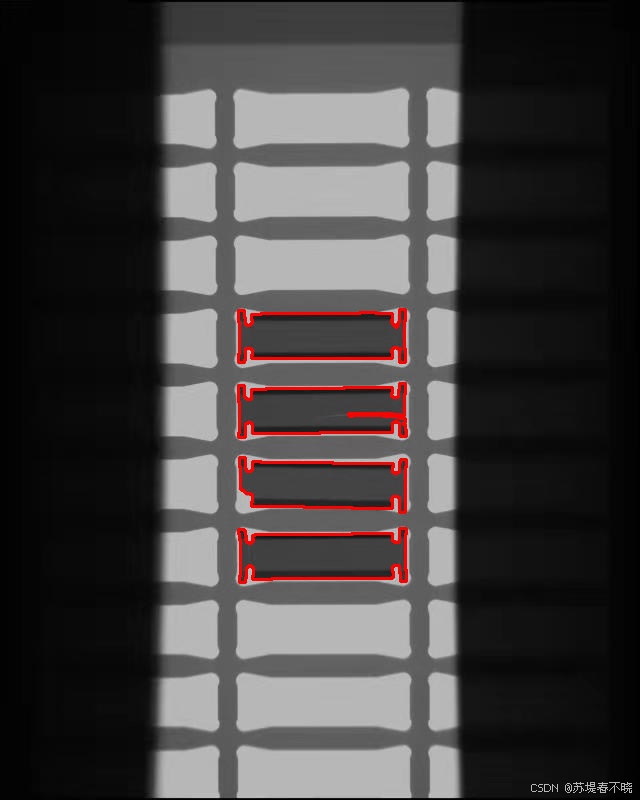
绘制缺陷样品,标记黄色字体 NG,框用红色
    for dx, dy, dw, dh in defect_boxes:
        cv2.rectangle(src, (dx, dy), (dx + dw, dy + dh), (0, 0, 255), 2, 8, 0)
        cv2.putText(src, "NG", (dx, dy-2), cv2.FONT_HERSHEY_SIMPLEX, 0.7, (0, 255, 255), 2)

可以看到和样品有差异的区域都被绘制成为了黄色
再绘制一些序号信息 No.1、No.2、No.3、No.4
    index = 1
    for dx, dy, dw, dh in rects:
        cv2.putText(src, "No.%d"%index, (dx-60, dy+30), cv2.FONT_HERSHEY_SIMPLEX, .7, (255, 0, 255), 2)
        index += 1

    cv2.imshow("result", src)
    cv2.imwrite("binary2.png", src)

    cv2.waitKey(0)
    cv2.destroyAllWindows()
3、效果展示
输入图片

输出结果

4、完整代码
import cv2
import numpy as np

# 获取模板ROI
def get_template(binary, boxes):
    x, y, w, h = boxes[0]
    roi = binary[y:y+h, x:x+w]
    return roi


def detect_defect(binary, boxes, tpl):
    global src
    height, width = tpl.shape
    index = 1
    defect_rois = []

    # 发现缺失
    for x, y, w, h in boxes:
        roi = binary[y:y + h, x:x + w]
        roi = cv2.resize(roi, (width, height))
        mask = cv2.subtract(tpl, roi)
        se = cv2.getStructuringElement(cv2.MORPH_RECT, (3, 3), (-1, -1))
        mask = cv2.morphologyEx(mask, cv2.MORPH_OPEN, se)
        ret, mask = cv2.threshold(mask, 0, 255, cv2.THRESH_BINARY)
        # mask, contours, hierarchy = cv2.findContours(mask, cv2.RETR_EXTERNAL, cv2.CHAIN_APPROX_SIMPLE)
        contours, hierarchy = cv2.findContours(mask, cv2.RETR_EXTERNAL, cv2.CHAIN_APPROX_SIMPLE)
        color_mask = cv2.cvtColor(mask, cv2.COLOR_GRAY2BGR)
        cv2.drawContours(color_mask, contours, -1, (0, 255, 255), -1, 8)
        mask_roi = src[y:y + height, x:x + width]
        cv2.bitwise_or(color_mask, mask_roi, mask_roi, mask = mask)
        count = 0
        for row in range(height):
            for col in range(width):
                pv = mask[row, col]
                if pv == 255:
                    count += 1
        if count > 20:
            defect_rois.append([x, y, w, h])
        else:
            cv2.rectangle(src, (x, y), (x+w, y+h), (0, 255, 0), 2, 8, 0)
            cv2.putText(src, "OK", (x, y - 2), cv2.FONT_HERSHEY_SIMPLEX, 0.7, (0, 255, 0), 2)
        cv2.imwrite("mask%d.png"%index, mask)
        index += 1

    return defect_rois


if __name__ == "__main__":
    global src
    src = cv2.imread("1.jpg")  # (800, 640, 3)
    src_copy = src.copy()
    cv2.imshow("input", src)

    # 图像二值化
    gray = cv2.cvtColor(src, cv2.COLOR_BGR2GRAY)
    ret, binary = cv2.threshold(gray, 0, 255, cv2.THRESH_BINARY_INV | cv2.THRESH_OTSU)

    # 形态学开运算
    se = cv2.getStructuringElement(cv2.MORPH_RECT, (3, 3), (-1, -1))
    binary = cv2.morphologyEx(binary, cv2.MORPH_OPEN, se)
    cv2.imshow("binary", binary)

    # 轮廓提取
    # out, contours, hierarchy = cv2.findContours(binary, cv2.RETR_LIST, cv2.CHAIN_APPROX_SIMPLE)
    contours, hierarchy = cv2.findContours(binary, cv2.RETR_LIST, cv2.CHAIN_APPROX_SIMPLE)
    height, width = src.shape[:2]
    rects = []
    # 轮廓筛选
    for c in range(len(contours)):
        # 轮廓外接矩形
        x, y, w, h = cv2.boundingRect(contours[c])
        # 轮廓面积
        area = cv2.contourArea(contours[c])
        if h > (height//2):
            continue
        if area < 150:
            continue
        rects.append([x, y, w, h])

    # 排序轮廓(按照rect中y值排序也就是纵坐标从小到大)
    rects = sorted(rects, key = lambda x:x[1])

    for i in range(len(rects)):
        print(rects[i])

    # 获取模板ROI
    template = get_template(binary, rects)
    cv2.imshow("template", template)

    # 填充边缘
    for c in range(len(contours)):
        x, y, w, h = cv2.boundingRect(contours[c])
        area = cv2.contourArea(contours[c])
        if h > (height//2):
            continue
        if area < 150:
            continue
        cv2.drawContours(src_copy, contours, c, (0, 0, 255), 2, 8)
        # cv2.drawContours(binary, contours, c, (0), 2, 8)
    cv2.imshow("src_copy", src_copy)

    # 检测缺陷
    defect_boxes = detect_defect(binary, rects, template)
    for dx, dy, dw, dh in defect_boxes:
        cv2.rectangle(src, (dx, dy), (dx + dw, dy + dh), (0, 0, 255), 2, 8, 0)
        cv2.putText(src, "NG", (dx, dy-2), cv2.FONT_HERSHEY_SIMPLEX, 0.7, (0, 255, 255), 2)

    index = 1
    for dx, dy, dw, dh in rects:
        cv2.putText(src, "No.%d"%index, (dx-60, dy+30), cv2.FONT_HERSHEY_SIMPLEX, .7, (255, 0, 255), 2)
        index += 1

    cv2.imshow("result", src)
    cv2.imwrite("binary2.png", src)

    cv2.waitKey(0)
    cv2.destroyAllWindows()
改进建议
- 使用更鲁棒的差异度量:
替换 cv2.subtract 为 SSIM(结构相似性) 或 MSE(均方误差)。 - 引入多尺度匹配:
处理不同大小的缺陷,避免 cv2.resize 带来的形变。 - 结合边缘检测:
在差异计算前,用 cv2.Canny 提取边缘,减少光照影响。 - 深度学习替代:
对复杂场景,可用 Autoencoder 或 U-Net 进行无监督缺陷检测。
5、涉及到的库函数
cv2.bitwise_or()
opencv 官方文档,v4.10.0
https://docs.opencv.org/4.10.0/d2/de8/group__core__array.html#gab85523db362a4e26ff0c703793a719b4

cv2.bitwise_or() 函数对两个输入图像的每个对应像素执行按位或运算。
按位或运算的规则是:如果两个二进制位中至少有一个为1,则结果位为1;否则,结果位为0。
该函数常用于图像融合、掩模操作等场景。
mask,只有在掩模中非零的像素位置才会执行按位或运算。
6、参考
更多有趣的代码示例,可参考【Programming】