目录
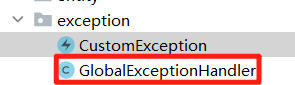
(3)定义统一异常处理 GlobalExceptionHandler
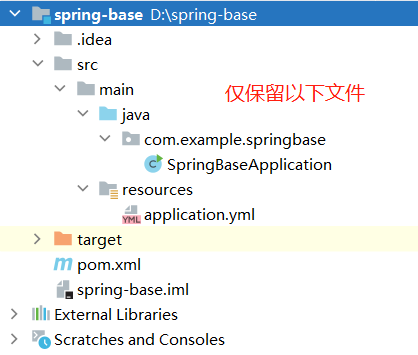
一、环境搭建
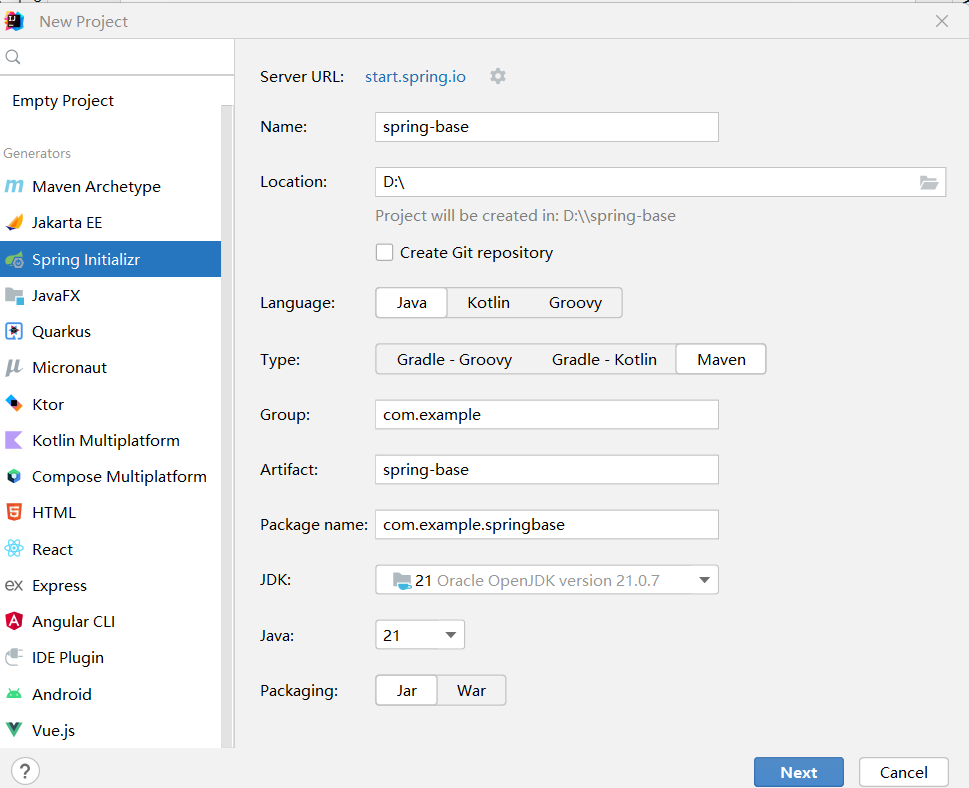
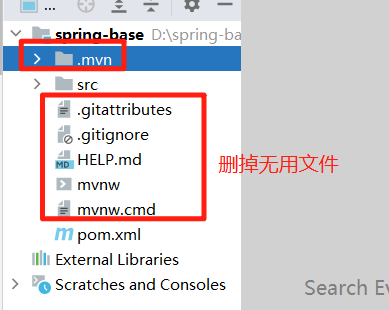
1、新建springboot项目

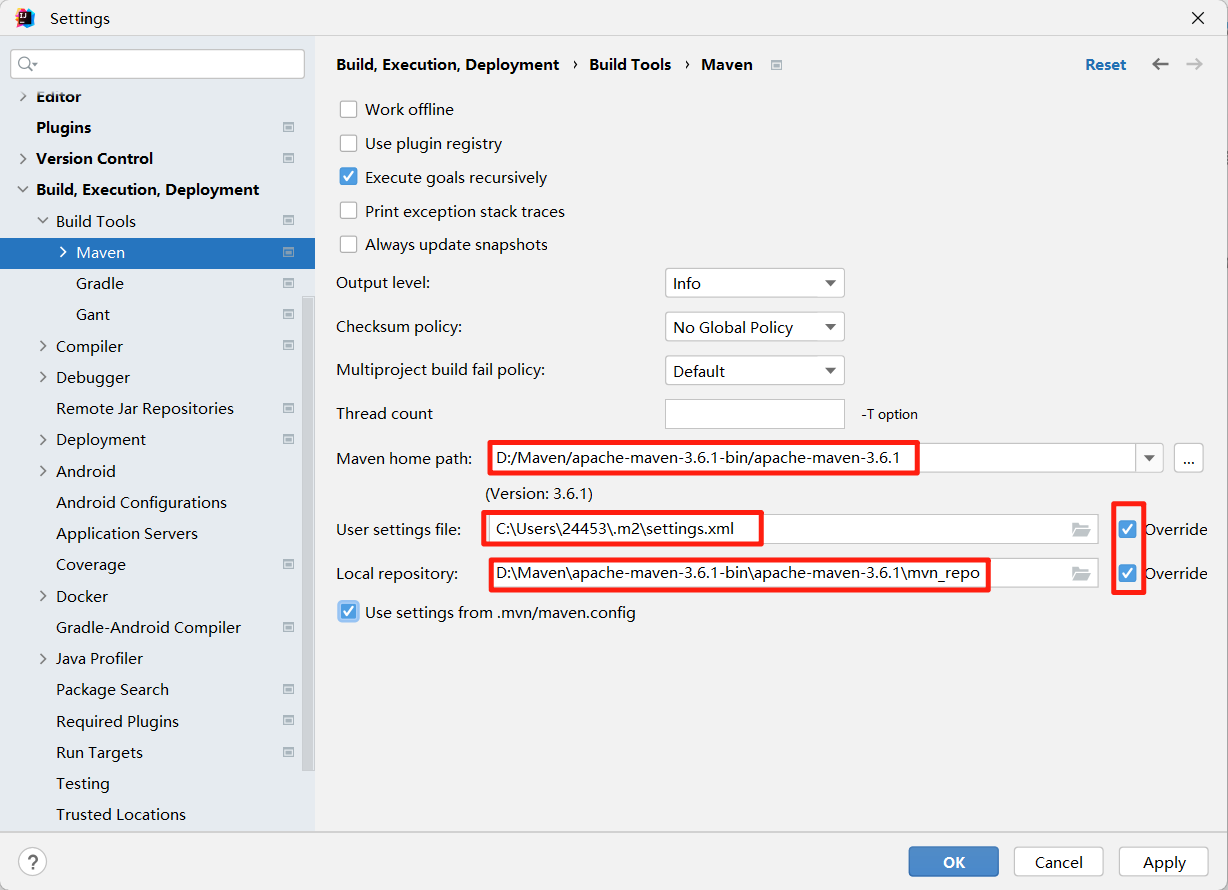
2、Maven配置
左上角打开Settings,配置Maven
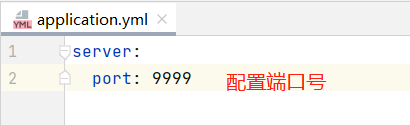
3、配置端口号
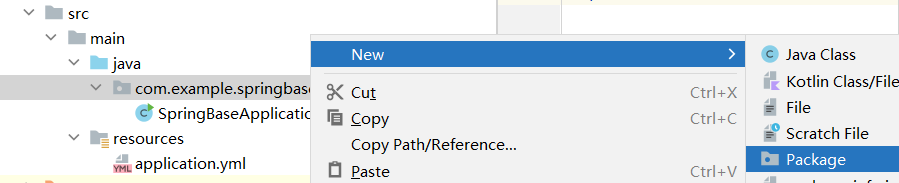
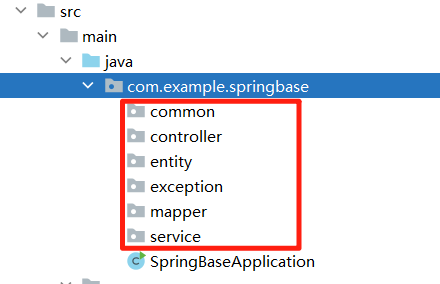
4、创建包
Spring Boot 项目各包的作用与含义
(1)controller包
- 处理 HTTP 请求
- 接收前端参数,调用 service 层并返回响应(2)service包
- 实现 核心业务逻辑
- 调用 mapper 层操作数据库(3)mapper包
- 数据库交互层,直接执行 SQL 操作。
- 使用 MyBatis 访问数据库。(4)entity包
- 定义 数据库表对应的 Java 实体类(5)common包
- 存放 通用工具类、常量、配置
- 可能包含 全局返回封装(如 Result 统一响应格式)(6)exception包
- 定义 自定义异常
- 提供 全局异常处理,统一返回错误信息。
层级调用关系:
- controller → service → mapper → entity
- common 和 exception 为辅助模块,支撑整个项目
包间关系简述:
- controller 负责接收前端的请求并返回响应,它就像个前台接待,把活儿交给后面的 service 去处理
- service 是真正的业务核心,各种复杂的逻辑都在这里实现,同时它还会调用 mapper 去跟数据库打交道
- mapper 就是个数据库操作工,负责增删改查,而 entity 包则定义了数据库表对应的 Java 实体,相当于数据模型的模板
- common 是个工具箱,放一些通用的配置、工具类和常量,哪里需要哪里搬
- exception 专门管异常,不管是系统错误还是业务异常,都能统一处理,避免乱七八糟的错误直接抛给前端
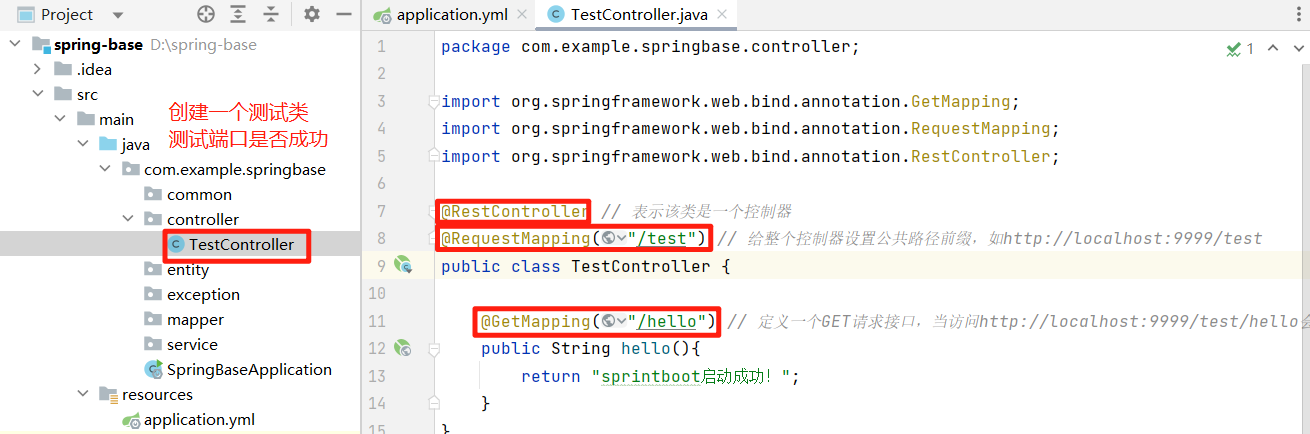
5、测试端口是否配置成功
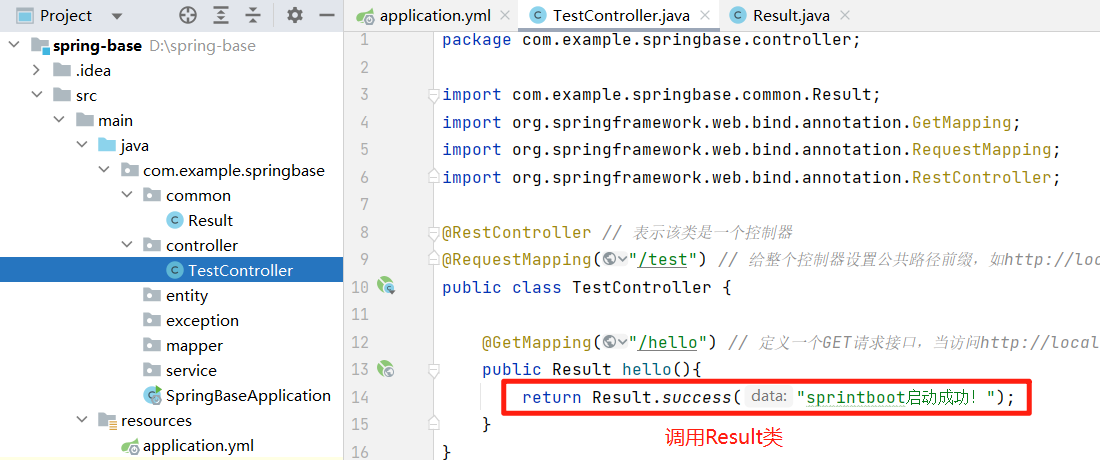
package com.example.springbase.controller;

import org.springframework.web.bind.annotation.GetMapping;
import org.springframework.web.bind.annotation.RequestMapping;
import org.springframework.web.bind.annotation.RestController;

@RestController // 表示该类是一个控制器
@RequestMapping("/test") // 给整个控制器设置公共路径前缀,如http://localhost:9999/test
public class TestController {

    @GetMapping("/hello") // 定义一个GET请求接口,当访问http://localhost:9999/test/hello会使用该方法
    public String hello(){
        return "sprintboot启动成功!";
    }
}
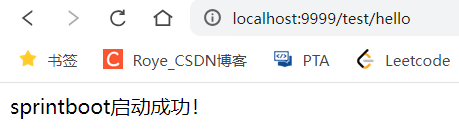
点击运行类运行,在网页输入网址localhost:配置的端口号/test/hello,若显示则说明端口配置成功
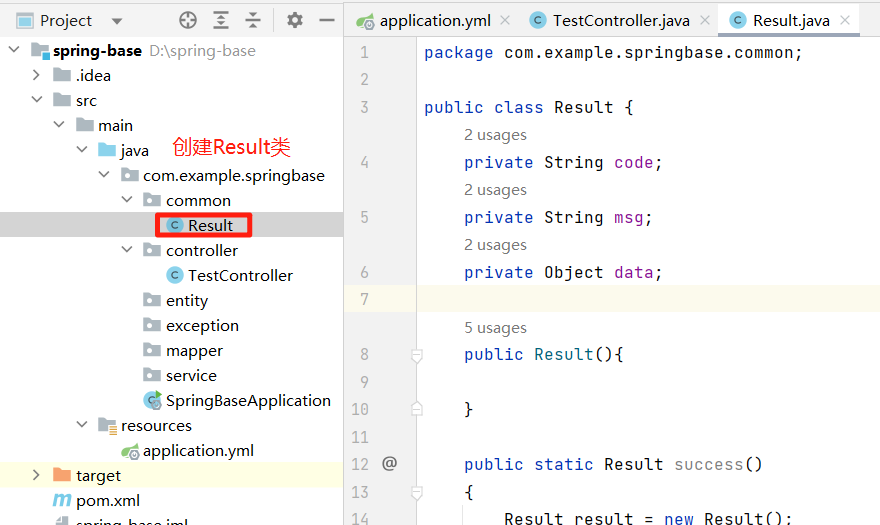
6、定义统一的返回类型 Result类
在common包下新建Result类,作用是:让所有接口的响应格式保持一致,方便前后端协作
通常我们会封装一个包含 状态码code 、返回数据data 和 提示信息msg 的通用对象,这样无论是成功还是失败,前端都能按照固定格式解析数据,而不用针对每个接口单独处理。
这个 Result 类就像是给接口响应设计的一个标准包装盒。相当于你网购时,商家发货时总要有个统一的包装箱,里面要有订单号(code)、发货单(msg)和商品本身(data),这个类就是做这个事的。
注:alt+insert 快速创建代码,可以快速创建类中get、set、tostring等方法
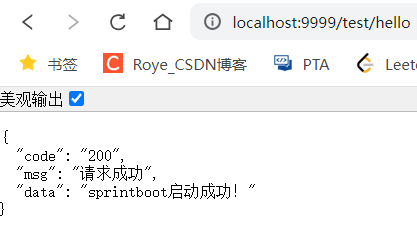
public class Result {
    private String code;
    private String msg;
    private Object data;

    public Result(){

    }

    public static Result success()
    {
        Result result = new Result();
        result.setCode("200");
        result.setMsg("请求成功");
        return result;
    }

    public static Result success(Object data)
    {
        Result result = new Result();
        result.setCode("200");
        result.setMsg("请求成功");
        result.setData(data);
        return result;
    }

    public static Result error()
    {
        Result result = new Result();
        result.setCode("500");
        result.setMsg("请求失败");
        return result;
    }

    public static Result error(String code,String msg)
    {
        Result result = new Result();
        result.setCode(code);
        result.setMsg(msg);
        return result;
    }

    public static Result error(String msg)
    {
        Result result = new Result();
        result.setCode("500");
        result.setMsg(msg);
        return result;
    }

    public String getCode() {
        return code;
    }

    public String getMsg() {
        return msg;
    }

    public Object getData() {
        return data;
    }

    public void setCode(String code) {
        this.code = code;
    }

    public void setMsg(String msg) {
        this.msg = msg;
    }

    public void setData(Object data) {
        this.data = data;
    }
}
测试一下,将TestController类中测试方法进行修改,改为返回Result类
再次刷新页面,成功显示说明咱们的Result类配置成功!

7、定义全局异常处理
首先在pom.xml文件引入依赖(这个依赖相对于给项目装了个工具箱,内置很多方便工具)
<dependency>
    <groupId>cn.hutool</groupId>
    <artifactId>hutool-all</artifactId>
    <version>5.8.25</version>
</dependency>
用来获取日志记录器(Logger)的,通俗来说就是给你的Java类装了个"录音笔",专门用来记录程序运行时的各种信息。
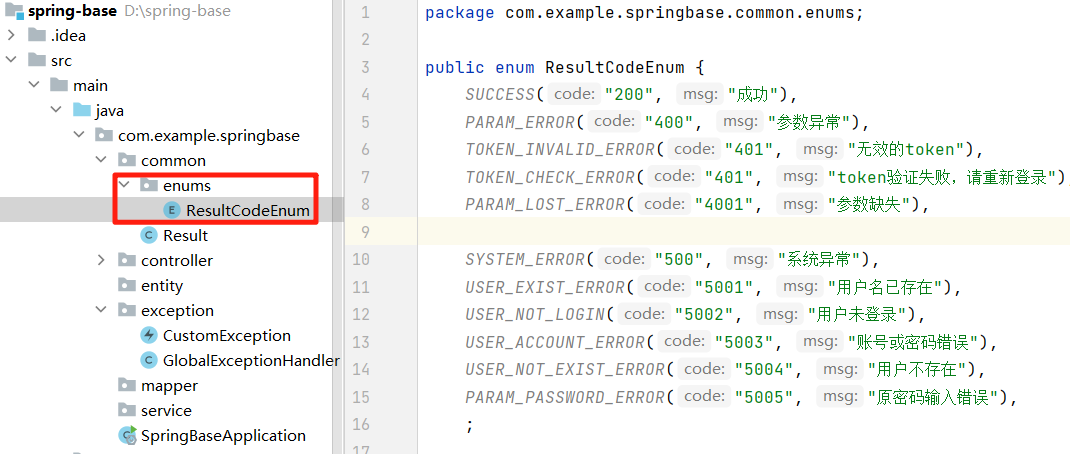
(1)创建自定义异常常量类 ResultCodeEnum
创建位置:common包下新建文件夹enums,用于存放常量类
作用:统一管理项目的状态码和提示信息,相当于给系统所有可能的操作结果(成功/失败/异常等)建立一个标准的"响应代码字典"
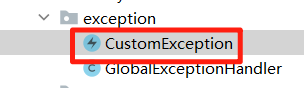
package com.example.springbase.common.enums;

public enum ResultCodeEnum {
    SUCCESS("200", "成功"),
    PARAM_ERROR("400", "参数异常"),
    TOKEN_INVALID_ERROR("401", "无效的token"),
    TOKEN_CHECK_ERROR("401", "token验证失败,请重新登录"),
    PARAM_LOST_ERROR("4001", "参数缺失"),

    SYSTEM_ERROR("500", "系统异常"),
    USER_EXIST_ERROR("5001", "用户名已存在"),
    USER_NOT_LOGIN("5002", "用户未登录"),
    USER_ACCOUNT_ERROR("5003", "账号或密码错误"),
    USER_NOT_EXIST_ERROR("5004", "用户不存在"),
    PARAM_PASSWORD_ERROR("5005", "原密码输入错误"),
    ;

    public String code;
    public String msg;

    ResultCodeEnum(String code, String msg) {
        this.code = code;
        this.msg = msg;
    }
}
(2)创建自定义异常类 CustomException
创建位置:exception包下
public class CustomException extends RuntimeException{
    private String code;
    private String msg;

    public CustomException(String code, String msg) {
        this.code = code;
        this.msg = msg;
    }

    public String getCode() {
        return code;
    }

    public void setCode(String code) {
        this.code = code;
    }

    public String getMsg() {
        return msg;
    }

    public void setMsg(String msg) {
        this.msg = msg;
    }

    public CustomException(ResultCodeEnum resultCodeEnum) {
        this.code = resultCodeEnum.code;
        this.msg = resultCodeEnum.msg;
    }
}
(3)定义统一异常处理 GlobalExceptionHandler
创建位置:exception包下
专门用来统一处理项目中发生的异常,它的作用相当于一个"异常拦截器",当程序报错时,它会自动捕获并处理,避免直接把难懂的异常堆栈信息抛给前端用户
@ControllerAdvice("com.example.controller")
public class GlobalExceptionHandler {

    private static final Log log = LogFactory.get();

    @ExceptionHandler(Exception.class)
    @ResponseBody // 返回json串
    public Result error(Exception e) {
        log.error("异常信息:", e);
        return Result.error();
    }

    @ExceptionHandler(CustomException.class)
    @ResponseBody // 返回json串
    public Result error(CustomException e) {  //自定义异常
        log.error("异常信息:", e);
        return Result.error(e.getCode(), e.getMsg());
    }
}
@ControllerAdvice("com.example.controller")
表示只监控com.example.controller包下的所有控制器(Controller),如果这些控制器里的方法抛出异常,就会被这个类捕获。
@ExceptionHandler(Exception.class)
声明这个方法专门处理Exception类型的异常(包括其所有子类,相当于能抓所有类型的错误)。
@ResponseBody
让返回的结果自动转成JSON格式(比如返回Result.error()会变成{"code":"500","msg":"请求失败"})。

二、Vue前端搭建
1、创建vue项目
(1)首先确认安装node v20.15.1,后打开项目文件夹,输入cmd进入命令框
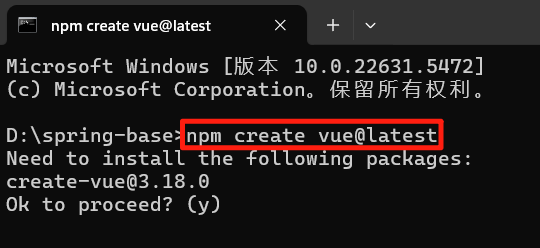
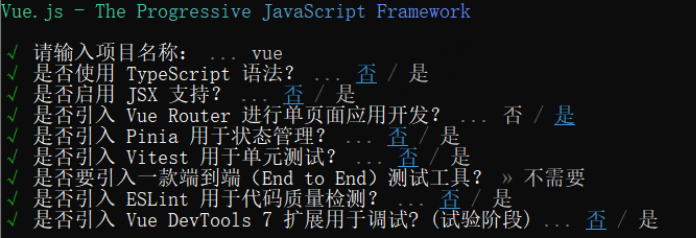
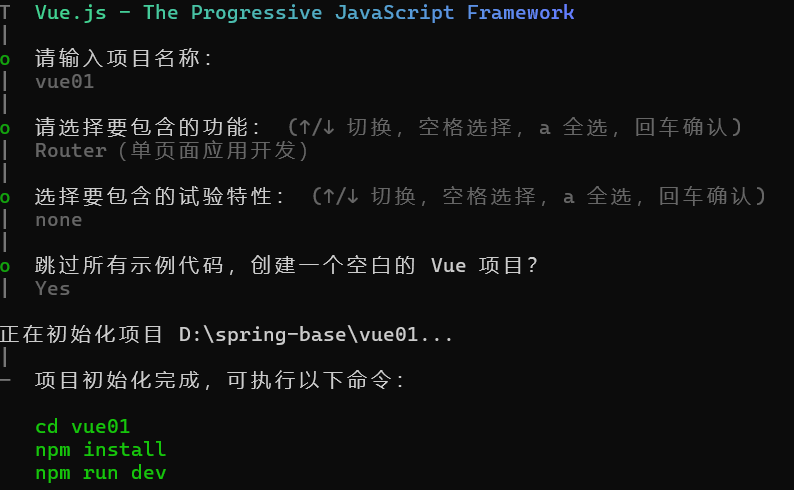
(2)在命令框内输入npm create vue@latest,回车运行命令,并安装下图选择
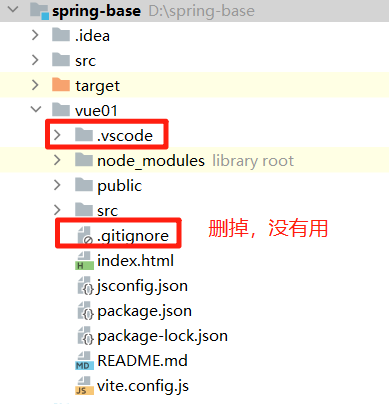
成功运行,可以在项目目录中看到新生成的vue目录,注意:这里【跳过所有示例代码,创建一个空白的Vue项目】选择【是】
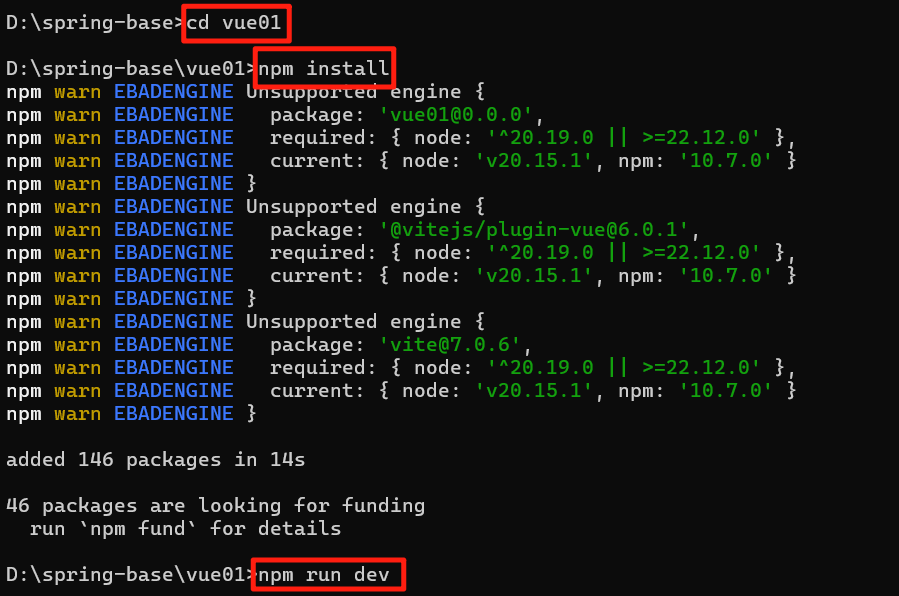
(3)继续在命令框输入命令进行初始化
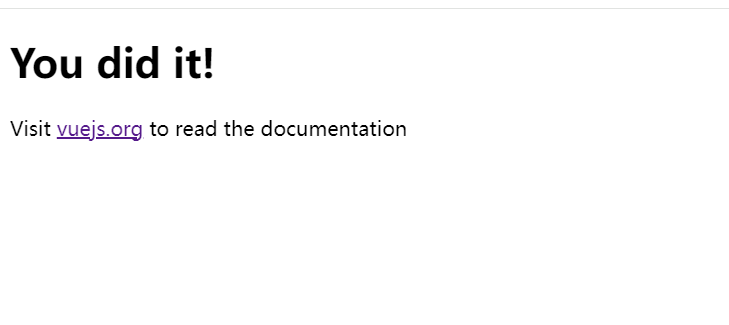
初始化完成后,生成前端项目默认首页


2、vue目录介绍
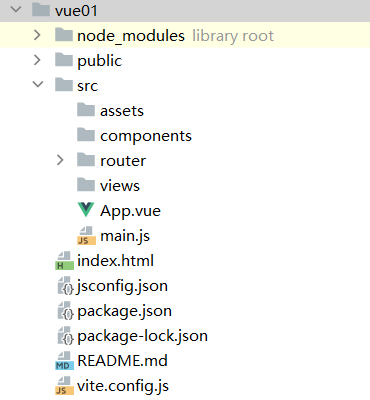
以下是vue文件目录:
(1)node_modules【相当于工具箱仓库】
存放项目所有的第三方依赖库
自动管理,不应手动修改
(2)public【相当于前院】
- 存放无需构建处理的静态资源
- 这些文件会被直接复制到最终构建目录
(3)src【相当于房子主体建筑】
- 项目核心源代码目录
- 包含以下重要子目录和文件
- assets【相当于装修材料贮藏室】
- 存放需要经过构建处理的静态资源(如图片、样式等)
- components【相当于可移动的家具】
像沙发、餐桌这些可移动的东西(可复用组件)
比如按钮、导航栏这种到处都能用的
- router【相当于房子地图】
- 记录哪个网址对应哪个房间(路由配置)
- views【相当于各个房间】
主页客厅(Home.vue)、书房(About.vue)等
每个房间有不同功能
(4)App.vue【相当于房子布局】
- 决定房子基本结构,比如哪里放客厅、哪里放厨房
(5)main.js【相当于房子地基】
- 从这里开始建造整个房子(Vue应用初始化)
(6)index.html【相当于大门】
- 访客最先看到的东西
(7)jsconfig.json【相当于给编译器的导航地图】
(8)package.json 【相当于购物清单】
- 记录需要哪些工具(依赖库)和施工步骤(脚本命令)
- 和后端的pom.xml依赖库文件类似
(9)package-lock.json【相当于精确的购物清单】
- package.json给出一个模糊的依赖,可能会出现我的电脑可以运行,但你的电脑不能运行
(10)vite.config.js【相当于施工图纸】
- 告诉建筑队(Vite)怎么盖这个房子

3、启动vue项目
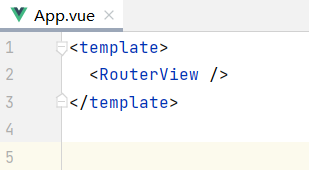
(1)App.vue文件内仅保留下图所示代码,其他全部删掉
(2)在package.json中启动vue项目
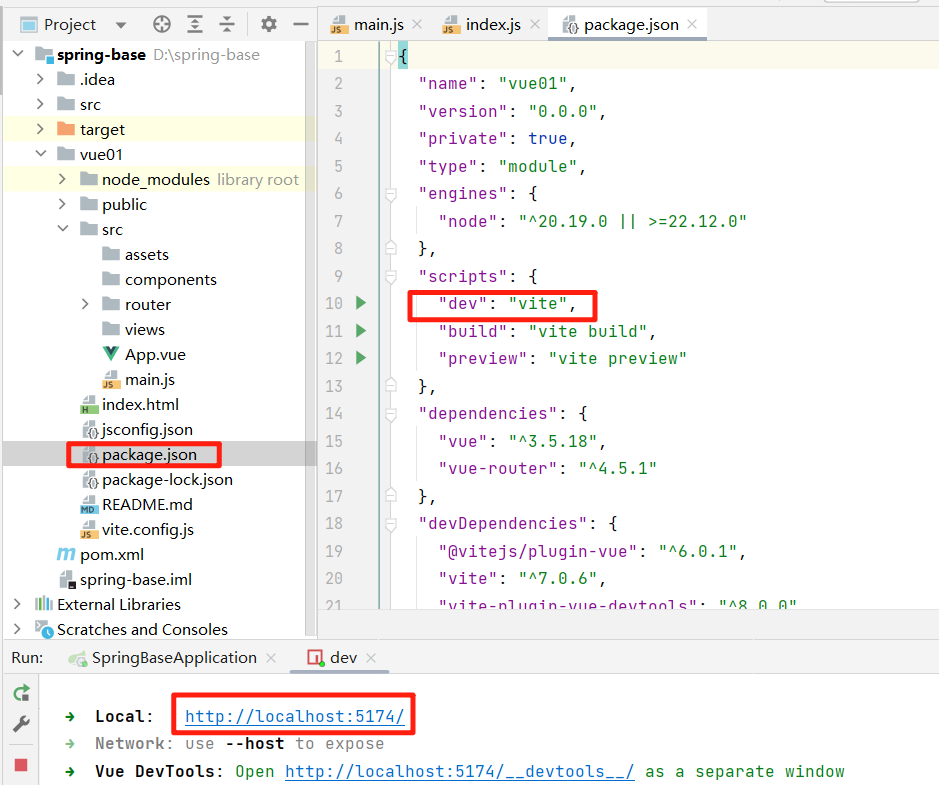
前端页面布局设计总体步骤:在vue文件中设置布局-->在css文件中具体设置大小、颜色等-->在main.js/index.js绑定css文件
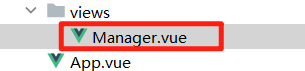
在views文件夹下新建管理员页面Manager.vue,主要负责设计布局
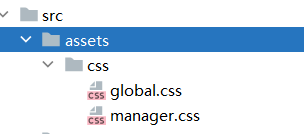
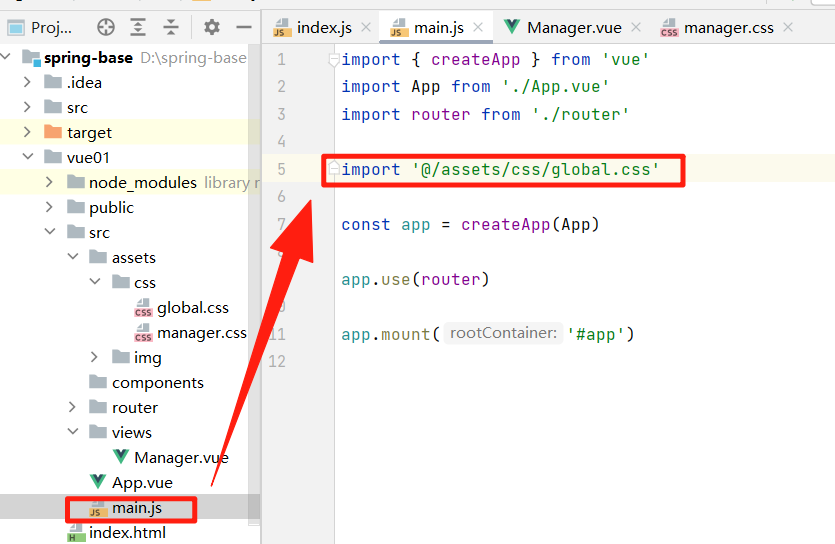
在assets文件夹下创建global.css全局样式、manager.css管理员页面样式,css文件主要负责细节样式设置
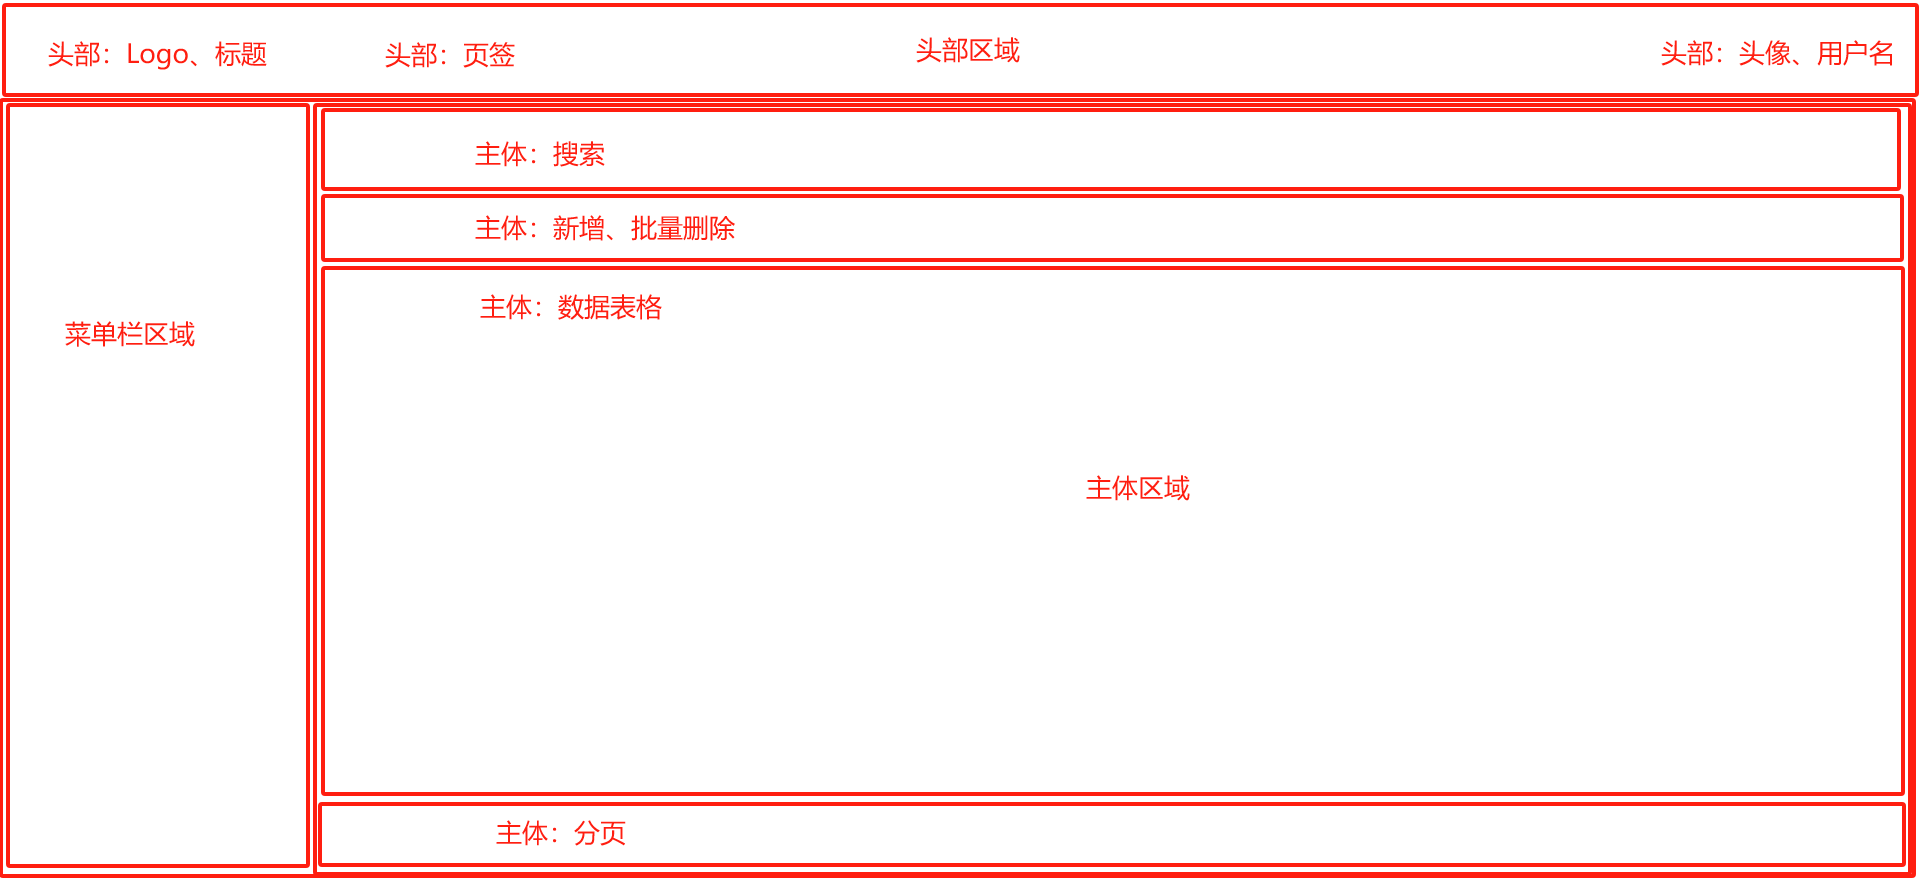
4、管理员后台设计 - 顶部区域设计
布局:【左:logo区域 中:页签 右:头像、用户名】
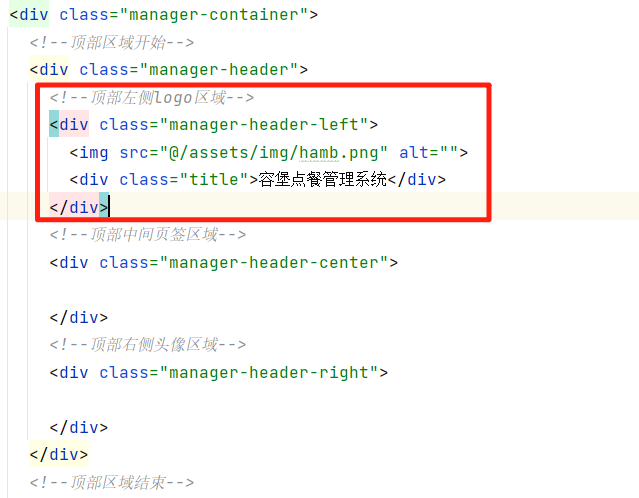
(1)左侧logo区域
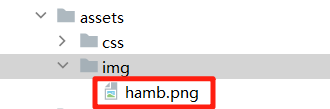
① 在assets文件夹下新建img文件夹,并导入logo图片
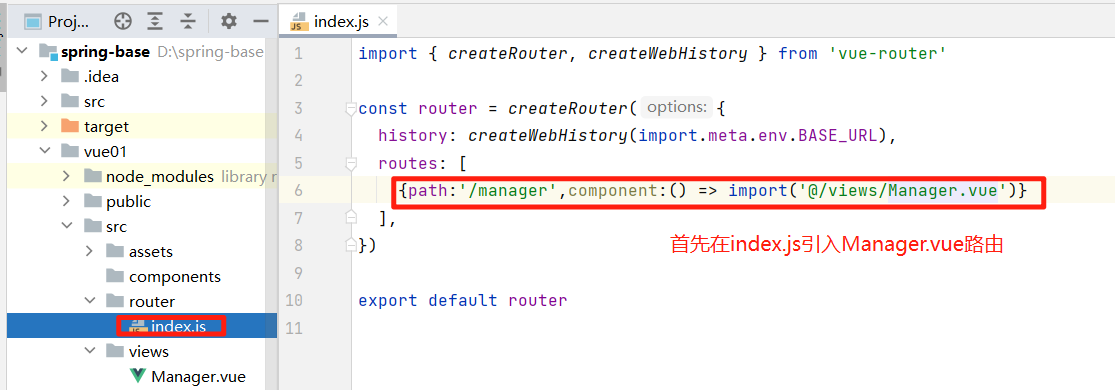
② 在index.js中引入manager页面路由
{path:'/manager',component:() => import('@/views/Manager.vue')}③ 在Manager.vue进行顶部左侧布局
      <!--顶部左侧logo区域-->
      <div class="manager-header-left">
        <img src="@/assets/img/hamb.png" alt="">
        <div class="title">容堡点餐管理系统</div>
      </div>
④ 在manager.css进行样式设计
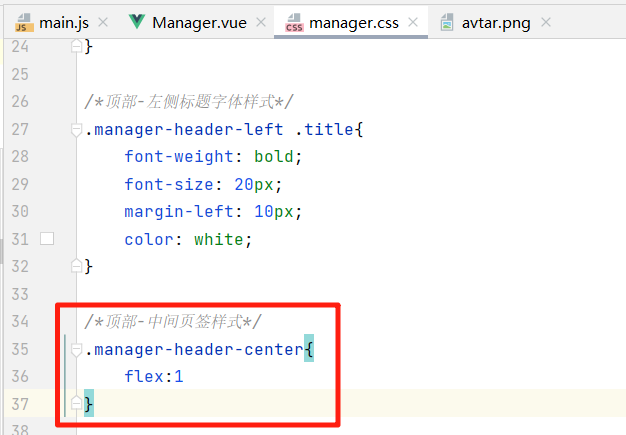
/*顶部区域*/
.manager-header{
    height: 60px;
    background-color: #FF9F1C;
    display: flex;
    align-items: center;
    box-shadow: 0 1px 4px rgba(0,21,41,.08);
}

/*顶部-左侧logo区域*/
.manager-header-left{
    background-color: #FF9F1C;
    width: 300px;
    height: 100%;
    padding-left: 10px;
    display: flex;
    align-items: center;
}

/*顶部-左侧logo图片大小*/
.manager-header-left img{
    width:45px;
    height: 45px;
}

/*顶部-左侧标题字体样式*/
.manager-header-left .title{
    font-weight: bold;
    font-size: 20px;
    margin-left: 10px;
    color: white;
}
⑤ 在global.css进行全局样式设计
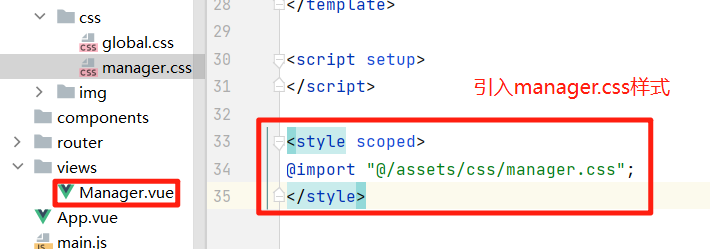
/* 全局设置:所有元素使用 border-box 盒模型(宽度包含 padding 和 border) */
* {
    box-sizing: border-box;
}

/* 重置 body 元素的默认样式 */
body {
    margin: 0;          /* 清除默认外边距 */
    padding: 0;         /* 清除默认内边距 */
    color: #333;        /* 设置默认文字颜色为深灰色 */
    font-size: 14px;    /* 设置默认字体大小为 14 像素 */
}

/* 去除所有链接(<a> 标签)的下划线 */
a {
    text-decoration: none;
}

/* 定义卡片(card)组件的样式 */
.card {
    background-color: #fff;      /* 白色背景 */
    border-radius: 5px;         /* 圆角 5 像素 */
    padding: 10px;              /* 内边距 10 像素 */
    box-shadow: 0 0 10px rgba(0,0,0,0.1);  /* 轻微阴影效果(注意原代码的 rgba 写法有误,已修正) */
}
⑥ 在Manager.vue引入manager.css样式
⑦ 在main.js引入global.css全局样式
最终效果展示↓

(2)中间页签区域
① 安装Element
Element官网网址:Element - The world's most popular Vue UI framework
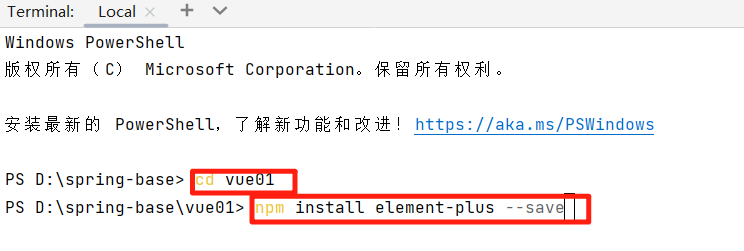
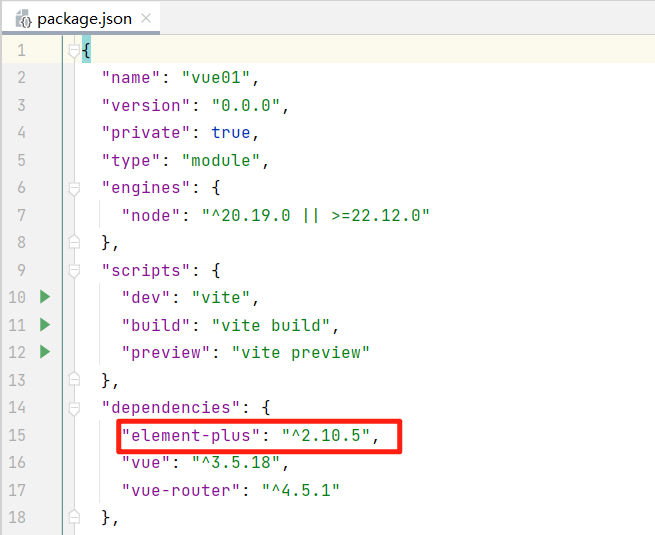
页签需要先安装Element-Plus,在idea下方点击命令框terminal,跳转到vue文件,输入指令
npm install element-plus --save注意:这里如果显示"无法识别npm "的错误提示,可以用管理员身份启动idea,再次输入指令即可
如果显示下图,说明安装成功!
接着在main.js导入Element
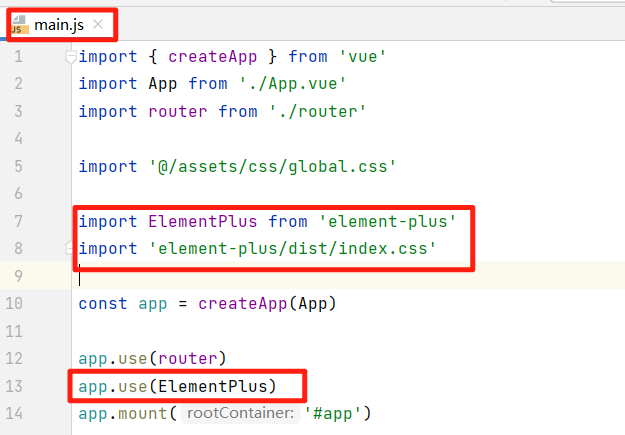
② 导航栏
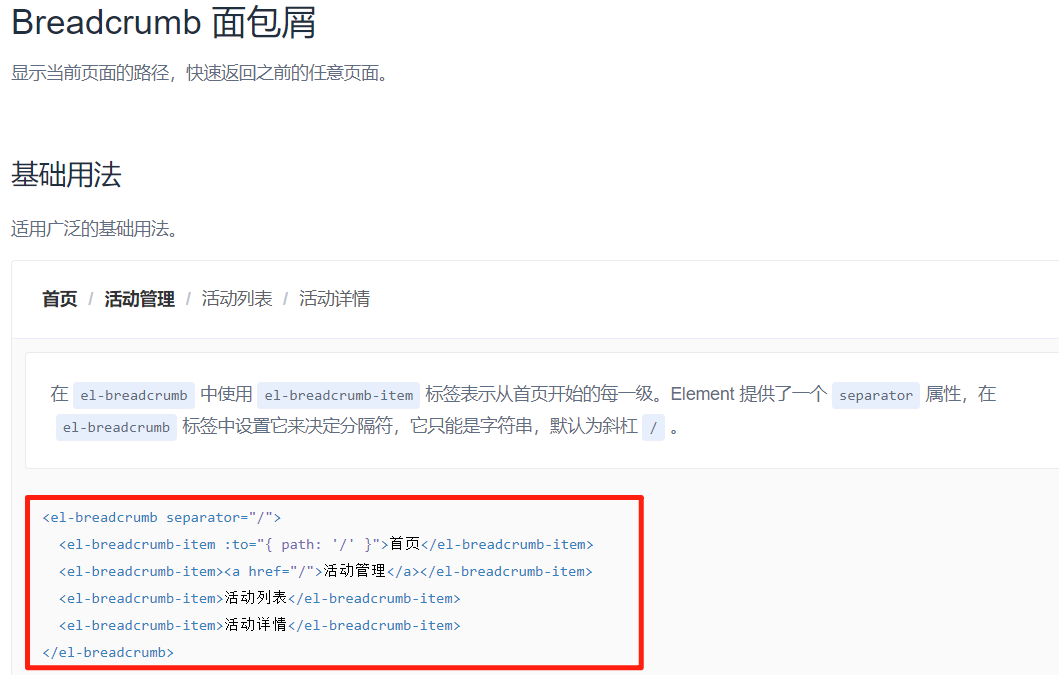
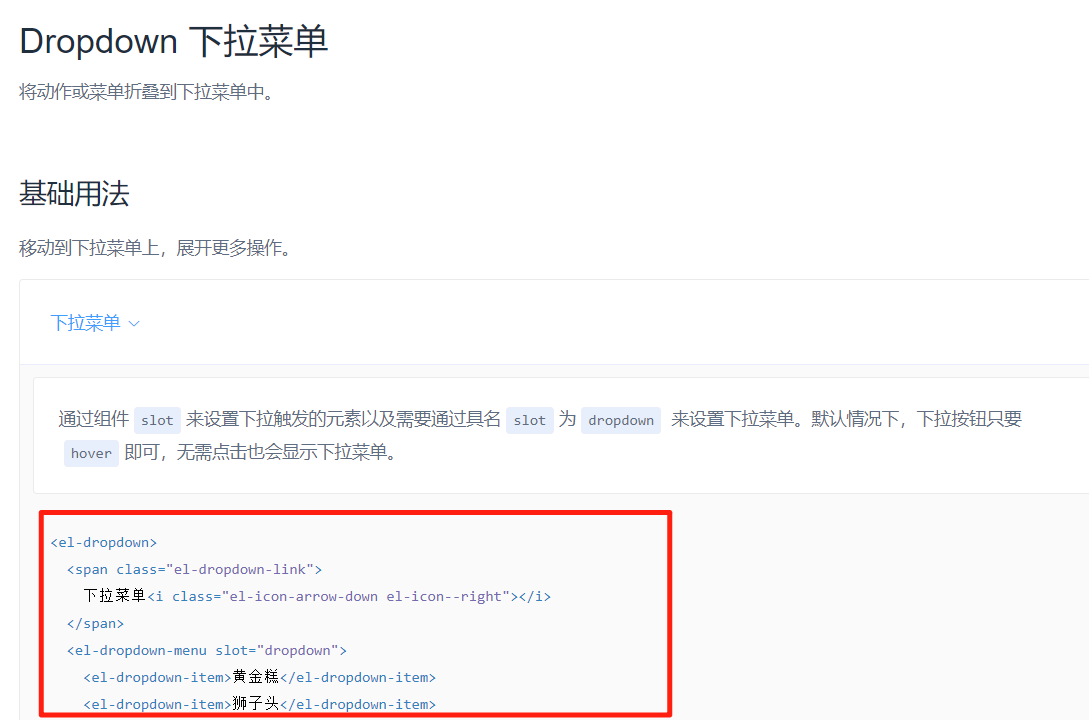
在Element官网找到Breadcrumb面包屑导航栏,复制下面的代码,粘贴至Manager.vue的顶部中间处
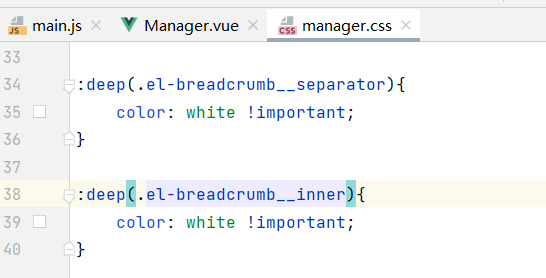
<!--顶部中间页签区域-->
<div class="manager-header-center">
    <el-breadcrumb separator="/">
        <el-breadcrumb-item>活动管理</el-breadcrumb-item>
        <el-breadcrumb-item>活动列表</el-breadcrumb-item>
        <el-breadcrumb-item>活动详情</el-breadcrumb-item>
    </el-breadcrumb>
</div>
在manager.css文件修改中部导航栏样式
最终效果展示↓


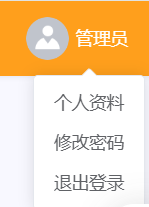
(3)右侧头像区域
把默认头像导入img文件夹
在Element搜索dropdown下拉框样式,复制下面的代码,粘贴至Manager.vue的顶部右侧处,并进行修改
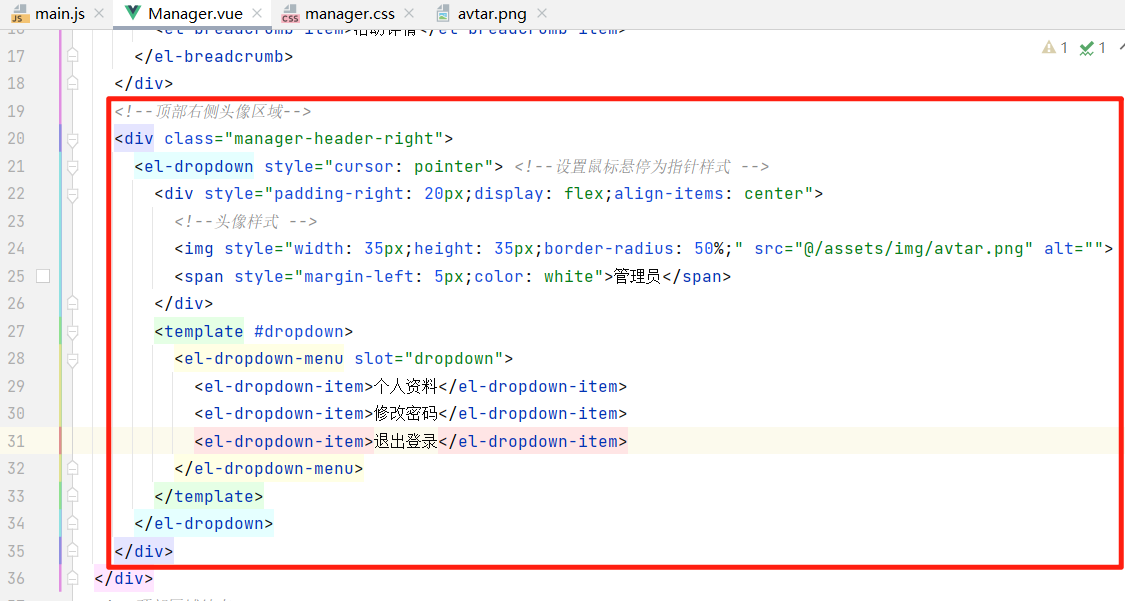
      <!--顶部右侧头像区域-->
      <div class="manager-header-right">
        <el-dropdown style="cursor: pointer"> <!--设置鼠标悬停为指针样式 -->
          <div style="padding-right: 20px;display: flex;align-items: center">
            <!--头像样式 -->
            <img style="width: 35px;height: 35px;border-radius: 50%;" src="@/assets/img/avtar.png" alt="">
            <span style="margin-left: 5px;color: white">管理员</span>
          </div>
          <template #dropdown>
            <el-dropdown-menu slot="dropdown">
              <el-dropdown-item>个人资料</el-dropdown-item>
              <el-dropdown-item>修改密码</el-dropdown-item>
              <el-dropdown-item>退出登录</el-dropdown-item>
            </el-dropdown-menu>
          </template>
        </el-dropdown>
      </div>
在manager.css文件修改样式
最终效果展示↓
最后顶部区域效果展示↓


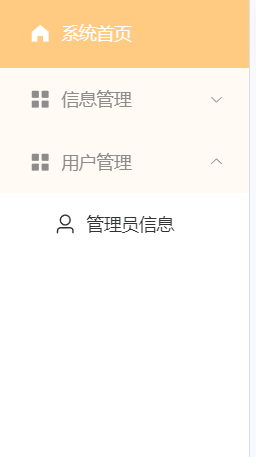
5、管理员后台设计 - 左侧导航栏设计
(1)安装并导入导航栏图标
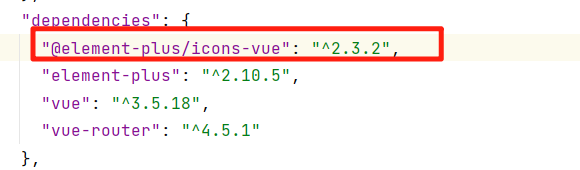
在Termial命令框内输入指令cd vue,然后输入以下指令
npm install @element-plus/icons-vue
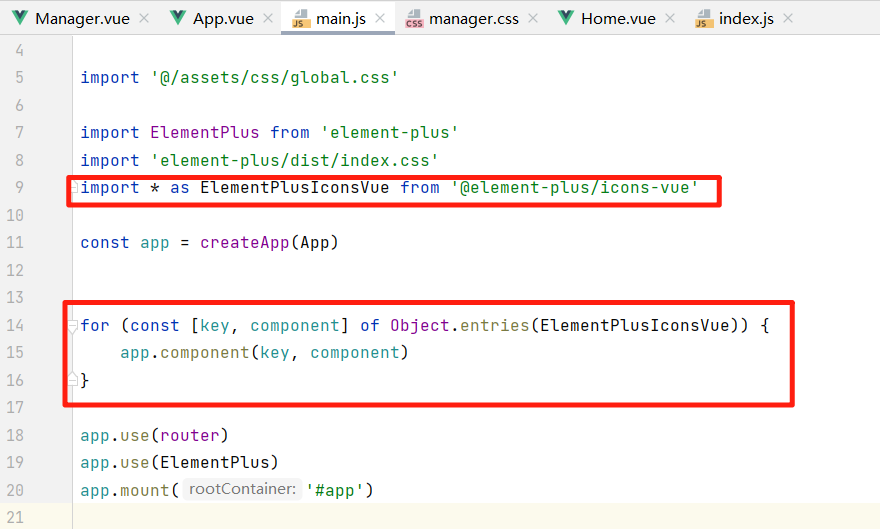
在main.js导入图标
import * as ElementPlusIconsVue from '@element-plus/icons-vue'

for (const [key, component] of Object.entries(ElementPlusIconsVue)) {
    app.component(key, component)
}
(2)引入导航栏代码
<!--下方区域左侧导航栏-->
      <div class="manager-main-left">
        <el-menu :default-active="router.currentRoute.value.path"
                 :default-openeds="['1', '2']"
                 router
        >

          <el-menu-item index="/manager/home">
            <el-icon><HomeFilled /></el-icon>
            <span>系统首页</span>
          </el-menu-item>

          <el-sub-menu index="1">
            <template #title>
              <el-icon><Menu /></el-icon>
              <span>信息管理</span>
            </template>
          </el-sub-menu>

          <el-sub-menu index="2">
            <template #title>
              <el-icon><Menu /></el-icon>
              <span>用户管理</span>
            </template>
            <el-menu-item index="/manager/admin">
              <template #title>
                <el-icon><User /></el-icon>
                <span>管理员信息</span>
              </template>
            </el-menu-item>
          </el-sub-menu>

        </el-menu>
      </div>
:default-active
绑定当前路由路径
router.currentRoute.value.path,使菜单能高亮显示当前页面对应的菜单项:default-openeds
默认展开index为'1'和'2'的sub-menu子菜单
数组中的值对应sub-menu的index属性
router
开启此属性后:
点击菜单项时会自动进行路由跳转
菜单项的index会被当作path使用
需要配合vue-router使用
(3)设置导航栏css样式
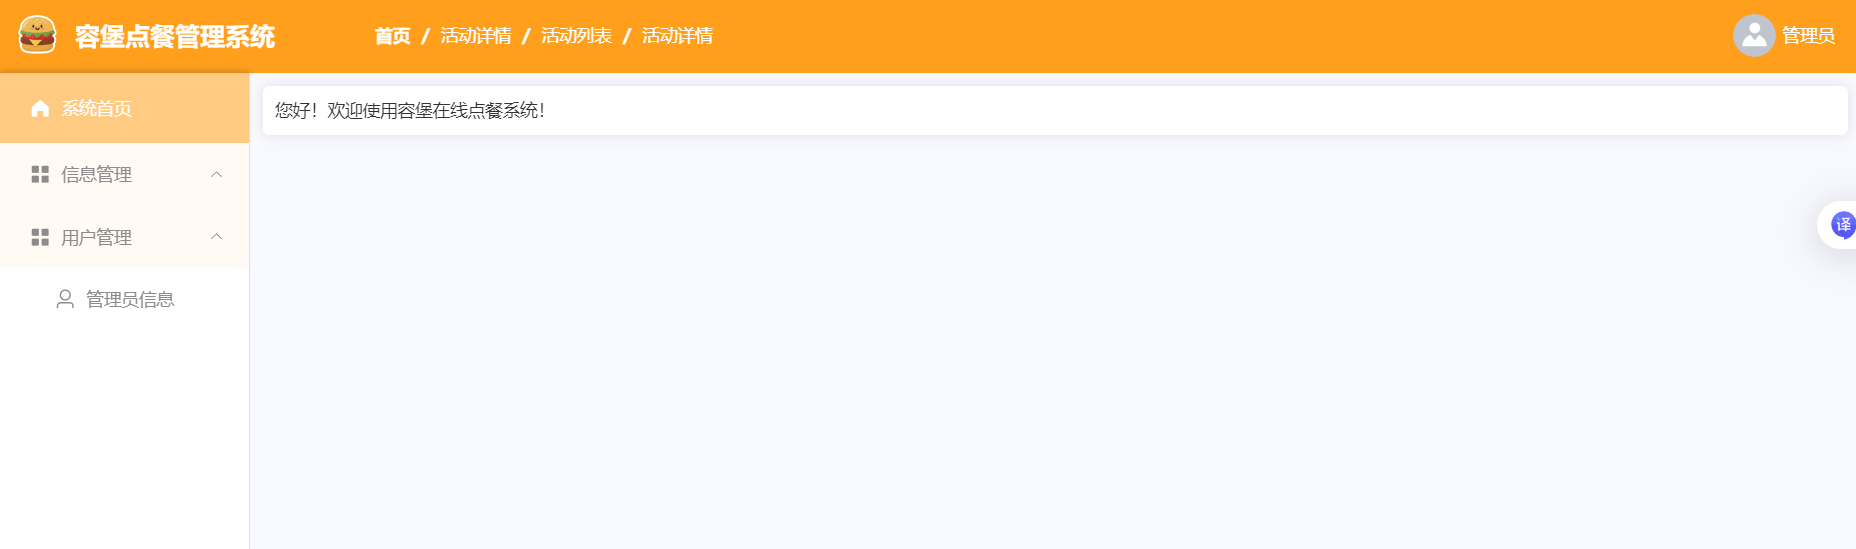
.el-menu{
    width: 200px;
    height: 100%;
    background-color: white;
}

/*子菜单标题样式*/
:deep(.el-sub-menu__title) {
    color: #8d8b8b !important;        /* 设置文字颜色为浅灰色 */
    height: 50px;                 /* 固定高度 */
    line-height: 50px;            /* 行高与高度相同实现垂直居中 */
    background-color: rgba(255, 159, 28, 0.05) !important;  /* 橙色背景 */
}

/* 当前激活菜单项样式 */
.el-menu .is-active {
    color: #fff !important;        /* 白色文字 */
    background-color: rgba(255, 159, 28, 0.55) !important;  /* 淡橙背景 */
}

/* 非激活菜单项的悬停状态 */
.el-menu-item:not(.is-active):hover {
    color: #fff !important;        /* 悬停时白色文字 */
    background-color: rgba(255, 159, 28, 0.55) !important;  /* 悬停时橙色背景 */
}

/* 子菜单项颜色 */
.el-menu-item{
    color: #8d8b8b !important;
}

/* 子菜单标题的悬停状态 */
.el-sub-menu__title:hover {
    color: #fff;                  /* 悬停时文字变为白色 */
}

/* 嵌套菜单项的缩进样式 */
.el-menu--inline .el-menu-item {
    padding-left: 40px !important;  /* 增加左侧缩进 */
}
最终效果展示↓
6、管理员后台设计 - 右侧主页设计
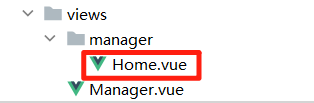
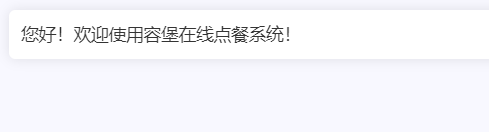
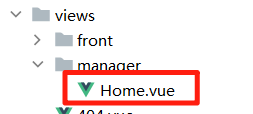
(1)创建后台Home.vue
<template>
  <div>
    <div class="card">您好!欢迎使用容堡在线点餐系统!</div>
  </div>
</template>
(2)添加路由
在index.js加入Home.vue路由路径
import { createRouter, createWebHistory } from 'vue-router'

const router = createRouter({
  history: createWebHistory(import.meta.env.BASE_URL),
  routes: [
    {path:'/manager',component:() => import('@/views/Manager.vue'),
    children:[
      {path:'home',component:() => import('@/views/manager/Home.vue'),}
    ]}
  ],
})

export default router
然后在Manager.vue编写代码
<!--下方区域右侧主页-->
      <div class="manager-main-right">
        <RouterView />
      </div>
(3)设计css样式
/*下方-右侧主页样式*/
.manager-main-right {
    flex: 1;
    width: 0;
    background-color: #f8f8ff;
    padding: 10px;
}
最终效果展示↓

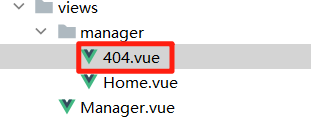
7、404页面
(1)先找一张404图片加入img文件夹
(2)在views文件夹下新建404.vue
<template>
  <div>
    <div style="height: 100vh; display: flex; justify-content: center; align-items: center">
      <div style="width: 30%">
        <img src="@/assets/img/404.png" alt="" style="width: 100%">
        <div style="font-size: 30px; text-align: center">找不到页面啦!<router-link to="/">请返回主页</router-link></div>
        <!--to: 指定目标路由路径(此处为根路径 "/")-->
      </div>
    </div>
  </div>
</template>
(3)在index.js引入路由
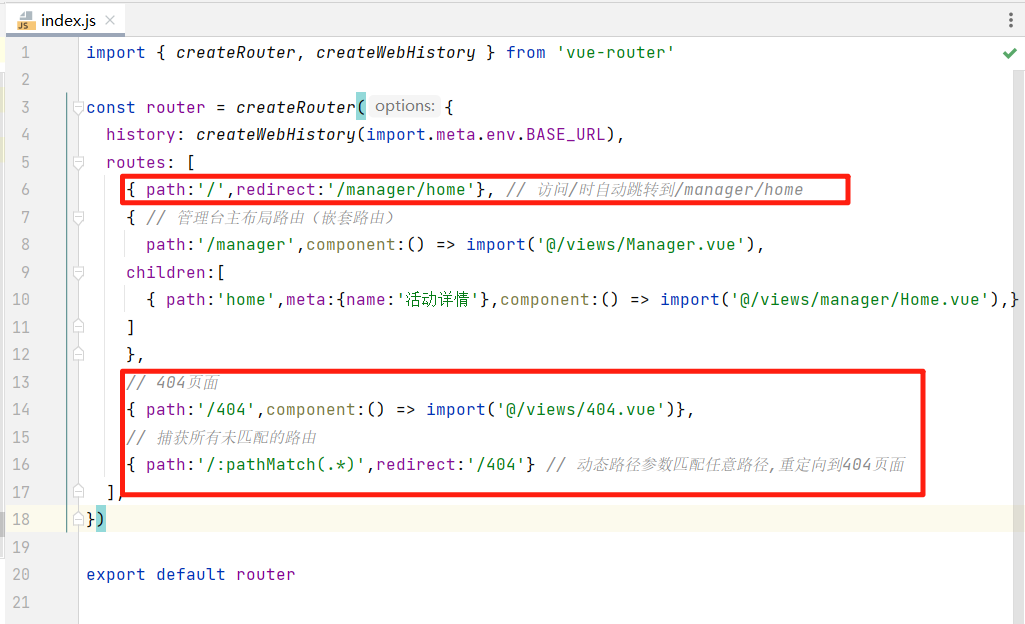
import { createRouter, createWebHistory } from 'vue-router'

const router = createRouter({
  history: createWebHistory(import.meta.env.BASE_URL),
  routes: [
    { path:'/',redirect:'/manager/home'}, // 访问/时自动跳转到/manager/home
    { // 管理台主布局路由(嵌套路由)
      path:'/manager',component:() => import('@/views/Manager.vue'),
    children:[
      { path:'home',meta:{name:'活动详情'},component:() => import('@/views/manager/Home.vue'),}
    ]
    },
    // 404页面
    { path:'/404',component:() => import('@/views/404.vue')},
    // 捕获所有未匹配的路由
    { path:'/:pathMatch(.*)',redirect:'/404'} // 动态路径参数匹配任意路径,重定向到404页面
  ],
})

export default router
最终效果展示↓


8、前台页面设计
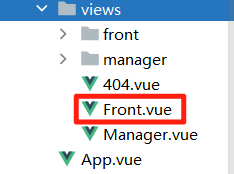
(1)创建Front.vue
<template>
  <div>
    <div class="front-header">
      <!--前台-顶部左侧-->
      <div class="front-header-left">
        <img src="@/assets/img/hamb.png" alt="">
        <div class="title">项目前台</div>
      </div>
      <!--前台-顶部中间-->
      <div class="front-header-center">
        <el-menu :default-active="router.currentRoute.value.path" router mode="horizontal">
          <el-menu-item index="/front/home">首页</el-menu-item>
          <el-menu-item index="/front/person">个人中心</el-menu-item>
        </el-menu>
      </div>
      <!--前台-顶部右侧-->
      <div class="front-header-right">
        <div v-if="!data.user.id"> <!--如果没有登录-->
          <el-button>登录</el-button>
          <el-button>注册</el-button>
        </div>
        <div v-else>
          <el-dropdown style="cursor: pointer; height: 60px">
            <div style="display: flex; align-items: center">
              <img style="width: 40px; height: 40px; border-radius: 50%;" src="@/assets/img/avtar.png" alt="">
              <span style="margin-left: 5px;">管理员</span><el-icon><arrow-down /></el-icon>
            </div>
            <template #dropdown>
              <el-dropdown-menu>
                <el-dropdown-item>退出登录</el-dropdown-item>
              </el-dropdown-menu>
            </template>
          </el-dropdown>
        </div>
      </div>

    </div>

    <!--前台-主体-->
    <div class="main-body">
      <RouterView />
    </div>
  </div>
</template>

<script setup>
import router from "@/router/index.js";   // 获取 router 实例
import { reactive } from "vue";

const data = reactive({
  user: {}
})
</script>

<style scoped>
@import "@/assets/css/front.css";  /*引入css样式*/
</style>
(2)创建前台Home.vue
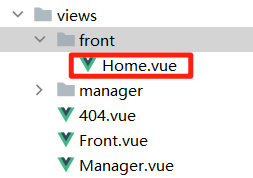
<template>
  <div class="main-content">
    前台首页
  </div>
</template>
(3)添加路由
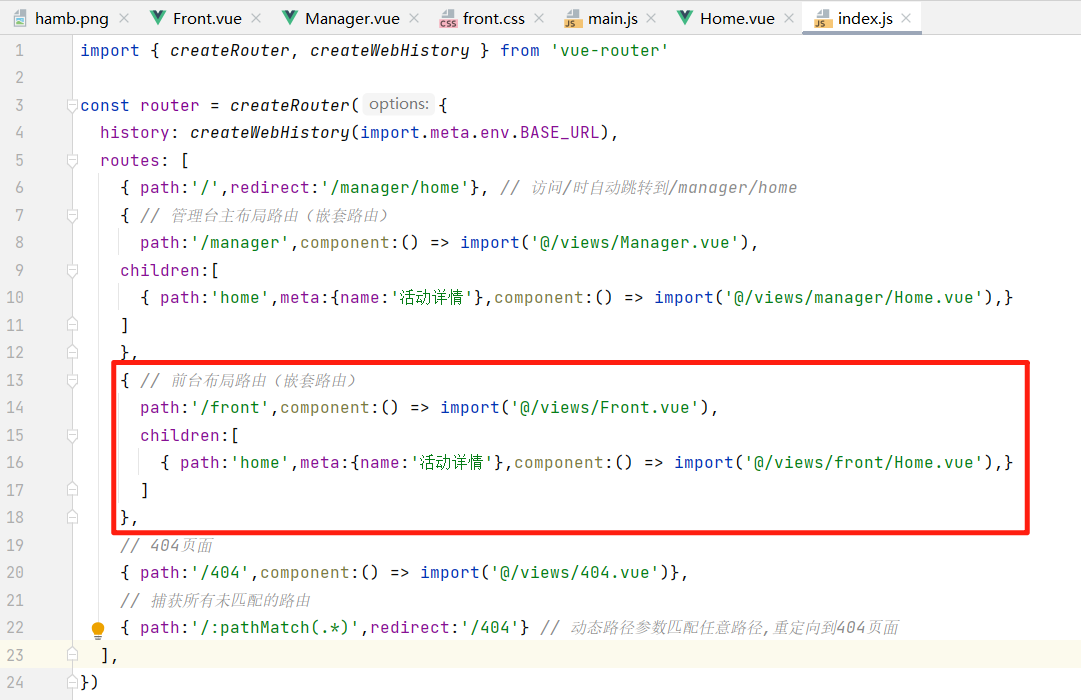
import { createRouter, createWebHistory } from 'vue-router'

const router = createRouter({
  history: createWebHistory(import.meta.env.BASE_URL),
  routes: [
    { path:'/',redirect:'/manager/home'}, // 访问/时自动跳转到/manager/home
    { // 管理台主布局路由(嵌套路由)
      path:'/manager',component:() => import('@/views/Manager.vue'),
    children:[
      { path:'home',meta:{name:'活动详情'},component:() => import('@/views/manager/Home.vue'),}
    ]
    },
    { // 前台布局路由(嵌套路由)
      path:'/front',component:() => import('@/views/Front.vue'),
      children:[
        { path:'home',meta:{name:'活动详情'},component:() => import('@/views/front/Home.vue'),}
      ]
    },
    // 404页面
    { path:'/404',component:() => import('@/views/404.vue')},
    // 捕获所有未匹配的路由
    { path:'/:pathMatch(.*)',redirect:'/404'} // 动态路径参数匹配任意路径,重定向到404页面
  ],
})

export default router
(4)设计css样式
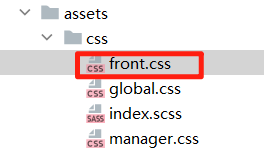
.front-header {
    display: flex;
    height: 60px;
    line-height: 60px;
    border-bottom: 1px solid #eee;
}

.front-header-left {
    width: 350px;
    display: flex;
    align-items: center;
    padding-left: 30px;
}

.front-header-left img {
    width: 40px;
    height: 40px;
    border-radius: 50%;
}

.front-header-left .title {
    color: #333;
    cursor: pointer;
    margin-left: 10px;
    font-size: 20px;
    font-weight: bold;
}

.front-header-center {
    flex: 1;
}

.front-header-right {
    padding-right: 20px;
}

.main-content {
    width: 80%;
    margin: 5px auto;
}

/*Element-Plus样式覆盖*/
.el-menu--horizontal {
    border: none !important;
    height: 59px;
}
.el-tooltip__trigger {
    outline: none;
}
最终效果展示↓

9、安装axios实现前后端数据交互
(1)安装axios
npm i axios -S
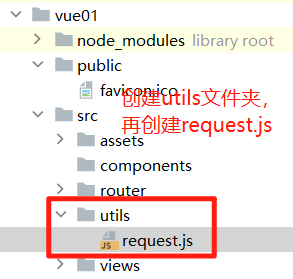
(2)创建request.js
import axios from "axios";
import {ElMessage} from "element-plus";

const request = axios.create({
    baseURL: 'http://localhost:9999', //这里填后端设置的端口号
    timeout: 30000  // 后台接口超时时间
})

// request 拦截器
// 可以自请求发送前对请求做一些处理
request.interceptors.request.use(config => {
    config.headers['Content-Type'] = 'application/json;charset=utf-8';
    return config
}, error => {
    return Promise.reject(error)
});

// response 拦截器
// 可以在接口响应后统一处理结果
request.interceptors.response.use(
    response => {
        let res = response.data;
        // 如果是返回的文件
        if (response.config.responseType === 'blob') {
            return res
        }
        // 兼容服务端返回的字符串数据
        if (typeof res === 'string') {
            res = res ? JSON.parse(res) : res
        }
        return res;
    },
    error => {
        if (error.response.status === 404) {
            ElMessage.error('未找到请求接口')
        } else if (error.response.status === 500) {
            ElMessage.error('系统异常,请查看后端控制台报错')
        } else {
            console.error(error.message)
        }
        return Promise.reject(error)
    }
)

export default request
(3)前后端交互测试
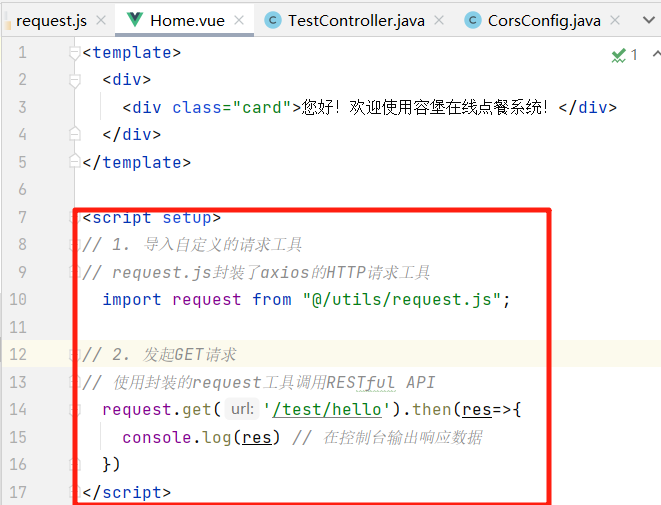
在管理员Home.vue中加入接口测试
<script setup>
// 1. 导入自定义的请求工具
// request.js封装了axios的HTTP请求工具
  import request from "@/utils/request.js";

// 2. 发起GET请求
// 使用封装的request工具调用RESTful API
  request.get('/test/hello').then(res=>{
    console.log(res) // 在控制台输出响应数据
  })
</script>
按F12 在console看到出现【跨域错误】
(4)引入跨域配置
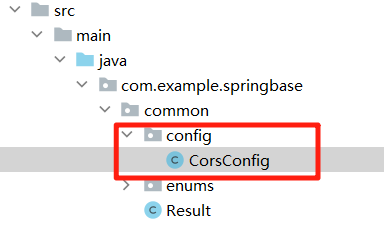
在后端代码新建config文件夹,新建CorsConfig
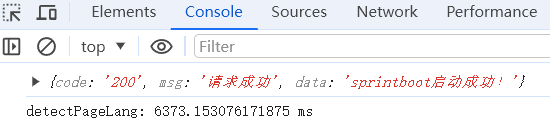
package com.example.springbase.common.config;

import org.springframework.context.annotation.Bean;
import org.springframework.context.annotation.Configuration;
import org.springframework.web.cors.CorsConfiguration;
import org.springframework.web.cors.UrlBasedCorsConfigurationSource;
import org.springframework.web.filter.CorsFilter;

/**
 * 跨域配置
 */
@Configuration
public class CorsConfig {

    @Bean
    public CorsFilter corsFilter() {
        UrlBasedCorsConfigurationSource source = new UrlBasedCorsConfigurationSource();
        CorsConfiguration corsConfiguration = new CorsConfiguration();
        corsConfiguration.addAllowedOrigin("*"); // 1 设置访问源地址
        corsConfiguration.addAllowedHeader("*"); // 2 设置访问源请求头
        corsConfiguration.addAllowedMethod("*"); // 3 设置访问源请求方法
        source.registerCorsConfiguration("/**", corsConfiguration); // 4 对接口配置跨域设置
        return new CorsFilter(source);
    }
}
运行后端代码,回到网页在控制台看到返回的数据,说明前后端跨域成功!


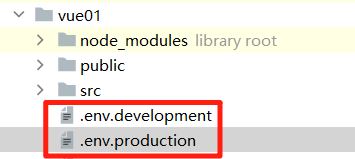
10、动态配置文件env设置
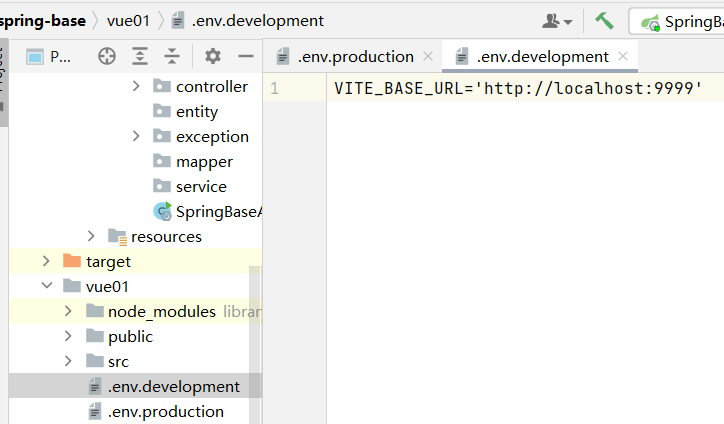
.env.development 是前端项目中专门用于开发环境的配置文件,它存储开发阶段所需的变量
与生产环境(.env.production)隔离,确保开发和生产环境使用不同的配置。
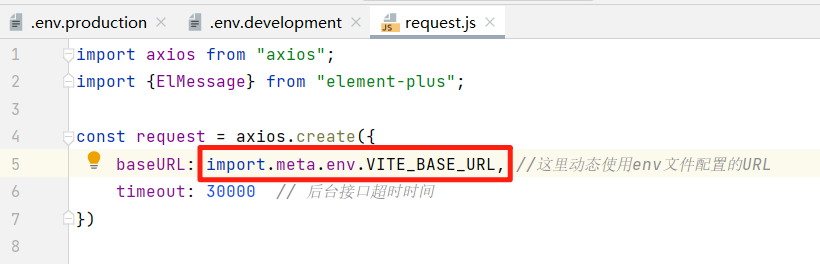
接着在request引入配置好的URL
重新运行后端代码,成功实现动态URL配置
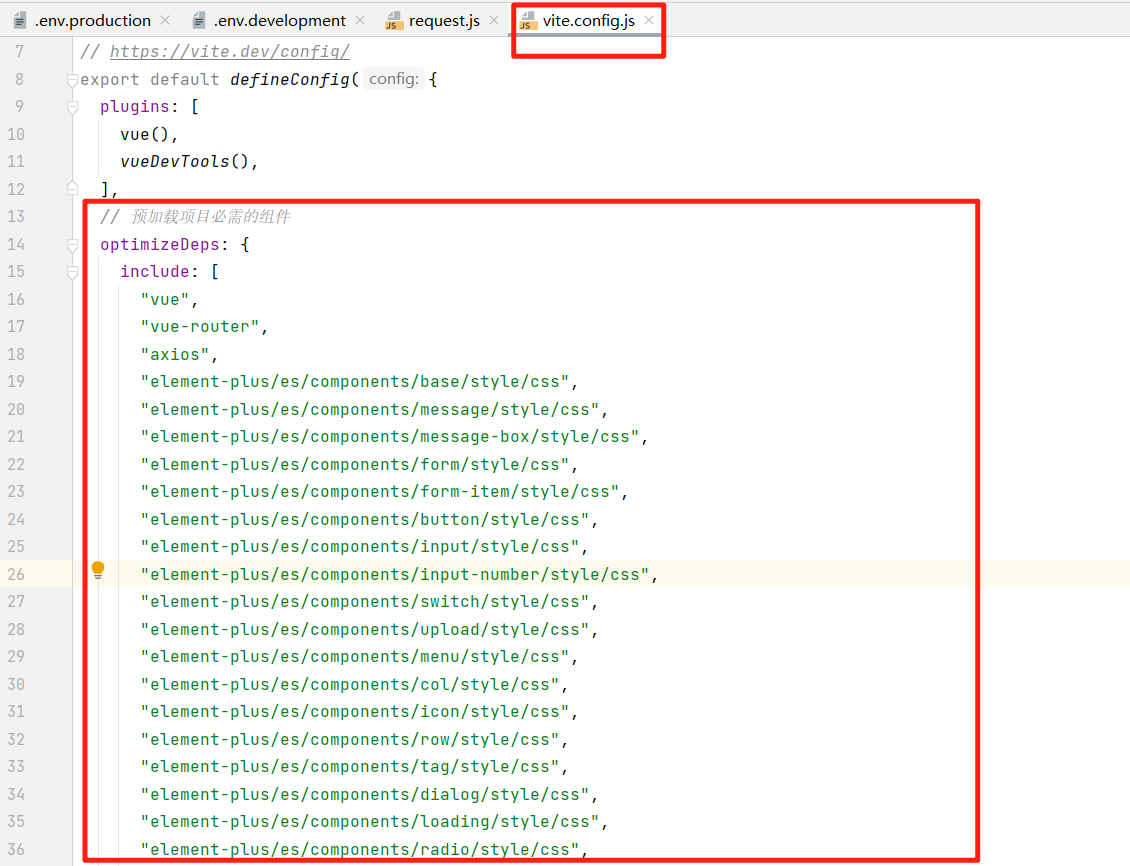
11、设置vite懒加载
Vite 的懒加载是一种优化技术,它允许将代码拆分成多个小块,在需要时才动态加载,而不是在应用初始化时一次性加载所有代码。
在vite.config.js文件中加入相关组件
// 预加载项目必需的组件
  optimizeDeps: {
    include: [
      "vue",
      "vue-router",
      "axios",
      "element-plus/es/components/base/style/css",
      "element-plus/es/components/message/style/css",
      "element-plus/es/components/message-box/style/css",
      "element-plus/es/components/form/style/css",
      "element-plus/es/components/form-item/style/css",
      "element-plus/es/components/button/style/css",
      "element-plus/es/components/input/style/css",
      "element-plus/es/components/input-number/style/css",
      "element-plus/es/components/switch/style/css",
      "element-plus/es/components/upload/style/css",
      "element-plus/es/components/menu/style/css",
      "element-plus/es/components/col/style/css",
      "element-plus/es/components/icon/style/css",
      "element-plus/es/components/row/style/css",
      "element-plus/es/components/tag/style/css",
      "element-plus/es/components/dialog/style/css",
      "element-plus/es/components/loading/style/css",
      "element-plus/es/components/radio/style/css",
      "element-plus/es/components/radio-group/style/css",
      "element-plus/es/components/popover/style/css",
      "element-plus/es/components/scrollbar/style/css",
      "element-plus/es/components/tooltip/style/css",
      "element-plus/es/components/dropdown/style/css",
      "element-plus/es/components/dropdown-menu/style/css",
      "element-plus/es/components/dropdown-item/style/css",
      "element-plus/es/components/sub-menu/style/css",
      "element-plus/es/components/menu-item/style/css",
      "element-plus/es/components/divider/style/css",
      "element-plus/es/components/card/style/css",
      "element-plus/es/components/link/style/css",
      "element-plus/es/components/breadcrumb/style/css",
      "element-plus/es/components/breadcrumb-item/style/css",
      "element-plus/es/components/table/style/css",
      "element-plus/es/components/tree-select/style/css",
      "element-plus/es/components/table-column/style/css",
      "element-plus/es/components/select/style/css",
      "element-plus/es/components/option/style/css",
      "element-plus/es/components/pagination/style/css",
      "element-plus/es/components/tree/style/css",
      "element-plus/es/components/alert/style/css",
      "element-plus/es/components/radio-button/style/css",
      "element-plus/es/components/checkbox-group/style/css",
      "element-plus/es/components/checkbox/style/css",
      "element-plus/es/components/tabs/style/css",
      "element-plus/es/components/tab-pane/style/css",
      "element-plus/es/components/rate/style/css",
      "element-plus/es/components/date-picker/style/css",
      "element-plus/es/components/notification/style/css",
      "element-plus/es/components/image/style/css",
      "element-plus/es/components/statistic/style/css",
      "element-plus/es/components/watermark/style/css",
      "element-plus/es/components/config-provider/style/css",
      "element-plus/es/components/text/style/css",
      "element-plus/es/components/drawer/style/css",
      "element-plus/es/components/color-picker/style/css",
    ],
  },
简单脚手架页面展示