Kubernetes核心概念Service
Service作用
使用kubernetes集群运行工作负载时,由于Pod经常处于用后即焚状态,Pod经常被重新生成,因此Pod对应的IP地址也会经常变化,导致无法直接访问Pod提供的服务,Kuberetes中使用了Service来解决这一问题,即在Pod前面使用Service对Pod进行代理,无论Pod怎样变化,只要有Label,就可以让Service能够联系上Pod,把Pod lP地址添加到Service对应的端点列表(Endpoints)实现对Pod IP跟踪,进而实现通过Service访问Pod目的。
通过service为pod客户端提供访问pod方法,即可客户端访问pod入口
通过标签动态感知podIP地址变化等
防止pod失联
定义访问pod访问策略
通过label-selector相关联
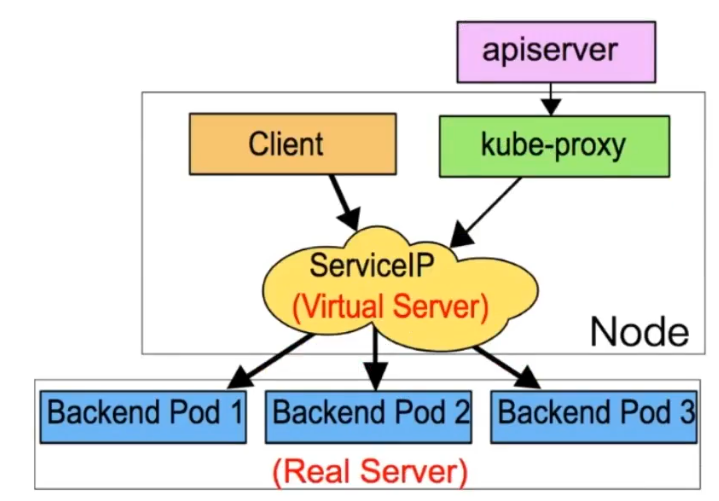
通过**Service实现Pod的负载均衡(TCP/UDP4层)**
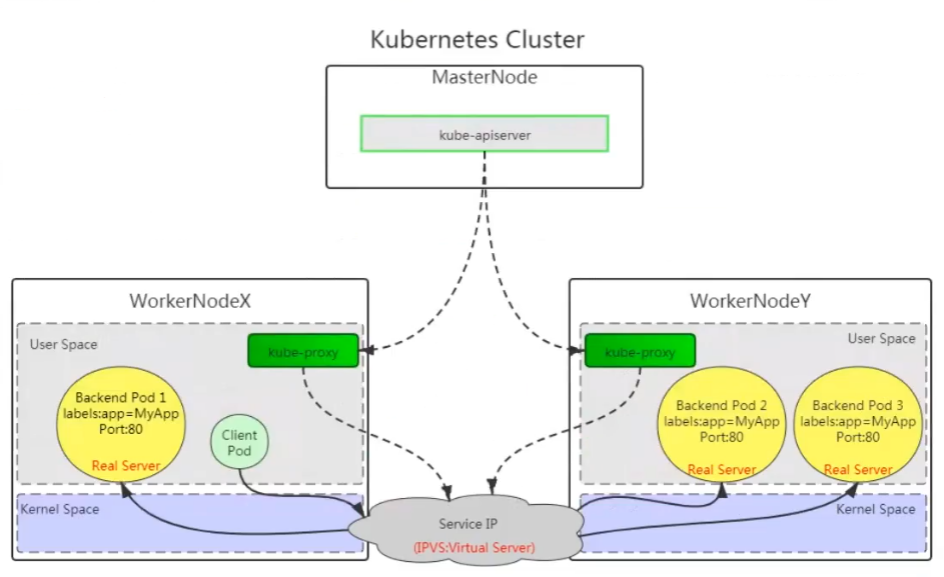
底层实现由kube-proxy通过userspace、iptables、ipvs三种代理模式
kube-proxy三种代理模式
kubernetes集群中有三层网络,一类是真实存在的,例如Node Network、Pod Network,提供真实IP地址;一类是虚拟的,例如ClusterNetwork或Service Network,提供虚拟IP地址,不会出现在接口上,仅会出现在Service当中
kube-proxy始终watch(监控)kube-apiserver上关于Service相关的资源变动状态,一旦获取相关信息kube:proxy都要把相关信息转化为当前节点之上的,能够实现Service资源调度到特定Pod之上的规则,进而实现访问Service就能够获取Pod所提供的服务
kube-proxy三种代理模式:userspace模式、iptables模式、ipvs模式
userspace模式
userspace 模式是 kube-proxy 使用的第一代模式,该模式在 kubernetes v1.0 版本开始支持使用。
userspace 模式的实现原理图示如下:
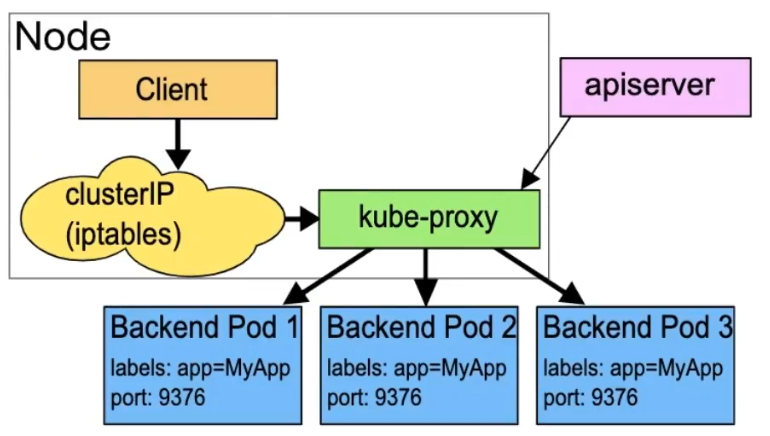
kube-proxy会为每个 Service 随机监听一个端口(proxyport),并增加一条 iptables规则。所以通过ClusterlP:Port 访问 Service 的报文都redirect 到 proxy port,kube-proxy 从它监听的 proxy port 收到报文以后,走 round robin(默认)或是 session affinity(会活亲和力,即同client IP 都走同一链路给同一pod 服务),分发给对应的 pod。
由于 userspace 模式会造成所有报文都走一遍用户态(也就是Service 请求会先从用户空间进入内核iptables,然后再回到用户空间,由kube-proxy 完成后端 Endpoints 的选择和代理工作),需要在内核空间和用户空间转换,流量从用户空间进出内核会带来性能损耗,所以这种模式效率低、性能不高,不推荐使用。
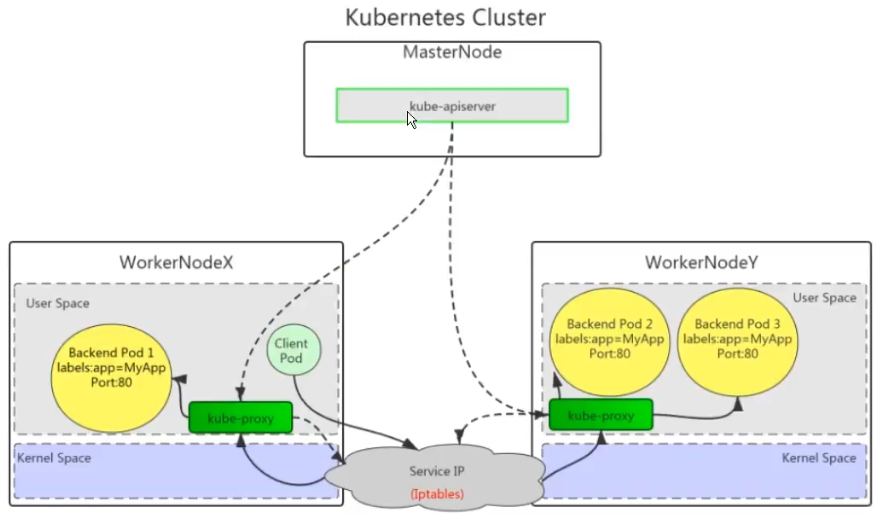
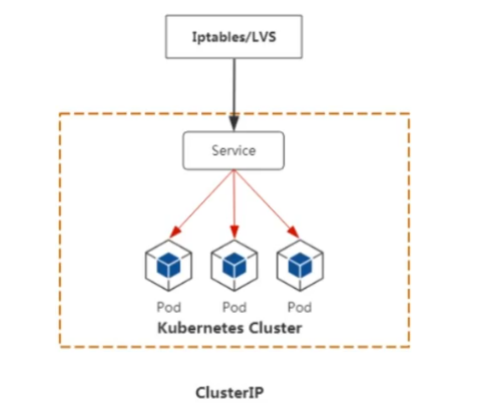
iptables模式
iptables 模式是 kube-proxy使用的第二代模式,该模式在 kubernetes v1.1版本开始支持,从v1.2 版本开始成为 kube-proxy 的默认模式。
iptables 模式的负载均衡模式是通过底层 netfilter/iptables 规则来实现的,通过 informer 机制 Watch接口实时跟踪 Service 和 Endpoint 的变更事件,并触发对 iptables 规则的同步更新。
iptables 模式的实现原理图示如下:

通过图示可以发现在 iptables模式下,kube proxy只是作为 controller,而不是server,真正服务的是内核的 netfilter,体现在用户态的是 iptables。所以整体的效率会比 userspace 模式高。
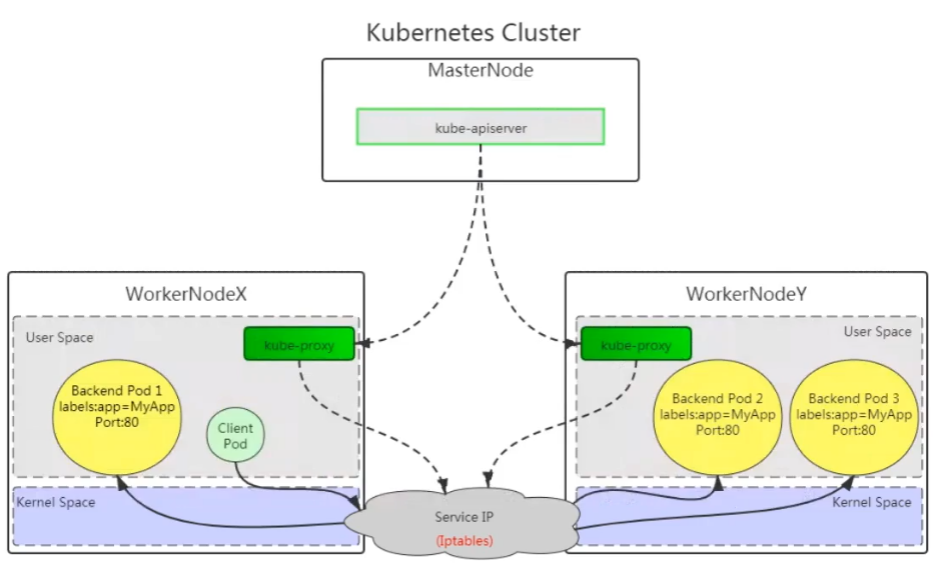
ipvs模式
ipvs 模式被 kube-proxy采纳为第三代模式,模式在 kubernetes v1.8 版本开始引入,在 v1.9 版本中处于 beta 阶段,在 v1.11 版本中正式开始使用。
ipvs(iP Virtual Server)实现了传输层负载均衡,也就是4层交换,作为 Linux 内核的一部分。ipvs运行在主机上,在真实服务器前充当负载均衡器。ipvs 可以将基于 TCP和 UDP 的服务请求转发到真实服务器上,并使真实服务器上的服务在单个IP 地址上显示为虚拟服务。
ipvs 模式的实现原理图示如下:
ipvs 和 iptables 都是基于 netfilter 的,那么ipvs 模式有哪些更好的性能呢?
- ipvs 为大型集群提供了更好的可拓展性和性能
- ipvs 支持比 iptables 更复杂的负载均衡算法(包括:最小负载、最少连接、加权等)
- ipvs 支持服务器健康检查和连接重试等功能
- 可以动态修改 ipset的集合,即使iptables 的规则正在使用这个集合
ipvs 依赖于 iptables。ipvs 会使用 iptables 进行包过滤、airpin-masquerade tricks(地址伪装)、SNAT等功能,但是使用的是 iptables 的扩展ipset,并不是直接调用 iptables 来生成规则链。通过 ipset 来存储需要 DROP或 masquerade 的流量的源或目标地址,用于确保iptables 规则的数量是恒定的,这样我们就不需要关心有多少 Service 或是 Pod 了。
使用 ipset 相较于 iptables有什么优点呢?iptables 是线性的数据结构,而ipset引入了带索引的数据结构,当规则很多的时候,ipset 依然可以很高效的查找和匹配。可以将 ipset 简单理解为一个IP(段)的集合,这个集合的内容可以是IP 地址、IP 网段、端口等,iptables 可以直接添加规则对这个“可变的集合进行操作”,这样就可以大大减少iptables规则的数量,从而减少性能损耗。
举一个例子,如果我们要禁止成千上万个IP访问我们的服务器,如果使用 iptables 就需要一条一条的添加规则,这样会在 iptables 中生成大量的规则:如果用ipset 就只需要将相关的IP 地址(网段)加入到 ipset集合中,然后只需要设置少量的 iptables 规则就可以实现这个目标。
下面的表格是ipvs模式下维护的ipset表集合:
| 设置名称 | 成员 | 用法 |
|---|---|---|
| KUBE-CLUSTER-IP | 所有服务 IP + 端口 | 在 masquerade-all=true 或 custerCIDR 指定的情况下对 Service Cluster IP地址进行伪装,解决数据包欺骗问题 |
| KUBE-LOOP-BACK | 所有服务 IP + 端口 + IP | 解决数据包欺骗问题 |
| KUBE-EXTERNAL-IP | 服务外部 IP + 端口 | 将数据包伪装成 Service 的外部 IP 地址 |
| KUBE-LOAD-BALANCER | 负载均衡器入口 IP + 端口 | 将数据包伪装成 Load Balancer 类型的 Service |
| KUBE-LOAD-BALANCER-LOCAL | 负载均衡器入口 IP + 端口以及externalTrafficPolicy=local | 接受数据包的 Load Balancer externalTrafficPolicy=local |
| KUBE-LOAD-BALANCER-FW | 负载均衡器入口 IP + 端口以及loadBalancerSourceRanges | 使用指定的loadBalancerSourcceRanges 丢弃 Load Balancer 类型 Service 的数据包 |
| KUBE-LOAD-BALANCER-CIDR | 负载均衡器入口 IP + 端口 + 源CIDR | 接受 Load Balancer 类型 Service 的数据包,并指定loadBalancerSourceRanges |
| KUBE-NODE-PORT-TCP | NodePort 类型服务 TCP 端口 | 将数据包伪装成 NodePort(TCP) |
| KUBE-NODE-PORT-LOCAL-TCP | NodePort 类型服务 TCP 端口,带有externalTrafficPolicy=local | 接受数据包到 NodePort 服务,使用 externalTrafficPolicy=local |
| KUBE-NODE-PORT-UDP | NodePort 类型服务 UDP 端口 | 将数据包伪装成 NodePort(UDP) |
| KUBE-NODE-PORT-LOCAL-UDP | NodePort 类型服务 UDP 端口,使用externalTrafficPolicy=local | 接受数据包到 NodePort 服务,使用 externalTrafficPolicy=local |
iptables与ipvs对比
iptables
工作在内核空间
优点
- 灵活,功能强大(可以在数据包不同阶段对包进行操作)
缺点
- 表中规则过多时,响应变慢,即规则遍历匹配和更新,呈线性延时
ipvs
工作在内核空间
优点
- 转发效率高
- 调度算法丰富:rr,wrr,lc,wlc,ip hash等
缺点
- 内核支持不全,低版本内核不能使用,需要升级到4.0或5.0以上。
使用iptables与ipvs时机
1.10版本之前使用iptables(1.1版本之前使用UserSpace进行转发)
1.11版本之后同时支持iptables与ipvs,默认使用ipvs,如果ipvs模块没有加载时,会自动降级至iptables
Service类型及参数
类型
ClusterIP
- 默认,分配一个集群内部可以访问的虚拟IP
NodePort
在每个Node上分配一个端口作为外部访问入口
nodePort端口范围为:30000-32767
LoadBalancer
- 工作在特定的Cloud Provider上,例如Google Cloud,AWS,OpenStack
ExternalName
- 表示把集群外部的服务引入到集群内部中来,即实现了集群内部pod和集群外部的服务进行通信
参数
port:访问service使用的端口
targetPort:Pod中容器端口
nodePort:通过Node实现外网用户访问k8s集群内service(30000-32767)
containerPort:容器端口
Service资源
Service的创建在工作中有两种方式,一是命令行创建,二是通过资源清单文件YAML文件创建。
Cluster IP 类型
ClusterlP根据是否生成ClusterlP又可分为普通Service和Headless Service。
service两类:
- 普通service:
为Kubernetes的Service分配一个集群内部可访问的固定虚拟IP(Cluster IP),实现集群内的访问,。
- Headless Service
该服务不会分配Cluster Ip,也不通过kube-proxy做反向代理和负载均衡。而是通过DNS提供稳定的网络ID来访问,DNS会将headless service的后端直接解析为pod IP列表。
ClusterIP Service
命令创建service
创建deployment类型的应用
# 创建 yaml
[root@master service]# cat nginx-deployment.yaml
apiVersion: apps/v1
kind: Deployment
metadata:
  name: nginx-server
spec:
  replicas: 2
  selector:
    matchLabels:
      app: nginx
  template:
    metadata:
      labels:
        app: nginx
    spec:
      containers:
        - name: c1
          image: nginx:1.26-alpine
          imagePullPolicy: IfNotPresent
          ports:
            - containerPort: 80
# 应用 yaml
[root@master service]# kubectl apply -f nginx-deployment.yaml
deployment.apps/nginx-server created
# 查看pod
[root@master service]# kubectl get pod -o wide
NAME                            READY   STATUS    RESTARTS   AGE   IP               NODE    NOMINATED NODE   READINESS GATES
nginx-server-5b6d5cd699-ckmd9   1/1     Running   0          31s   10.244.166.177   node1   <none>           <none>
nginx-server-5b6d5cd699-pfb5v   1/1     Running   0          31s   10.244.104.3     node2   <none>           <none>
命令创建clusterIP类型service与Deployment类型应用关联
# 命令创建clusterIP类型service与Deployment类型应用关联
[root@master service]# kubectl expose deployment nginx-server --type=ClusterIP --target-port=80 --port=80
service/nginx-server exposed
# expose:创建service
# deployment:控制器类型
# nginx-server:应用名称,也是service名称
# --type=ClusterIP:指定service类型
# --target-port=80:指定Pod中容器端口
# --port=80:指定service端口


# 查看 service
[root@master service]# kubectl get service
NAME           TYPE        CLUSTER-IP     EXTERNAL-IP   PORT(S)   AGE
kubernetes     ClusterIP   10.96.0.1      <none>        443/TCP   8d
nginx-server   ClusterIP   10.109.5.201   <none>        80/TCP    6s


# 进入容器修改主页内容
[root@master service]# kubectl exec -it nginx-server-5b6d5cd699-pfb5v -- /bin/sh
/ # echo "this is nginx web2" > /usr/share/nginx/html/index.html
[root@master service]# kubectl exec -it nginx-server-5b6d5cd699-ckmd9 -- /bin/sh
/ # echo "this is nginx web1" > /usr/share/nginx/html/index.html

# 验证负载均衡功能
[root@master service]# curl 10.109.5.201
this is nginx web1
[root@master service]#
[root@master service]# curl 10.109.5.201
this is nginx web2
[root@master service]# curl 10.109.5.201
this is nginx web1
[root@master service]# curl 10.109.5.201
this is nginx web2
YAML文件创建Service
# 编写 yaml
[root@master service]# cat nginx-deployment.yaml
apiVersion: apps/v1
kind: Deployment
metadata:
  name: nginx-server
spec:
  replicas: 2
  selector:
    matchLabels:
      app: nginx
  template:
    metadata:
      labels:
        app: nginx
    spec:
      containers:
        - name: c1
          image: nginx:1.26-alpine
          imagePullPolicy: IfNotPresent
          ports:
            - containerPort: 80
---
apiVersion: v1
kind: Service
metadata:
  name: nginx-svc
spec:
  type: ClusterIP
  ports:
    - protocol: TCP                  # 指定协议
      port: 80
      targetPort: 80
  selector:
    app: nginx
# 应用 yaml
[root@master service]# kubectl apply -f nginx-deployment.yaml
deployment.apps/nginx-server unchanged
service/nginx-svc created
# 验证 service
[root@master service]# kubectl get svc
NAME         TYPE        CLUSTER-IP       EXTERNAL-IP   PORT(S)   AGE
kubernetes   ClusterIP   10.96.0.1        <none>        443/TCP   9d
nginx-svc    ClusterIP   10.100.204.158   <none>        80/TCP    44s
# 访问验证
[root@master service]# curl 10.100.204.158
<!DOCTYPE html>
<html>
<head>
<title>Welcome to nginx!</title>
<style>
html { color-scheme: light dark; }
body { width: 35em; margin: 0 auto;
font-family: Tahoma, Verdana, Arial, sans-serif; }
</style>
</head>
<body>
<h1>Welcome to nginx!</h1>
<p>If you see this page, the nginx web server is successfully installed and
working. Further configuration is required.</p>

<p>For online documentation and support please refer to
<a href="http://nginx.org/">nginx.org</a>.<br/>
Commercial support is available at
<a href="http://nginx.com/">nginx.com</a>.</p>

<p><em>Thank you for using nginx.</em></p>
</body>
</html>
总结:Cluster IP 可以直接通过集群Service IP地址进行后端访问
Headless Service
普通的clusterIP service是service name解析为cluster ip,然后cluster ip对应到后面pod ip。
headless service是指service name直接解析为后面的pod ip
# 创建 Deployment 资源文件
[root@master service]# cat nginx-deployment.yaml
apiVersion: apps/v1
kind: Deployment
metadata:
  name: nginx-server
spec:
  replicas: 2
  selector:
    matchLabels:
      app: nginx
  template:
    metadata:
      labels:
        app: nginx
    spec:
      containers:
        - name: c1
          image: nginx:1.26-alpine
          imagePullPolicy: IfNotPresent
          ports:
            - containerPort: 80
# 应用资源文件
[root@master service]# kubectl apply -f nginx-deployment.yaml
deployment.apps/nginx-server created
# 查看pod
[root@master service]# kubectl get pod
NAME                            READY   STATUS    RESTARTS   AGE
nginx-server-5b6d5cd699-5r6qg   1/1     Running   0          46s
nginx-server-5b6d5cd699-hwm9t   1/1     Running   0          46s
创建headless资源文件
# 创建 headless service 的资源文件
[root@master service]# cat headless-service.yaml
apiVersion: v1
kind: Service
metadata:
  name: nginx-headless
spec:
  type: ClusterIP
  clusterIP: None             # 无头服务,没有clusterIP
  ports:
    - protocol: TCP
      port: 80
      targetPort: 80
  selector:
    app: nginx
# 应用 yaml
[root@master service]# kubectl get service nginx-headless
NAME             TYPE        CLUSTER-IP   EXTERNAL-IP   PORT(S)   AGE
nginx-headless   ClusterIP   None         <none>        80/TCP    58s
DNS:
DNS服务监视Kubernetes APl,为每一个Service创建DNS记录用于域名解析
headless service需要DNS来解决访问问题
DNS记录格式为:…svc.cluster.local.
# 查看kube-dns服务的ip
[root@master service]# kubectl get -n kube-system  service kube-dns
NAME       TYPE        CLUSTER-IP   EXTERNAL-IP   PORT(S)                  AGE
kube-dns   ClusterIP   10.96.0.10   <none>        53/UDP,53/TCP,9153/TCP   9d
# 通过DNS服务地址查找无头服务的解析
[root@master service]# dig -t a nginx-headless.default.svc.cluster.local. @10.96.0.10

; <<>> DiG 9.9.4-RedHat-9.9.4-50.el7 <<>> -t a nginx-headless.default.svc.cluster.local. @10.96.0.10
;; global options: +cmd
;; Got answer:
;; ->>HEADER<<- opcode: QUERY, status: NOERROR, id: 24071
;; flags: qr aa rd; QUERY: 1, ANSWER: 2, AUTHORITY: 0, ADDITIONAL: 1
;; WARNING: recursion requested but not available

;; OPT PSEUDOSECTION:
; EDNS: version: 0, flags:; udp: 4096
;; QUESTION SECTION:
;nginx-headless.default.svc.cluster.local. IN A

;; ANSWER SECTION:
nginx-headless.default.svc.cluster.local. 14 IN	A 10.244.166.179
nginx-headless.default.svc.cluster.local. 14 IN	A 10.244.104.5

;; Query time: 0 msec
;; SERVER: 10.96.0.10#53(10.96.0.10)
;; WHEN: 三 8月 06 16:21:09 CST 2025
;; MSG SIZE  rcvd: 181
# 根据查看到的后端进行访问
[root@master service]# curl 10.244.104.5
<!DOCTYPE html>
<html>
<head>
<title>Welcome to nginx!</title>
<style>
html { color-scheme: light dark; }
body { width: 35em; margin: 0 auto;
font-family: Tahoma, Verdana, Arial, sans-serif; }
</style>
</head>
<body>
<h1>Welcome to nginx!</h1>
<p>If you see this page, the nginx web server is successfully installed and
working. Further configuration is required.</p>

<p>For online documentation and support please refer to
<a href="http://nginx.org/">nginx.org</a>.<br/>
Commercial support is available at
<a href="http://nginx.com/">nginx.com</a>.</p>

<p><em>Thank you for using nginx.</em></p>
</body>
</html>


# 在集群内创建Pod进行解析访问
[root@master service]# kubectl run -it centos --image=centos:7 --image-pull-policy=IfNotPresent
If you don't see a command prompt, try pressing enter.
[root@centos /]# curl http://nginx-headless.default.svc.cluster.local
<!DOCTYPE html>
<html>
<head>
<title>Welcome to nginx!</title>
<style>
html { color-scheme: light dark; }
body { width: 35em; margin: 0 auto;
font-family: Tahoma, Verdana, Arial, sans-serif; }
</style>
</head>
<body>
<h1>Welcome to nginx!</h1>
<p>If you see this page, the nginx web server is successfully installed and
working. Further configuration is required.</p>

<p>For online documentation and support please refer to
<a href="http://nginx.org/">nginx.org</a>.<br/>
Commercial support is available at
<a href="http://nginx.com/">nginx.com</a>.</p>

<p><em>Thank you for using nginx.</em></p>
</body>
</html>
总结:headless service 需要通过dns解析访问后端pod
NodePort类型
# 创建 yaml 资源
[root@master service]# cat nginx-deployment.yaml
apiVersion: apps/v1
kind: Deployment
metadata:
  name: nginx-server
spec:
  replicas: 2
  selector:
    matchLabels:
      app: nginx
  template:
    metadata:
      labels:
        app: nginx
    spec:
      containers:
        - name: c1
          image: nginx:1.26-alpine
          imagePullPolicy: IfNotPresent
          ports:
            - containerPort: 80
---
apiVersion: v1
kind: Service
metadata:
  name: nginx-svc
spec:
  type: NodePort
  ports:
    - protocol: TCP
      nodePort: 31111
      port: 8060
      targetPort: 80
  selector:
    app: nginx
# 应用 yaml 资源
[root@master service]# kubectl apply -f nginx-deployment.yaml
deployment.apps/nginx-server unchanged
service/nginx-svc created
# 验证资源
[root@master service]# kubectl get pod,svc
NAME                                READY   STATUS    RESTARTS   AGE
pod/nginx-server-5b6d5cd699-8zrht   1/1     Running   0          48s
pod/nginx-server-5b6d5cd699-pjbsx   1/1     Running   0          48s

NAME                 TYPE        CLUSTER-IP      EXTERNAL-IP   PORT(S)          AGE
service/kubernetes   ClusterIP   10.96.0.1       <none>        443/TCP          9d
service/nginx-svc    NodePort    10.99.164.191   <none>        8060:31111/TCP   38s
# 内部访问验证
[root@master service]# curl 10.99.164.191:8060
<!DOCTYPE html>
<html>
<head>
<title>Welcome to nginx!</title>
<style>
html { color-scheme: light dark; }
body { width: 35em; margin: 0 auto;
font-family: Tahoma, Verdana, Arial, sans-serif; }
</style>
</head>
<body>
<h1>Welcome to nginx!</h1>
<p>If you see this page, the nginx web server is successfully installed and
working. Further configuration is required.</p>

<p>For online documentation and support please refer to
<a href="http://nginx.org/">nginx.org</a>.<br/>
Commercial support is available at
<a href="http://nginx.com/">nginx.com</a>.</p>

<p><em>Thank you for using nginx.</em></p>
</body>
</html>
# 外部节点验证访问
[root@master service]# curl node1:31111
<!DOCTYPE html>
<html>
<head>
<title>Welcome to nginx!</title>
<style>
html { color-scheme: light dark; }
body { width: 35em; margin: 0 auto;
font-family: Tahoma, Verdana, Arial, sans-serif; }
</style>
</head>
<body>
<h1>Welcome to nginx!</h1>
<p>If you see this page, the nginx web server is successfully installed and
working. Further configuration is required.</p>

<p>For online documentation and support please refer to
<a href="http://nginx.org/">nginx.org</a>.<br/>
Commercial support is available at
<a href="http://nginx.com/">nginx.com</a>.</p>

<p><em>Thank you for using nginx.</em></p>
</body>
</html>

[root@master service]# curl node2:31111
<!DOCTYPE html>
<html>
<head>
<title>Welcome to nginx!</title>
<style>
html { color-scheme: light dark; }
body { width: 35em; margin: 0 auto;
font-family: Tahoma, Verdana, Arial, sans-serif; }
</style>
</head>
<body>
<h1>Welcome to nginx!</h1>
<p>If you see this page, the nginx web server is successfully installed and
working. Further configuration is required.</p>

<p>For online documentation and support please refer to
<a href="http://nginx.org/">nginx.org</a>.<br/>
Commercial support is available at
<a href="http://nginx.com/">nginx.com</a>.</p>

<p><em>Thank you for using nginx.</em></p>
</body>
</html>
DOCTYPE html>
Welcome to nginx!
If you see this page, the nginx web server is successfully installed and working. Further configuration is required.
For online documentation and support please refer to nginx.org.
Commercial support is available at nginx.com.
Thank you for using nginx.